
In questo post
Hai bisogno di un modo per creare un sito web multilingue?
Viviamo in un mondo multilingue, quindi offrire il tuo sito web in più lingue è un ottimo modo per renderlo più intuitivo e connettersi con nuovi pubblici.
Ma allo stesso tempo, creare un sito web multilingue è un'impresa impegnativa. Anche se ci sono molti costruttori di siti web facili da usare in circolazione, hai bisogno di uno strumento che ti permetta non solo di creare un sito dall'aspetto fantastico, ma anche di tradurre ogni elemento, dal testo alle immagini, in lingue diverse.
Per aiutarti avere successo, condivideremo una guida dettagliata su come creare un sito web multilingue. Ti porteremo da “zero” a “sito web multilingue user-friendly” spiegando come:
- Scegli la piattaforma migliore per il tuo sito web multilingue (consigliamo WordPress);
- Segui le migliori pratiche per i siti web multilingue;
- Traduci tutti i tuoi contenuti in diverse lingue su WordPress: qualsiasi singolo elemento, dai titoli e contenuti ai form, immagini, pulsanti e altro ancora.
Condivideremo anche alcuni esempi di siti web multilingue per darvi qualche idea su come i siti di successo gestiscono più lingue.
Il nostro tutorial passo dopo passo per un sito web multilingua è:
- Non tecnico. Utilizzerai una semplice interfaccia visiva per tradurre i tuoi contenuti: non è richiesta alcuna conoscenza tecnica.
- Conveniente. Infatti, molti degli strumenti che utilizziamo in questo tutorial sono gratuiti (100%).
- Veloce. Soprattutto, puoi configurarlo rapidamente. Puoi persino usare servizi di traduzione automatica come Google Translate e Deepl, che ti aiutano a velocizzare il processo.
Entro la fine di questo articolo, sarai in grado di aggiungere il tuo contenuto multilingue utilizzando una semplice interfaccia visiva come questa:

Pronti per iniziare? Mettiamoci all'opera...
3 grandi esempi di siti web multilingue per trarre ispirazione
A volte guardare l'esempio di un sito web multilingue è un ottimo modo per stimolare la creatività. Per questo motivo, inizieremo la nostra guida dando un'occhiata ad alcuni siti web che sono diventati con successo multilingue.
1. WordPress.org
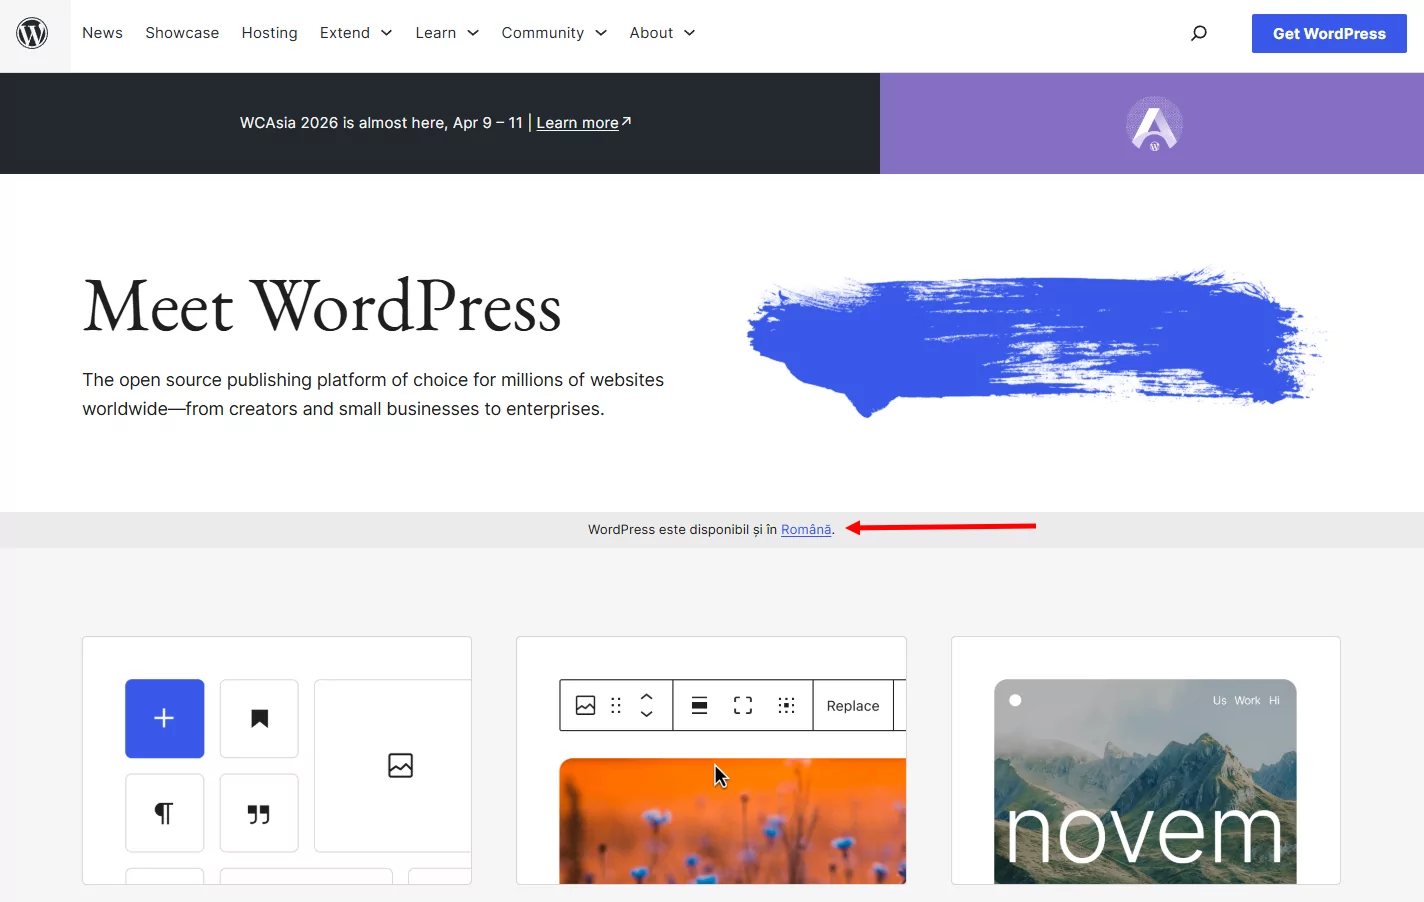
WordPress.org è la casa ufficiale del progetto open-source WordPress, che riteniamo sia il modo più semplice per creare un sito web multilingue. Poiché WordPress è un progetto globale, il sito web WordPress.org è localizzato e tradotto in praticamente ogni lingua popolare. Inoltre, suggerisce la lingua locale del visitatore sulla homepage per aiutarlo a orientarsi verso il punto giusto.
2. Etsy
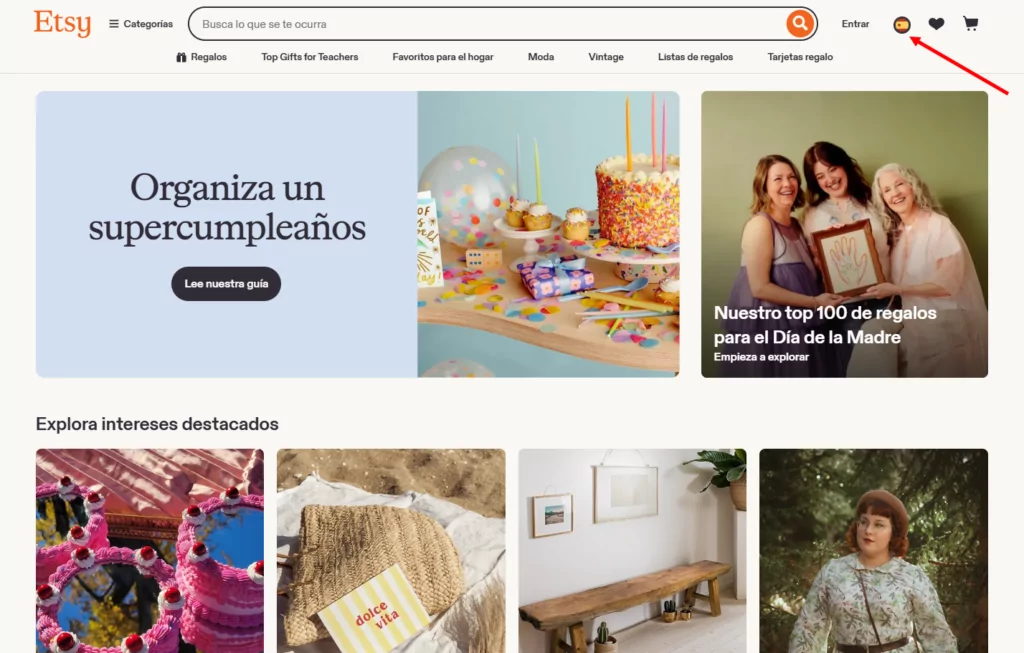
Etsy è un ottimo esempio di sito web multilingua di come aggiungere le lingue multiple possono migliorare la SEO per un negozio di e-commerce. Comunemente vedrai le pagine dei prodotti di Etsy posizionarsi per diverse parole chiave, il che offre loro un'ottima nuova fonte di traffico.
Etsy offre anche molteplici opzioni di localizzazione, consentendo ai visitatori di scegliere la regione, la lingua e la valuta preferite.
3. Kinsta
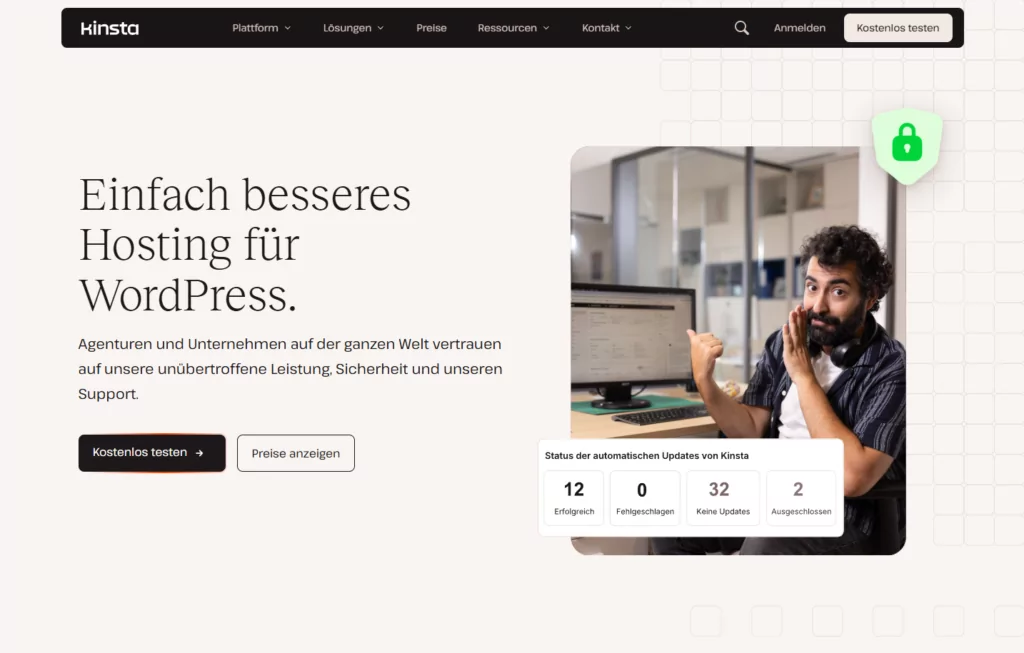
Il nostro ultimo esempio di sito web multilingue è Kinsta, un noto provider di hosting WordPress che è riuscito ad aumentare il proprio traffico organico del 18% dopo aver tradotto i propri contenuti in nuove lingue. Ora i contenuti di Kinsta sono disponibili in dieci lingue e i visitatori possono scegliere la lingua preferita tramite un selettore di lingua presente nel piè di pagina.
Continua a leggere per scoprire come rendere il tuo sito web multilingue per ottenere questi benefici.
Come scegliere la migliore piattaforma per il tuo sito web multilingua
Prima di poter tradurre i tuoi contenuti in nuove lingue, hai bisogno di un sito web funzionante nella tua lingua originale.
Ci sono due approcci principali per creare un sito web sul web moderno:
- Usa un sistema di gestione dei contenuti (CMS) self-hosted come WordPress o Drupal.
- Usa un costruttore di siti web ospitato come Squarespace, Wix, o Shopify.
Sebbene sia possibile creare siti Web multilingua con i costruttori di siti Web, non è questo lo scopo per cui sono stati progettati. Ad esempio, Squarespace ti costringe a duplicare ogni pagina del tuo sito per ciascuna lingua, il che crea confusione e richiede molto tempo.
Se hai intenzione di crearne un sito multilingue, l'utilizzo di un sistema di gestione dei contenuti self-hosted renderà molto più semplice ottimizzare l'esperienza sia sul front-end che sul back-end.
Sebbene i diversi sistemi di gestione dei contenuti presentino vantaggi e svantaggi diversi, consiglieremo un'opzione specifica:
WordPress self-hosted.
WordPress è di gran lunga il modo più popolare per creare qualsiasi tipo di sito web. La sua popolarità oscura quella dei costruttori di siti web e di altri sistemi di gestione dei contenuti self-hosted. Infatti, WordPress alimenta oltre 43% di tutti i siti web presenti su Internet.
Per di più, puoi usare WordPress per creare praticamente qualsiasi tipo di sito web, dai blog ai siti aziendali, Negozi di e-commerce, siti per abbonamento, corsi online e molto altro. Quindi non importa di cosa tratti il tuo sito web multilingua.
E oh già, il software principale di WordPress è 100% gratuito.
Perché WordPress è la migliore piattaforma per creare un sito web multilingue
WordPress non è solo il modo migliore per realizzare un sito web multilingue grazie alla sua popolarità: offre anche tutti gli strumenti necessari per tradurre rapidamente e facilmente il tuo sito in nuove lingue.
Ecco i motivi specifici per cui consigliamo WordPress per un sito web multilingua:
- Il software di base di WordPress è gratuito;
- Puoi estendere il tuo sito WordPress con migliaia di plugin gratuiti e a pagamento;
- Ottieni l'accesso a semplici strumenti di traduzione visiva come TranslatePress;
- WordPress è ottimizzato per i motori di ricerca, il che renderà più semplice posizionare i tuoi contenuti tradotti su Google e altri motori di ricerca;
- Puoi controllare l'aspetto del tuo sito con migliaia di temi gratuiti e a pagamento;
- Il software di WordPress è sicuro e puoi rafforzare ulteriormente la sicurezza con i plugin di sicurezza per WordPress.
WordPress ti permette di utilizzare l'editor visivo TranslatePress
Una delle estensioni a cui WordPress ti dà accesso è TranslatePress, che ti consente di tradurre il tuo sito WordPress utilizzando una comoda interfaccia visiva come questa:
Questo è molto più veloce e conveniente di praticamente qualsiasi altra piattaforma web che prenderai in considerazione.
TranslatePress supporta inoltre la traduzione automatica tramite tre motori:
- TranslatePress AI — la soluzione integrata, senza piattaforme aggiuntive o chiavi API richieste. Include un piano gratuito (2.000 parole IA) su tutti i piani.
- Google Traduttore — disponibile nella versione gratuita utilizzando la propria chiave API di Google.
- DeepL — disponibile nei piani Business e Developer.
Anche se usi la traduzione automatica, potrai comunque tornare indietro e perfezionare manualmente le tue traduzioni utilizzando l'interfaccia che hai visto sopra.
TranslatePress Multilingue
Oltre a ciò, TranslatePress ti aiuta anche ad adottare una serie di best practice per i siti web multilingue. A proposito…
8 Migliori Pratiche per Creare un Sito Web Multilingue
L'utilizzo di WordPress per costruire il tuo sito web ti predisporrà al successo, ma devi comunque implementare alcune best practice per creare un sito web multilingue di successo.
Ecco su cosa concentrarsi...
1. Implementa la SEO multilingue per posizionare il tuo sito in diverse lingue
Uno dei grandi vantaggi della creazione di un sito web multilingue è la capacità di entrare in contatto con nuovi pubblici su Google e altri motori di ricerca.
Tuttavia, se desideri ottenere questo beneficio, devi enfatizzare l'ottimizzazione per i motori di ricerca (SEO) multilingue.
La SEO consiste nel cercare di posizionare il tuo sito più in alto su Google. Dopodiché, la SEO multilingue applica lo stesso concetto ma in lingue diverse.
SEO multilingue significa ottimizzare ogni versione linguistica del tuo sito per posizionarsi nei risultati di ricerca di quella lingua — non solo traducendo il contenuto, ma assicurandosi che i motori di ricerca possano trovarlo, indicizzarlo correttamente e servirlo al pubblico giusto.
Abbiamo un intero post su migliori pratiche SEO multilingue, ma alcune delle tattiche che vorrai implementare sono:
- Traduzioni complete – questo include non solo il testo, ma anche gli URL slug e i metadati SEO.
- Sitemap XML multilingue – questo aiuta Google a trovare tutti i tuoi contenuti in ciascuna lingua.
- Struttura URL ottimizzata – ne parleremo più approfonditamente nella prossima sezione, poiché riguarda aspetti che vanno ben oltre la SEO multilingua.
- attributo hreflang – questo aiuta Google a capire quale versione del tuo sito web mostrare nelle diverse lingue.
TranslatePress può aiutarti ad attuare tutte queste best practice di SEO multilingue, alcune delle quali anche in modo automatico.
2. Utilizzare una struttura URL multilingue ottimizzata
Per indicizzare ciascuna lingua sul tuo sito in Google, devi assegnare a ogni versione linguistica il proprio URL.
Questo non solo influisce sulla SEO del tuo sito, ma influisce anche su come i visitatori umani solcheranno il tuo sito poiché i tuoi URL forniscono un contesto importante.
Ci sono tre strategie principali per la struttura degli URL del tuo sito web multilingue:
- Sottocartelle – per esempio, yoursite.com/content per la tua lingua principale e yoursite.com/es/content per le tue traduzioni in spagnolo.
- Sottodomini – per esempio, yoursite.com/content per la tua lingua principale e es.yoursite.com/content per le tue traduzioni in spagnolo.
- Domini separati – per esempio, iltuosito.com per la tua lingua principale e yoursite.es per le tue traduzioni in spagnolo.
Google consiglia tutti e tre i metodi, ma l'approccio con le sottocartelle è generalmente il più semplice da configurare e mantenere perché non è necessario apportare modifiche tecniche al backend. Tuttavia, puoi saperne di più in merito nel nostro articolo sull'argomento sottodominio vs sottodirectory dilemma.
TranslatePress utilizza automaticamente l'approccio basato sulle sottocartelle: non è necessaria alcuna configurazione tecnica. Tuttavia, con il plugin è possibile configurare anche qualsiasi altra struttura di URL, compresa quella che prevede domini diversi per ogni lingua.
3. Presta attenzione ai tempi di caricamento della pagina
Assicurarsi che il tuo sito si carichi rapidamente è importante per qualsiasi cosa, dall'esperienza utente alla SEO, al coinvolgimento e persino ai tassi di conversione del tuo sito.
Questo è vero sia per i siti in lingua singola che multilingue, ma la posta in gioco è più alta per i siti multilingue perché alcune soluzioni multilingue possono rallentare il sito aggiungendo dimensioni extra ai file e query di database non necessarie.
TranslatePress è una delle soluzioni più ottimizzate per le prestazioni per tradurre un sito WordPress, che aiuta a garantire che ciascuna lingua sul vostro sito Web si carichi rapidamente:
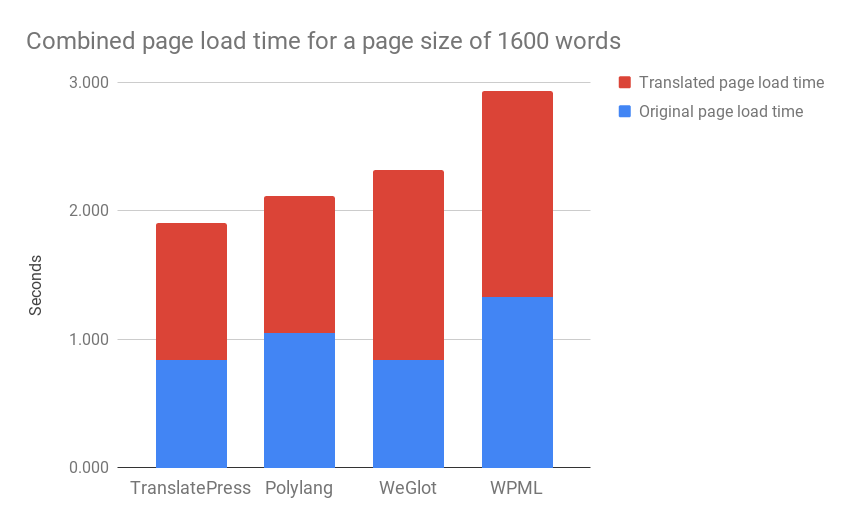
4. Aggiungere un selettore di lingua di facile utilizzo
I visitatori possono beneficiare dei tuoi contenuti multilingue solo se riescono a trovarli. Un ben posizionato selettore di lingua sul tuo sito WordPress è essenziale — e il modo in cui lo progetti conta tanto quanto il luogo in cui lo metti.
Migliori pratiche per il tuo selettore di lingua:
- Mostra la lingua nel suo formato locale. Ad esempio, Deutsch (corretto) contro German (errato). Questo permette alle persone di riconoscere rapidamente la propria lingua anche se non parlano inglese.
- Non affidarti solo alle bandiere delle lingue. Anche se è accettabile includere bandiere inoltre al nome della lingua locale, è confuso usare le bandiere delle lingue da sole. Ad esempio, alcuni siti usano la bandiera messicana per lo spagnolo, mentre altri usano quella spagnola. Questo aggiunge confusione inutile.
- Rendilo visibile — Un selettore mobile nell'angolo di ogni pagina assicura che i visitatori non debbano mai cercarlo.
TranslatePress ti offre un selettore di lingua completamente personalizzabile, accessibile dalla pagina dedicata Cambio lingua scheda nelle impostazioni del tuo plugin. Puoi configurare tre diversi tipi di selettore:
- Galleggiante un selettore persistente fissato in un angolo di ogni pagina. Supporta design predefiniti visivi, ma anche colori personalizzati, bordi, forme di bandiere e controlli di layout per Desktop/Mobile.
- Codice breve incorpora il selettore ovunque sul tuo sito utilizzando il shortcode o il blocco selettore di lingua nell'editor Gutenberg.
- Voce di menu — aggiungi le lingue direttamente a qualsiasi menu di navigazione di WordPress tramite Aspetto → Menu.
Tutti e tre i tipi di selettore supportano nomi di lingua completi e brevi, icone di bandiera (rettangolari, quadrate o arrotondate per le voci di menu) e l'opzione di non mostrare alcun nome. I selettori mobili e shortcode includono anche un editor CSS personalizzato per una stilizzazione di precisione.
5. Rileva automaticamente le lingue dei visitatori
Oltre all'aggiunta di un selettore di lingua front-end, un altro modo per aiutare a indirizzare i visitatori è quello di reindirizzamento automatico alla lingua preferita.
Ci sono due modi per farlo. Puoi reindirizzare i visitatori in base a:
- La lingua del browser, che è la lingua preferita scelta da un visitatore.
- Il loro indirizzo IP, che corrisponde alla loro posizione geografica.
In genere, l'utilizzo della lingua del browser è un'opzione migliore perché la posizione fisica di una persona non coincide sempre con la sua lingua preferita. Ad esempio, un americano che vive in Vietnam, ma parla inglese.
TranslatePress ti offre la possibilità di provare innanzitutto a rilevare la lingua del browser e, se non riesce a individuarla, di ricorrere all'indirizzo IP dell'utente.
Invece di reindirizzare i visitatori silenziosamente, il plugin mostra un popup che chiede ai visitatori se desiderano passare alla lingua rilevata, dando loro il controllo e mostrando comunque l'opzione corretta.
6. Presta attenzione al design e all'impaginazione nelle diverse lingue
Quando crei il design iniziale per il tuo sito, probabilmente ti concentrerai sull'assicurarti che ogni elemento sia perfetto al pixel.
Ad esempio, il titolo dovrebbe occupare due o tre righe? Il testo del pulsante entra su una sola riga? E così via.
Tuttavia, quando traduci i tuoi contenuti in nuove lingue, questo spaziatura può diventare un problema perché le traduzioni non occupano sempre la stessa quantità di spazio.
Per poter correggere questi problemi di impaginazione e garantire un risultato perfetto in tutte le lingue, è utile disporre di uno strumento come TranslatePress, che offre un'interfaccia di traduzione visiva in cui è possibile visualizzare in anteprima le modifiche in tempo reale, anziché le interfacce di back-end utilizzate da molti strumenti di traduzione.
7. Controlla che i tuoi caratteri siano compatibili con le tue lingue di arrivo
Quando progetti il tuo sito, una delle scelte principali che fai è la selezione dei caratteri tipografici che utilizzerai. Ora, a seconda delle lingue che prevedi di utilizzare nel tuo sito, questi potrebbero richiedere un set di caratteri speciali per essere visualizzati correttamente.
È una buona idea verificare che i tuoi caratteri tipografici dispongano dei caratteri speciali necessari per le tue nuove lingue. In caso contrario, potresti ritrovarti con un segnaposto al posto del carattere normale, che risulterebbe errato e fuori luogo.
Come in questo esempio:
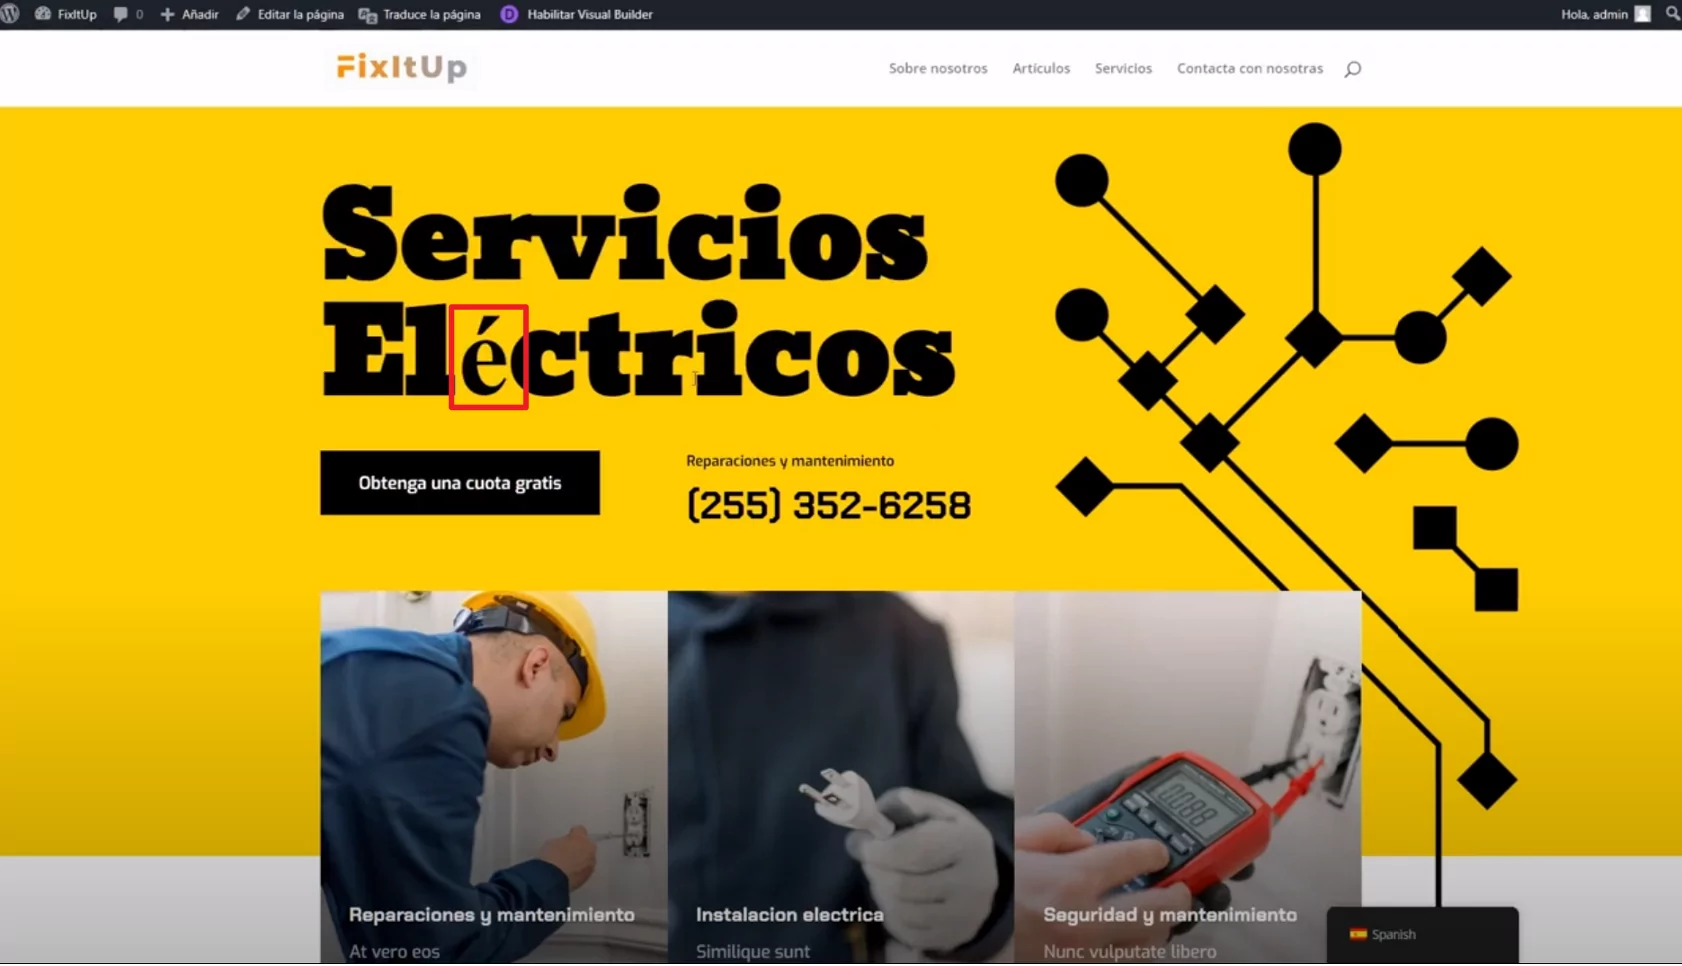
Ciò è dovuto al fatto che lo sviluppatore del carattere non ha pensato alla localizzazione o ha semplicemente progettato il carattere per l'inglese.
8. Concentrati sulla localizzazione completa: non solo sul testo
Infine, ricorda che la creazione di un sito web multilingue comporta molto di più della semplice traduzione del testo di una pagina.
Sebbene questo sia certamente importante, devi anche considerare altri aspetti della creazione di un esperienza completamente localizzata in ogni lingua.
Ad esempio, potresti voler utilizzare immagini/video diversi per lingue diverse o mostrare voci di menu diverse per ciascuna lingua (piuttosto che limitarsi a tradurre le stesse voci di menu in lingue diverse).
Con WordPress e TranslatePress potrai anche tenere conto di questi aspetti secondari.
TranslatePress Multilingue
Come creare un sito web multilingua con WordPress
Ora che abbiamo trattato la teoria alla base di un sito web multilingua, passiamo ai passaggi effettivi che devi compiere per rendere il tuo sito web operativo.
1. Configura il tuo sito WordPress nella tua lingua madre
Per iniziare, devi prima configurare il tuo sito WordPress di base in lingua singola. Puoi trovare molti tutorial al riguardo, quindi manterremo questa sezione un po' più breve poiché ci concentriamo principalmente sulla parte multilingue.
Ma ecco le basi...
Per prima cosa, dovrai:
- Scegli l'hosting WordPress – SiteGround è una buona opzione economica che funziona per la maggior parte dei siti WordPress multilingue. EasyWP è un'altra ottima opzione, in quanto è un servizio di hosting WordPress gestito estremamente veloce, non solo nella velocità del sito ma anche nella configurazione dello stesso.
- Acquista un nome di dominio – puoi acquistare il tuo nome di dominio quando ti registri su SiteGround.
- Installa il software principale di WordPress – SiteGround include una procedura guidata di benvenuto che semplifica l'installazione di WordPress: non sono necessarie conoscenze tecniche.
Una volta creato il tuo sito WordPress di base, dovrai:
- Scegli un tema WordPress per controllare l'aspetto del tuo sito. Lo strumento di traduzione che ti mostreremo nelle prossime sezioni funzionerà con qualsiasi tema WordPress, quindi non devi preoccuparti di alcun problema di compatibilità.
- Aggiungi il contenuto del tuo sito nella tua lingua madre. Per ora non preoccuparti degli aspetti relativi alla traduzione: indipendentemente dal modo in cui inserisci i tuoi contenuti, potrai tradurli facilmente nelle sezioni successive.
Se desideri un po’ più di flessibilità nella progettazione, potresti preferire l’uso di un plugin per la creazione di pagine in WordPress come Elementor. Questo aggiunge a WordPress un'esperienza di design più simile a “Wix” o “Squarespace”, che alcuni utenti preferiscono.
Potresti anche voler utilizzare alcuni plugin aggiuntivi per altri tipi di contenuti, come moduli multilingue o cursori/caroselli.
Fondamentalmente, l'obiettivo qui è costruire completamente il tuo sito in un'unica lingua. Dopodiché, una volta che hai quel sito di base in una lingua, puoi tradurlo in tutte le lingue necessarie utilizzando il semplice editor di traduzione visiva che hai visto prima.
2. Installa TranslatePress e scegli la lingua o le lingue desiderate
Una volta configurato il tuo sito WordPress monolingua, sei pronto per tradurlo in una o più nuove lingue.
Per farlo, puoi usare il plugin gratuito TranslatePress di cui abbiamo discusso sopra. Inizia visitando Plugin → Aggiungi Nuovo nella tua dashboard di WordPress e installando il plugin gratuito TranslatePress disponibile su WordPress.org.
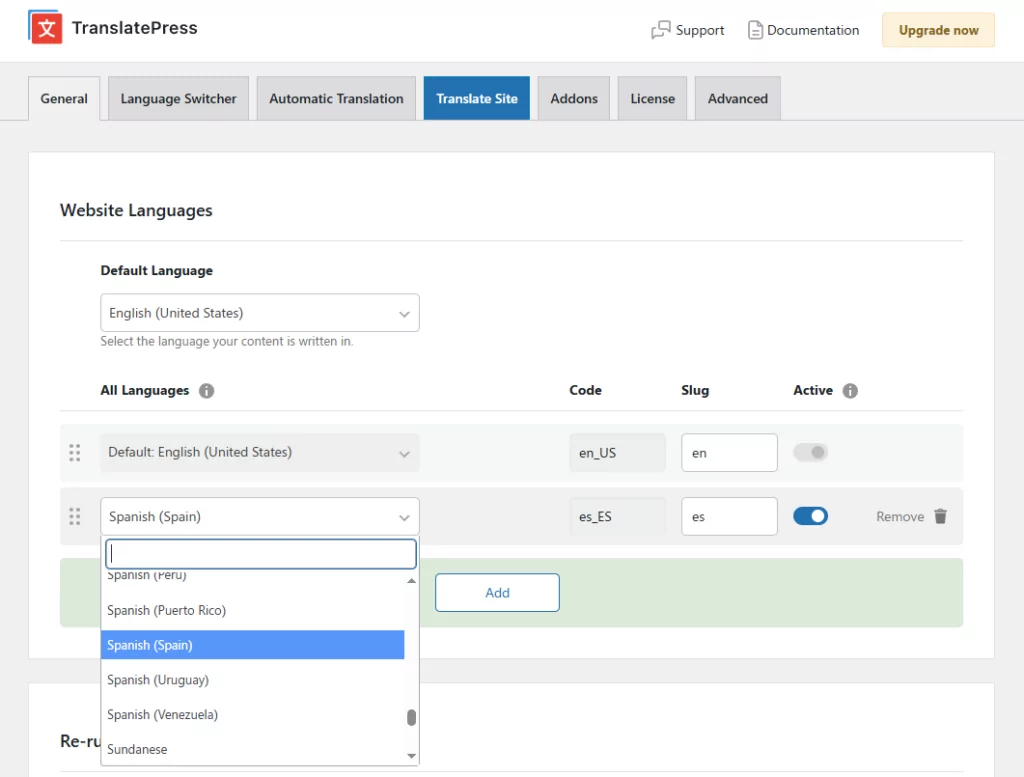
Una volta installato il plugin, vai su Impostazioni → TranslatePress per scegliere le lingue che desideri offrire sul tuo sito.
Innanzitutto, usa il menu a tendina per selezionare il tuo Lingua predefinita, che è la lingua in cui il tuo sito esiste attualmente. Quindi, usa il Tutte le lingue impostazioni per aggiungere le nuove lingue in cui desideri che il tuo sito esista.
Per esempio, ecco come appare la traduzione di un sito web in lingua inglese in spagnolo:
3. Imposta la traduzione automatica (facoltativo)
Se non vuoi tradurre tutti i tuoi contenuti da zero, TranslatePress ti offre la possibilità di scegliere tra due metodi di traduzione automatica:
- TranslatePress AI – la soluzione integrata per traduzioni istantanee alla massima precisione (2.000 parole IA incluse gratuitamente). Nessuna registrazione o chiave API richiesta.
- API di Google Translate (disponibile nella versione gratuita di TranslatePresso DeepL (richiede la versione a pagamento di TranslatePress).
Traduzione automatica può farti risparmiare un sacco di tempo, soprattutto se gestisci un sito web multilingue di grandi dimensioni con molti contenuti. Per configurare la traduzione automatica, vai alla scheda “Traduzione automatica” nelle impostazioni di TranslatePress, attiva l’opzione e seleziona il motore di traduzione. Se utilizzi un’API a pagamento, puoi anche impostare dei limiti mensili di traduzione per tenere sotto controllo i costi.
Mentre TranslatePress non ti addebita alcun costo aggiuntivo In base al tuo utilizzo del servizio di traduzione, Google Translate e DeepL sono a pagamento (sebbene entrambi offrano un contingente gratuito limitato).
Anche con la traduzione automatica abilitata, puoi comunque rivedere e perfezionare ogni traduzione manualmente nell'editor visivo. La maggior parte dei siti utilizza la traduzione automatica per una bozza iniziale, per poi perfezionare manualmente le pagine ad alta priorità come la homepage, le pagine dei prodotti e le pagine diatterra principali.
E non è tutto?
Utilizzare TranslatePress AI è semplicissimo, come si vede nel video qui sotto.
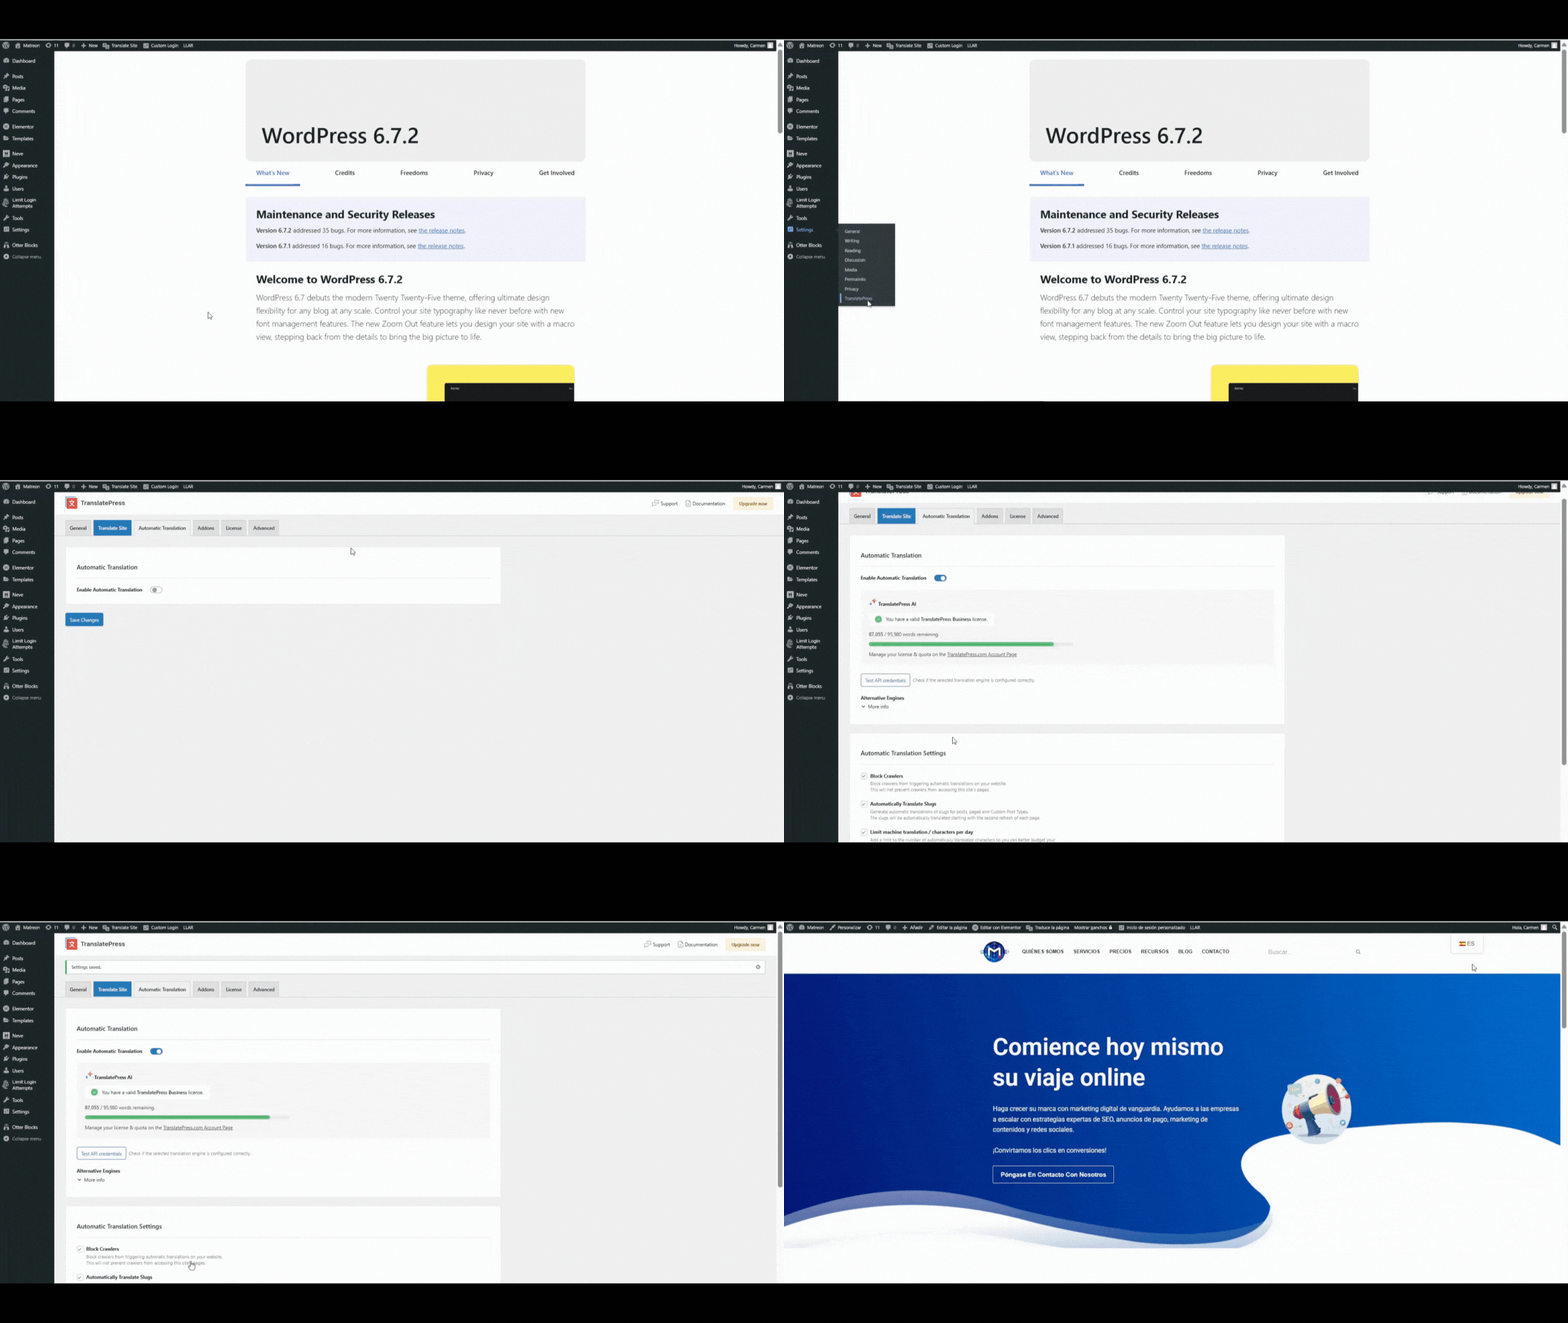
Ricorda che puoi sempre apportare modifiche utilizzando l'editor di traduzione visiva, come stai per imparare qui sotto.
4. Traduci i tuoi contenuti utilizzando l'editor visivo
Ora sei ufficialmente pronto per iniziare a tradurre i contenuti del tuo sito web.
Per aprire l'editor visivo di "TranslatePress", vai alla pagina che desideri tradurre e clicca sul Traduci pagina opzione nella barra degli strumenti di WordPress:
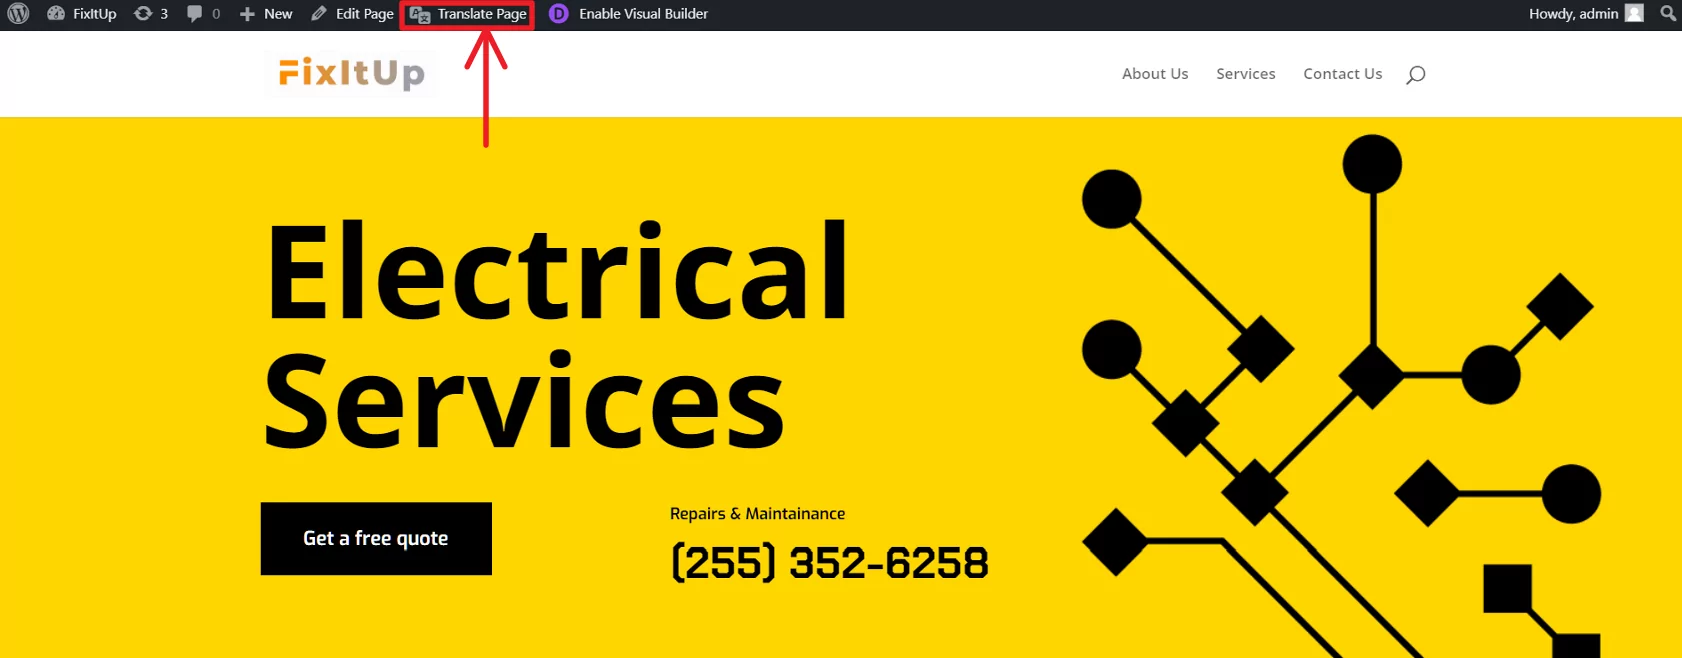
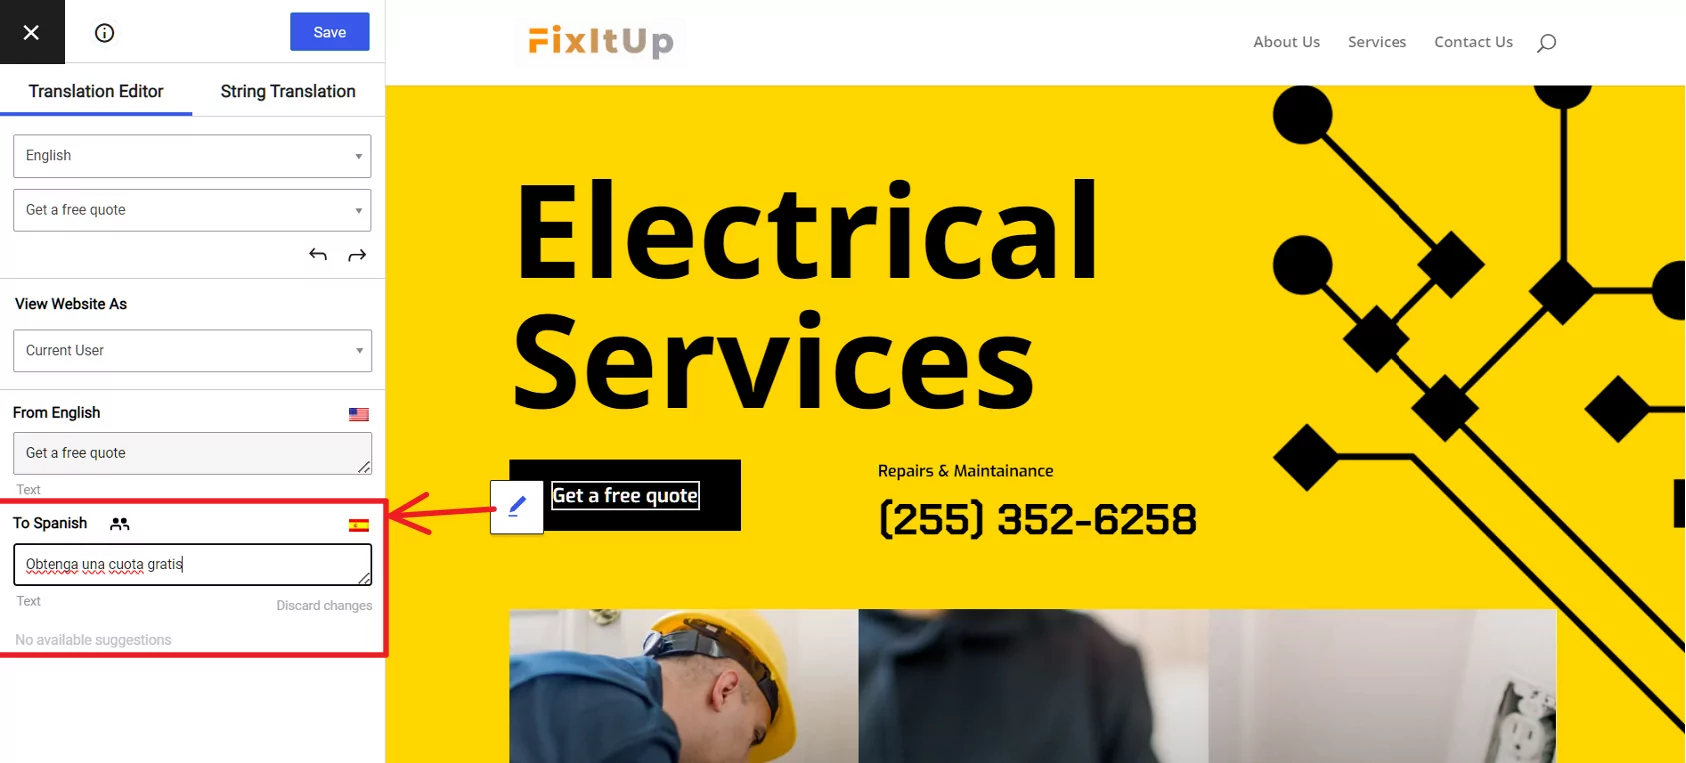
Tradurre i contenuti è semplice. Per tradurre qualsiasi elemento del tuo sito, ti basta passarci sopra con il mouse e cliccare sull'icona della matita.
Questo aprirà la traduzione nella barra laterale, dove potrai apportare le tue modifiche.
Se hai scelto di utilizzare la traduzione automatica, vedrai già la versione tradotta automaticamente nell'interfaccia.
Se stai traducendo il tuo sito da zero, vedrai un campo vuoto finché non aggiungi la tua traduzione:
È così semplice!
Questo approccio non si limita nemmeno al testo normale. Puoi anche tradurre altri elementi della tua pagina.
Per esempio:
Voglio tradurre entrambi i testi e URL di un pulsante? Basta fare clic sull'icona della matita!
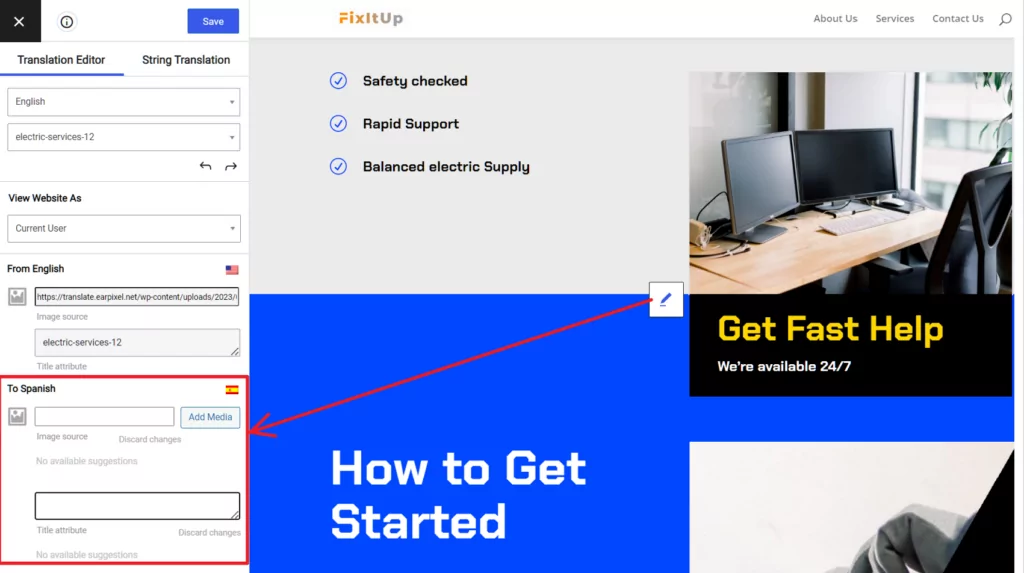
Vuoi “tradurre” un'immagine in modo che i visitatori vedano un'immagine diversa in base alla lingua scelta? Usa la stessa icona a forma di matita!
Infatti, puoi utilizzare questo approccio per tradurre praticamente qualsiasi contenuto del tuo sito WordPress, anche se proviene da un plugin o da un tema separato.
Abbiamo tutorial dettagliati su come tradurre alcuni degli elementi più comuni di un sito web multilingue:
- Moduli WordPress
- Menu di WordPress
- Immagini
- Contenuto del popup
- Cursori
- Contenuto del page builder di WordPress da Elementor, Dividi, e altro
- Prodotti WooCommerce
- Blocchi di Gutenberg
- Campi personalizzati
- Tipi di pubblicazione personalizzati
Per tradurre il resto del tuo sito web multilingua, tutto ciò che devi fare è ripetere lo stesso processo per le altre pagine. E ricorda: se hai molti contenuti, puoi sempre tornare indietro e abilitare la traduzione automatica per risparmiare un po' di tempo.
5. Configurazione di selettore di lingua
Per impostazione predefinita, TranslatePress aggiunge un elemento selettore di lingua mobile al tuo sito subito dopo aver aggiunto una lingua di traduzione. Se l'aspetto predefinito ti soddisfa, non devi modificare nulla.
Tuttavia, se le impostazioni predefinite non sono sufficienti, ci sono molte opzioni di personalizzazione disponibili per te.
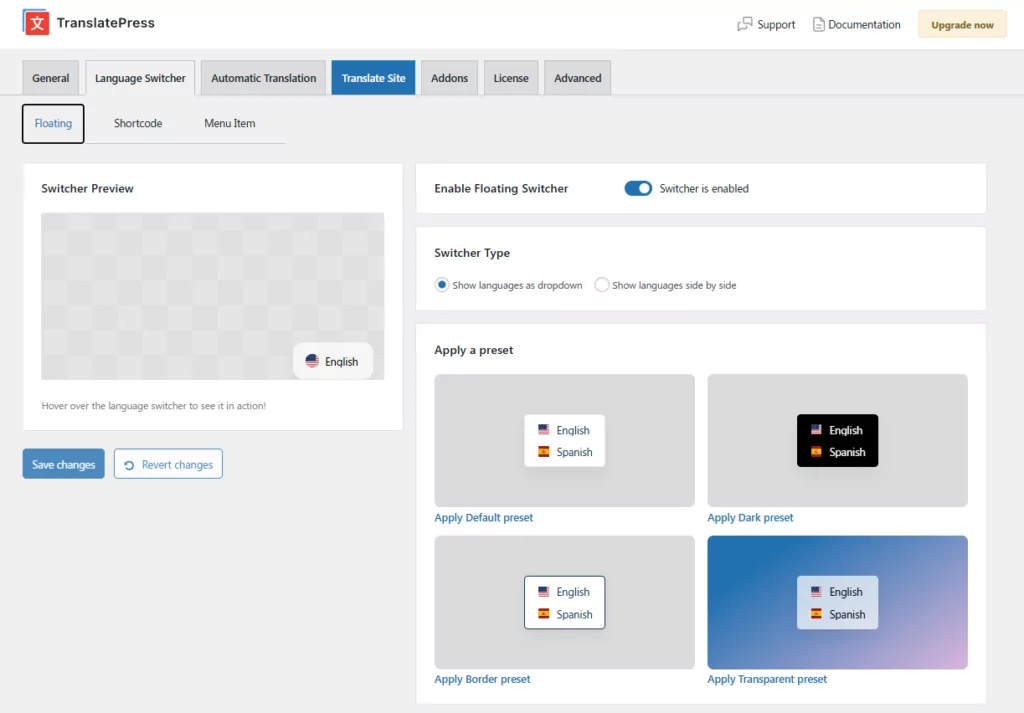
Per personalizzare il selettore della lingua, vai alla pagina Cambio lingua scheda nel tuo Impostazioni TranslatePress (nella barra di navigazione superiore del plugin). Troverai tre sottosezioni:
Commutatore Flottante
Il menu a comparsa rimane visibile in un angolo fisso di ogni pagina: è l'opzione più facile da individuare per chi visita il sito per la prima volta.
Le opzioni di personalizzazione includono:
- Quattro impostazioni predefinite per iniziare subito: Predefinita, Scura, Con bordo e Trasparente
- Controllo completo del colore: colori di sfondo, hover, testo e bordo
- Controlli individuali del raggio di arrotondamento per ciascun angolo
- Forma della bandiera: rettangolare, quadrata, rotonda
- Visualizzazione dei nomi: nomi completi, nomi abbreviati o nessun nome
- Posizione dell'icona della bandiera: prima del nome della lingua, dopo o nascosta
- Impostazioni di layout per desktop e dispositivi mobili in modo indipendente
- Posizione: In basso a destra, in basso a sinistra, in alto a destra o in alto a sinistra
- Editor CSS personalizzato per un controllo dettagliato
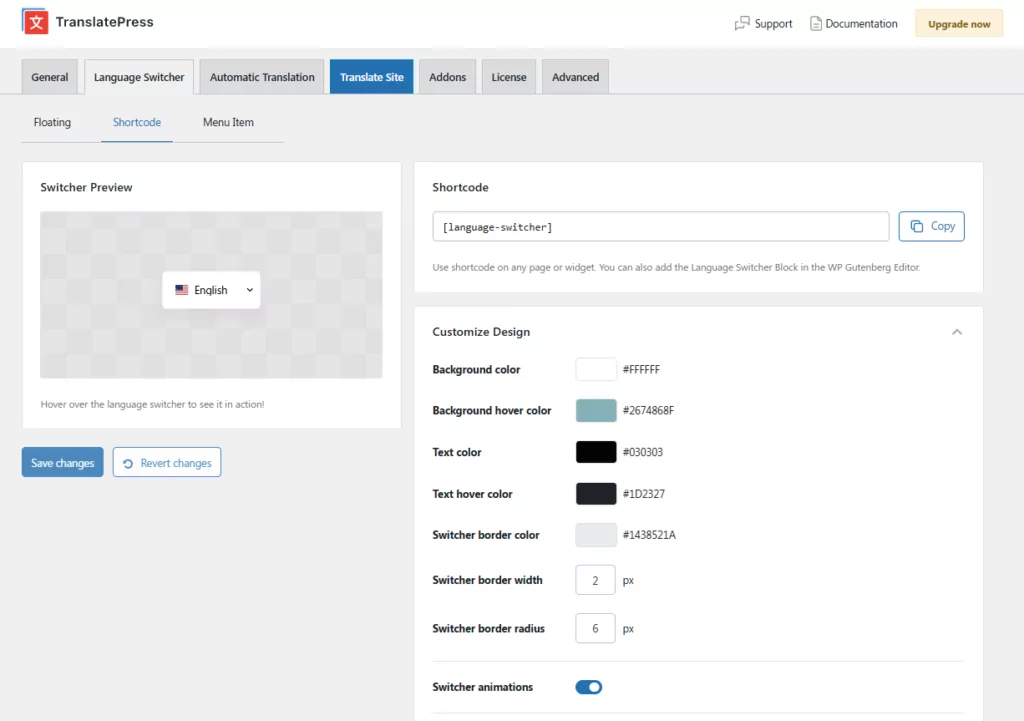
Selettore di shortcode/blocco
Usare il Cambio lingua blocco o shortcode
Il selettore tramite shortcode offre le stesse opzioni di personalizzazione del design del selettore mobile. Tuttavia, un’opzione esclusiva dello shortcode è la Apri al clic funzionalità. Se selezionato, il selettore si apre al clic anziché al passaggio del mouse. Si chiude facendo nuovamente clic, cliccando altrove nella pagina o premendo il tasto Esc.
Selettore delle voci di menu
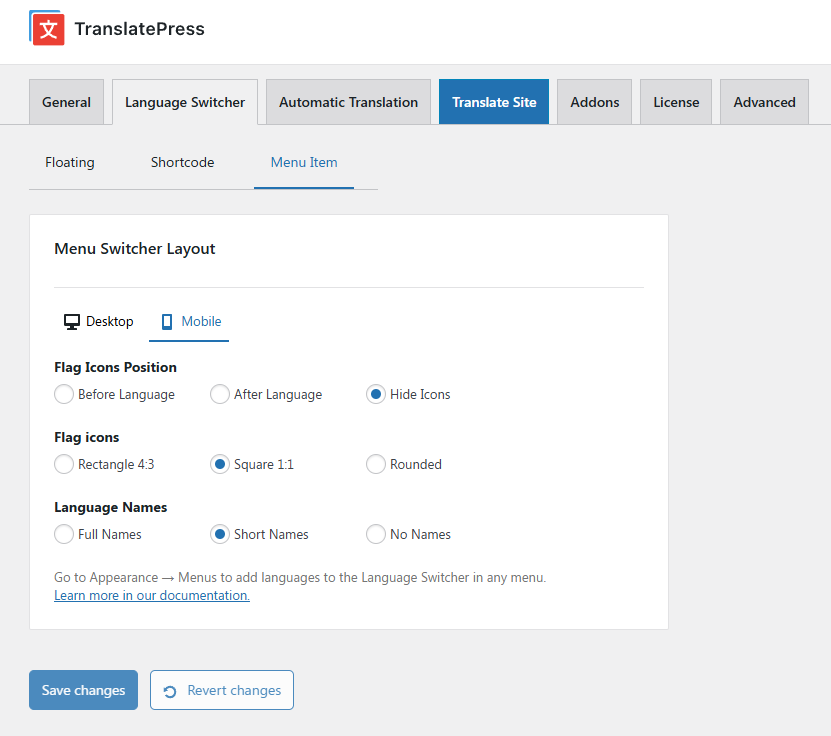
Per aggiungere il selettore di lingua a un menu di navigazione di WordPress, vai su Aspetto → Menu e aggiungi elementi linguistici dal Cambio lingua sezione. Non sono presenti controlli di colore o di design per questo tipo di selettore: eredita automaticamente lo stile del menu del tuo tema.
Il selettore di menu supporta le stesse opzioni relative ai flag e ai nomi delle lingue degli altri tipi di selettore.
Lancia oggi il tuo sito web multilingua
Come dimostrano gli esempi sopra riportati, la scelta di un sito multilingue è uno dei modi più efficaci per aumentare il traffico organico, raggiungere un pubblico nuovo e rendere il proprio sito web realmente accessibile agli utenti di Internet di tutto il mondo.
WordPress è la piattaforma ideale per realizzare quel sito multilingue: ti offre il pieno controllo su SEO, design e struttura dei contenuti, ed è la piattaforma per cui sono stati sviluppati la maggior parte degli strumenti di traduzione.
Con TranslatePress, avrai a disposizione un flusso di lavoro di traduzione visivo che rende il processo veloce e gestibile, indipendentemente dal tuo background tecnico. Installa il plugin gratuito, aggiungi la lingua di destinazione e potrai avere un sito multilingue funzionante e online in meno di un’ora.
TranslatePress Multilingue
Con TranslatePress, il tuo sito web multilingue avrà:
- SEO multilingue migliori pratiche per posizionare ogni lingua su Google.
- Traduzioni a caricamento rapido per creare un'esperienza utente migliore.
- Traduzioni complete con l'opzione di localizzare ogni singolo elemento del tuo sito, comprese immagini, moduli e altro ancora.
- A personalizzabile selettore di lingua questo si adatta al tuo design
Puoi seguire questo tutorial e iniziare a utilizzare la versione gratuita di TranslatePress. Dopodiché, valuta la possibilità di aggiornamento alla versione premium per:
- Funzionalità SEO multilingue migliorate e supporto per tutti i principali plugin SEO;
- Pacchetti AIword più grandi per TranslatePress AI
- Accesso al servizio di traduzione automatica DeepL;
- La possibilità di tradurre il tuo sito in un numero illimitato di nuove lingue (la versione gratuita ti permette di tradurre il tuo sito in una nuova lingua);
- Speciali account dedicati per traduttori per aiutarti a lavorare con traduttori freelance o altri servizi
- Rilevamento automatico della lingua.
Per ottenere il massimo dal tuo sito web multilingua, consulta la elenco completo delle funzionalità di TranslatePress.
Se hai trovato utile questo post, ti invitiamo a visitare il nostro Canale YouTube, dove carichiamo costantemente brevi tutorial video facili da seguire. Puoi anche seguirci su Facebook e Twitter per essere tra i primi a sapere ogni volta che pubblichiamo.

davvero fantastico... voglio usare questo sito per cambiare il mondo!