
In questo post
Cos'è davvero la localizzazione di WordPress? Il termine suona abbastanza misterioso. Non c'è da stupirsi se molti proprietari di siti Web WordPress faticano a capire cosa sia la localizzazione di WordPress e come farla in modo efficace.
- La localizzazione di WordPress riguarda la creazione di un sito multilingue e la sua traduzione per i mercati esteri?
- Si tratta di mostrare una versione in lingua locale del vostro sito in base alla provenienza del lettore?
- E, se sei uno sviluppatore, si tratta di preparare il tuo tema o plugin per la traduzione?
Risponderemo a tutte queste domande in questa guida alla localizzazione di WordPress.
Prima di tutto:
Cos'è la localizzazione di WordPress?
In poche parole:
La localizzazione è il processo di adattamento di un prodotto (o di un contenuto) a una specifica area geografica, a una lingua o a un mercato locale.
Questo processo di adattamento comporta solitamente la traduzione dell'elemento in questione in una lingua locale.
La localizzazione viene anche spesso definita “l10n” poiché ci sono dieci lettere tra la lettera “l” e la lettera “n” in “localization”.
Localizzazione vs. Internazionalizzazione
(Da leggere se sei uno sviluppatore) ?
Ora entriamo nel vivo del divertimento!
Nel linguaggio di tutti i giorni, localizzazione e internazionalizzazione sono usati in modo intercambiabile. Ma è un errore, tecnicamente. (Anche se non verrete perseguiti, in caso di colpevolezza.)
Internazionalizzazione (o “i18n” – sempre 18 lettere tra la lettera “i” e la lettera “n” in “internationalization”) è il processo di creazione del vostro prodotto in modo tale da consentire all'utente di localizzarlo.
In altre parole, per gli sviluppatori di WordPress, l'internazionalizzazione consiste nell'aderire a convenzioni specifiche in linea con le linee guida di traduzione di WordPress.
Nel quadro generale, internazionalizzazione viene prima, e può quindi essere seguito da localizzazione.
Esempi di localizzazione
La localizzazione di WordPress va ben oltre la semplice traduzione dei contenuti. Ecco alcuni esempi e idee per la localizzazione di WordPress:
Traduzione dei contenuti del sito web per i mercati di riferimento
Questa è la cosa più semplice e intuitiva da fare quando si inizia a localizzare il proprio sito web WordPress.
L'idea è semplice: prendi tutto il contenuto testuale presente sul tuo sito e lo traduci in una o più versioni localizzate.
A seconda degli strumenti a vostra disposizione, tali traduzioni possono essere redatte manualmente oppure in modo automatizzato utilizzando Google Translate o moderni strumenti di traduzione basati sull'intelligenza artificiale. (Ne parleremo più avanti in questa guida.)
Adattare la grafica ai mercati di riferimento
Le immagini e le foto presenti sul sito estendono l'esperienza che i visitatori hanno con i vostri contenuti. Queste grafiche non sono meno importanti quando si tratta di localizzazione.
In termini semplici, vuoi che la tua grafica sia localizzata esattamente come tutti gli altri contenuti presenti sul sito.
Lasciami fare un esempio; ecco un'immagine in evidenza che potresti allegare a un post del blog:

Se poi traduci il sito in spagnolo, dovresti anche ottenere un'immagine localizzata adatta da abbinare alla versione spagnola; come questa:

Modifica dei contenuti per adattarli ai gusti e alle abitudini di consumo dei mercati di riferimento
Ad esempio, i siti di notizie sportive in Europa non sono molto interessati a ciò che accade nella NFL. Allo stesso modo, il pubblico americano non si interessa molto a quello che chiama calcio.
Con un'adeguata localizzazione del sito web, è possibile filtrare intere categorie di contenuti e regolare ciò che ogni area geografica visualizza.
Adattare il design e il layout per visualizzare correttamente il testo tradotto
In generale, non devi fare nulla con il layout o il design del tuo sito quando passaggio da una versione linguistica a un'altra. Ma ci sono eccezioni:
È qui che entrano in gioco le scritture RTL (da destra a sinistra).
Quando traduzione in arabo lingue: la possibilità di adattare la struttura del sito renderà la lettura molto più agevole per il pubblico straniero.
Conversione in valute e unità di misura locali
In Europa, ci piace mostrare i valori monetari in questo modo: 20$. Negli Stati Uniti, lo standard è $20 – con il simbolo della valuta prima dell'importo.
Una buona localizzazione si assicura che questi rimangano corretti.
Utilizzando i formati locali appropriati per date, indirizzi e numeri di telefono
Come viene interpretato da te il seguente formato di data?
03/12/2020
Se ti trovi negli Stati Uniti, questo è il 12 marzo. Ovunque altrove, questo sarebbe il 3 dicembre.
Come proprietario di un sito web, vuoi evitare malintesi di questo tipo, soprattutto se i tuoi contenuti sono legati al tempo e spesso riguardano eventi che si verificano in date specifiche – per esempio, siti web nel settore finanziario mercato.
Affrontare le normative locali e i requisiti legali
Informative sulla privacy, norme GDPR, informative FTC, oltre a decine di altre leggi e normative locali.
Un sito web dovrebbe essere in sintonia con le normative di ciascun paese in cui ha una presenza ufficiale.
Fornire assistenza clienti nella lingua locale
Ultimo ma non meno importante, abbiamo probabilmente il vantaggio più grande per le aziende che operano a livello internazionale.
Offerta assistenza clienti nella lingua madre del cliente è una grande vittoria, e nient'altro dimostrerà loro che tieni davvero alla loro esperienza.
Vantaggi della localizzazione
La domanda che potreste porvi è perché dovreste affrontare tutto questo fastidio per localizzare il vostro sito.
Ci sono alcuni eccellenti vantaggi nella localizzazione di WordPress:
- Aumentare la quota di mercato e i ricavi. Non importa se vendi prodotti o condividi semplicemente contenuti su vari argomenti, l'esposizione a più mercati comporterà maggiori entrate (se non dalle vendite, almeno dalla pubblicità). Infatti, i dati dicono che ogni $1 speso per la localizzazione genera $25 di nuovi ricavi.
- Attenuare la sensibilità culturale. Alcune espressioni o argomenti che vanno bene in un paese potrebbero essere del tutto non va bene in un'altra. Offrendo contenuti localizzati, eviti questi problemi.
- Costruisci la fiducia dei clienti. Nulla dà più sicurezza che vedere che il sito web che stai visitando ha fatto lo sforzo extra di tradurre i propri contenuti per facilitare le cose al lettore.
- Ottieni un vantaggio competitivo. Essere presenti in più luoghi rispetto alla concorrenza è sempre un bene.
- Rafforzare la presenza globale. Diventando globale, rendi il tuo marchio molte volte più riconoscibile.
Come fare la localizzazione di WordPress
Messa da parte tutta la teoria, passiamo ora all'azione e compiamo i passi necessari per localizzare il vostro sito web WordPress:
Vi mostreremo come gestire la localizzazione in quattro aree specifiche:
- localizzazione dei contenuti testuali ← clicca per saltare
- localizzazione di file multimediali e immagini
- localizzazione delle impostazioni SEO
- configurazione delle traduzioni automatiche
Per portare a termine il lavoro userò il nostro plugin TranslatePress: la maggior parte di queste operazioni si può eseguire utilizzando il versione gratuita del plugin.
Se desideri la versione riassuntiva di questo post del blog, ecco un breve video tutorial che illustra i punti principali del processo di localizzazione:
Ma per dare uno sguardo più approfondito alla localizzazione di WordPress, continua a leggere.
Dunque, per cominciare, ecco come installare e configurare il plugin:
Installazione e configurazione di TranslatePress
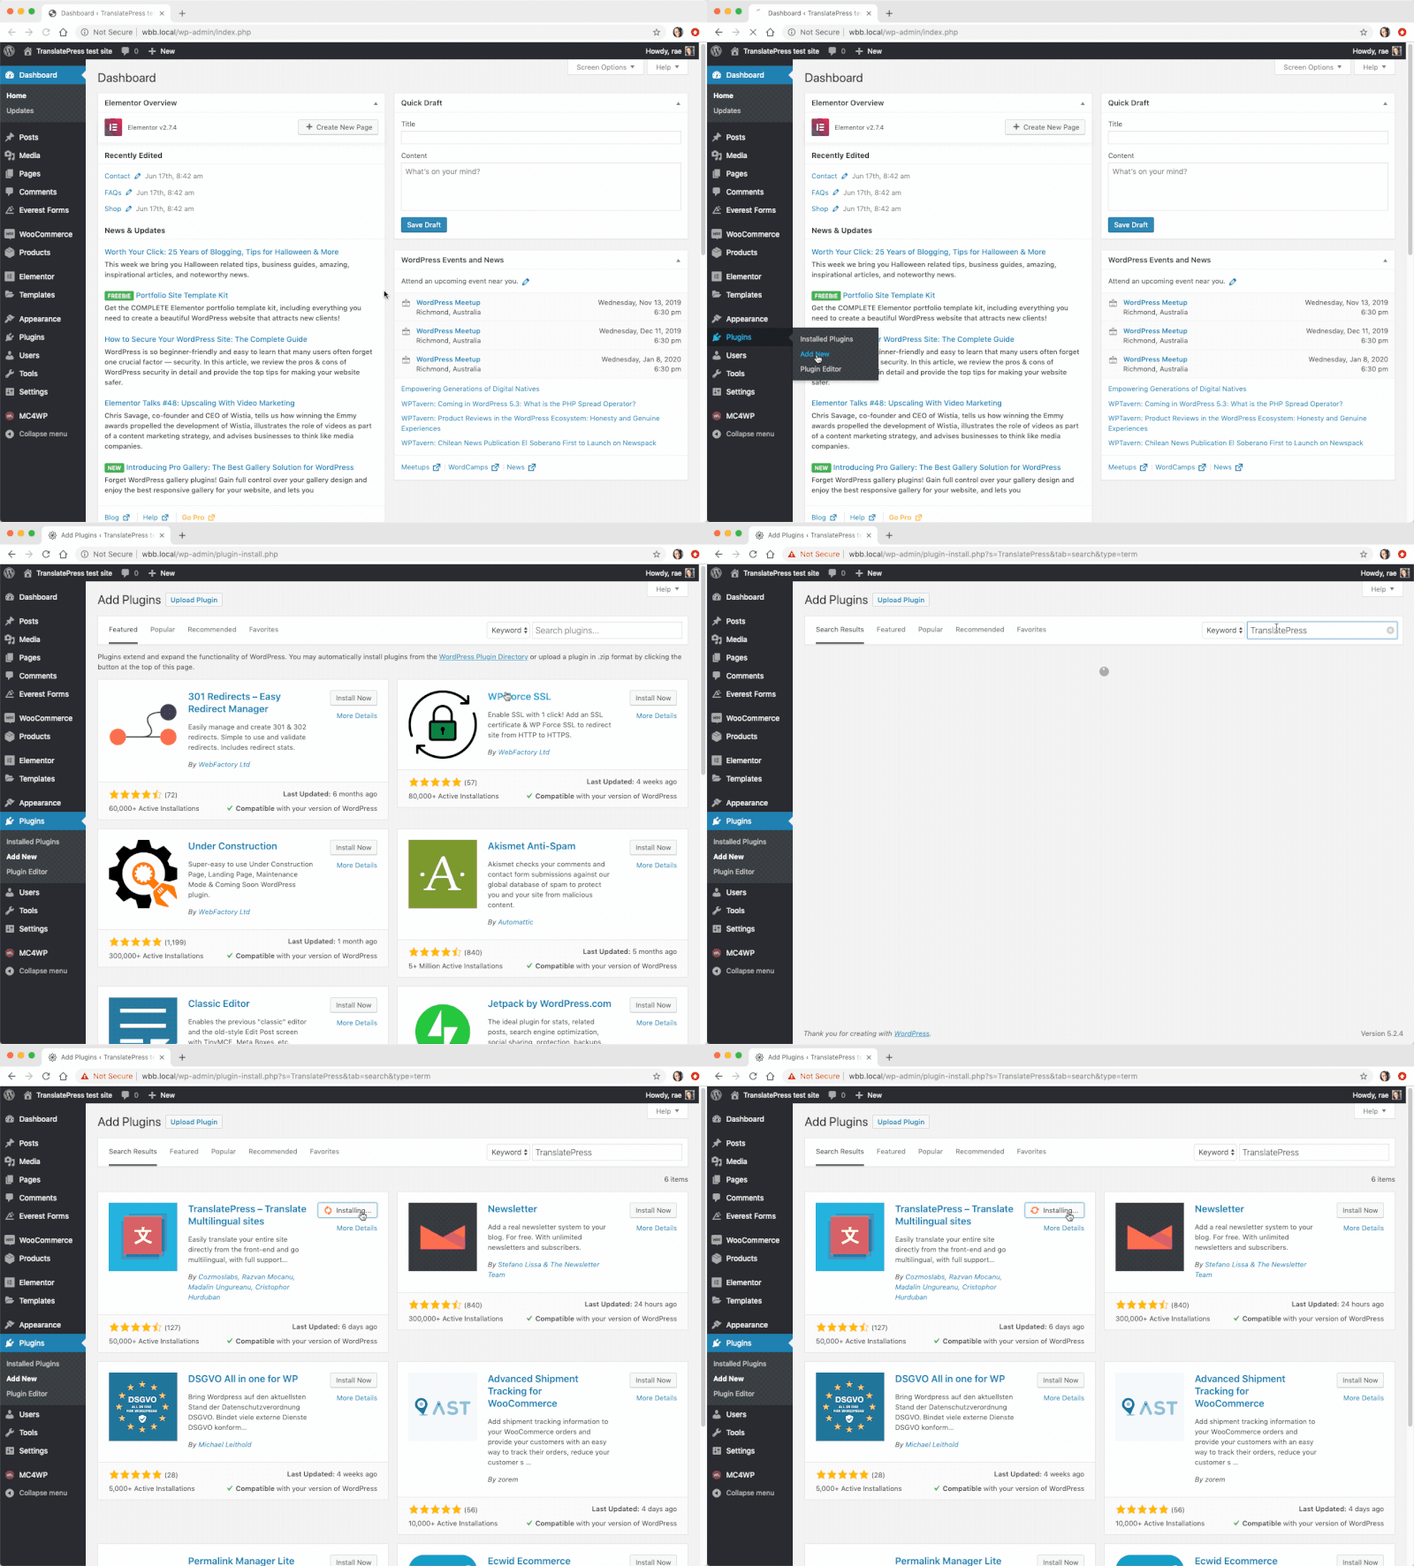
TranslatePress può essere installato come qualsiasi altro plugin gratuito di WordPress. Accedi alla dashboard di WordPress, quindi vai su Plugin → Aggiungi Nuovo e inserisci TranslatePress nella casella di ricerca. Successivamente, fai clic su Installa ora E poi acceso Attiva.
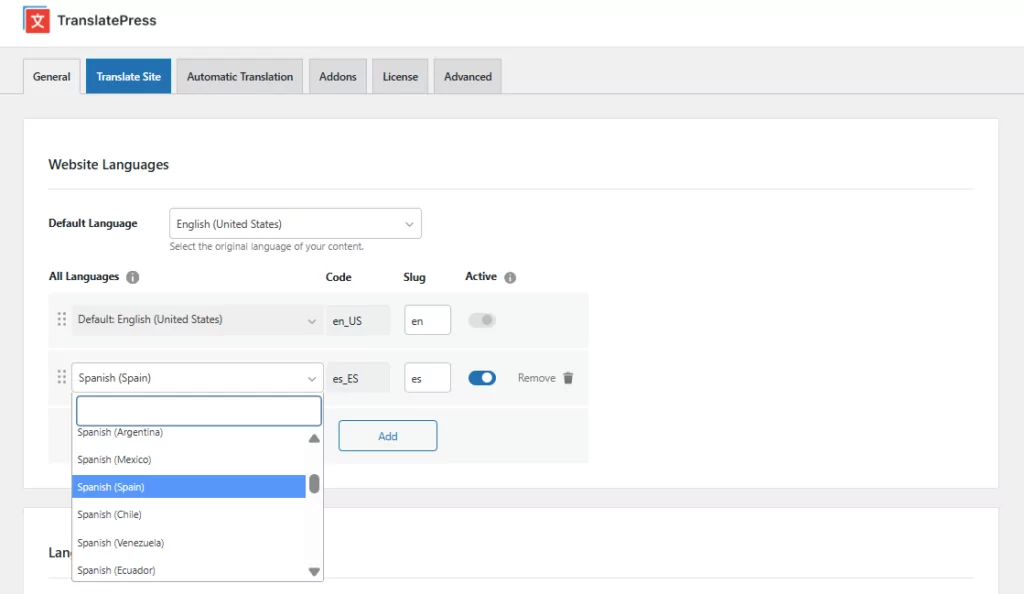
Vai a Impostazioni → TranslatePress e aggiungi nuove lingue al tuo sito.
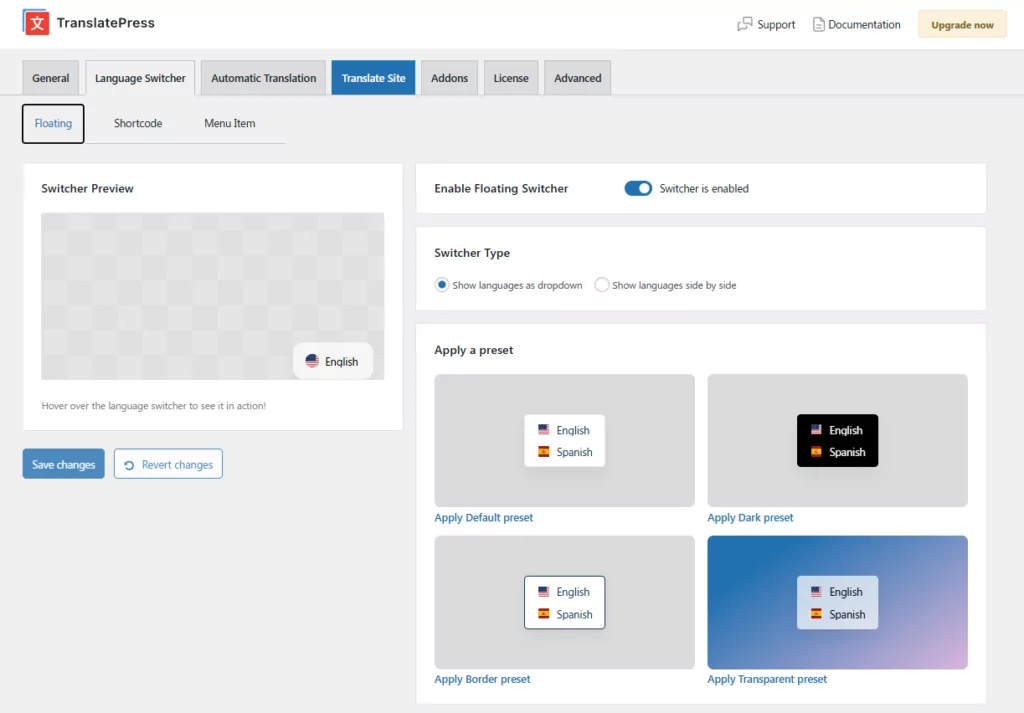
Una volta salvate le tue lingue, vai su Cambio lingua scheda nella barra di navigazione in alto delle impostazioni di TranslatePress per configurare il modo in cui i visitatori passa da una lingua all'altra sul tuo sito. Per impostazione predefinita, TranslatePress aggiunge un elemento selettore di lingua mobile nell'angolo in basso a destra di ogni pagina; quindi, se questa configurazione ti va bene, non devi modificare nulla.
Se desideri personalizzarne l'aspetto o la posizione, la scheda selettore di lingua ti offre tre opzioni, ciascuna con una propria sottoscheda:
- Galleggiante — regola la posizione, i colori, la forma della bandiera e il layout per Desktop/Mobile del selettore d'angolo
- Codice breve — usa
- Voce di menu — aggiungi le opzioni di lingua a qualsiasi menu di navigazione tramite Aspetto → Menu
Ricordati di cliccare su Salva modifiche fatto.
Con queste semplici azioni, hai appena comunicato a WordPress quali lingue desideri utilizzare sul tuo sito multilingue. Nel passaggio successivo, localizzeremo diverse aree del tuo sito web.
Localizzazione di contenuti testuali
Uno dei grandi vantaggi di TranslatePress è che ti permette di tradurre tutti i tuoi contenuti in modo molto intuitivo, utilizzando un'interfaccia di traduzione visiva. Per iniziare, basta andare sulla pagina che desideri tradurre – può essere qualsiasi pagina – e cliccare sul Traduci pagina il link che si trova nella barra superiore:
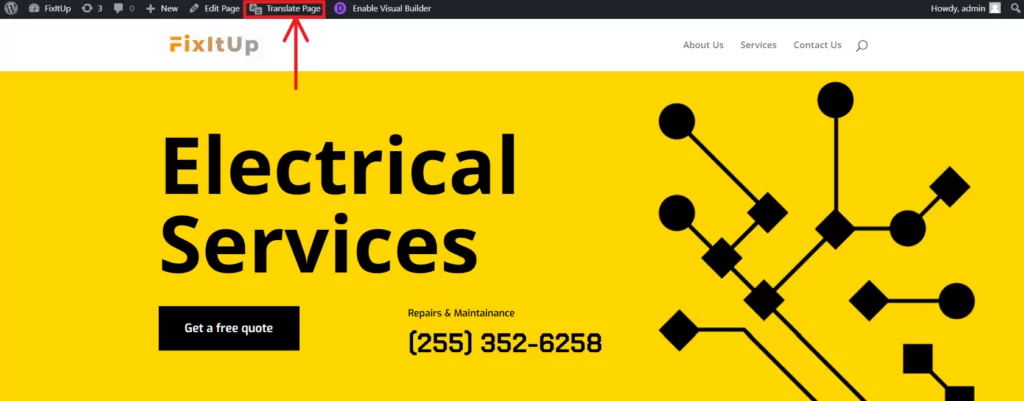
Una buona idea è iniziare dalla tua homepage e poi procedere attraverso tutte le altre pagine che necessitano di traduzioni. Puoi utilizzare l'editor di traduzione visiva per navigare nel tuo sito web e tradurre tutto ciò che vedi.
Per tradurre qualsiasi testo che vedi sulla pagina, basta fare clic su icona della matita accanto. Un nuovo pannello apparirà nella barra laterale a sinistra. È qui che puoi inserire la tua traduzione.
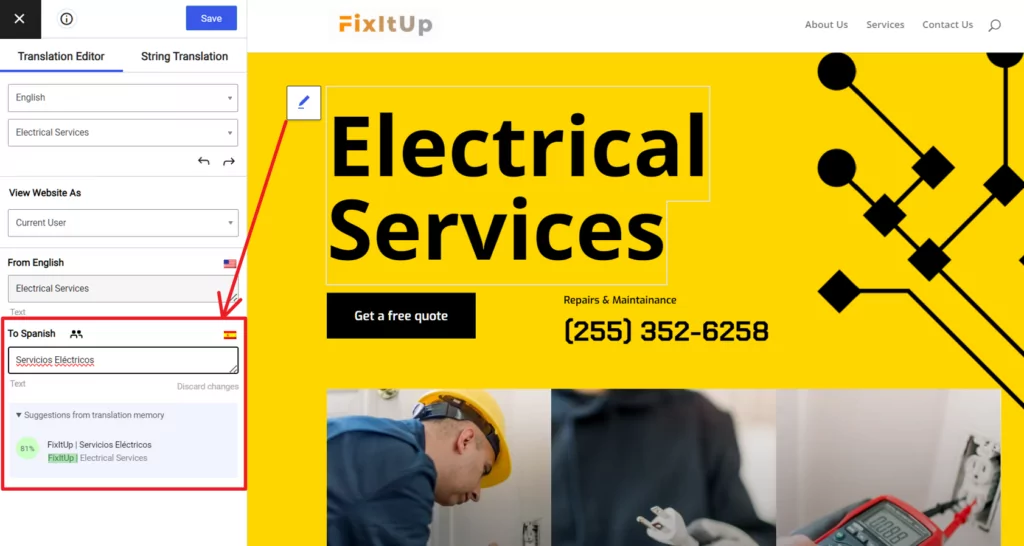
Puoi scorrere ogni blocco di testo sulla pagina fino a tradurli tutti.
Il dettaglio importante qui è che questo metodo funziona su tutti i tipi di testi che il tuo tema mostra sulla pagina. Non importa se il testo proviene da un articolo del blog, dalle stringhe del tema stesso, da una stringa dinamica, ecc., TranslatePress può gestirli tutti.
Non dimenticare di cliccare su Salva la traduzione (angolo in alto a sinistra).
NotaPer accelerare i tempi, puoi anche scegliere che le tue traduzioni vengano fatte automaticamente. Ne parleremo in una delle sezioni sottostanti.
Localizzazione di file multimediali e immagini
La localizzazione delle immagini funziona esattamente allo stesso modo della localizzazione dei contenuti testuali. Tutto ciò che devi fare è cliccare su icona della matita accanto all'immagine che desideri localizzare, e quindi sostituirla selezionando un'altra immagine dalla libreria multimediale o caricandone una dal tuo computer.
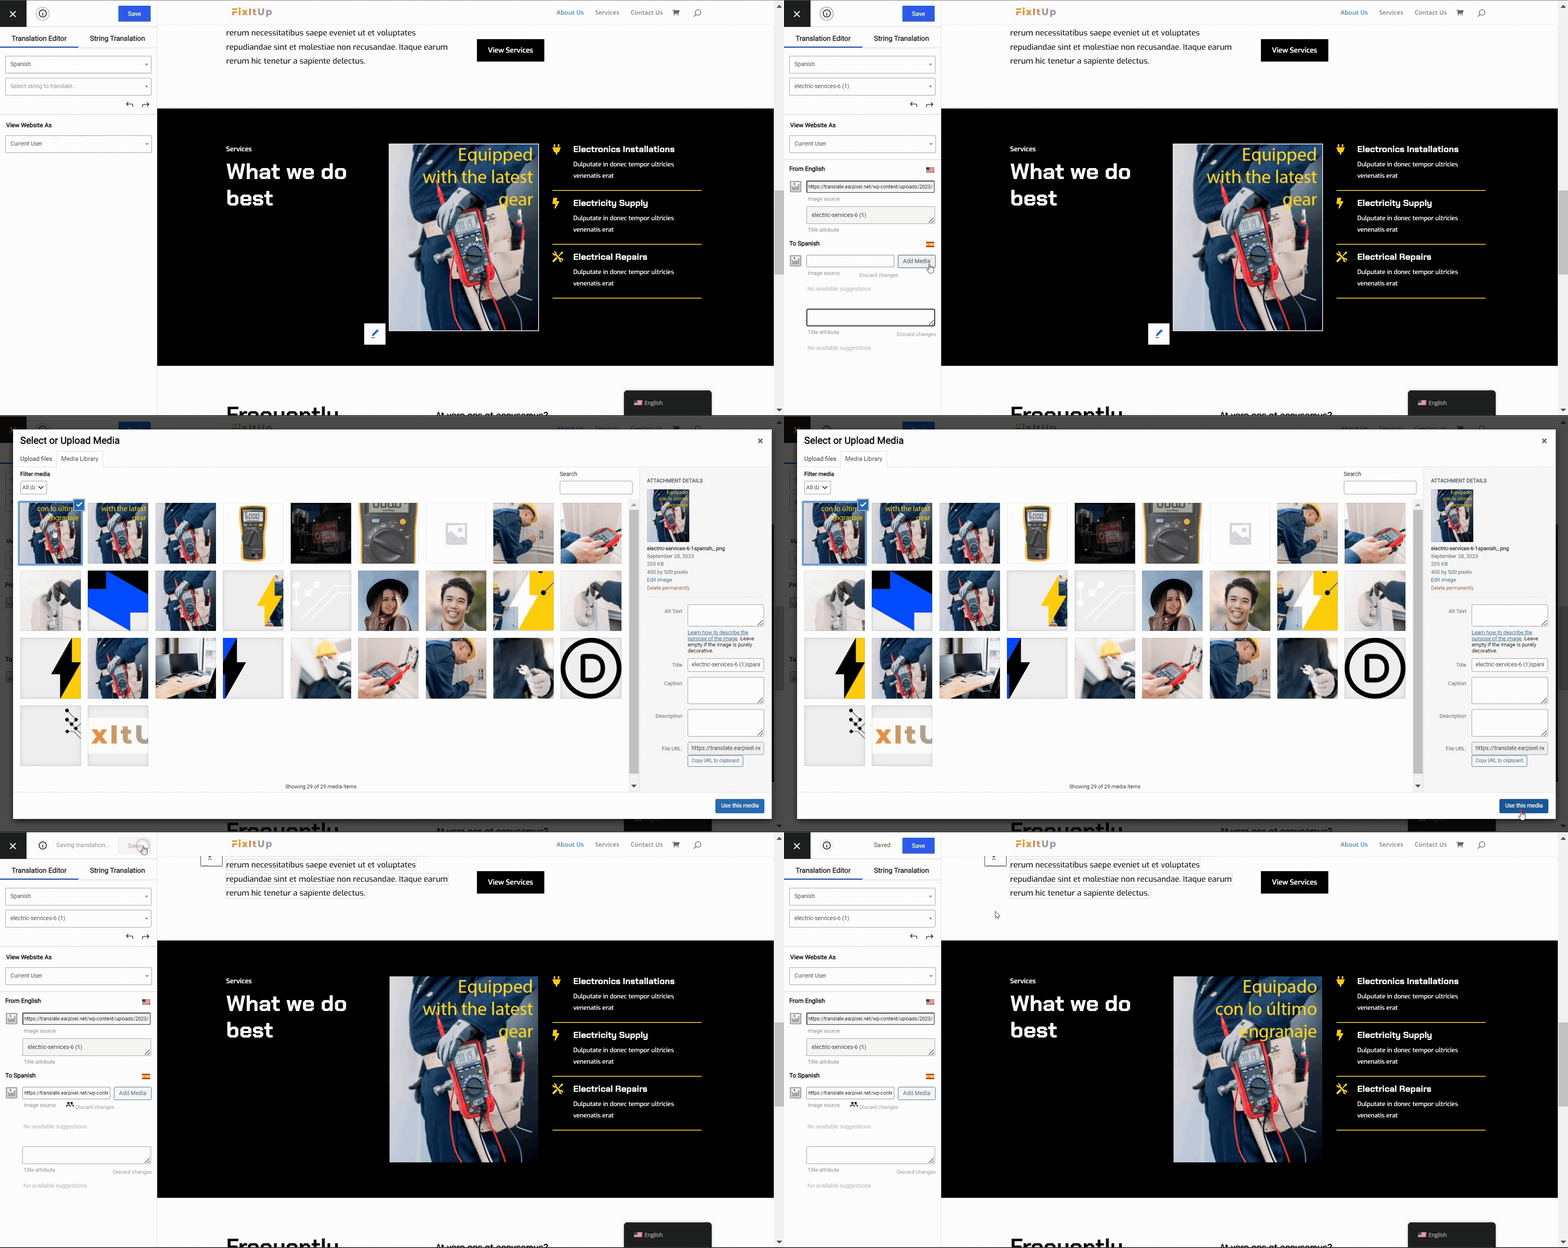
È importante sottolineare che questa funzionalità si estende a tutti i tipi di file multimediali. Non potete localizzare solo le vostre immagini, ma anche video, file audio e cursori anche.
Per saperne di più sulla localizzazione delle immagini del sito web, leggi questa guida.
Localizzazione delle impostazioni SEO
In linea di principio, la SEO multilingue non è diversa dalla SEO tradizionale. Si vuole semplicemente fare in modo che non sia solo la versione in lingua principale del proprio sito a poter essere scoperta tramite Google, ma anche tutte le versioni localizzate.
NotaPer tradurre tutti gli elementi SEO importanti di una pagina, utilizzeremo il Componente aggiuntivo pacchetto SEO per TranslatePress – disponibile con tutte le licenze premium.
Per assicurarti che i tuoi contenuti si posizionino in più lingue, desideri:
- modifica lo slug dell'URL indirizzo web di ciascuna pagina localizzata,
- Traduci il titolo della pagina e la meta description,
- abilitare sitemap multilingue,
- imposta quello corretto
hreflangattributi per le tue pagine localizzate.
In TranslatePress tutto questo è davvero semplice.
Le ultime due operazioni (TranslatePress) verranno eseguite automaticamente. Le prime due – la modifica dello slug dell'URL, del titolo e della descrizione della pagina – vengono effettuate tramite la stessa interfaccia di traduzione che abbiamo utilizzato nel passaggio precedente.
Per visualizzare tutte le stringhe SEO che possono essere tradotte, espandi il menu sotto la tua lingua principale; questo:
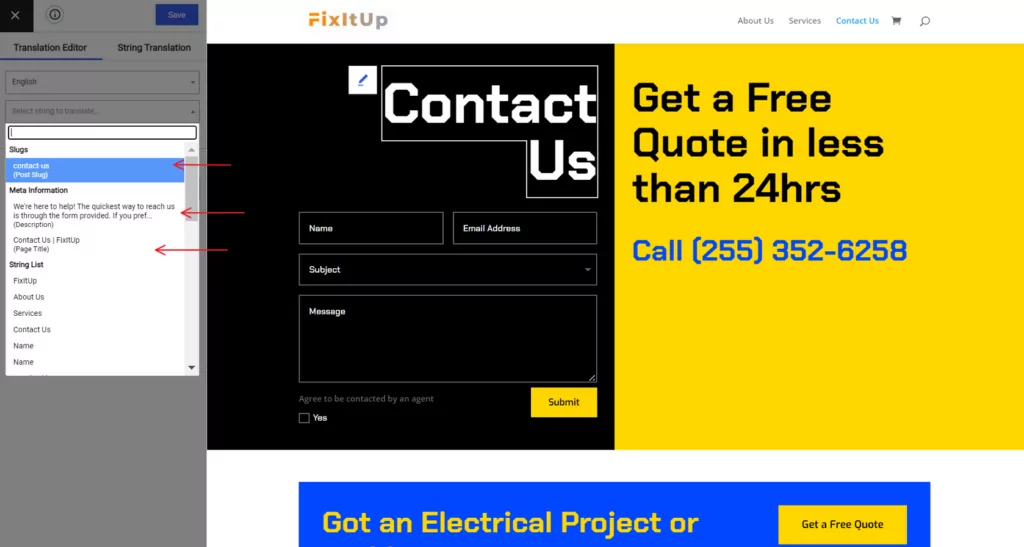
Le frecce indicano lo slug della pagina, il titolo e la meta descrizione. Clicca su una di queste stringhe per modificarle tramite l'interfaccia TranslatePress.
Per saper di più sulla localizzazione delle impostazioni SEO, leggi questa guida.
Configurazione delle traduzioni automatiche
Infine, ma non meno importante, se preferisci non dover effettuare tutte le traduzioni manualmente, TranslatePress supporta anche la traduzione automatica — ed è facile da attivare.
L'opzione più semplice è TranslatePress AI, il motore di traduzione integrato nel plugin stesso. Non richiede alcun account esterno né alcuna chiave API. È possibile ottenere una licenza gratuita di TranslatePress AI tramite mi iscrivo qui, e i piani a pagamento includono un numero di parole AI da utilizzare con il motore come parte del piano. Se hai bisogno di più parole, con un piano a pagamento puoi ricaricare i crediti per le parole dal tuo account TranslatePress.
Per abilitare la traduzione automatica, vai su Impostazioni → TranslatePress e apri il Traduzione automatica scheda. Abilita traduzione automatica e seleziona il tuo motore preferito.
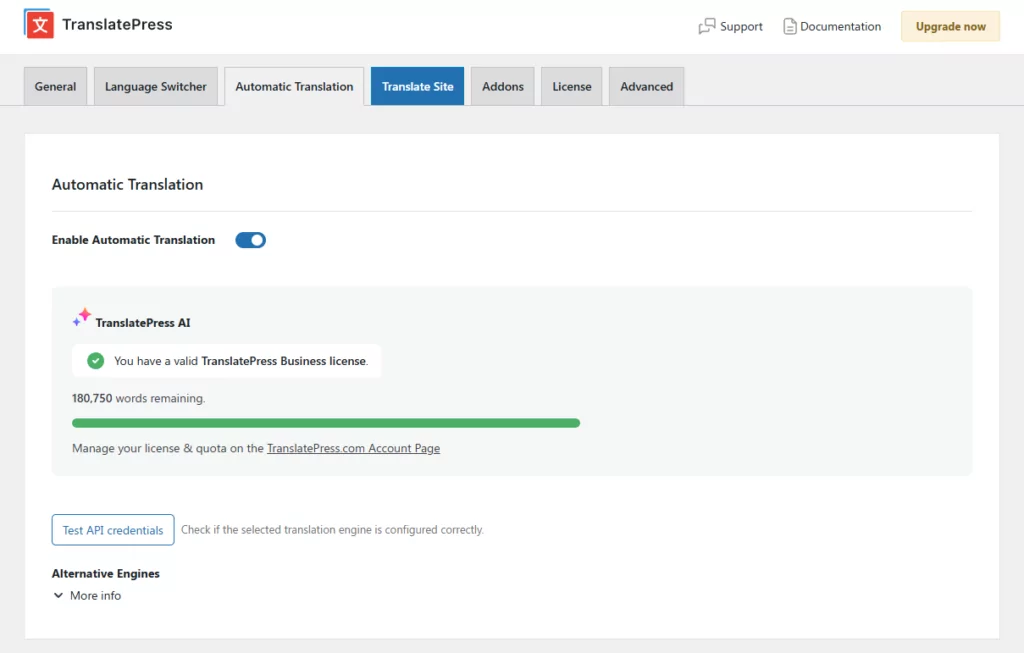
Se preferisci utilizzare un'API esterna, TranslatePress supporta anche:
- Google Traduttore — disponibile su tutti i piani, compresa la versione gratuita, utilizzando la propria chiave API di Google Cloud. Ecco come crearne uno.
- DeepL — disponibile nei piani Business e Developer, utilizzando la propria chiave API DeepL. Ecco come generare una chiave API di DeepL.
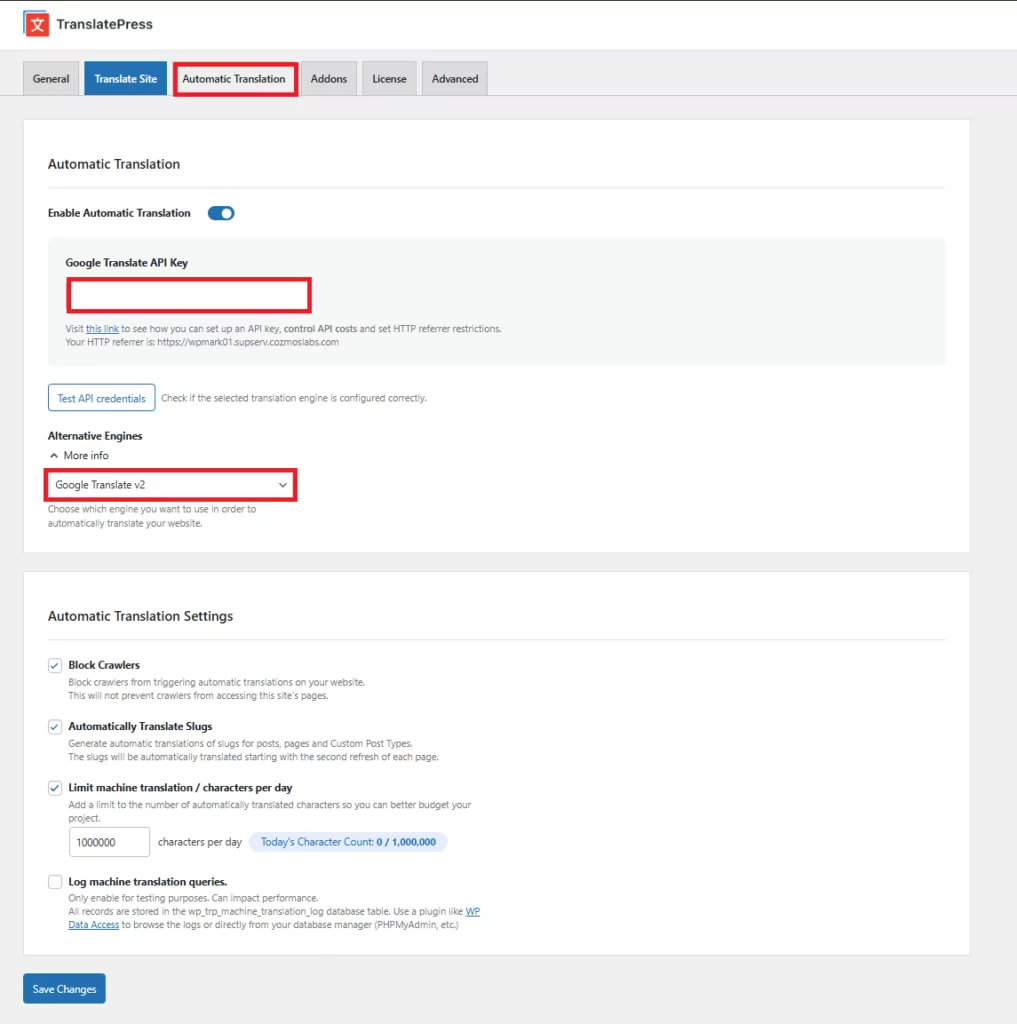
Qualsiasi motore tu scelga, le traduzioni automatiche sono un punto di partenza: puoi rivedere e perfezionare tutto ciò che non suona naturale direttamente nell'editor visivo.
Per saperne di più sulla traduzione automatica del tuo sito WordPress, leggi questa guida.
Localizzazione di WordPress per Temi e Plugin
Questa parte della nostra guida alla localizzazione di WordPress è pensata per gli sviluppatori che lavorano sui propri prodotti, temi e plugin per WordPress.
Se sei un utente quindi la localizzazione di tutti i plugin e temi che hai installato sul tuo sito viene fatta tramite i metodi descritti sopra.
Continua a leggere se sei uno sviluppatore:
Quando lavori a un tema o a un plugin per WordPress, il tuo compito non è tanto preparare versioni in lingua originale del prodotto, quanto piuttosto fare in modo che altre persone possano tradurre la tua creazione in autonomia.
Più o meno, è questo quello che internazionalizzazione tratta di.
Fortunatamente, anche se può sembrare intimidatorio, i compiti effettivi che devi eseguire per internazionalizzare il tuo tema o plugin sono piuttosto semplici:
Imposta l'intestazione del Text Domain
Questo primo passaggio serve a far sapere a WordPress che il tuo prodotto è pronto per le traduzioni.
Per i temi, questo viene fatto includendo la seguente chiamata di funzione nel functions.php file del tema
load_theme_textdomain('YOUR_THEME', THEME_PATH.'/languages');
Utilizzare le funzioni “gettext”
Ci sono due funzioni PHP disponibili in WordPress che rendono la traduzione del tuo tema o plugin davvero semplice.
Essi sono:
_e()__()
Queste sono quelle che chiamiamo funzioni “gettext”.
Dovresti usarli ogni volta che desideri visualizzare una stringa di testo sullo schermo.
Quindi, invece di fare questo:
<?php echo 'Welcome to Great Theme!'; ?>
Faresti così:
<?php _e('Welcome to Great Theme!', 'YOUR_THEME'); ?>
Questa funzione cerca il file di traduzione (ne parleremo tra un attimo), individua la corrispondenza con la stringa che hai fornito come parametro e infine stampa la sua versione tradotta (per la lingua attualmente impostata).
- La differenza tra il
_e()e__()le funzioni è che la prima stampa/riproduce il suo risultato e il secondo resi esso. - L'altro parametro,
'IL_TUO_TEMA', è il percorso del modello del tuo tema.
⚠️ Voglio sottolinearlo di nuovo: dovete usare queste funzioni “gettext” ogni volta che volete mostrare qualsiasi stringa di testo all'utente.
Le funzioni “gettext” non servono solo a tradurre i contenuti dei siti web, ma i loro risultati possono essere intercettati anche da plugin come TranslatePress in altre circostanze. Ad esempio, gli utenti di WooCommerce saranno lieti di sapere che modificando i testi predefiniti come “Aggiungi al carrello” o “Saldi” è facile da fare proprio perché WooCommerce utilizza le funzioni “gettext” durante la loro visualizzazione.
Per capire come funziona, attiva TranslatePress (versione gratuita) e clicca su Traduci pagina quando visualizzi una qualsiasi delle nostre pagine di prodotti. Mentre passi il cursore del mouse sopra il “Aggiungi al carrello” pulsante, vedrai un matita verde icona. Questa icona indica che il testo può essere tradotto e che proviene da una funzione “gettext”. (In alternativa, matita blu le icone indicano i testi creati dall'utente, come parte di un post, di una pagina o della descrizione di un prodotto.
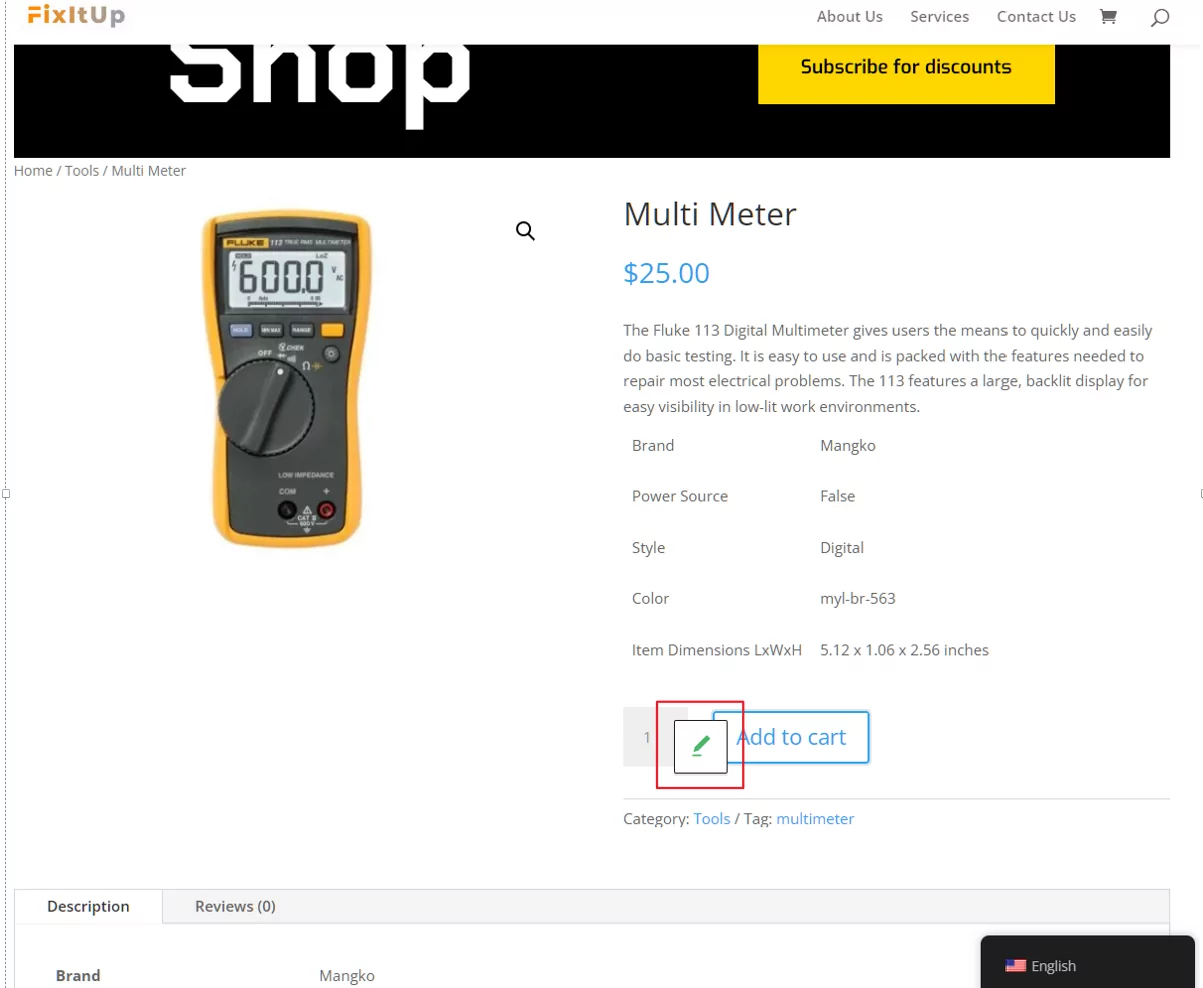
Cliccando sull'icona a forma di matita, potrai non solo aggiungere una nuova versione linguistica del testo, ma anche modificare la versione linguistica principale – nel caso in cui tu voglia optare per “Acquista ora” invece di “Aggiungi al carrello”.
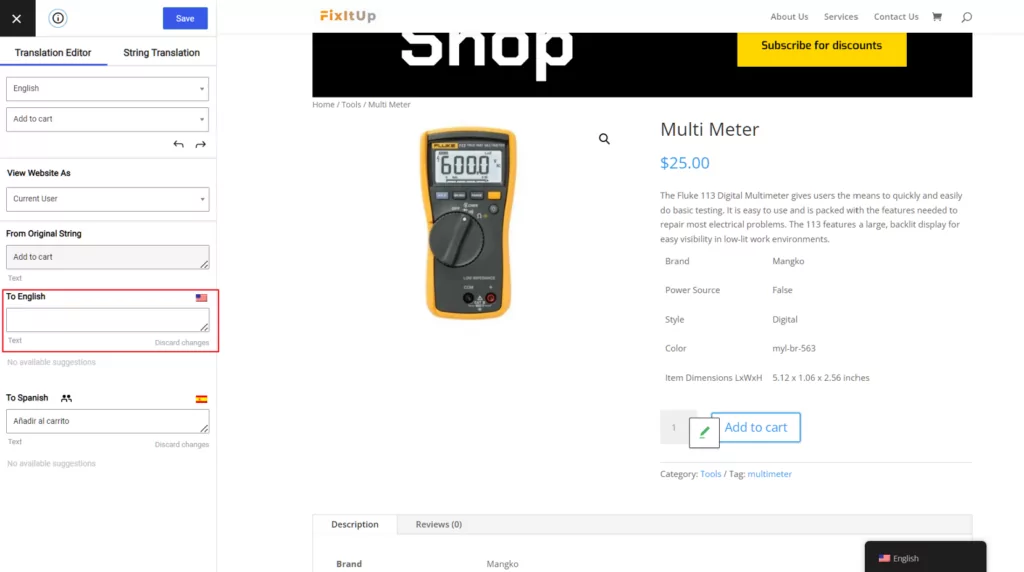
Un cambiamento semplice come questo non sarebbe possibile senza le funzioni “gettext”.
Crea un file di traduzione
L'ultimo passaggio per rendere il tuo tema o plugin pronto per le traduzioni è creare quello che viene chiamato un file POT. Un file POT è fondamentalmente una tabella. Collega le stringhe di testo originali con le loro versioni tradotte.
I file POT possono essere creati e modificati utilizzando uno strumento come Poedit, per esempio. È open-source e ha versioni per tutti i principali sistemi operativi.
L'idea alla base di un file POT è che tutte le stringhe che il tuo tema o plugin mostra all'utente tramite le funzioni “gettext” dovrebbero essere elencate nel file.
Dai al tuo file POT il nome del tuo tema, salvalo con il .pot estensione e mettilo nel lingue sottodirettoria nella directory principale del tuo tema / plugin.
Fatto ciò, il tuo tema è pronto per le traduzioni!
Bisogna preoccuparsi delle stringhe di testo dinamiche?
Le stringhe dinamiche sono tutto ciò che il tuo tema memorizza in luoghi diversi dalle tabelle dei contenuti principali di WordPress (wp_posts o wp_postmeta) o i file POT.
A seconda della complessità del tema e del grado di personalizzazione che offre, potresti essere costretto a memorizzare alcuni dei dati testuali del tema nel wp_options tabella o anche nelle tabelle del tema stesso.
Anche in questo caso, si tratta di stringhe di testo che si desidera rendere personalizzabili dall’utente. Uno scenario tipico in cui vengono utilizzate stringhe di questo tipo è quello delle home page personalizzate. Molti temi offrono blocchi di contenuto originali e design personalizzati nelle loro home page. Il contenuto grezzo presente in quelle pagine è spesso difficile da memorizzare nel database in modo standard.
Il problema delle stringhe dinamiche è che spesso sono problematiche dal punto di vista della localizzazione di WordPress.
A seconda del plugin di localizzazione utilizzato dall'utente, questi potrebbe o meno essere in grado di tradurre tali stringhe.
TranslatePress, ad esempio, include già gli strumenti necessari. Consente agli utenti di lavorare con le stringhe dinamiche del tema corrente proprio come farebbero con qualsiasi altro testo visualizzato sulla pagina.
In generale, ogni volta che puoi evitare di usare stringhe dinamiche nel tuo tema o plugin, cerca di farlo.
Scopri di più localizzazione di stringhe dinamiche in WordPress.
Localizzazione di WordPress: Conclusione
Orientarsi nella localizzazione di WordPress può sembrare un compito intimidatorio all'inizio, ma in realtà non è così difficile una volta che ci si mette all'opera. Ovvero, se si dispone di strumenti di qualità.
Come avete visto, TranslatePress può essere di grande aiuto per localizzare rapidamente il vostro sito web e soddisfare il vostro pubblico internazionale.
Quasi tutto ciò che è stato descritto sopra può essere fatto con Versione gratuita del plugin 100%.
Se anche tu vuoi aumentare le tue possibilità di posizionare i tuoi contenuti multilingue su Google, valuta la possibilità di passare a uno dei piani Pro di TranslatePress. L’estensione SEO inclusa nell’offerta si occuperà di tutte le tue esigenze di ottimizzazione multilingue. Avrai inoltre accesso a numerose estensioni avanzate, come il numero illimitato di lingue di traduzione, rilevamento automatico della lingua dell'utente, account di traduttori e altro.
TranslatePress Multilingue
E, naturalmente, se avete domande sulla localizzazione di WordPress, non esitate a chiedere nei commenti.
Se hai trovato utile questo post, ti invitiamo a visitare il nostro Canale YouTube, dove carichiamo costantemente brevi tutorial video facili da seguire. Puoi anche seguirci su Facebook e Twitter per essere tra i primi a sapere ogni volta che pubblichiamo.

Karol, questo è un pezzo fantastico che mette davvero in risalto l'importanza di adattare la presenza online di un'azienda al proprio mercato di riferimento, tenendo conto delle sensibilità culturali e della lingua. Il modo in cui lo hai suddiviso lo rende non solo facile da seguire, ma può sicuramente aiutare chi è alle prime armi con la localizzazione di WordPress tenendo d'occhio la SEO. Grazie per averlo condiviso!