
En esta publicación
¿Necesitas una forma de crear un sitio web multilingüe?
Vivimos en un mundo multilingüe, por lo que ofrecer su sitio web en varios idiomas es una excelente manera de hacerlo más fácil de usar y conectar con nuevas audiencias.
Pero al mismo tiempo, crear un sitio web multilingüe es una gran empresa. Si bien hay muchos creadores de sitios web fáciles de usar en el mercado, necesitas una herramienta que te permita no solo crear un sitio web de excelente aspecto, sino también traducir cada elemento, desde el texto hasta las imágenes, a diferentes idiomas.
Para ayudarte a tener éxito, vamos a compartir una guía detallada sobre cómo crear un sitio web multilingüe. Te llevaremos de “cero” a “sitio web multilingüe fácil de usar” cubriendo cómo:
- Elige la mejor plataforma para tu sitio web multilingüe (recomendamos WordPress);
- Sigue las mejores prácticas para sitios web multilingües;
- Traduce todo tu contenido a diferentes idiomas en WordPress: cada elemento, desde tus títulos y contenido hasta formularios, imágenes, botones y más.
También compartiremos algunos ejemplos de sitios web multilingües para darte algunas ideas de cómo los sitios web exitosos manejan múltiples idiomas.
Nuestro tutorial paso a paso para sitios web multilingües es:
- No técnico. Utilizarás una interfaz visual sencilla para traducir tu contenido; no se requieren conocimientos técnicos.
- Asequible. De hecho, muchas de las herramientas que utilizamos en este tutorial son gratuitas (100%).
- Rápido. Lo más importante es que puedes configurar esto rápidamente. Incluso puedes usar servicios de traducción automática como Google Translate y Deepl, que te ayudarán a agilizar el proceso.
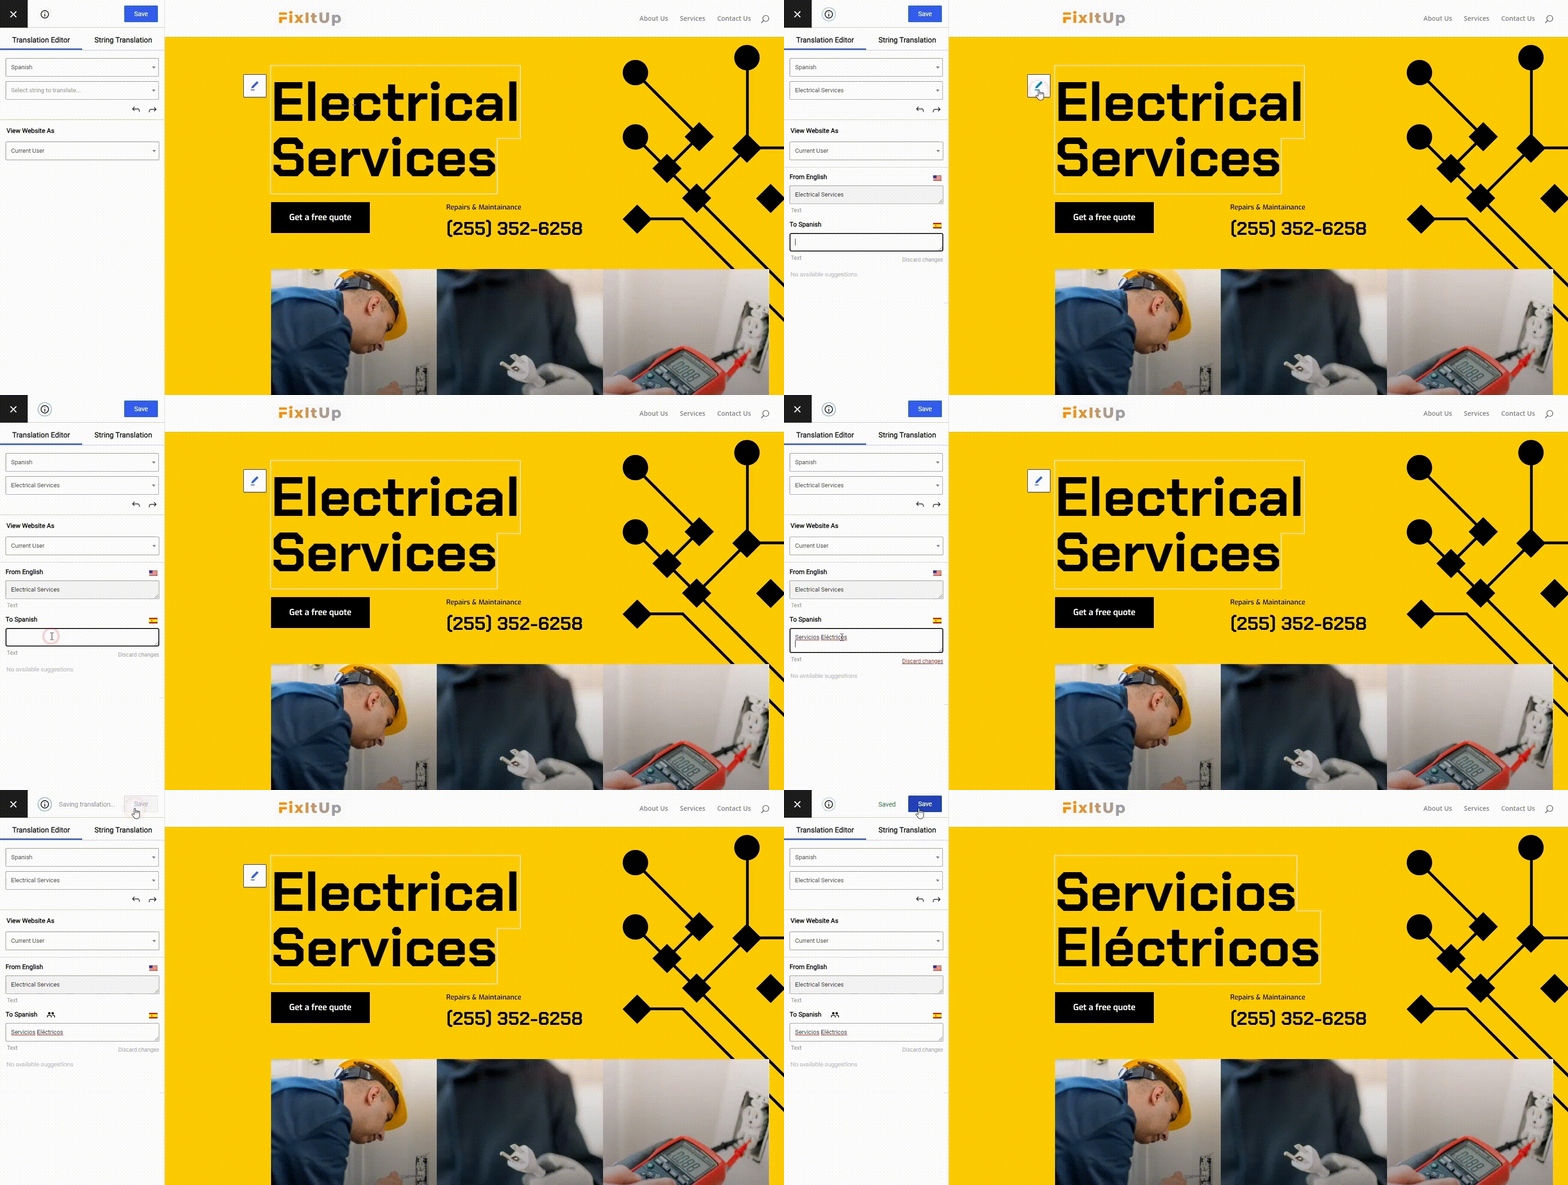
Al final de esta publicación, podrás agregar tu contenido multilingüe utilizando una interfaz visual sencilla como esta:
¿Listo para empezar? Vamos a profundizar...
3 grandes ejemplos de sitios web multilingües para inspirarse
A veces, ver el ejemplo de un sitio web multilingüe es una excelente manera de estimular tu creatividad. Por esa razón, vamos a comenzar nuestra guía echando un vistazo a algunos sitios web que se han vuelto multilingües con éxito.
1. WordPress.org
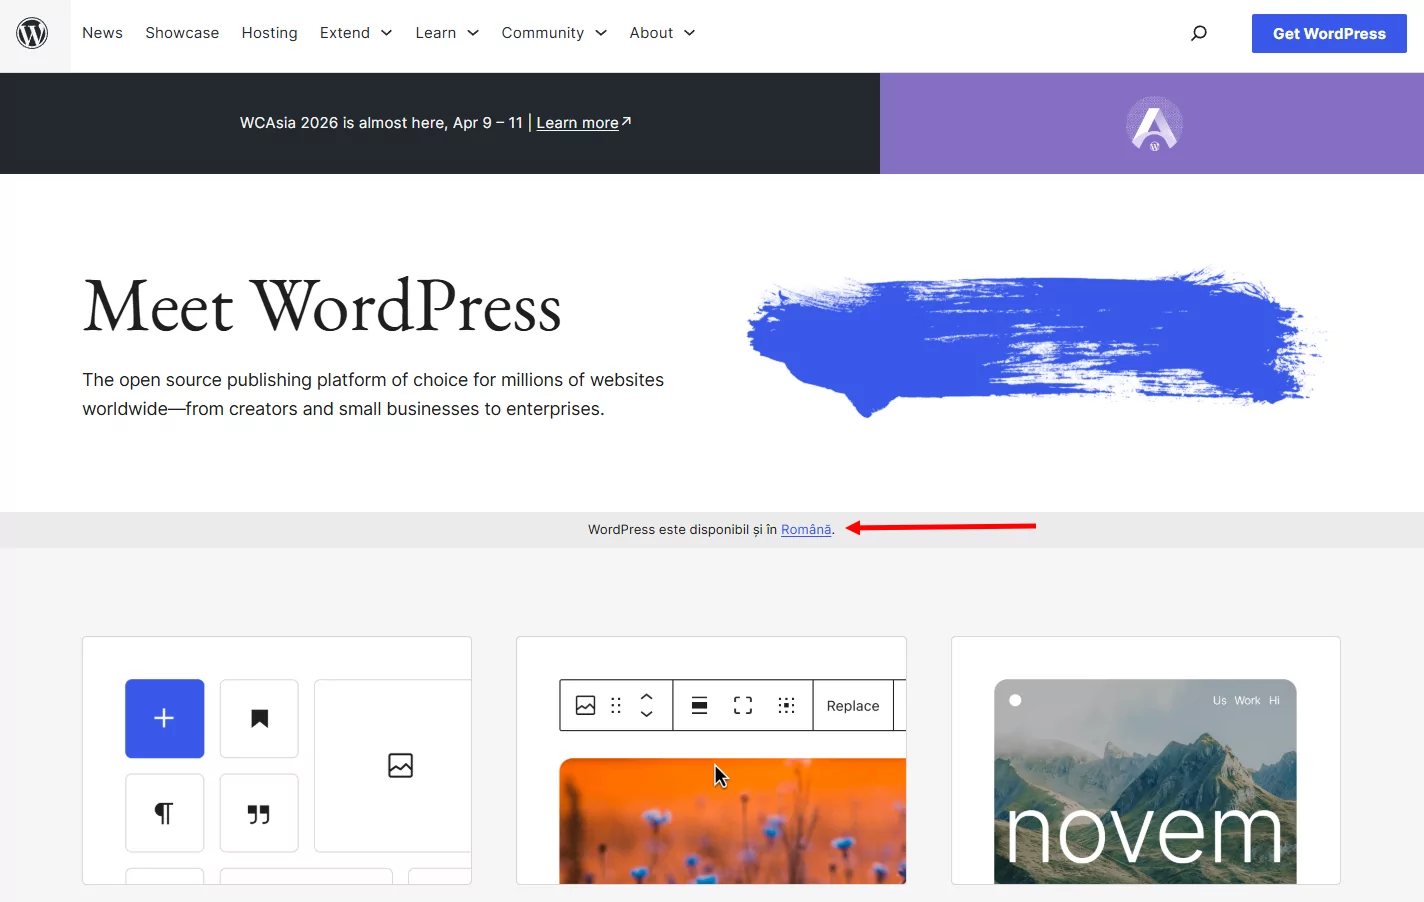
WordPress.org es el hogar oficial del proyecto de código abierto WordPress, que consideramos que es la forma más fácil de crear un sitio web multilingüe. Debido a que WordPress es un proyecto global, el sitio web WordPress.org está localizado y traducido a prácticamente todos los idiomas populares. También sugerirá el idioma local de un visitante en la página de inicio para ayudar a guiar a los visitantes hacia el lugar correcto.
2. Etsy
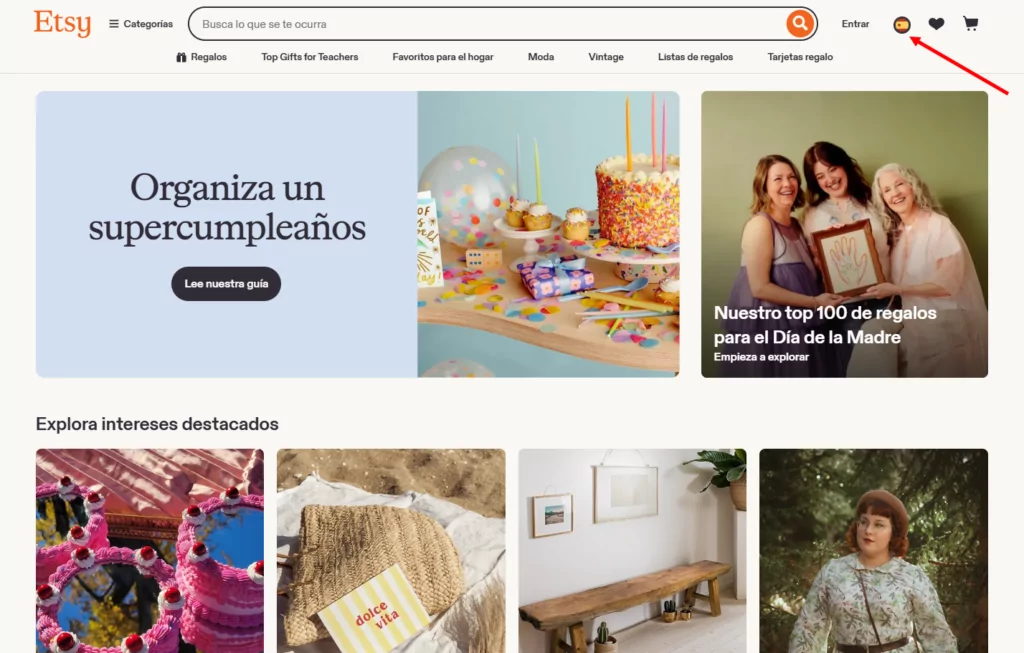
Etsy es un gran ejemplo de sitio web multilingüe de cómo añadir los múltiples idiomas pueden mejorar el SEO para una tienda de comercio electrónico. Comúnmente verás que las páginas de productos de Etsy se posicionan en diferentes palabras clave, lo que les proporciona una excelente fuente nueva de tráfico.
Etsy también ofrece múltiples opciones de localización, permitiendo a los visitantes elegir su región, idioma y moneda preferidos.
3. Kinsta
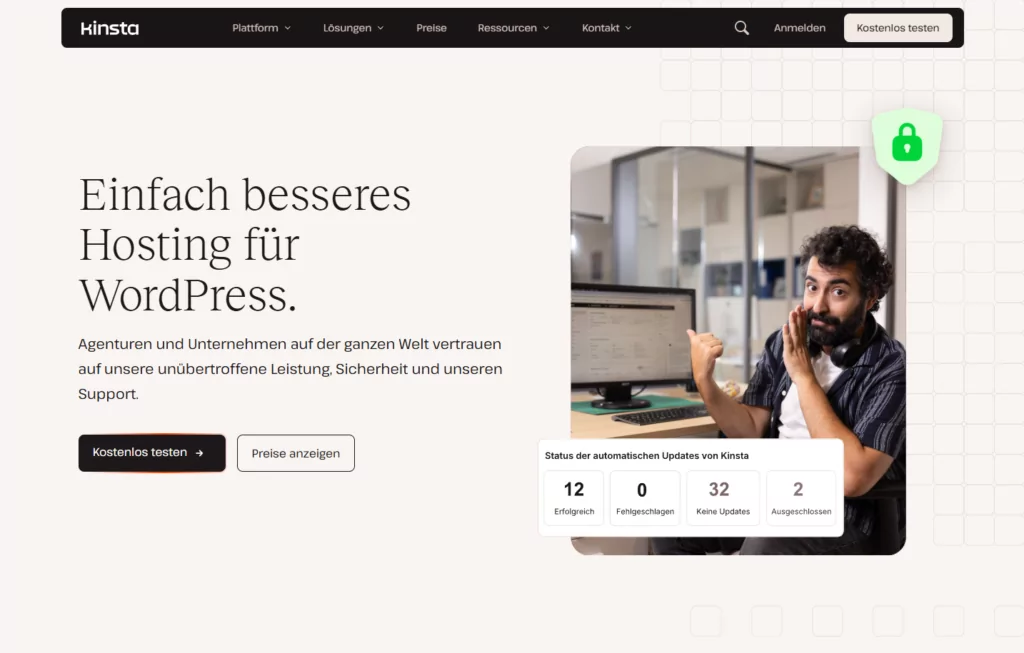
Nuestro último ejemplo de página web multilingüe es Kinsta, un popular proveedor de alojamiento de WordPress que logró aumentar su tráfico orgánico en un 18% tras traducir su contenido a nuevos idiomas. Ahora, el contenido de Kinsta está disponible en diez idiomas y los visitantes pueden elegir su idioma preferido mediante un selector de idioma situado en el pie de página.
Sigue leyendo para aprender cómo puedes hacer que tu sitio web sea multilingüe para lograr estos beneficios.
Cómo elegir la mejor plataforma para tu sitio web multilingüe
Antes de poder traducir tu contenido a nuevos idiomas, necesitas un sitio web que funcione en tu idioma original.
Hay dos enfoques principales para crear un sitio web en la web moderna:
- Utilice un sistema de gestión de contenido autohospedado como WordPress o Drupal.
- Utiliza un creador de sitios web alojado como Squarespace, Wix, o Shopify.
Si bien es posible crear sitios web multilingües con los creadores de sitios web, no es realmente para lo que están diseñados. Por ejemplo, Squarespace te obliga a duplicar cada página de tu sitio para cada idioma, lo que resulta confuso y requiere mucho tiempo.
Si vas a crear un sitio multilingüe, el uso de un sistema de gestión de contenido autohospedado va a facilitar mucho la optimización de la experiencia tanto en el front-end como en el back-end.
Mientras que los diferentes sistemas de gestión de contenido tienen diferentes ventajas y desventajas, vamos a recomendar una opción específica:
WordPress autohospedado.
WordPress es por mucho la forma más popular de hacer cualquier tipo de sitio web. Su popularidad empequeñece a la de los creadores de sitios web y a la de otros sistemas de gestión de contenido autohospedados. De hecho, WordPress impulsa más de 43% de todas las páginas web de Internet.
Además, puedes usar WordPress para crear prácticamente cualquier tipo de sitio web, desde blogs hasta sitios web empresariales, tiendas de comercio electrónico, sitios de membresía, cursos en línea y más. Así que no importa de qué trate tu sitio web multilingüe.
Y oh sí, el software principal de WordPress es 100% gratis.
Por qué WordPress es la mejor plataforma para crear un sitio web multilingüe
WordPress no es solo la mejor manera de crear un sitio web multilingüe debido a su popularidad, sino que también ofrece todas las herramientas que necesitas para traducir tu sitio rápida y fácilmente a nuevos idiomas.
Estas son las razones específicas por las que recomendamos WordPress para un sitio web multilingüe:
- El software básico de WordPress es 100% gratuito;
- Puedes ampliar tu sitio de WordPress con miles de plugins gratuitos y de pago;
- Obtienes acceso a herramientas simples de traducción visual como TranslatePress;
- WordPress es apto para SEO, lo que facilitará el posicionamiento de su contenido traducido en Google y otros motores de búsqueda;
- Puedes controlar el aspecto de tu sitio web con miles de temas gratuitos y de pago;
- El software de WordPress es seguro y puedes reforzar aún más la seguridad con complementos de seguridad de WordPress.
WordPress te permite utilizar el editor visual TranslatePress
Una de las extensiones a las que WordPress te da acceso es TranslatePress, que le permite traducir su sitio de WordPress utilizando una cómoda interfaz visual como esta:
Esto es mucho más rápido y conveniente que prácticamente cualquier otra plataforma de sitios web que vayas a ver.
TranslatePress también admite la traducción automática a través de tres motores:
- TranslatePress AI — la solución integrada, sin necesidad de plataformas adicionales o claves de API. Incluye un nivel gratuito (2,000 palabras de IA) en todos los planes.
- Google Traductor — disponible en la versión gratuita usando tu propia clave de API de Google.
- DeepL — disponible en los planes Business y Developer.
Incluso si utilizas la traducción automática, aún podrás volver atrás y perfeccionar manualmente tus traducciones utilizando la interfaz que viste arriba.
TranslatePress Multilingüe
Además, TranslatePress también te ayuda a aplicar una serie de buenas prácticas para sitios web multilingües. Hablando de eso…
8 mejores prácticas para crear un sitio web multilingüe
Usar WordPress para crear tu sitio web te preparará para el éxito, pero aún necesitas implementar algunas de las mejores prácticas para crear un sitio web multilingüe exitoso.
Esto es en lo que debes concentrarte...
1. Implementa SEO multilingüe para posicionar tu sitio en diferentes idiomas
Uno de los grandes beneficios de crear un sitio web multilingüe es la capacidad de conectar con nuevas audiencias en Google y otros motores de búsqueda.
Sin embargo, si quieres lograr este beneficio, debes enfatizar la optimización de motores de búsqueda (SEO) multilingüe.
El SEO consiste en intentar posicionar tu sitio más alto en Google. Luego, el SEO multilingüe aplica ese mismo concepto sino a diferentes idiomas.
El SEO multilingüe consiste en optimizar cada versión de idioma de su sitio para posicionarse en los resultados de búsqueda de ese idioma; no se trata solo de traducir el contenido, sino de asegurarse de que los motores de búsqueda puedan encontrarlo, indexarlo correctamente y ofrecerlo a la audiencia adecuada.
Tenemos una publicación entera sobre Mejores prácticas de SEO multilingüe, pero algunas de las tácticas que querrás implementar son:
- Traducciones integrales – esto incluye no solo tu texto, sino también los slugs de URL y los metadatos de SEO.
- Mapa del sitio XML multilingüe – esto ayuda a Google a encontrar todo tu contenido en cada idioma.
- Estructura de URL optimizada – hablaremos más sobre esto en la próxima sección porque afecta a algo más que al SEO multilingüe.
- atributo hreflang – esto ayuda a Google a entender qué versión de tu sitio web debe ofrecer en diferentes idiomas.
TranslatePress puede ayudarte a poner en práctica todas estas recomendaciones de SEO multilingüe, algunas de ellas incluso de forma automática.
2. Utilice una estructura de URL multilingüe optimizada
Para posicionar cada idioma de su sitio en Google, debe asignarle a cada versión de idioma su propia URL.
Esto no solo afecta al SEO de tu sitio, sino que también afecta a cómo los visitantes humanos navegarán por tu sitio porque tus URL proporcionan un contexto importante.
Hay tres estrategias principales para la estructura de URL de su sitio web multilingüe:
- Subcarpetas – por ejemplo, yoursite.com/content para tu idioma principal y yoursite.com/es/content para tus traducciones al español.
- Subdominios – por ejemplo, yoursite.com/content para tu idioma principal y es.yoursite.com/content para tus traducciones al español.
- Dominios separados – por ejemplo, yoursite.com para tu idioma principal y yoursite.es para tus traducciones al español.
Google recomienda los tres métodos, pero utilizar el enfoque de subcarpetas es generalmente el método más fácil de configurar y mantener porque no es necesario realizar ningún cambio técnico en el backend. Sin embargo, puedes leer más sobre esto en nuestro artículo sobre todo esto subdominio vs subdirectorio dilema.
TranslatePress utiliza automáticamente el método de subcarpetas, sin necesidad de ninguna configuración técnica. No obstante, también puedes configurar cualquiera de las demás estructuras de URL con el complemento, incluyendo la opción de tener diferentes dominios para cada idioma.
3. Presta atención a los tiempos de carga de la página
Asegurarse de que su sitio cargue rápidamente es importante para todo, desde la experiencia del usuario hasta el SEO, la participación e incluso las tasas de conversión de su sitio.
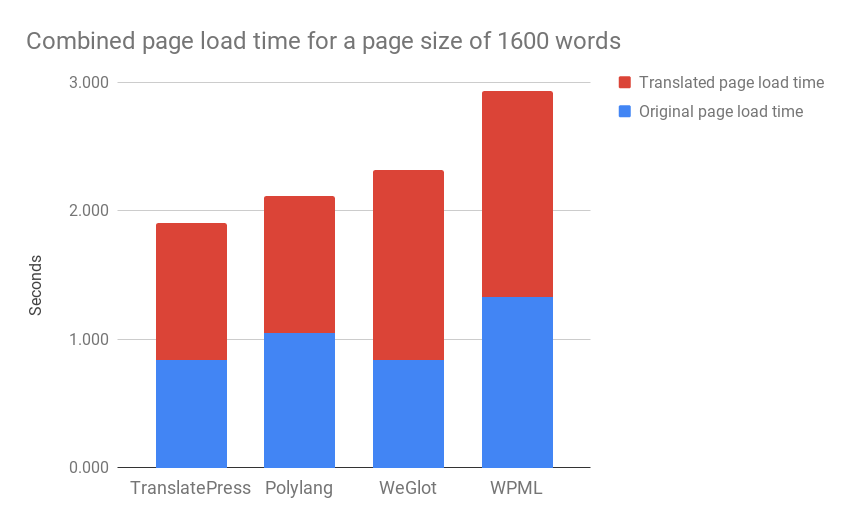
Esto es cierto tanto para sitios de un solo idioma como multilingües, pero lo que está en juego es más grave para los sitios multilingües porque algunas soluciones multilingües pueden ralentizar su sitio al añadir un tamaño de archivo adicional y consultas innecesarias a la base de datos.
TranslatePress es una de las soluciones más optimizadas en cuanto a rendimiento para traducir un sitio de WordPress, lo que ayuda a garantizar que cada idioma de su sitio web se cargue rápidamente:
4. Añadir un selector de idiomas fácil de usar
Los visitantes solo pueden beneficiarse de su contenido multilingüe si pueden encontrarlo. Un lugar bien ubicado selector de idiomas en tu sitio de WordPress es fundamental — y cómo lo diseñas importa tanto como dónde lo pones.
Mejores prácticas para su selector de idiomas:
- Mostrar el idioma en su formato local. Por ejemplo, Deutsch (correcto) frente a German (incorrecto). Esto permite a las personas reconocer rápidamente su idioma incluso si no hablan inglés.
- No confíes únicamente en las etiquetas de idioma. Si bien es aceptable incluir banderas además al nombre del idioma local, es confuso usar banderas de idiomas por sí solas. Por ejemplo, algunos sitios usan la bandera de México para el español, mientras que otros usan la bandera de España. Esto añade una confusión innecesaria.
- Hazlo visible — un selector flotante en la esquina de cada página garantiza que los visitantes nunca tengan que buscarlo.
TranslatePress te ofrece un selector de idioma totalmente personalizable al que se puede acceder desde la página dedicada Selector de Idioma pestaña en la configuración de su complemento. Puede configurar tres tipos diferentes de conmutadores:
- Flotando un selector persistente fijado en una esquina de cada página. Compatible con diseños preestablecidos visuales, así como con colores personalizados, bordes, formas de banderas y controles de diseño para Escritorio/Móvil.
- Código corto incrusta el selector en cualquier parte de tu sitio web usando el el código corto o el bloque Selector de idiomas en el editor de Gutenberg.
- Elemento del menú añade idiomas directamente a cualquier menú de navegación de WordPress mediante Apariencia → Menús.
Los tres tipos de selectores admiten nombres de idiomas completos y cortos, iconos de bandera (rectangulares, cuadrados o redondeados para los elementos del menú) y la opción de no mostrar ningún nombre. Los selectores flotantes y de código corto también incluyen un editor de CSS personalizado para un estilo detallado.
5. Detectar automáticamente los idiomas de los visitantes
Además de añadir un selector de idioma en la interfaz, otra forma de ayudar a guiar a los visitantes es mediante redirigiéndolos automáticamente a su idioma preferido.
Hay dos formas de hacer esto. Puedes redirigir a los visitantes según:
- El idioma de su navegador, que es el idioma preferido que un visitante ha elegido.
- Su dirección IP, que es su ubicación geográfica.
Por lo general, usar el idioma del navegador es una mejor opción porque la ubicación física de una persona no siempre coincide con su idioma preferido. Por ejemplo, un estadounidense que vive en Vietnam, pero habla inglés.
TranslatePress te ofrece la opción de intentar determinar primero el idioma del navegador y, si no puede detectarlo, recurrir a la dirección IP del usuario.
En lugar de redirigir a los visitantes de forma silenciosa, el plugin muestra una ventana emergente que les pregunta si desean cambiar al idioma detectado, dándoles el control y al mismo tiempo ofreciendo la opción correcta.
6. Presta atención al diseño y la maquetación en diferentes idiomas
Cuando crees el diseño inicial de tu sitio, probablemente te enfocarás en asegurarte de que cada elemento sea perfecto al píxel.
Por ejemplo, ¿debería el titular ocupar dos o tres líneas? ¿El texto del botón cabe en una sola línea? Etcétera.
Sin embargo, cuando traduces tu contenido a nuevos idiomas, este espaciado puede convertirse en un problema porque las traducciones no siempre ocupan la misma cantidad de espacio.
Para poder resolver estos problemas de maquetación y garantizar un diseño perfecto en todos los idiomas, resulta muy útil contar con una herramienta como TranslatePress, que ofrece una interfaz de traducción visual en la que se pueden previsualizar los cambios en tiempo real, en lugar de las interfaces de administración que utilizan muchas herramientas de traducción.
7. Comprueba que tus fuentes sean compatibles con tus idiomas de destino
Cuando estás diseñando tu sitio web, una de las principales elecciones que tomas es elegir las fuentes que vas a utilizar. Ahora bien, dependiendo de los idiomas que planees usar en tu sitio, estas podrían requerir un conjunto de caracteres especiales para mostrarse correctamente.
Es una buena idea comprobar que tus fuentes tienen los caracteres especiales necesarios para tus nuevos idiomas. De lo contrario, podrías acabar con un marcador de posición en lugar del carácter normal que simplemente se ve mal y fuera de lugar.
Como en este ejemplo:
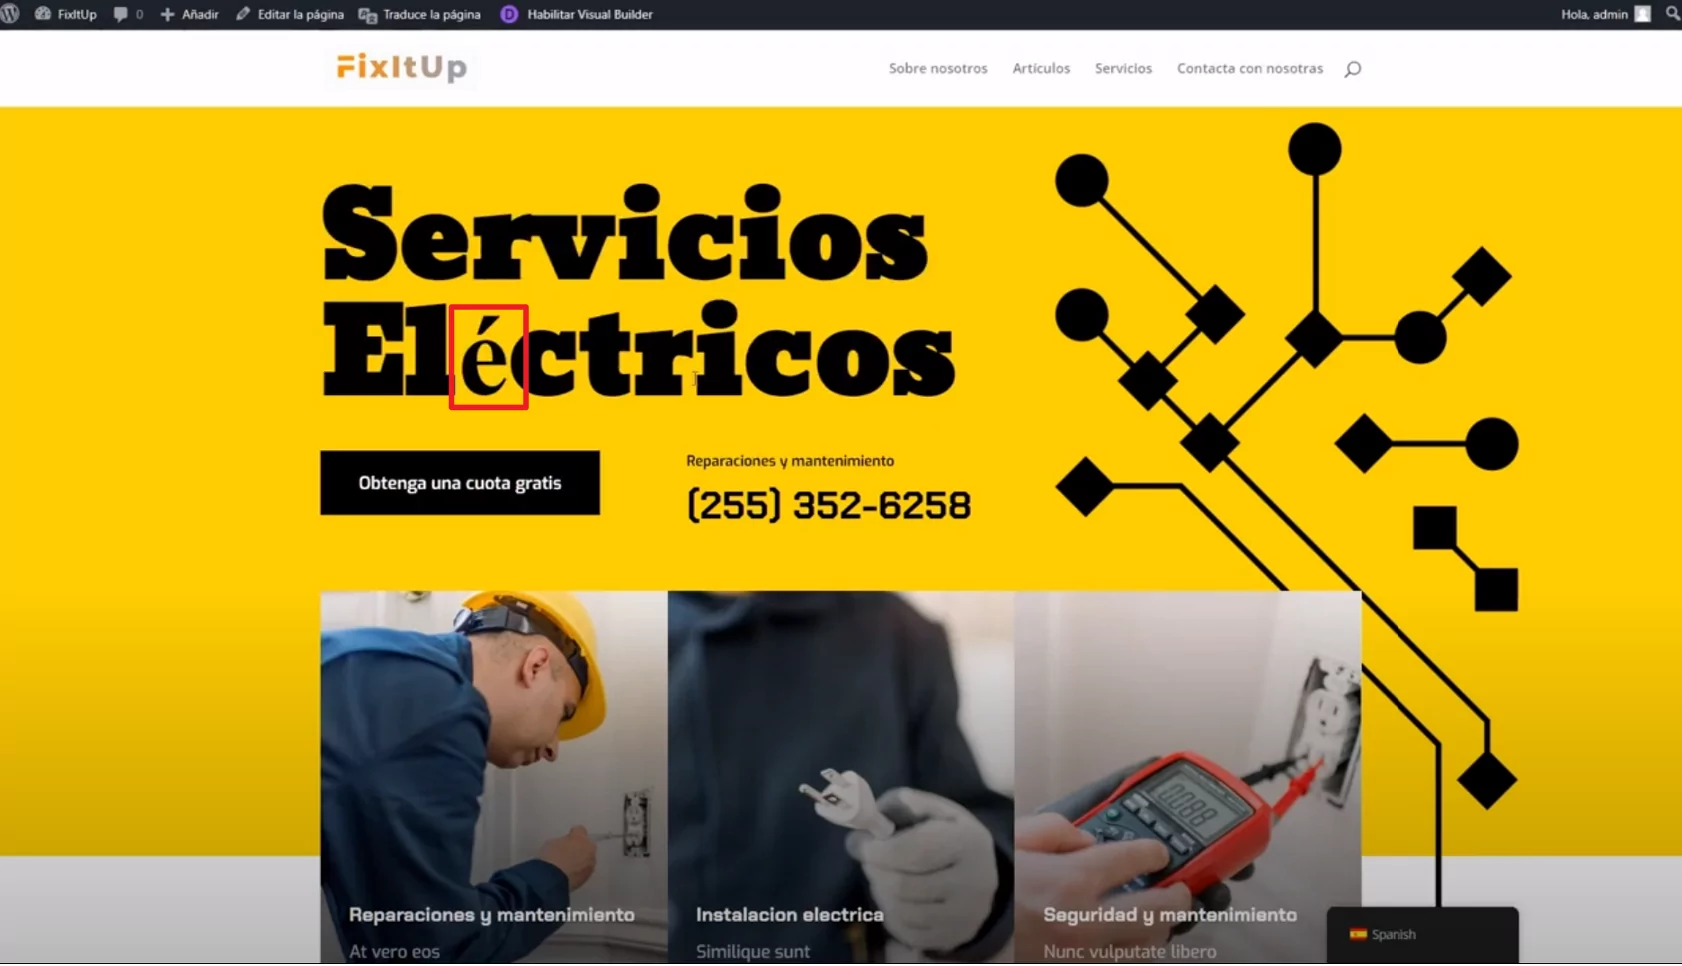
Esto se debe a que el creador de la fuente no pensó en la localización o simplemente diseñó la fuente para inglés.
8. Centrarse en la localización completa, no solo en el texto
Por último, recuerda que crear un sitio web multilingüe implica más que simplemente traducir el texto de una página.
Si bien eso es ciertamente importante, también debes considerar otros aspectos de la creación de un experiencia completamente localizada en cada idioma.
Por ejemplo, es posible que desees utilizar diferentes imágenes/vídeos para diferentes idiomas o mostrar diferentes elementos de menú para cada idioma (en lugar de simplemente traducir los mismos elementos del menú a diferentes idiomas).
Con WordPress y TranslatePress, también podrás tener en cuenta estos pequeños detalles.
TranslatePress Multilingüe
Cómo crear un sitio web multilingüe con WordPress
Ahora que hemos cubierto la teoría detrás de un sitio web multilingüe, pasemos a los pasos reales que debes seguir para poner tu sitio web en marcha.
1. Configura tu sitio de WordPress en tu idioma nativo
Para empezar, primero debes configurar tu sitio web básico de WordPress en un solo idioma. Puedes encontrar muchos tutoriales para esto, así que mantendremos esta sección un poco más breve, ya que nos centraremos principalmente en la parte multilingüe.
Pero aquí están los fundamentos…
Primero, deberás:
- Elegir alojamiento para WordPress – SiteGround es una buena opción económica que funciona para la mayoría de los sitios de WordPress multilingües. EasyWP es otra excelente opción, al ser un servicio de alojamiento WordPress administrado extremadamente rápido, no solo en la velocidad del sitio sino también en su configuración.
- Comprar un nombre de dominio – puedes comprar tu nombre de dominio al registrarte en SiteGround.
- Instalar el software principal de WordPress – SiteGround incluye una herramienta de asistente de bienvenida que facilita la instalación de WordPress, sin necesidad de conocimientos técnicos.
Una vez que tengas tu sitio web básico de WordPress, deberás:
- Elija un tema de WordPress para controlar el aspecto de su sitio. La herramienta de traducción que te mostraremos en las siguientes secciones funcionará con cualquier tema de WordPress, por lo que no debes preocuparte por ningún problema de compatibilidad.
- Añade el contenido de tu sitio en tu idioma nativo. No te preocupes por ningún problema de traducción por ahora; sin importar cómo agregues tu contenido, podrás traducirlo fácilmente en las próximas secciones.
Si quieres un poco más de flexibilidad de diseño, es posible que prefieras usar un complemento de maquetador de páginas de WordPress como Elementor. Esto añade una experiencia de diseño más similar a “Wix” o “Squarespace” a WordPress, lo cual algunos usuarios prefieren.
También es posible que quieras usar algunos complementos adicionales para otros tipos de contenido, como formularios multilingües o controles deslizantes/carruseles.
Básicamente, el objetivo aquí es desarrollar completamente tu sitio en un solo idioma. Luego, una vez que tengas ese sitio base en un solo idioma, puedes traducirlo a tantos idiomas diferentes como sea necesario utilizando el sencillo editor de traducción visual que viste antes.
2. Instala TranslatePress y elige el idioma o idiomas que desees
Una vez que tengas configurado tu sitio de WordPress en un solo idioma, estarás listo para traducirlo a uno o más idiomas nuevos.
Para hacer eso, puedes usar el complemento gratuito TranslatePress que discutimos anteriormente. Comienza visitando Plugins → Añadir Nuevo en tu panel de control de WordPress e instalando el plugin gratuito TranslatePress de WordPress.org.
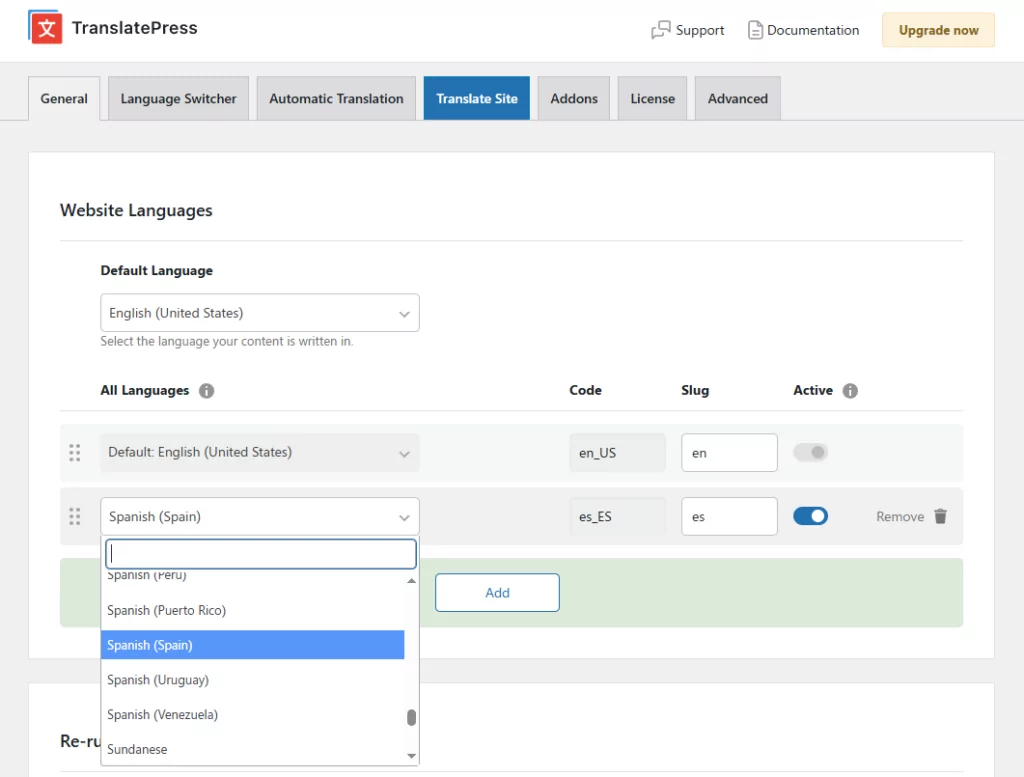
Una vez que hayas instalado el plugin, dirígete a Configuración → TranslatePress para elegir los idiomas que desea ofrecer en su sitio.
Primero, usa el menú desplegable para seleccionar tu Idioma predeterminado, que es el idioma en el que su sitio existe actualmente. Luego, use el Todos los idiomas configuración para agregar los nuevos idiomas en los que deseas que exista tu sitio.
Por ejemplo, así es como se ve traducir un sitio web en inglés al español:
3. Configurar traducción automática (Opcional)
Si no quieres traducir todo tu contenido desde cero, TranslatePress te ofrece la posibilidad de utilizar dos métodos de traducción automática:
- TranslatePress AI – la solución integrada para traducciones instantáneas con la máxima precisión (2000 palabras de IA incluidas gratis). Sin registro ni clave de API necesarios.
- API de Google Translate (disponible en la versión gratuita de TranslatePress) o DeepLRequiere la versión de pago de TranslatePress).
Traducción automática te puede ahorrar muchísimo tiempo, sobre todo en una página web multilingüe de gran tamaño con mucho contenido. Para configurar la traducción automática, ve a la pestaña «Traducción automática» en la configuración de TranslatePress, actívala y selecciona el motor de traducción. También puedes establecer límites de traducción mensuales para controlar los costes si utilizas una API de pago.
Mientras que TranslatePress no te cobra extra Según tu uso del servicio de traducción, Google Translate y DeepL sí cobran (aunque ambos ofrecen una cuota gratuita limitada).
Incluso con la traducción automática habilitada, aún puedes revisar y perfeccionar cada traducción manualmente en el editor visual. La mayoría de los sitios utilizan la traducción automática para un borrador inicial y luego pulen manualmente las páginas de alta prioridad, como la página de inicio, las páginas de productos y las páginas de destino clave.
¿Y qué más?
Utilizar TranslatePress AI es tan sencillo como se muestra en el vídeo que aparece a continuación.
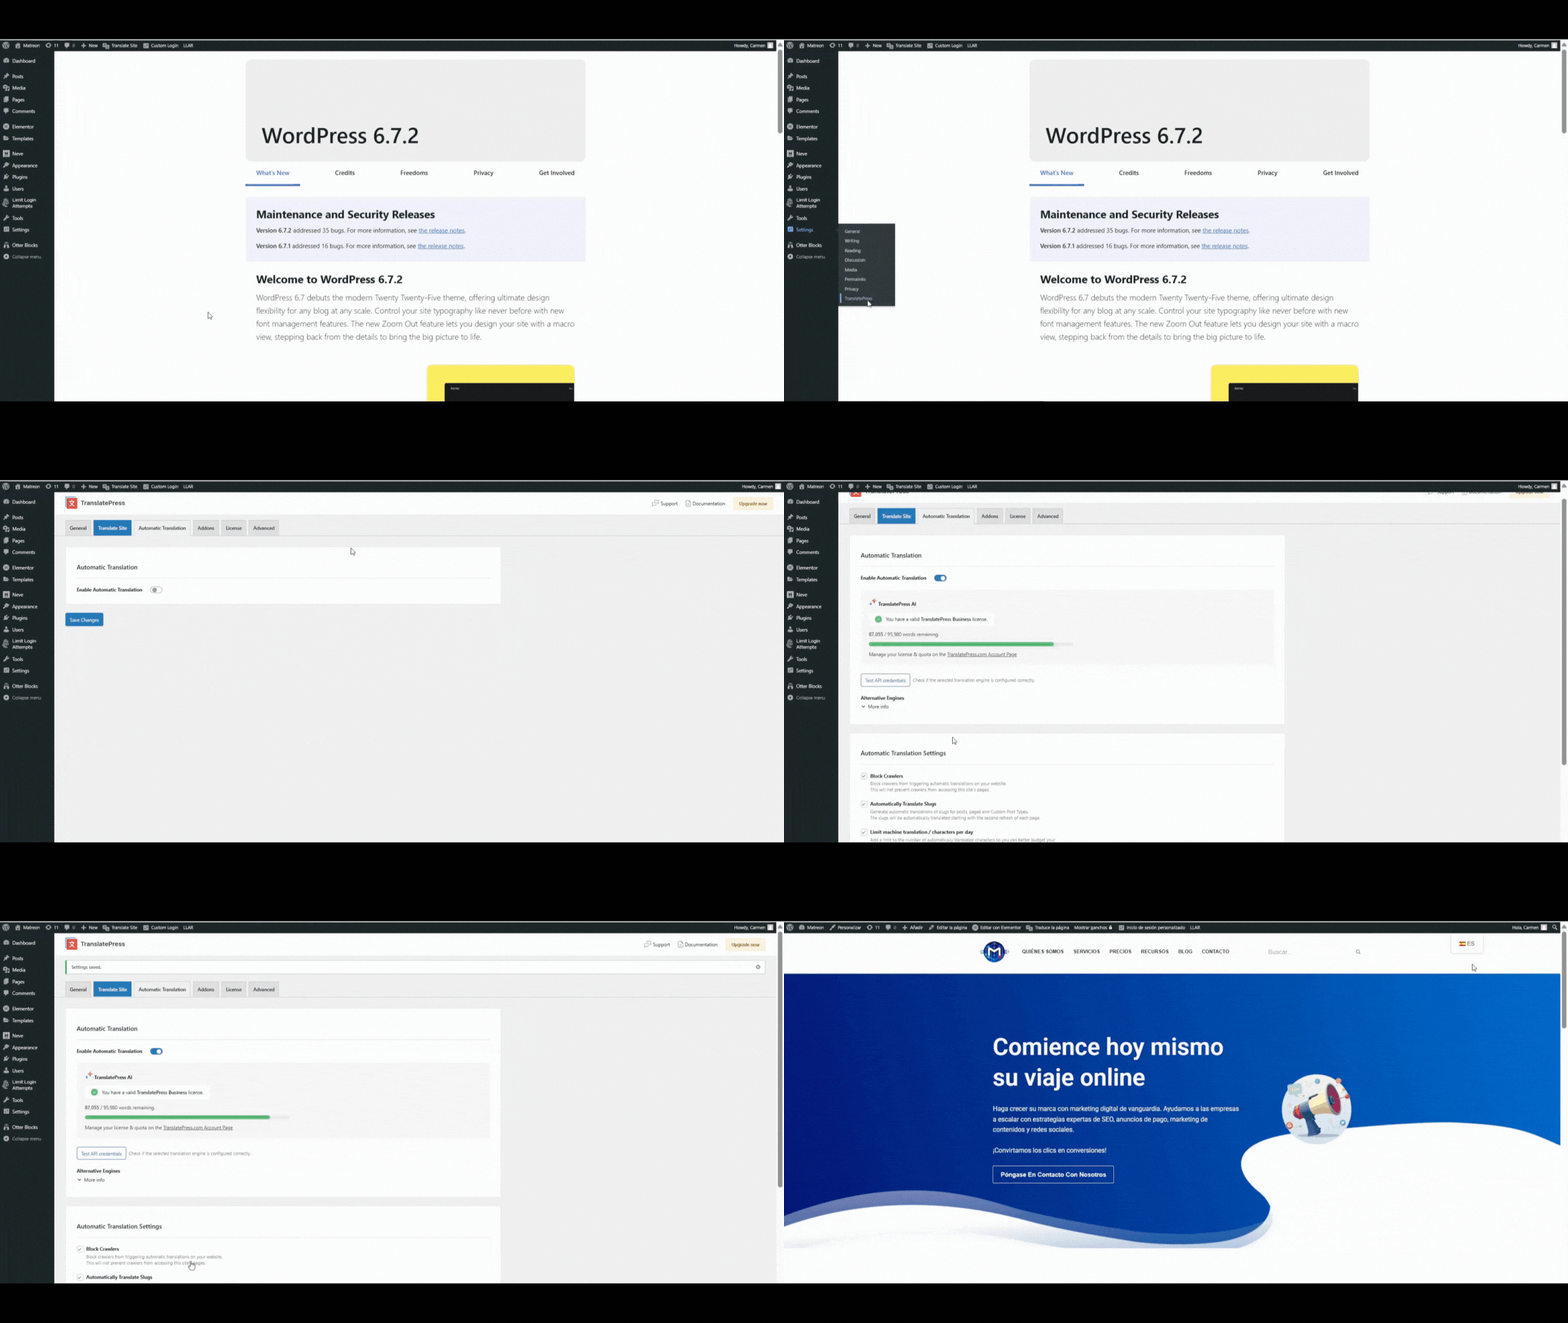
Recuerda que siempre puedes hacer cambios utilizando el editor de traducción visual, como estás a punto de aprender a continuación.
4. Traduce tu contenido usando el editor visual
Ahora estás oficialmente listo para comenzar a traducir el contenido de tu sitio web.
Para abrir el editor visual de ’TranslatePress», ve a la página que quieras traducir y haz clic en el Traducir página opción en la barra de herramientas de WordPress:
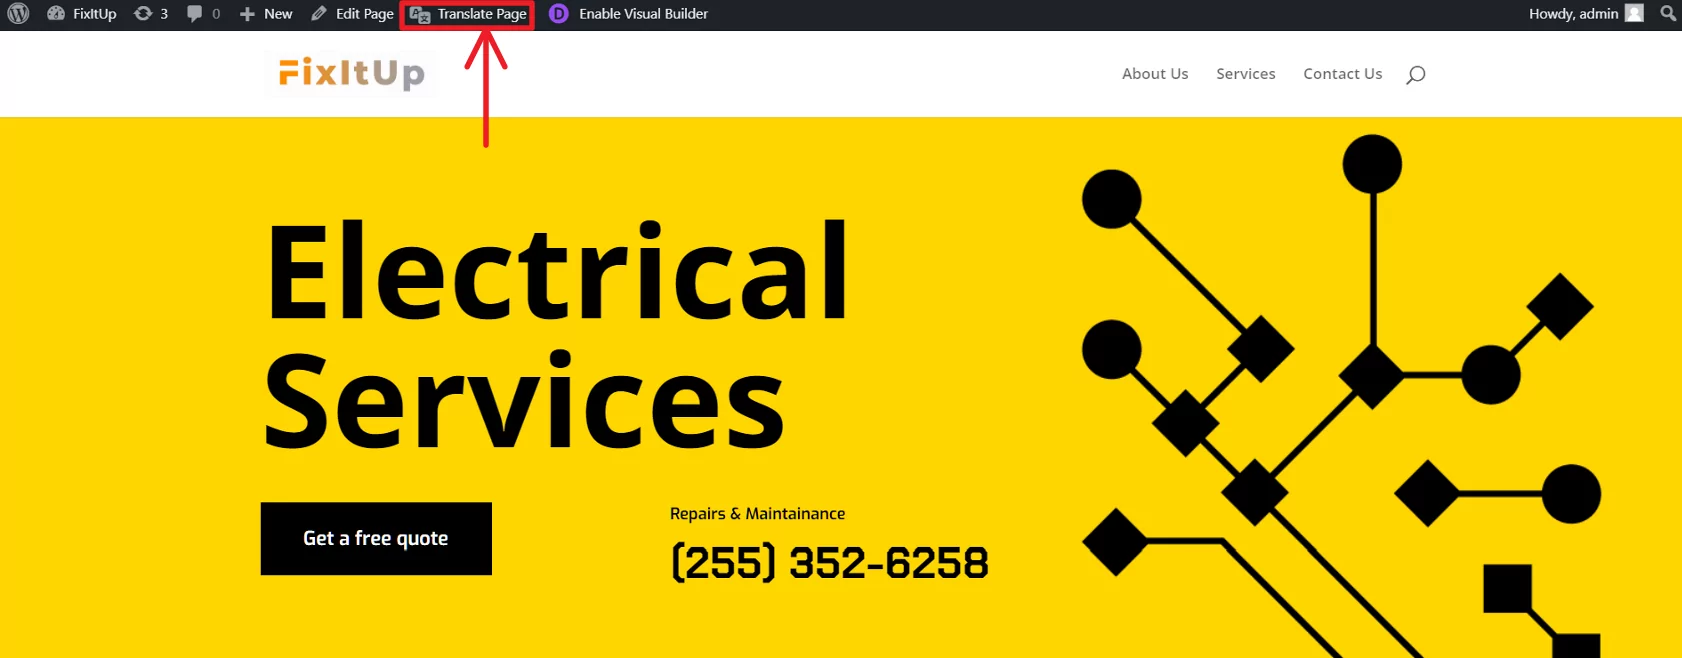
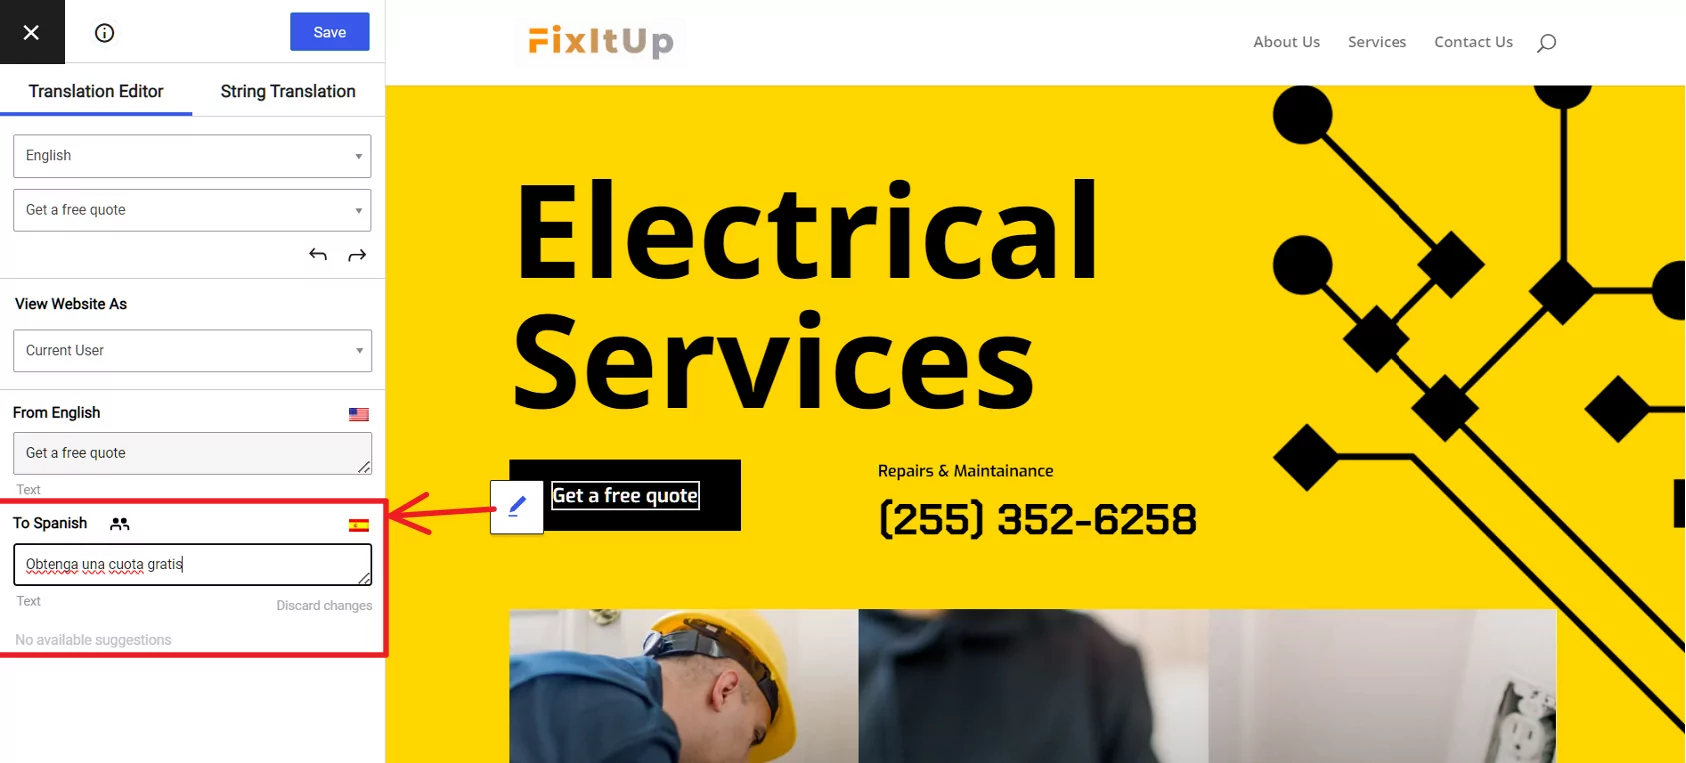
Traducir contenido es sencillo. Para traducir cualquier elemento de su sitio, todo lo que debe hacer es pasar el cursor sobre él y hacer clic en el icono del lápiz.
Eso abrirá la traducción en la barra lateral, donde podrás realizar tus ediciones.
Si optaste por usar la traducción automática, ya verás la versión traducida por máquina en la interfaz.
Si estás traduciendo tu sitio desde cero, verás un campo en blanco hasta que añadas tu traducción:
¡Así de fácil!
Este enfoque tampoco se limita al texto normal. También puedes traducir otros elementos de tu página.
Por ejemplo:
Quiero traducir ambos textos y ¿URL de un botón? ¡Solo haz clic en el icono del lápiz!
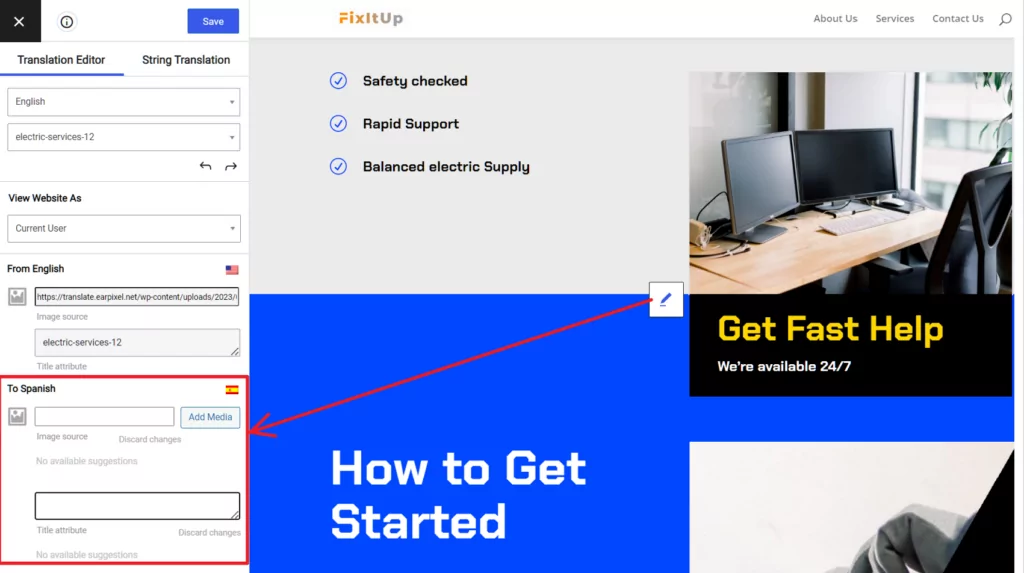
¿Quieres “traducir” una imagen para que los visitantes vean una imagen diferente según el idioma que hayan elegido? ¡Usa el mismo icono de lápiz!
De hecho, puedes usar este enfoque para traducir prácticamente cualquier contenido de tu sitio de WordPress, incluso si proviene de un plugin o tema independiente.
Tenemos tutoriales detallados sobre cómo traducir algunos de los elementos más comunes de un sitio web multilingüe:
- Formularios de WordPress
- Menús de WordPress
- Imágenes
- Contenido emergente
- Deslizadores
- contenido del maquetador de páginas de WordPress de Elementor, Divi, y más
- Productos de WooCommerce
- Bloques de Gutenberg
- Campos personalizados
- Tipos de publicaciones personalizadas
Para traducir el resto de su sitio web multilingüe, todo lo que tiene que hacer es repetir el mismo proceso para otras páginas. Y recuerde: si tiene mucho contenido, siempre puede volver y habilitar la traducción automática para ahorrar algo de tiempo.
5. Configure su selector de idioma
Por defecto, TranslatePress añade un selector de idioma flotante a tu sitio web inmediatamente después de que añadas un idioma de traducción. Si el aspecto predeterminado te parece adecuado, no es necesario que cambies nada.
Sin embargo, si la configuración predeterminada no es suficiente, existen muchas opciones de personalización disponibles para ti.
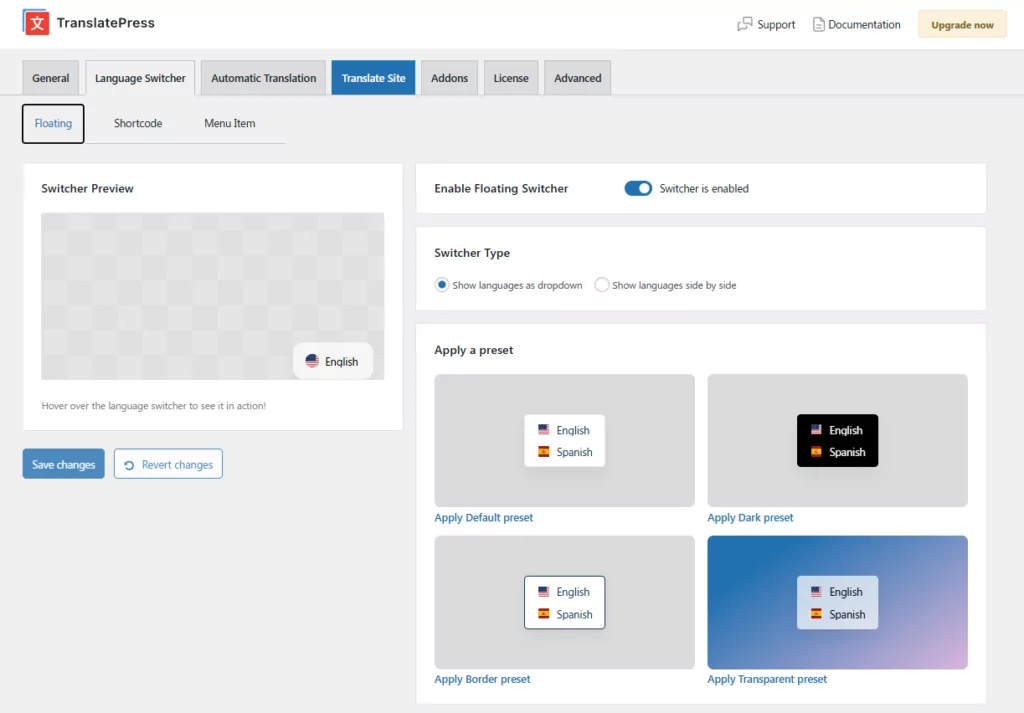
Para personalizar tu selector de idioma, ve a la Selector de Idioma pestaña en tu Configuración de TranslatePress (en la barra de navegación superior del complemento). Encontrará tres subpestañas:
Conmutador flotante
El selector flotante permanece visible en una esquina fija de cada página, lo que lo convierte en la opción más fácil de descubrir para los visitantes primerizos.
Las opciones de personalización incluyen:
- Cuatro preajustes de diseño para empezar rápidamente: Predeterminado, Oscuro, Borde y Transparente
- Control total del color: colores de fondo, hover, texto y borde
- Controles individuales de radio de borde para cada esquina
- Forma de la bandera: rectángulo, cuadrado, redonda
- Visualización de idiomas: nombres completos, nombres cortos o sin nombres
- Posición del icono de bandera: antes del nombre del idioma, después u oculto
- Configuración de diseño independiente para ordenador y móvil
- Posición: Abajo a la derecha, Abajo a la izquierda, Arriba a la derecha o Arriba a la izquierda
- Editor de CSS personalizado para un control detallado
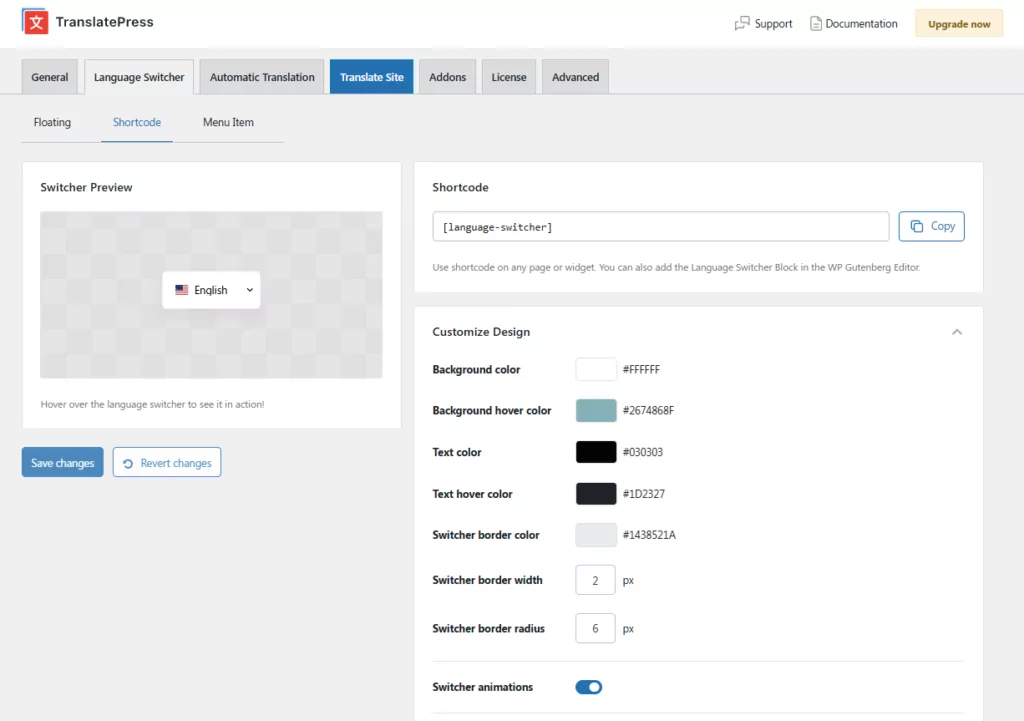
Cambiador de Shortcodes/Bloques
Utilizar el Selector de Idioma bloque o código corto
El selector de código corto tiene las mismas opciones de personalización de diseño que el selector flotante. Sin embargo, una opción exclusiva para el código corto es el Abrir al hacer clic característica. Marcar esto hace que el selector se abra al hacer clic en lugar de al pasar el cursor. Se cierra al volver a hacer clic, al hacer clic en otra parte de la página o al pulsar Escape.
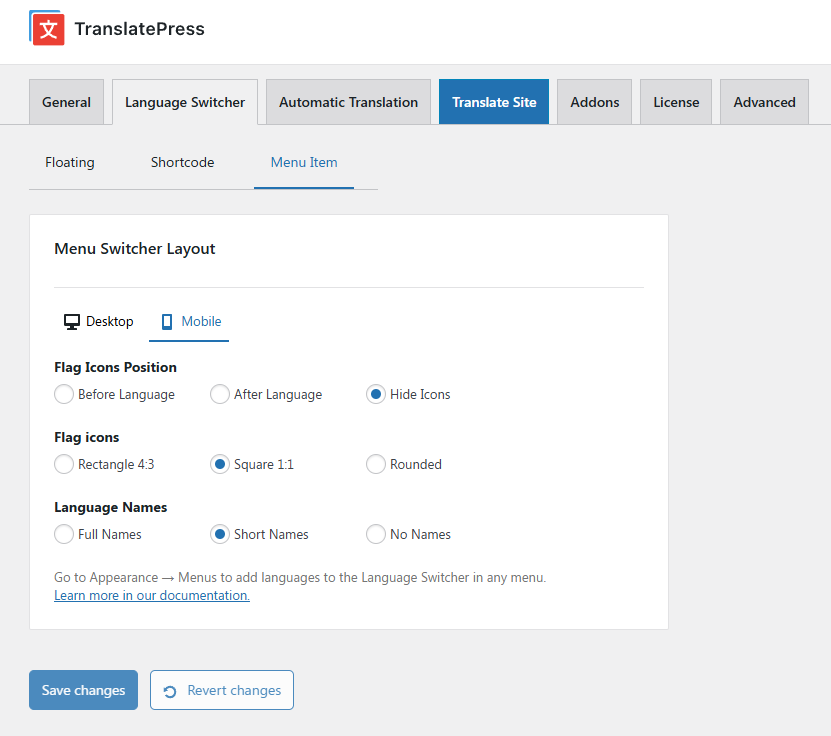
Selector de elementos del menú
Para añadir el selector de idioma a un menú de navegación de WordPress, ve a Apariencia → Menús y añadir elementos de idioma del Selector de Idioma sección. No hay controles de color o diseño para este tipo de selector; hereda automáticamente el estilo del menú de tu tema.
El selector de menús admite las mismas opciones de bandera y nombre de idioma que los otros tipos de selectores.
Lanza tu sitio web multilingüe hoy
Como muestran los ejemplos anteriores, volverse multilingüe es una de las formas más efectivas de hacer crecer tu tráfico orgánico, llegar a nuevas audiencias y hacer que tu sitio web sea verdaderamente accesible para el internet global.
WordPress es la mejor plataforma para crear ese sitio multilingüe; te ofrece control total sobre el SEO, el diseño y la estructura de contenido, y es para la que se han creado la mayoría de las herramientas de traducción.
Con TranslatePress, dispondrás de un flujo de trabajo de traducción visual que hace que el proceso sea rápido y fácil de gestionar, independientemente de tus conocimientos técnicos. Instala el complemento gratuito, añade tu idioma de destino y podrás tener una web multilingüe en funcionamiento en menos de una hora.
TranslatePress Multilingüe
Con TranslatePress, tu página web multilingüe contará con:
- SEO multilingüe mejores prácticas para posicionar cada idioma en Google.
- Traducciones de carga rápida para crear una mejor experiencia de usuario.
- Traducciones completas con la opción de localizar cada uno de los elementos de su sitio, incluidas imágenes, formularios y más.
- A selector de idioma personalizable eso se adapta a tu diseño
Puedes seguir este tutorial y empezar a utilizar la versión gratuita de TranslatePress. A continuación, plantéate actualizar a la versión premium para
- Mejoras en las funciones de SEO multilingüe y compatibilidad con todos los principales complementos de SEO;
- Paquetes de AIword más grandes para TranslatePress AI
- Acceso al servicio de traducción automática DeepL;
- La capacidad de traducir su sitio a un número ilimitado de nuevos idiomas (La versión gratuita te permite traducir tu sitio a un nuevo idioma);
- Cuentas de traductores dedicadas especiales para ayudarte a trabajar con traductores autónomos u otros servicios
- Detección automática de idioma.
Para aprovechar al máximo su sitio web multilingüe, consulte el Lista completa de las funciones de TranslatePress.
Si encontraste útil esta publicación, por favor visita nuestro Canal de YouTube, donde subimos constantemente tutoriales en video cortos y fáciles de seguir. También puedes seguirnos en Facebook y Twitter ser el primero en enterarte cada vez que publicamos.
muy bien ……. ¡quiero usar este sitio web para cambiar el mundo!