
In questo post
Creazione di un sito WordPress multilingue è un compito piuttosto laborioso. Devi prima capire in quali lingue vuoi che il tuo sito sia disponibile, poi trovare il miglior plugin di traduzione per il tuo progetto. Solo dopo arriverai alla parte in cui traduci effettivamente i contenuti del tuo sito. Questo processo è probabilmente il più laborioso di tutti quelli sopra citati.
La traduzione automatica del tuo sito WordPress è un ottimo modo per accelerare il processo di traduzione e utilizzare le traduzioni automatiche come punto di partenza per i tuoi contenuti multilingue. Puoi avere tutto tradotto in pochi minuti, anziché giorni o settimane.
In questo tutorial vedremo come tradurre automaticamente i siti WordPress in modo rapido e con costi minimi utilizzando TranslatePress.
TranslatePress offre traduzioni sia automatiche che manuali. Cosa distingue TranslatePress dalle altre soluzioni multilingue è possibile tradurre tutto il contenuto del sito direttamente dal front-end, utilizzando un'interfaccia di traduzione visiva.

TranslatePress dispone anche di un proprio servizio di traduzione automatica integrato chiamato TranslatePress AI, ma consente anche di collegarsi direttamente a Google Translate o DeepL, se si preferiscono queste soluzioni.
Cominciamo…
Come tradurre automaticamente qualsiasi sito web con Google Translate
Più avanti in questo post vi mostreremo il modo migliore per utilizzare la traduzione automatica per tradurre il tuo sito web. Ma se vuoi tradurre il sito web di qualcun altro, ti basta Google Translate.
Questo è utile se c'è un sito web in un'altra lingua che vuoi consultare, o se in generale hai bisogno di tradurre un sito web che non controlli.
Per iniziare, vai su la pagina standard Google Translate e seleziona la lingua in cui è redatto il sito web (a sinistra) così come la lingua in cui desideri tradurre il contenuto del sito web (sulla destra).
Quindi, invece di inserire il testo che desideri tradurre come faresti normalmente, incolla semplicemente l'URL del sito web che vuoi tradurre nella casella a sinistra. A questo punto, clicca sul link nella casella a destra per aprire la versione tradotta del sito web.
Ad esempio, per tradurre il sito web TranslatePress dall'inglese allo spagnolo, dovresti configurarlo in questo modo:
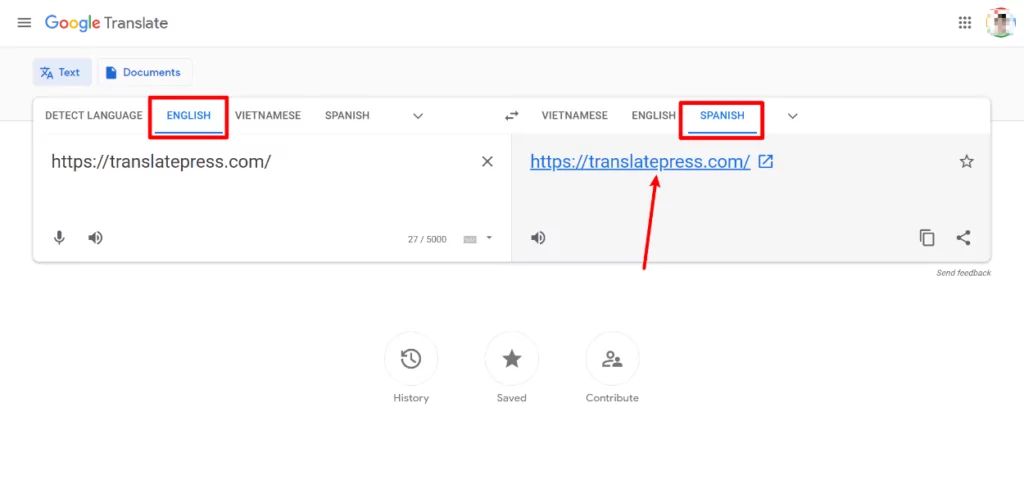
Cliccando sul link, si aprirà la versione tradotta del sito web, insieme a una nuova barra degli strumenti di Google Translate. Potrai navigare tra le diverse sezioni del sito proprio come faresti normalmente e potrai anche utilizzare la barra degli strumenti per cambiare lingua e tornare alla versione originale, se necessario:
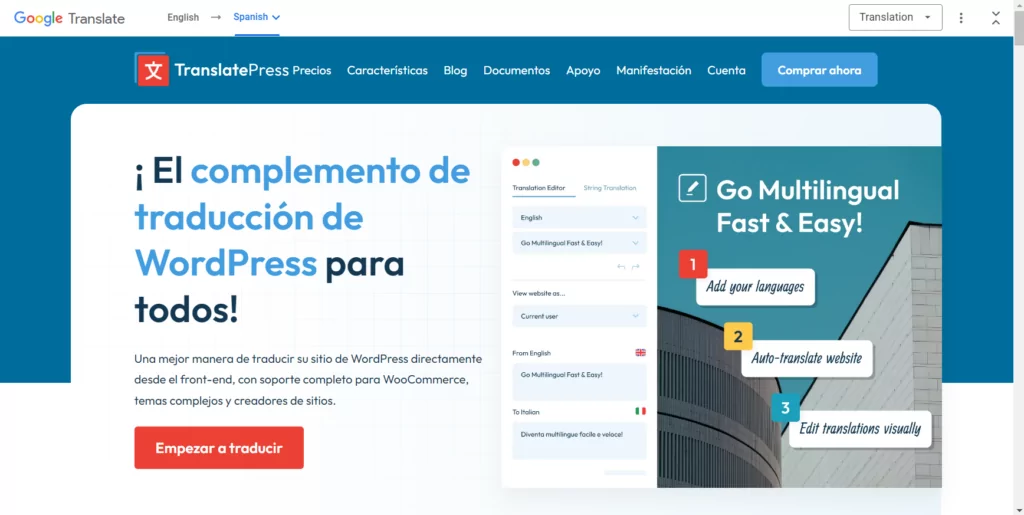
Ed ecco fatto: un modo semplice per tradurre automaticamente un sito web.
Perché la traduzione dinamica di Google Translate non è adatta al tuo sito web
Il metodo Google Translate descritto sopra è davvero utile se devi tradurre un sito web che non gestisci. Ma se vuoi tradurre il tuo proprio Se desideri creare un sito web multilingue, non dovresti utilizzare questo approccio dinamico.
È importante sottolineare che il problema riguarda solo la parte “dinamica”.
Va benissimo usare Google Translate per tradurre automaticamente i tuoi contenuti, basta farlo in modo tale da creare statico versioni del contenuto tradotto dopo aver generato le traduzioni utilizzando Google Translate, come vi mostreremo nel tutorial qui di seguito.
L'utilizzo del modello Google Translate per tradurre dinamicamente i contenuti su richiesta presenta due problemi:
- SEO multilingue – con la traduzione dinamica, le versioni tradotte dei vostri contenuti non hanno URL permanenti sul vostro sito, il che significa che Google non potrà includerle nel suo indice di ricerca e voi non potrete posizionarvi per termini di ricerca multilingue. Si tratta di un grande svantaggio se il vostro obiettivo è trarre vantaggio da SEO multilingue.
- Precisione (nessun controllo manuale) – poiché la traduzione avviene in modo dinamico, non hai la possibilità di modificare manualmente le traduzioni una volta generate. A volte la traduzione automatica non è perfetta, quindi questo potrebbe significare dover tollerare traduzioni imprecise.
Se desideri tradurre automaticamente il tuo sito web, un approccio migliore consiste nell'utilizzare Google Translate (o un altro servizio) per generare le traduzioni iniziali del tuo sito. Tuttavia, invece di farlo dinamicamente, prendi quelle traduzioni e le memorizzi nel database del tuo sito.
Poiché le traduzioni vengono memorizzate localmente, è possibile creare versioni statiche e indicizzabili dei contenuti tradotti (per la SEO) e puoi anche modificare le traduzioni automatiche secondo necessità.
Nel tutorial che segue ti mostreremo come implementare questo approccio su WordPress utilizzando il plugin TranslatePress.
Perché dovresti comunque tradurre automaticamente il tuo sito WordPress
Fintanto che non usi l'approccio dinamico, tradurre automaticamente il tuo sito WordPress è una scelta eccellente che ti permetterà di diventare multilingue, risparmiando sia tempo che denaro.
Anche se parli perfettamente le lingue in cui vuoi rendere disponibile il tuo sito, configurare la traduzione automatica è un ottimo punto di partenza. Una volta che i tuoi contenuti sono stati tradotti automaticamente, potresti rivedere tutto e apportare le modifiche necessarie.
Tieni presente che questo passaggio è fondamentale se fai sul serio riguardo a SEO multilingue. Ma approfondiremo i dettagli del posizionamento in più lingue più avanti.
Per ora credo che siamo entrambi d'accordo sul fatto che le traduzioni automatiche siano un grande risparmio di tempo.
Se non parli fluentemente le lingue in cui il tuo sito web sarà disponibile, iniziare con traduzioni automatiche è comunque un'ottima opzione. Una volta che il tuo sito è stato tradotto automaticamente, puoi assumere un traduttore professionista per perfezionare tutto e dare ai tuoi contenuti un tocco umano.
La maggior parte del testo non richiederà alcuna modifica, ma alcune parti potrebbero necessitare dell’intervento umano per garantire che il significato di ogni frase sia chiaro e non si limiti a una traduzione letterale. TranslatePress ti permette di configurare Account per traduttori, così puoi facilmente creare o consentire a un traduttore professionista di esaminare il tuo sito e apportare modifiche senza concedergli i diritti di amministratore.
E per ultimo, ma non meno importante, costi di traduzione. I costi di lavorare con un traduttore professionista sono molto più alti rispetto a quelli dell'utilizzo di un servizio di traduzione automatica. Oltre a ciò, il processo di andata e ritorno per trovare i traduttori giusti, far tradurre e approvare tutto ritarderà notevolmente i tempi.
TranslatePress è ottimizzato per ridurre al minimo i costi di traduzione automatica del testo.
Di seguito spiegherò più nel dettaglio come TranslatePress garantirà che tu paghi una sola volta per la traduzione automatica di un determinato testo e che NON ti venga addebitato alcun costo ogni volta che un utente cerca di visualizzare una pagina tradotta.
Come tradurre automaticamente un sito WordPress utilizzando TranslatePress
Tradurre automaticamente il tuo sito WordPress è davvero molto semplice usando TranslatePress e il suo traduzione automatica caratteristica.
Per tradurre automaticamente il tuo sito nel modo più veloce e semplice possibile, TranslatePress include il proprio servizio integrato TranslatePress AI.
TranslatePress AI si basa su diversi motori di traduzione automatica neurale, tra cui Google Translate, DeepL e Microsoft Translate.
Quando attivi la traduzione automatica sul tuo sito, TranslatePress AI utilizzerà questi servizi per generare traduzioni accurate e contestualizzate dei tuoi contenuti. Scegliendo il servizio più adatto alle caratteristiche specifiche del tuo sito web, è possibile ottenere traduzioni di qualità superiore rispetto a quelle che si otterrebbero ricorrendo a un unico servizio.
Oltre a TranslatePress AI, TranslatePress ti permette anche di collegarti direttamente a Google Translate o DeepL utilizzando la tua chiave API. Tuttavia, ti consigliamo di optare per TranslatePress AI se desideri il modo più semplice per iniziare a utilizzare la traduzione automatica sul tuo sito.
Di seguito ti mostreremo, passo dopo passo, come tradurre integralmente il tuo sito WordPress utilizzando TranslatePress AI.
L'unica cosa che daremo per scontato è che tu abbia già configurato il tuo sito WordPress nella sua lingua predefinita. Ecco come appare il nostro sito di esempio:

Installazione e attivazione di TranslatePress
Per iniziare, dovrai installare il plugin TranslatePress sul tuo sito WordPress.
Mentre TranslatePress ha una versione gratuita su WordPress.org, per poter utilizzare TranslatePress AI dovrai disporre di una delle licenze premium. Oltre a consentirti l'accesso a TranslatePress AI, queste licenze offrono anche tantissime altre utili funzionalità, come funzionalità SEO multilingue più avanzate, la possibilità di utilizzare un numero illimitato di lingue sul tuo sito e molto altro ancora.
Puoi acquista la tua licenza qui – I piani partono da soli €99.
Se al momento il tuo budget non te lo consente, puoi comunque utilizzare la versione gratuita e collegarla alla tua API Google Translate. Tuttavia, questo metodo non è così semplice come quello TranslatePress AI, motivo per cui non lo utilizzeremo in questo tutorial. Ne parleremo brevemente più avanti nel post, però.
Una volta acquistata la licenza di TranslatePress, dovrai installare il plugin TranslatePress sul tuo sito. Per accedere alle funzionalità premium, dovrai installare due plugin:
- Il plugin gratuito Core TranslatePress su WordPress.org. Puoi installarlo proprio come qualsiasi altro plugin gratuito: vai su Plugin → Aggiungi plugin e cerca “TranslatePress”.
- Il plugin TranslatePress Premium, che puoi scaricare da l'area Account TranslatePress dopo aver acquistato la licenza. Puoi installarla andando su Plugin → Aggiungi plugin e poi facendo clic Carica Plugin per caricare il file Zip.
Dopo aver attivato il plugin, dovrai anche inserire la tua chiave di licenza TranslatePress per poter accedere a TranslatePress AI:
- Vai a Impostazioni → TranslatePress nella tua bacheca di WordPress.
- Seleziona il Licenza scheda.
- Incolla la tua chiave di licenza nel riquadro. Puoi ottenere la tua chiave di licenza da l'area "Il mio account" di TranslatePress.
- Clicca il Attiva licenza pulsante.
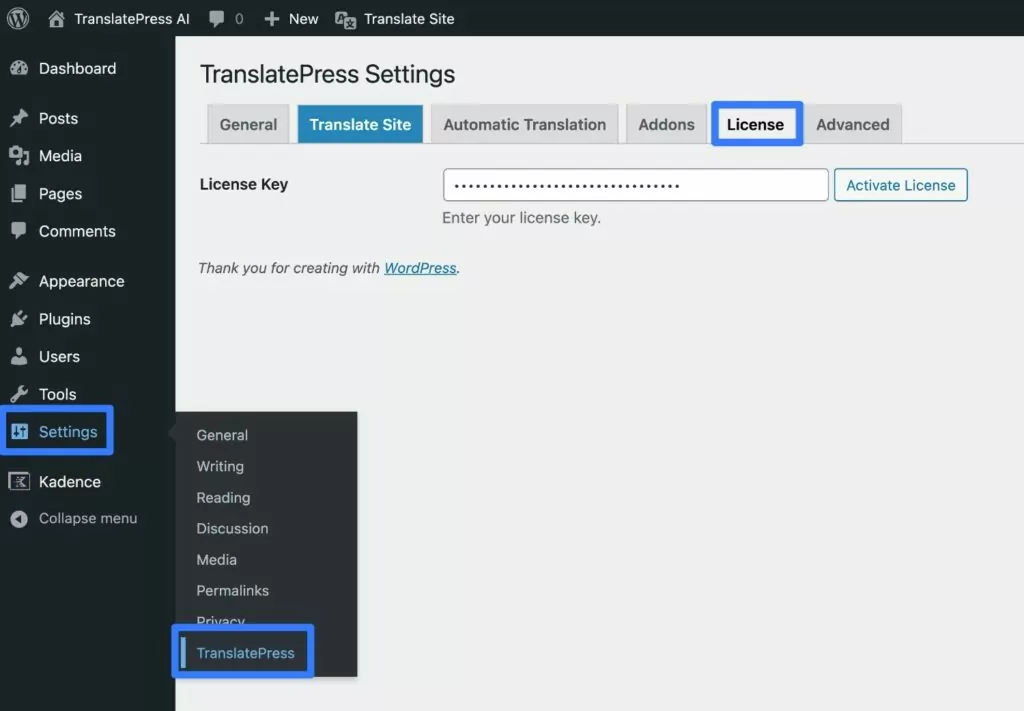
Dopo aver attivato con successo la tua licenza, dovresti vedere comparire un segno di spunta verde.
Scegli le tue lingue
Successivamente, vorrai scegliere la lingua o le lingue che desideri aggiungere al tuo sito.
Poiché possiedi una delle licenze a pagamento di TranslatePress, puoi aggiungere un numero illimitato di nuove lingue.
Puoi configurarli andando su Impostazioni → TranslatePress nella bacheca di WordPress. Quindi, usa il Tutte le lingue area da aggiungere per tutte le nuove lingue necessarie.
Ad esempio, se il tuo sito attuale è in inglese e desideri tradurlo in spagnolo, potrebbe apparire più o meno così.
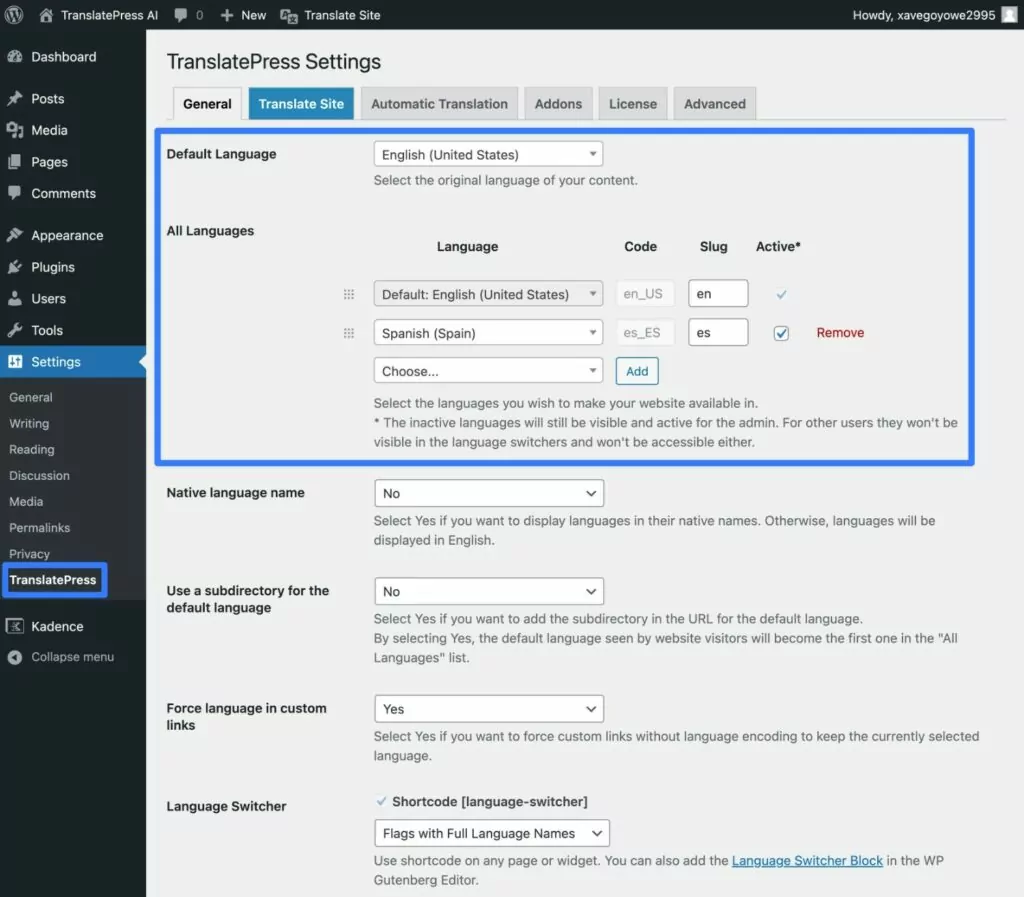
Una volta abilitata la traduzione automatica nel passaggio successivo, avrai un'opzione aggiuntiva per ciascuna lingua per scegliere il livello di Formalità – Formale o Informale. Quando TranslatePress AI traduce automaticamente il tuo sito, utilizzerà questa impostazione per decidere se rendere le traduzioni automatiche più formali o informali. Se desideri modificare il livello di formalità, potrai tornare a questa interfaccia dopo il passaggio successivo.
Una volta aggiunte tutte le lingue che desideri utilizzare, assicurati di fare clic su Salva modifiche pulsante in basso.
Abilita traduzione automatica
Una volta selezionate le lingue, il passo successivo consiste nell'attivare la traduzione automatica tramite TranslatePress AI.
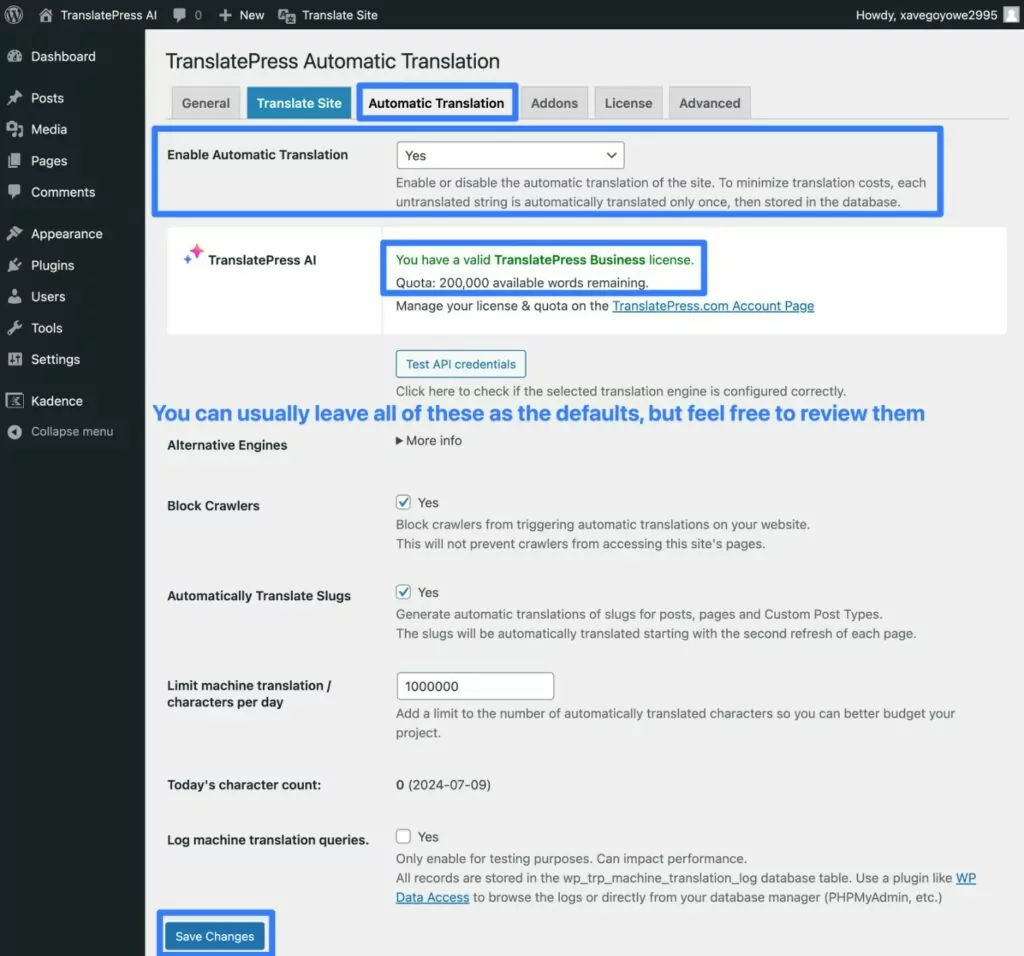
Per fare ciò, seleziona Traduzione automatica scheda nell'area delle impostazioni TranslatePress (Impostazioni → TranslatePress).
Per prima cosa, imposta Abilita traduzione automatica a discesa uguale a Sì.
A questo punto dovresti vedere comparire l'opzione TranslatePress AI, insieme alla quota di parole di traduzione gratuita associata alla tua licenza:
- Personal – 50.000 parole gratuite.
- Business – 200.000 parole gratuite.
- Developer – 500.000 parole gratuite.
Questi dovrebbero essere più che sufficienti per la maggior parte dei siti, il che significa che non ci sono costi aggiuntivi per l'utilizzo della traduzione automatica.
Tuttavia, se mai avessi bisogno di superare la quota gratuita associata alla tua licenza, puoi anche acquistare altre parole da La tua area account TranslatePress, a partire da €24 per altre 100.000 parole.
Sotto, troverai alcune opzioni aggiuntive. Tuttavia, nella maggior parte dei casi puoi lasciare tutte queste impostazioni sui valori predefiniti.
Per attivare la traduzione automatica, basta fare clic su Salva modifiche pulsante in basso.
E questo è tutto! TranslatePress AI tradurrà ora automaticamente l'intero sito WordPress utilizzando il servizio di traduzione automatica più adatto alle tue esigenze.
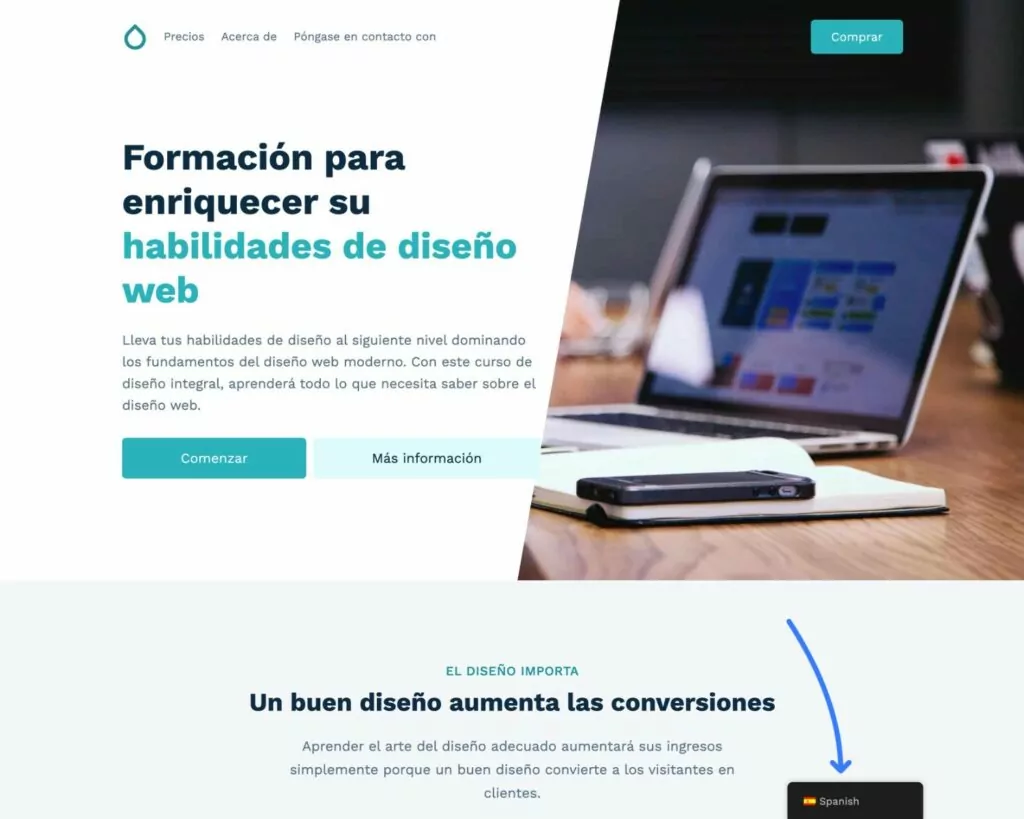
Per verificarlo, puoi accedere al frontend del tuo sito e utilizzare il codice selettore di lingua per passare a una lingua diversa.
Ad esempio, il nostro sito di test è ora completamente tradotto in spagnolo dalla sua lingua originale inglese.
Perfeziona manualmente le traduzioni se necessario (facoltativo)
Uno dei vantaggi dell'utilizzo di TranslatePress AI per la traduzione automatica è che puoi comunque perfezionare facilmente a mano qualsiasi traduzione presente sul tuo sito.
Non hai bisogno per farlo, ma potresti trovarti in situazioni in cui desideri modificare una delle traduzioni generate automaticamente.
Per fare ciò, avvia l'editor di traduzione visiva per la pagina che desideri tradurre:
- Apri la pagina in cui desideri regolare le traduzioni nel frontend del tuo sito.
- Clicca il Traduci pagina opzione nella barra degli strumenti di WordPress.

Una volta nell'editor di traduzione visiva, è possibile perfezionare qualsiasi traduzione utilizzando un approccio punta e clicca.
Basta passare il mouse sopra il testo che vuoi tradurre e fare clic sull'icona della matita.
In questo modo la traduzione verrà aperta nella barra laterale, già precompilata con la traduzione automatica fornita da TranslatePress AI. Vedrai inoltre un'icona di traduzione automatica che indica chiaramente che quella specifica traduzione proviene da TranslatePress AI.
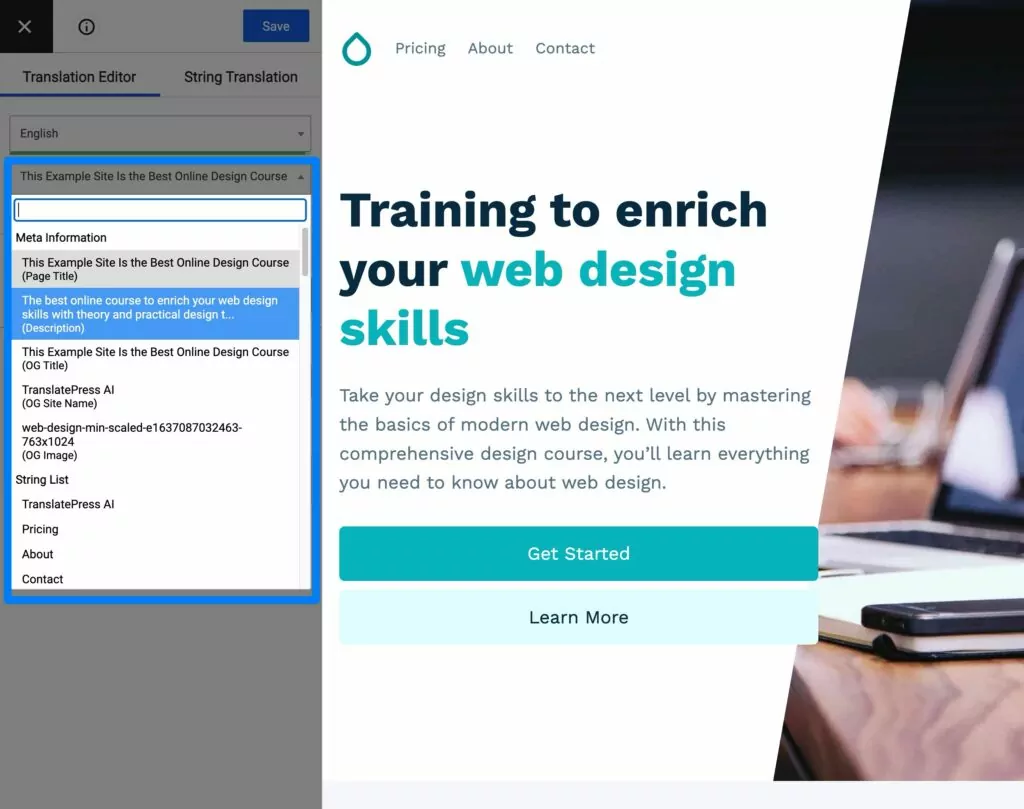
Oltre a tradurre tutto il testo visibile, TranslatePress AI tradurrà automaticamente anche tutti i dettagli SEO “dietro le quinte”, come il titolo SEO e la meta descrizione. Questo ti aiuterà a implementare migliori pratiche importanti per la SEO multilingue.
Assicurati di abilitare l'estensione SEO Pack Per accedere a questa funzione: è disponibile su tutti i piani premium di TranslatePress.
Tutto quello che devi fare è usare il menu a tendina per selezionare i metadati che desideri tradurre:
Un'altra cosa simpatica di questa interfaccia è che consente anche di tradurre alcuni elementi che non possono essere tradotti automaticamente, come le immagini effettive sul vostro sito. TranslatePress AI volontà traduce automaticamente il testo alternativo dell'immagine, ma non modificherà il file dell'immagine stessa.
Se desideri visualizzare un'immagine diversa in base alla lingua scelta da un utente, tutto ciò che devi fare è passare il mouse sull'immagine e fare clic sull'icona della matita, proprio come se stessi traducendo del testo.
Se disponi di contenuti disponibili solo per determinati ruoli utente o utenti registrati, l'editor di traduzione ti consente di naviga nel sito come un determinato ruolo utente per tradurre contenuti specifici dell'utente.
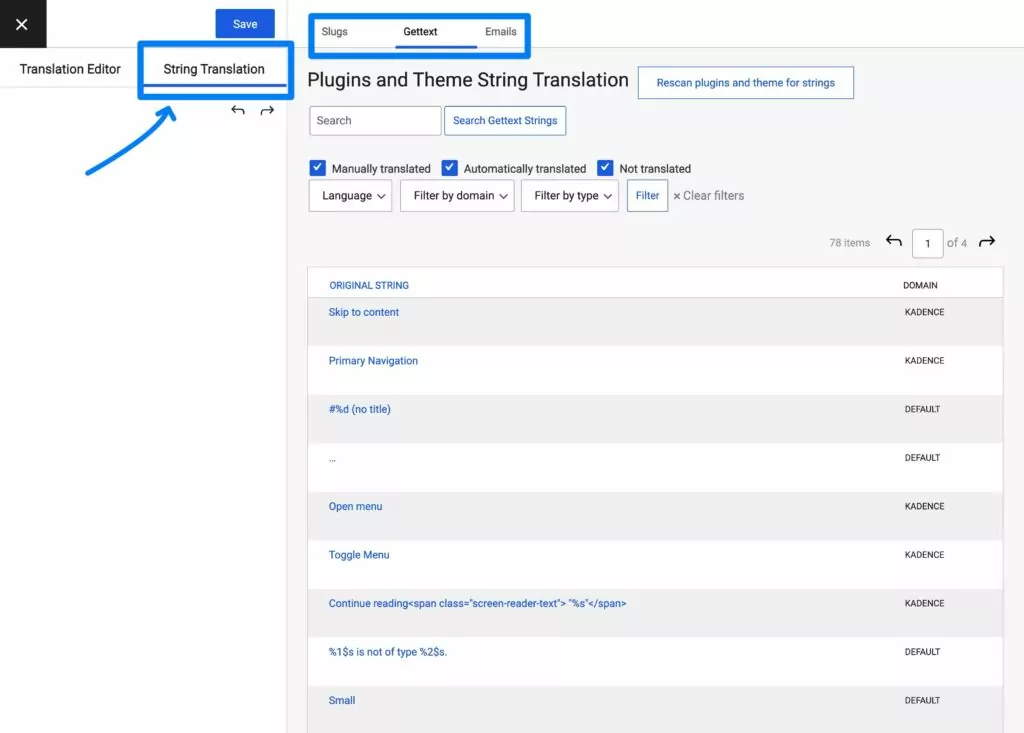
Infine, per accedere alle traduzioni per altri tipi di contenuti come email e gettext di temi/plugin, puoi fare clic sull'opzione Traduzione stringhe per passare dall'editor visivo all'editor di stringhe del backend.
Regola il tuo selettore di lingua (facoltativo)
A questo punto, disponi di un sito WordPress multilingue perfettamente funzionante, grazie alla traduzione automatica fornita da TranslatePress AI.
Per consentire ai visitatori di accedere alle diverse lingue, la configurazione predefinita di TranslatePress prevede l'inserimento di un pulsante selettore di lingua mobile nell'angolo in basso a destra del sito.
Se ti piace questa posizione, non devi fare nulla.
Tuttavia, se desideri modificarlo, TranslatePress ti offre diverse impostazioni selettore di lingua, oltre a numerose opzioni di posizionamento, tra cui le seguenti:
- Voce di menu – puoi aggiungere il tuo selettore di lingua utilizzando il normale sistema di menu di WordPress (Aspetto → Menu).
- Blocco/Shortcode – Puoi inserire manualmente il tuo selettore di lingua in qualsiasi punto del tuo sito utilizzando un blocco o uno shortcode.
- Altre posizioni fluttuanti – puoi anche spostare il selettore di lingua mobile in un altro punto, ad esempio nell'angolo in basso a sinistra del tuo sito.
Consulta la documentazione di selettore di lingua per imparare come funziona ogni cosa.
E questo è tutto! Con TranslatePress AI, puoi avere un sito web WordPress multilingue funzionante in pochi minuti, grazie alla potenza della traduzione automatica.
Metodi alternativi: utilizzare direttamente Google Translate o DeepL
Se vuoi il modo più semplice per tradurre automaticamente WordPress, ti consigliamo di utilizzare il metodo TranslatePress AI che abbiamo illustrato nel tutorial qui sopra.
Tuttavia, per offrirti una flessibilità ancora maggiore, TranslatePress ti consente anche di collegarti direttamente all'API di Google Cloud Translate o all'API di DeepL.
TranslatePress AI utilizza entrambi questi servizi, quindi quando utilizzi TranslatePress AI benefici già delle loro traduzioni accurate. Tuttavia, se ti trovassi in una situazione in cui preferissi collegarti direttamente al servizio utilizzando la tua chiave API, TranslatePress ti offre questa possibilità.
È possibile accedere all'API Google Translate nella versione gratuita di TranslatePress, mentre è necessario la licenza commerciale TranslatePress per accedere all'integrazione con DeepL.
Se non sei sicuro di quale scegliere, potresti voler Leggi il nostro confronto tra Google Translate e DeepL.
Ecco alcune guide rapide su come utilizzare entrambi i servizi...
Traduci automaticamente WordPress con Google Translate
Se vuoi Tradurre automaticamente WordPress con Google Translate, dovrai generare una chiave API Google Translate utilizzando il tuo account Google Cloud Platform.
Per fare ciò, dovrai creare un progetto in Google Cloud e poi aggiungere l'API a quel progetto e creare la chiave. Puoi dai un'occhiata a questo articolo della documentazione di guida per imparare come funziona.
Con l'API Google Translate, i primi 500.000 caratteri (non (parole) che traduci ogni mese sono gratuite. Oltre tale limite, i caratteri aggiuntivi vengono fatturati al costo di $20 per ogni milione di caratteri.
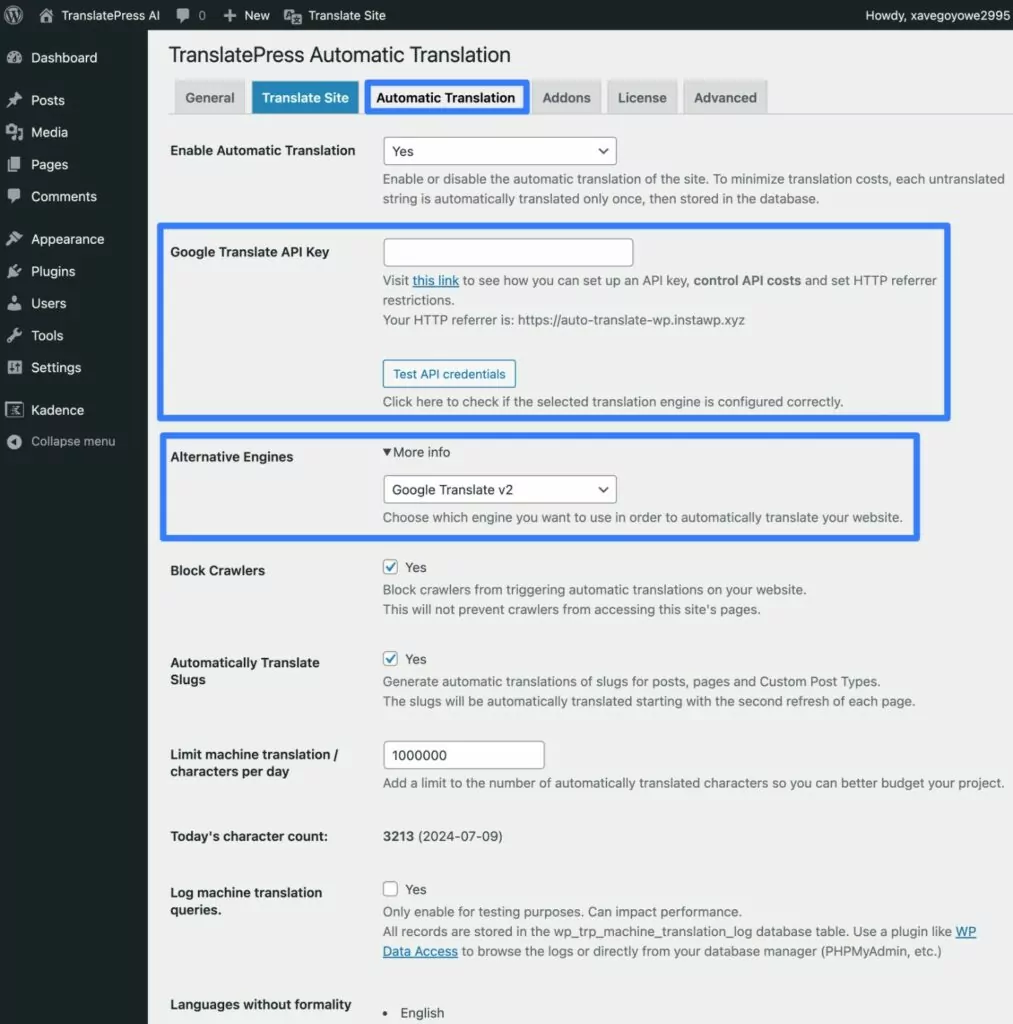
Una volta ottenuta la chiave API Google Translate, ecco come configurare TranslatePress:
- Vai a Impostazioni → TranslatePress per aprire l'area delle impostazioni TranslatePress.
- Fai clic sul Traduzione automatica scheda.
- Imposta Abilita traduzione automatica a discesa uguale a Sì.
- Clicca il Maggiori informazioni opzione accanto Motori Alternativi.
- Modifica il menu a discesa da TranslatePress AI a Google Translate v2.
- Incolla la tua chiave API nel Chiave API di Google Translate scatola.
- Clicca il Test delle credenziali API pulsante per verificare che la connessione funzioni.
- Configura le altre impostazioni in base alle tue preferenze. Ti consigliamo vivamente di utilizzare l' Limita la traduzione automatica / caratteri al giorno impostazione che consente di fissare un limite di fatturazione, aiutandoti così a evitare addebiti imprevisti per l'utilizzo dell'API Google Translate.
- Clicca il Salva modifiche pulsante in basso.
Traduci WordPress automaticamente con DeepL
Se vuoi traduci automaticamente WordPress con DeepL, dovrai creare il tuo account DeepL e accedere alla tua chiave API di DeepL. Questo articolo di aiuto spiega come per accedere alla tua chiave API di DeepL una volta creato il tuo account.
Con l'API di DeepL puoi tradurre gratuitamente fino a 5.000.000 di caratteri al mese. Se devi superare tale limite, pagherai un canone mensile forfettario di $5,49 più $25 per ogni milione di caratteri tradotti.
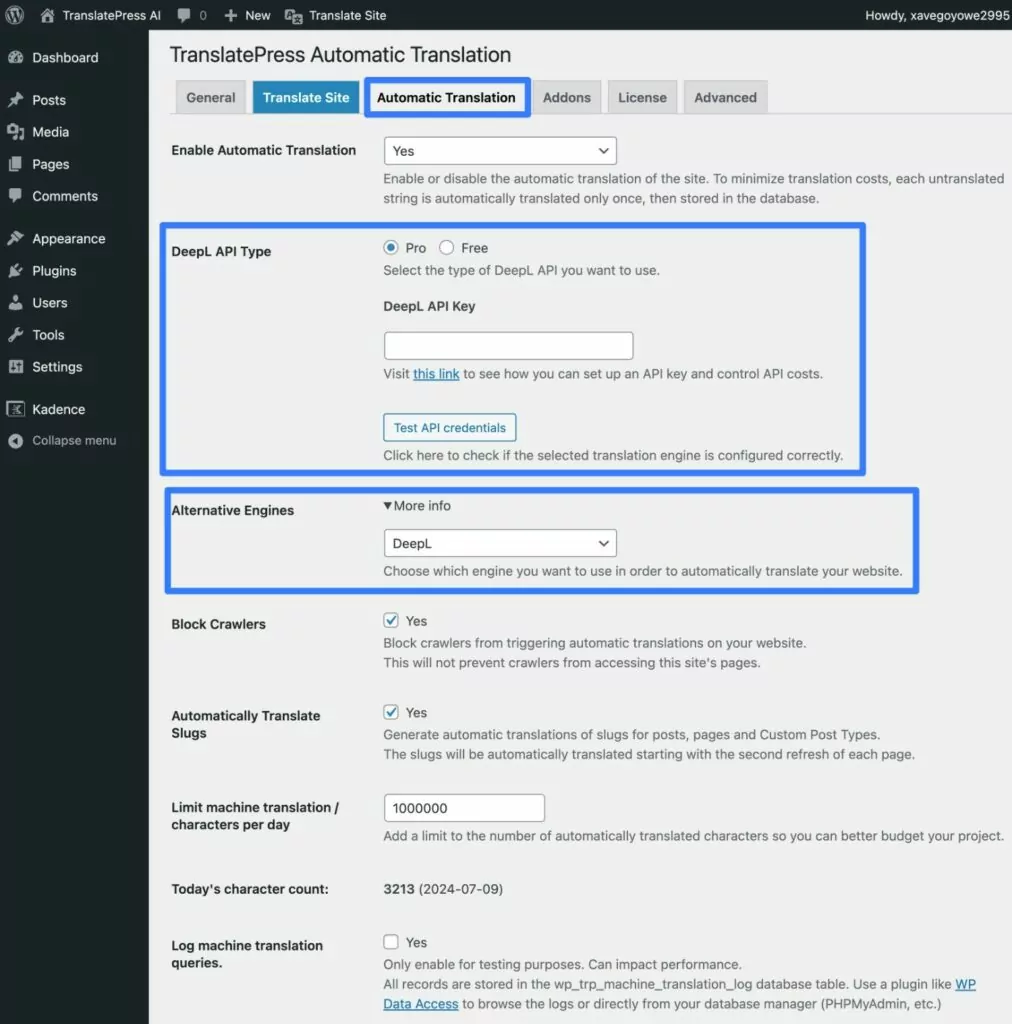
Una volta ottenuta la chiave API di DeepL, ecco come configurare TranslatePress:
- Vai a Impostazioni → TranslatePress per aprire l'area delle impostazioni TranslatePress.
- Fai clic sul Traduzione automatica scheda.
- Imposta Abilita traduzione automatica a discesa uguale a Sì.
- Clicca il Maggiori informazioni opzione accanto Motori Alternativi.
- Modifica il menu a discesa da TranslatePress AI a DeepL.
- Scegli se stai utilizzando l'API gratuita di DeepL o se hai sottoscritto un abbonamento a DeepL API Pro.
- Incolla la tua chiave API nel Chiave API DeepL scatola.
- Clicca il Test delle credenziali API pulsante per verificare che la connessione funzioni.
- Configura le altre impostazioni in base alle tue preferenze. Ti consigliamo vivamente di utilizzare l' Limita la traduzione automatica / caratteri al giorno impostazione per definire un limite di fatturazione, che ti aiuterà ad evitare costi imprevisti per l'utilizzo dell'API di DeepL.
- Clicca il Salva modifiche pulsante in basso.
In che modo TranslatePress riduce al minimo i costi della traduzione automatica
Ora che abbiamo visto quanto sia facile tradurre automaticamente un sito WordPress utilizzando TranslatePress e la sua integrazione con i servizi di traduzione automatica, vediamo come questo strumento ti aiuti a ridurre al minimo i costi.
La maggior parte di questi risparmi sui costi si applica indipendentemente dal fatto che si utilizzi TranslatePress AI o la propria chiave API Google Translate o DeepL.
Innanzitutto, la traduzione automatica viene attivata SOLO la prima volta che un utente visita una pagina che non è stata ancora tradotta.
Quando visiti il tuo sito per la prima volta in una determinata lingua, in realtà lo stai traducendo automaticamente pagina per pagina. Una volta che un testo è stato tradotto automaticamente, TranslatePress lo memorizza nel tuo database, riducendo così al minimo le richieste al servizio di traduzione automatica.
Ciò risulta anche in un caricamento veloce delle pagine tradotte.
Puoi anche mantenere i costi sotto controllo impostando un limite giornaliero per i caratteri tradotti automaticamente.
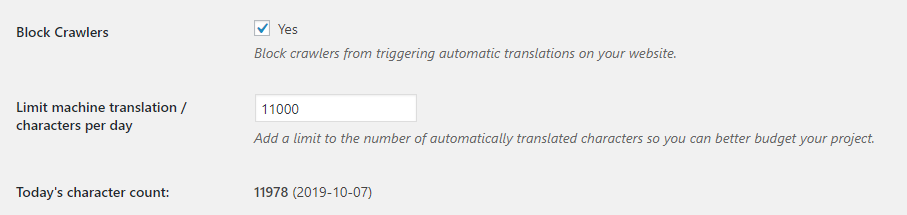
Per impostazione predefinita, stiamo anche bloccando i crawler dall'attivare traduzioni automatiche sul vostro sito, poiché ciò può anche comportare costi indesiderati per testi che potreste non aver voluto tradurre.
Tutte queste opzioni fanno parte della scheda "Traduzione automatica" in TranslatePress.
Infine, acquistando una licenza premium, avrai anche accesso a un determinato numero di parole che potrai tradurre gratuitamente con TranslatePress AI. Questo numero varia da 50.000 parole su Personal licenza per 500.000 parole sul Developer licenza.
A meno che tu non abbia un numero enorme di post sul blog, la maggior parte dei siti WordPress avrà ben meno di 50.000 parole, il che significa che probabilmente non dovrai pagare nulla per l'utilizzo di TranslatePress AI.
SEO multilingue e traduzioni automatiche
Ultimo ma non meno importante, se desideri che i tuoi contenuti si posizionino nelle lingue tradotte, devi seguire il principi di SEO multilingue.
Abbiamo già accennato alla traduzione dei dettagli SEO nel tutorial qui sopra, ma approfondiamo l'argomento in modo leggermente più dettagliato.
Se utilizzi TranslatePress, il plugin procederà automaticamente a aggiungi l'attributo hreflang per ciascuna lingua utilizzata dal vostro sito. In questo modo Google riconosce la lingua di ogni contenuto del vostro sito web.
TranslatePress Componente aggiuntivo pacchetto SEO faremo in modo che tu possa tradurre automaticamente gli elementi SEO più importanti di una pagina. Cose come lo slug dell'URL, il titolo della pagina, la descrizione, i tag alt delle immagini o i tag del social graph.
Funziona subito con tutti i plugin SEO più famosi (come Yoast SEO, Rank Math, All in One SEO, SEOPress) ed estende la loro funzionalità di sitemap per creare una sitemap multilingue che segue le raccomandazioni di Google.
Assicurati di rivedere tutto ciò che è stato tradotto automaticamente. Innanzitutto, assicurati che ogni pagina sia stata completamente tradotta, poiché Google consiglia vivamente che ogni pagina disponga di contenuti disponibili in UNA sola lingua. In caso contrario, le probabilità di posizionamento per quella pagina diminuiranno significativamente.
Secondo, assicurati di modificare tutte le frasi o parti di testo che sono state tradotte letteralmente dal motore di traduzione automatica e sono prive di significato. Tutto deve sembrare scritto da un essere umano, per aumentare le tue possibilità di posizionarti bene.
Se disponi di contenuti disponibili solo per determinati ruoli utente o utenti registrati, l'editor di traduzione ti consente di naviga nel sito come un determinato ruolo utente per tradurre contenuti specifici dell'utente.
Ecco come tradurre automaticamente il tuo sito WordPress
La traduzione automatica dei siti WordPress con TranslatePress AI è davvero semplice e non richiede conoscenze particolari. Una volta che il tuo sito multilingua viene tradotto automaticamente, puoi sfogliare ogni pagina e modificare manualmente qualsiasi parte di testo che risulta priva di significato o suona strana.
Oltre alla facilità d'uso, il vantaggio dell'interfaccia di traduzione visiva TranslatePress è che si ha sempre ben chiara la contesto in cui si inserisce una frase o un brano di testo. Ciò rende più facile trovare la traduzione giusta.
Poiché TranslatePress funziona immediatamente con qualsiasi tema pronto per la traduzione o plugin, incluso WooCommerce o page builder, gli stessi principi mostrati qui possono essere usati per tradurre qualsiasi tipo di sito WordPress, indipendentemente dagli strumenti usati per crearlo.
TranslatePress Multilingue
Per saperne di più su come TranslatePress può aiutarti a tradurre automaticamente i siti WordPress, assicurati di scopri tutte le funzionalità.
Inoltre, assicurati di guardare questo breve video che illustra i pochi passaggi necessari per configurare TranslatePress con Google Translate in modo da tradurre automaticamente tutti i contenuti del tuo sito web:
Se desideri tradurre il tuo sito web automaticamente e hai domande, assicurati di porle nella sezione dei commenti qui sotto.


Un articolo fantastico. Voglio puntare a molti paesi. Tuttavia, assumere un traduttore per tradurre il sito web manualmente richiede molto tempo e più soldi. Posso farlo facilmente ora.
Il miglior plugin per la traduzione automatica