In this post
In this post
Need a way to create a multi language website?
We live in a multilingual world, so offering your website in multiple languages is a great way to make it more user-friendly and connect with new audiences.
But at the same time, creating a multi language website is a big undertaking. While there are plenty of user-friendly website builders out there, you need a tool that will let you not only create a great-looking website, but also translate every element, from the text to the images, into different languages.
To help you be successful, we’re going to share a detailed guide on how to create a multi language website. We’ll take you from “zero” to “user-friendly multilingual website” by covering how to:
- Pick the best platform for your multi language website (we recommend WordPress);
- Follow multilingual website best practices;
- Translate all of your content into different languages on WordPress – every single element from your titles and content, to forms, images, buttons, and more.
We’ll also share some multi language website examples to give you some ideas of how successful websites are handling multiple languages.
Our step-by-step multi language website tutorial is:
- Non-technical. You’ll use a simple visual interface to translate your content – no technical knowledge is required.
- Affordable. In fact, many of the tools that we use in this tutorial are 100% free.
- Fast. Most importantly, you can set this up quickly. You can even use machine translation services like Google Translate and Deepl to help you speed up the process.
By the end of this post, you’ll be able to add your multilingual content using a simple visual interface like this one:
Ready to get started? Let’s dig in…
3 Great Multi Language Website Examples for Inspiration
Sometimes looking at a multi language website example is a great way to get your creative juices flowing. For that reason, we’re going to start our guide by taking a look at a few websites that have successfully gone multilingual.
1. WordPress.org
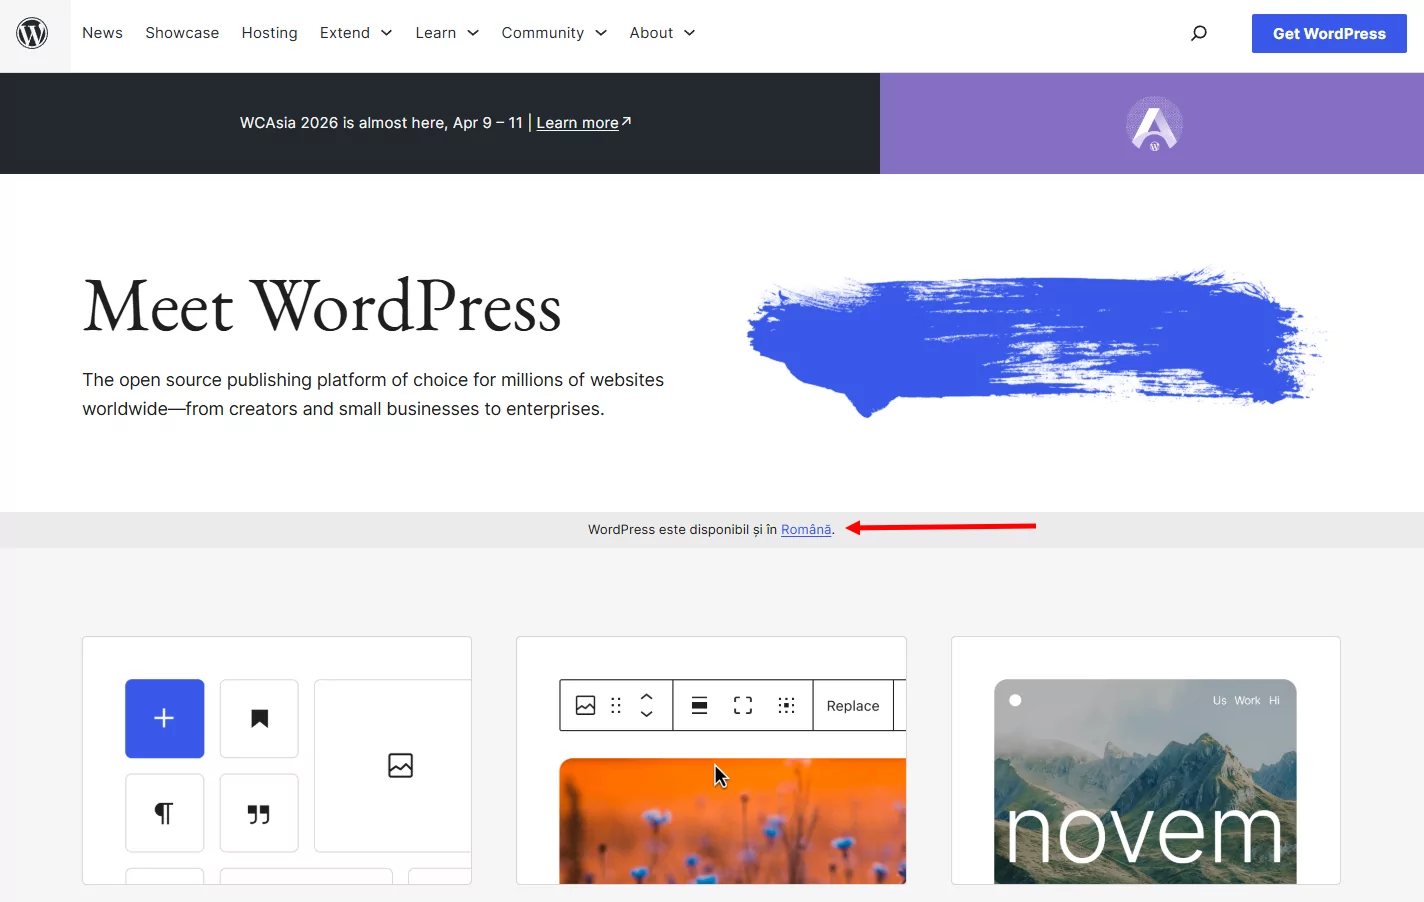
WordPress.org is the official home of the open-source WordPress project, which we think is the easiest way to create a multi language website. Because WordPress is a global project, the WordPress.org website is localized and translated into virtually every popular language. It will also suggest a visitor’s local language on the homepage to help guide visitors towards the right spot.
2. Etsy
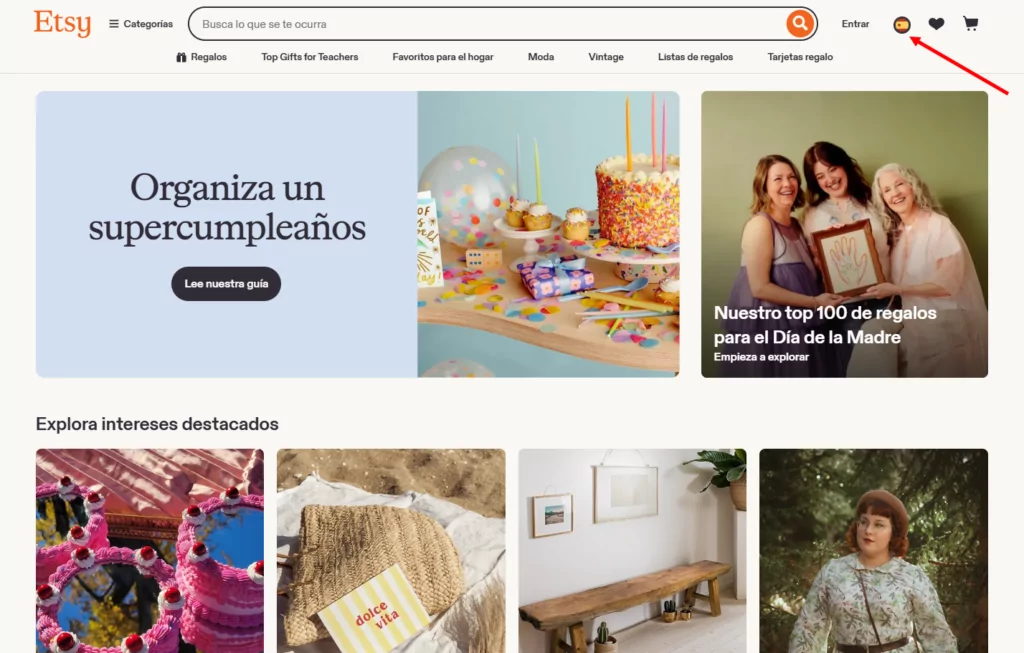
Etsy is a great multi language website example of how adding multiple languages can improve SEO for an eCommerce store. You’ll commonly see Etsy’s product pages ranking in different keywords, which gives them a great new source of traffic.
Etsy also offers multiple localization options, letting visitors choose their preferred region, language, and currency.
3. Kinsta
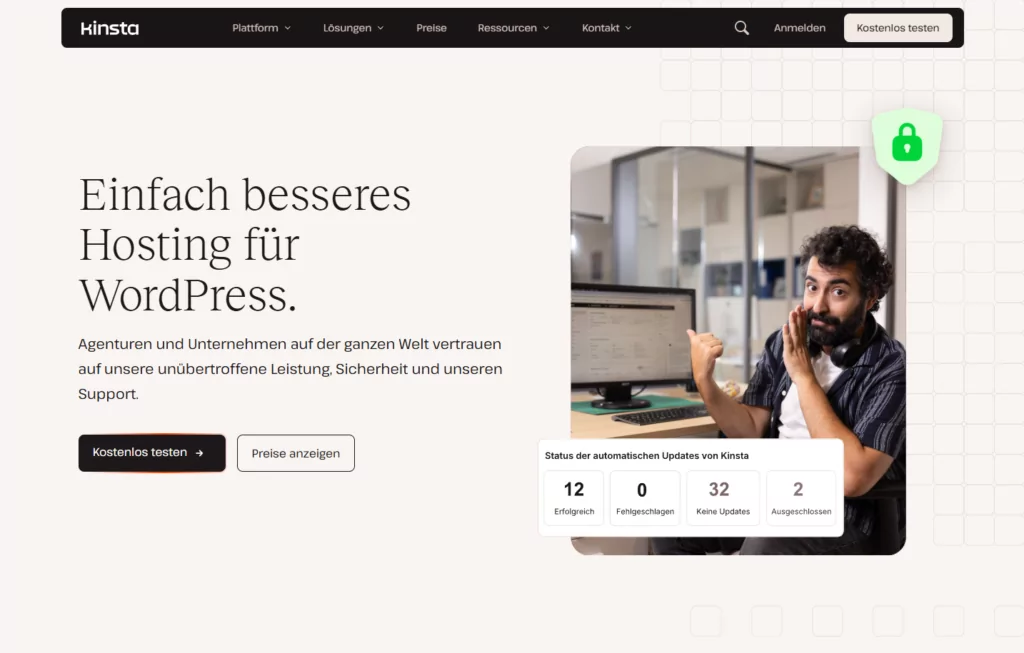
Our final multi language website example is Kinsta, a popular WordPress host that managed to increase its organic traffic by 18% after translating its content into new languages. Now, Kinsta’s content is available in ten languages and visitors can choose their preferred language using a language switcher in the footer.
Keep reading to learn how you can make your website multilingual to achieve these benefits.
How to Pick the Best Platform for Your Multi Language Website
Before you can translate your content into new languages, you need a working website in your original language.
There are two main approaches to creating a website on the modern web:
- Use a self-hosted content management system like WordPress or Drupal.
- Use a hosted website builder like Squarespace, Wix, or Shopify.
While it is possible to create multi language websites with website builders, it’s not really what they’re built for. For example, Squarespace makes you duplicate each page on your site for each language, which is confusing and time-consuming.
If you’re going to create a multi language site, using a self-hosted content management system is going to make it a lot easier to optimize the experience on both the front-end and back-end.
While different content management systems have different pros and cons, we’re going to recommend one specific option:
Self-hosted WordPress.
WordPress is by far the most popular way to make any type of website. Its popularity dwarfs that of both website builders and other self-hosted content management systems. In fact, WordPress powers over 43% of all the websites on the Internet.
What’s more, you can use WordPress to create pretty much any type of website, from blogs to business websites, eCommerce stores, membership sites, online courses, and more. So it doesn’t matter what your multi language website is about.
And oh yeah, the core WordPress software is 100% free.
Why WordPress is the Best Platform for Creating a Multilingual Website
WordPress isn’t just the best way to make a multi language website because of its popularity – it also offers all the tools you need to quickly and easily translate your site into new languages.
Here are the specific reasons why we recommend WordPress for a multi language website:
- The core WordPress software is 100% free;
- You can extend your WordPress site with thousands of free and paid plugins;
- You get access to simple visual translation tools like TranslatePress;
- WordPress is SEO-friendly, which will make it easier to rank your translated content in Google and other search engines;
- You can control how your site looks with thousands of free and paid themes;
- The WordPress software is secure and you can further beef up security with WordPress security plugins.
WordPress Lets You Use the TranslatePress Visual Editor
One of the extensions that WordPress gives you access to is TranslatePress, which lets you translate your WordPress site using a convenient visual interface like this:
This is a lot faster and more convenient than pretty much every other website platform that you’ll look at.
TranslatePress also supports automatic translation via three engines:
- TranslatePress AI — the integrated solution, no extra platforms or API keys required. Includes a free tier (2,000 AI words) on all plans.
- Google Translate — available in the free version using your own Google API key.
- DeepL — available on Business and Developer plans.
Even if you use automatic translation, you’ll still be able to go back and manually refine your translations using the interface that you saw above.
TranslatePress Multilingual
Beyond that, TranslatePress also helps you implement a number of multi language website best practices. Speaking of…
8 Best Practices for Creating a Multi Language Website
Using WordPress to build your website will set you up for success, but you still need to implement some best practices to create a successful multi language website.
Here’s what to focus on…
1. Implement Multilingual SEO to Rank Your Site in Different Languages
One of the big benefits of creating a multilingual website is the ability to connect with new audiences in Google and other search engines.
However, if you want to achieve this benefit, you need to emphasize multilingual search engine optimization (SEO).
SEO involves trying to rank your site higher in Google. Then, multilingual SEO applies that same concept but to different languages.
Multilingual SEO means optimising each language version of your site to rank in that language’s search results — not just translating the content, but making sure search engines can find it, index it correctly, and serve it to the right audience.
We have an entire post on multilingual SEO best practices, but some of the tactics that you’ll want to implement are:
- Comprehensive translations – this includes not just your text, but also URL slugs and SEO metadata.
- Multilingual XML sitemap – this helps Google find all of your content in each language.
- Optimized URL structure – we’ll talk more about this in the next section because it affects more than just multi language SEO.
- hreflang attribute – this helps Google understand which version of your website to deliver in different languages.
TranslatePress can help you implement all of these multilingual SEO best practices, and some even automatically.
2. Use an Optimized Multilingual URL Structure
In order to rank each language on your site in Google, you need to give each language version its own URL.
This not only affects the SEO of your site, but also affects how human visitors will browse your site because your URLs provide important context.
There are three main strategies for the URL structure of your multilingual website:
- Subfolders – for example, yoursite.com/content for your main language and yoursite.com/es/content for your Spanish translations.
- Subdomains – for example, yoursite.com/content for your main language and es.yoursite.com/content for your Spanish translations.
- Separate domains – for example, yoursite.com for your main language and yoursite.es for your Spanish translations.
Google recommends all three methods, but using the subfolder approach is generally the easiest method to set up and maintain because you don’t need to make any technical changes on the backend. However, you can read more about this in our article on this whole subdomain vs subdirectory dilemma.
TranslatePress automatically uses the subfolder approach – no technical setup required. However, you can also set up any of the other URL structures with the plugin, including having different domains for each language.
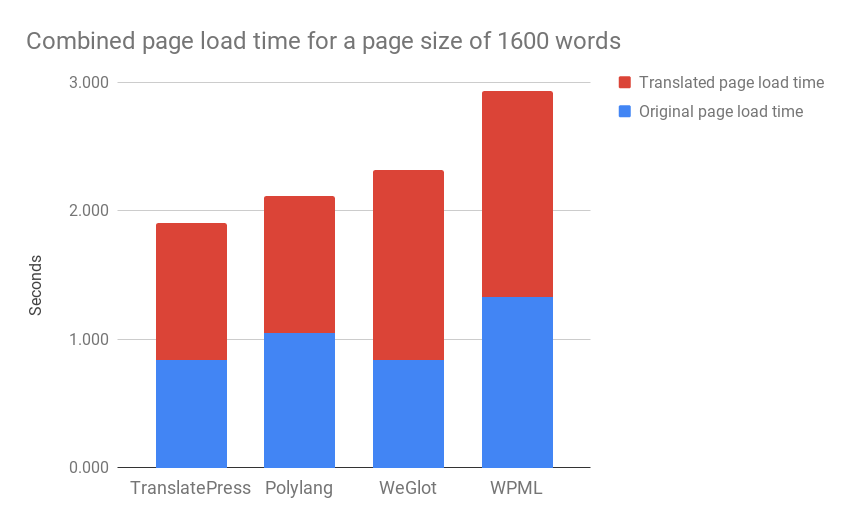
3. Pay Attention to Page Load Times
Making sure your site loads quickly is important for everything from user experience to SEO, engagement, and even your site’s conversion rates.
This is true for both single and multi language sites, but the stakes are more dire for multilingual sites because some multilingual solutions can slow down your site by adding extra file size and unnecessary database queries.
TranslatePress is one of the most performance-optimized solutions for translating a WordPress site, which helps ensure that each language on your website loads quickly:
4. Add a User-Friendly Language Switcher
Visitors can only benefit from your multilingual content if they can find it. A well-placed language switcher on your WordPress site is essential — and how you design it matters as much as where you put it.
Best practices for your language switcher:
- Display the language in its local format. For example, Deutsch (correct) vs German (incorrect). This lets people quickly recognize their language even if they don’t speak English.
- Don’t rely on language flags alone. While it’s acceptable to include flags in addition to the local language name, it’s confusing to use language flags by themselves. For example, some sites use the Mexican flag for Spanish, while others use the Spanish flag. This adds unnecessary confusion.
- Make it visible — a floating switcher in the corner of every page ensures visitors never have to hunt for it.
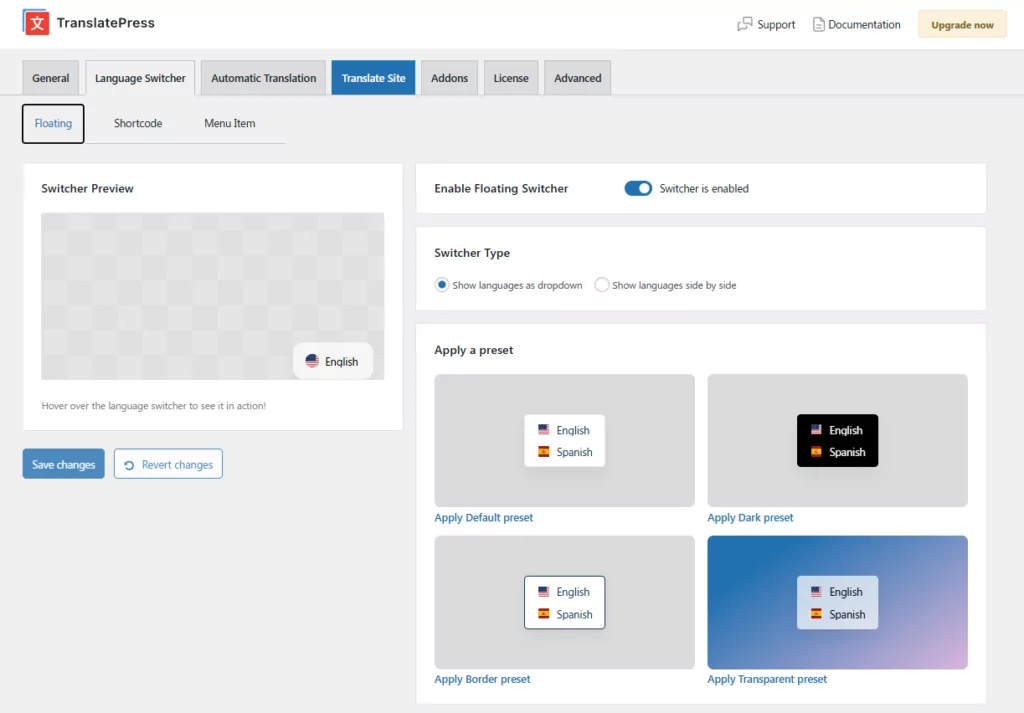
TranslatePress gives you a fully customisable language switcher accessible from the dedicated Language Switcher tab in your plugin settings. You can configure three different switcher types:
- Floating — a persistent switcher fixed in a corner of every page. Supports visual preset designs, but also custom colors, borders, flag shapes, and Desktop/Mobile layout controls.
- Shortcode — embed the switcher anywhere on your site using the shortcode or the Language Switcher block in the Gutenberg editor.
- Menu Item — add languages directly to any WordPress navigation menu via Appearance → Menus.
TrAll three switcher types support full and short language names, flag icons (rectangle, square, or rounded for menu items), and the option to show no names at all. The floating and shortcode switchers also include a custom CSS editor for fine-grained styling.
5. Automatically Detect Visitors’ Languages
Beyond adding a front-end language switcher, another way to help direct visitors is by automatically redirecting them to their preferred language.
There are two ways to do this. You can redirect visitors based on:
- Their browser language, which is the preferred language a visitor has chosen.
- Their IP address, which is their geographic location.
Typically, using the browser language is a better option because a person’s physical location doesn’t always match with their preferred language. For example, an American who lives in Vietnam, but speaks English.
TranslatePress gives you the option to try for the browser language first and then fall back to a person’s IP address if it can’t detect a browser language.
Rather than redirecting visitors silently, the plugin shows a popup asking visitors if they’d like to switch to their detected language — giving them control while still surfacing the right option.
6. Pay Attention to Design and Layout in Different Languages
When you create the initial design for your site, you’ll probably focus on making sure every element is pixel-perfect.
For example, should the headline take up two lines or three lines? Does the button text fit on a single line? Etc.
However, when you translate your content into new languages, this spacing can become an issue because translations don’t always take up the same amount of space.
To be able to adjust these layout issues and ensure a perfect design in all languages, it helps to have a tool like TranslatePress that offers a visual translation interface where you can preview changes in real-time, rather than the back-end interfaces that many translation tools use.
7. Check that your Fonts are Compatible with your Target Languages
When you’re designing your site, one of the major choices you make is picking the fonts that you are going to use. Now, depending on what languages you’re planning on using with your site, these might require a set of special characters to display properly.
It’s a good idea to check that your fonts have the special characters needed by your new languages. Otherwise, you might end up with a placeholder instead of the normal character that just looks wrong and out of place.
Like in this example:
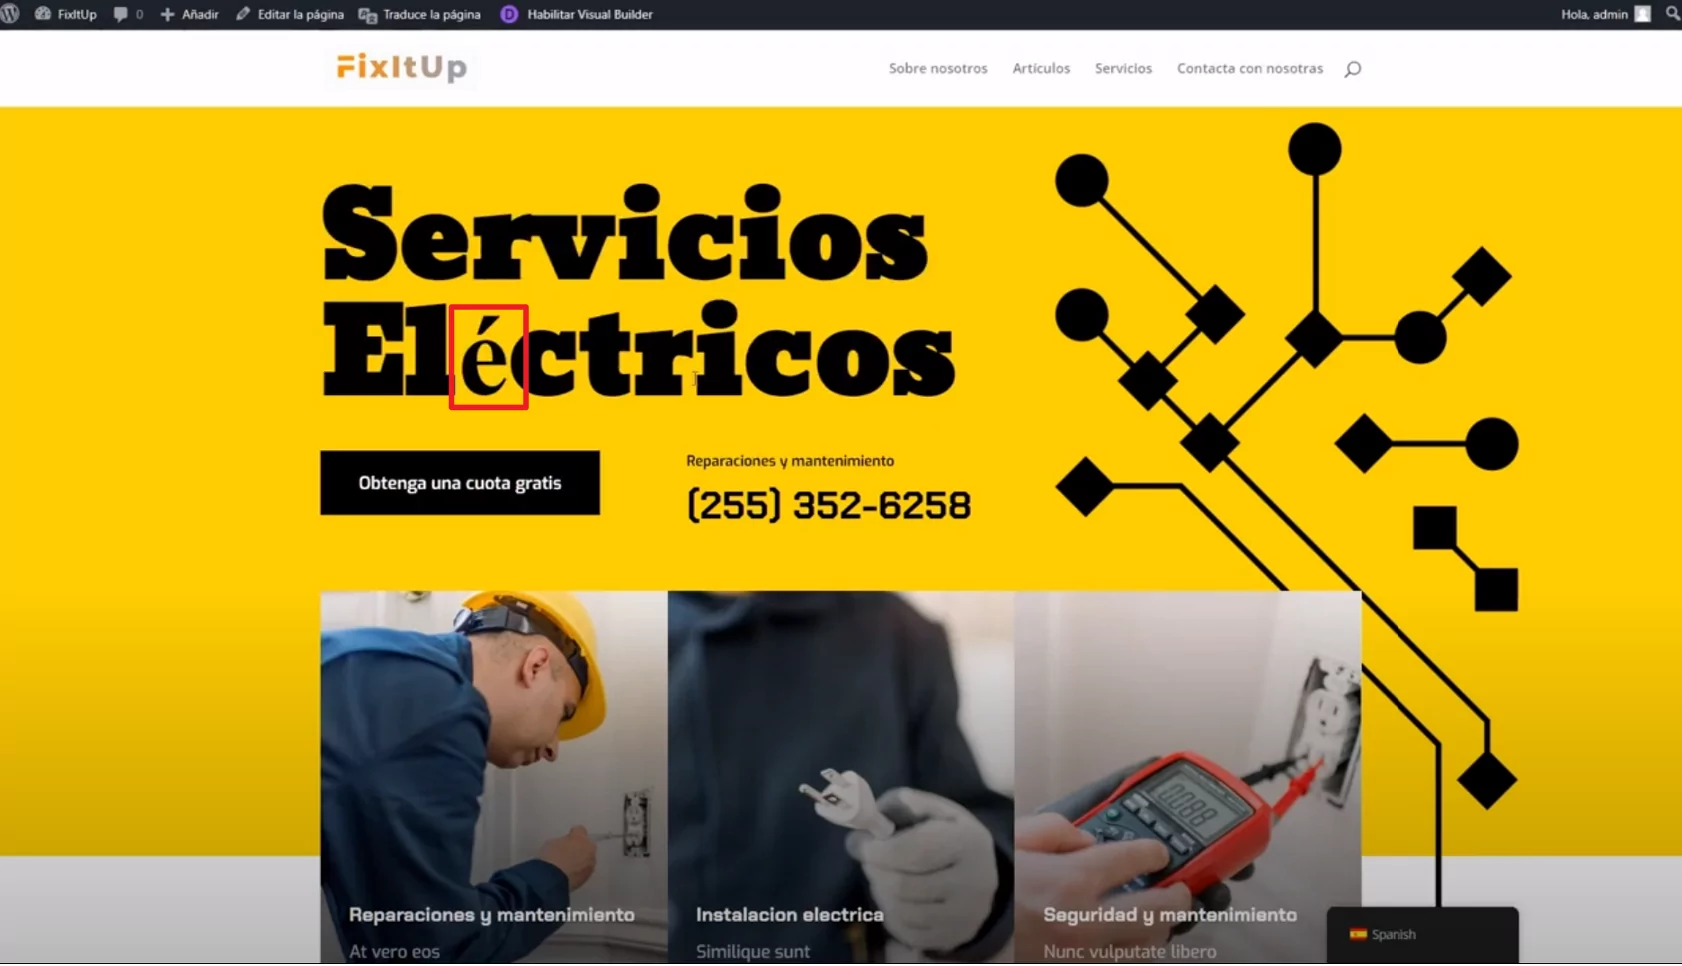
This is due to the fact that the developer of the font didn’t think about localization or just designed the font for English.
8. Focus on Full Localization – Not Just Text
Finally, remember that there’s more to creating a multi language website than just translating text on a page.
While that’s certainly important, you also need to consider other aspects of creating a fully localized experience in each language.
For example, you might want to use different images/videos for different languages or display different menu items for each language (rather than just translating the same menu items into different languages).
With WordPress and TranslatePress, you’ll also be able to take these smaller considerations into account.
TranslatePress Multilingual
How to Create a Multi Language Website With WordPress
Now that we’ve covered the theory behind a multi language website, let’s get into the actual steps that you need to take to get your website up and running.
1. Set Up Your WordPress Site in Your Native Language
To get started, you first need to set up your basic single language WordPress site. You can find a lot of tutorials for this, so we’ll keep this section a little briefer since we’re mostly focused on the multilingual part.
But here are the basics…
First, you’ll need to:
- Choose WordPress hosting – SiteGround is a good affordable option that works for most multi language WordPress sites. EasyWP is another great option, being an extremely fast managed WordPress hosting service, not only in site speed but also in site setup.
- Purchase a domain name – you can purchase your domain name when you sign up for SiteGround.
- Install the core WordPress software – SiteGround includes a welcome wizard tool that makes it easy to install WordPress – no technical knowledge required.
Once you have your basic WordPress site, you’ll need to:
- Choose a WordPress theme to control how your site looks. The translation tool that we’ll show you in the next sections will work with any WordPress theme, so you don’t need to worry about any compatibility issues.
- Add your site’s content in your native language. Don’t worry about any translation concerns for now – no matter how you add your content, you’ll be able to easily translate it in the next sections.
If you want a little more design flexibility, you might prefer using a WordPress page builder plugin like Elementor. This adds a more “Wix-like” or “Squarespace-like” design experience to WordPress, which some users prefer.
You also might want to use some additional plugins for other types of content, like multilingual forms or sliders/carousels.
Basically, the goal here is to completely build out your site in a single language. Then, once you have that baseline single language site, you can translate it into as many different languages as needed using the simple visual translation editor that you saw earlier.
2. Install TranslatePress and Choose Your Language(s)
Once you have your single language WordPress site set up, you’re ready to translate it into one or more new languages.
To do that, you can use the free TranslatePress plugin that we discussed above. Get started by visiting Plugins → Add New in your WordPress dashboard and installing the free TranslatePress plugin from WordPress.org.
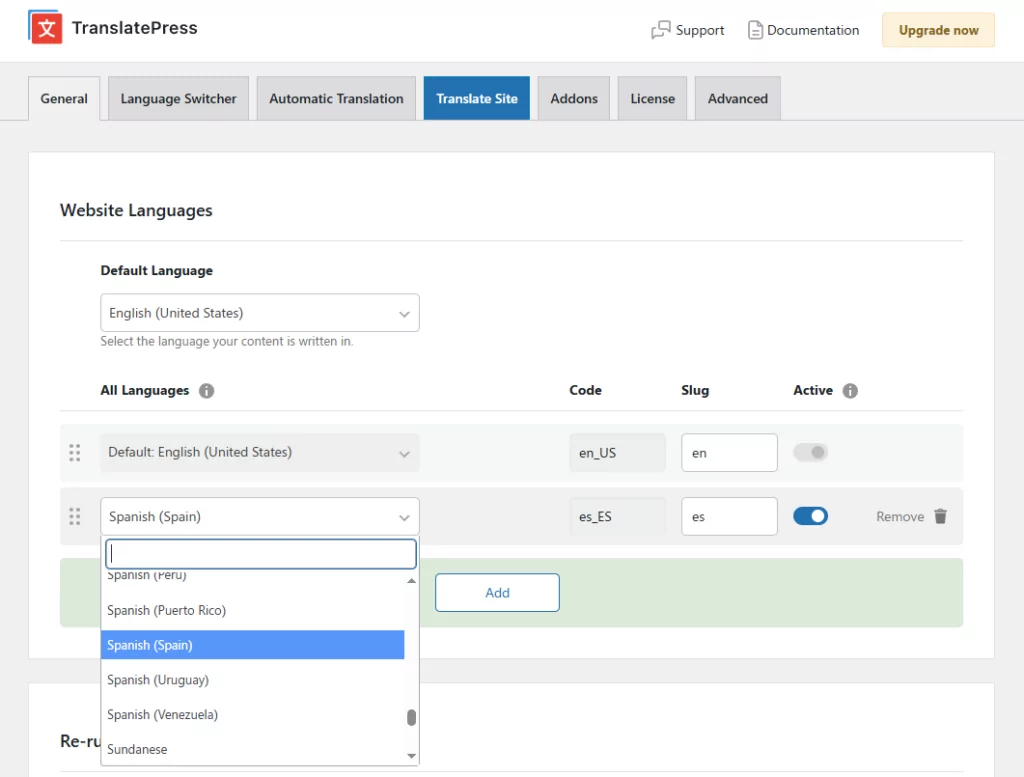
Once you’ve installed the plugin, head to Settings → TranslatePress to choose the languages that you want to offer on your site.
First, use the drop-down to select your Default Language, which is the language that your site currently exists in. Then, use the All Languages settings to add the new languages that you want your site to exist in.
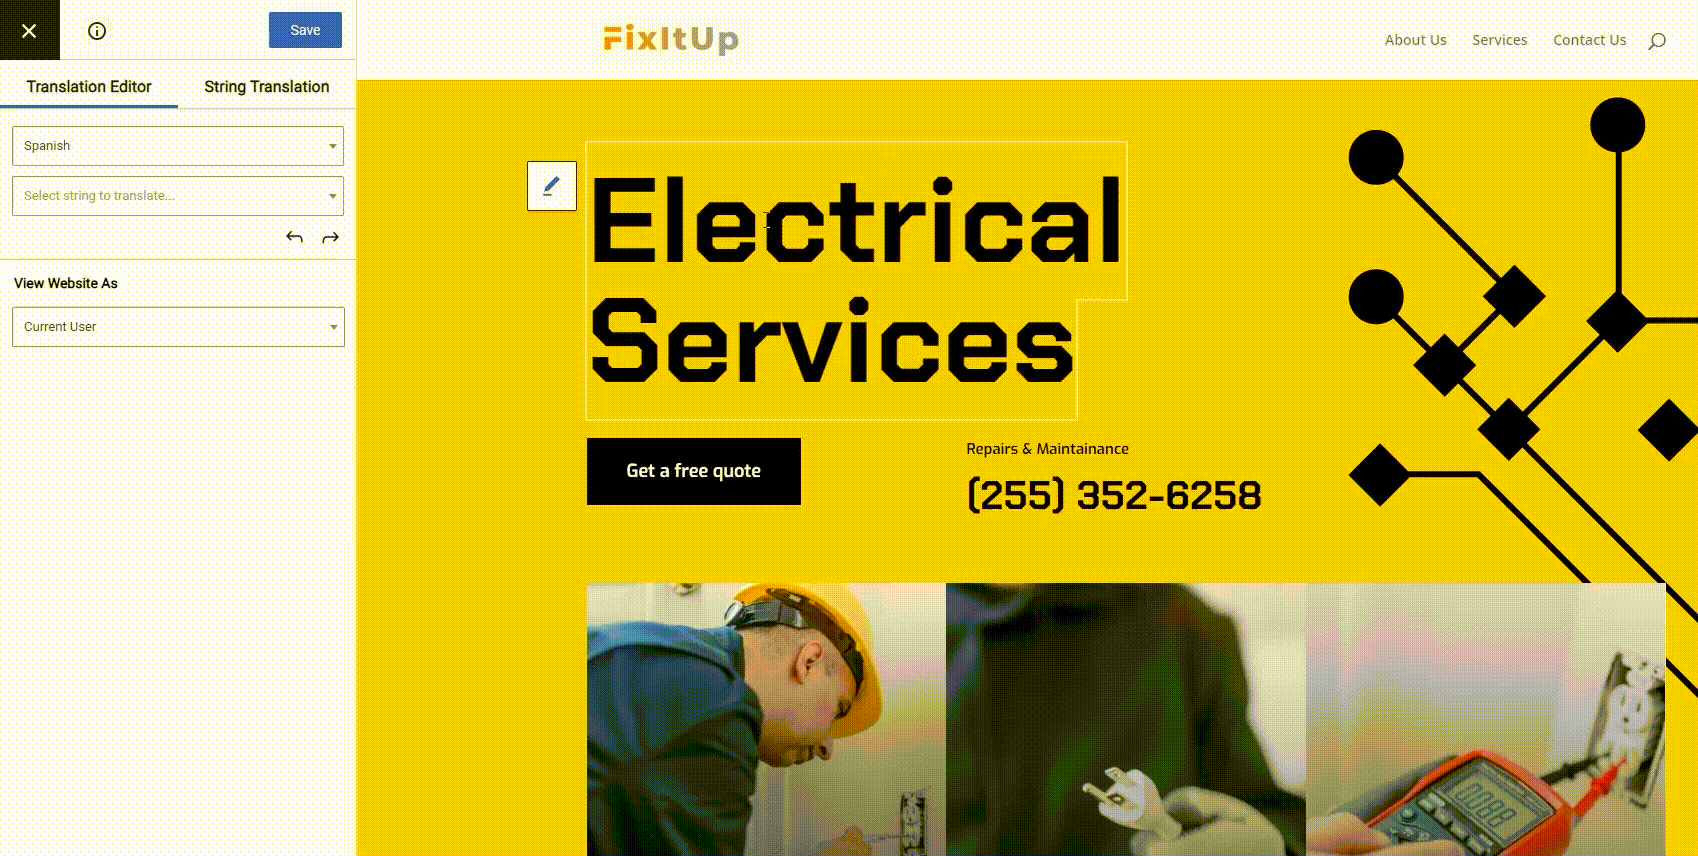
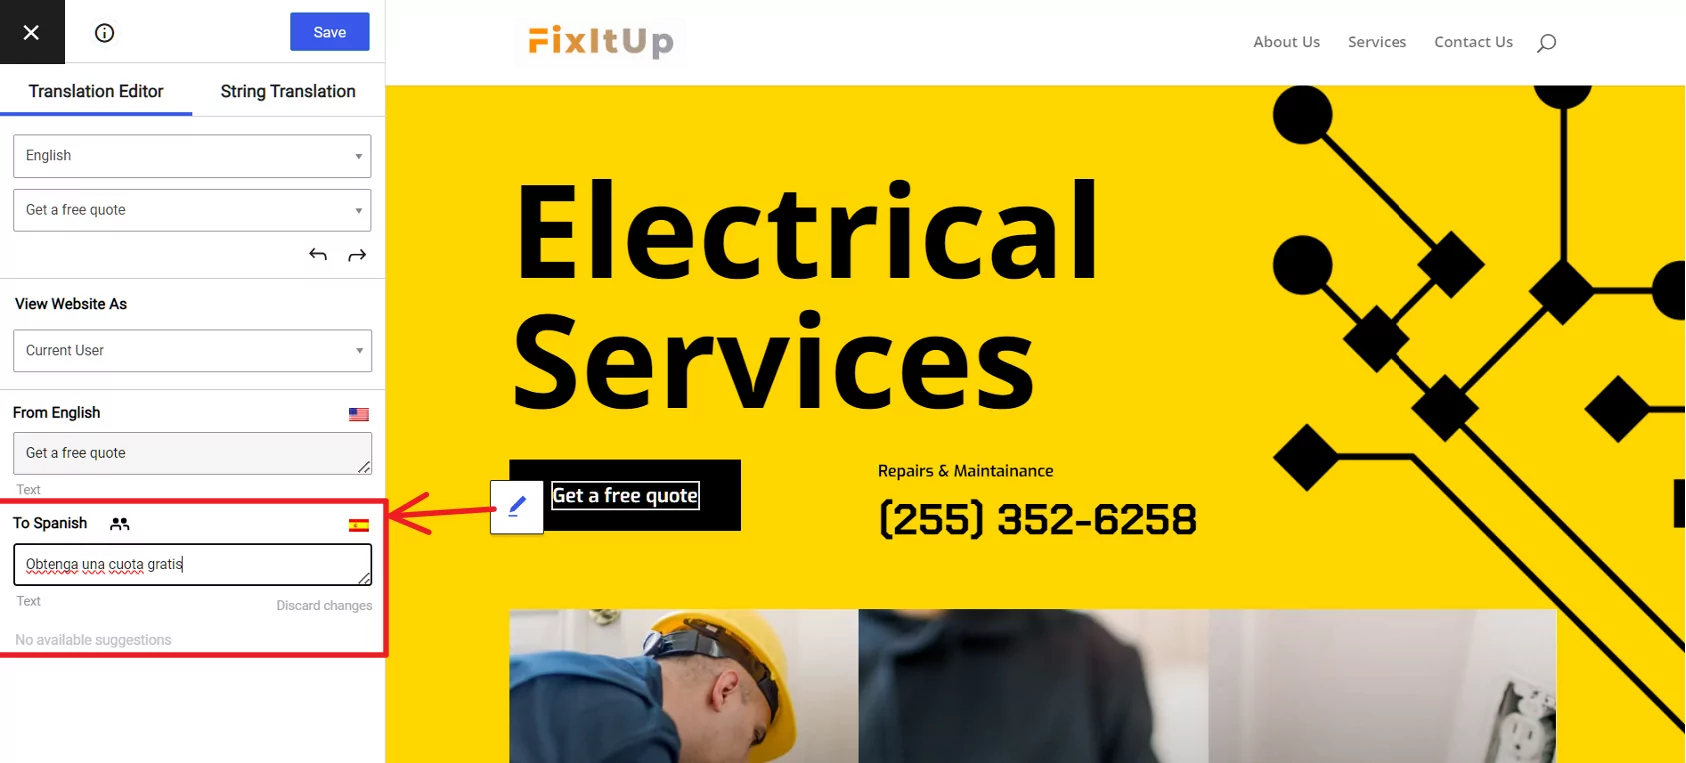
For example, here’s what it looks like to translate an English language website into Spanish:
3. Set Up Automatic Translation (Optional)
If you don’t want to translate all of your content from scratch, TranslatePress gives you the option to use two approaches for automatic translation:
- TranslatePress AI – the integrated solution for instant translations at maximum accuracy (2,000 AI words included fo free). No sign-up or API key required.
- APIs from Google Translate (available in the free version of TranslatePress) or DeepL (requires the paid version of TranslatePress).
Automatic translation can save you a ton of time, especially on a larger multi language website with lots of content. To set up automatic translation, go to the Automatic Translation tab in your TranslatePress settings, toggle it on, and select your engine. You can also set monthly translation limits to control costs if you’re using a paid API.
While TranslatePress does not charge you extra based on your translation usage, Google Translate and DeepL do charge (though both offer a limited free quota).
Even with automatic translation enabled, you can still review and refine every translation manually in the visual editor. Most sites use automatic translation for an initial draft, then manually polish high-priority pages like the homepage, product pages, and key landing pages.
What’s more?
Using TranslatePress AI is as simple as seen in the video below.
Remember that you can always make changes using the visual translation editor, as you are about to learn below.
4. Translate Your Content Using the Visual Editor
Now, you’re officially ready to start translating your website’s content.
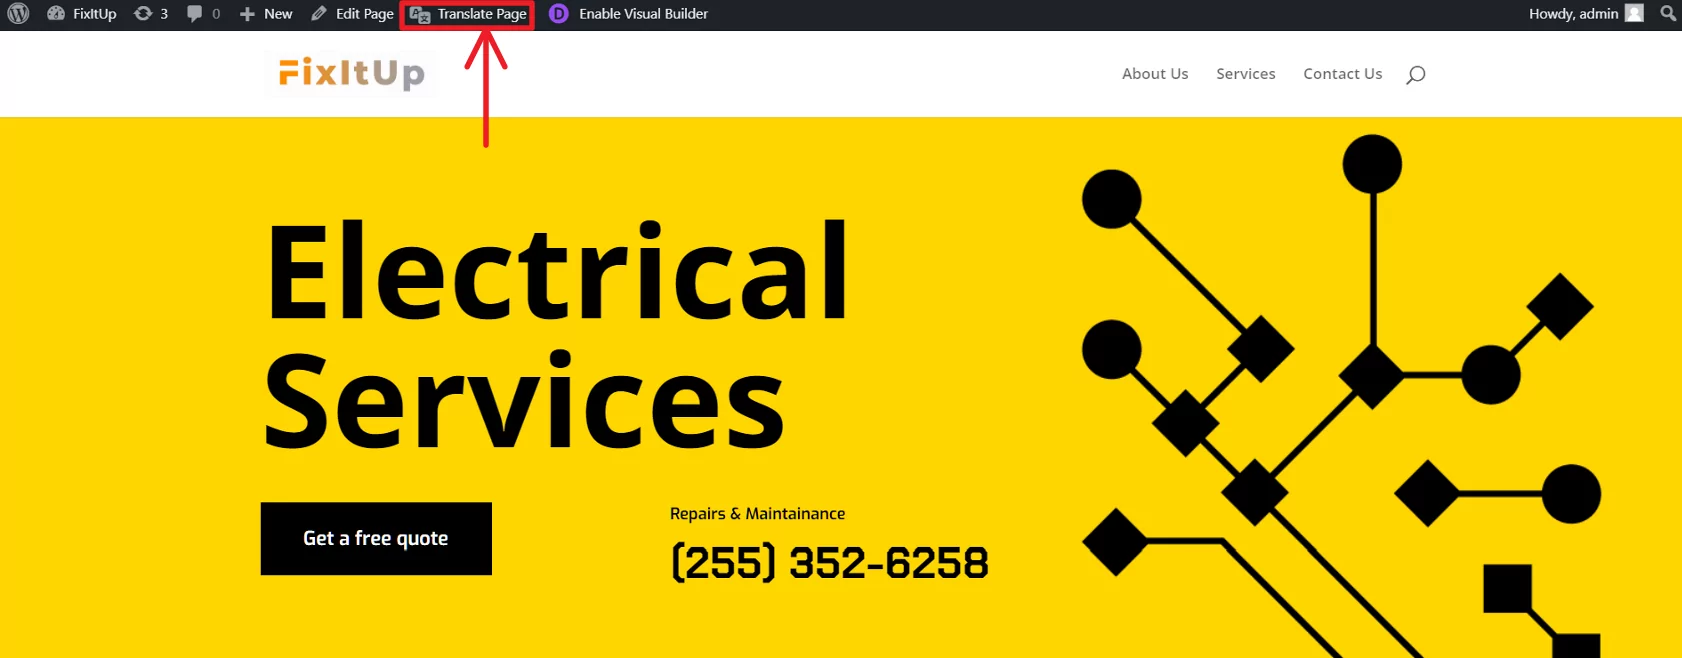
To open TranslatePress’ visual editor, go to the page that you want to translate and click the Translate Page option on the WordPress toolbar:
Translating content is simple. To translate any element on your site, all you do is hover over it and click the pencil icon.
That will open the translation in the sidebar, where you can make your edits.
If you opted to use automatic translation, you’ll already see the machine translated version in the interface.
If you’re translating your site from scratch, you’ll see a blank field until you add your translation:
It’s that easy!
This approach isn’t limited to regular text, either. You can also translate other elements on your page.
For example:
Want to translate both the text and URL of a button? Just click the pencil icon!
Want to “translate” an image so that visitors see a different image based on their chosen language? Use the same pencil icon!
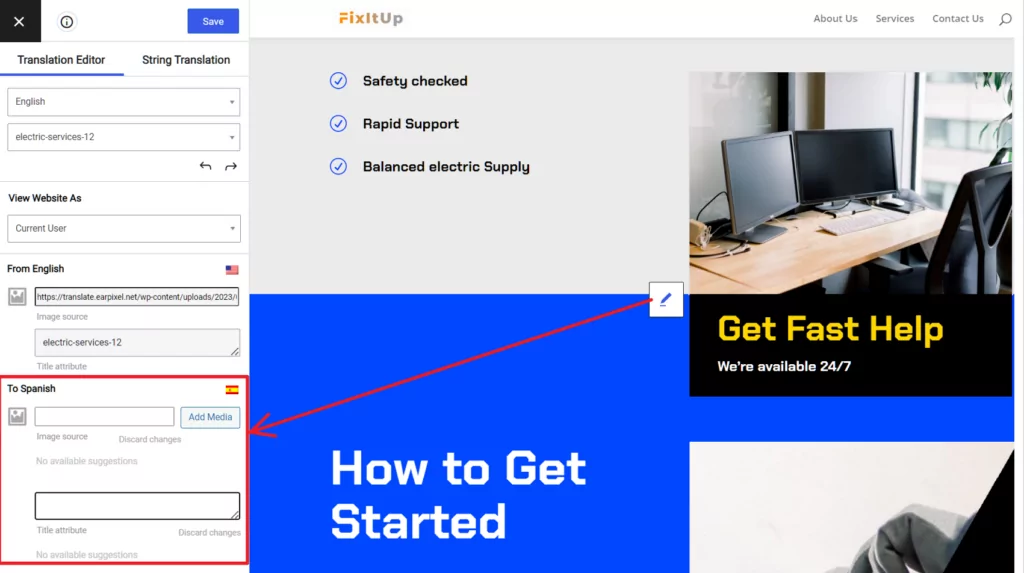
In fact, you can use this approach to translate pretty much any content on your WordPress site, even if it came from a separate plugin or theme.
We have detailed tutorials on how to translate some of the most common elements of a multi language website:
- WordPress forms
- WordPress menus
- Images
- Popup content
- Sliders
- WordPress page builder content from Elementor, Divi, and more
- WooCommerce products
- Gutenberg blocks
- Custom fields
- Custom post types
To translate the rest of your multi language website, all you need to do is repeat the same process for other pages. And remember – if you have a lot of content, you can always go back and enable automatic translation to save some time.
5. Configure Your Language Switcher
By default, TranslatePress adds a floating language switcher to your site immediately after you add a translation language. If the default appearance works for you, you don’t need to change anything.
However, if the default settings are not enough, there are plenty of customization options available for you.
To customise your alnguage switcher, go to the Language Switcher tab in your TranslatePress Settings (in the top navigation bar of the plugin). You’ll find three sub-tabs:
Floating Switcher
The floating switcher stays visible in a fixed corner of every page — the most discoverable option for first-time visitors.
Customisation options include:
- Four design presets to get started quickly: Default, Dark, Border, and Transparent
- Full colour control: background, hover, text, and border colours
- Individual border radius controls for each corner
- Flag shape: rectangle, square, round
- Language display: full names, short names, or no names
- Flag icon position: before language name, after, or hidden
- Desktop and Mobile layout settings independently
- Position: Bottom Right, Bottom Left, Top Right, or Top Left
- Custom CSS editor for fine-grained control
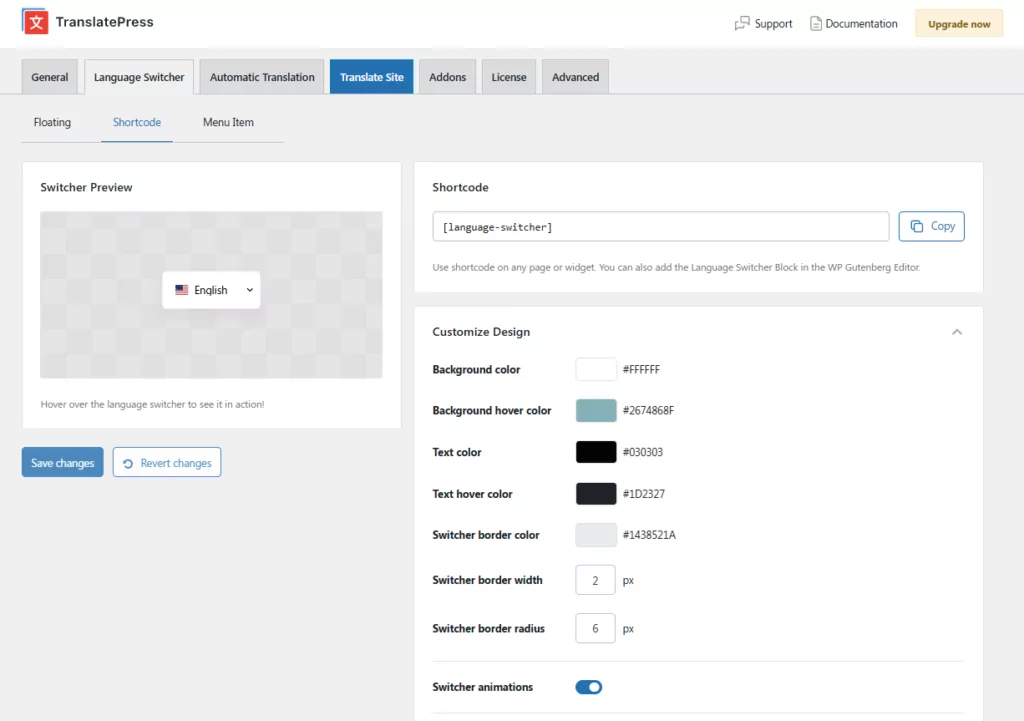
Shortcode/Block Switcher
Use the Language Switcher block or shortcode
The shortcode switcher has the same design customisation options as the floating switcher. However, a shortcode-exclusive option is the Open on click feature. Checking this makes the switcher open on click rather than hover. It closes when clicked again, when clicking elsewhere on the page, or when pressing Escape.
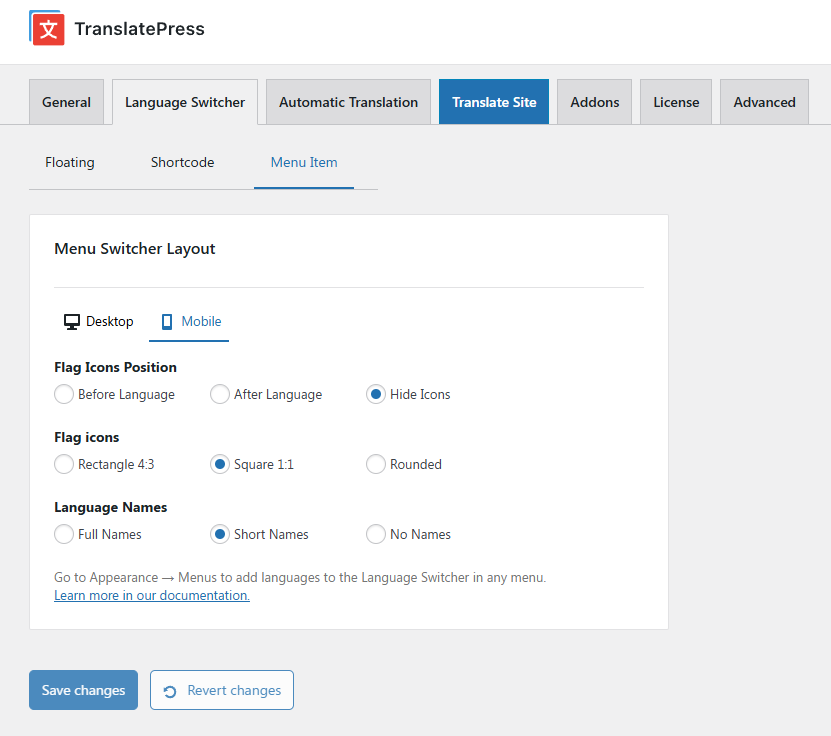
Menu Item Switcher
To add the language switcher to a WordPress navigation menu, go to Appearance → Menus and add language items from the Language Switcher section. There are no colour or design controls for this switcher type — it inherits your theme’s menu styling automatically.
The menu switcher supports the same flag and language name options as the other switcher types.
Launch Your Multi Language Website Today
As the examples above show, going multilingual is one of the most effective ways to grow your organic traffic, reach new audiences, and make your website genuinely accessible to the global internet.
WordPress is the best platform to build that multilingual site — it gives you full control over SEO, design, and content structure, and it’s the platform most translation tools are built for.
With TranslatePress, you get a visual translation workflow that makes the process fast and manageable regardless of your technical background. Install the free plugin, add your target language, and you can have a working multilingual site live in under an hour.
TranslatePress Multilingual
With TranslatePress, your multilingual website will have:
- Multilingual SEO best practices to rank each language in Google.
- Fast-loading translations to create a better user experience.
- Complete translations with the option to localize every single element on your site, including images, forms, and more.
- A customisable language switcher that fits your design
You can follow this tutorial and get started with the free version of TranslatePress. Then, consider upgrading to the premium version for:
- Improved multilingual SEO features & support for all major SEO plugins;
- Bigger AIword packages for TranslatePress AI
- Access to the DeepL machine translation service;
- The ability to translate your site into unlimited new languages (the free version lets you translate your site into one new language);
- Special dedicated translator accounts to help you work with freelance translators or other services
- Automatic language detection.
To get the most from your multi language website check out the full list of TranslatePress features.
If you found this post helpful, please check out our YouTube channel, where we constantly upload short & easy-to-follow video tutorials. You can also follow us on Facebook and Twitter to be the first to know each time we post.


really good ……. i wan to use this website to change the world !