
In questo post
Hai difficoltà con la traduzione di LearnDash?
Se desideri raggiungere un pubblico più ampio per i tuoi corsi, imparare a tradurre LearnDash è fondamentale.
Oltre a rendere più facile per un pubblico multilingue la fruizione dei contenuti del tuo corso, puoi anche costruire un pubblico più ampio fin dall'inizio tramite la SEO multilingue e il social media marketing.
Ma se non hai mai creato prima un corso LearnDash multilingue, può essere difficile sapere dove iniziare.
Ecco a cosa serve questo post...
Inizieremo discutendo le diverse opzioni per la traduzione di LearnDash. Poi, vi mostreremo passo dopo passo come creare un corso multilingue utilizzando la versione freemium Plugin TranslatePress.
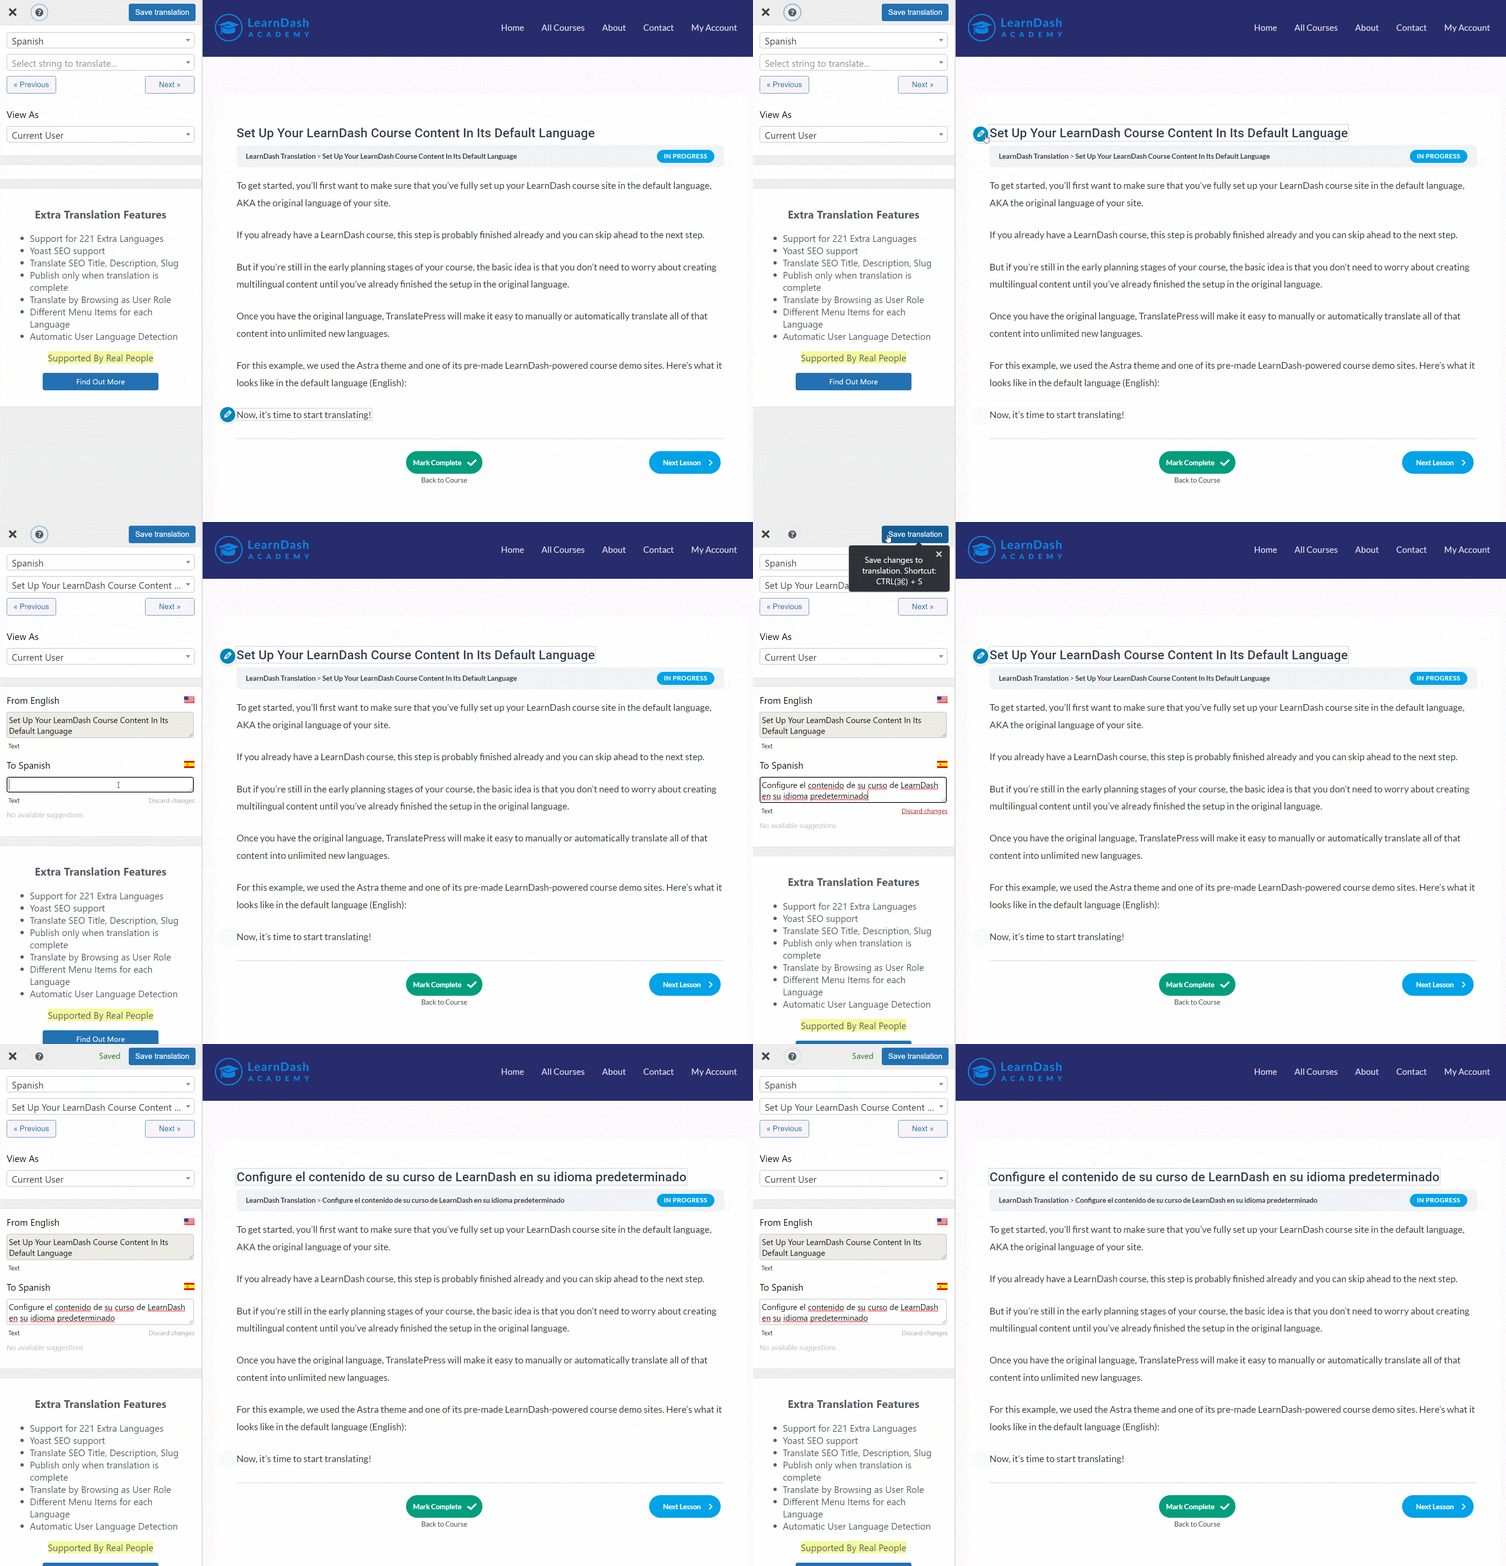
Questo metodo non richiede alcuna conoscenza tecnica speciale. Infatti, dai contenuti del corso ai quiz e alle attività, sarai in grado di gestire tutte le tue traduzioni utilizzando un semplice editor visivo come questo:
Pronto per iniziare? Iniziamo a tradurre...
Ciò di cui hai bisogno per la traduzione di LearnDash nel 2026 e oltre
Quando si tratta della traduzione di LearnDash, hai a disposizione diverse opzioni:
- Plugin multilingua dedicati – puoi usare un plugin multilingue dedicato come TranslatePress per creare un pezzo di contenuto separato per ciascuna lingua. Ad esempio, l'URL della lezione in inglese potrebbe essere yoursite.com/example-course/lesson mentre la versione spagnola potrebbe essere a yoursite.com/it/example-course/lesson.
- WordPress multisito – puoi usare WordPress multisite per creare un sito di rete separato per ciascuna lingua.
- Traduzione dinamica – puoi utilizzare la traduzione dinamica per tradurre ogni pagina al volo. Ogni pagina avrà un solo URL (a differenza del plugin multilingue) e utilizzerai un servizio per tradurre dinamicamente il contenuto nella lingua preferita del visitatore. Per questo, c'è strumenti come questo.
Per la maggior parte dei corsi LearnDash, l’approccio basato sui plugin multilingue risulterà ottimale, poiché offre il miglior equilibrio tra flessibilità, controllo e facilità d’uso. Per quanto riguarda i plugin multilingue, consigliamo ovviamente TranslatePress – ne parleremo più approfonditamente tra un attimo.
Ecco perché un plugin multilingua è la scelta più logica
Qual è il problema degli altri metodi? Beh, sebbene ognuno abbia dei vantaggi, ci sono anche grandissimi svantaggi che superano i benefici.
Ad esempio, l'utilizzo di WordPress multisite offre molta flessibilità e controllo perché è possibile personalizzare completamente ogni sito del network per ciascuna lingua, ma aggiunge molta complessità al tuo corso e rende difficile mantenere sincronizzati i contenuti del corso poiché ciascun sito del network è separato dagli altri.
L'utilizzo di un plug-in di traduzione dinamica è semplicissimo perché è pronto all'uso, ma limita la flessibilità e il controllo poiché non è possibile perfezionare o modificare manualmente le traduzioni, dal momento che avvengono in modo dinamico. In pratica, bisogna fidarsi del servizio di traduzione automatica affinché generi traduzioni perfette, il che non è sempre così. Inoltre, non potrete beneficiare della SEO multilingue perché non esistono versioni statiche dei contenuti tradotti.
Con TranslatePress, ottieni un buon mix. È comunque facilissimo da usare perché puoi essere operativo in pochissimi minuti e gestire tutto da un editor visivo. Hai anche la possibilità di utilizzare un servizio di traduzione automatica per generare le tue traduzioni di base.
Allo stesso tempo, però, avrai il pieno controllo (100%) sulle tue traduzioni. Potrai perfezionare manualmente ogni parola presente nel tuo corso. Anche se utilizzi la traduzione automatica, potrai comunque modificare integralmente tali traduzioni, poiché TranslatePress le salverà localmente anziché tradurle dinamicamente al volo.
Puoi anche andare oltre il testo e “tradurre” le immagini e i video del tuo corso, in modo che gli studenti vedano contenuti multimediali diversi in base alla lingua scelta. Questo ti aiuta ad andare oltre la semplice traduzione e a localizzare completamente i tuoi corsi LearnDash.
In sintesi, è per questo che riteniamo che TranslatePress sia la soluzione migliore per la traduzione di LearnDash, ed è per questo che lo useremo nel tutorial che segue.
Come tradurre LearnDash con TranslatePress
Ora che abbiamo illustrato brevemente la teoria alla base della creazione di un corso multilingue su LearnDash, passiamo alla guida pratica passo dopo passo su come tradurre il tuo corso utilizzando TranslatePress.
Sarai in grado di seguire la maggior parte di questo tutorial usando la versione gratuita di TranslatePress su WordPress.org.
Tuttavia, ci sono alcune situazioni in cui potresti voler acquistare la versione premium di TranslatePress, che non mancheremo di segnalare nella nostra guida.
Per un corso LearnDash, i principali vantaggi di l'acquisto della versione premium sono i seguenti:
- Supporto linguistico illimitato – la versione gratuita ti permette di aggiungere una nuova lingua (due sole lingue), ma la versione premium supporta lingue illimitate.
- SEO multilingue – la versione premium aggiunge funzionalità per migliorare la SEO multilingue del tuo corso, come la possibilità di tradurre i metadati SEO.
- Supporto DeepL – La versione gratuita consente di utilizzare Google Translate per la traduzione automatica, ma per utilizzare DeepL è necessaria la versione premium.
- Account di traduttore – puoi creare account di traduttori dedicati. Questo potrebbe essere utile se desideri lavorare con un traduttore freelance e/o se consentite a istruttori di terze parti di creare corsi e desiderate permettere a tali istruttori di tradurre i propri corsi.
- Visualizza come ruoli utente differenti – se utilizzi un plugin di abbonamento per mostrare contenuti diversi in base al ruolo dell'utente, questa funzione ti permette di usare l'editor visivo per tradurre tutti i tuoi contenuti. Questo avrà più senso più avanti.
Ecco come funziona…
TranslatePress Multilingue
1. Configura i contenuti del tuo corso LearnDash nella lingua predefinita
Per iniziare, ti consigliamo innanzitutto di assicurarti di aver configurato completamente il tuo sito del corso LearnDash nella lingua predefinita, ovvero la lingua originale del tuo sito.
Se hai già un corso LearnDash, probabilmente questo passaggio è già stato completato e puoi passare direttamente al passaggio successivo.
Ma se sei ancora nelle prime fasi di pianificazione del tuo corso, l'idea di fondo è che non devi preoccuparti di creare contenuti multilingue finché non avrai completato la configurazione nella lingua originale.
Una volta che avrai il testo in lingua originale, TranslatePress ti consentirà di tradurre facilmente, in modo manuale o automatico, tutti quei contenuti in un numero illimitato di nuove lingue.
Per questo esempio abbiamo utilizzato il tema Astra e uno dei suoi siti dimostrativi preconfigurati basati su LearnDash. Ecco come appare nella lingua predefinita (inglese):

Bene, è ora di iniziare a tradurre!
2. Installa TranslatePress e seleziona le lingue
Il prossimo passo consiste nell'installare e attivare il plugin TranslatePress sul tuo sito LearnDash.
Se stai utilizzando la versione gratuita, puoi installa il plugin direttamente da WordPress.org. Se sei utilizzando TranslatePress Premium, puoi scaricare il plugin da la dashboard del tuo account TranslatePress.
Una volta che attivi il plugin, vai su Impostazioni → TranslatePress nella dashboard del tuo sito WordPress e seleziona le lingue del tuo corso:
- Lingua predefinita – la lingua originale del tuo corso, ovvero la lingua in cui sono attualmente redatti i contenuti del corso.
- Tutte le lingue – una o più nuove lingue in cui desideri tradurre i contenuti del tuo corso. La versione gratuita di TranslatePress ti consente di aggiungere una nuova lingua, mentre la versione premium di TranslatePress supporta un numero illimitato di lingue.
Ad esempio, se il tuo corso LearnDash è attualmente in inglese e desideri tradurlo in spagnolo, dovresti configurare le impostazioni in questo modo: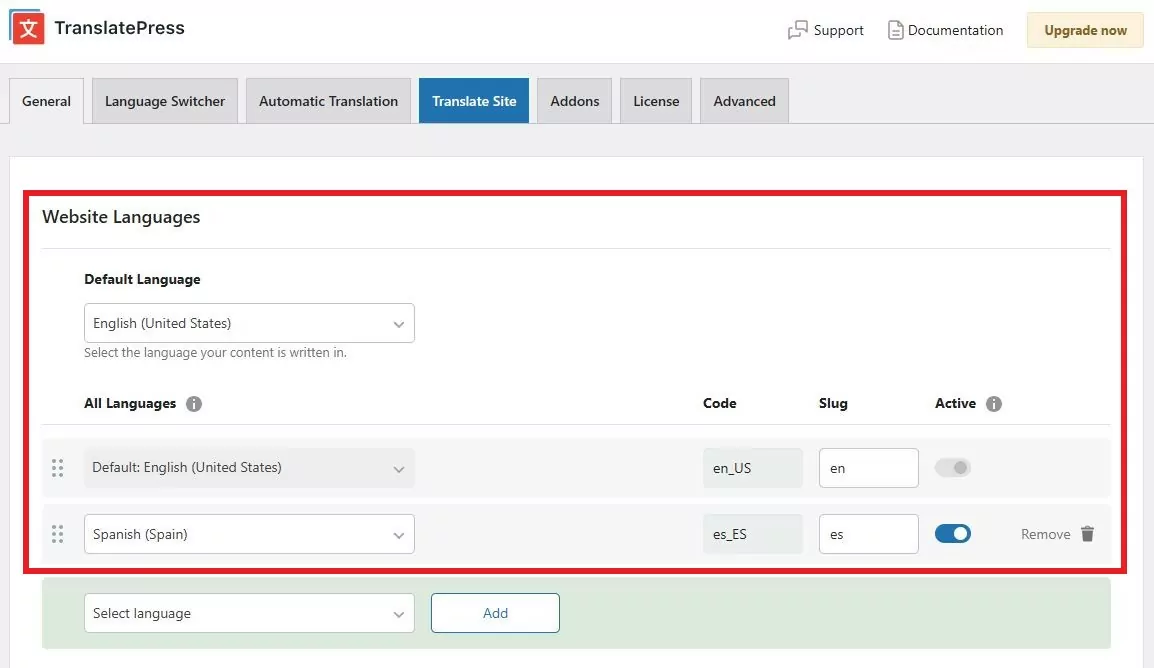
TranslatePress offre il supporto integrato per centinaia di lingue e impostazioni regionali, quindi dovresti riuscire a trovare la lingua o le lingue desiderate dal menu a tendina. Tuttavia, se non riesci a trovare la lingua che desideri utilizzare, TranslatePress ti permette anche di aggiungi una lingua personalizzata.
Per farlo, basta andare alla pagina Avanzato scheda delle impostazioni TranslatePress e scorrendo verso il basso fino a il Lingua personalizzata impostazioni.
3. Configurazione della traduzione automatica di LearnDash (facoltativo)
Se vuoi risparmiare tempo nella traduzione dei contenuti del tuo corso, TranslatePress supporta la traduzione automatica — ed è completamente facoltativa. Se preferisci tradurre da zero, passa direttamente al Passo 4. Anche se utilizzi la traduzione automatica, ogni traduzione generata può comunque essere modificata manualmente nell'editor visivo.
Il punto di partenza più semplice: TranslatePress AI
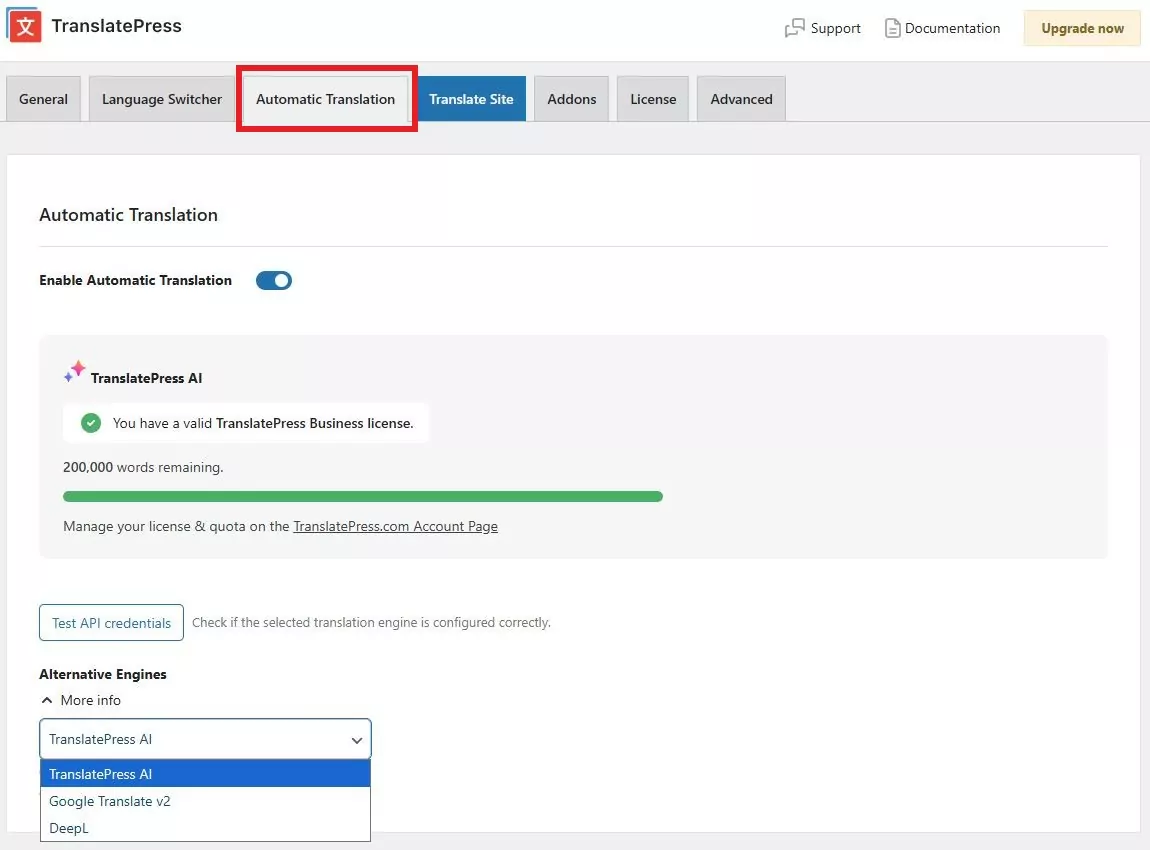
TranslatePress AI è il motore di traduzione integrato nel plugin stesso: nessuna chiave API, nessun account esterno, nessuna configurazione aggiuntiva. È disponibile una licenza AI gratuita se iscriviti qui, rendendolo il modo più semplice per far tradurre automaticamente il tuo corso. I piani a pagamento includono un determinato numero di parole tradotte tramite IA. Se hai bisogno di un numero maggiore di parole con un piano a pagamento, puoi ricaricare i crediti direttamente dal tuo account TranslatePress.
Preferisci un'API di traduzione esterna?
TranslatePress si collega anche a Google Translate e DeepL:
- Google Traduttore — disponibile su tutti i piani, compresa la versione gratuita, utilizzando la propria chiave API di Google Cloud. Ecco come crearne uno. TranslatePress non applica alcun costo per l'utilizzo di Google Translate, ma se si supera il limite gratuito previsto da Google (~500.000 caratteri al mese) si applicano le tariffe di Google.
- DeepL — disponibile nei piani Business e Developer, utilizzando la propria chiave API DeepL. Ecco la guida alla configurazione di DeepL. Se stai valutando le due opzioni esterne, abbiamo un Confronto dettagliato tra Google Translate e DeepL.
Come attivarlo
Vai al Traduzione automatica scheda nelle impostazioni di TranslatePress, e abilitare traduzione automatica e scegli il motore di traduzione. TranslatePress ti permette inoltre di impostare un limite massimo di caratteri al giorno, utile per tenere sotto controllo i costi se utilizzi un'API esterna a pagamento.
Nota per gli utenti di Google Translate e DeepL: TranslatePress non addebita alcun costo in base all'utilizzo del servizio di traduzione automatica, ma potrebbe essere necessario pagare direttamente Google Translate o DeepL se si superano i limiti previsti dai loro piani gratuiti (ovvero circa 500.000 caratteri al mese).
Una volta salvate le modifiche, TranslatePress inizierà a tradurre automaticamente i contenuti del tuo corso. Nel passaggio successivo potrai rivedere e modificare qualsiasi elemento nell'editor visivo.
4. Tradurre i contenuti dei corsi di LearnDash utilizzando l'editor visivo
Ora sei pronto per aprire l'editor di traduzione visiva e iniziare a tradurre il tuo corso LearnDash:
- Se hai utilizzato la traduzione automatica, le traduzioni nell'editor verranno precompilate con la traduzione fornita dal servizio che hai scelto.
- Se non hai utilizzato la traduzione automatica, i campi di traduzione saranno inizialmente vuoti e dovrai aggiungere tutte le traduzioni manualmente.
Parliamo innanzitutto, a grandi linee, di come funziona l’editor TranslatePress e poi approfondiremo come tradurre parti specifiche di LearnDash.
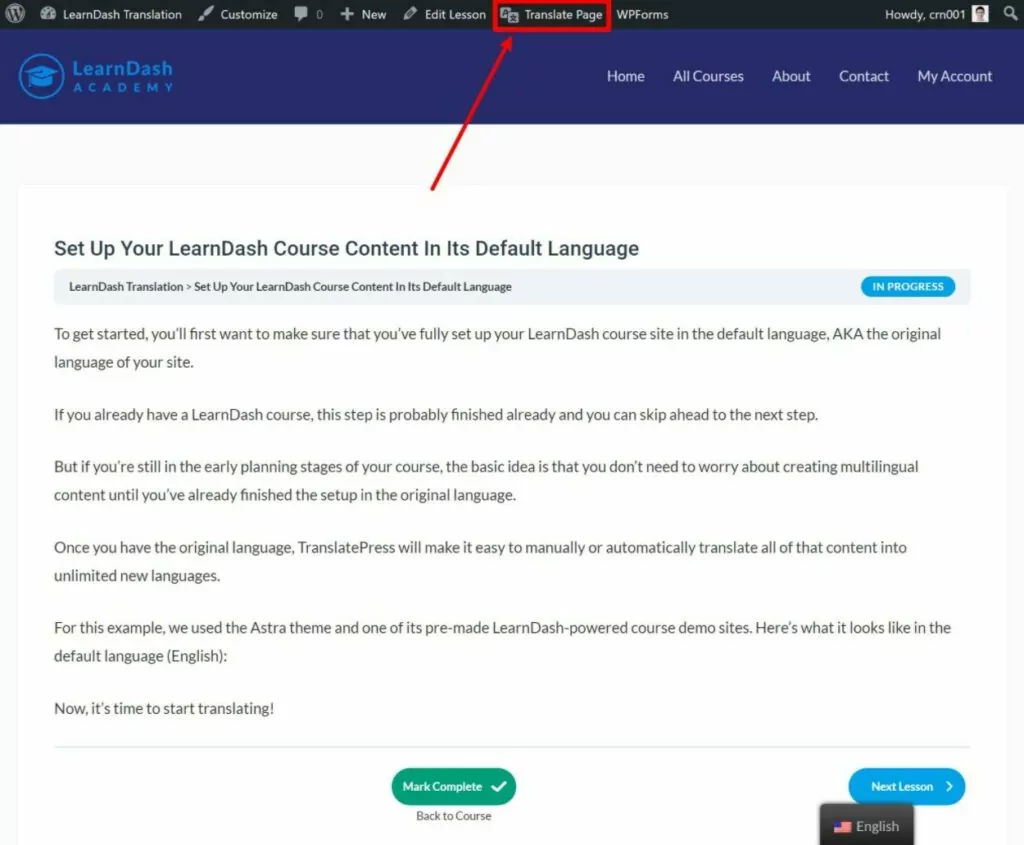
Per aprire l'editor TranslatePress, devi prima visitare la pagina che desideri tradurre nell'interfaccia pubblica del tuo sito. Quindi, clicca su "Nuovo" Traduci pagina opzione nella barra degli strumenti di WordPress:
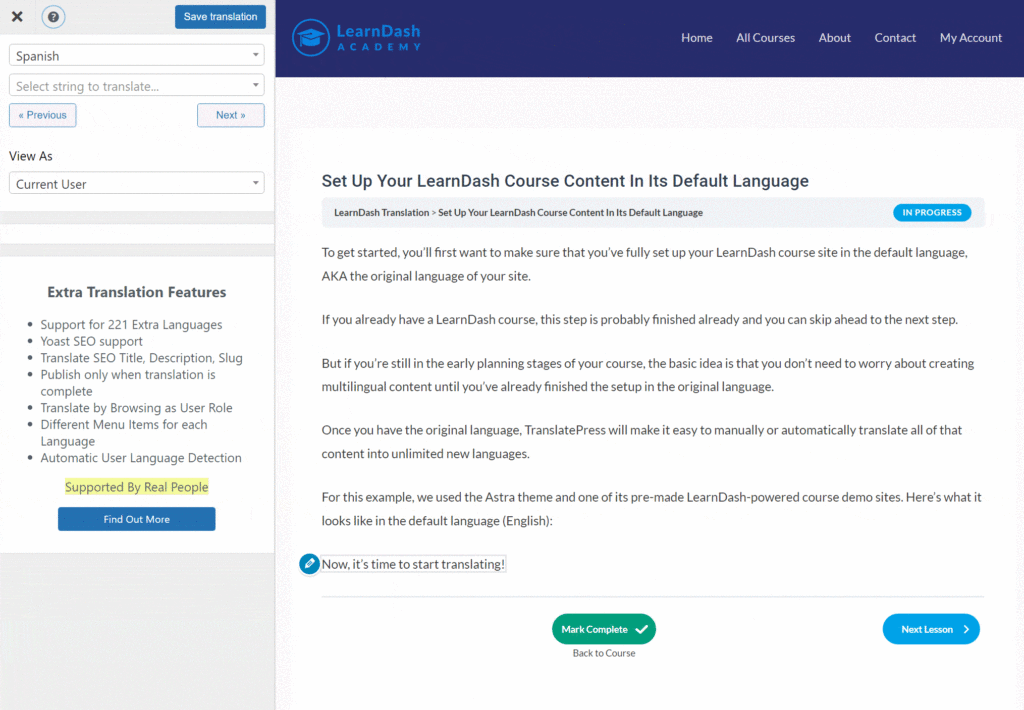
Ora sarai nell'editor visivo che funziona molto come il Personalizzatore nativo di WordPress. Vedrai un'anteprima dal vivo del tuo sito sulla destra e una barra laterale sulla sinistra in cui puoi gestire le tue traduzioni.
Per tradurre qualsiasi testo o elemento della pagina, basta passarci sopra con il mouse e cliccare sull'icona della matita. Questo aprirà la traduzione nella barra laterale dove potrai apportare le tue modifiche:
E questo è tutto! Puoi ripetere il processo per tradurre altri contenuti.
Diamo un'occhiata ad alcuni esempi specifici…
Come tradurre il testo dei corsi di LearnDash
Ti abbiamo già mostrato come tradurre il testo del corso LearnDash nell'esempio sopra: basta passarci sopra con il mouse e fare clic sull'icona a forma di matita.
Come tradurre le immagini dei corsi di LearnDash
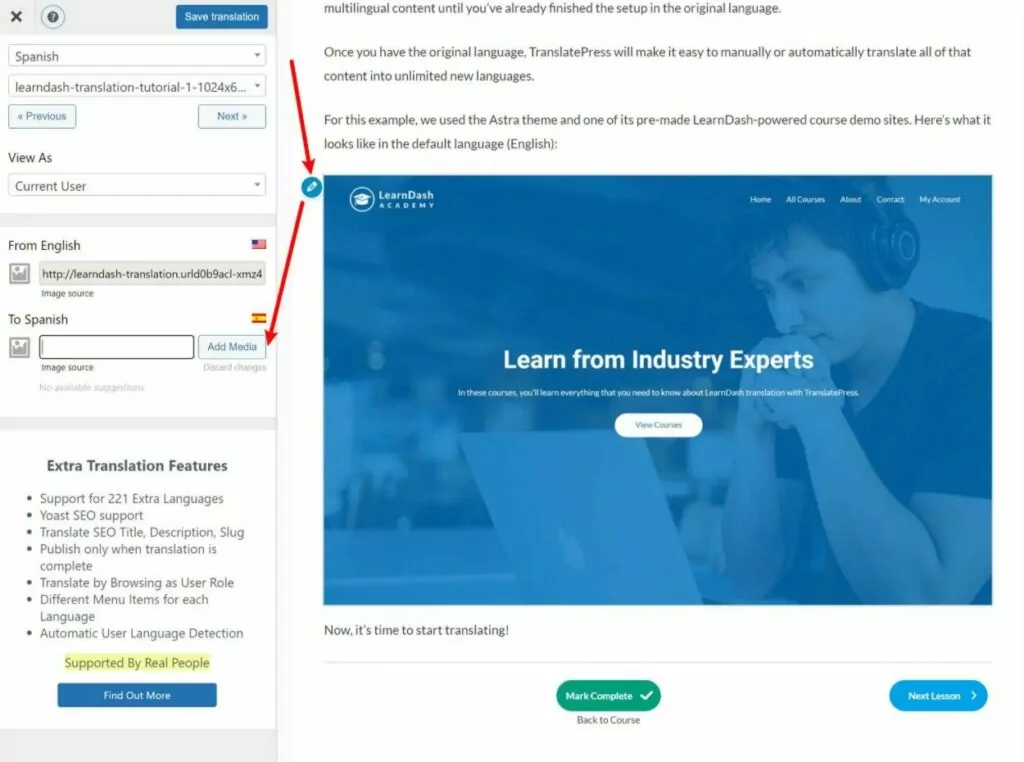
A traduci immagini nel contenuto del tuo corsoo altrove sul tuo sito), puoi utilizzare lo stesso approccio punta e clicca. Ti basta passare il mouse sull'immagine che desideri tradurre e fare clic sull'icona della matita.
Quindi potrai scegliere/caricare un nuovo file immagine dalla tua Libreria media.
Se applicabile, potrai anche tradurre il titolo dell'immagine e il testo altPresto altre informazioni sulla traduzione dei metadati SEO):
Come tradurre i video dei corsi di LearnDash
I contenuti video sono un elemento che non è possibile tradurre tramite l'editor visivo di TranslatePress. Tuttavia, se desideri offrire contenuti video multilingue, puoi comunque tradurli: ti basterà farlo tramite l'editor delle lezioni con lo shortcode di traduzione.
Per iniziare, apri l'editor per la lezione con il video che desideri tradurre.
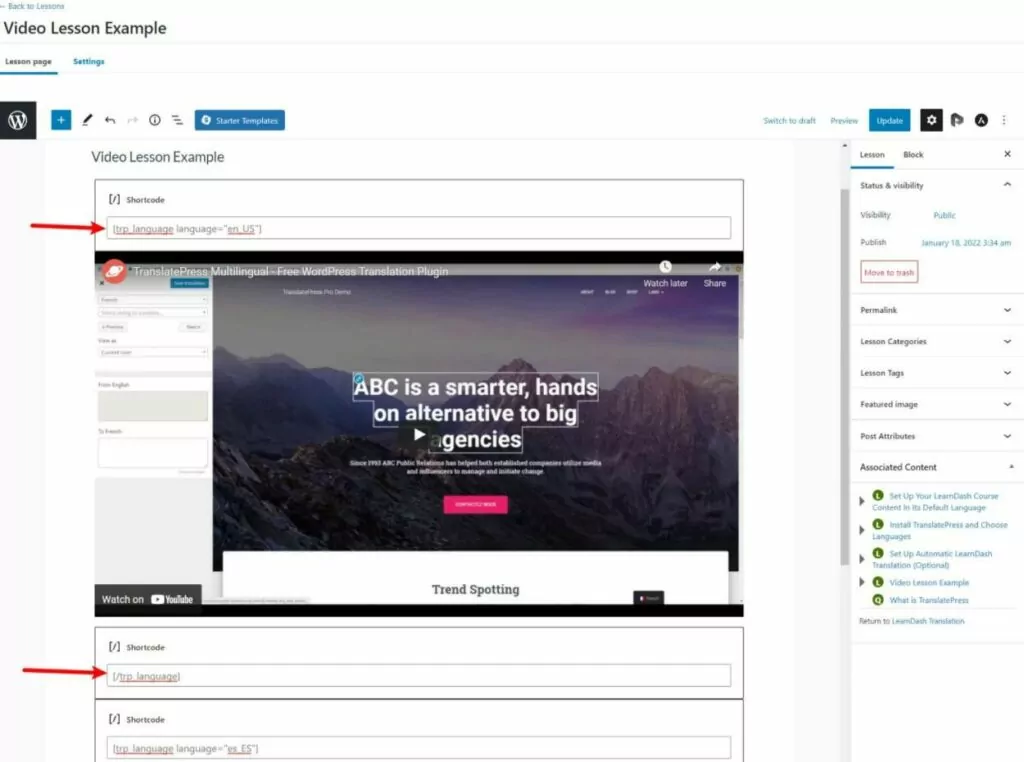
Se hai aggiunto il video direttamente all'editor, tutto ciò che devi fare è racchiudere il video nello shortcode per la lingua pertinente. Dopodiché, puoi aggiungere un altro video per l'altra lingua e racchiudere anch'esso nello shortcode pertinente.
Quando qualcuno visualizza la lezione nel front-end, vedrà solo il video applicabile alla propria lingua:
Se utilizzi la funzione di progressione video di LearnDash, non potrai racchiudere l'embed del video negli shortcode perché aggiungi il link del video direttamente nelle impostazioni della lezione anziché nell'editor.
Un modo per aggirare questo problema è utilizza l'integrazione di LearnDash con Presto Player. Quando fai questo, LearnDash utilizzerà Presto Player incorporato per la progressione dei suoi video. Presto Player viene effettivamente visualizzato nell'editor, il che ti consente di racchiuderlo in degli shortcode.
Come gestire il contenuto ristretto (utenti diversi vedono contenuti diversi)
Se hai ho aggiunto la funzionalità di sito per membri al tuo corso con un plugin come Paid Member Subscriptions o di un'altra delle integrazioni di plugin per membership di LearnDash, potresti trovarti in situazioni in cui gli utenti con differenti ruoli utente vedi contenuti diversi.
Oppure, potresti trovarti in situazioni in cui gli utenti registrati vedono contenuti diversi rispetto agli ospiti anonimi.
Per gestire queste situazioni nell'editor visivo di TranslatePress, TranslatePress offre la possibilità di “visualizzare” ogni pagina dal punto di vista di un diverso tipo di utente.
Puoi fare queste scelte usando il Visualizza come menu a tendina nell'editor:
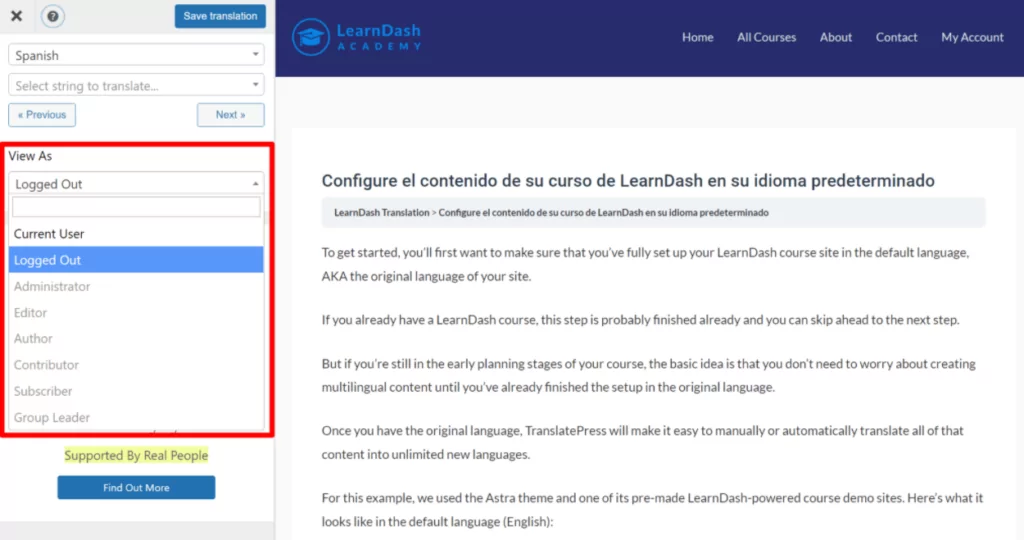
Con la versione gratuita di TranslatePress, puoi visualizzare i tuoi contenuti sia come utente attualmente connesso sia come utente disconnesso. Se aggiornamento a Business licenza, potrai visualizzare i tuoi contenuti come ruoli utente specifici.
Come tradurre i quiz di LearnDash
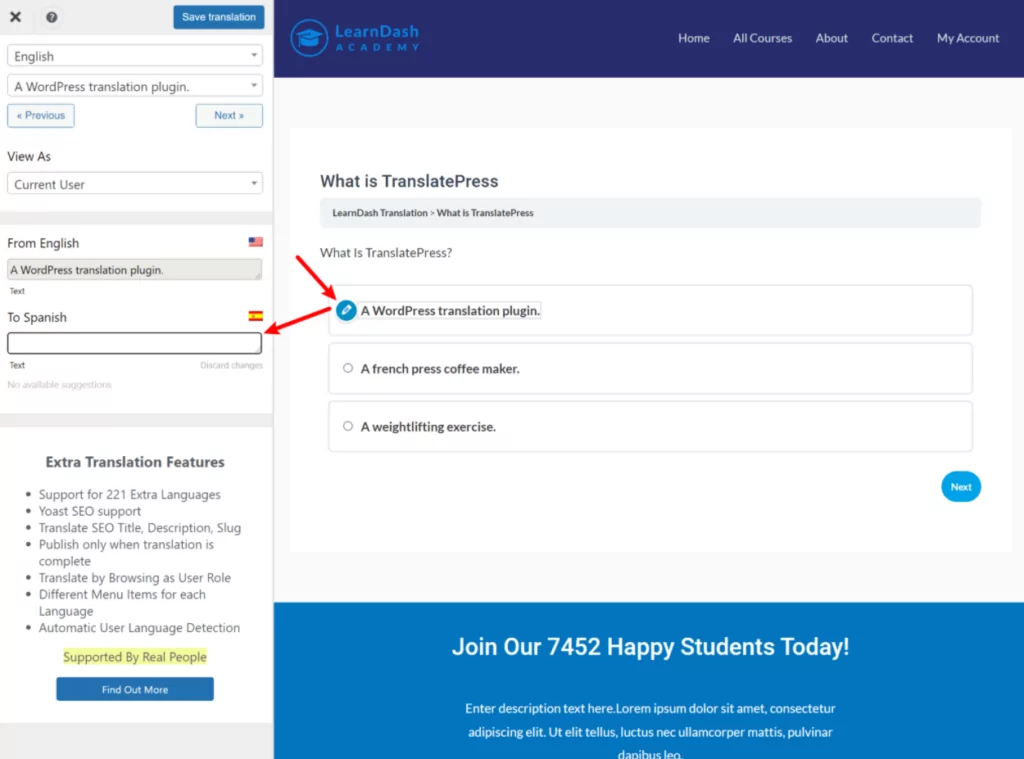
Puoi tradurre i quiz di LearnDash esattamente come gli altri contenuti.
Puoi tradurre domande e risposte usando il "punta e clicca". Quando sei pronto per passare alla domanda successiva, basta fare clic sul pulsante per avanzare:
Come tradurre il menu del tuo sito
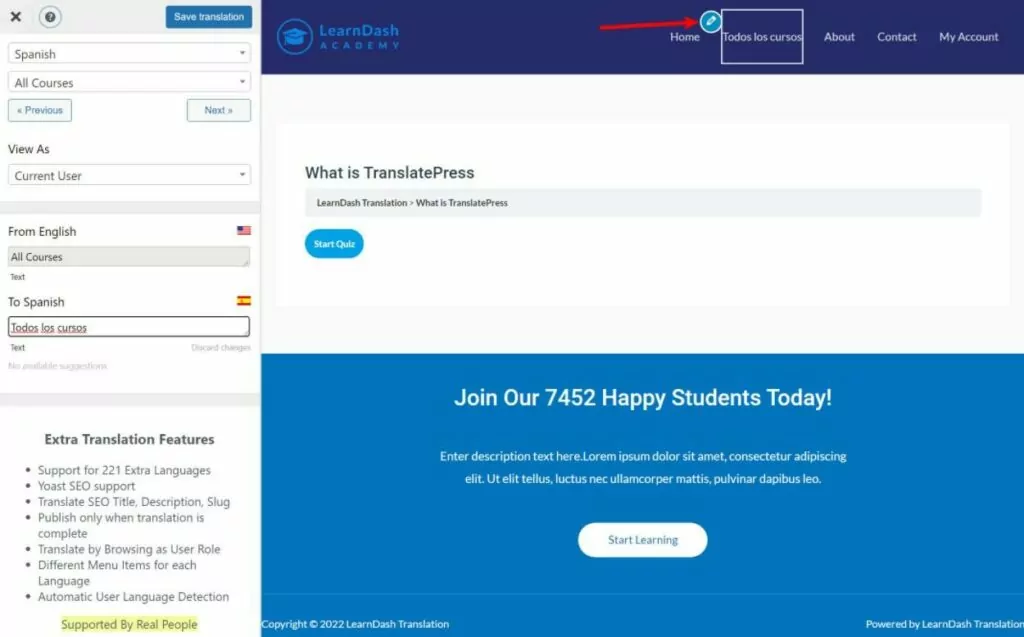
Probabilmente ormai hai capito il concetto – a il menu del tuo corso, ti basta aprire una pagina qualsiasi che contenga quel menu. Puoi quindi passare con il mouse sulla voce di menu e cliccare sull'icona della matita per modificarne la traduzione.
Una volta tradotta la voce di menu una volta, quella traduzione verrà utilizzata automaticamente per ogni istanza in cui compare quel menu:
Con il TranslatePress Business licenza, puoi anche creare menu completamente diversi in base alla lingua dell'utente (piuttosto che limitarsi a tradurre lo stesso set di voci di menu consentito dalla versione gratuita del plugin).
Come tradurre i metadati SEO e gli URL slug
Se vuoi che il tuo corso trarre vantaggio dalla SEO multilingue, vorrai andare oltre la traduzione dei contenuti del frontend sul tuo sito e tradurre anche tutti i metadati SEO (titoli, descrizioni, ecc.) e URL slug.
Per farlo, puoi utilizzare il TranslatePress Componente aggiuntivo pacchetto SEO, che è disponibile su il Personal patente e superiori.
Ad esempio, se stai usando un plugin SEO come Yoast SEO, sarai in grado di traduci i dettagli che aggiungi a Yoast SEO, tra gli altri contenuti SEO.
Una volta attivato il componente aggiuntivo SEO Pack, puoi utilizzare il menu a discesa nell'editor di traduzione per selezionare i tuoi metadati SEO o lo slug dell'URL per quel contenuto:
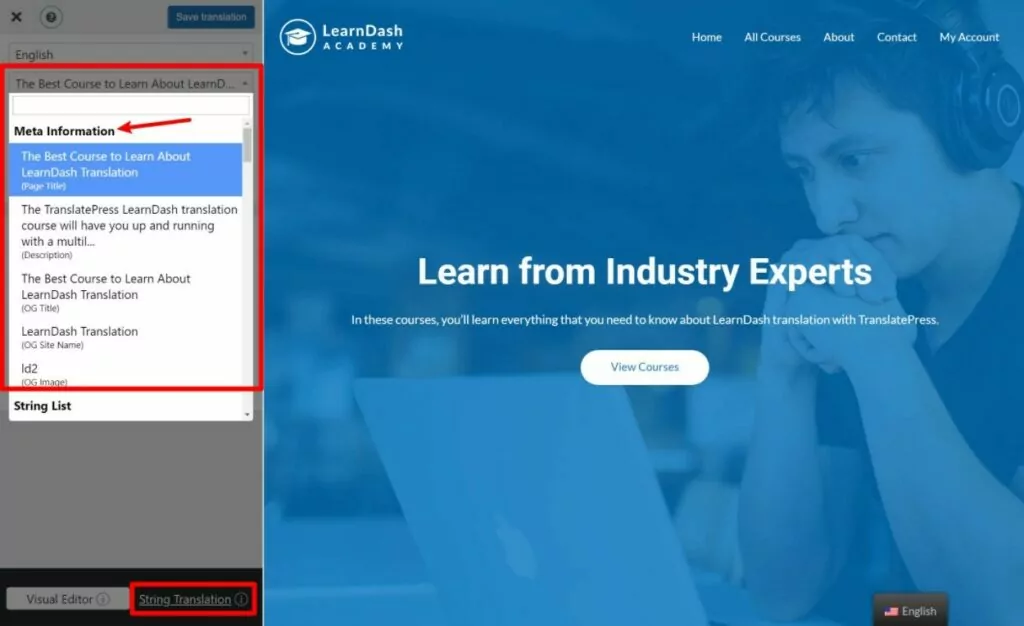
Per tradurre gli slug degli URL su tutto il sito, come lo slug della base delle categorie, puoi aprire il Traduzione stringa interfacciaillustrato sopra).
Come tradurre altri contenuti sul tuo corso LearnDash
Infine, vale la pena notare che puoi utilizzare lo stesso approccio per tradurre qualsiasi altro contenuto frontend sul tuo sito. Potrebbe trattarsi di post del blog, contenuti di altri plugin che stai utilizzando, contenuti del tuo plugin di page builder preferito, moduli, popup e così via.
Per tutte le operazioni utilizzerai lo stesso approccio "punta e clicca", ma se desideri approfondire l'argomento, abbiamo delle guide specifiche:
- Blocchi dell'editor (Gutenberg)
- Campi personalizzati
- Tipi di pubblicazione personalizzati
- Moduli WordPress
- Menu di WordPress
- Contenuto del popup
- Cursori
- Prodotti WooCommerce
- Elementor (page builder)
- Divi (page builder)
- Ossigeno (creatore di siti web)
Come consentire ad altri utenti di tradurre i contenuti
Se hai più docenti e desideri consentire loro di tradurre autonomamente i propri corsi, puoi concedere loro l'accesso alla stessa interfaccia di traduzione visiva che hai visto sopra.
L'opzione più semplice è quella di acquista il TranslatePress Business licenza, che ti offre un ruolo utente dedicato al traduttore che puoi assegnare ai docenti:
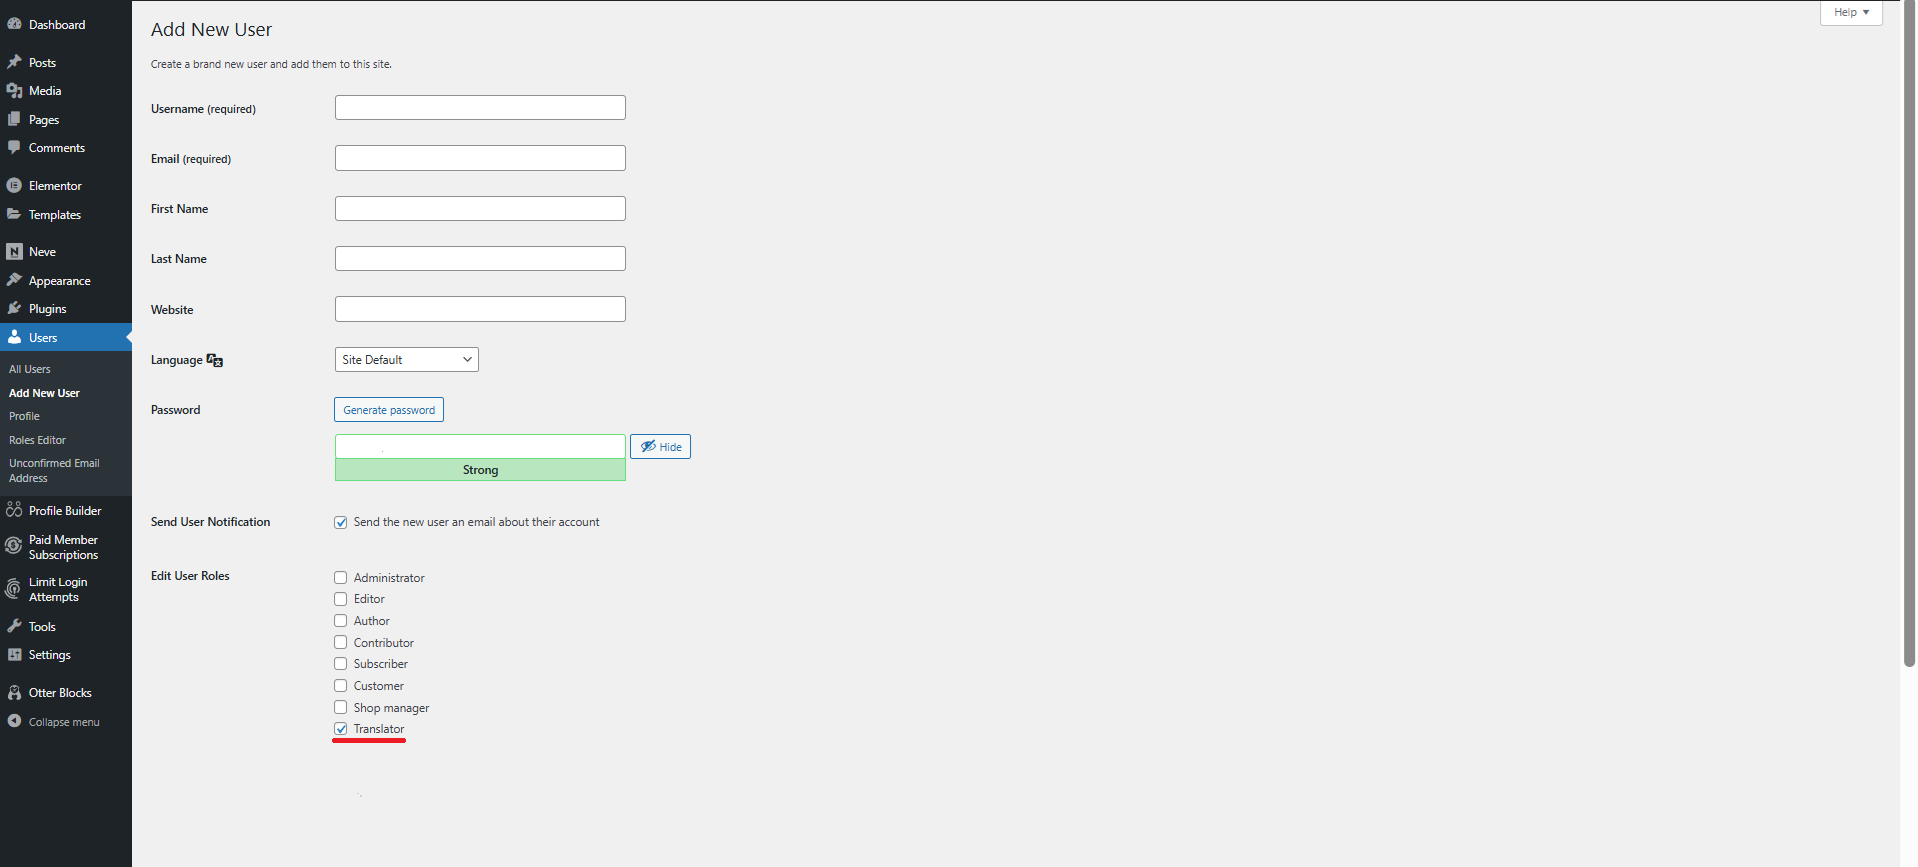
Potranno quindi utilizzare questo ruolo utente per tradurre i propri corsi senza il rischio di accedere al backend del tuo sito.
5. Configurazione di LearnDash selettore di lingua
Per finire, vorrai configurare il selettore di lingua per il tuo corso.
Per impostazione predefinita, TranslatePress aggiunge un elemento selettore di lingua mobile nell'angolo in basso a destra del tuo sito web. Tuttavia, puoi modificare la posizione dell'elemento selettore di lingua mobile e/o scegliere un posizionamento diverso. Ecco le opzioni aggiuntive oltre all'elemento selettore di lingua mobile:
- Voce di menu – aggiungi il tuo selettore di lingua al menu andando su Aspetto → Menu.
- Codice breve – Inserisci il tuo selettore di lingua in qualsiasi punto del tuo sito utilizzando uno shortcode. Puoi aggiungerlo a un widget, nell’editor di contenuti o direttamente nei file dei template del tuo tema utilizzando la funzione do_shortcode.
Per iniziare, ti consigliamo di configurare le impostazioni di base di selettore di lingua, ad esempio se visualizzare o meno le bandierine delle lingue. Vai su Impostazioni → TranslatePress → Cambio lingua scheda: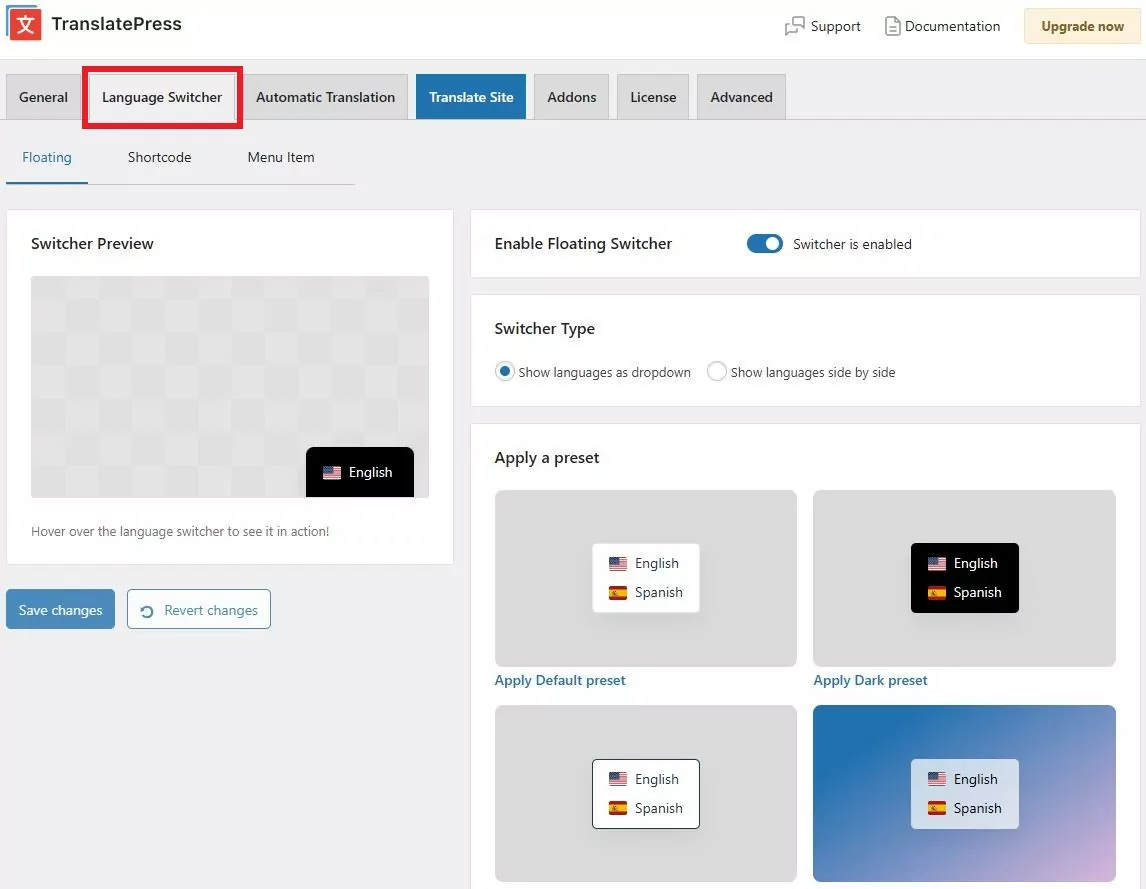
Se desideri utilizzare un posizionamento diverso, puoi procedere con la sua configurazione.
Per il metodo dello shortcode, basta aggiungere lo shortcode nel punto in cui si desidera che appaia selettore di lingua.
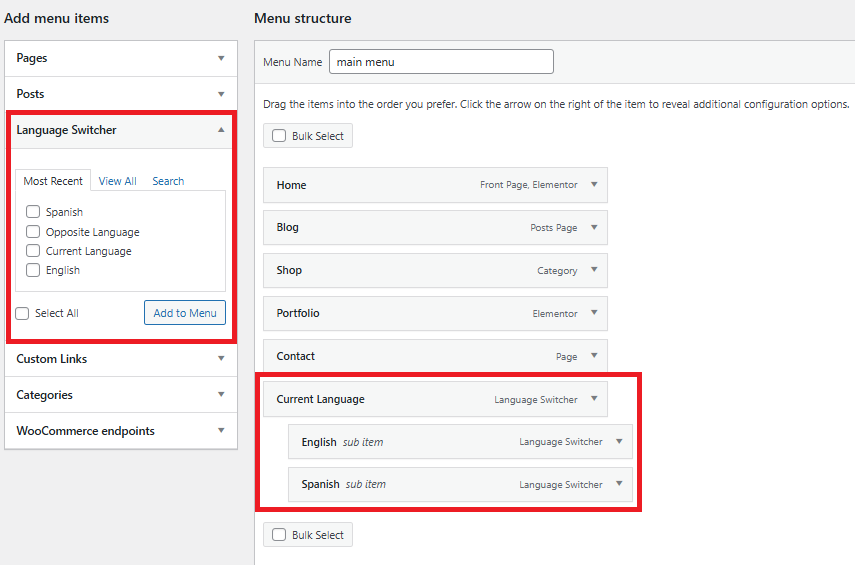
Per il metodo "menu", vai su Aspetto → Menu e aggiungere le voci di menu dedicate selettore di lingua.
Se hai solo due lingue, puoi semplicemente aggiungere il Lingua opposta opzione.
Per altre lingue, è possibile aggiungere il Lingua Corrente Seleziona l'opzione come voce di primo livello del menu, quindi aggiungi le singole lingue come voci del sottomenu per creare un menu a tendina selettore di lingua nel tuo menu:
Ecco come potrebbe apparire sul frontend:

Inizia oggi con la traduzione di LearnDash
Se vuoi creare un corso LearnDash multilingue, TranslatePress offre la soluzione più semplice e completa per la traduzione di LearnDash.
Grazie all'editor visivo di TranslatePress, potrai tradurre tutti i tuoi corsi, argomenti, lezioni, quiz e altro ancora su LearnDash. Potrai inoltre andare oltre il testo e tradurre anche immagini e video.
Se vuoi risparmiare tempo, puoi iniziare con la traduzione automatica — tramite TranslatePress AI, Google Translate o DeepL — e poi correggere manualmente il tutto per garantire ai tuoi studenti un'esperienza di altissimo livello.
Se vuoi provare, puoi Prova la versione gratuita di TranslatePress tradurre LearnDash in una nuova lingua.
Quindi, considera passaggio alla versione premium di TranslatePress per accedere a tantissime funzioni utili, tra cui le seguenti:
- Supporto linguistico illimitato;
- Ottimizzazione SEO multilingue migliorata;
- Integrazione con DeepL;
- Possibilità di visualizzare i contenuti nell'editor di traduzione assumendo diversi ruoli utente;
- Menu separati per lingue diverse;
- Account traduttori dedicati;
- Rilevamento automatico della lingua dell'utente.
TranslatePress Multilingue
Hai ancora qualche domanda sulla traduzione di LearnDash o su come creare corsi LearnDash multilingue? Facci sapere nei commenti!
Se hai trovato utile questo post, ti invitiamo a visitare il nostro Canale YouTube, dove carichiamo costantemente brevi tutorial video facili da seguire. Puoi anche seguirci su Facebook e X per essere tra i primi a sapere ogni volta che pubblichiamo.


La traduzione dei siti LearnDash funziona alla grande ed è semplicissima. In particolare, la modifica dal front-end funziona alla perfezione. Ecco perché abbiamo preferito translatepress rispetto ad altri plugin. Tuttavia, stiamo riscontrando un problema. I certificati di LearnDash funzionano solo nella lingua originale. In tutte le altre lingue si verifica un errore durante la creazione del PDF. Qualcuno ha già avuto esperienze simili?