In this post
In this post
Struggling with LearnDash translation?
If you want to reach a broader audience for your courses, learning how to translate LearnDash is a must.
In addition to making it easier for a multilingual audience to consume your course content, you can also build a bigger audience in the first place via multilingual SEO and social media marketing.
But if you’ve never created a multilingual LearnDash course before, it can be tough to know where to get started.
That’s what this post is for…
We’ll start by discussing the different options for LearnDash translation. Then, we’ll show you step-by-step how to create a multilingual course using the freemium TranslatePress plugin.
This method doesn’t require any special technical knowledge. In fact, from course content to quizzes and assignments, you’ll be able to manage all of your translations using a simple visual editor like this:

Ready to begin? Let’s start translating…
What You Need for LearnDash Translation in 2026 and Beyond
When it comes to LearnDash translation, you have a few different options:
- Dedicated multilingual plugins – you can use a dedicated multilingual plugin like TranslatePress to create a separate piece of content for each language. For example, the English lesson URL might be yoursite.com/example-course/lesson while the Spanish version might be at yoursite.com/es/example-course/lesson.
- WordPress multisite – you can use WordPress multisite to create a separate network site for each language.
- Dynamic translation – you can use dynamic translation to translate each page on the fly. Each page will only have one URL (unlike the multilingual plugin) and you’ll use some service to dynamically translate the content into a visitor’s preferred language. For this, there’s tools like this one.
For most LearnDash courses, the multilingual plugin approach is going to be optimal because it offers the best blend of flexibility, control, and ease of use. When it comes to multilingual plugins, we obviously recommend TranslatePress – more on that in a second.
Here’s Why a Multilingual Plugin Makes the Most Sense
What’s the problem with the other methods? Well, while each does have advantages, there are also very big disadvantages that overpower the benefits.
For example, using WordPress multisite gives you a lot of flexibility and control because you can fully customize each network site for each language, but it adds a lot of complication to your course and makes it difficult to keep course content in sync because each network site is separate from the others.
Using a dynamic translation plugin is super simple because it’s plug and play, but it limits your flexibility and control because you can’t manually refine or edit the translations since they’re happening dynamically. Basically, you have to trust the machine translation service to generate perfect translations, which isn’t always the case. You also won’t be able to benefit from multilingual SEO because there aren’t static versions of the translated content.
With TranslatePress, you get a good blend. It’s still very easy to use because you can be up and running in just a few minutes and manage everything from a visual editor. You also have the option to use a machine translation service to generate your baseline translations.
But at the same time, you’ll get 100% control over your translations. You can manually refine every word that appears on your course. Even if you use machine translation, you can still fully edit those translations because TranslatePress will store them locally rather than dynamically translating on the fly.
You can also go beyond text and also “translate” your course’s images and videos so that learners see different media content based on their chosen language. This helps you go beyond basic translation and fully localize your LearnDash courses.
Overall, that’s why we think TranslatePress is the best option for LearnDash translation, and that’s why we’re going to use it in the tutorial below.
How to Translate LearnDash With TranslatePress
Now that we’ve explained a little bit about the theory behind creating a multilingual LearnDash course, let’s get into the actual step-by-step guide for how to translate your course using TranslatePress.
You’ll be able to follow most of this tutorial using the free version of TranslatePress at WordPress.org.
However, there are a few situations where you might want to purchase the premium version of TranslatePress, which we’ll be sure to note in our guide.
For a LearnDash course, the main benefits of purchasing the premium version are as follows:
- Unlimited language support – the free version lets you add one new language (two languages total), but the premium version supports unlimited languages.
- Multilingual SEO – the premium version adds features to improve your course’s multilingual SEO, such as the ability to translate SEO metadata.
- DeepL support – the free version lets you use Google Translate for automatic translation, but you need the premium version to use DeepL.
- Translator accounts – you can create dedicated translator accounts. This might be useful if you want to work with a freelance translator and/or if you allow third-party instructors to create courses and you want to let those instructors translate their own courses.
- View as different user roles – if you use a membership plugin to show different content based on a user’s role, this feature lets you use the visual editor to translate all of your content. This will make more sense later on.
Here’s how it works…
TranslatePress Multilingual
1. Set Up Your LearnDash Course Content In Its Default Language
To get started, you’ll first want to make sure that you’ve fully set up your LearnDash course site in the default language, AKA the original language of your site.
If you already have a LearnDash course, this step is probably finished already and you can skip ahead to the next step.
But if you’re still in the early planning stages of your course, the basic idea is that you don’t need to worry about creating multilingual content until you’ve already finished the setup in the original language.
Once you have the original language, TranslatePress will make it easy to manually or automatically translate all of that content into unlimited new languages.
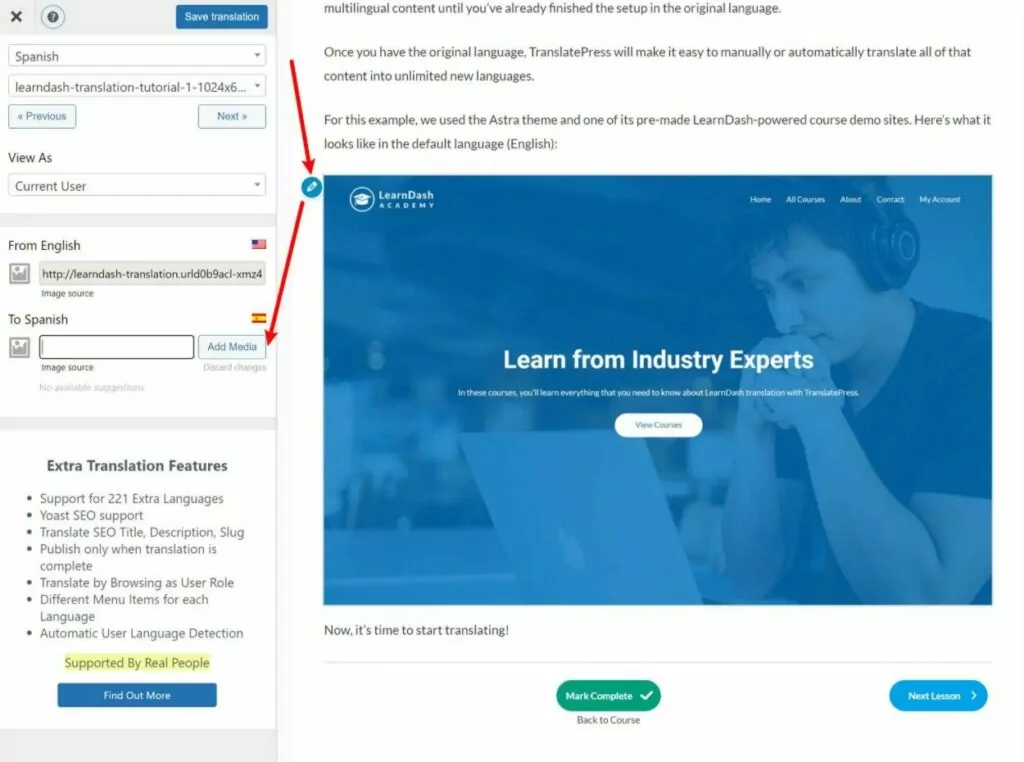
For this example, we used the Astra theme and one of its pre-made LearnDash-powered course demo sites. Here’s what it looks like in the default language (English):

Now, it’s time to start translating!
2. Install TranslatePress and Choose Languages
Next up, you’ll want to install and activate the TranslatePress plugin on your LearnDash site.
If you’re using the free version, you can install the plugin directly from WordPress.org. If you’re using TranslatePress Premium, you can download the plugin from your TranslatePress account dashboard.
Once you activate the plugin, go to Settings → TranslatePress in your WordPress site’s dashboard and choose your course’s languages:
- Default Language – the original language of your course, AKA the language that your course content currently exists in.
- All Languages – one or more new languages into which you want to translate your course content. The free version of TranslatePress lets you add one new language while the premium version of TranslatePress supports unlimited languages.
For example, if your LearnDash course is currently in English and you want to translate it into Spanish, you’d configure things like so: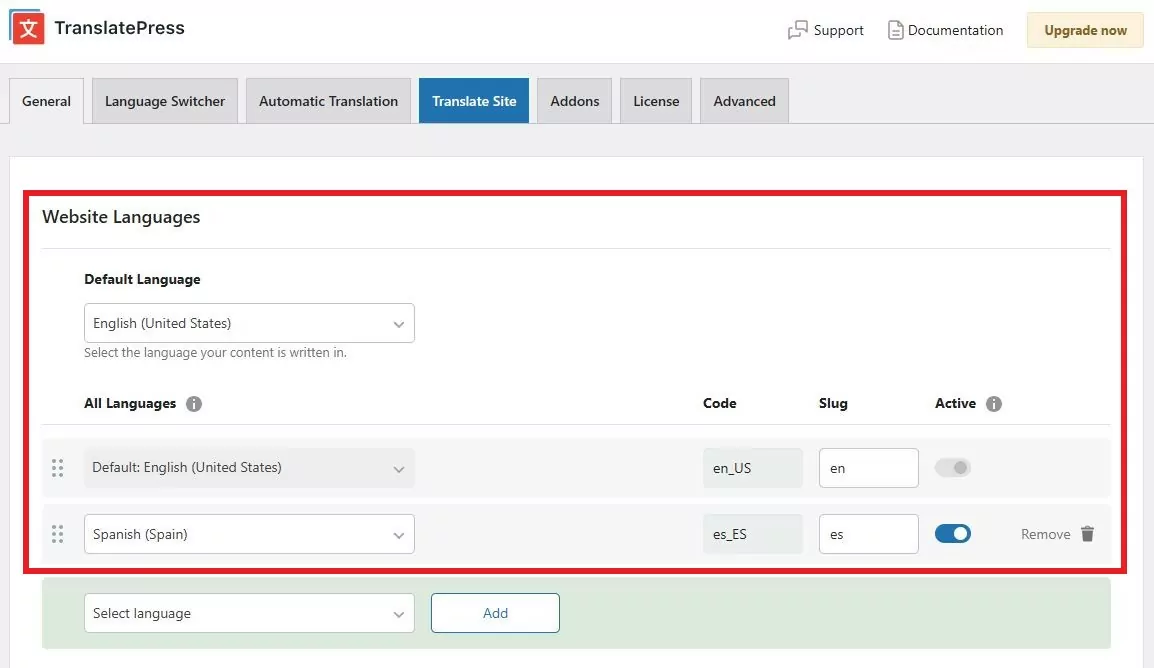
TranslatePress offers built-in support for hundreds of languages and locales, so you should be able to find your desired language(s) from the drop-down. However, if you can’t find the language that you want to use, TranslatePress also lets you add a custom language.
You can do this by going to the Advanced tab of the TranslatePress settings and scrolling down to the Custom language settings.
3. Set Up Automatic LearnDash Translation (Optional)
If you want to save time while translating your course content, TranslatePress supports automatic translation — and it’s completely optional. If you’d rather translate from scratch, skip ahead to Step 4. Even if you do use automatic translation, every generated translation can still be manually edited in the visual editor.
The easiest place to start: TranslatePress AI
TranslatePress AI is the plugin’s own built-in translation engine — no API key, no external account, no extra setup. A free AI license is available if you sign up for it here, making it the lowest-friction way to get your course translated automatically. Paid plans include AI words as part of the plan. If you need more words on a paid plan, you can top up credits directly from your TranslatePress account.
Prefer an external translation API?
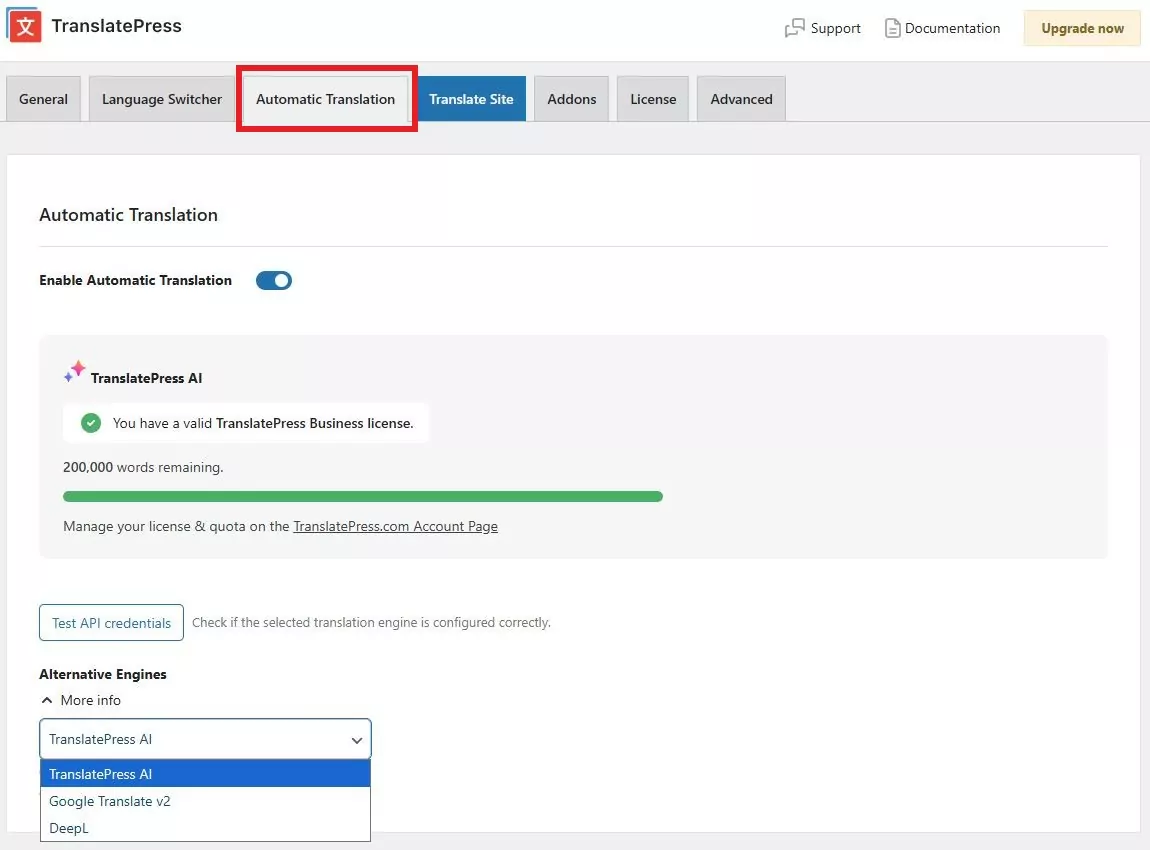
TranslatePress also connects to Google Translate and DeepL:
- Google Translate — available on all plans including the free version, using your own Google Cloud API key. Here’s how to generate one. TranslatePress itself doesn’t charge for using Google Translate, but Google’s own pricing applies if you exceed their free tier (~500,000 characters per month).
- DeepL — available on Business and Developer plans, using your own DeepL API key. Here’s the DeepL setup guide. If you’re weighing the two external options, we have a detailed Google Translate vs DeepL comparison.
How to enable it
Go to the Automatic Translation tab in your TranslatePress settings, and enable automatic translation and choose your engine. TranslatePress also lets you set a maximum character limit per day, which is useful for controlling costs if you’re using a paid external API.
Note for Google Translate & DeepL users: TranslatePress itself doesn’t charge you anything based on your machine translation usage, but you might need to pay Google Translate or DeepL directly if you exceed the limits on their free tiers (which is ~500,000 characters per month).
Once you save your changes, TranslatePress will start translating your course content automatically. You can review and adjust anything in the visual editor in the next step.
4. Translate LearnDash Course Content Using the Visual Editor
Now, you’re ready to open the visual translation editor and start translating your LearnDash course:
- If you used automatic translation, the translations in the editor will be pre-filled with the translation from your chosen service.
- If you didn’t use automatic translation, the translation fields will be empty to start and you’ll need to add all the translations yourself.
Let’s talk about how the TranslatePress editor works at a high level first and then we’ll dig into how to translate specific parts of LearnDash.
To open the TranslatePress editor, you’ll first want to visit the page that you want to translate on the front end of your site. Then, click the new Translate Page option on the WordPress toolbar:
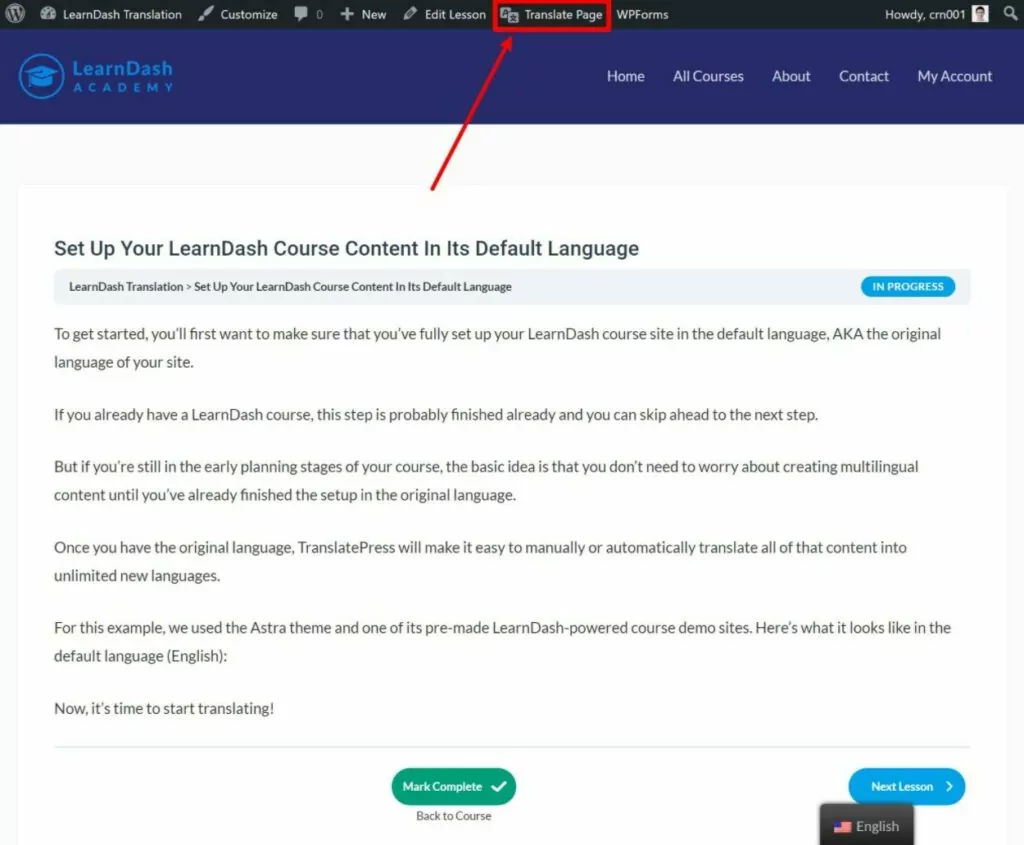
Now, you’ll be in the visual editor that works a lot like the native WordPress Customizer. You’ll see a live preview of your site on the right and a sidebar on the left where you can manage your translations.
To translate any text or element on the page, just hover over it and click the pencil icon. That will open the translation in the sidebar where you can make your changes:
And that’s it! You can repeat the process to translate additional content.
Let’s look at some specific examples…
How to Translate LearnDash Course Text
We already showed you how to translate LearnDash course text in the example above – just hover over it and click the pencil icon.
How to Translate LearnDash Course Images
To translate images in your course content (or anywhere else on your site), you can use the same point-and-click approach. Just hover over the image that you want to translate and click the pencil icon.
Then, you’ll be able to choose/upload a new image file from your Media Library.
If applicable, you’ll also be able to translate the image title and alt text (more on translating SEO metadata soon):
How to Translate LearnDash Course Videos
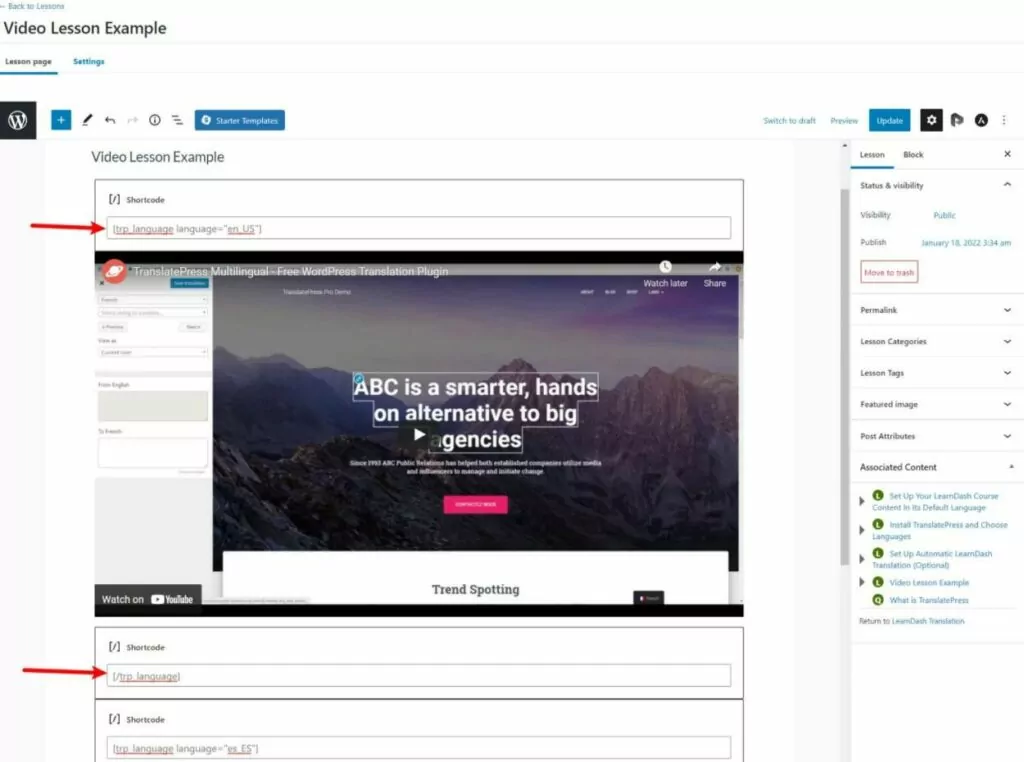
Video content is one detail that you’re not able to translate via TranslatePress’s visual editor. However, you are still able to translate videos if you want to offer multilingual video content – you’ll just need to do it via the lesson editor with the translation shortcode.
To begin, open the editor for the lesson with the video that you want to translate.
If you added the video directly to the editor, all you need to do is wrap the video in the shortcode for the relevant language. Then, you can add another video for the other language and wrap that in the relevant shortcode.
When someone views the lesson on the front end, they’ll only see the video that applies to their language:
If you’re using LearnDash’s video progression feature, you won’t be able to wrap the video embed in shortcodes because you add the video link directly to the lesson settings instead of to the editor.
One way to get around this is to use the LearnDash Presto Player integration. When you do that, LearnDash will use the embedded Presto Player for its video progression. The Presto Player actually shows up in the editor, which lets you wrap it in shortcodes.
How to Handle Restricted Content (Different Users See Different Content)
If you’ve added membership site functionality to your course with a plugin such as Paid Member Subscriptions or another one of LearnDash’s membership plugin integrations, you might have situations where users with different user roles see different content.
Or, you might have situations where logged-in users see different content from anonymous guests.
To handle these situations in the visual TranslatePress editor, TranslatePress gives you an option to “view” each page as a different type of user.
You can make these choices using the View As drop-down in the editor:
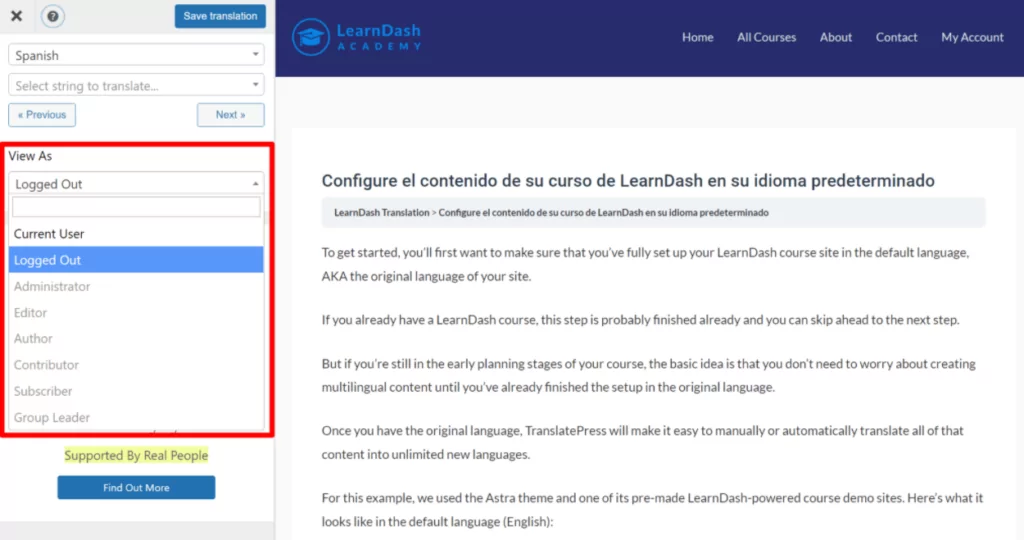
With the free version of TranslatePress, you can view your content as the current user or a logged-out user. If you upgrade to the Business license, you’ll be able to view your content as specific user roles.
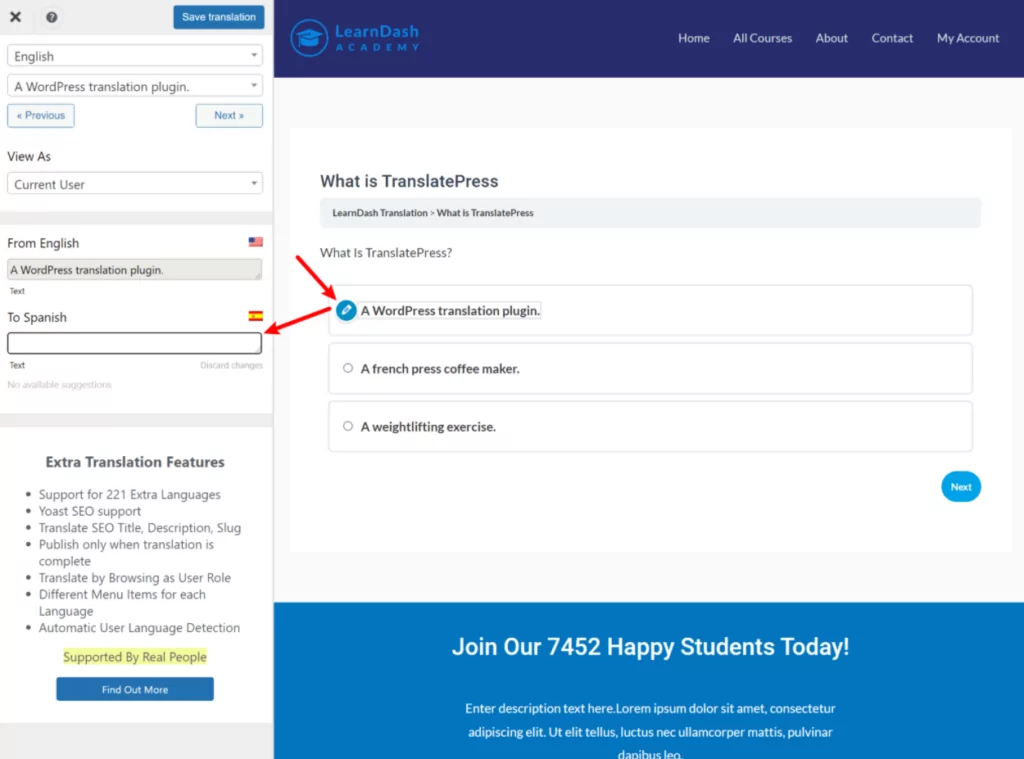
How to Translate LearnDash Quizzes
You can translate LearnDash quizzes just like other content.
You can translate questions and answers using point and click. When you’re ready to move to the next question, just click the button to advance:
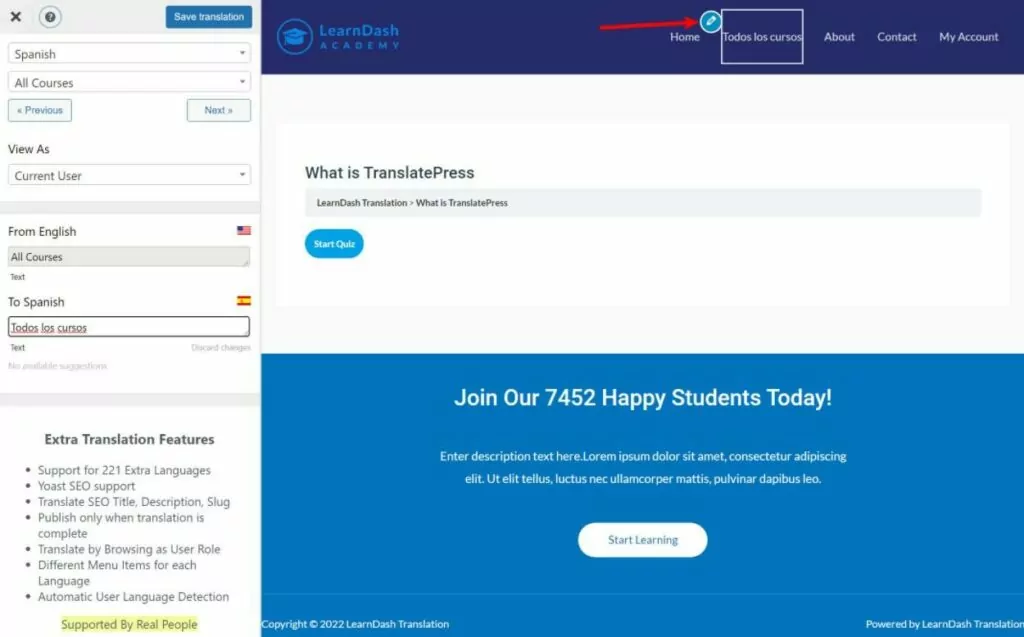
How to Translate Your Site’s Menu
You probably get the idea by now – to translate your course’s menu, you just need to open any page that contains that menu. You can then hover over the menu item and click the pencil icon to edit its translation.
Once you translate the menu item one time, that translation will automatically be used for every instance where that menu appears:
With the TranslatePress Business license, you can also create completely different menus based on a user’s language (rather than just translating the same set of menu items like the free version of the plugin allows).
How to Translate SEO Metadata and URL Slugs
If you want your course to benefit from multilingual SEO, you’ll want to go beyond translating the frontend content on your site and also translate all of the SEO metadata (titles, descriptions, etc.) and URL slugs.
To accomplish this, you can use the TranslatePress SEO Pack add-on, which is available on the Personal license and above.
For example, if you’re using an SEO plugin like Yoast SEO, you’ll be able to translate the details that you add to Yoast SEO, among other SEO content.
Once you’ve activated the SEO Pack add-on, you can use the drop-down in the translation editor to select your SEO metadata or the URL slug for that piece of content:
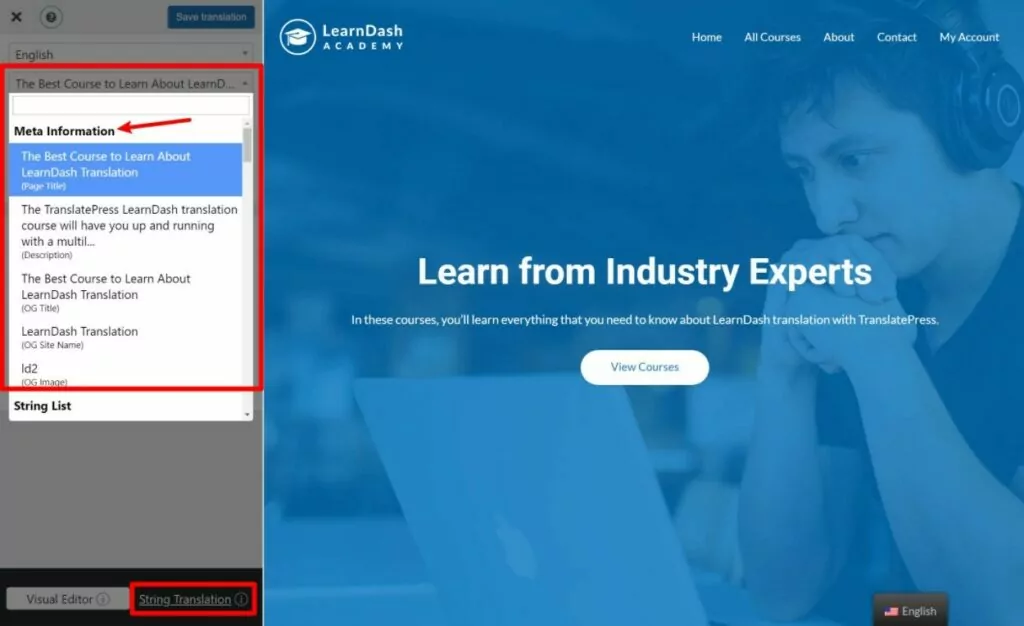
To translate sitewide URL slugs, such as the category base slug, you can open the String Translation interface (pictured above).
How to Translate Other Content on Your LearnDash Course
Finally, it’s worth noting that you can use the same approach to translate any other frontend content on your site. That could be blog posts, content from other plugins that you’re using, content from your favorite page builder plugin, forms, popups, and so on.
You’ll use the same point-and-click approach for everything, but we have specific guides if you want a more detailed look:
- Editor (Gutenberg) blocks
- Custom fields
- Custom post types
- WordPress forms
- WordPress menus
- Popup content
- Sliders
- WooCommerce products
- Elementor (page builder)
- Divi (page builder)
- Oxygen (website builder)
How to Let Other Users Translate Content
If you have multiple instructors and want to let instructors translate their own courses, you can give them access to the same visual translation interface that you saw above.
The easiest option is to purchase the TranslatePress Business license, which gives you a dedicated translator user role that you can assign to instructors:
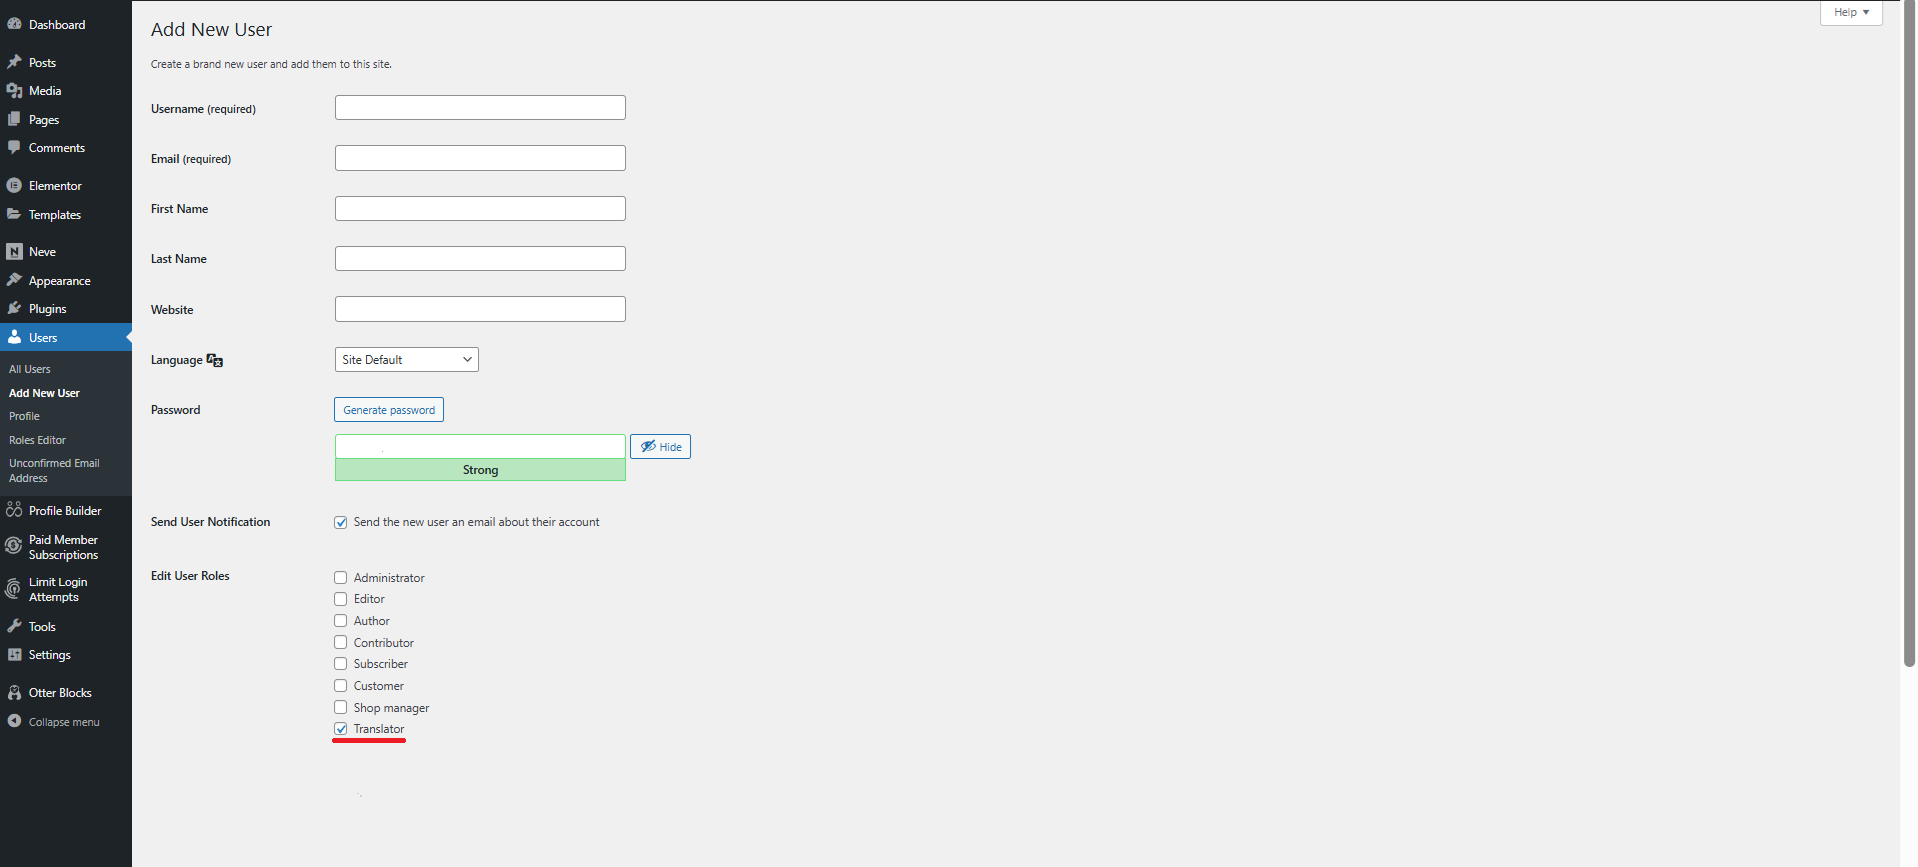
They can then use this user role to translate their own courses without the risk of ending up in the backend of your site.
5. Configure Your LearnDash Language Switcher
To finish things out, you’ll want to configure the language switcher for your course.
By default, TranslatePress adds a floating language switcher to the bottom-right corner of your website. However, you can change the position of the floating language switcher and/or use a different placement. Here are the additional options beyond the floating language switcher:
- Menu item – add your language switcher to your menu by going to Appearance → Menus.
- Shortcode – place your language switcher anywhere on your site using a shortcode. You can add it to a widget, in the content editor, or directly to your theme’s template files using the do_shortcode function.
To begin, you’ll want to configure your basic language switcher settings, such as whether or not to show language flags. Go to Settings → TranslatePress → Language Switcher tab: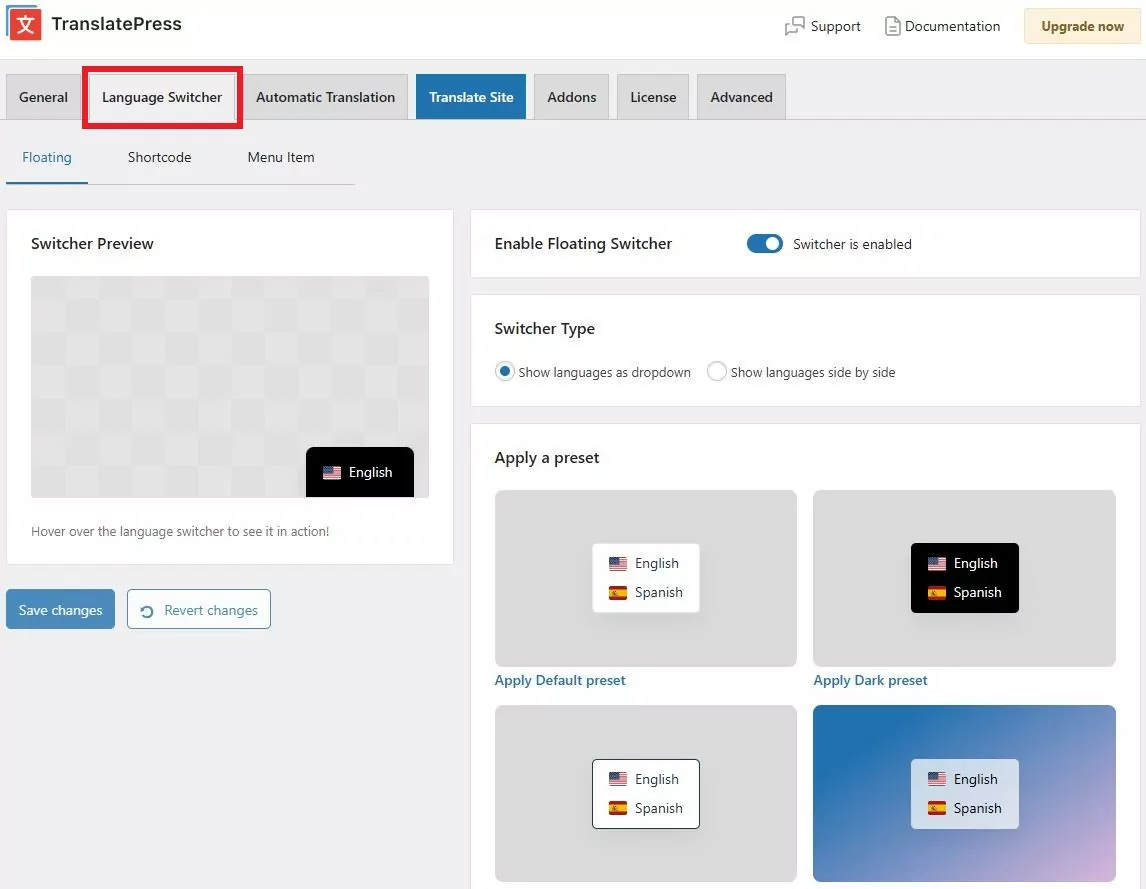
If you want to use a different placement, you can then continue to set that up.
For the shortcode method, you just need to add the shortcode where you want the language switcher to appear.
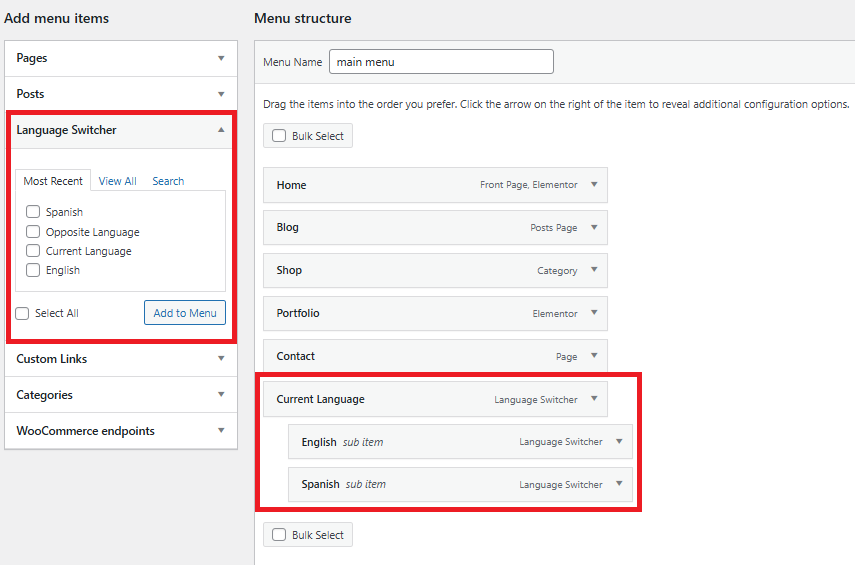
For the menu method, go to Appearance → Menus and add the dedicated language switcher menu items.
If you only have two languages, you can just add the Opposite Language option.
For more languages, you can add the Current Language option as a top-level menu item and then add the individual languages as sub-menu items to create a drop-down language switcher on your menu:
Here’s what that might look like on the frontend:

Get Started With LearnDash Translation Today
If you want to create a multilingual LearnDash course, TranslatePress offers the easiest, most comprehensive option for LearnDash translation.
Using TranslatePress’s visual editor, you’ll be able to translate all of your LearnDash courses, topics, lessons, quizzes, and more. You can also go beyond text and translate your images and videos as well.
If you want to save time, you can start with automatic translation — via TranslatePress AI, Google Translate, or DeepL — and then manually edit everything to ensure a top-notch experience for your students.
If you want to test things out, you can try the free version of TranslatePress to translate LearnDash into one new language.
Then, consider upgrading to the premium version of TranslatePress to access tons of useful features including the following:
- Unlimited language support;
- Improved multilingual SEO;
- DeepL integration;
- Option to view content in the translation editor as different user roles;
- Separate menus for different languages;
- Dedicated translator accounts;
- Automatic user language detection.
TranslatePress Multilingual
Do you still have any questions about LearnDash translation or how to create multilingual LearnDash courses? Let us know in the comments!
If you found this post helpful, please check out our YouTube channel, where we constantly upload short & easy-to-follow video tutorials. You can also follow us on Facebook and X to be the first to know each time we post.

Translating LearnDash Sites works great and super easy. Especially the front end editing works like a charm. That’s why we gave translatepress preference over other plugins. But we’re facing one issue. LearnDash certificates only work in the original language. In all other languages there is an error, when creating the pdf. Has anyone already gained experience with this?