
In diesem Beitrag
Anlegen eines mehrsprachige WordPress-Website ist eine ziemlich mühsame Aufgabe. Man muss erst herausfinden, in welchen Sprachen die Website verfügbar sein soll, und dann die bestes Übersetzungstool für Ihr Projekt. Erst danach kommen Sie zu dem Teil, in dem Sie tatsächlich Ihre Website-Inhalte übersetzen. Dieser Prozess ist wahrscheinlich der zeitaufwändigste von allen genannten.
Die automatische Übersetzung Ihrer WordPress-Website ist ein hervorragender Weg, um den Übersetzungsprozess zu beschleunigen und automatische Übersetzungen als Ausgangspunkt für Ihre mehrsprachigen Inhalte zu nutzen. Sie können alles in Minuten statt in Tagen oder Wochen übersetzen lassen.
In diesem Tutorial gehen wir darauf ein, wie man WordPress-Seiten schnell und mit minimalen Kosten automatisch übersetzen kann, indem man TranslatePress.
TranslatePress bietet sowohl automatische als auch manuelle Übersetzungen an. Was TranslatePress von anderen mehrsprachigen Lösungen unterscheidet ist, dass Sie alle Ihre Website-Inhalte direkt vom Front-End aus über eine visuelle Übersetzungsoberfläche übersetzen können.

TranslatePress verfügt außerdem über einen eigenen integrierten automatischen Übersetzungsdienst namens TranslatePress AI; Sie können aber auch direkt eine Verbindung zu Google Translate oder DeepL herstellen, falls Sie diese Dienste bevorzugen.
Fangen wir an...
So übersetzen Sie jede Website automatisch mit Google Translate
Später in diesem Beitrag zeigen wir Ihnen den optimalen Weg, die automatische Übersetzung zu nutzen, um zu übersetzen dein eigenes Website. Wenn Sie jedoch die Website einer anderen Person übersetzen möchten, brauchen Sie lediglich Google Translate.
Dies ist nützlich, wenn es eine Website in einer anderen Sprache gibt, die Sie erleben möchten, oder wenn Sie generell eine Website übersetzen müssen, die Sie nicht kontrollieren.
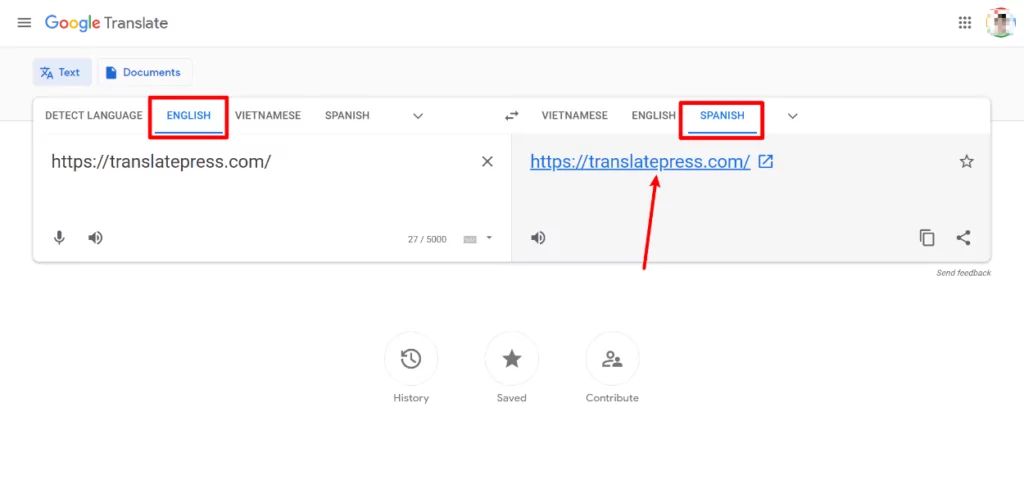
Um zu beginnen, gehen Sie zu die reguläre Google Translate-Seite und wählen Sie die Sprache aus, in der sich die Website befindet (links) sowie die Sprache, in die Sie den Inhalt der Website übersetzen möchten (rechts).
Anstatt dann wie gewohnt den Text einzugeben, den Sie übersetzen möchten, fügen Sie einfach die URL der Website, die Sie übersetzen möchten, in das Feld auf der linken Seite ein. Klicken Sie dann auf den Link im rechten Feld, um die übersetzte Version der Website zu öffnen.
Um beispielsweise die TranslatePress-Website vom Englischen ins Spanische zu übersetzen, würden Sie die Konfiguration wie folgt vornehmen:
Wenn Sie auf den Link klicken, wird die übersetzte Version der Website zusammen mit einer neuen Symbolleiste von Google Translate geöffnet. Sie können wie gewohnt durch die verschiedenen Bereiche der Website navigieren und über die Symbolleiste bei Bedarf die Sprache wechseln oder zur Originalversion zurückkehren:
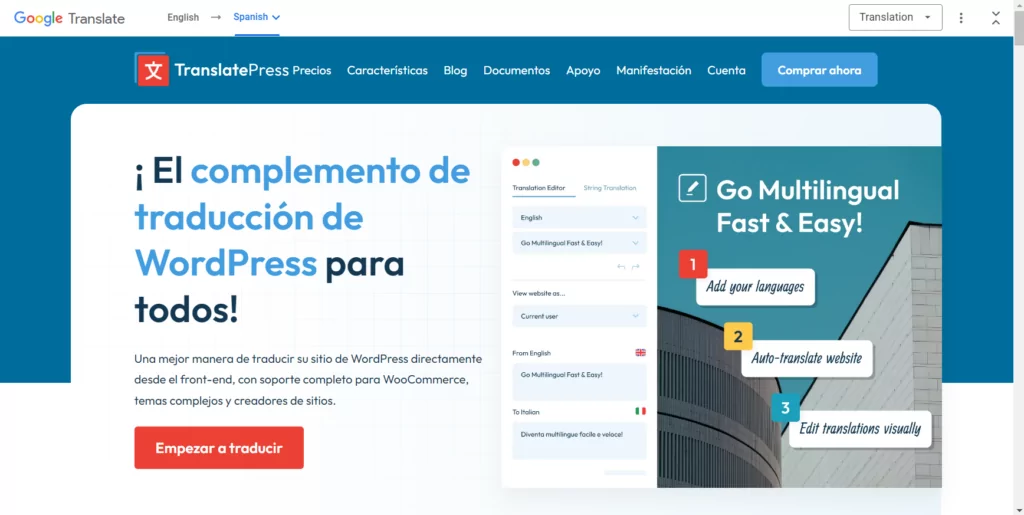
Und da haben Sie es – eine einfache Möglichkeit, eine Website automatisch zu übersetzen.
Warum die dynamische Übersetzung von Google Translate für Ihre eigene Website nicht geeignet ist
Die oben beschriebene Google Translate-Methode ist wirklich praktisch, wenn Sie eine Website übersetzen müssen, über die Sie keine Kontrolle haben. Wenn Sie jedoch Ihre eigene eigen Website, um eine mehrsprachige Website zu erstellen, Sie sollten diesen dynamischen Ansatz nicht verwenden.
Es ist wichtig zu beachten, dass nur der “dynamische” Teil das Problem ist.
Es ist völlig in Ordnung, Google Translate zur automatischen Übersetzung Ihrer Inhalte zu nutzen – Sie müssen dabei nur darauf achten, dass dabei statisch Versionen des übersetzten Inhalts, nachdem Sie Ihre Übersetzungen mit Google Translate erstellt haben – genau das zeigen wir Ihnen im folgenden Tutorial.
Die reine Verwendung von Google Translate zur dynamischen Übersetzung Ihrer Inhalte auf Abruf wirft zwei Probleme auf:
- Mehrsprachige SEO – bei der dynamischen Übersetzung haben die übersetzten Versionen Ihrer Inhalte keine eigenen permanenten URLs auf Ihrer Website, was bedeutet, dass Google sie nicht in seinen Suchindex aufnehmen kann und Sie nicht für mehrsprachige Suchbegriffe ranken können. Dies ist ein großer Nachteil, wenn Ihr Ziel darin besteht, von Mehrsprachige SEO.
- Genauigkeit (keine manuelle Steuerung) – da die Übersetzung dynamisch erfolgt, haben Sie nicht die Möglichkeit, die Übersetzungen nach ihrer Generierung manuell zu bearbeiten. Manchmal ist die automatische Übersetzung nicht perfekt, was bedeuten kann, dass Sie ungenaue Übersetzungen in Kauf nehmen müssen.
Wenn Sie Ihre Website automatisch übersetzen möchten, ist es besser, Google Translate zu verwenden (oder einem anderen Dienst) zu verwenden, um die anfänglichen Übersetzungen Ihrer Website zu generieren. Stattdessen jedoch dynamisch, Sie übernehmen diese Übersetzungen und speichern sie in der Datenbank Ihrer Website.
Da Sie die Übersetzungen lokal speichern, können Sie statische, indexierbare Versionen Ihrer übersetzten Inhalte erstellenfür SEO) und Sie können die automatischen Übersetzungen bei Bedarf auch bearbeiten.
Im folgenden Tutorial zeigen wir Ihnen, wie Sie diesen Ansatz in WordPress mithilfe des TranslatePress-Plugins umsetzen können.
Warum Sie Ihre WordPress-Website immer noch automatisch übersetzen sollten
Solange Sie nicht den dynamischen Ansatz wählen, ist die automatische Übersetzung Ihrer WordPress-Website eine hervorragende Wahl, mit der Sie mehrsprachig werden und gleichzeitig Zeit und Geld sparen können.
Selbst wenn Sie die Sprachen, in denen Sie Ihre Website verfügbar machen möchten, fließend beherrschen, ist die Einrichtung einer automatischen Übersetzung ein großartiger Ausgangspunkt. Sobald Ihre Inhalte automatisch übersetzt wurden, können Sie alles überprüfen und die notwendigen Änderungen vornehmen.
Denken Sie daran, dass dieser Schritt entscheidend ist, wenn es Ihnen ernst ist mit Mehrsprachige SEO. Aber wir werden später noch in die Details des Rankings in weiteren Sprachen eintauchen.
Im Moment sind wir uns wohl beide einig, dass automatische Übersetzungen eine große Zeitersparnis sind.
Wenn Sie die Sprachen, in denen Ihre Website verfügbar sein wird, nicht fließend beherrschen, ist der Einstieg mit automatischen Übersetzungen dennoch eine großartige Option. Sobald Ihre Website automatisch übersetzt ist, können Sie einen professioneller Übersetzer alles zu verfeinern und Ihren Inhalten eine menschliche Note zu verleihen.
Das meiste davon muss nicht geändert werden, aber bei einigen Textstellen ist möglicherweise menschliches Eingreifen erforderlich, um sicherzustellen, dass die Bedeutung jedes Satzes klar ist und nicht nur wörtlich übersetzt wird. Mit TranslatePress können Sie Folgendes einrichten: Übersetzerkonten, damit Sie ganz einfach einen professionellen Übersetzer beauftragen oder darauf zugreifen lassen können, Ihre Website zu überprüfen und Änderungen vorzunehmen, ohne ihm Admin-Rechte zu geben.
Und zu guter Letzt, Übersetzungskosten. Die Kosten für die Zusammenarbeit mit einem professionellen Übersetzer sind viel höher als die eines automatischen Übersetzungsdienstes. Außerdem wird das Hin und Her bei der Suche nach den richtigen Übersetzern, bis alles übersetzt und genehmigt ist, die Abläufe erheblich verzögern.
TranslatePress ist darauf optimiert, Ihre Kosten für die automatische Textübersetzung zu minimieren.
Im Folgenden werde ich näher erläutern, wie TranslatePress sicherstellt, dass Sie für die automatische Übersetzung eines bestimmten Textes nur einmal bezahlen und NICHT jedes Mal belastet werden, wenn ein Nutzer versucht, eine übersetzte Seite aufzurufen.
So übersetzen Sie eine WordPress-Website automatisch mit TranslatePress
Die automatische Übersetzung Ihrer WordPress-Website ist wirklich unkompliziert mit TranslatePress und sein automatische Übersetzung Merkmal.
Um Ihre Website auf schnellste und einfachste Weise automatisch übersetzen zu lassen, verfügt TranslatePress über einen eigenen, integrierten TranslatePress AI-Dienst.
TranslatePress AI basiert auf mehreren neuronalen Maschinenübersetzungs-Engines, darunter Google Translate, DeepL und Microsoft Translate.
Wenn Sie die automatische Übersetzung auf Ihrer Website aktivieren, nutzt TranslatePress AI diese Dienste, um präzise, kontextbezogene Übersetzungen Ihrer Inhalte zu erstellen. Durch den Einsatz des für die spezifischen Gegebenheiten Ihrer Website am besten geeigneten Dienstes lassen sich bessere Übersetzungen erzielen, als dies bei der Nutzung eines einzelnen Dienstes möglich wäre.
Neben TranslatePress AI können Sie mit TranslatePress auch eine direkte Verbindung zu Google Translate oder DeepL herstellen, indem Sie Ihren eigenen API-Schlüssel verwenden. Wir empfehlen jedoch TranslatePress AI, wenn Sie auf möglichst einfache Weise mit der automatischen Übersetzung auf Ihrer Website beginnen möchten.
Im Folgenden zeigen wir Ihnen Schritt für Schritt, wie Sie Ihre WordPress-Website mit TranslatePress AI vollständig übersetzen können.
Wir setzen lediglich voraus, dass Sie Ihre WordPress-Website bereits in ihrer Standardsprache eingerichtet haben. So sieht unsere Beispiel-Website aus:

TranslatePress installieren und aktivieren
Um loszulegen, müssen Sie das TranslatePress-Plugin auf Ihrer WordPress-Website installieren.
Während TranslatePress bietet tatsächlich eine kostenlose Version auf WordPress.org an, benötigen Sie eine der Premium-Lizenzen, um TranslatePress AI nutzen zu können. Diese Lizenzen gewähren Ihnen nicht nur Zugriff auf TranslatePress AI, sondern bieten auch zahlreiche weitere nützliche Funktionen, wie beispielsweise erweiterte Funktionen für mehrsprachige Suchmaschinenoptimierung (SEO), die Möglichkeit, eine unbegrenzte Anzahl von Sprachen auf Ihrer Website zu verwenden, und vieles mehr.
Du kannst Kaufen Sie Ihre Lizenz hier – Die Tarife beginnen bereits bei €99.
Falls Ihr Budget das derzeit nicht zulässt, können Sie dennoch die kostenlose Version nutzen und diese mit Ihrer eigenen Google Translate-API verbinden. Diese Methode ist jedoch nicht ganz so einfach wie TranslatePress AI, weshalb wir sie in diesem Tutorial nicht verwenden. Wir werden darauf jedoch etwas später in diesem Beitrag kurz eingehen.
Nachdem Sie Ihre TranslatePress-Lizenz erworben haben, müssen Sie das TranslatePress-Plugin auf Ihrer Website installieren. Um die Premium-Funktionen nutzen zu können, sollten Sie zwei Plugins installieren:
- Das kostenlose „core TranslatePress“-Plugin auf WordPress.org. Sie können es wie jedes andere kostenlose Plugin installieren – gehen Sie zu Plugins → Plugin hinzufügen und suchen Sie nach “TranslatePress”.
- Das TranslatePress Premium-Plugin, das Sie herunterladen können von der TranslatePress-Kundenbereich Nachdem Sie Ihre Lizenz erworben haben, können Sie diese installieren, indem Sie zu Plugins → Plugin hinzufügen und dann auf das Klicken Plugin hochladen die Zip-Datei hochzuladen.
Nachdem Sie das Plugin aktiviert haben, müssen Sie außerdem Ihren TranslatePress-Lizenzschlüssel hinzufügen, damit Sie auf TranslatePress AI zugreifen können:
- Gehen Sie zu Einstellungen → TranslatePress in Ihrem WordPress-Dashboard.
- Wählen Sie die Lizenz Tab.
- Fügen Sie Ihren Lizenzschlüssel in das Feld ein. Sie erhalten Ihren Lizenzschlüssel von der Bereich „Mein Konto“ bei TranslatePress.
- Klick auf den Lizenz aktivieren Schaltfläche.
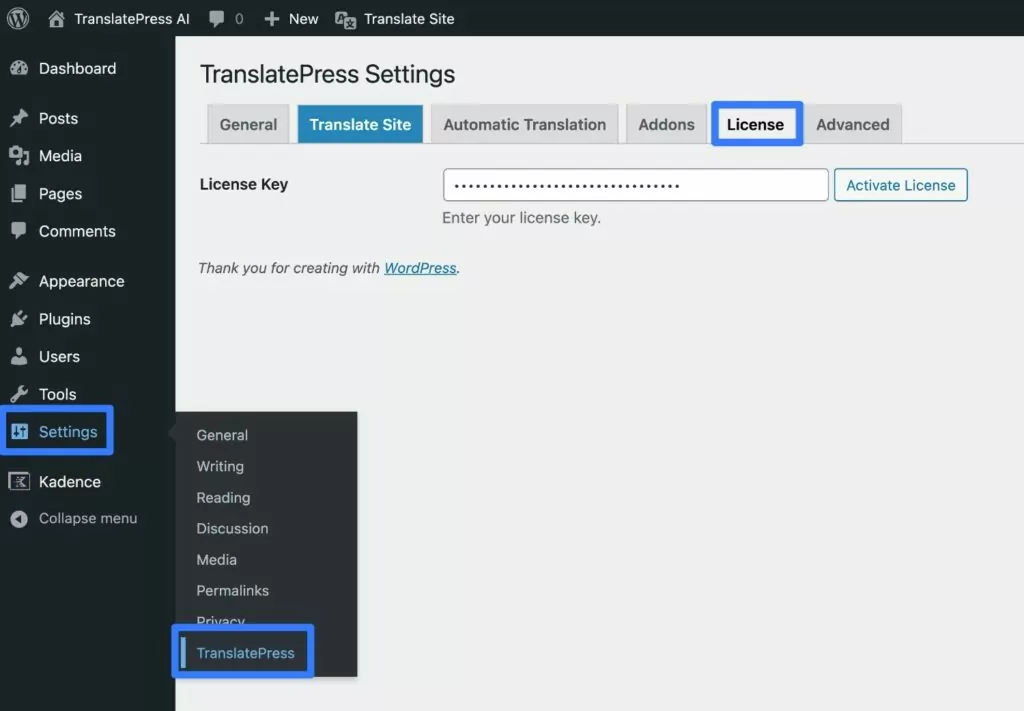
Nach erfolgreicher Aktivierung Ihrer Lizenz sollten Sie ein grünes Häkchen sehen.
Wählen Sie Ihre Sprachen
Als Nächstes sollten Sie die Sprache(n) auswählen, die Sie zu Ihrer Website hinzufügen möchten.
Da Sie über eine der kostenpflichtigen TranslatePress-Lizenzen verfügen, können Sie unbegrenzt viele neue Sprachen hinzufügen.
Sie können diese einrichten, indem Sie zu Einstellungen → TranslatePress in Ihrem WordPress-Dashboard. Verwenden Sie dann die Alle Sprachen Bereich zum Hinzufügen beliebig vieler neuer Sprachen.
Wenn Ihre aktuelle Website beispielsweise auf Englisch ist und Sie sie ins Spanische übersetzen möchten, könnte das ungefähr so aussehen.
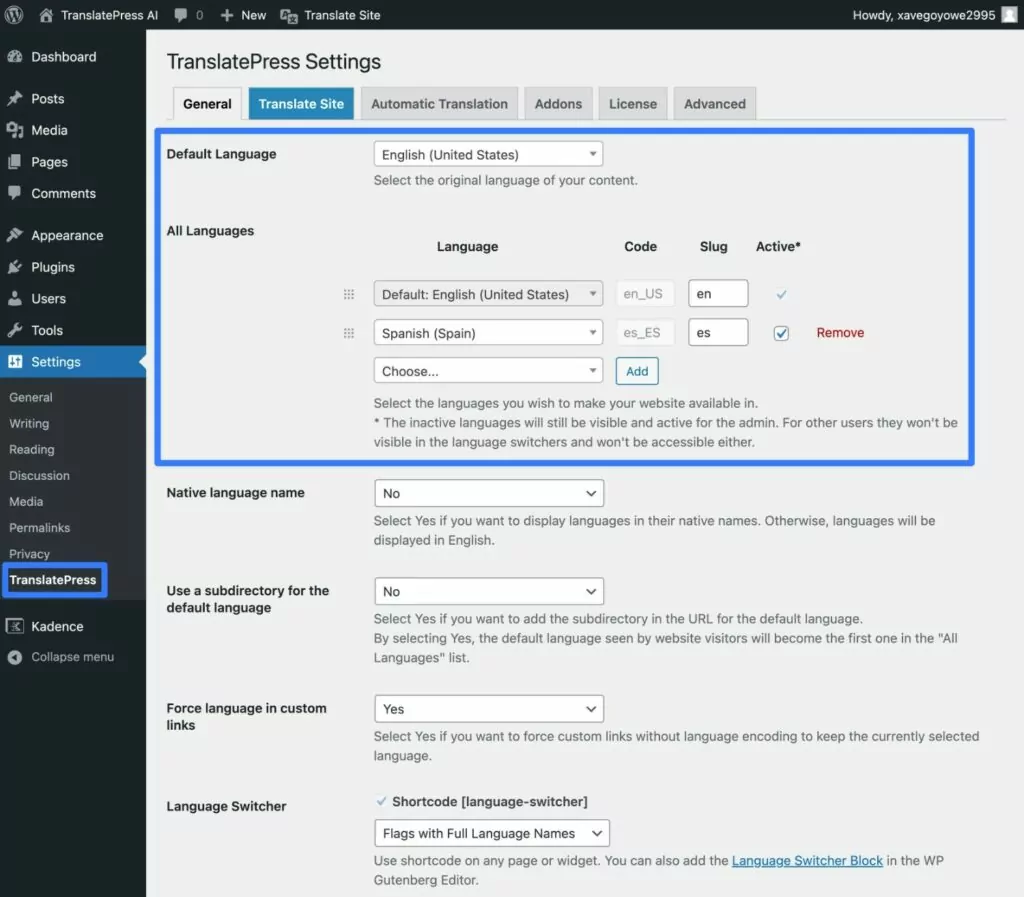
Sobald Sie im nächsten Schritt die automatische Übersetzung aktivieren, erhalten Sie für jede Sprache eine zusätzliche Option zur Auswahl des Niveaus Formalität – Formell oder Informell. Wenn TranslatePress AI Ihre Website automatisch übersetzt, wird anhand dieser Einstellung gesteuert, ob die automatischen Übersetzungen eher formell oder eher informell ausfallen sollen. Sie können nach dem nächsten Schritt zu dieser Oberfläche zurückkehren, falls Sie den Formalisierungsgrad ändern möchten.
Sobald Sie alle Sprachen hinzugefügt haben, die Sie verwenden möchten, klicken Sie unbedingt auf Änderungen speichern Schaltfläche unten.
Automatische Übersetzung aktivieren
Sobald Sie Ihre Sprachen ausgewählt haben, besteht der nächste Schritt darin, die automatische Übersetzung über TranslatePress AI zu aktivieren.
Wählen Sie dazu Automatische Übersetzung Registerkarte im Einstellungsbereich „TranslatePress“ (Einstellungen → TranslatePress).
Zuerst stellen Sie Automatische Übersetzung aktivieren Drop-down entspricht Ja.
Anschließend sollte die Option „TranslatePress AI“ angezeigt werden, zusammen mit dem Ihrer Lizenz zugeordneten Kontingent an kostenlosen Übersetzungswörtern:
- Personal – 50.000 kostenlose Wörter.
- Business – 200.000 kostenlose Wörter.
- Developer – 500.000 freie Wörter.
Diese sollten für die meisten Websites mehr als genügen, was bedeutet, dass bei der Nutzung der automatischen Übersetzung keine zusätzlichen Kosten anfallen.
Sollten Sie jedoch jemals das kostenlose Kontingent überschreiten, das mit Ihrer Lizenz verbunden ist, können Sie auch weitere Wörter erwerben von Ihr TranslatePress-Kundenbereich, beginnend bei €24 für weitere 100.000 Wörter.
Darunter erhalten Sie einige zusätzliche Optionen. Die meisten davon können Sie jedoch in den Standardeinstellungen belassen.
Um die automatische Übersetzung zu aktivieren, klicken Sie einfach auf Änderungen speichern Schaltfläche unten.
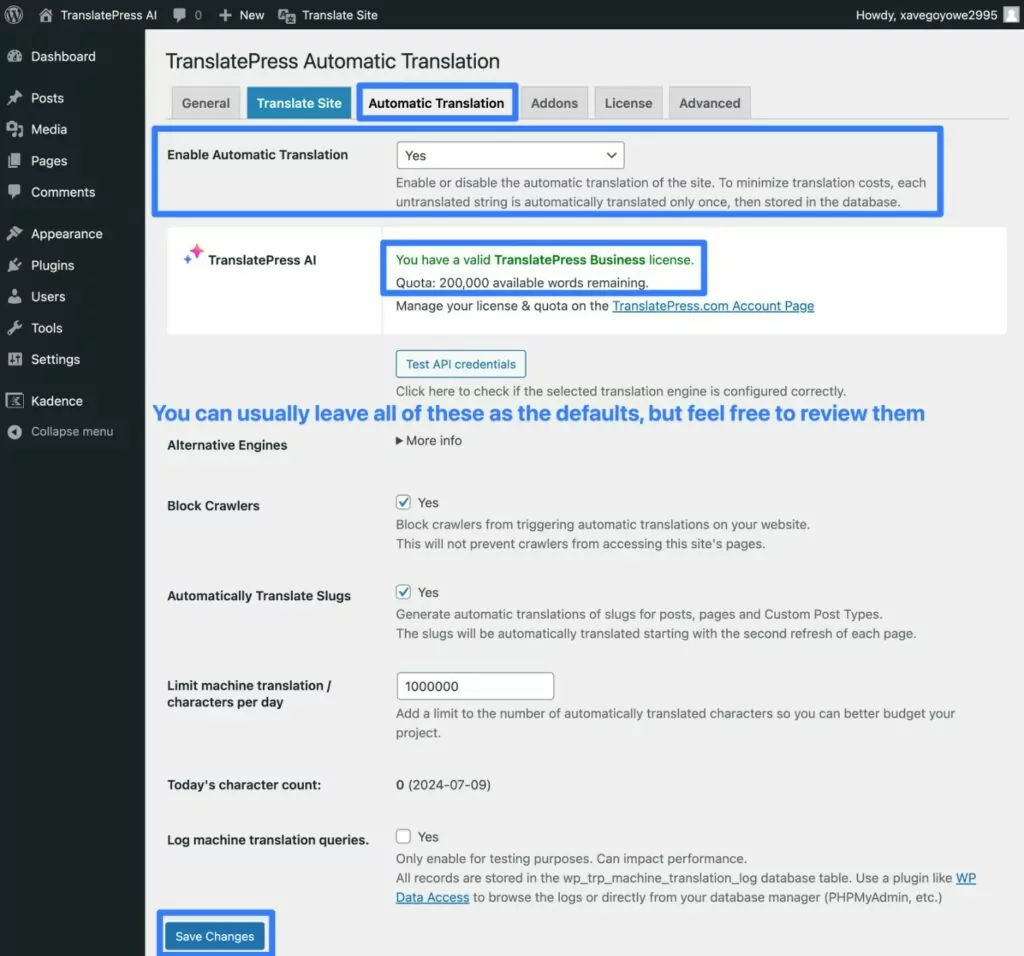
Und das war’s schon! TranslatePress AI übersetzt nun automatisch Ihre gesamte WordPress-Website mit dem für Ihre Situation am besten geeigneten maschinellen Übersetzungsdienst.
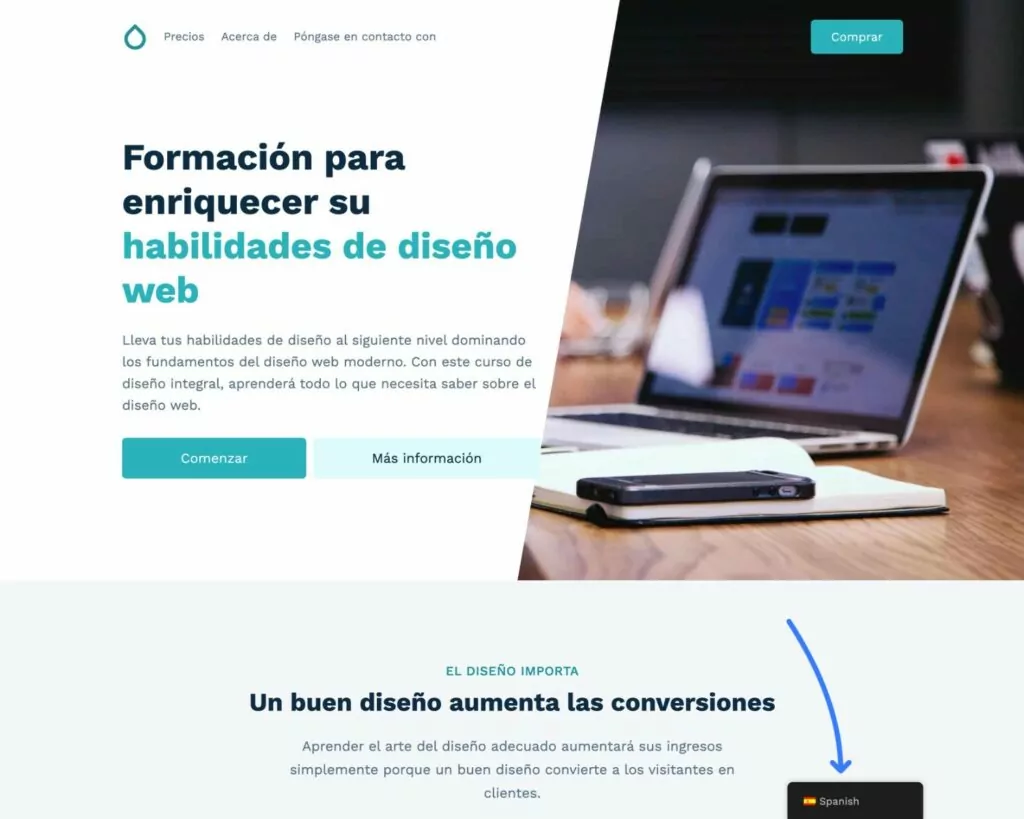
Um dies zu testen, können Sie zum Frontend Ihrer Website gehen und den Sprachumschalter verwenden, um in eine andere Sprache zu wechseln.
Zum Beispiel ist unsere Test-Website jetzt vollständig aus dem englischen Original ins Spanische übersetzt.
Übersetzungen bei Bedarf manuell anpassen (optional)
Einer der Vorteile der Verwendung von TranslatePress AI für die automatische Übersetzung besteht darin, dass Sie jede Übersetzung auf Ihrer Website weiterhin ganz einfach manuell anpassen können.
Du tust es nicht Brauchen um dies zu tun, aber es kann Situationen geben, in denen Sie eine der automatisch generierten Übersetzungen anpassen möchten.
Starten Sie dazu den visuellen Übersetzungseditor für die Seite, die Sie übersetzen möchten:
- Öffnen Sie die Seite auf dem Frontend Ihrer Website, auf der Sie Übersetzungen anpassen möchten.
- Klick auf den Seite übersetzen Option in der WordPress-Werkzeugleiste.
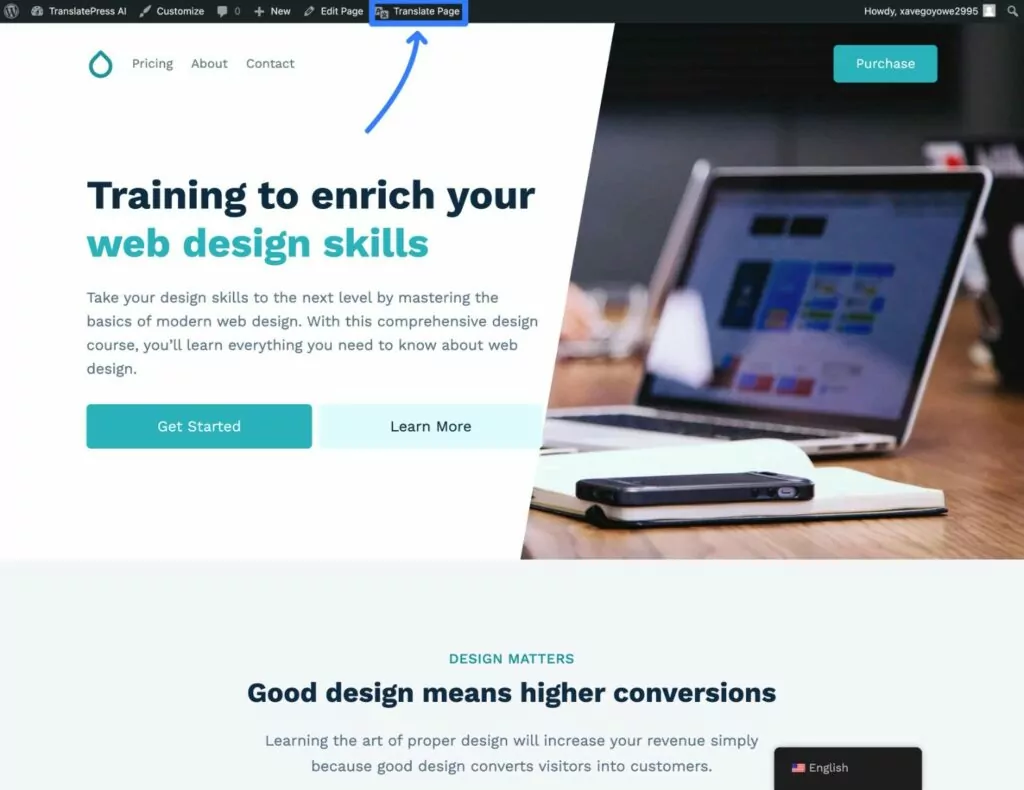
Sobald Sie sich im visuellen Übersetzungseditor befinden, können Sie jede Übersetzung per Klick verfeinern.
Führen Sie einfach den Mauszeiger über den Text, den Sie übersetzen möchten, und klicken Sie auf das Stiftsymbol.
Dadurch wird diese Übersetzung in der Seitenleiste geöffnet, in der bereits die automatische Übersetzung von TranslatePress AI eingetragen ist. Außerdem wird ein Symbol für die maschinelle Übersetzung angezeigt, das deutlich macht, dass diese konkrete Übersetzung von TranslatePress AI stammt.
TranslatePress AI übersetzt nicht nur den gesamten sichtbaren Text, sondern auch automatisch alle Ihre SEO-Angaben im Hintergrund, wie beispielsweise den SEO-Titel und die Meta-Beschreibung. Dies hilft Ihnen bei der Umsetzung Wichtige Best Practices für mehrsprachiges SEO.
Stellen Sie sicher, dass Sie aktivieren das SEO-Pack-Add-on Um diese Funktion zu nutzen – sie ist in allen Premium-Tarifen von TranslatePress enthalten.
Sie müssen lediglich das Dropdown-Menü verwenden, um die Metadaten auszuwählen, die Sie übersetzen möchten:
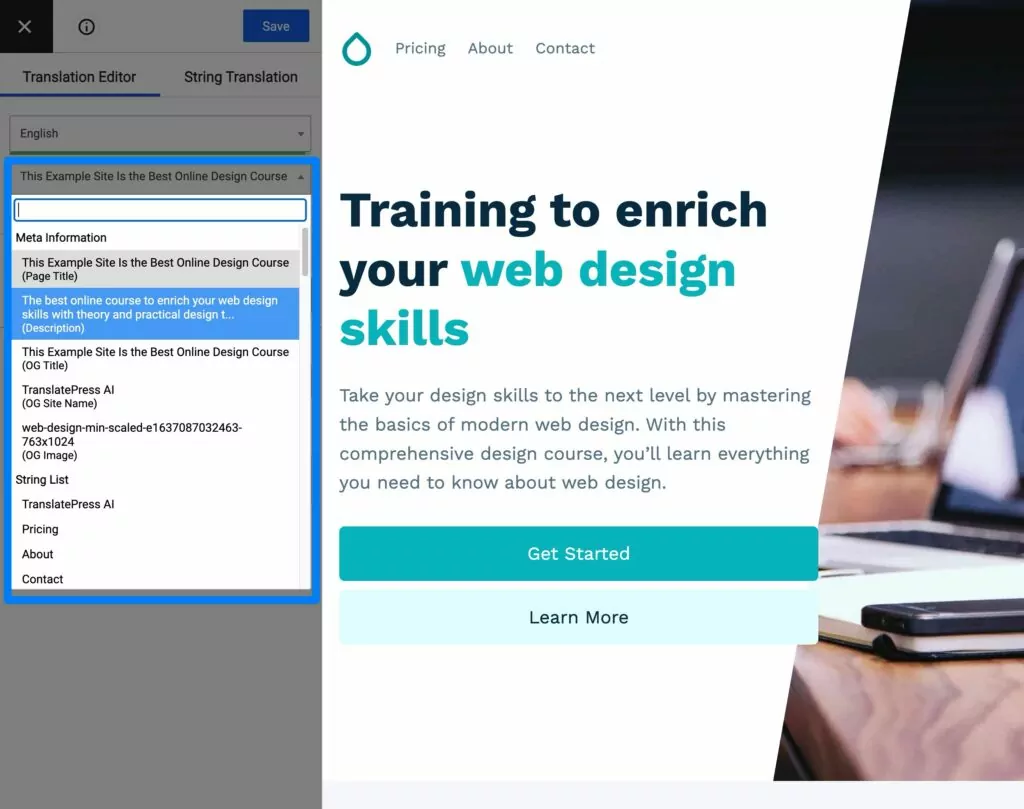
Eine weitere schöne Eigenschaft dieser Schnittstelle ist, dass sie es Ihnen auch ermöglicht, einige Elemente zu übersetzen, die nicht automatisch übersetzt werden können, wie zum Beispiel die tatsächlichen Bilder auf Ihrer Website. TranslatePress AI wird Der Alternativtext des Bildes wird automatisch übersetzt, aber die Bilddatei selbst wird dadurch nicht verändert.
Wenn Sie basierend auf der vom Benutzer gewählten Sprache ein anderes Bild anzeigen möchten, müssen Sie lediglich mit der Maus über das Bild fahren und auf das Stiftsymbol klicken, genau wie beim Übersetzen von Text.
Wenn Sie Inhalte haben, die nur für bestimmte Benutzerrollen oder angemeldete Benutzer verfügbar sind, können Sie mit dem Übersetzungseditor die Website als eine bestimmte Benutzerrolle durchsuchen um benutzerspezifische Inhalte zu übersetzen.
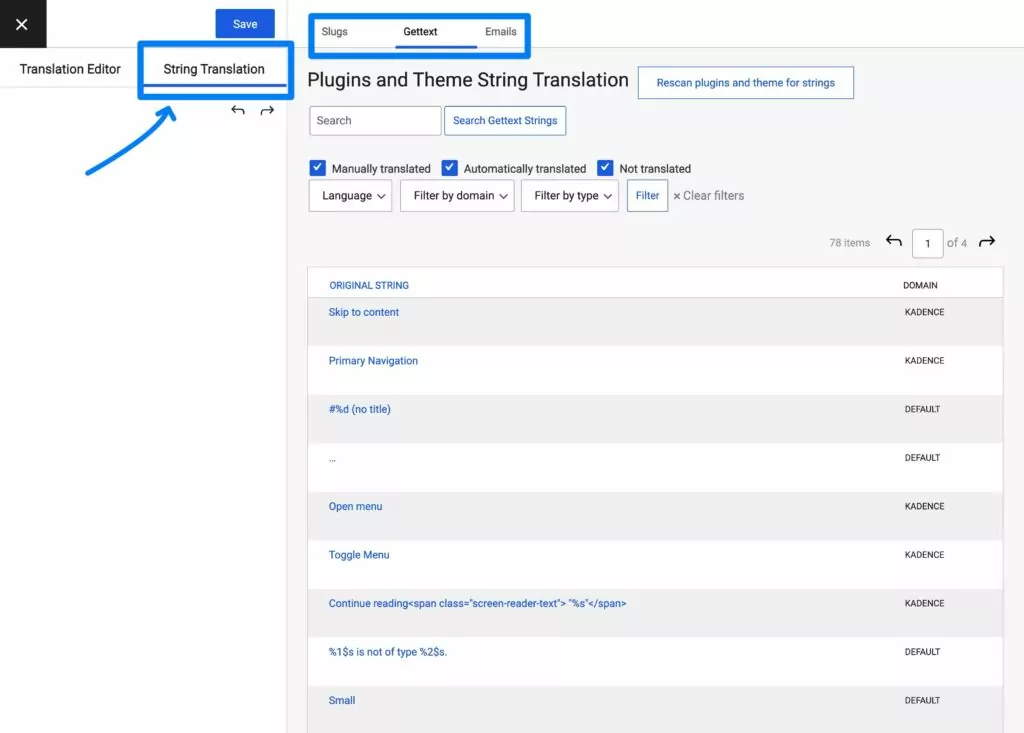
Um schließlich auf die Übersetzungen für andere Arten von Inhalten wie E-Mails und „gettext“-Dateien von Themes und Plugins zuzugreifen, können Sie auf die Option „String-Übersetzung“ klicken, um vom visuellen Editor zum Backend-String-Editor zu wechseln.
Passen Sie Ihren Sprachumschalter an (optional)
Nun verfügen Sie über eine voll funktionsfähige mehrsprachige WordPress-Website, die auf der automatischen Übersetzung über TranslatePress AI basiert.
Um Besuchern den Zugriff auf verschiedene Sprachen zu erleichtern, ist in der Standardkonfiguration von TranslatePress ein schwebender Sprachumschalter in der unteren rechten Ecke Ihrer Website integriert.
Wenn Ihnen diese Platzierung gefällt, müssen Sie nichts tun.
Wenn Sie die Einstellung jedoch anpassen möchten, bietet Ihnen TranslatePress verschiedene Optionen zur Sprachumschaltung sowie zahlreiche Platzierungsmöglichkeiten, darunter die folgenden:
- Menüpunkt – Sie können Ihren Sprachumschalter über das normale WordPress-Menüsystem hinzufügen (Darstellung → Menüs).
- Block/Shortcode – Sie können Ihren Sprachumschalter mithilfe eines Blocks oder Shortcodes manuell an jeder beliebigen Stelle Ihrer Website platzieren.
- Andere schwebende Positionen – Sie können den schwebenden Sprachumschalter auch an eine andere Stelle verschieben, beispielsweise in die untere linke Ecke Ihrer Website.
Schau dir die Dokumentation zum Sprachwechsler an um zu lernen, wie alles funktioniert.
Und das war’s schon! Mit TranslatePress AI können Sie dank der Leistungsfähigkeit der automatischen Übersetzung innerhalb weniger Minuten eine funktionierende mehrsprachige WordPress-Website erstellen.
Alternative Methoden: Verwenden Sie Google Translate oder DeepL direkt
Wenn Sie WordPress auf einfachste Weise automatisch übersetzen möchten, sollten Sie die TranslatePress AI-Methode verwenden, die wir im obigen Tutorial behandelt haben.
Um Ihnen jedoch noch mehr Flexibilität zu bieten, können Sie mit TranslatePress auch eine direkte Verbindung zur Google Cloud Translate API oder zur DeepL API herstellen.
TranslatePress AI nutzt beide Dienste, sodass Sie bereits von deren präzisen Übersetzungen profitieren, wenn Sie TranslatePress AI verwenden. Sollten Sie jedoch eine Situation haben, in der Sie lieber direkt über Ihren eigenen API-Schlüssel eine Verbindung zum Dienst herstellen möchten, bietet Ihnen TranslatePress diese Möglichkeit.
In der kostenlosen Version von TranslatePress können Sie auf die Google Translate-API zugreifen, während Sie die TranslatePress-Gewerbelizenz um auf die DeepL-Integration zuzugreifen.
Wenn Sie sich nicht sicher sind, welche Sie wählen sollen, möchten Sie vielleicht Lesen Sie unseren Vergleich zwischen Google Translate und DeepL.
Hier sind einige Kurzanleitungen zur Nutzung beider Dienste...
WordPress automatisch mit Google Translate übersetzen
Wenn Sie möchten WordPress mit Google Translate automatisch übersetzen, müssen Sie mithilfe Ihres eigenen Google Cloud Platform-Kontos einen Google Translate-API-Schlüssel generieren.
Dazu müssen Sie ein Projekt in Google Cloud erstellen, dann die API zu diesem Projekt hinzufügen und den Schlüssel erstellen. Sie können Schau dir diesen Hilfedokumentationsartikel an um zu lernen, wie es funktioniert.
Mit der Google Translate-API werden die ersten 500.000 Zeichen (nicht (Wörter), die Sie jeden Monat übersetzen, sind kostenlos. Darüber hinausgehende Zeichen werden mit einem Satz von $20 pro einer Million Zeichen in Rechnung gestellt.
Sobald Sie Ihren Google Translate-API-Schlüssel haben, gehen Sie wie folgt vor, um TranslatePress einzurichten:
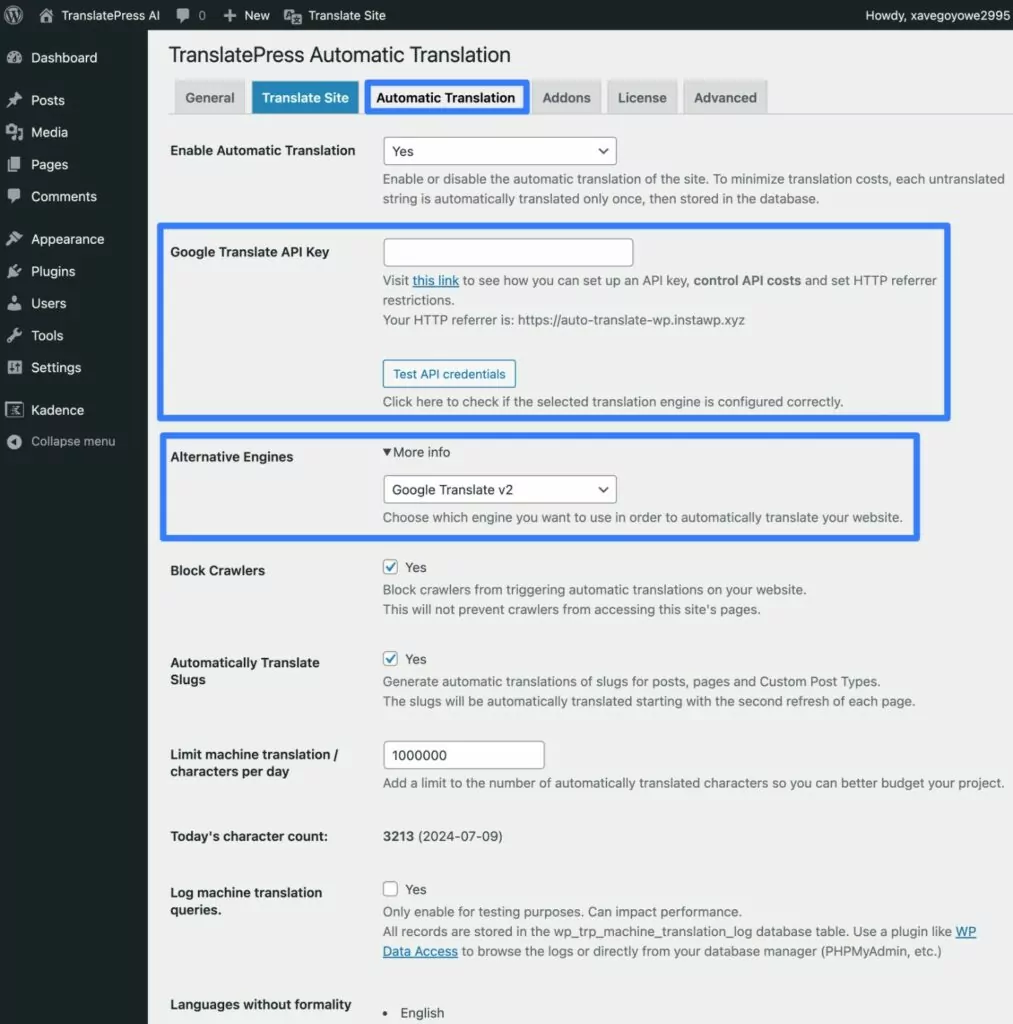
- Gehen Sie zu Einstellungen → TranslatePress um den Einstellungsbereich „TranslatePress“ zu öffnen.
- Klicke auf die Automatische Übersetzung Tab.
- Einstellen Automatische Übersetzung aktivieren Drop-down entspricht Ja.
- Klick auf den Mehr Informationen Option neben Alternative Maschinen.
- Ändern Sie das Dropdown-Menü von TranslatePress AI zu Google Translate v2.
- Fügen Sie Ihren API-Schlüssel ein in die Google Translate API-Schlüssel Kiste.
- Klick auf den API-Anmeldedaten testen Schaltfläche, um sicherzustellen, dass die Verbindung funktioniert.
- Konfigurieren Sie die anderen Einstellungen nach Ihren Wünschen. Wir empfehlen dringend die Verwendung von Maschinelle Übersetzung / Zeichen pro Tag begrenzen Einstellung zum Festlegen eines Abrechnungslimits, mit der Sie unerwartete Gebühren für die Nutzung der Google Translate-API vermeiden können.
- Klick auf den Änderungen speichern Schaltfläche unten.
WordPress automatisch mit DeepL übersetzen
Wenn Sie möchten WordPress automatisch mit DeepL übersetzen, müssen Sie Ihr eigenes DeepL-Konto erstellen und Ihren eigenen DeepL-API-Schlüssel verwenden. Dieser Hilfsartikel behandelt, wie um auf Ihren DeepL-API-Schlüssel zuzugreifen, sobald Sie Ihr Konto erstellt haben.
Mit der DeepL-API können Sie monatlich bis zu 5.000.000 Zeichen kostenlos übersetzen. Wenn Sie dieses Limit überschreiten, zahlen Sie eine monatliche Pauschalgebühr von $5,49 sowie $25 pro einer Million übersetzter Zeichen.
Sobald Sie Ihren DeepL-API-Schlüssel haben, gehen Sie wie folgt vor, um TranslatePress einzurichten:
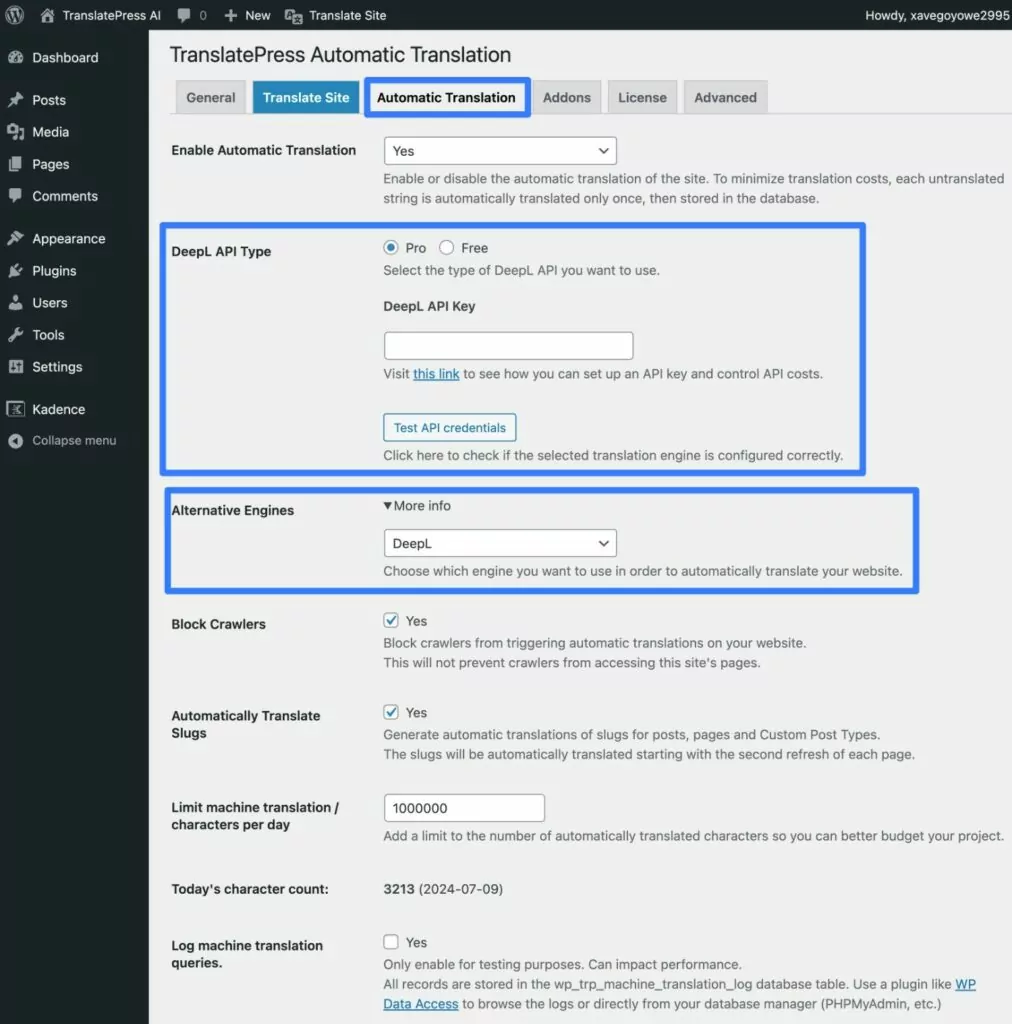
- Gehen Sie zu Einstellungen → TranslatePress um den Einstellungsbereich „TranslatePress“ zu öffnen.
- Klicke auf die Automatische Übersetzung Tab.
- Einstellen Automatische Übersetzung aktivieren Drop-down entspricht Ja.
- Klick auf den Mehr Informationen Option neben Alternative Maschinen.
- Ändern Sie das Dropdown-Menü von TranslatePress AI zu DeepL.
- Wählen Sie aus, ob Sie die kostenlose DeepL API verwenden oder ein Abonnement für die DeepL API Pro abgeschlossen haben.
- Fügen Sie Ihren API-Schlüssel ein in die DeepL API-Schlüssel Kiste.
- Klick auf den API-Anmeldedaten testen Schaltfläche, um sicherzustellen, dass die Verbindung funktioniert.
- Konfigurieren Sie die anderen Einstellungen nach Ihren Wünschen. Wir empfehlen dringend die Verwendung von Maschinelle Übersetzung / Zeichen pro Tag begrenzen Einstellung zum Festlegen eines Ausgabenlimits, das Ihnen hilft, unerwartete Gebühren für die DeepL API zu vermeiden.
- Klick auf den Änderungen speichern Schaltfläche unten.
Wie TranslatePress die Kosten für maschinelle Übersetzungen minimiert
Nachdem wir nun gesehen haben, wie einfach es ist, eine WordPress-Website mithilfe von TranslatePress und dessen Anbindung an automatische Übersetzungsdienste automatisch zu übersetzen, wollen wir uns nun ansehen, wie Sie damit Ihre Kosten senken können.
Die meisten dieser Kosteneinsparungen gelten unabhängig davon, ob Sie TranslatePress AI oder Ihren eigenen Google Translate- oder DeepL-API-Schlüssel verwenden.
Zunächst einmal wird die automatische Übersetzung NUR dann ausgelöst, wenn ein Nutzer zum ersten Mal eine Seite aufruft, die noch nicht übersetzt wurde.
Wenn Sie Ihre Website zum ersten Mal in einer bestimmten Sprache aufrufen, wird diese tatsächlich automatisch Seite für Seite übersetzt. Sobald ein Text automatisch übersetzt wurde, speichert TranslatePress ihn in Ihrer Datenbank, wodurch die Anzahl der Anfragen an den automatischen Übersetzungsdienst minimiert wird.
Dies führt auch zu einem schnelles Laden der übersetzten Seiten.
Sie können die Kosten auch unter Kontrolle halten, indem Sie ein tägliches Limit für die automatisch übersetzten Zeichen festlegen.
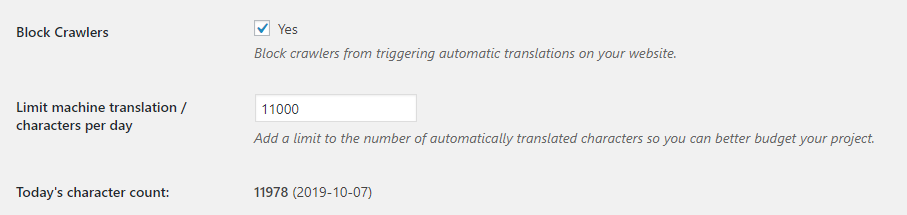
Standardmäßig blockieren wir außerdem Crawler daran, automatische Übersetzungen auf Ihrer Website auszulösen, da dies ebenfalls zu unerwünschten Kosten durch Texte führen kann, die Sie möglicherweise gar nicht übersetzen wollten.
All diese Optionen sind auf der Registerkarte „Automatische Übersetzung“ in TranslatePress zu finden.
Schließlich erhalten Sie beim Kauf einer Premium-Lizenz auch Zugriff auf eine bestimmte Anzahl von Wörtern, die Sie mit TranslatePress AI kostenlos übersetzen können. Diese reicht von 50.000 Wörtern bei der Personal Lizenz für 500.000 Wörter auf der Developer Lizenz.
Sofern Sie nicht über eine Unmenge an Blogbeiträgen verfügen, werden die meisten WordPress-Seiten deutlich unter 50.000 Wörtern liegen, was bedeutet, dass Sie für die Nutzung von TranslatePress AI wahrscheinlich nichts bezahlen müssen.
Mehrsprachige SEO und automatische Übersetzungen
Zu guter Letzt, wenn Sie möchten, dass Ihre Inhalte in übersetzten Sprachen ranken, müssen Sie dem folgen Prinzipien für mehrsprachige Suchmaschinenoptimierung.
Wir haben das Übersetzen von SEO-Details im Tutorial oben bereits angesprochen, aber lassen wir uns das Thema etwas genauer ansehen.
Wenn Sie TranslatePress verwenden, wird das Plugin automatisch Fügen Sie das hreflang-Attribut hinzu für jede Sprache, die Ihre Website verwendet. Auf diese Weise weiß Google für jeden Inhalt Ihrer Website, um welche Sprache es sich handelt.
TranslatePress SEO-Add-on wird sichergestellt, dass Sie die wichtigsten SEO-Elemente auf einer Seite automatisch übersetzen können. Dinge wie URL-Slug, Seitentitel, Beschreibung, Bild-Alt-Tags oder Social-Graph-Tags.
Es funktioniert sofort mit allen gängigen SEO-Plugins (wie Yoast SEO, Rank Math, All in One SEO, SEOPress) und erweitert deren Sitemap-Funktionalität, um eine mehrsprachige Sitemap zu erstellen, die den Empfehlungen von Google entspricht.
Stellen Sie sicher, dass Sie alles überprüfen, was automatisch übersetzt wurde. Stellen Sie zunächst sicher, dass jede Seite vollständig übersetzt wurde, da Google dringend empfiehlt, dass jede Seite Inhalte in nur EINER Sprache bereitstellt. Andernfalls sinken die Chancen für ein Ranking dieser Seite erheblich.
Zweitens sollten Sie unbedingt alle Sätze oder Textteile, die von der automatischen Übersetzungsmaschine wörtlich übersetzt wurden und keinen Sinn ergeben, überarbeiten. Alles muss so klingen, als wäre es von einem Menschen geschrieben worden, um Ihre Chancen auf ein gutes Ranking zu erhöhen.
Wenn Sie Inhalte haben, die nur für bestimmte Benutzerrollen oder angemeldete Benutzer verfügbar sind, können Sie mit dem Übersetzungseditor die Website als eine bestimmte Benutzerrolle durchsuchen um benutzerspezifische Inhalte zu übersetzen.
So übersetzen Sie Ihre WordPress-Website automatisch
Die automatische Übersetzung von WordPress-Websites mit TranslatePress AI ist wirklich kinderleicht und erfordert keine besonderen Kenntnisse. Sobald Ihre Mehrsprachige Website wird automatisch übersetzt. Sie können jede Seite durchsuchen und Textteile, die keinen Sinn ergeben oder unnatürlich klingen, manuell anpassen.
Neben der einfachen Bedienung liegt der Vorteil der visuellen Übersetzungsoberfläche von TranslatePress darin, dass Sie stets den Kontext kennen, in dem ein Satz oder ein Textabschnitt vorkommt. Das erleichtert es, die richtige Übersetzung dafür zu finden.
Da TranslatePress mit jedem Gerät sofort einsatzbereit ist, übersetzungsbereites Theme oder Plugin, einschließlich WooCommerce oder Page Buildern lassen sich die hier gezeigten Prinzipien nutzen, um jede Art von WordPress-Website zu übersetzen, unabhängig von den zu ihrer Erstellung verwendeten Werkzeugen.
TranslatePress Mehrsprachig
Wenn Sie mehr darüber erfahren möchten, wie TranslatePress Ihnen bei der automatischen Übersetzung von WordPress-Websites helfen kann, sollten Sie unbedingt Schauen Sie sich alle Funktionen an.
Sehen Sie sich außerdem unbedingt dieses kurze Video an, in dem die wenigen Schritte erläutert werden, die erforderlich sind, um TranslatePress mit Google Translate einzurichten und alle Inhalte Ihrer Website automatisch zu übersetzen:
Wenn Sie Ihre Website automatisch übersetzen möchten und Fragen haben, stellen Sie diese bitte unbedingt im Kommentarbereich unten.

Was für ein toller Artikel. Ich möchte viele Länder erreichen. Allerdings kostet die Einstellung eines Übersetzers zur manuellen Übersetzung der Website viel Zeit und mehr Geld. Ich kann das jetzt ganz einfach erledigen.
Bestes Plugin für automatische Übersetzung