In this post
In this post
Creating a multilingual WordPress site is a pretty laborious task. You first need to figure out what languages you want your site to be available in, then find the best translation plugin for your project. Only after this you’ll get to the part where you actually translate your site content. This process is probably the most time consuming of all the above.
Automatically translating your WordPress site is a excellent way to speed up the translation process and use automatic translations as a starting point for your multilingual content. You can have everything translated in minutes, not days or weeks.
In this tutorial we’ll go through how to automatically translate WordPress sites fast and with minimal costs by using TranslatePress.
TranslatePress offers both automatic and manual translations. What sets TranslatePress apart from other multilingual solutions is that you can to translate all your site content directly from the front-end, by using a visual translation interface.

TranslatePress also has its own built-in automatic translation service called TranslatePress AI, while also letting you connect directly to Google Translate or DeepL if you prefer those approaches.
Let’s get started…
How to Automatically Translate Any Website With Google Translate
Later in this post, we’ll show you the most optimal way to use automatic translation to translate your own website. But if you’re looking to translate someone else’s website, all you need is Google Translate.
This is useful if there’s a website in another language that you want to experience, or if you just generally need to translate a website that you don’t control.
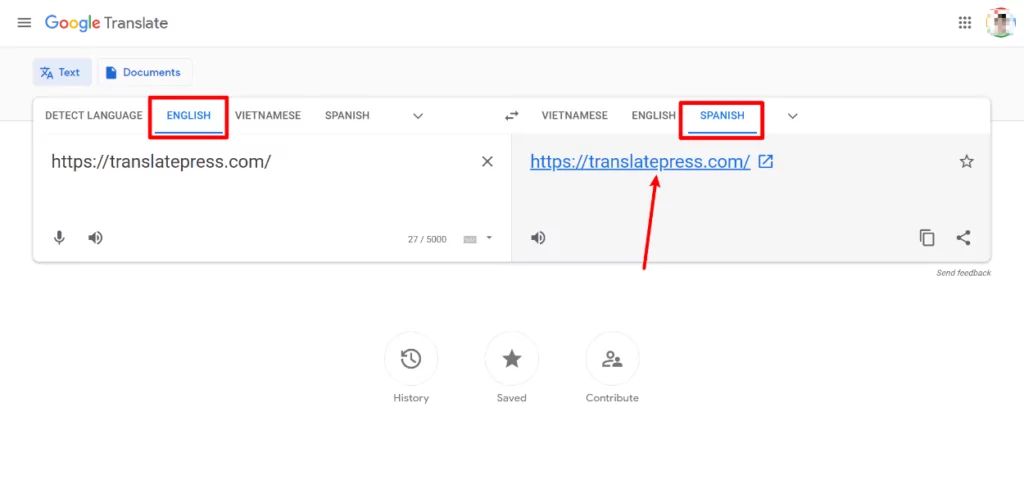
To get started, go to the regular Google Translate page and choose the language that the website is in (on the left) as well as the language into which you want to translate the website’s content (on the right).
Then, instead of entering the text that you want to translate like you normally would, just paste the URL to the website that you want to translate in the box on the left. Then, click the link in the box on the right to open the translated version of the website.
For example, to translate the TranslatePress website from English to Spanish, you would configure it like so:
When you click the link, it will open the translated version of the website, along with a new toolbar from Google Translate. You can click around to different parts of the site just like you normally would and you can also use the toolbar to change languages and switch back to the original version as needed:
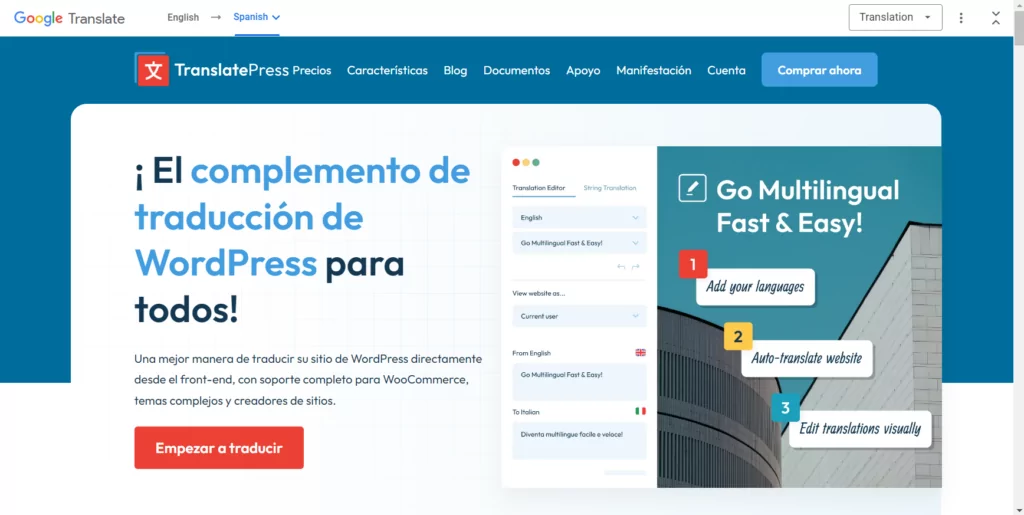
And there you have it – an easy way to automatically translate a website.
Why Dynamic Translation From Google Translate Isn’t Good for Your Own Website
The Google Translate method above is really handy if you need to translate a website that you don’t control. But if you’re looking to translate your own website to create a multilingual website, you shouldn’t use this dynamic approach.
It’s important to note that only the “dynamic” part is the problem.
It’s totally fine to use Google Translate to automatically translate your content, you just need to do so in a way that creates static versions of the translated content after you generate your translations using Google Translate, which is what we’ll show you in the tutorial below.
There are two problems with just using Google Translate to dynamically translate your content on-demand:
- Multilingual SEO – with dynamic translation, the translated versions of your content don’t have their own permanent URLs on your site, which means that Google won’t be able to include them in its search index and you won’t be able to rank for multilingual search terms. This is a big negative if your goal is to benefit from multilingual SEO.
- Accuracy (no manual control) – because the translation happens dynamically, you don’t have the option to manually edit the translations once they’ve been generated. Sometimes the automatic translation isn’t perfect, so this might mean you have to put up with inaccurate translations.
If you want to automatically translate your website, a better approach is to use Google Translate (or another service) to generate your site’s initial translations. However, instead of doing so dynamically, you take those translations and store them in your site’s database.
Because you’re locally storing the translations, you can create static, indexable versions of your translated content (for SEO) and you can also edit the automatic translations as needed.
In the tutorial below, we’ll show you how to implement this approach on WordPress using the TranslatePress plugin.
Why You Should Still Automatically Translate WordPress Site
As long as you don’t use the dynamic approach, translating your WordPress site automatically is an excellent choice that will allow you to go multilingual, while saving both time and money.
Even if you’re fluent in the languages you want to make your site available in, setting up automatic translation is a great starting point. Once your content is automatically translated, you could review everything and make the necessary changes.
Keep in mind that this step is critical if you’re serious about multilingual SEO. But we’ll dive into the details of ranking in more languages later.
For now I think we can both agree that automatic translations are a great time saver.
If you’re not fluent in the languages your website will be available in, starting with automatic translations is still a great option. Once your site is automatically translated, you can hire a professional translator to polish everything and give your content a human touch.
Most of it won’t need any changes, but some parts of the text may need human intervention for making sure the meaning of each sentence is clear, and not just translated literally. TranslatePress let’s you set up Translator Accounts, so you can easily create or allow a professional translator go over your site and make changes without giving him admin rights.
And last but not least, translation costs. The costs of working with a professional translator are much higher than those of using an automatic translation service. Besides this, the back and forth with finding the right translators, get everything translated and approved will delay things significantly.
TranslatePress is optimized to minimize your costs with translating text automatically.
Below, I’ll explain more about how TranslatePress will make sure you only pay once for a certain text to be automatically translated, and NOT be charged every time a user tries to browse a translated page.
How to Automatically Translate WordPress Site Using TranslatePress
Translating your WordPress site automatically is really straightforward using TranslatePress and its automatic translation feature.
For the fastest and easiest way to automatically translate your site, TranslatePress includes its own built-in TranslatePress AI service.
TranslatePress AI is built on top of multiple neural machine translation engines, including Google Translate, DeepL, and Microsoft Translate.
When you enable automatic translation on your site, TranslatePress AI will use these services to generate accurate, contextual translations for your content. By utilizing the optimal service for your website’s unique situation, it can allow for better translations than just connecting to a single service would allow.
In addition to TranslatePress AI, TranslatePress also lets you connect directly to Google Translate or DeepL using your own API key. However, we recommend going with TranslatePress AI if you want the most straightforward way to get started with automatic translation on your site.
Below, we’ll show you step-by-step how to fully translate your WordPress site using TranslatePress AI.
The only thing we’ll assume is that you’ve already set up your WordPress site in its default language. Here’s what our example site looks like:

Install and Activate TranslatePress
To get started, you’ll need to install the TranslatePress plugin on your WordPress site.
While TranslatePress does have a free version at WordPress.org, you’ll need one of the premium licenses to use TranslatePress AI. Beyond giving you access to TranslatePress AI, these licenses also add tons of other helpful features, such as more advanced multilingual SEO functionality, the ability to use unlimited languages on your site, and more.
You can purchase your license here – plans start at just €99.
If your budget doesn’t allow that right now, you could still use the free version and connect it to your own Google Translate API. However, this method isn’t quite as simple as TranslatePress AI, which is why we’re not using it for this tutorial. We will briefly cover this a bit later in the post, though.
Once you’ve purchased your TranslatePress license, you need to install the TranslatePress plugin on your site. To access the premium functionality, you’ll want to install two plugins:
- The free core TranslatePress plugin at WordPress.org. You can install it just like any other free plugin – go to Plugins → Add New Plugin and search for “TranslatePress”.
- The TranslatePress Premium plugin, which you can download from the TranslatePress Account area after you’ve purchased your license. You can install it by going to Plugins → Add New Plugin and then clicking Upload Plugin to upload the Zip file.
After activating the plugin, you’ll also need to add your TranslatePress license key so that you can access TranslatePress AI:
- Go to Settings → TranslatePress in your WordPress dashboard.
- Select the License tab.
- Paste your license key into the box. You can get your license key from the TranslatePress My Account area.
- Click the Activate License button.
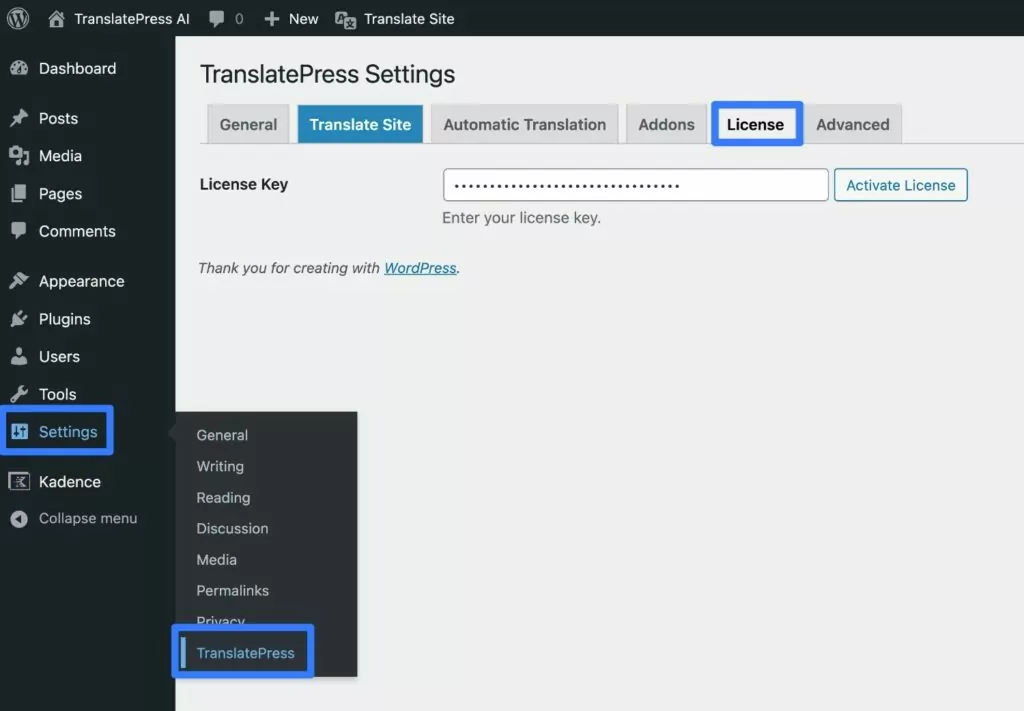
After successfully activating your license, you should see a green checkmark appear.
Choose Your Languages
Next, you’ll want to choose the language(s) that you want to add to your site.
Because you have one of the paid TranslatePress licenses, you can add unlimited new languages.
You can set these up by going to Settings → TranslatePress in your WordPress dashboard. Then, use the All Languages area to add as many new languages as needed.
For example, if your current site is in English and you want to translate it into Spanish, it might look something like this.
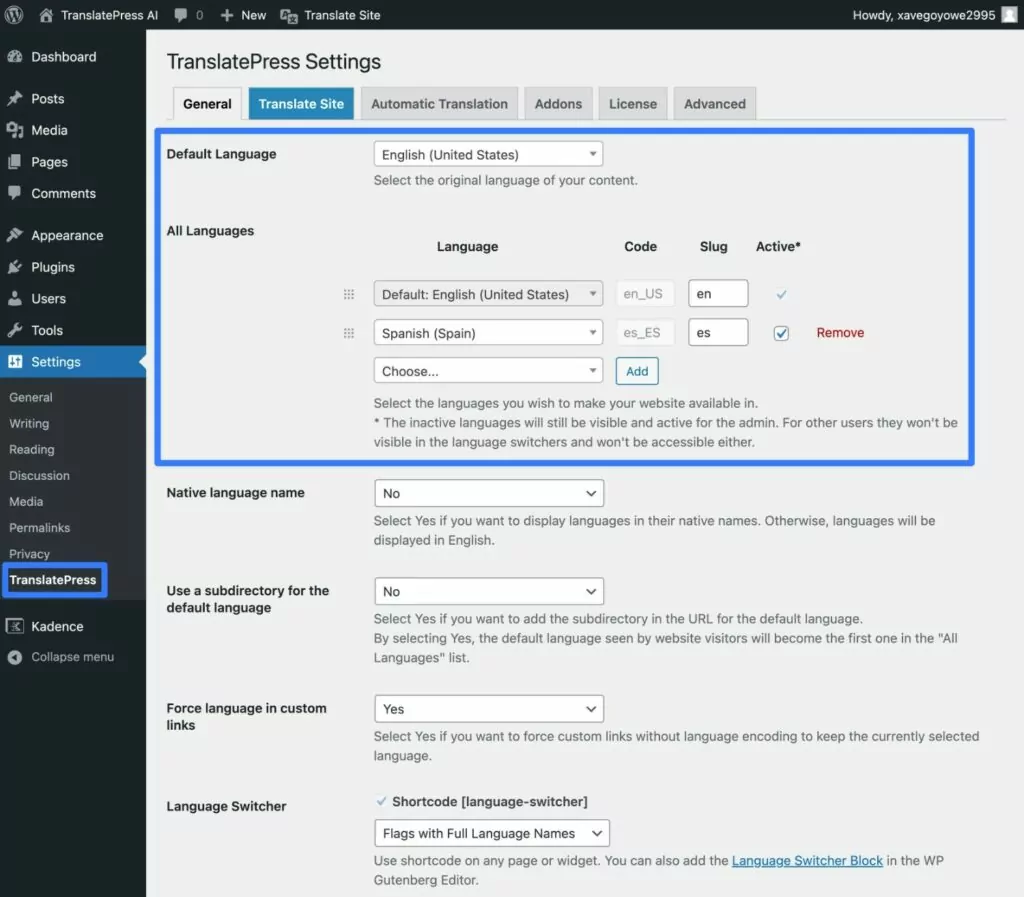
Once you enable automatic translation in the next step, you’ll get an additional option for each language to choose the level of Formality – Formal or Informal. When TranslatePress AI automatically translates your site, it will use this setting to control whether to make the automatic translations more formal or informal. You can come back to this interface after the next step if you want to change the formality level.
Once you’ve added all of the languages that you want to use, make sure to click the Save Changes button at the bottom.
Enable Automatic Translation
Once you’ve picked your languages, the next step is to enable automatic translation through TranslatePress AI.
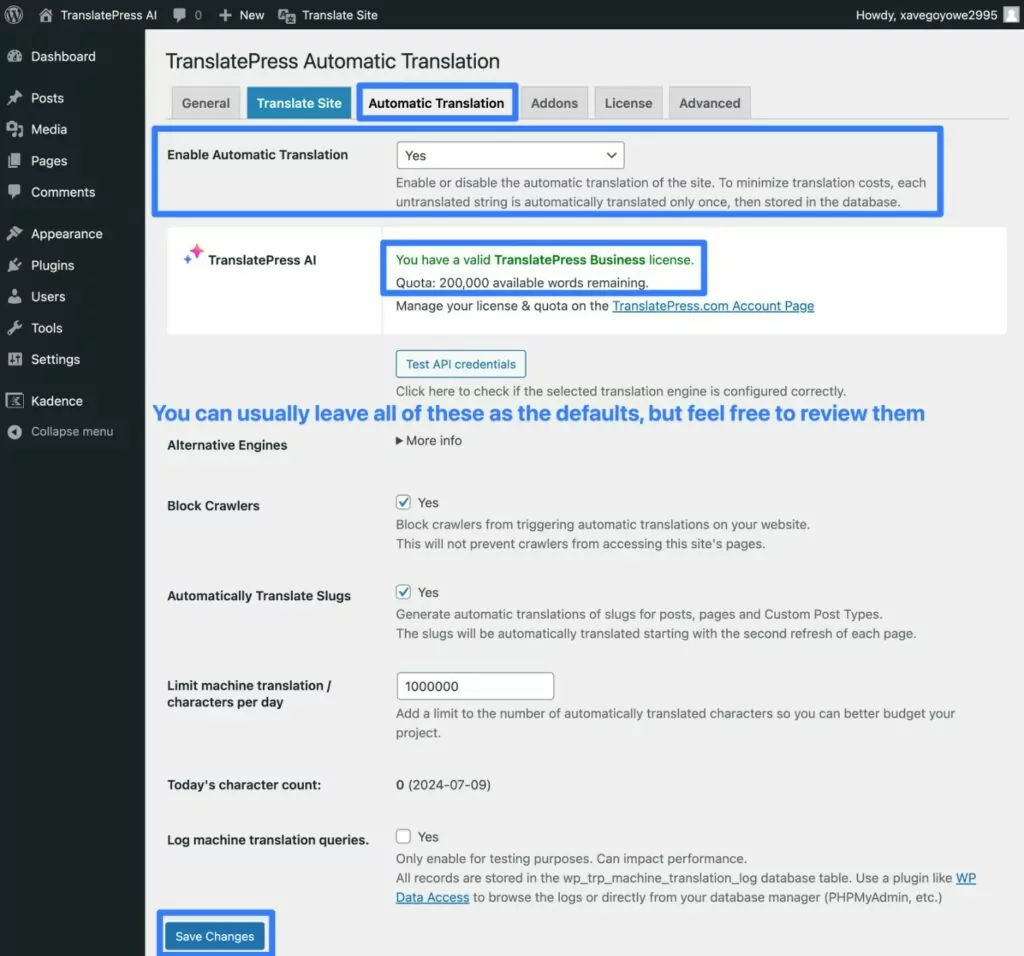
To do this, select the Automatic Translation tab in the TranslatePress settings area (Settings → TranslatePress).
First, set the Enable Automatic Translation drop-down equal to Yes.
You should then see the TranslatePress AI option appear, along with the free translation words quota associated with your license:
- Personal – 50,000 free words.
- Business – 200,000 free words.
- Developer – 500,000 free words.
These should be plenty for most sites, which means there are no added costs to using automatic translation.
However, if you ever need to exceed the free allocation associated with your license, you can also purchase more words from your TranslatePress Account area, starting at €24 for an extra 100,000 words.
Below that, you get a few additional options. However, most of the time you can leave all of these as the defaults.
To enable automatic translation, just click the Save Changes button at the bottom.
And that’s it! TranslatePress AI will now automatically translate your entire WordPress site using the most optimal machine translation service for your situation.
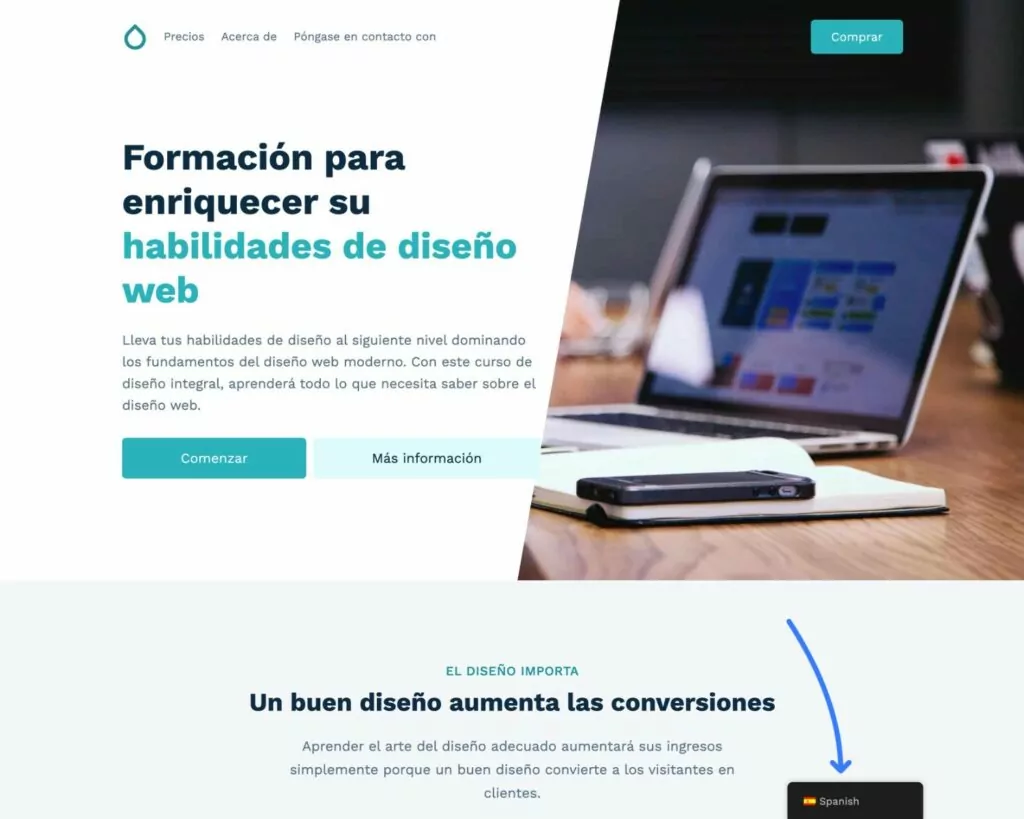
To test this, you can go to the frontend of your site and use the language switcher to change to a different language.
For example, our test site is now fully translated into Spanish from its original English language.
Manually Refine Translations As Needed (Optional)
One of the nice things about using the TranslatePress AI for automatic translation is that you can still easily manually refine any of the translations on your site.
You don’t need to do this, but you might have situations in which you want to tweak one of the automatically generated translations.
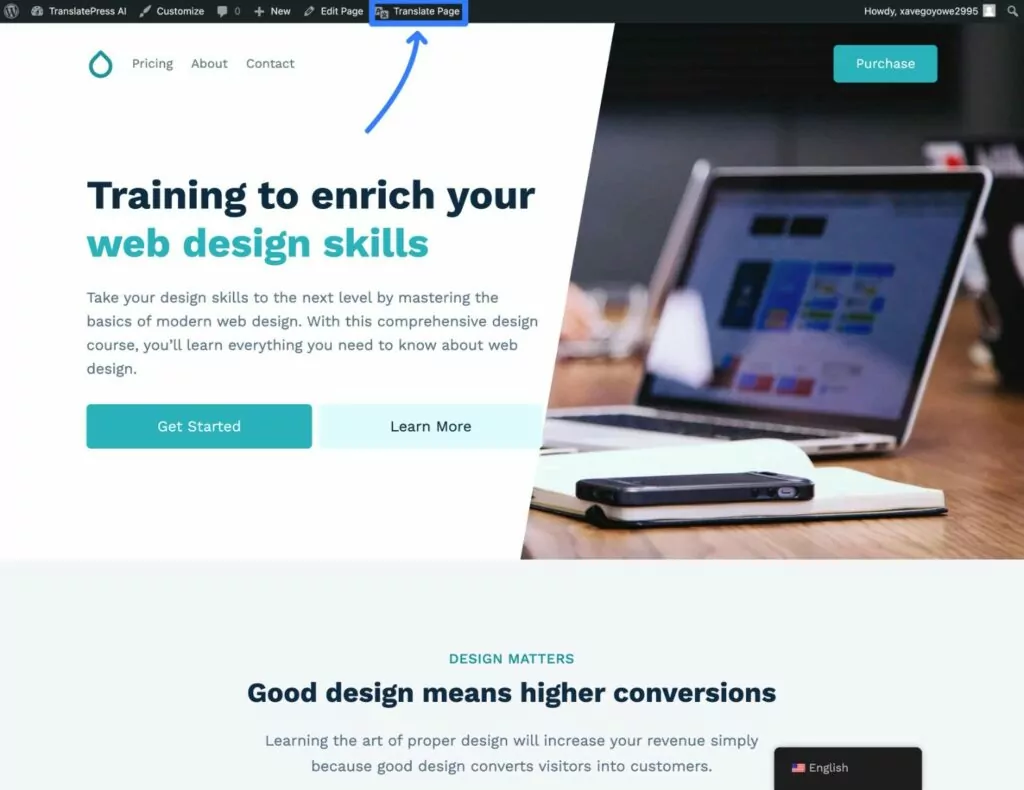
To do this, launch the visual translation editor for the page that you want to translate:
- Open the page where you want to adjust translations on the frontend of your site.
- Click the Translate Page option on the WordPress toolbar.
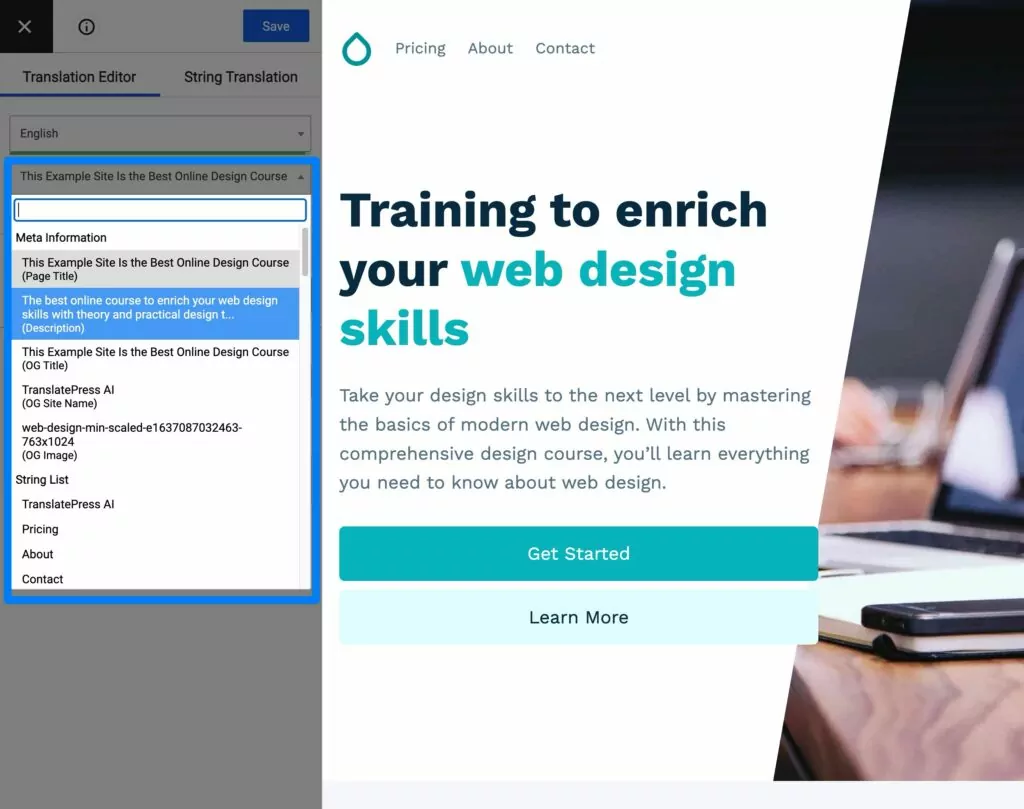
Once you’re in the visual translation editor, you can refine any translation using a point-and-click approach.
Just hover your mouse over the text that you want to translate and click the pencil icon.
This will open that translation in the sidebar, which will be pre-filled with the automatic translation from TranslatePress AI. You’ll also see a machine translation icon that makes it clear that this specific translation came from TranslatePress AI.
In addition to translating all the visible text, TranslatePress AI will also automatically translate all of your behind-the-scenes SEO details, such as the SEO title and meta description. This will help you implement important multilingual SEO best practices.
Make sure you enable the SEO Pack add-on to access this feature – it’s available on all of the premium TranslatePress plans.
All you need to do is use the drop-down to select the metadata that you want to translate:
Another nice thing about this interface is that it also lets you translate some elements that can’t be automatically translated, such as the actual images on your site. TranslatePress AI will automatically translate the image alt text, but it won’t change the image file itself.
If you want to display a different image based on a user’s chosen language, all you need to do is hover over the image and click the pencil icon, just as if you were translating text.
If you have content that’s available only for certain user roles or logged-in users, the translation editor lets you browse the site as a certain user role in order to translate user specific content.
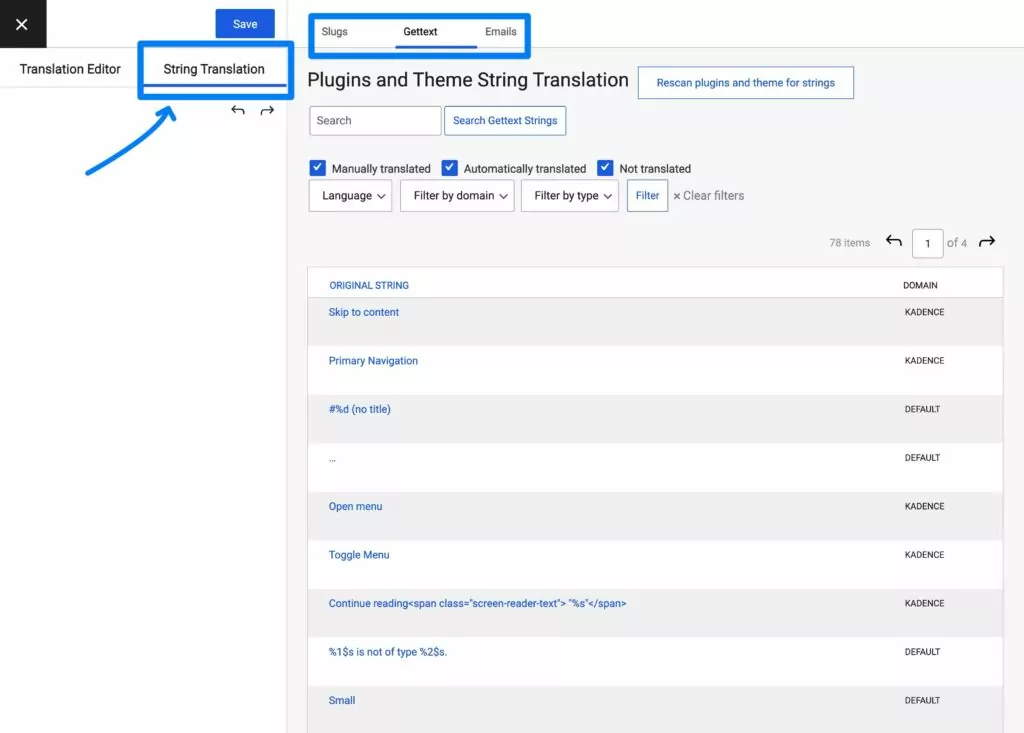
Finally, to access the translations for other types of content such as emails and theme/plugin gettext, you can click on the String Translation option to switch from the visual editor to the backend string editor.
Adjust Your Language Switcher (Optional)
At this point, you have a fully working multilingual WordPress site, powered by automatic translation via TranslatePress AI.
To help visitors access different languages, TranslatePress’s default configuration is to add a floating language switcher in the bottom-right corner of your site.
If you like this placement, you don’t need to do anything.
However, if you’d like to adjust it, TranslatePress gives you several language switcher settings, along with multiple placement options including the following:
- Menu item – you can add your language switcher using the normal WordPress menu system (Appearance → Menus).
- Block/Shortcode – you can manually place your language switcher anywhere on your site using a block or shortcode.
- Other floating positions – you can also move the floating language switcher to a different spot, such as the bottom-left corner of your site.
Check out the language switcher documentation to learn how everything works.
And that’s it! With TranslatePress AI, you can have a working multilingual WordPress website within just a few minutes, thanks to the power of automatic translation.
Alternative Methods: Use Google Translate or DeepL Directly
If you want the easiest way to automatically translate WordPress, you should use the TranslatePress AI method that we covered in the tutorial above.
However, to give you even more flexibility, TranslatePress also lets you connect directly to the Google Cloud Translate API or the DeepL API.
TranslatePress AI utilizes both of these services, so you’re already benefiting from their accurate translations when you use TranslatePress AI. However, if you have a situation where you’d rather connect directly to the service using your own API key, TranslatePress does give you that option.
You can access the Google Translate API in the free version of TranslatePress while you need the TranslatePress Business license to access the DeepL integration.
If you’re not sure which to pick, you might want to read our Google Translate vs DeepL comparison.
Here are some quick guides for how to use both services…
Translate WordPress Automatically With Google Translate
If you want to automatically translate WordPress with Google Translate, you’ll need to generate a Google Translate API key using your own Google Cloud Platform account.
To do this, you’ll need to create a project in Google Cloud and then add the API to that project and create the key. You can check out this help documentation article to learn how it works.
With the Google Translate API, the first 500,000 characters (not words) that you translate each month are free. After that, additional characters are billed at a rate of $20 per one million characters.
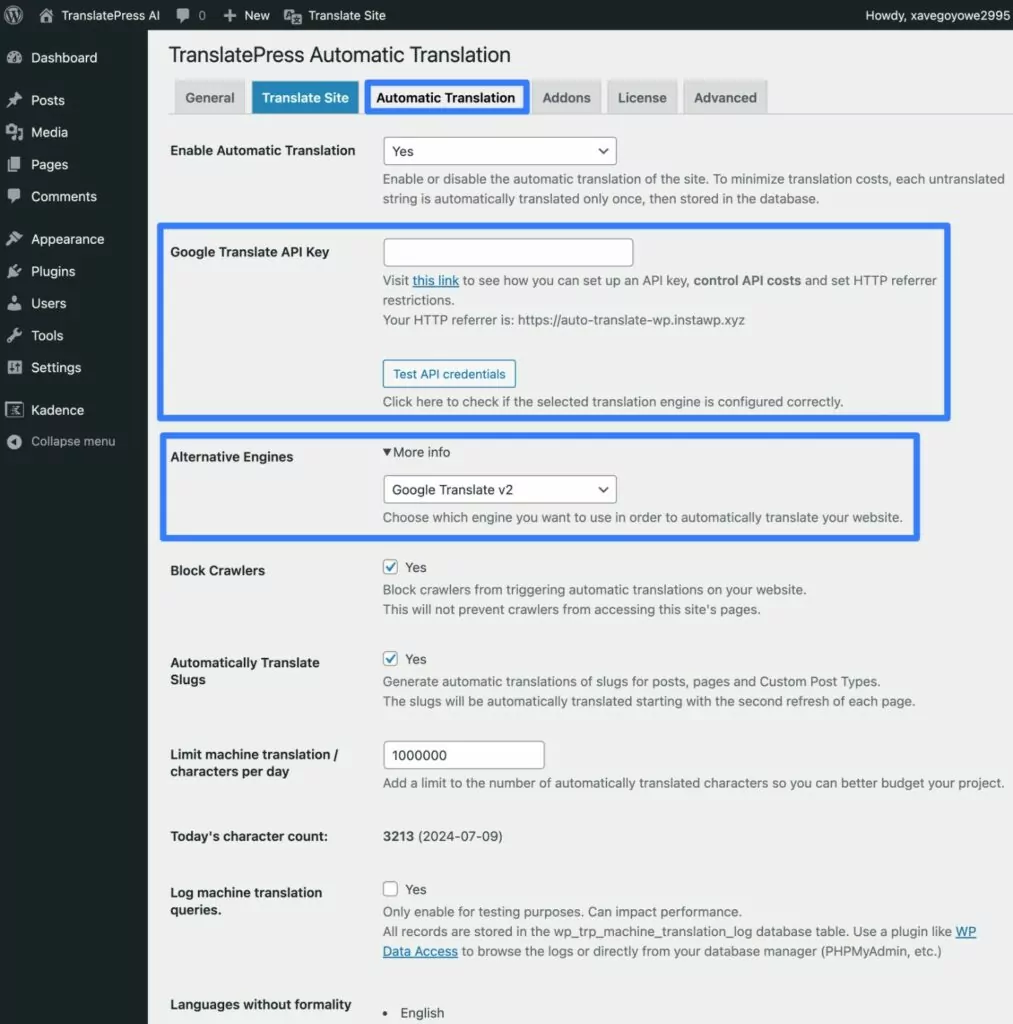
Once you have your Google Translate API key, here’s how to set up TranslatePress:
- Go to Settings → TranslatePress to open the TranslatePress settings area.
- Click on the Automatic Translation tab.
- Set the Enable Automatic Translation drop-down equal to Yes.
- Click the More info option next to Alternative Engines.
- Change the drop-down from TranslatePress AI to Google Translate v2.
- Paste your API key into the Google Translate API Key box.
- Click the Test API credentials button to make sure that the connection is working.
- Configure the other settings according to your preferences. We highly recommend using the Limit machine translation / characters per day setting to set a billing limit, which will help you avoid unexpected Google Translate API usage charges.
- Click the Save Changes button at the bottom.
Translate WordPress Automatically With DeepL
If you want to automatically translate WordPress with DeepL, you’ll need to create your own DeepL account and access your own DeepL API key. This help article covers how to access your DeepL API key once you create your account.
With the DeepL API, you can translate up to 5000,000 characters per month for free. If you need to exceed that limit, you’ll pay a flat $5.49 per month fee plus $25 per one million characters that you translate.
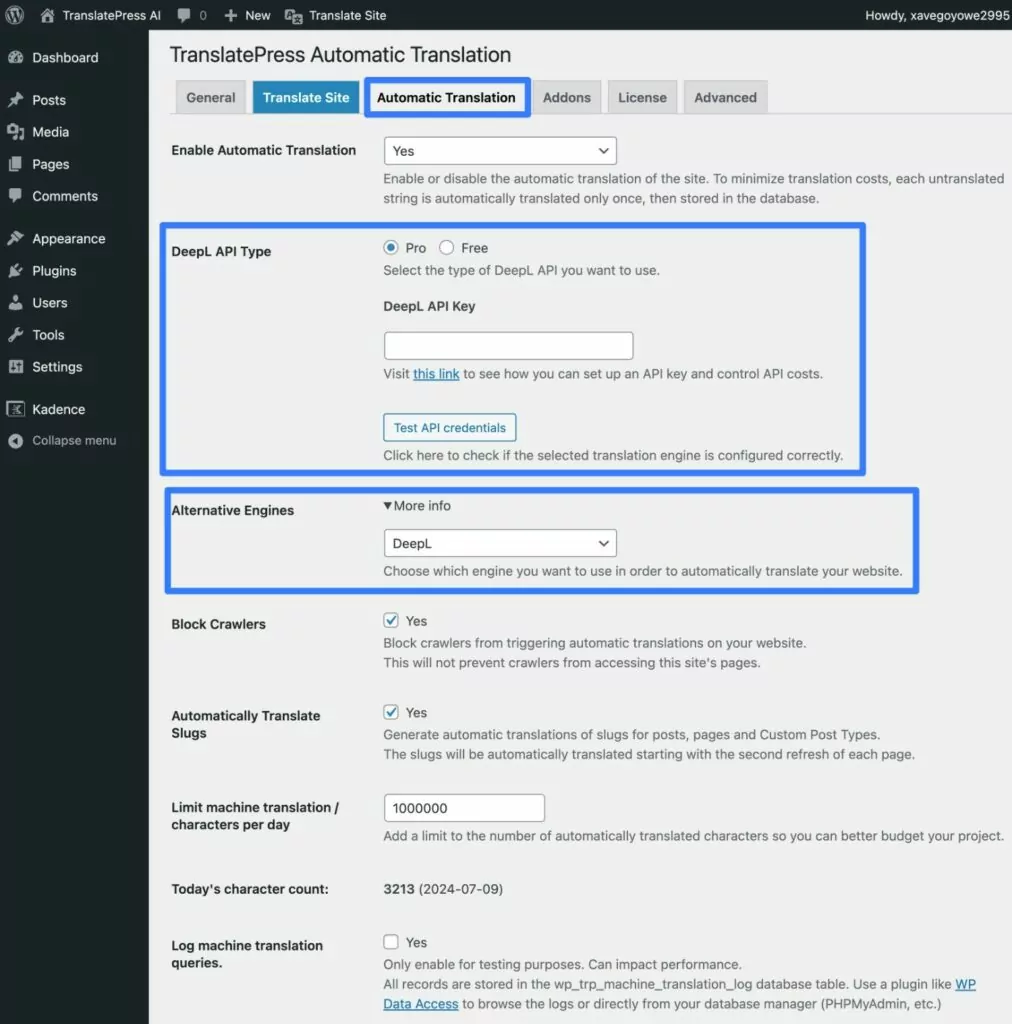
Once you have your DeepL API key, here’s how to set up TranslatePress:
- Go to Settings → TranslatePress to open the TranslatePress settings area.
- Click on the Automatic Translation tab.
- Set the Enable Automatic Translation drop-down equal to Yes.
- Click the More info option next to Alternative Engines.
- Change the drop-down from TranslatePress AI to DeepL.
- Choose whether you’re using the free DeepL API or you’ve subscribed to DeepL API Pro.
- Paste your API key into the DeepL API Key box.
- Click the Test API credentials button to make sure that the connection is working.
- Configure the other settings according to your preferences. We highly recommend using the Limit machine translation / characters per day setting to set a billing limit, which will help you avoid unexpected DeepL API usage charges.
- Click the Save Changes button at the bottom.
How TranslatePress Minimizes Automatic Translation Costs
Now that we saw how easy it is to automatically translate a WordPress site using TranslatePress and its integration with automatic translation services, let’s have a look at how it helps you minimize costs.
Most of these cost-savings apply regardless of whether you use TranslatePress AI or your own Google Translate or DeepL API key.
First off, the automatic translation is triggered ONLY the first time a user visits a page that hasn’t been translated yet.
By browsing your site for the first time in a certain language you’re actually automatically translating it page by page. Once a text has been automatically translated, TranslatePress stores it in your database, thereby minimizing the requests to the automatic translation service.
This also results in a fast loading of the translated pages.
You can also keep costs under control by setting a daily limit for the automatically translated characters.
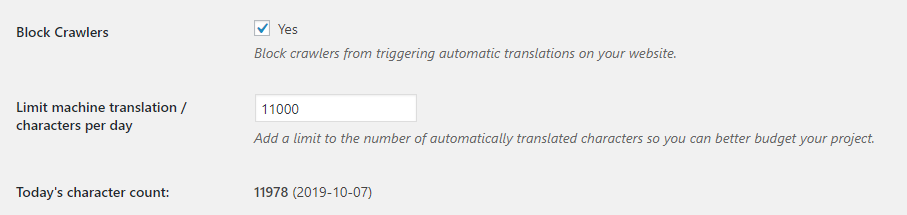
By default, we are also blocking crawlers from triggering automatic translations on your site, as this can also result in unwanted costs from texts that maybe you didn’t want translated.
All these options are part of the Automatic Translation tab in TranslatePress.
Finally, when you purchase any premium license, you also get access to a certain number of words that you can translate for free with TranslatePress AI. This ranges from 50,000 words on the Personal license to 500,000 words on the Developer license.
Unless you have a ton of blog posts, most WordPress sites will be well under 50,000 words, which means you probably won’t need to pay anything for your TranslatePress AI usage.
Multilingual SEO and Automatic Translations
Last but not least, if you want your content to rank in translated languages you need to follow the multilingual SEO principles.
We already touched on translating SEO details in the tutorial above, but let’s go through the topic in a little more detail.
If you’re using TranslatePress, the plugin will automatically add the hreflang attribute for each language that your site uses. This way Google knows the language for each piece of content from your website.
TranslatePress SEO Pack add-on will make sure you are able to automatically translate the most important SEO elements on a page. Things like URL slug, page title, description, image alt tags or social graph tags.
It works out of the box with all popular SEO plugins (like Yoast SEO, Rank Math, All in One SEO, SEOPress) and extends their sitemap functionality to create a multilingual sitemap that follows Google’s recommendations.
Make sure to review everything that has been automatically translated. First, make sure that each page has been fully translated, as Google strongly advises that each page has content available in ONE language only. Otherwise, the chances of ranking for that page will drop significantly.
Second, make sure to modify all sentences or bits of text that have been translated literally by the automatic translation engine and lack meaning. Everything needs to read like it was written by a human, to increase your chances of ranking well.
If you have content that’s available only for certain user roles or logged-in users, the translation editor lets you browse the site as a certain user role in order to translate user specific content.
That’s How You Automatically Translate Your WordPress Site
Automatically translating WordPress sites using TranslatePress AI is really straight forward and requires no special knowledge. Once your multi language website is automatically translated, you can browse each page and manually change any bits of text that lack meaning or sound off.
Besides ease of use, the beauty of using TranslatePress visual translation interface is that you are always familiar with the context in which a sentence or piece of text is appearing. This makes it easy to come up with the right translation for it.
Since TranslatePress works out of the box with any translation-ready theme or plugin, including WooCommerce or page builders, the same principles shown here can be used to translate any type of WordPress site, independently of the tools used to create it.
TranslatePress Multilingual
To learn more about how TranslatePress can help you automatically translate WordPress sites, make sure to check out all the features.
Also, make sure to browse this short video covering the few steps required for setting up TranslatePress with Google Translate to automatically translate all your website content:
If you’re looking to translate your website automatically and have any questions, please make sure to ask them in the comments section below.
Such a great article. I want to target many countries. However, hiring a translator to translate the website manually takes a lot of time and more ney. I can make it done easily now.
Best plugin for automatically translate