In this post
In this post
Looking for a way to offer WordPress in multiple languages?
Creating a multilingual WordPress site is a great way to build a more user-friendly website and reach more visitors. But if you want to use multiple languages, you’ll need some help because WordPress doesn’t support multiple languages by default.
In this post, we’ll cover the different tools that you can use to offer your site in different languages. Then, we’ll show you step-by-step how to add languages to your site using TranslatePress, the solution that we think is the best for most WordPress users.
By the end of this post, you’ll be able to easily offer your site in multiple languages and manage your translations using a simple visual editor like this:
But before we get to all that information, let’s quickly go over the biggest benefits of using multiple languages on WordPress.
Benefits of Offering WordPress in Different Languages
There are two big benefits to offering WordPress in multiple languages:
- You can reach new visitors and expand your audience.
- You can create a better user experience for new or existing visitors who speak a different language.
To the first point, when implemented properly, offering your WordPress site in multiple languages lets you benefit from multilingual search engine optimization (SEO).
With a single-language WordPress site, you can rank your content in Google for one language. But when you add multiple languages, you’ll have a chance to rank your content in every single language that you offer. This can quickly 2X or 3X your ranking opportunities, all without creating any “new” content.
Translating your site can also boost your visibility in other ways because you’ll be able to reach new people on social media, as well.
Second, offering your site in different languages helps you create a better user experience for your multilingual visitors.
As you’d expect, the vast majority of people prefer to browse websites in their native language whenever possible. By going multilingual, you can give these visitors what they want.
This is true even if your website only targets a small geographic area. For example, if your website targets visitors in California, a significant portion of your visitors speak Spanish as their preferred language. By offering your site in both English and Spanish, you can make sure that everyone has a great experience.
Now for the next question – how can you translate your website to achieve those improvements?
Different Methods to Use WordPress in Multiple Languages
If you want to offer your WordPress site in multiple languages, there are a few different routes that you can go:
- WordPress translation plugin
- SaaS translation service (software as a service)
- Dynamic translation widget
- WordPress Multisite
Let’s go through the pros and cons of each approach…
WordPress Translation Plugin
A WordPress translation plugin makes it easy to translate your WordPress site into one or more new languages.
Depending on the plugin, you’ll be able to use manual translation, automatic translation, or a mix of both.
Your translations will be fully indexable by Google and shareable on social media. Most translation plugins will also go a step further and also add other useful features like a front-end language switcher and multilingual SEO enhancements.
Pros:
- Affordable – most translation plugins are quite affordable and some even offer free versions.
- Ownership – all of your translated content stays on your site’s server.
- Native WordPress – because these are native WordPress plugins, you’ll be able to do everything from your WordPress dashboard and you won’t need to learn a new interface.
Cons:
- Can be time-consuming (if you use manual translation) – if you want to save time, we recommend choosing a plugin that supports automatic translation via services like Google Translate or DeepL.
SaaS Translation Service
With a SaaS translation tool, you’ll get a separate cloud dashboard where you can manage all of your site’s translations. Your translations “live” on the SaaS tool’s servers, but you’ll typically get some type of integration plugin to deliver those translations on your WordPress site.
Typically, the setup process goes something like this:
- Register for an account at the service’s website
- Install the integration plugin on WordPress and sync it with the service
- Manage your translations from the service’s website
Pros:
- Simple – the biggest benefit of these services is simplicity. They usually automatically translate your content right away, which lets you start offering WordPress in multiple languages within just a few minutes.
Cons:
- Expensive – with a SaaS tool, you’ll need to pay a recurring fee for as long as you want to use the service. This is different from the normal WordPress plugin approach of a one-time fee (plus an optional renewal to continue receiving updates and support).
- Lack of ownership – because your translations don’t “live” on your WordPress site’s servers, there can be some ownership issues. Most services will let you export your translations if you stop using the service, but it’s still not ideal.
Dynamic Translation Widget
A dynamic translation widget works a lot like how the Chrome browser’s automatic translation feature works. Visitors choose their preferred language from a drop-down. Then, the service (usually Google Translate) dynamically translates all of the content on the page.
If you want to experience this in action, just open a page in Chrome that’s not in your native language – these widgets add that exact same effect, but to your WordPress site.
Two important things to note about this approach are that:
- The translations are never saved anywhere. They happen dynamically in each visitor’s browser. This means you can’t edit them.
- The translations aren’t separate pages, which means that people can’t link to the translated version and Google can’t index the translated version.
Pros:
- Simple – these tools are super easy to use. You pretty much just install a plugin and you’re ready to go.
- Comprehensive – you can offer any language that Google Translate supports, which lets you translate your site into 100+ different languages with a single widget.
- Free – typically, these simple plugins are 100% free.
Cons:
- Not SEO-friendly – because the widget is dynamically translating your content, there’s no static version of your translated content for search engines like Google to index. Basically, you cannot rank your translated content in Google, which means you’re completely missing out on the benefits of multilingual SEO.
- Cannot edit translations – there’s no option to manually edit the dynamic translations – you’re completely at the whims of the machine translations. This is a big deal if you want to guarantee accurate translations.
WordPress Multisite
Another approach to add languages to WordPress is to use WordPress multisite to create a network of sites. You can create a new network site for every language that you want to offer and then add links to each language. This will let you have a multi language WordPress site without using a plugin.
This approach is free, but it has some big drawbacks when it comes to managing your content.
Pros:
- SEO-friendly – each language gets its own indexable translations, which helps you benefit from multilingual SEO.
- Easy to customize sites for localization – because each language is its own network site, it’s easy to create different layouts/menus/sidebars/etc. which can improve localization in some scenarios.
Cons:
- No automatic translation support – you’ll need to translate all of your content manually from scratch, which is time-consuming compared to other tools that let you use automatic translation to get a base.
- Hard to sync content – because each language is its own network site, there’s nothing syncing the content, which makes it hard to keep track of things. For example, if you edit the English-language version, you’ll have to remember to also update the Spanish content. A translation plugin or SaaS tool usually has features to make this easier.
Which Method Should You Use?
For most people, using a dedicated WordPress translation plugin is the best route for a few reasons:
- You can optimize for multilingual SEO – that is, you can actually rank your translated content in Google, which wouldn’t be possible with a dynamic translation widget.
- You can choose your translation method – a good translation plugin should let you choose between automatic and manual translation (and even combine the two for the best of both worlds).
- It’s affordable – you’ll pay a one-time fee rather than the expensive recurring billing that the SaaS translation tools require.
- You have full ownership – your translations stay on your WordPress site’s server, rather than being served from a separate server like some SaaS tools.
When it comes to WordPress translation plugins, the best option is TranslatePress. TranslatePress offers the ease of use of a SaaS tool in a native WordPress plugin package.
You’ll be able to manage all of your translations using a simple visual editor like this:
Out of the box, TranslatePress works with all of your WordPress site’s content, including content from your plugins or theme.
It also includes multilingual SEO features to help you rank your content and lots of user-friendly features, like a floating front-end language switcher.
WordPress Multiple Languages Tutorial
In this section, we’ll show you how to offer your WordPress site in different languages using the TranslatePress plugin. But before we get started, here’s a short video explaining how to do it in less than 5 minutes:
TranslatePress is available for free at WordPress.org and you’ll be able to follow most of this tutorial with just the free version.
With the free version, you’ll be able to offer your WordPress site in one new language using the same simple visual editor that you saw above. You’ll also get:
- Fully indexable translations, which can help you get started with multilingual SEO.
- A front-end language switcher that you can add to different parts of your site.
- The option to use automatic translation powered by Google Translate (while still being able to manually edit those translations).
For more features, you can upgrade to the Pro version to:
- Translate your site into unlimited new languages (vs one new language in the free version).
- Further improve your multilingual SEO with the ability to translate SEO metadata, URL slugs, and more.
- Use DeepL for automatic translations (in addition to Google Translate).
- Access lots of other useful features
TranslatePress Multilingual
To get started, install and activate the free TranslatePress plugin from WordPress.org. Then, here’s how to set everything up…
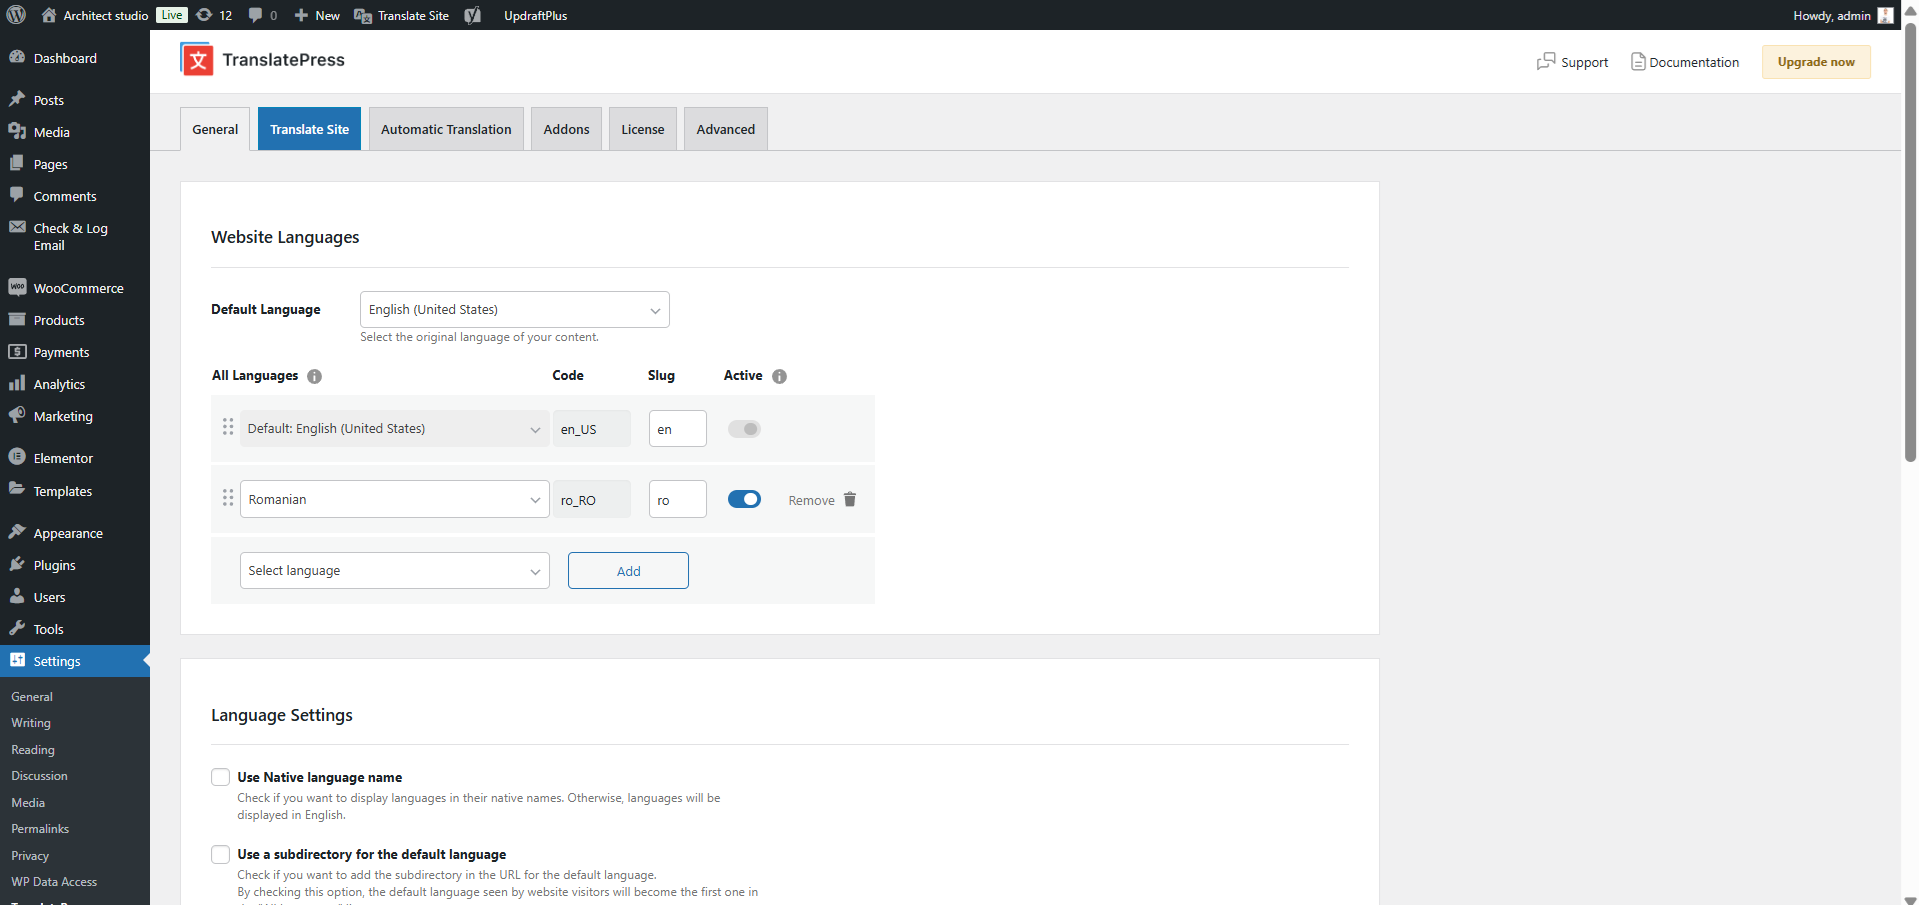
1. Choose Which Languages to Add to WordPress
Once you’ve installed and activated the plugin, you can go to Settings → TranslatePress to choose your site’s default language and the new language(s) into which you want to translate your content:
2. Choose Your Approach to Language Translation
Next, you need to choose how you want to translate your content. You have three options:
- 100% manual – you can manually add all of your translations from scratch, either by yourself or with the help of a freelancer or translation agency. This is the most time-consuming approach, but it guarantees accurate translations.
- 100% automatic machine translation – you can use Google Translate or DeepL to automatically translate your entire site. This is the fastest method but, while machine translation has improved a lot, automatic translations still aren’t perfect.
- Mixed – you can start by using Google Translate or DeepL to generate a set of baseline translations. Then, you can go back and manually refine those translations as needed.
For most people, the mixed approach offers the best balance. It lets you quickly get up and running with a fully translated site. However, you can still manually edit the translations needed where necessary – you can either make these edits yourself or you can hire a freelancer to go through and proofread your machine translations.
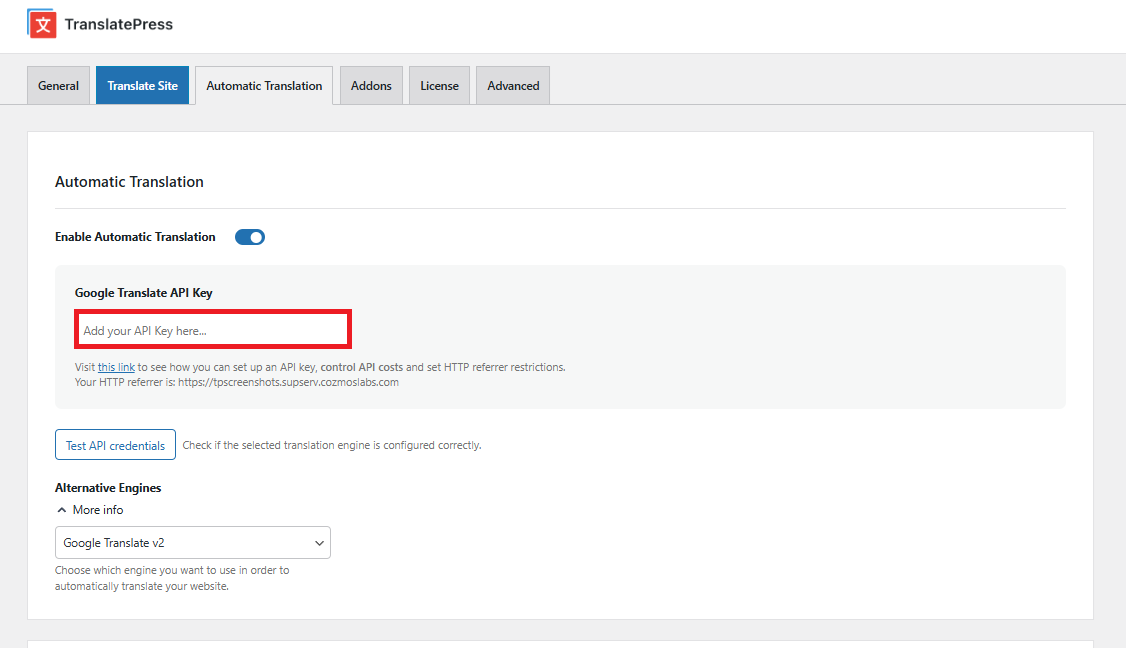
If you want to use one of the automatic translation approaches, you can configure your preferred service in the Automatic Translation tab. Here are two guides for the services that TranslatePress supports:
3. Translate Your Content
Now, you’re ready to translate your content! Or, if you used automatic translation, you’re ready to manually refine your translations (if needed).
You can use TranslatePress’ visual editor to translate 100% of your content, no matter if it’s coming from the WordPress editor, your plugins, or your theme.
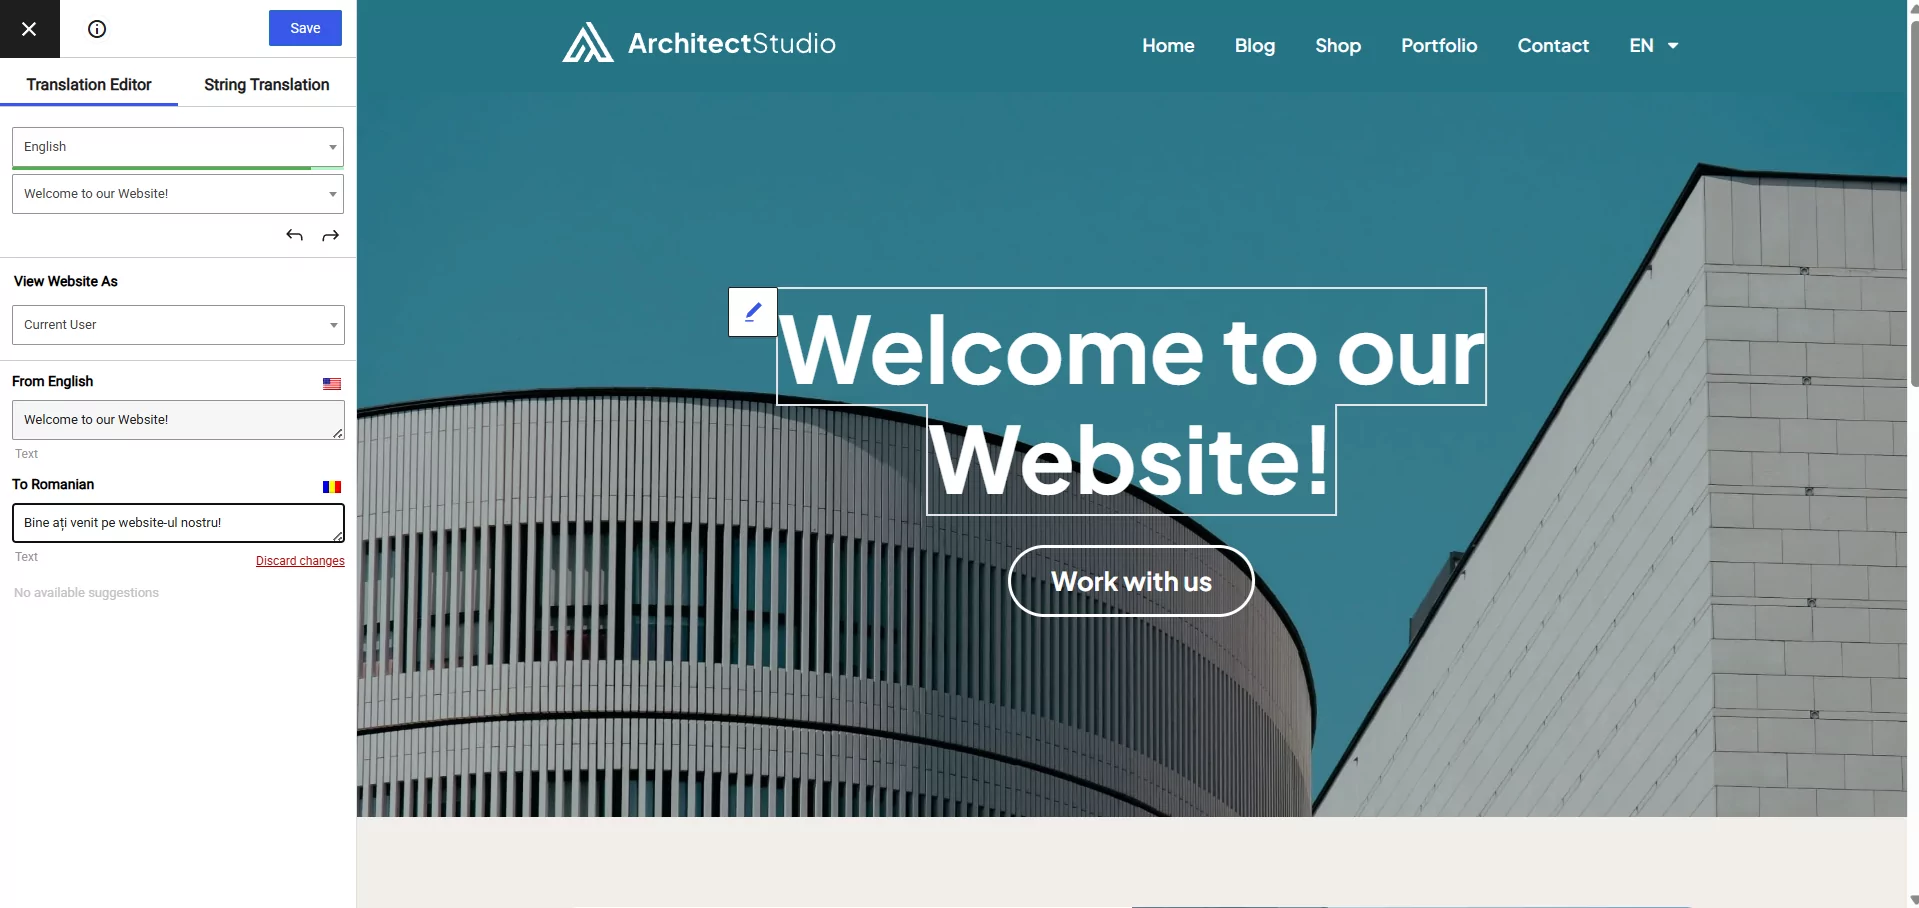
To open the translation editor, go to the piece of content that you want to translate on the front-end of your site and click the Translate Page button on the WordPress toolbar:
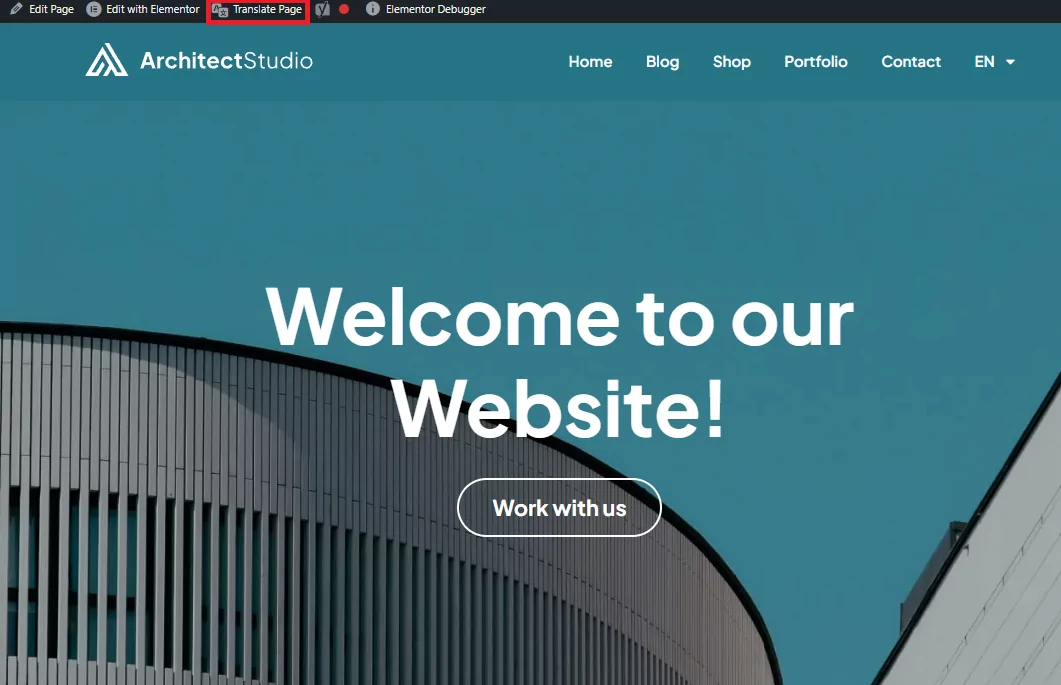
This will launch a live preview of your content, along with a sidebar on the left where you can manage your translations.
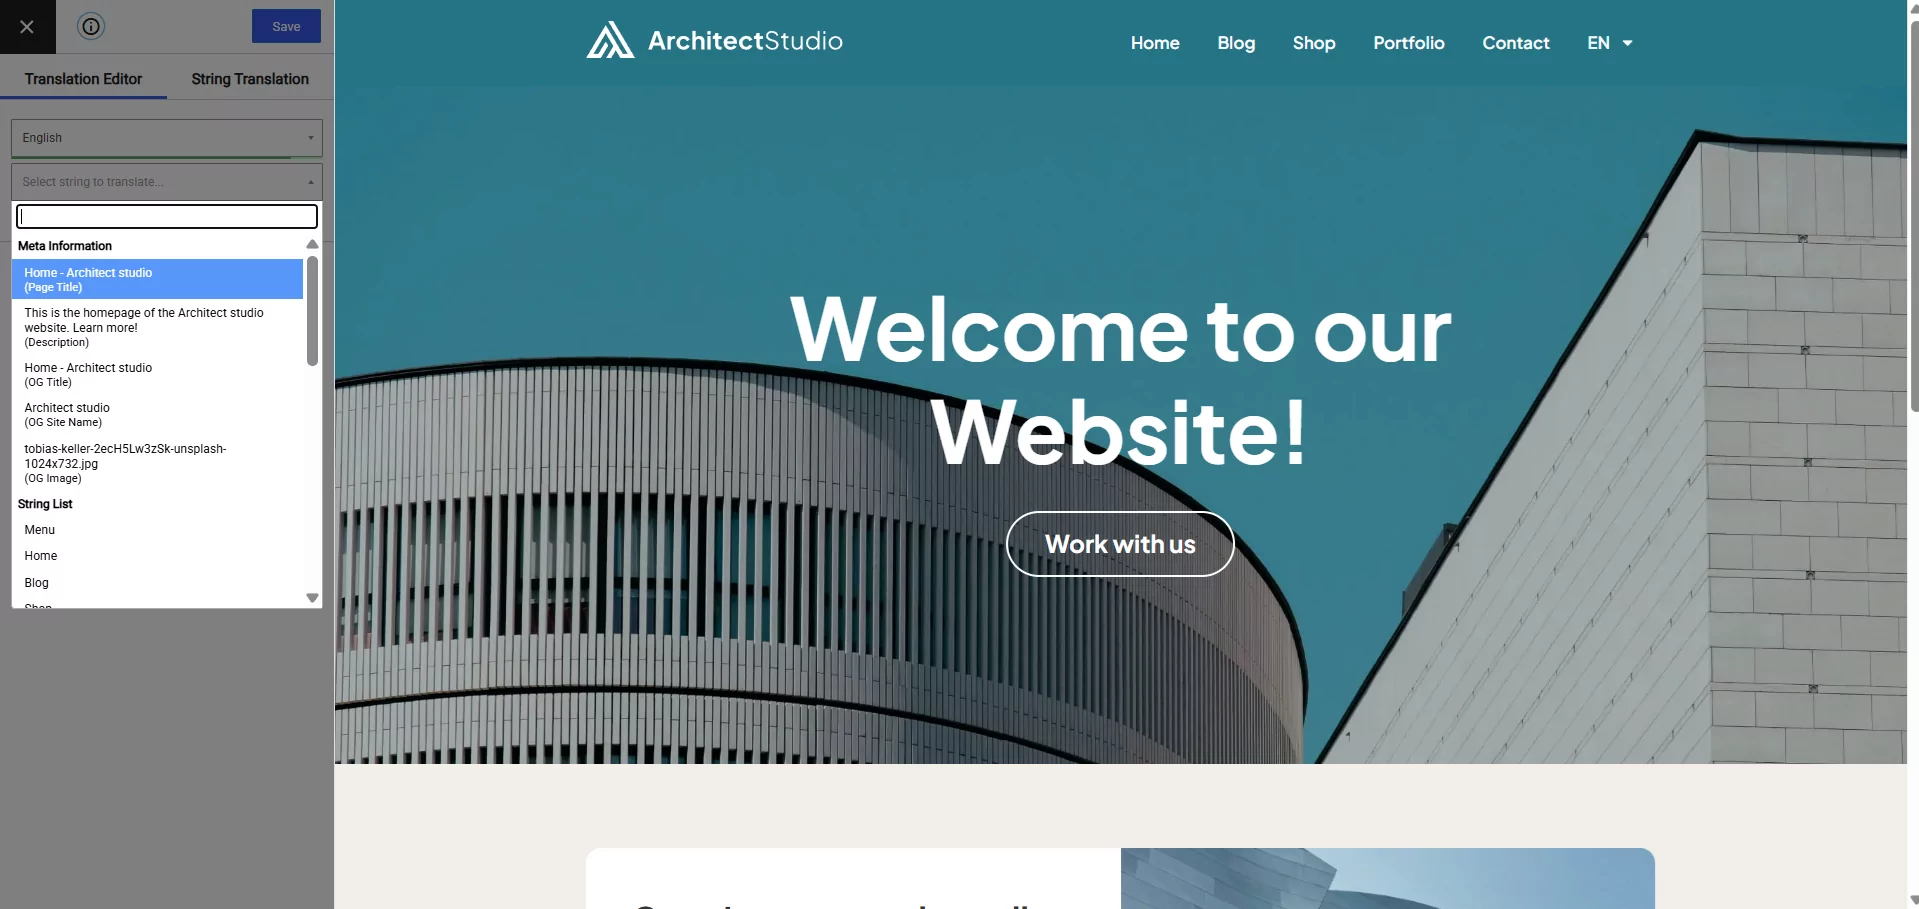
To translate any content on your site, hover over it on the live preview and click the pencil icon. That will open the translation in the sidebar editor – all you need to do is enter the translated text in the box:
You’ll use this same approach to translate your entire site. If you want to see more detailed instructions for specific parts of your site, here are a bunch of guides that can help. How to translate…
- Editor (Gutenberg) blocks
- Custom fields
- Custom post types
- WordPress forms
- WordPress menus
- Images
- Popup content
- Sliders
- WooCommerce products
4. Optimize for Multilingual SEO
In the previous section, we focused on helping you translate the front-end content of your site. This is what your human visitors will mostly care about. However, if you want to optimize your site’s multilingual SEO, you also need to translate the behind-the-scenes details like your:
With the premium SEO Pack addon, you’ll be able to also translate all of these elements using TranslatePress.
Once you’ve purchased and installed the SEO Pack add-on, you’ll be able to manage the translations for your SEO metadata and social media information using the drop-down in the TranslatePress editor:
To edit URL slugs, you can click the option to open the String Translation interface.
5. Configure Your WordPress Language Switcher
To help your visitors choose their preferred languages, TranslatePress automatically adds a floating language switcher to the bottom-right corner of your site. You can fully customize this switcher by going to Settings → TranslatePress → Language Switcher tab.
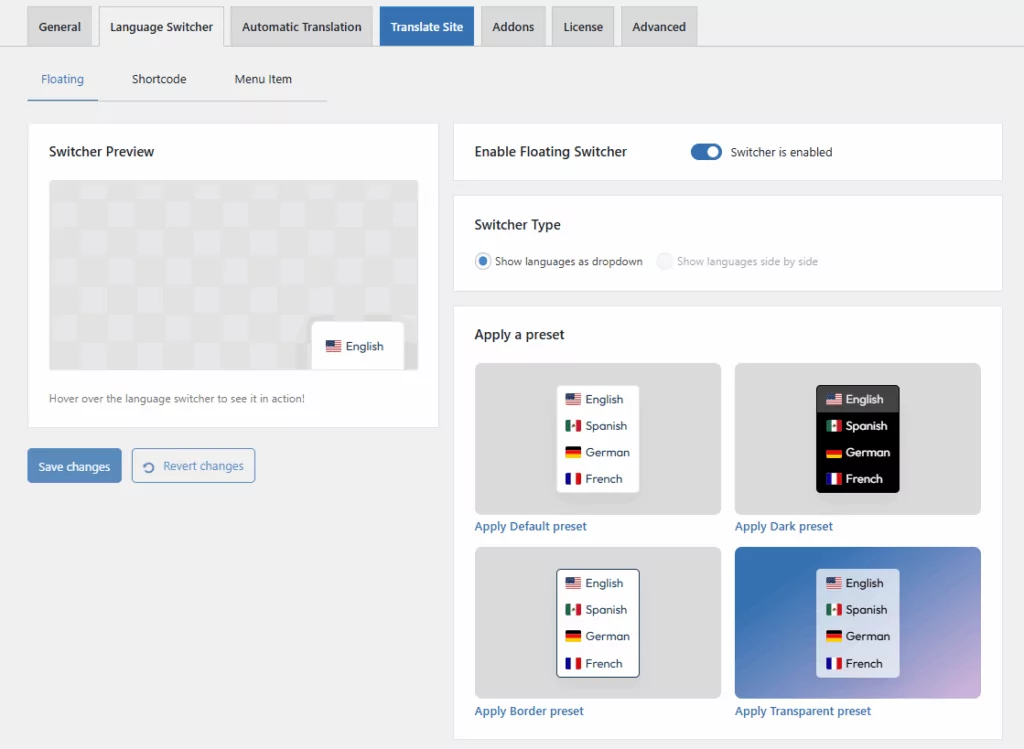
Here, you have the ability to move this language switcher to a different location and change how it works and looks. For example, you could move it to your site’s top left corner and only show the language name (instead of also showing a flag).
In addition to the floating language switcher, you can also place your language switcher:
- In a menu using a new option in the native WordPress menu tool (Appearance → Menus).
- Anywhere on your site using a block or shortcode (including in your sidebar by adding it to a widget).
- Directly in your theme’s template files using a PHP function
And that’s it! Visitors will now be able to benefit from multiple languages when they browse your site, and you’ll also be able to start ranking your content in Google in multiple languages.
Start Using WordPress in Multiple Languages Today
Offering your WordPress site in multiple languages is a great way to help you reach more people in search engines and on social media. Better yet, it also provides a better experience for any existing multilingual visitors to your site because they’ll be able to choose their preferred languages while browsing.
While you have lots of options for offering WordPress in different languages, a dedicated WordPress translation plugin is the best option for most sites because:
- You can use both automatic and manual translation (and mix-and-match the two approaches as needed).
- Your translations will be static indexable content, which lets you benefit from multilingual SEO and also lets visitors share your multilingual content or link to it from their sites.
- It’s affordable because you can avoid the expensive monthly fees that come with SaaS translation tools.
- Your translations stay on your WordPress site’s server.
To easily get started with a multilingual WordPress site, you can use the free TranslatePress plugin at WordPress.org and follow this guide.
Then, if you want to improve your site’s multilingual SEO, offer unlimited new languages, and get access to some other useful premium features, upgrade to the premium version.