In this post
In this post
Want to use Google Translate with WordPress to start automatically offering your site’s content in new languages?
Google Translate makes it easy to quickly create a multilingual WordPress site.
However, you’ll want to pay attention to how you implement Google Translate on your WordPress site so that you can fully achieve the benefits of a multi language website when it comes to SEO and user experience.
In this post, you’ll learn the two main approaches to using Google Translate on your WordPress site. Then, we’ll show you step-by-step how you can use Google Translate to automatically create a user-friendly and SEO-friendly multilingual site with TranslatePress.
Two Ways to Use Google Translate With WordPress
At a high level, there are two ways that you can use Google Translate with WordPress:
- Add a dynamic Google Translate widget – you can add a simple Google Translate widget that lets visitors translate your content into any language. However, this happens dynamically, much like how the Chrome browser lets you automatically translate a site into your preferred language.
- Use Google Translate to generate static content – you use Google Translate to automatically translate your site’s content into new languages and then store those translations in your site’s database.
While using the dynamic widget method is simple, there are two big flaws with it:
- It’s not SEO-friendly – because the widget dynamically translates your site’s content, Google can’t index your translated content, which means you’ll completely miss out on the many benefits of multilingual SEO.
- You can’t edit translations – you won’t be able to edit any of the dynamic translations, which means you’ll be completely at the whims of Google Translate’s machine translations. That isn’t always optimal for important pages since automatic translations aren’t always accurate.
For those reasons, most sites should use the second approach, which is what we’ll show you in this tutorial.
Using Google Translate to automatically translate your WordPress site, improving translations manually and storing them in your site’s database means that:
- Google and other search engines can index each language’s content, which gives you a chance to increase your traffic from search engines (by reaching searchers in new languages).
- Once you use automatic translations to translate your site, you can go back and manually edit those translations if needed. This still lets you save time, while also ensuring that you can have human-approved translations for key content.
TranslatePress Multilingual
How to Add Google Translate to WordPress with TranslatePress
To use Google Translate with WordPress, you can use the free TranslatePress plugin.
TranslatePress lets you use Google Translate to translate all of your site’s content, even down to your contact forms, products, and SEO metadata. To translate all the important SEO elements on the page (things like page title, description, URL slug & more) you’ll need the SEO Pack add-on (available in the premium version).
The powerful thing with TranslatePress is that, once you’ve generated your site’s translations using Google Translate, TranslatePress locally stores those translations in your WordPress site’s database. Again, this means that you can:
- Rank the translated version(s) of your multi language website in Google and other search engines.
- Manually adjust the Google Translate generated text if needed.
It also means that you own those translations, so even if you stop using Google Translate or even TranslatePress, you’ll still have them saved on your site.
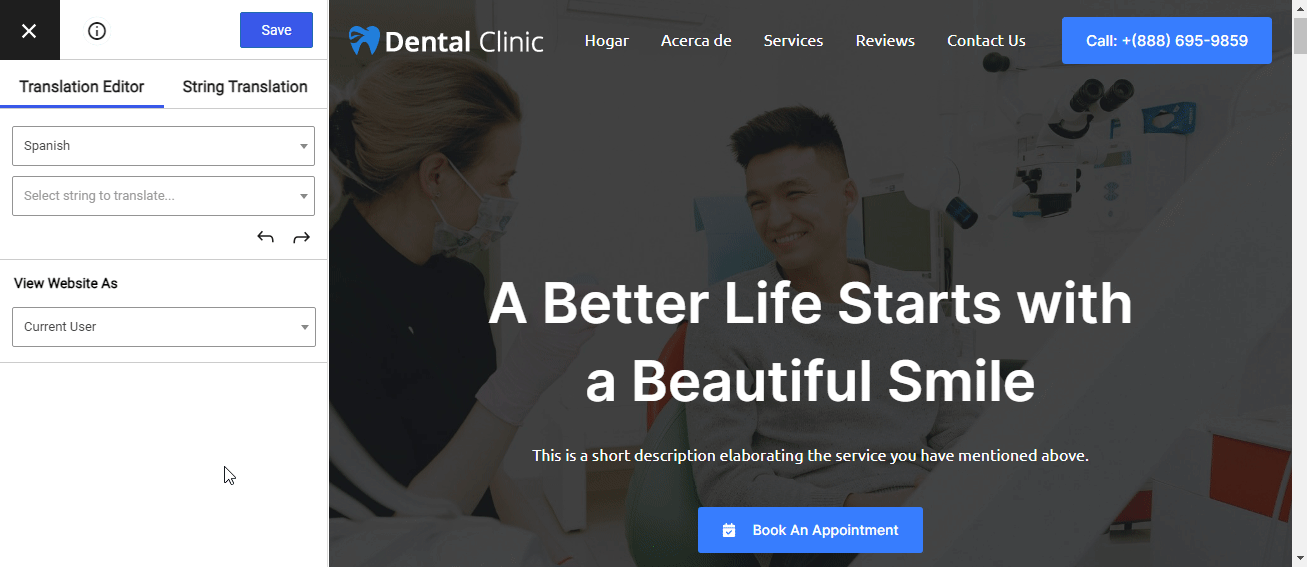
Once you have Google Translate generate your site’s translations, you’ll be able to use a visual editor to manage them as needed:
TranslatePress will also add a front-end language switcher so that visitors can choose their preferred languages.
How much will Google Translate cost?
You can use Google Translate with the free version of TranslatePress at WordPress.org. However, you may need to pay Google for access to the Google Translate API depending on your usage.
You can translate up to 500,000 characters (not words) for free per month. After that, Google charges $20 per million characters. (See how it compares to other machine translation services.)
On average, a 1,500-word blog post is around 10,000 characters, so the 500,000 characters per month free tier should work for most sites.
Here’s how to set up TranslatePress with Google Translate…
1. Install TranslatePress – Google Translate plugin for WordPress
To get started, install and activate the free TranslatePress plugin from WordPress.org.
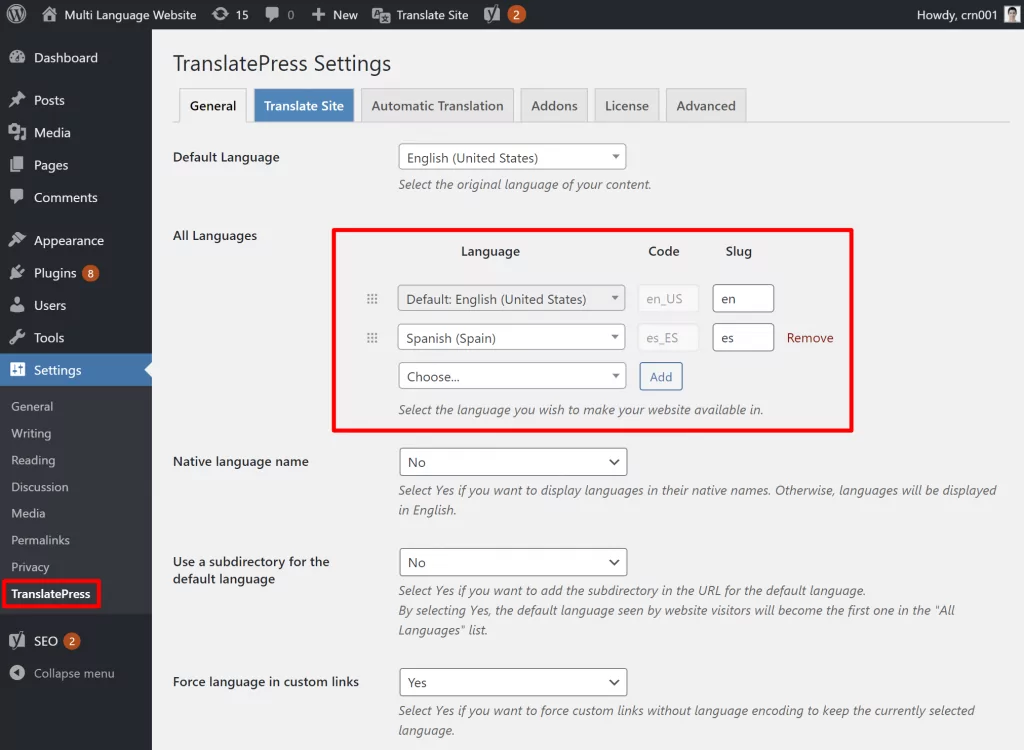
Then, go to Settings → TranslatePress to choose which language(s) to use on your site. These are the languages into which TranslatePress will use Google Translate to translate your content.
For example, if you want to translate your existing English-language site into Spanish, you’d configure the plugin like this:
2. Generate Google Translate API Key
Next, you need to generate a Google Translate API key. This is what allows you to connect your WordPress site to Google Translate.
To get your key, you can follow the detailed instructions in this help article or watch this short video tutorial:
Once you follow those steps, you should have an API key that gives you access to automatic translations powered by Google Translate.
3. Set Up Automatic Translation in TranslatePress
Once you have your API key, you’re ready to set up automatic translation in TranslatePress.
To do so, open the TranslatePress settings in your WordPress dashboard, go to the Automatic Translation tab, and:
- Turn on automatic translation
- Select Google Translate v2 as your Translation Engine
- Add your Google Translate API key from the previous step
To control your budget, you can also add a limit to the number of characters that TranslatePress will process. You can also set a limit when setting up your Google Translate API key, but this gives you another useful tool to control the costs that you pay to Google Translate.

Once you click Save Changes, TranslatePress will use Google Translate to automatically translate your entire site into the language(s) that you chose in Step #1 (while adhering to your daily character limit, of course).
Note:
For anyone who doesn’t want to fetch the Google Translate API (or can’t obtain one for some reason), there is an easier and faster way to enable automatic translations on your site.
Ladies and gents, say a big hello to TranslatePress AI.
TranslatePress AI allows you to automatically translate your website using Google Translate (alongside all other top machine translation engines), without generating API keys. This is a much faster and more accurate alternative to using an API.
To activate the TranslatePress AI add-on, you need the premium version of TranslatePress, which ships with many other features such as multiple languages, translator accounts, SEO translation, and more.
4. Manually Refine Translations (Optional)
If you want to manually refine the translations from Google Translate, you can use TranslatePress’ visual translation editor.
To open the translation editor, visit the page that you want to edit on the front end of your site and click on the Translate Page option on the WordPress toolbar:

Then, you can edit the translation for any element on your site by hovering over it and clicking the pencil icon. When you click on the pencil icon, you’ll see that the translation in action:

You can use this approach to translate more than just text. For example, you can translate:
- WooCommerce products
- Gutenberg blocks
- Custom fields
- Custom post types
- WordPress forms
- WordPress menus
- Images
- Popup content
- Sliders
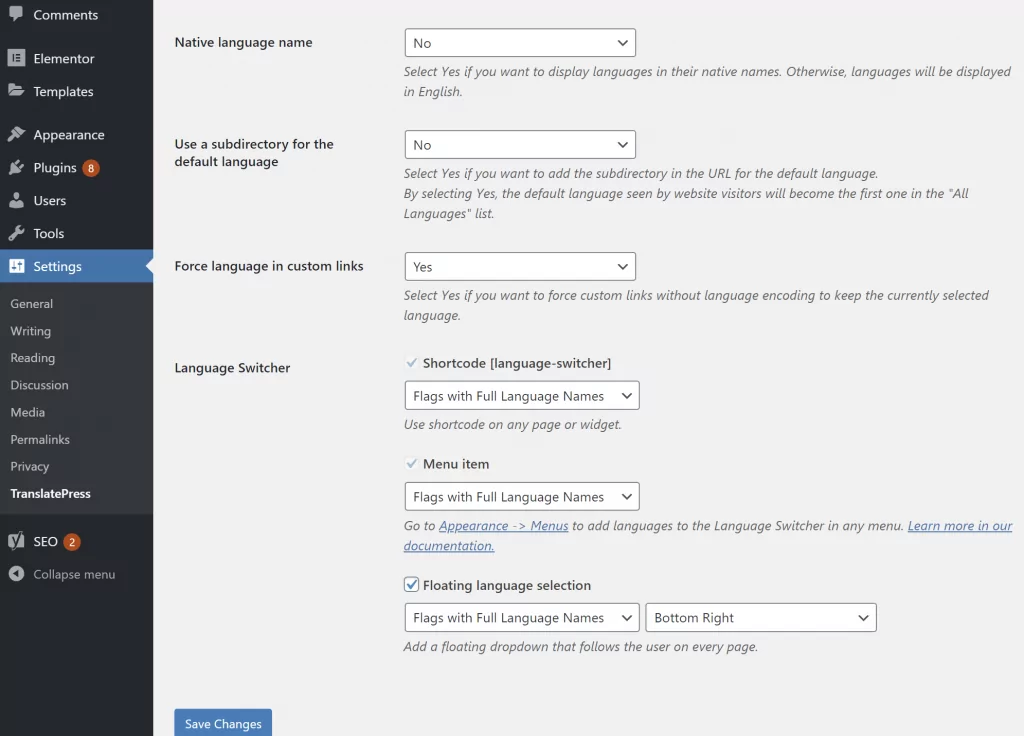
5. Configure Language Switcher
By default, TranslatePress adds a floating language switcher to the bottom-right corner of your site that lets visitors choose their preferred languages:

If you’d like to adjust this position, TranslatePress also lets you add your language switcher as a menu item. Or, for even more control, you can use the Language Switcher Gutenberg block to add it wherever you want on a page.
You can also choose whether or not to display language flags and the full name of each language.
You can configure how your language switcher functions by visiting Settings → TranslatePress.
Get Started With Google Translate on WordPress Today!
With TranslatePress, it’s easy to use Google Translate to automatically translate your WordPress site.
You get the ease of use of Google Translate powered machine translation, while still being able to rank your translated content in Google and manually edit it if needed.
To translate your site into one new language with Google Translate, you can use the free version of TranslatePress.
Then, consider upgrading to the premium version to access new useful features like:
- Unlimited languages – use Google Translate to translate your site into as many new languages as needed.
- Multilingual SEO – improve your multilingual SEO with the ability to translate SEO metadata, URL slugs, and more.
- DeepL support – not happy with Google Translate’s quality? You can try DeepL machine translation instead.
- Different menus for different languages – instead of just translating the same set of menu items, you can offer completely different menus for different languages on your site.
- Automatic language detection – automatically detect a visitor’s preferred language and redirect them to that version of your site.
TranslatePress Multilingual
If you found this post helpful, please check out our YouTube channel, where we constantly upload short & easy-to-follow video tutorials. You can also follow us on Facebook and Twitter to be the first to know each time we post.

TranslatePress is a great plugin, I’m using it on my website and it works great, thanks guys.
Happy to hear that Jim!
When iam adding the Google translate function for my website. Will all the old translations i have already done be deleted?
I want to use google translate to translate my shop items stuff so i dont need to do it manually. But i dont want to change the translations i have already done.
thanks