Searching for a way to carry out Avada theme translation and translate content from the Avada Builder?
Avada is the most popular ThemeForest theme of all time, with an incredible 725,000+ sales and a stellar 4.77-star rating on over 24,400 reviews.
People love Avada because you can use it for literally anything, from a blog to a business website, eCommerce store, and more. Better yet, you get complete code-free control over your site thanks to the visual, drag-and-drop Avada Builder.
However, one feature that Avada doesn’t offer is a way to create a multilingual WordPress site.
With the free TranslatePress plugin, you can fix that and make Avada multilingual. Better yet, TranslatePress is just as beginner-friendly and non-technical as Avada is.
Just like Avada gives you the visual Avada Builder, TranslatePress gives you a visual translation editor where you can translate any element on your Avada site just by pointing and clicking:
In this article, we’re going to show you step-by-step how you can use the free TranslatePress plugin for Avada translation. By the end, you’ll have a fully multilingual website powered by Avada and TranslatePress.
Let’s dig in…
What You Need for Optimized Avada Theme Translation
To translate the Avada theme, Avada Builder, and the rest of your site’s content, all you need is TranslatePress.
TranslatePress is a free translation plugin that helps you create a true multilingual WordPress site. Search engines will be able to index your translated content (good for multilingual SEO) and your site’s visitors can use a simple language switcher to choose their preferred languages.
TranslatePress offers out-of-the-box compatibility with the Avada theme, as well as all of the content that you create with the Avada Builder.
Of course, TranslatePress also works with any content that you create with the regular WordPress editor and it will also work with any other plugins that you might be using, including the ones that come bundled with Avada such as WooCommerce, Slider Revolution, Advanced Custom Fields, The Events Calendar, and more.
Basically, TranslatePress lets you translate 100% of the content on your site, no matter where it comes from.
How to Translate the Avada Theme on WordPress
Now, we’ll show you step-by-step how you can create a multilingual WordPress site with the Avada theme.
For all the core steps in this tutorial, you can use the free version of TranslatePress. However, there are some features for which you’ll need the premium version – we’ll be sure to note those details in the tutorial.
TranslatePress Multilingual
1. Set Up the Avada Theme in Your Original Language
To get started with Avada translation, you’ll want to make sure that you’ve fully set up the Avada theme in your site’s original language.
If you’ve already done that, you can skip ahead to the next step. Otherwise, go through and finish building your site and content.
To help you save time, you can import one of Avada’s many pre-built demo sites:
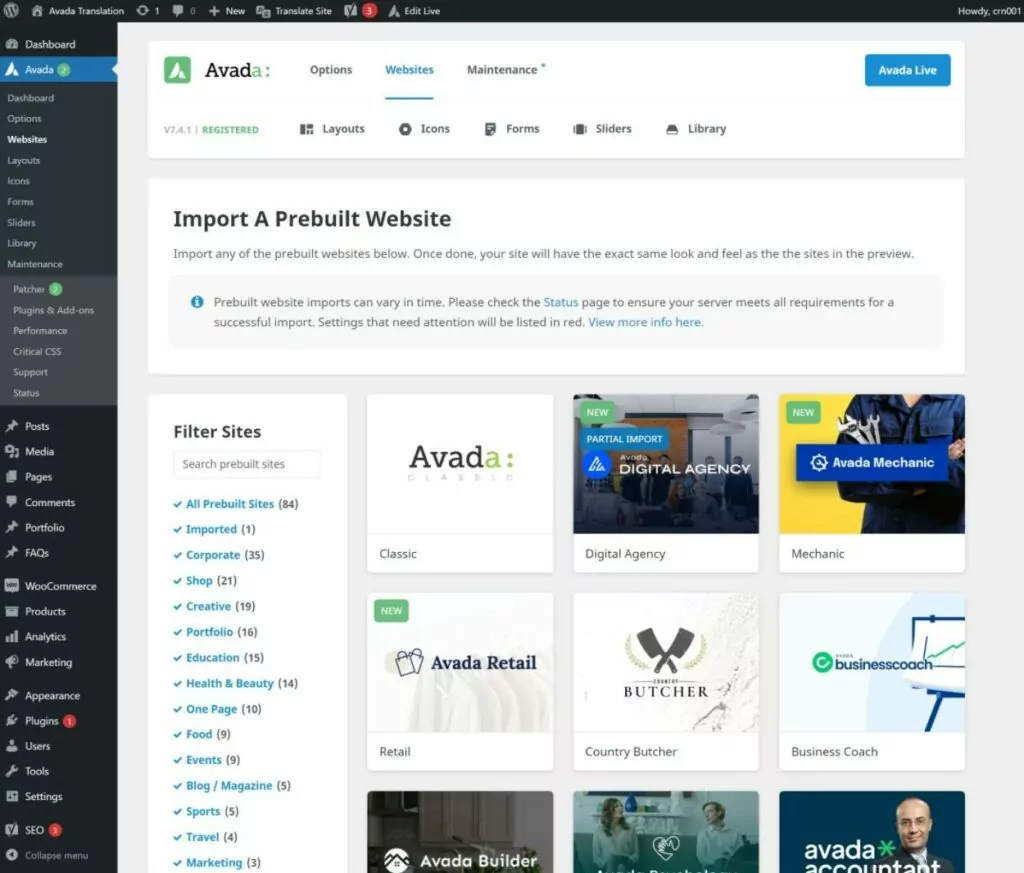
Then, you can customize and design your site’s content using the visual, drag-and-drop Avada Builder interface.
Feel free to use both the native WordPress editors and the Avada Builder – no matter which editor you use, you’ll be able to translate everything with TranslatePress.
2. Install TranslatePress and Choose Your Languages
Once you’ve completely set up Avada in your site’s original language, it’s time to get started with TranslatePress to translate Avada into one or more new languages.
To begin, make sure to install and activate the TranslatePress plugin on your WordPress site. You can use the free version of TranslatePress at WordPress.org to get started.
Or, if you want to access the premium features, make sure to also install the premium version of TranslatePress (which you can download from your TranslatePress account after purchase).
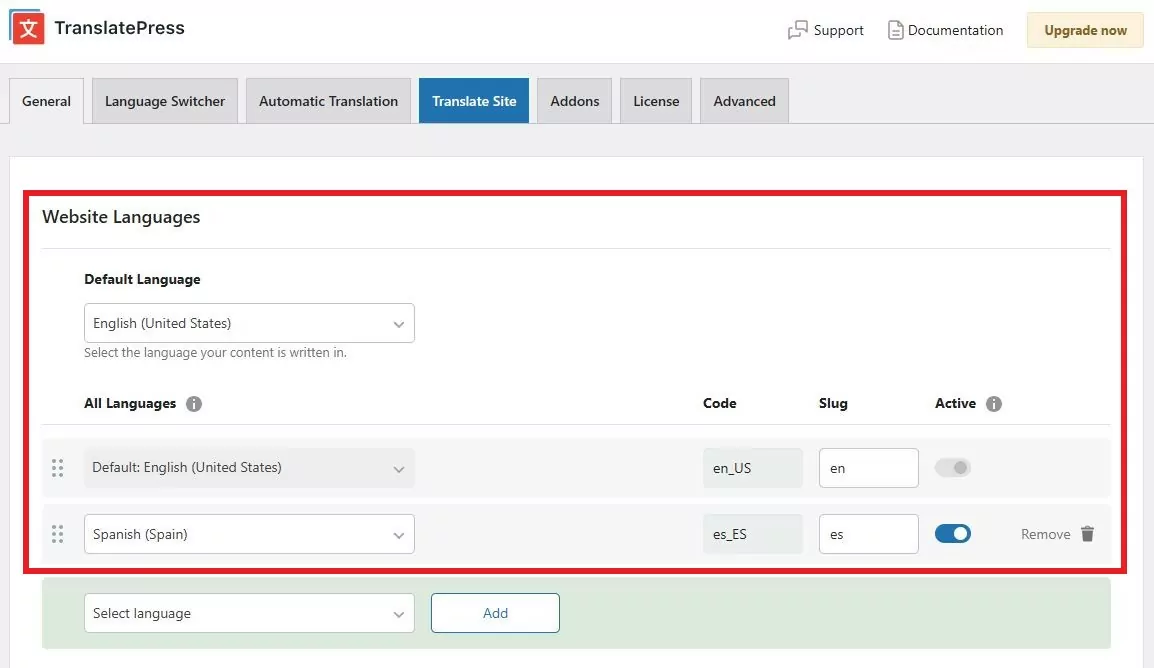
Once you’ve activated the plugin(s), go to Settings → TranslatePress to choose the languages that you want to use on your site:
- Default Language – the original language of your Avada site’s content.
- All Languages – one or more new languages into which you want to translate your Avada site’s content. The free version of TranslatePress lets you add one new language, while the premium version lets you add unlimited languages.
For example, if your original site is in English and you want to translate Avada into Spanish, you’d configure it like so:
TranslatePress offers built-in support for hundreds of languages and locales. However, if you don’t see the language that you want to use, you also have the option to add a custom language.
3. Set Up Automatic Translation (Optional)
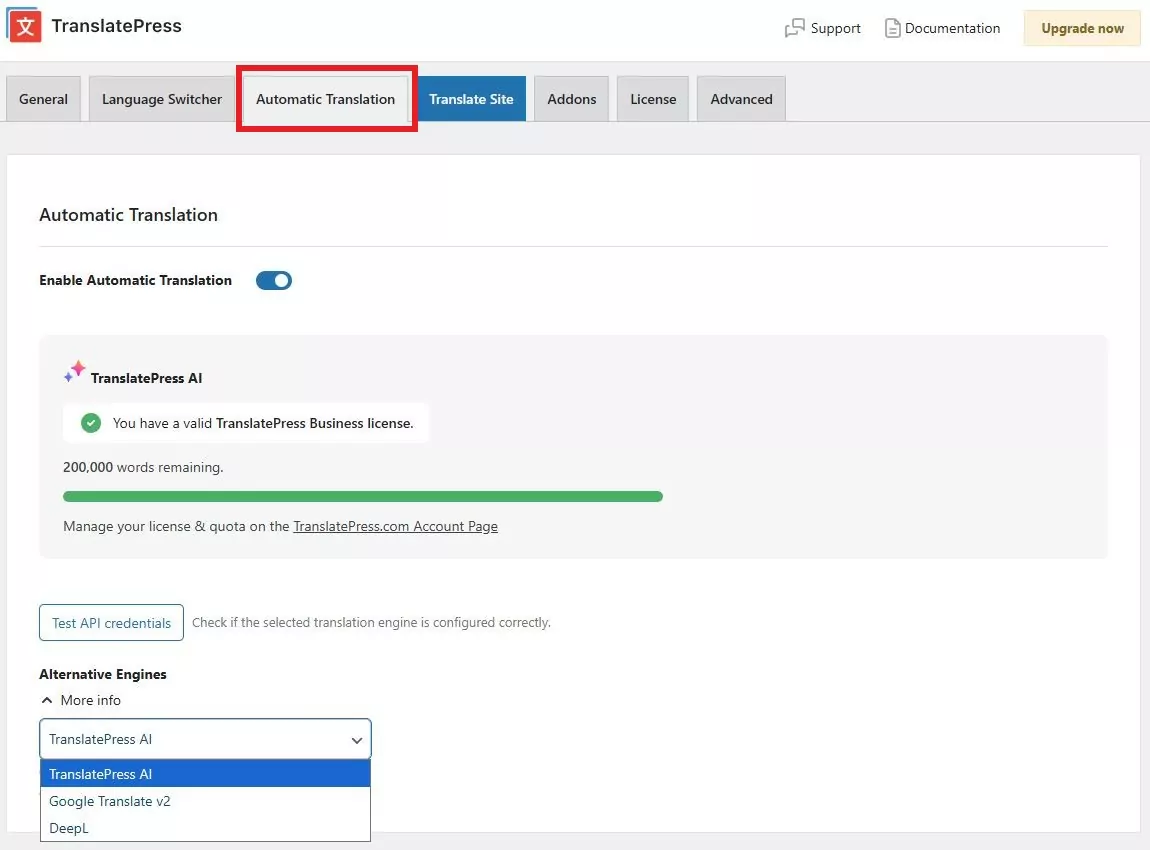
To help you save time with Avada theme translation, TranslatePress includes built-in support for two popular machine translation services:
- TranslatePress AI – available in all premium versions, offering an AI-powered translation engine that can provide more natural and context-aware translations – purchase here.
- Google Translate – available in the free version of TranslatePress.
- DeepL – available on the premium Business or Developer licenses of TranslatePress.
Not sure which is better? Check out our Google Translate vs DeepL comparison, or explore TranslatePress AI for a more advanced, AI-driven approach.
If you don’t want to translate your Avada content from scratch, you have the option to use these services to automatically translate all of your site’s content.
Don’t worry – even if you use automatic translation, you’ll still be able to manually edit and refine those translations using TranslatePress’s visual interface.
If you do want to use automatic translation, you can set it up from the Automatic Translation tab of the TranslatePress settings area.
TranslatePress AI is much easier to use compared to setting up external services like Google Translate or DeepL. Everything is integrated directly into your existing TranslatePress setup, streamlining the translation process and reducing technical complexity.
In addition, TranslatePress AI eliminates the need to constantly switch between different translation engines depending on language support, providing a more seamless and consistent translation experience across all your site languages.
Below, you can find guides on how to generate an API key and configure each service:
We also have dedicated guides to using both services:
4. Get Started With Avada Theme Translations
Now, you’re ready to translate the Avada theme, as well as the rest of your site’s content.
Whether or not you set up automatic translation in the previous step, you’ll use the same interface to manage your translations:
- If you set up automatic translation, your site’s translations will be pre-filled. You can edit them as needed.
- If you didn’t use automatic translation, your site’s translations will be empty and you’ll need to add them from scratch.
To open the translation editor, go to the page that you want to translate on the front-end of your site and click the new Translate Page option on the WordPress toolbar:
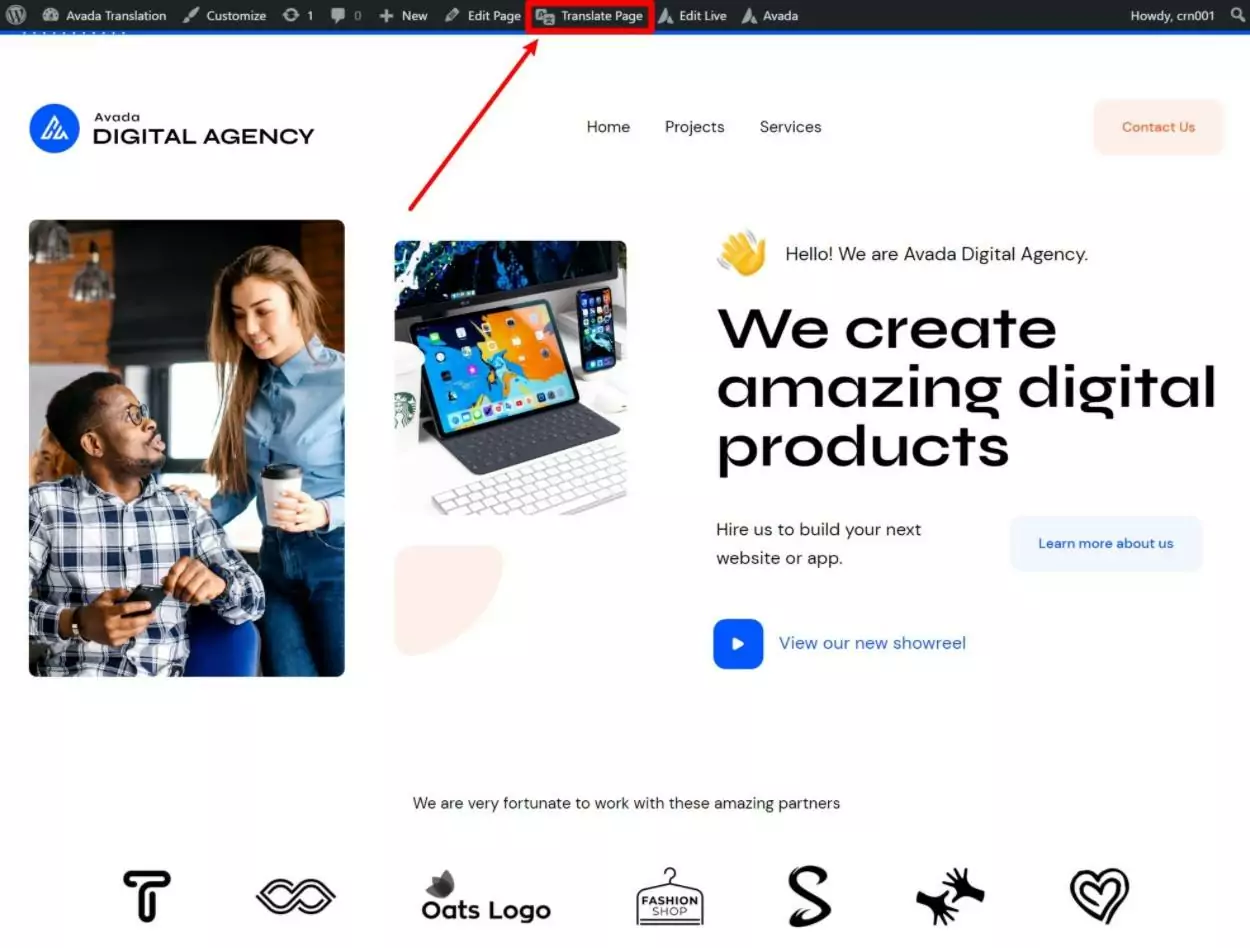
This will launch the visual translation editor. You should see a live preview of your Avada site on the right and a sidebar on the left where you can manage your translations.
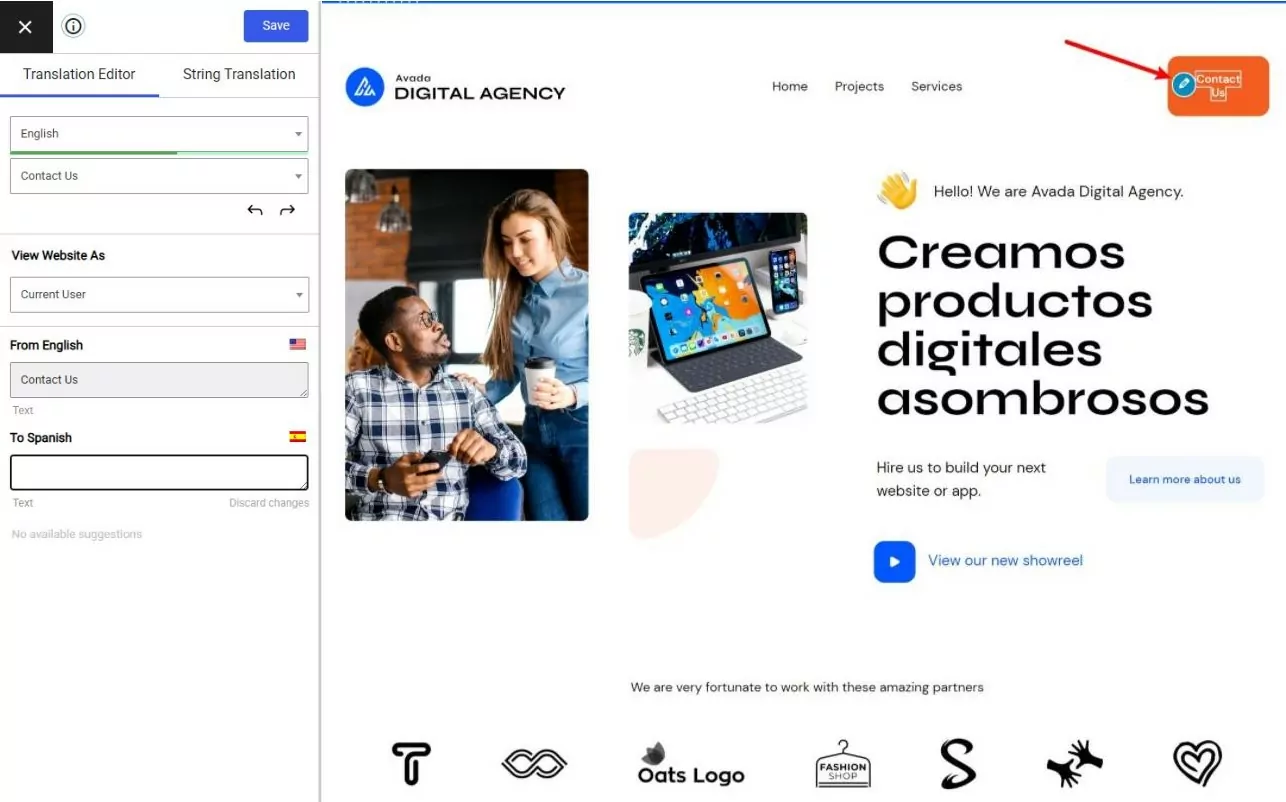
To translate any content on your site, all you do is hover over that content on the live preview and click the pencil icon. That will open the selected translation in the sidebar, where you can add your translation or edit the existing translation as needed:
You can use the exact same approach to translate every part of your Avada website, including details such as forms and images. Let’s look at some specific examples…
Translating Menu Items from Avada
To translate menu items, you hover and click on them just like you do for regular text. This also works for the special menu buttons that Avada adds for some demo sites, such as the Contact Us button on our example site:
With the premium version of TranslatePress, you also have the option to create completely different menus based on the language that a visitor has selected, rather than just translating the same set of menu items (as the free version of TranslatePress allows). You can access this feature by purchasing the TranslatePress Business or Developer license.
Translating Images
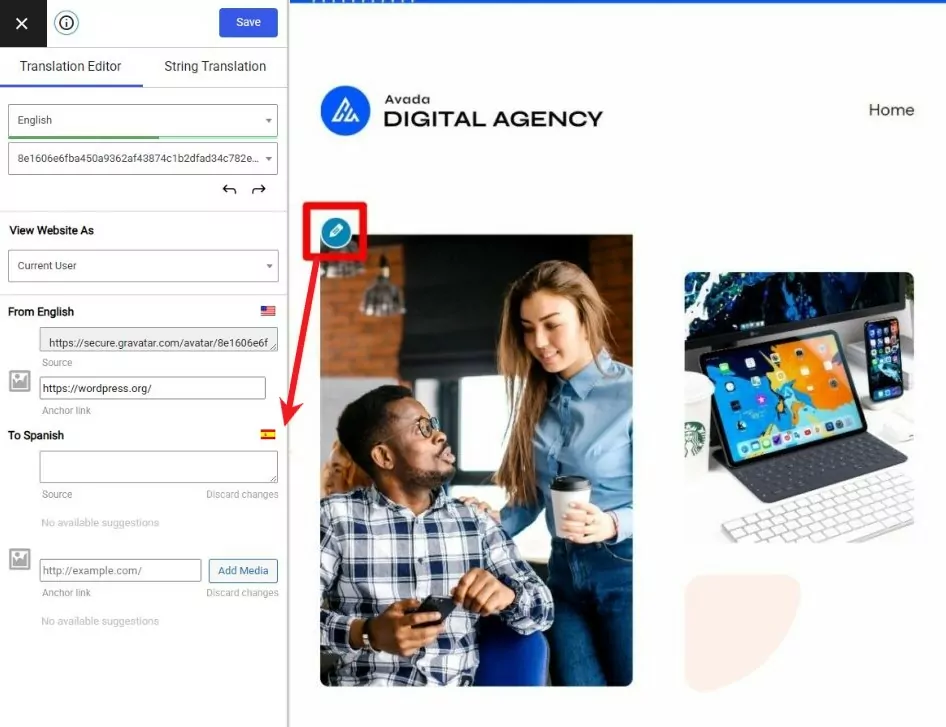
TranslatePress doesn’t just let you translate text, you can also use it to translate any of the images on your site. This works for both standalone images as well as sliders or galleries that you create with the slider or gallery elements in Avada Builder (or other plugins).
As with text, you can translate images by hovering over them and clicking the pencil icon. Then, you can choose a new image from your Media Library to use for that language. You’ll also be able to translate text metadata, such as the image’s title and alt text:
Translating Avada Contact Pages/Forms
If you’ve created any forms with the Avada Form element (or any other form plugin), TranslatePress also lets you translate the title and placeholder text for your form fields, as well as the ‘submit’ button and any other elements in your form.
Below, you can see that TranslatePress will even automatically detect when you’re translating a placeholder attribute:

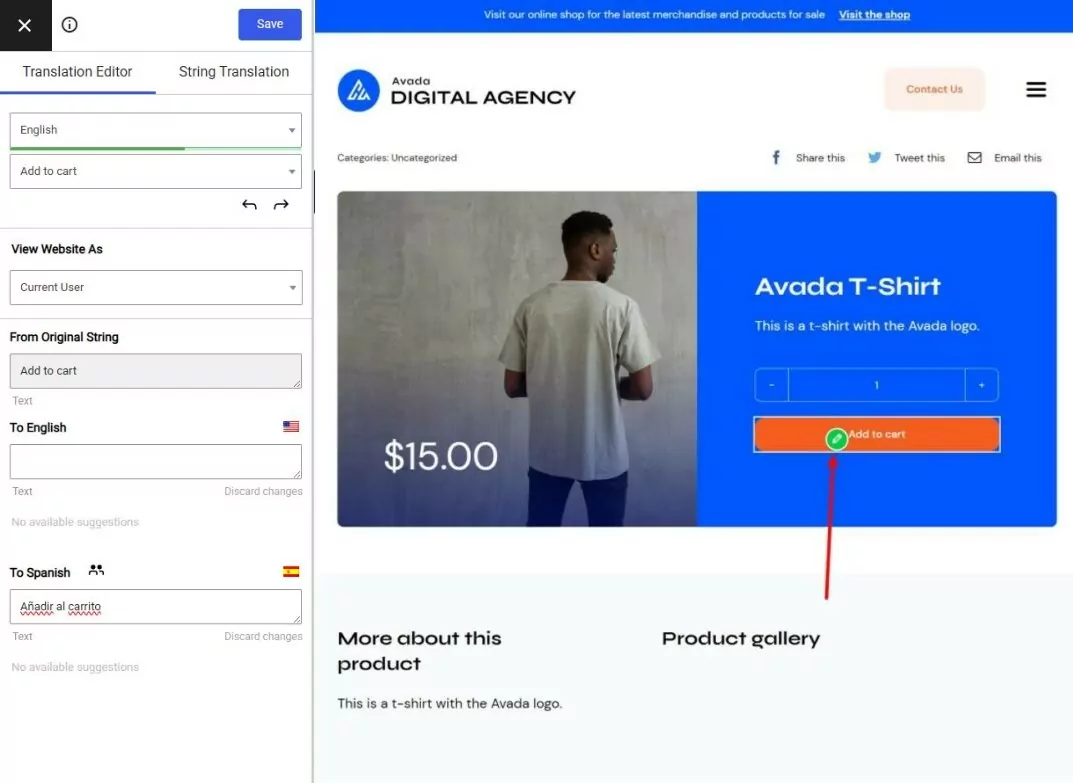
Translating WooCommerce Products/Pages
If you’ve used Avada to create a WooCommerce store, TranslatePress also makes it easy to translate all of your single product pages and shop pages, as well as your shopping cart and checkout.
For core WooCommerce content, TranslatePress will automatically import the translations from the WooCommerce language pack (if available), but you’ll still be able to fully edit those translations if needed.
For strings that come directly from the WooCommerce plugin (called gettext strings), you’ll be able to edit the translation in both your original language and the new languages that you’re using. The pencil icons for these strings will be green to help you recognize them (instead of the normal blue pencil icon):
For a more detailed look at using TranslatePress with WooCommerce, you can check out our guide on how to create a multilingual WooCommerce store.
Translating SEO Elements
If you want to optimize your Avada site for multilingual SEO, it’s important to not just translate your front-end content but to also translate important back-end metadata such as each page’s SEO title and meta description, along with all of your URL slugs.
With the TranslatePress SEO Pack add-on, you can easily translate all of these elements from the same translation editor that you use for the rest of your content.
To access the SEO Pack add-on, you’ll need to purchase at least the TranslatePress Personal license.
Once you’ve activated the SEO Pack add-on, you can use the drop-down in the translation editor to translate the SEO details from plugins such as Yoast SEO and Rank Math:
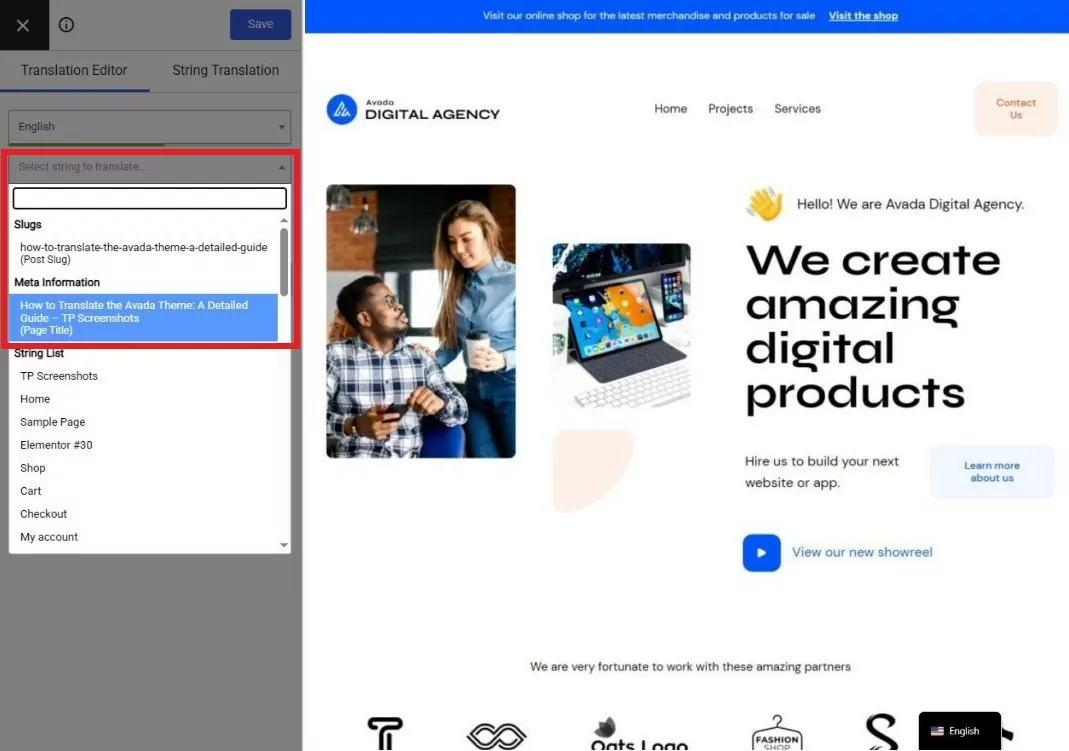
You can also use this drop-down to translate the URL slugs of individual pieces of content.
To translate sitewide URL slugs, such as the category base slug, you can open the String Translation interface, which is marked in the screenshot above.
Detailed Guides for How to Translate Other Parts of Your Avada Website
We tried to highlight some specific elements of Avada translation to give you an idea of how TranslatePress works. But TranslatePress is by no means limited to the elements above.
Again, using the point-and-click approach, you can translate pretty much any content on your site, no matter if it comes from Avada, the native WordPress editor, or any other plugins that you might be using.
To see some more detailed examples, you can check out these translation guides:
5. Configure Your Avada Language Switcher
To finish things out, you’ll want to configure the front-end language switcher that your visitors will use to choose their preferred languages when browsing your site.
By default, TranslatePress adds a floating language switcher to the bottom-right corner of your site. Here’s an example of what it looks like when expanded on the Avada Creative Agency demo site:
If you want, though, you have the option to change the language switcher’s placement (or add it in multiple places). Here are your options:
- Floating language switcher – you can change the position of the floating widget. For example, moving it to the bottom-left corner.
- Menu item – you can add it as a menu item to display in any one of your Avada menu locations.
- Shortcode – you can use the shortcode to place the language switcher anywhere on your site.
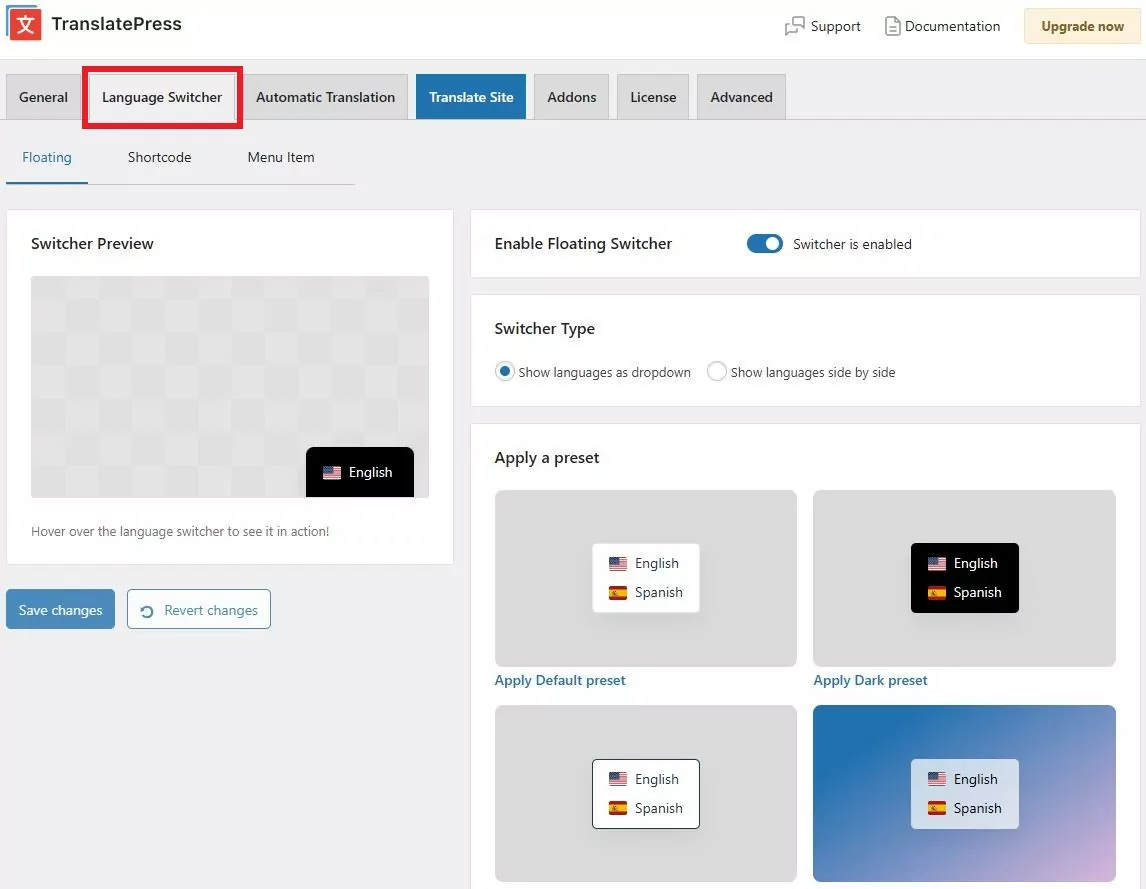
In addition to choosing the placement, you can also configure the design/content of your language switcher. For example, you can choose to only show the language name or include a flag in addition to the language name.
To configure these settings, go to Settings → TranslatePress → Language Switcher tab:
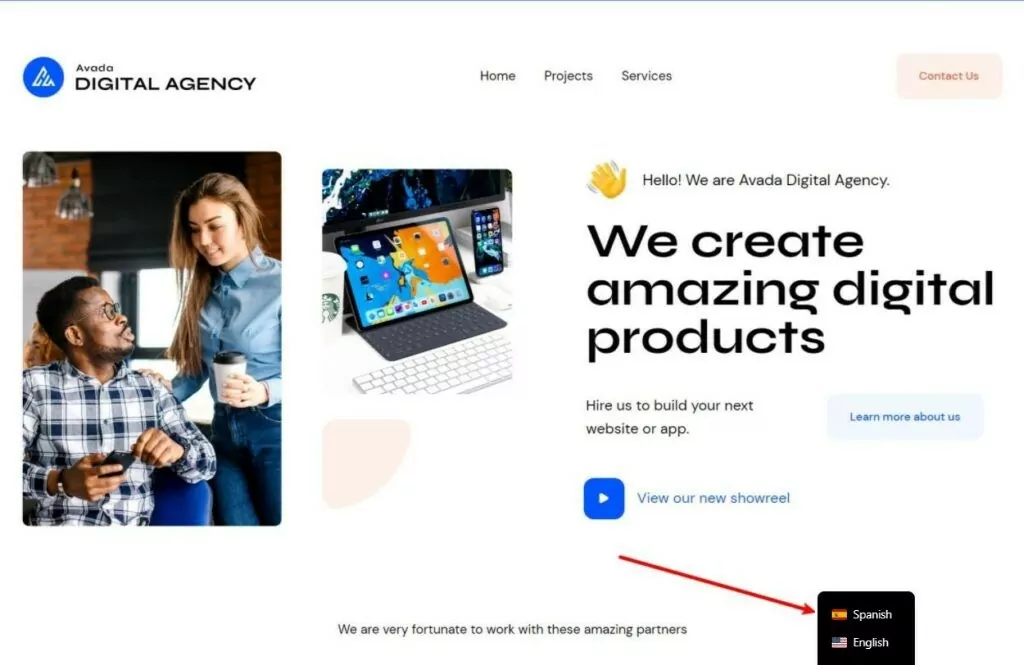
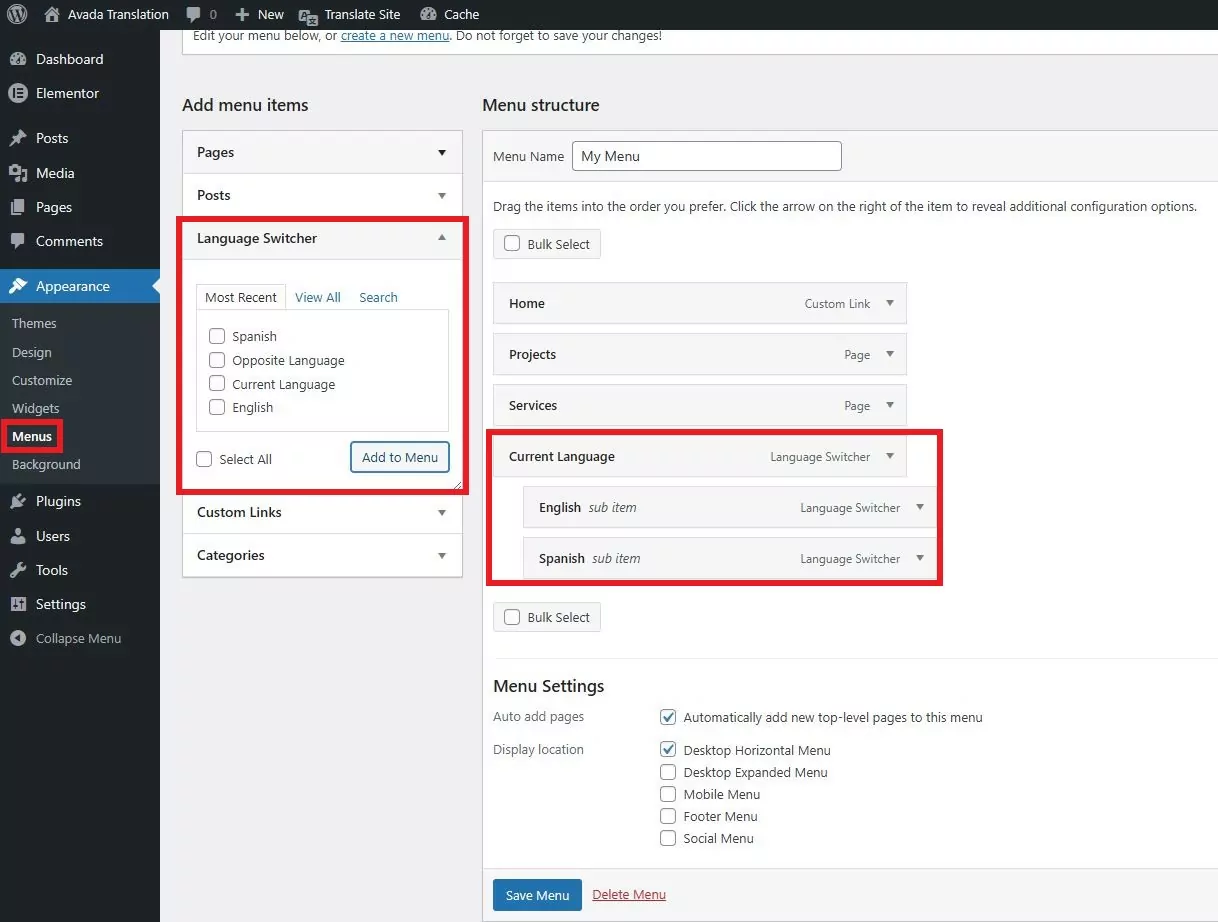
If you want to add your language switcher as a menu item, go to Appearance → Menus and add the dedicated Language Switcher options like so:
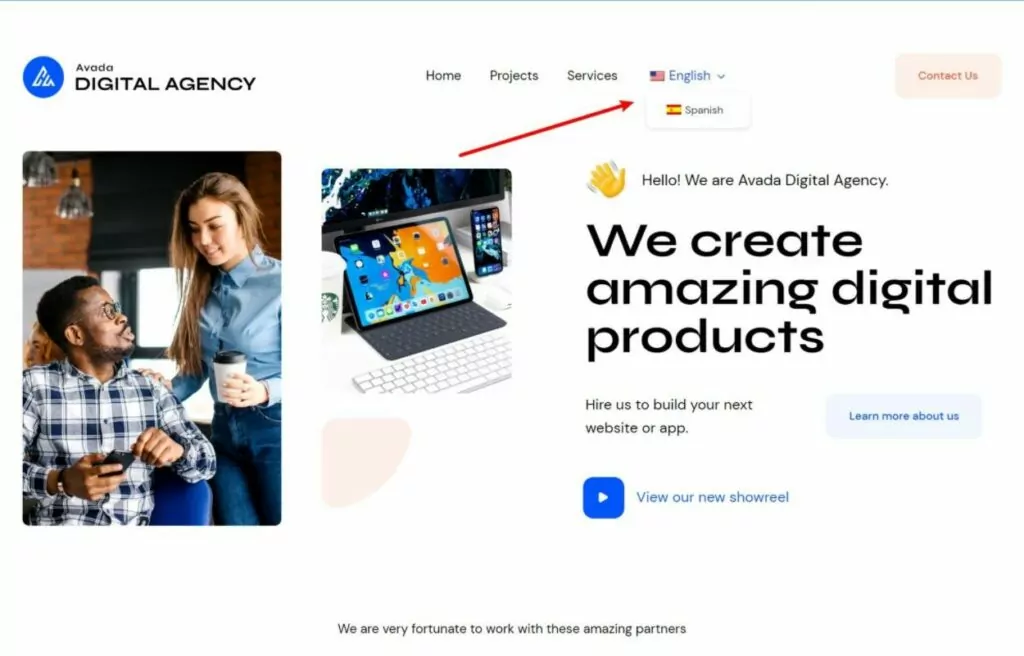
Here’s how that would look on the front-end of your Avada site:
With the premium version of TranslatePress, you can also activate the Automatic User Language Detection add-on so that you can automatically redirect visitors to their preferred languages based on their browser settings or their IP addresses. The add-on will also store each user’s preference and automatically redirect them to their last-visited language on future visits.
To access this add-on, you can purchase the TranslatePress Business or Developer license.
Get Started with Avada Theme Translation Today
If you need to translate the Avada theme, TranslatePress makes it easy to translate every single element on your site using a simple visual interface.
TranslatePress offers out-of-the-box support for Avada and the Avada Builder, and it will also work with the native WordPress editor and any other plugins that you might be using, such as WooCommerce.
With the free version of the TranslatePress plugin at WordPress.org, you can translate Avada into one new language.
If you upgrade to the premium version of TranslatePress, you’ll unlock support for unlimited languages as well as other useful features such as…
- Multilingual SEO – optimize your Avada site for multilingual SEO by translating SEO metadata, adding a multilingual XML sitemap, and more;
- DeepL support – use DeepL for automatic translation (the free version does still support Google Translate);
- Automatic language detection – automatically redirect visitors to their preferred language;
- Different menus based on language – create completely different menus based on a user’s language (instead of just translating the same menu into multiple languages as the free version allows);
- Translator accounts – create dedicated translator accounts to help you work with freelance translators or translation agencies.