In this post
In this post
Need to set up a WordPress custom language for your site?
While WordPress offers built-in support for a large number of languages, it’s not comprehensive and there are some languages that have slipped through the cracks. Unfortunately, if your language isn’t on WordPress’ list, there’s no easy way to add it to the core WordPress software.
However, there are still ways to add a custom language to WordPress, which is the topic of this post.
Below, we’ll show you how to use the free TranslatePress plugin to add absolutely any custom language to WordPress, real or fictional. You could even use it to translate your site into Klingon, if that floats your boat.
However, we’re going to focus on a slightly more real-world situation and show you how to add the Hmong language to WordPress, and even use Google Translate to automatically translate your site if you want to. With that being said, this method will work for literally any language, so you can easily adapt this tutorial to your own use case.
If reading is not your favorite activity, we also have a video tutorial covering this same topic in a more concise way:
But if you need to go into more detail, we suggest you keep reading since we covered a bit more detail in this article.
How to Check If WordPress Supports Your Custom Language
Before you go about adding a custom language, you should probably make absolutely sure that WordPress doesn’t already support the language that you want to use.
There are a few ways to check this.
First off, you can check the WordPress site language list by going to Settings → General and browsing the WordPress Site Language drop-down. If you find the language there, you’re set to jet. Otherwise, keep reading.
Second, you can also browse the full WordPress translate project board, which shows the percentage of completion for a range of language locales. This will give you an idea of whether anyone else has started work on adding your custom language, even if it doesn’t show up in the site language options.
If the language that you want to use isn’t on the list, you basically have two options:
- You can request the translation team to open a new locale and then find a group of people to support the locale by adding translations (quite difficult).
- You can manually add a custom WordPress language to your site using the free TranslatePress plugin. Depending on the language that you choose, you might even be able to use automatic translation (as long as Google Translate supports your chosen custom language).
In this article, we’re going to focus on the second method – it doesn’t require any code and you can set it up for free.
How to Add a WordPress Custom Language With TranslatePress
TranslatePress is a free WordPress translation plugin that lets you translate your site into literally any language. While it comes with tons of built-in languages, it also has an option that lets you add your own custom language, which is what we’re going to focus on in this tutorial.
The advantages of using TranslatePress when working with custom languages are that:
- You can add literally any language to your site – you aren’t limited by WordPress’ default list. You can even add fictional languages like Klingon.
- You don’t need to work directly with .po or .mo files, which is overly complicated. Instead, you can manage everything from a simple visual editor.
- If Google Translate supports your custom language, you can use automatic machine translation to translate your theme, plugins, and other content. For example, you can use automatic translation for Hmong, even though WordPress doesn’t officially support Hmong.
- You can customize every part of your language. For example, you can upload a custom language flag.
TranslatePress Multilingual
There are two ways that you can use TranslatePress to work with custom languages:
- You can use it to create a single-language WordPress site and “translate” your theme and plugin content into your custom language. Essentially, it offers an easy way to localize your theme and plugins into your custom language without needing to use complex .mo or .po files.
- You can create a multi-language WordPress site where your custom language is one of multiple languages (or you could even add multiple custom languages!). For example, you could offer your site in “English and Hmong” or “English and Klingon”. Visitors can use a language switcher to select their preferred language.
Either way, the basic setup process is the same.
To get started, you’ll want to install and activate the free TranslatePress plugin from WordPress.org. Then, here’s how to set everything up…
1. Add Your WordPress Custom Language
Once you’ve activated the free TranslatePress plugin, go to Settings → TranslatePress in your WordPress dashboard. Then, in the TranslatePress settings interface, click on the Advanced tab and then the Custom language link.
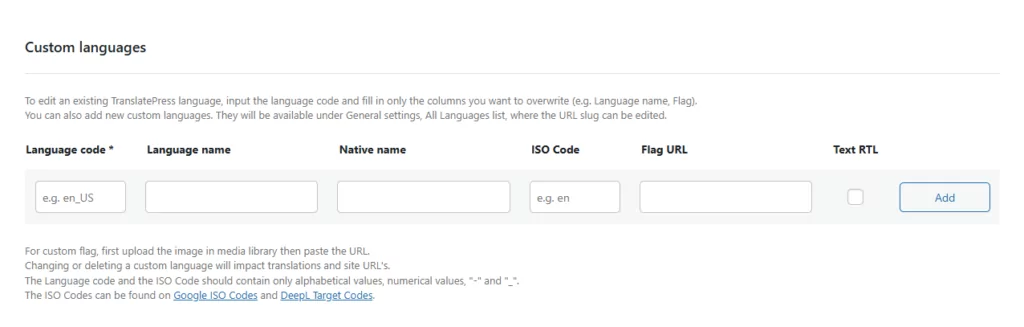
Then, use the fields to add your custom language details:
- Language code – the two or three-letter ISO code. E.g. hmn. You can find this by Googling if you’re not sure what it is. For example, search for “Hmong language ISO code”.
- Language name – the English language name. E.g. Hmong.
- Native name – the name of the language in the native language. E.g. Hmoob (the native name in the romanized alphabet).
- Automatic translation code – You can find these codes on Google ISO Codes and DeepL Target Codes.
- Flag URL – you can upload a custom flag for your language, which will appear in your language switcher
- Text RTL – if your custom language is RTL, you can check this box. Otherwise, leave it unchecked.
Then, click Add and then Save Changes to save your custom language.
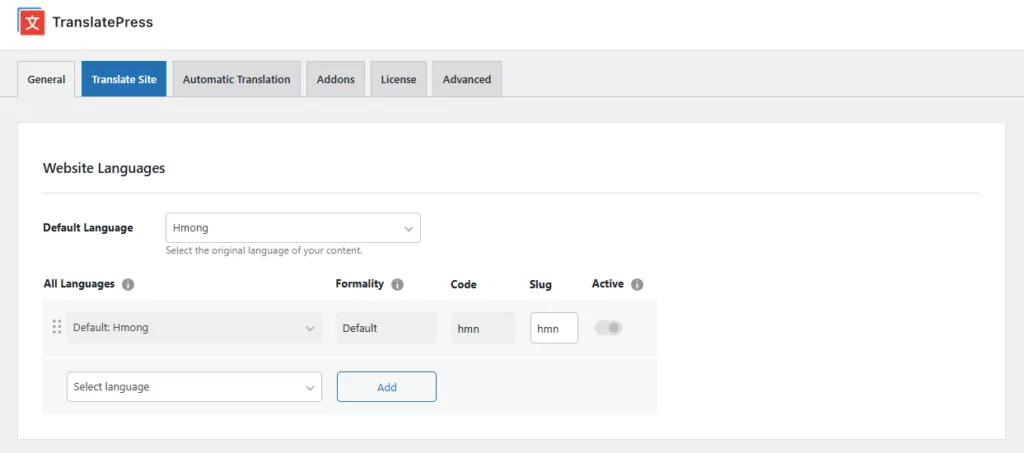
2. Set Your Language(s) in TranslatePress
Next, you need to configure the language(s) that you want TranslatePress to use. To do this, go back to the General tab of TranslatePress’ settings.
Here, your choices depend on whether you want to create a single-language site or a multilingual site. For this part of the tutorial, we’re going to focus on the multi-language use case for simplicity.
However, we will also cover the single-language use case at the end of this post. We recommend reading through the entire tutorial first so that you can learn how TranslatePress works, but you can also click here to jump straight to the single-language use case.
For this example, though, let’s say you have an English language site that you also want to offer in Hmong (your custom language).
You would first set your Default Language as English.
Then, you would use the All Languages section to add Hmong as the second language. Once you add your custom language in Step #1, it will appear in the drop-down along with all of the default WordPress languages:
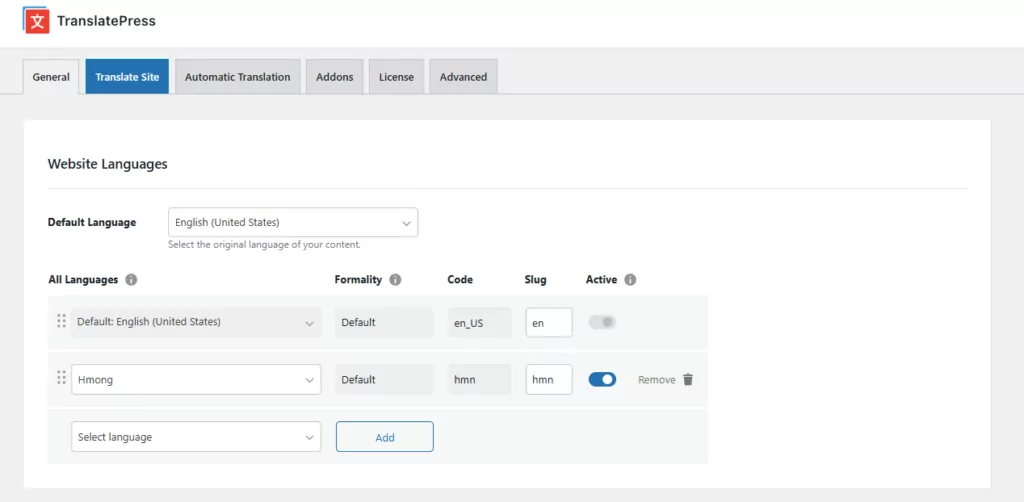
Make sure to save your changes.
3. Configure Automatic Translation
If your custom language is supported by Google Translate, TranslatePress lets you optionally use automatic machine translation to generate your baseline translations.
If you want to set this up, go to the Automatic Translation tab in the TranslatePress settings area and follow this tutorial:

4. Translate Your Content
To help you translate your content into your custom language, TranslatePress offers a simple visual editor. To launch the editor, open the page that you want to translate on the front-end of your site and click the Translate Page option on the WordPress toolbar:
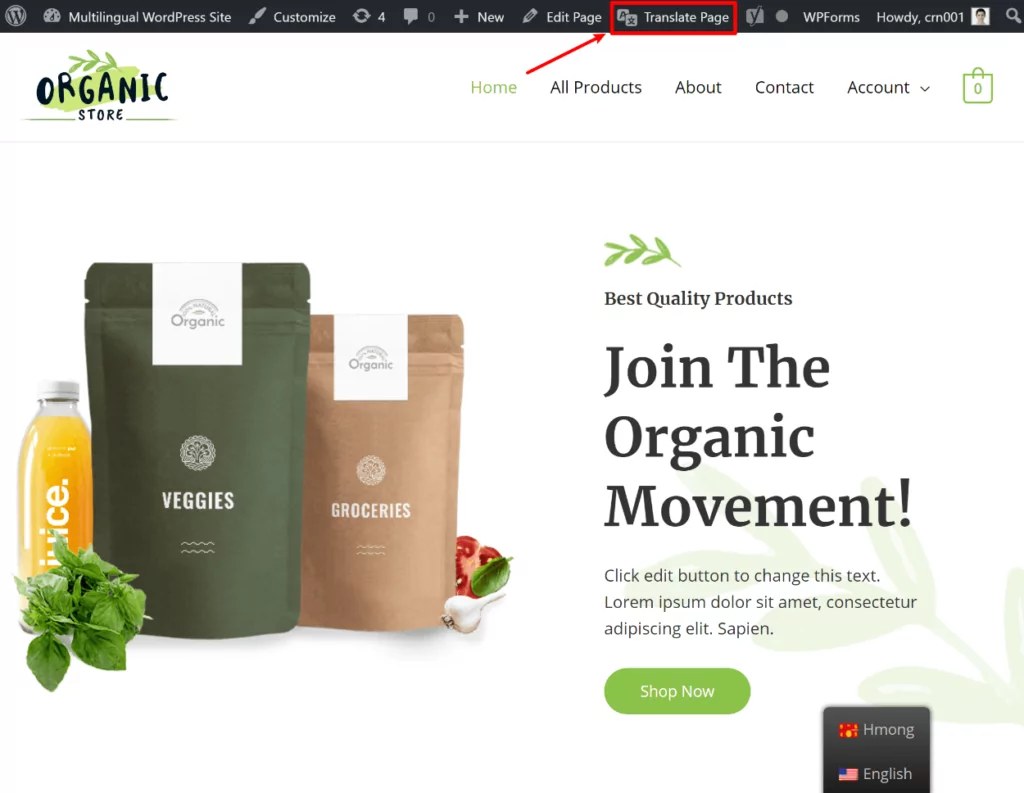
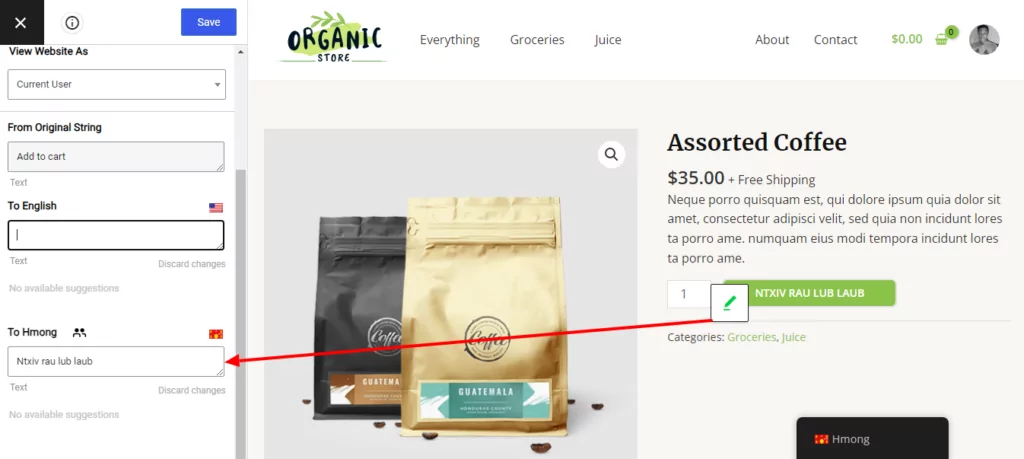
Then, to translate content, just hover over the content on the live preview of your site and click the pencil icon. That will open the translation in the sidebar, where you can add your translated content:

You can repeat the same process to translate 100% of your site, including content from your theme and plugins, as well as your images. For more detailed instructions on how to translate different parts of your site, we have lots of tutorials:
- Editor (Gutenberg) blocks
- Custom fields
- Custom post types
- WordPress forms
- WordPress menus
- Images
- Popup content
- Sliders
- WooCommerce products
- Elementor (page builder)
- Divi (page builder)
5. Configure Language Switcher
If you’re creating a multilingual site, TranslatePress adds a floating language switcher in the bottom-right corner of your site by default. This language switcher will include the custom language flag that you uploaded for your language – you can see the Hmong flag below:

However, you can also move this language switcher to a different location and/or customize its behavior. For locations, you can choose from a menu option, shortcode, or PHP function. Learn more about these options.
And that’s it! For a multilingual site, you’re pretty much finished. Now, let’s cover the other scenario – using a custom language for a single-language site.
How to Use a Single Custom WordPress Language
TranslatePress is primarily a plugin to help you create a multilingual WordPress site. However, it does still include everything that you need to offer your WordPress site in a single custom language.
If you use this approach, there’s one important difference:
You will only be able to translate gettext strings from your theme and plugins. These are the strings that come directly from your theme/plugins. Essentially, TranslatePress offers a simpler visual alternative to needing to work directly with .po and .mo files.
You won’t be able to edit any user-generated text in the TranslatePress editor. Instead, you’d need to manually add this content in your custom language through the editor for that piece of content. Some examples:
- To edit posts/pages, you’d use the WordPress editor.
- To control menu content, you’d go to Appearance → Menus.
- To control widget content, you’d go to Appearance → Widgets.
Basically, in this scenario, you’re just using TranslatePress as a tool to localize your theme and plugin content. TranslatePress will also set up the behind-the-scenes code to tell Google and others that your site is in your custom language.
To set this up, go to Settings → TranslatePress and set your Default Language equal to your custom language. Do not add any other languages in the All Languages settings. Then, save your changes:
Now, open the TranslatePress editor for a piece of content that includes content from your theme or plugins. For example, we’ll translate a single product page from WooCommerce.
Now, you can either:
- Hover over content from your theme/plugins and click the green pencil icon.
- Use the drop-down in the sidebar to quickly switch between strings.
Remember – you won’t be able to edit every string on the page – you will only be able to edit text strings that come directly from your theme or plugins (called gettext strings). For example, the “Add to Cart” button from WooCommerce:
You can repeat the process to localize all of your theme and plugin content.
Start Using Your Custom Language Today
The WordPress Polyglot team does a good job of translating WordPress into different languages, but WordPress still doesn’t offer support for all languages.
Thankfully, it’s possible to add your own custom language with the free TranslatePress plugin and manage everything from a simple visual interface. This is a lot easier than your other alternatives, which are to try and build a team to create an official locale for your custom language or work directly with .po and .mo files.
One option is to use TranslatePress to help you localize your theme and plugins into your custom language on a single-language site. Or, you can also use TranslatePress to create a multilingual site with your custom language as one of the options.
Install the free version of TranslatePress today to get started. And if you’re creating a multilingual WordPress site, upgrade to the premium version to get access to even more useful features to help you create a better multilingual site:
- Unlimited languages – add unlimited new languages to your site (the free version limits you to one new language).
- Multilingual SEO – improve your site’s multilingual SEO to rank your content in multiple languages.
- Show different menus based on language – offer localized experiences by showing completely different menus based on a user’s language.
- Automatically redirect visitors to their preferred language – send visitors directly to their preferred language as soon as they land on your site.
To access all of these features and more, upgrade to TranslatePress premium today.
TranslatePress Multilingual
Do you still have questions about adding custom languages to WordPress? Let us know in the comments below!
If you found this post helpful, please check out our YouTube channel, where we constantly upload short & easy-to-follow video tutorials. You can also follow us on Facebook and Twitter to be the first to know each time we post.