In this post
In this post
In a nutshell, a translation management system helps you manage and automate the translation process of your website, mobile app, game, or other software.
Offering your content in multiple languages is a great way to create a more user-friendly product and reach a bigger audience. However, properly translating and localizing all of your content can take a lot of work, which is why finding the best translation management system for your needs is an essential part of your localization efforts.
In this article, we’ll explain more about what a translation management system is and some of the biggest benefits of using these tools. Then, if you’re using WordPress, we’ll show you the easiest way to get started with a translation management system for your WordPress site, with a detailed tutorial showing you how to manage your translations with the free TranslatePress plugin.
What Is a Translation Management System?
A translation management system does pretty much exactly what the name says – it gives you a systematized way to manage all aspects of the translation process for your website, app, game, software, etc.
Translation management systems generally help you in three key areas:
- Computer assistance – the system will “remember” translations that you’ve already entered so that you can quickly reuse them across your site and ensure consistency. It also might help you automatically translate your content using machine translation from tools such as Google Translate or DeepL.
- Workflow automation – you’ll get tools to help you more quickly manage translations. These could be different depending on what you’re translating. For a website, that could be a visual translation management interface, while for a game or app it might be tools like APIs, webhooks, integrations with code repositories, and more.
- Project management – you’ll get tools to help you manage the progress of your translations and make sure that you’re able to fully localize everything. For example, you can quickly see which translations have already been reviewed by a human and which still need work. You can also manage who has access to your translations.
Five Big Benefits of Using a Translation Management System
There are a lot of benefits to using a dedicated system for translation management, but here are some of the biggest:
- Automates processes – you’ll be able to automate a lot of processes to avoid wasted effort. For example, you can store already-translated content to quickly reuse it in other places and avoid duplicating your work. You can also create glossaries of key terms, or exclude some terms from translation. Or, you might be able to translate all of your content using machine translation from services such as Google Translate or DeepL
- Ensures quality – you’ll be able to make sure that key terms are always translated the exact same way to avoid the confusion of using different translations (for the same term) in different areas.
- Improves collaboration – a good system should let multiple translators, departments, vendors, etc. all collaborate on translations in an organized fashion. By enabling easy collaboration, you can speed up the process of fully translating your content and avoid wasted back-and-forth emails.
- Creates one centralized storage space for your translations – instead of having your translations spread out over different interfaces, you’ll be able to access everything from your system.
- Allows for easy updates – if you need to update translations in the future, you can easily do that from your system.
Best Translation Management System for WordPress Users
Depending on what you’re trying to translate, you might find some translation systems more optimized than others. However, if you’re using WordPress, you can access a translation management system in the form of a WordPress plugin.
This is the simplest implementation and it means you won’t have to learn a new piece of software and go back and forth between different interfaces.
To easily get started with a WordPress translation management system, you can use the free TranslatePress plugin and, depending on your needs, some of its premium add-ons.
TranslatePress has many of the key features that we discussed above:
Visual Translation Management Interface
To help you manage your translations, TranslatePress gives you and your team a simple point-and-click visual interface:
You won’t need to mess around with spreadsheets, PO editors, etc. You can do everything from a visual interface that’s integrated into your WordPress dashboard.
Translation Memory
Once you start translating your content, TranslatePress will store those translations in its memory to help you quickly reuse them in other places on your site.
For example, if you translate “Household Solutions” on one page and then use that phrase on another page, TranslatePress will automatically pre-fill that translation to save you time and ensure consistency.
Automatic Translation
TranslatePress supports automatic translation via both Google Translate and DeepL, which is another feature that can save you time. Even if you use these services to import translations into your system, you (or other users) will still be able to manually refine those translations as needed. Speaking of other users…
Collaboration Features
If you’re working as part of a team or need to give a freelancer/translation service access to your content, TranslatePress lets you create dedicated translator accounts using WordPress’ built-in user system.
These users will be able to edit your site’s translations, but they won’t be able to access other areas of your WordPress dashboard.
TranslatePress Multilingual
How to Use a Translation Management System on WordPress
Now, let’s get into the actual tutorial and we’ll show you how to set up TranslatePress on WordPress to start using your own system for translation management.
To get started, you’ll want to install and activate the free TranslatePress plugin from WordPress.org.
You’ll be able to use the free version to follow most of the tutorial. However, there are a few spots where you might need premium add-ons to enable certain features. We’ll be sure to clearly note these situations in the tutorial and you can learn more about TranslatePress’ premium plans on the pricing page.
1. Choose your language(s)
Once you’ve installed and activated the plugin, you can go to Settings → TranslatePress to choose which languages you want to use on your site. You’ll want to choose your site’s current language, as well as one or more languages into which you want to translate your site’s content:
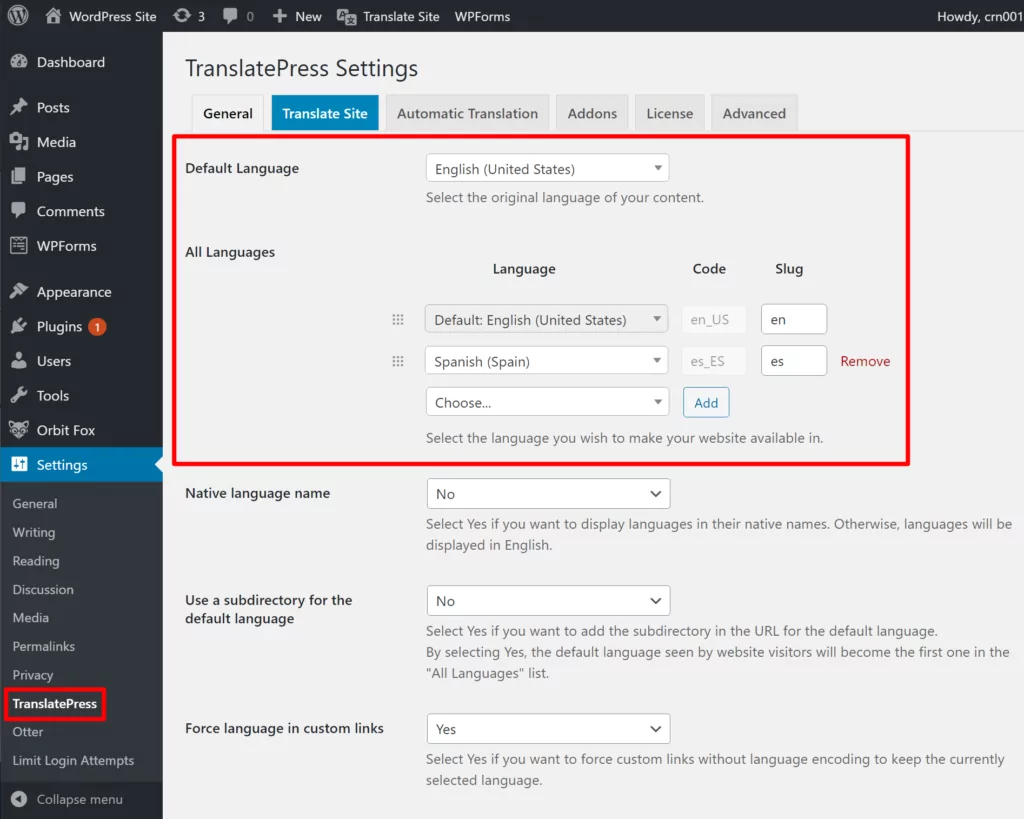
The free version of TranslatePress lets you translate your site into one new language. If you need to translate your site into multiple new languages, you can use the Multiple Languages add-on, which is available starting with the Personal license (purchase here).
TranslatePress offers a wide range of 221 languages to pick from. However, if you need to translate your WordPress site in a language that is not listed under the All Languages dropdown, you also have the option to add a custom language.
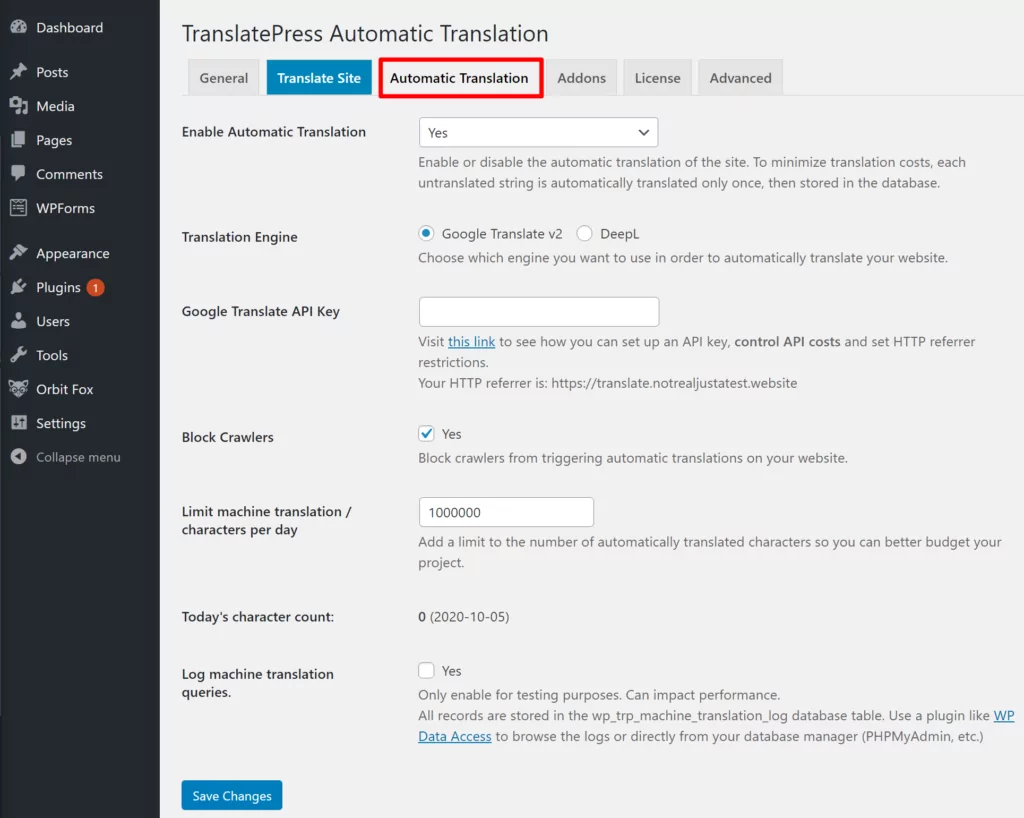
2. Set Up Automatic Translation (Optional)
If you want to speed up your translation process, TranslatePress supports automatic machine translation via both Google Translate and DeepL.
If you use this optional feature, TranslatePress will use those services to generate your translations and then store those translations locally in your WordPress site’s database. This means that you…
- Can fully edit all of the machine translations as needed.
- Won’t need to query an external service for each page load (and you’ll keep your costs down).
You can use Google Translate with the free version of TranslatePress, but you’ll need the Business or Developer license to access the DeepL add-on. TranslatePress does not charge any fee based on your usage, but you may need to pay Google Translate or DeepL directly to use the service. Google Translate does have a limited free tier, though, and you can configure TranslatePress to make sure you stay within Google’s free limits.
If you want to use automatic translation, go to the Automatic Translation tab of the TranslatePress settings area. Then, select and configure your preferred service. We have detailed guides for configuring both services:
You can also use the Limit machine translation setting to control the budget for your translation project. Again, this feature makes it easy to stay within the limits of Google Translate’s free tier:
3. Open the Translation Management Interface and Start Translating
Now, you’re ready to start translating your content. Or, if you want to have other users translate your content, you can skip to the next section where we show you how to create translator accounts.
To begin, open the page that you want to translate on the front-end of your site and click the Translate Page button on the WordPress toolbar:

This will open the visual translation editor. To edit a translation, all you do is hover over it, click the pencil icon, and then edit your translation in the sidebar:
Translating Other Elements
Above, we showed you an example of translating simple text from the WordPress block editor. However, you can use this exact same point-and-click approach to translate all the content on your WordPress site, whether it’s coming from your theme, your plugins, or anywhere else. You can even translate images in this way, which helps with localization.
For more detailed instructions on how to translate specific elements, we have lots of additional guides that you can consider:
- Editor (Gutenberg) blocks
- Custom fields
- Custom post types
- WordPress forms
- WordPress menus
- Images
- Popup content
- Sliders
- WooCommerce products
- Elementor page builder
- Divi page builder
- Beaver Builder page builder
- WPBakery Page Builder
- Brizy page builder
Using Translation Memory to Save Time
As you start translating content, TranslatePress will start building up its translation memory to help you quickly reuse translations in different parts of your site and ensure consistency. Again, this is one of the main benefits of using a translation management system.
If you reuse the same text in different parts of your site, TranslatePress will automatically apply the translation for that text to other instances. This eliminates the need to duplicate your work and also ensures consistency.
For example, above we showed you a GIF of translating the “Electrical Services” string. Here’s that same text in another page – notice how TranslatePress automatically pre-fills the existing translation (we didn’t manually change anything):
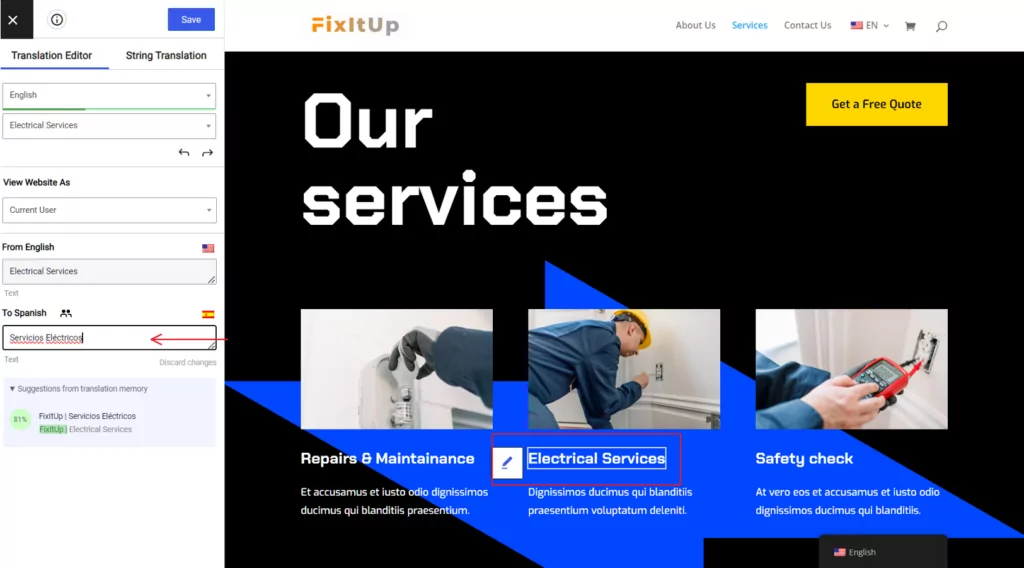
TranslatePress will also start giving you translation suggestions in the sidebar as its translation library grows, which is another feature that can help save you time.
Managing SEO Metadata and URL String Translations
In addition to helping you translate front-end content, TranslatePress can also manage the translations for important SEO and social metadata, as well as your URL slugs.
For example, if you’re using an SEO plugin like Yoast SEO or Rank Math to create SEO titles and meta descriptions, you’ll be able to fully translate those elements to ensure localization and improve your multilingual SEO.
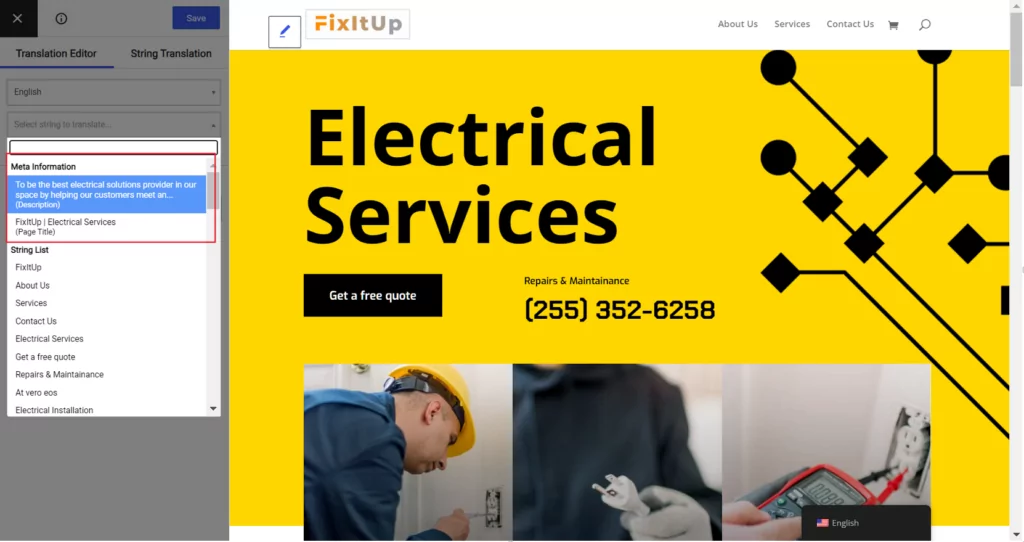
To be able to translate these elements, you’ll need the premium SEO Pack add-on, which is available on the Personal license (purchase here). Once you install this add-on, you can use the drop-down in the top-left corner of the TranslatePress editor to manage a piece of content’s URL slug and SEO/social media information:
You can also open the String Translation interface to translate sitewide URL slugs, like the URL slugs for taxonomies (categories and tags) and terms. You can also manage individual post slugs from this interface:
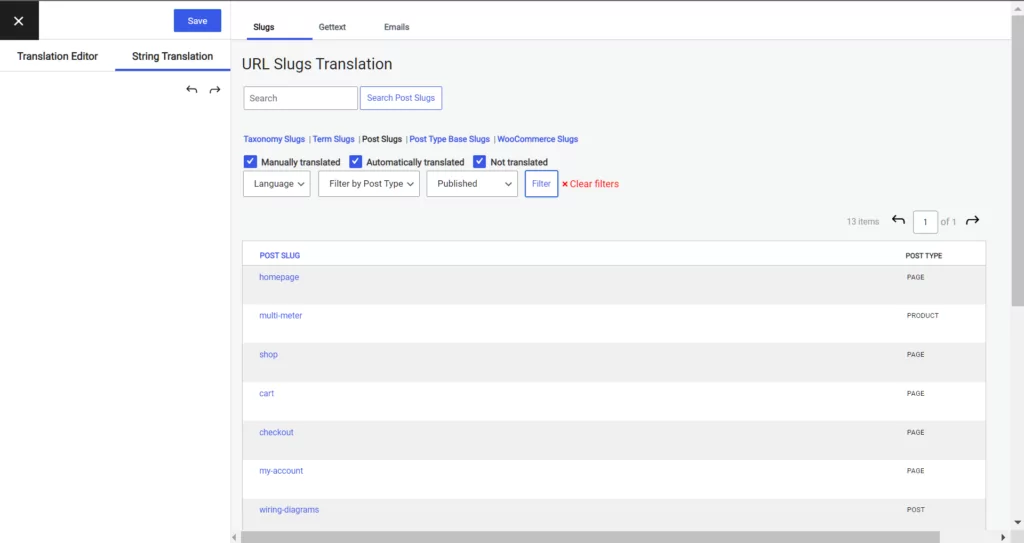
TranslatePress also gives you a filter that lets you quickly see whether or not a human has reviewed a translation yet, which helps you with project management.
4. Add Other Team Members as Translators
As we discussed earlier, collaboration is a key feature of any translation management system, and TranslatePress is no exception.
With the Translator Accounts add-on, you can create dedicated translator users via the native WordPress user registration system. These users will be able to translate content on your site via the same interface that you saw above, but they won’t be able to access any other key WordPress admin areas (like installing plugins).
If you’re interested in how this works on a technical level, TranslatePress adds a new “Translator” user role that you can apply just like other WordPress user roles (e.g. “Editor”, “Author”, etc.). This role gives them the limited WordPress capabilities needed to manage your translations.
To start adding team members, you’ll first need to install and activate the Translator Accounts add-on, which is available on the TranslatePress Developer or Business licenses.
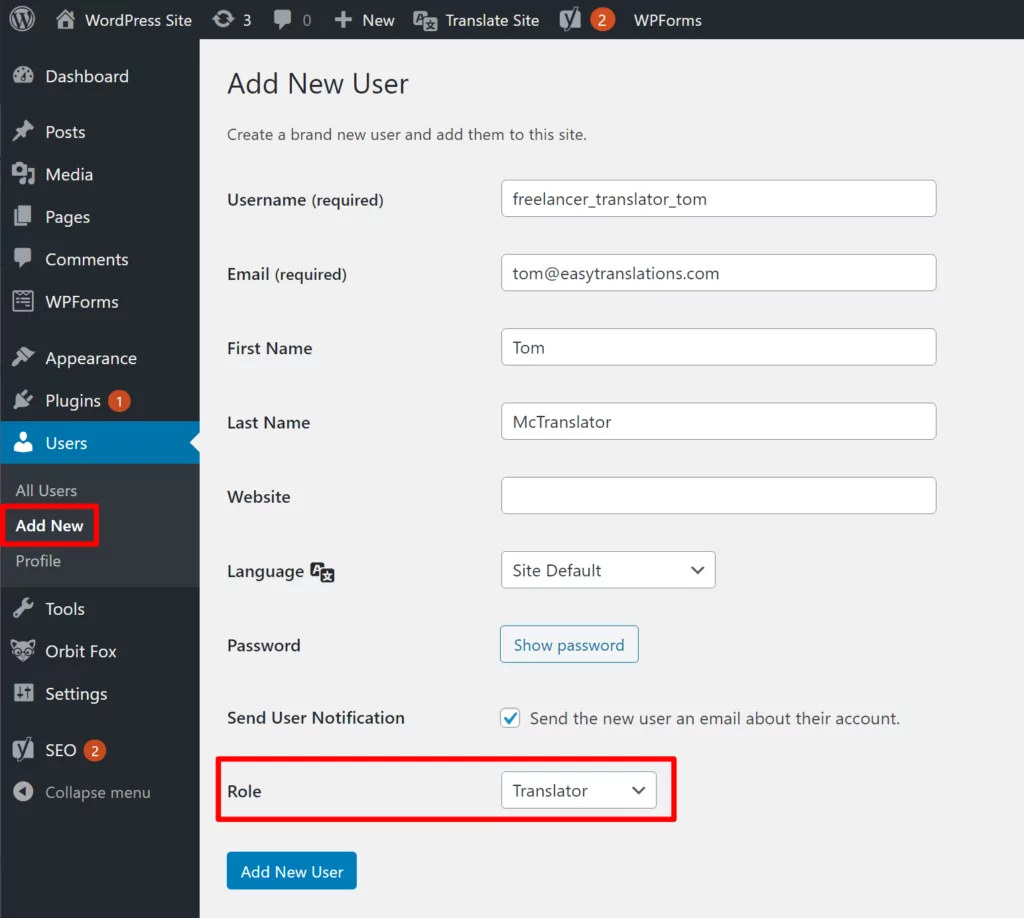
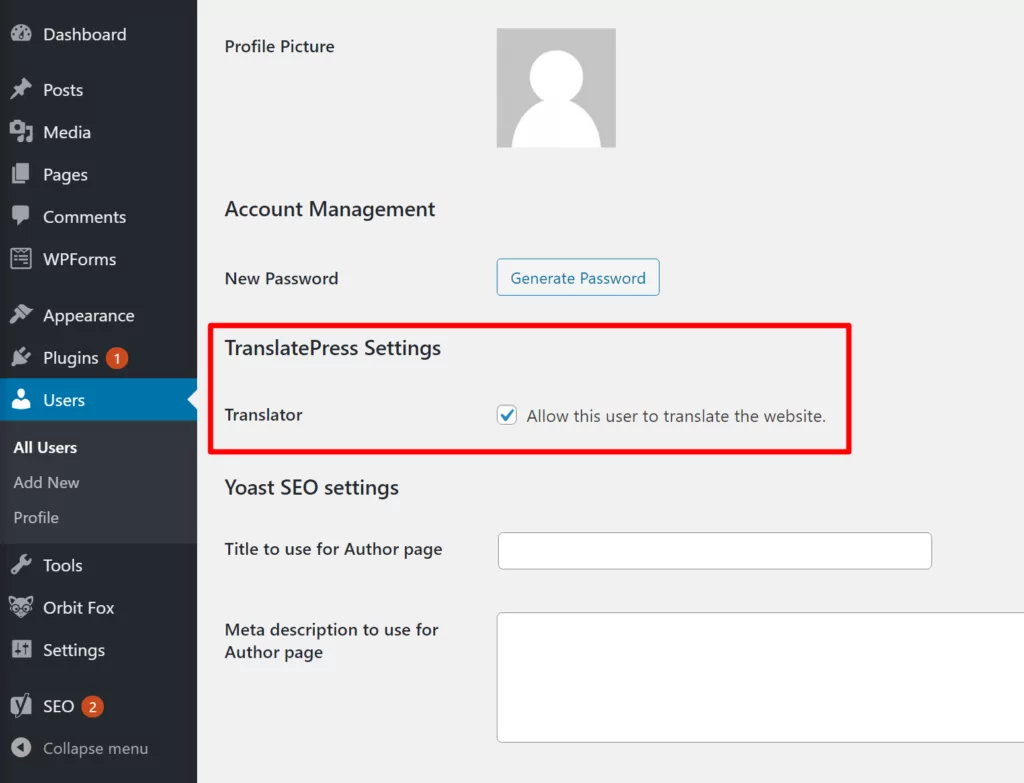
Once you’ve done that, you can go to Users → Add New to create a new translator account. When creating the account, use the Role drop-down to select Translator:
When editing a user account, you can also use a checkbox to quickly turn on/off their ability to manage your site’s translations:
5. Set Up Exclusion Rules (Optional)
So far, we’ve focused on translating your content into different languages. However, there also might be some situations in which you don’t want to translate your content, and a translation management system needs to be able to handle those, too.
For example, you might have a product brand name that you want to be the same in all languages.
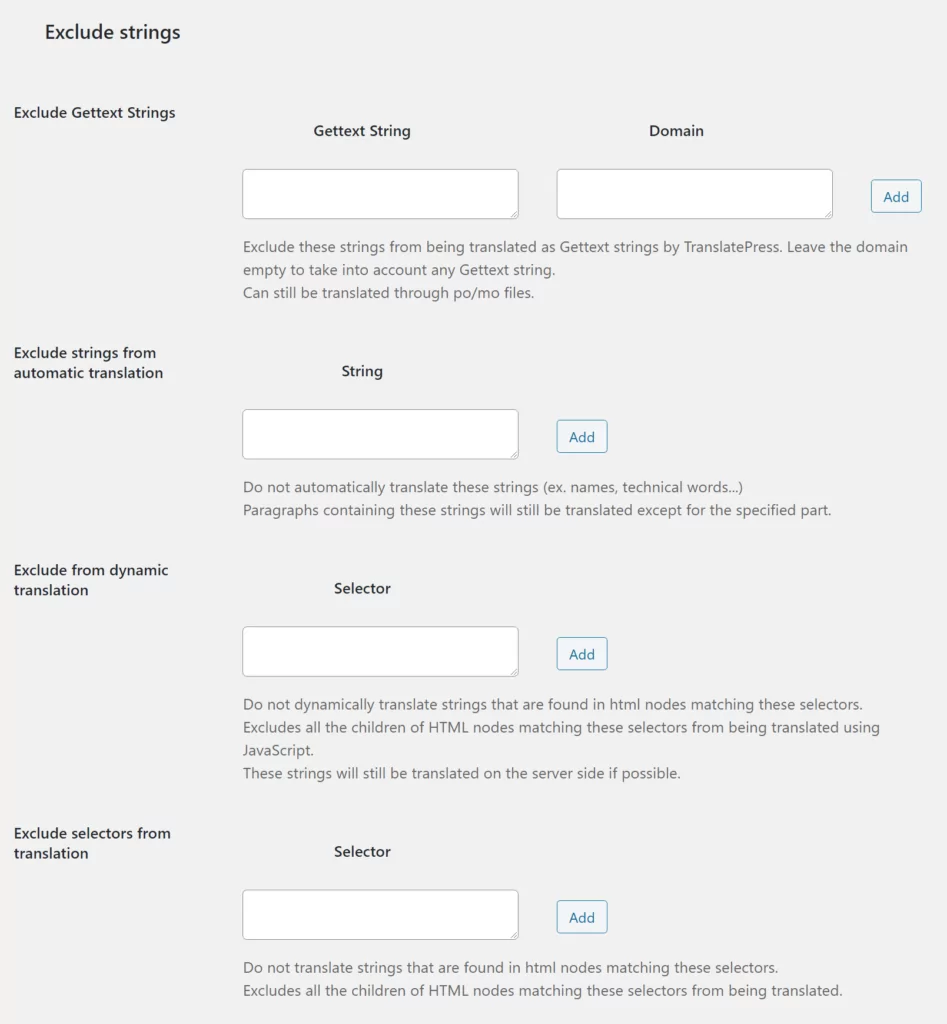
To help you avoid accidentally translating these strings, TranslatePress lets you set up exclusion rules for both individual text strings as well as all content inside certain CSS selectors that you specify.
You can set up these rules from the Advanced tab of the TranslatePress settings area:
And that’s it! You now have an easy system to help you localize your WordPress site and manage all of your translations.
Start Using a WordPress Translation Management System Today
To recap, a translation management system gives you a comprehensive way to translate and localize your content. Some translation management systems are better than others for certain types of content. For example, your needs when translating a game will be different than when translating a mobile app which will be different than when translating a WordPress website.
For WordPress users, you can use a dedicated translation management plugin, which will simplify your implementation and let you do everything right from your WordPress dashboard.
TranslatePress is a native WordPress translation management system plugin that offers all the features you need to translate and localize a WordPress site. You’ll be able to manage all of your site’s translations using a simple visual editor and you’ll also get useful features like:
- Comprehensive translations – whether your content comes from the WordPress editor, your theme, your plugins, or pretty much anywhere else, TranslatePress will let you translate it.
- Translator accounts – give as many users access to your translations as needed – you can bring the whole team along.
- Translation memory – TranslatePress will remember your translations across your entire site so that you don’t need to needlessly duplicate your work. This also helps to ensure your translations are always consistent.
- Automatic machine translation – if you want to, you can use automatic machine translation from Google Translate or DeepL to save time.
To get started, you can download and install the free version of TranslatePress from WordPress.org. It will let you translate your site into one new language and still includes comprehensive translations and translation memory.
Then, upgrade to the premium version to get access to other useful management features like translator accounts, DeepL support, unlimited languages, and more.
How are translators notified about new content to translate? How will they find untranslated content?
Will i have to remember all changes in pages, products, categories etc. and tell my translators manually in an email which content to translate? Websites can be large and content can be created by multiple people. Is TranslatePress the right tool for this?