In this post
In this post
What is WordPress localization, really? The term sounds mysterious enough. ? It’s no wonder that many WordPress website owners have a tough time understanding what WordPress localization is, and how to do it effectively.
- Is WordPress localization about making your site multilingual and translating it for overseas markets?
- Is it about displaying a local language version of your site based on where the reader is from?
- And, if you’re a developer, is it about preparing your theme or plugin for translation?
We’re going to answer all these questions in this guide to WordPress localization.
First things first:
What is WordPress Localization?
In a nutshell:
Localization is the process of adapting a product (or content) to a specific locale, language, or local market.
This adaptation process usually involves translating the item in question to some local language.
Localization is also often referred to as “l10n” since there are ten letters between the letters “l” and “n” in “localization”.
Localization vs. Internationalization
(Read if you’re a developer) ?
Now we’re getting into the fun stuff!
In everyday speech, localization and internationalization are used interchangeably. But that’s a mistake, technically. (Though you won’t be prosecuted if guilty.)
Internationalization (or “i18n” – again, 18 letters between the letters “i” and “n” in “internationalization”) is the process of building your product in a way that lets the user localize it.
In other words, for WordPress developers, internationalization is about adhering to specific conventions that are in tune with WordPress’ translation guidelines.
In the overall picture, internationalization comes first, and can then be followed by localization.
Examples of Localization
WordPress localization goes way above simple content translations. Here are some examples and WordPress localization ideas:
Translating website content for target markets
This is the most basic and intuitive thing to do when you’re just getting started localizing your WordPress website.
The idea is simple: you take all text content that’s on your site and translate it to one or more localized versions.
Depending on the tools you have access to, those translations can be written by hand or automated using Google Translate or modern AI translation tools. (More on that later in this guide.)
Adapting graphics to target markets
The images and photos you have on the site extend the experience that visitors have with your content. These graphics are no less important when it comes to localization.
In simple terms, you want your graphics to be just as localized as all the other content you have on the site.
Let me give you an example; here’s a featured image you might attach to a blog post:

If you then translate the site to Spanish, you should also get a suitable localized image to go alongside the Spanish version; like this one:

Modifying content to suit the tastes and consumption habits of target markets
For example, sports news sites in Europe are not very interested in what’s going on in the NFL. Likewise, American audiences don’t care that much for what they call soccer.
With proper website localization, you can filter out whole categories of content and adjust what each locale sees.
Adapting design and layout to display translated text properly
Generally speaking, you don’t have to do anything with your site’s layout or design when switching from one language version to another. But there are exceptions:
This is where RTL scripts (right-to-left) come into play.
When translating to Arabic languages, being able to adjust the structure of the site will make reading it much easier for foreign audiences.
Converting to local currencies and units of measure
In Europe, we like to display monetary values like so: 20$. In the US, the standard is $20 – with the currency symbol before the amount.
Good localization makes sure those remain correct.
Using proper local formats for dates, addresses, and phone numbers
What does the following date format read to you?
03/12/2020
If you’re in the US, this is the 12th of March. Everywhere else, this would be the 3rd of December.
As a website owner, you want to avoid misunderstandings like this, and especially if your content is time-sensitive and often brings up events that happen on specific dates – for example, websites in the financial market.
Addressing local regulations and legal requirements
Privacy policies, GDPR rules, FTC disclosures, plus tens of other local laws and regulations.
A website should be in tune with the regulations of each country where it has an official presence.
Providing customer support in the local language
Last but not least, we have what’s probably the biggest win for businesses operating internationally.
Offering customer support in the customer’s native language is a huge win, and nothing else will prove to them that you really care about their experience.
Benefits of Localization
The question you might be asking is why you should go through all this hassle to make your site localized.
There are some excellent benefits to WordPress localization:
- Increase market share and revenue. No matter if you sell products or just share content on various topics, exposure to more markets will result in more revenue (if not from sales, then at least from advertising). In fact, data says that every $1 spent on localization brings $25 of new revenue back.
- Mitigate cultural sensitivity. Some expressions or topics that are okay in one country might be entirely not okay in another. By offering localized content, you’re avoiding these issues.
- Build customer trust. Nothing builds confidence like seeing that the website you’re checking out took the extra effort to translate their content to make things easier for the reader.
- Gain a competitive advantage. Being in more places than your competition is always good.
- Strengthen global presence. By going global, you make your brand many folds more recognizable.
How to do WordPress Localization
With all the theory out of the way, let’s now get to work and take steps to localize your WordPress website:
We’re going to show you how to handle localization in four specific areas:
- localizing text content ← click to skip
- localizing media files and images
- localizing SEO settings
- setting up automatic translations
I’m going to use our TranslatePress plugin to get the job done – most of these tasks you can carry out using the free version of the plugin.
If you want the summarized version of this blog post, here’s a short video tutorial that goes over the main points of the localization process:
But to get a more in-depth look at WordPress localization, keep reading.
So, for starters, here’s how to install and configure the plugin:
Installing TranslatePress and Getting it Running
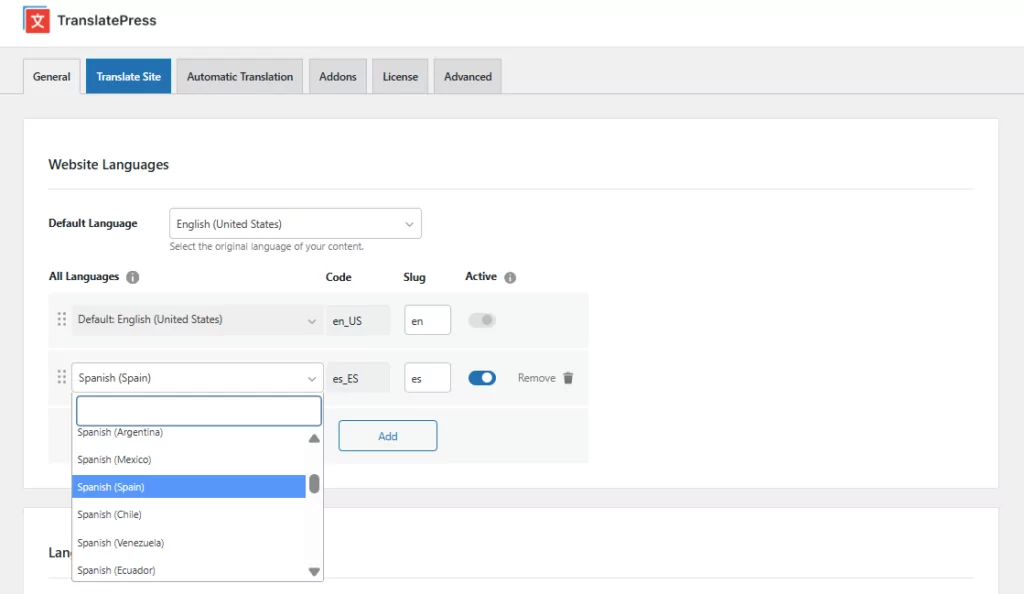
TranslatePress can be installed like any other free WordPress plugin. Go to your WordPress dashboard, then into Plugins → Add New and enter TranslatePress into the search box. Next, click on Install Now and then on Activate.
Go to Settings → TranslatePress and add new languages to your site.
Once your languages are saved, head to the Language Switcher tab in the top navigation of your TranslatePress settings to configure how visitors will switch between languages on your site. By default, TranslatePress adds a floating language switcher to the bottom-right corner of every page — so you don’t have to configure anything if that works for you.
If you’d like to customise its appearance or placement, the Language Switcher tab gives you three options, each with its own sub-tab:
- Floating — adjust the position, colours, flag shape, and Desktop/Mobile layout of the corner switcher
- Shortcode — use
- Menu Item — add language options to any navigation menu via Appearance → Menus
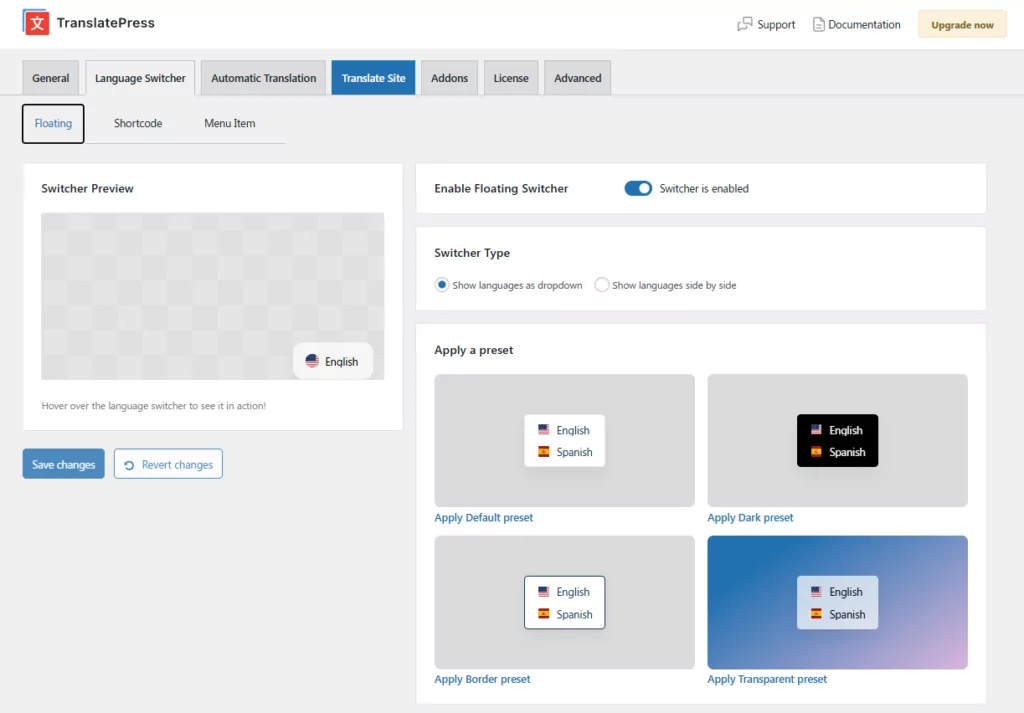
Remember to click on Save Changes when done.
With these simple actions, you’ve just let WordPress know about the languages you want to use on your multilingual site. In the next step, we’re going to localize different areas of your website.
Localizing Text Content
One of the great things about TranslatePress is that you can translate all your content in a very user-friendly way, using a visual translation interface. To begin, just go to the page that you want to translate – can be any page – and click on the Translate Page link that’s in the top bar:

A good idea is to start with your homepage and then progress through all the other pages that need translations. You can use the visual translation editor, to navigate your website and translate everything you see.
To translate any text that you see on the page, just click on the pencil icon next to it. A new panel will appear in the sidebar on the left. This is where you can enter your translation.
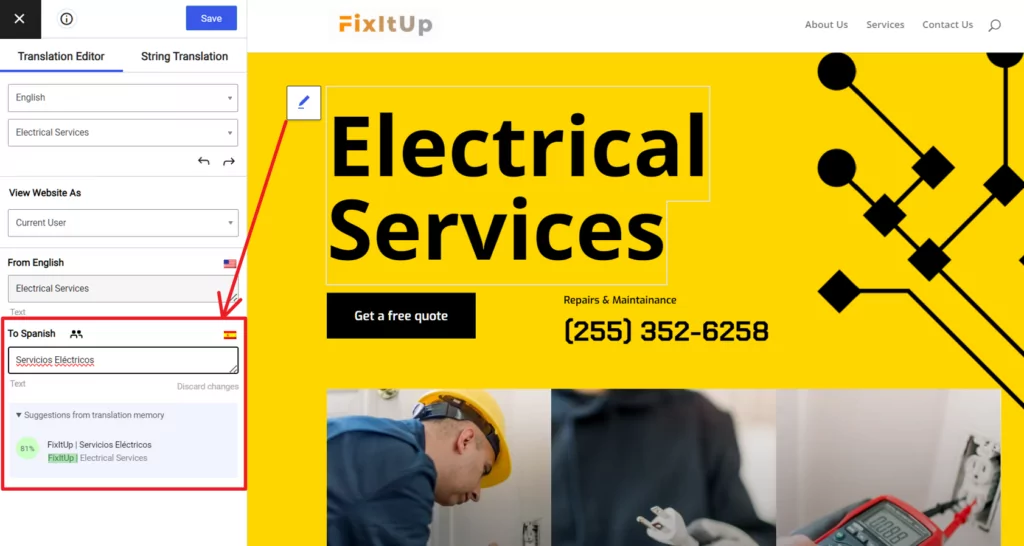
You can go through each block of text on the page until you eventually translate them all.
The important detail here is that this method works on all types of texts that your theme displays on the page. No matter if the text comes from a blog post, the theme’s own strings, a dynamic string, etc., TranslatePress can handle them all.
Don’t forget to click on Save translation (top left corner).
Note: To speed things up, you can also choose that your translations be done automatically. We’ll cover this in one of the sections below.
Localizing Media Files and Images
Localizing your images works just the same as localizing text content. All you have to do is click on the pencil icon next to the image you want to localize, and then replace it either by selecting another image from the media library or uploading one from your computer.
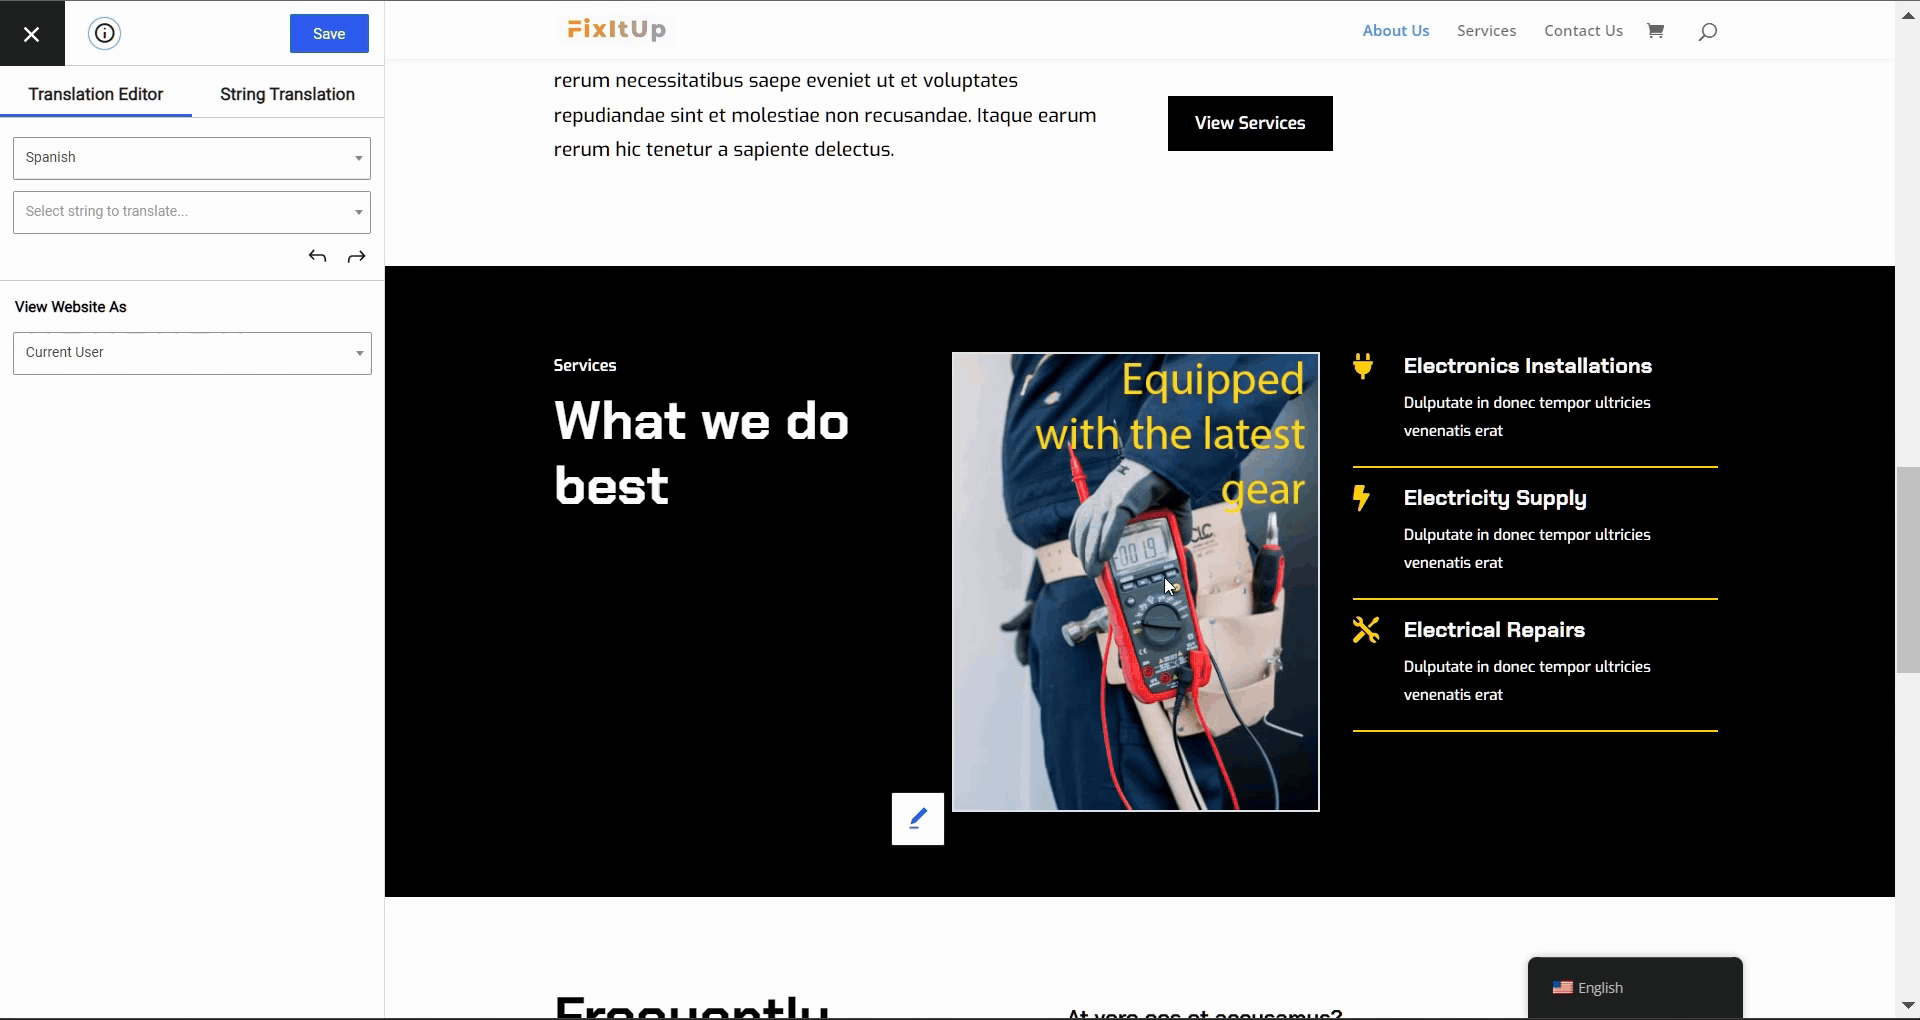
It’s important to point out that this functionality extends to all media types. You can localize not only your images, but videos, audio files, and sliders as well.
To learn more about localizing website images, read this guide.
Localizing SEO Settings
In principle, multilingual SEO is no different from regular SEO. You simply want to make sure that it’s not only the primary language version of your site that can be discovered via Google, but all the localized versions as well.
Note: To translate all the important SEO elements on a page, we’ll be using the SEO Pack add-on for TranslatePress – available with all premium licenses.
To make sure your content ranks in multiple languages, you want to:
- edit the URL slug (web address) of each localized page,
- translate the page title and meta description,
- enable multilingual sitemaps,
- set the correct
hreflangattributes for your localized pages.
All of this is really straight-forward in TranslatePress.
The latter two TranslatePress will do for you automatically. The first two – editing the URL slug, title and description of the page – is done via the same translation interface we used in the previous step.
To see all the SEO strings that can be translated, expand the menu under your primary language; this one:
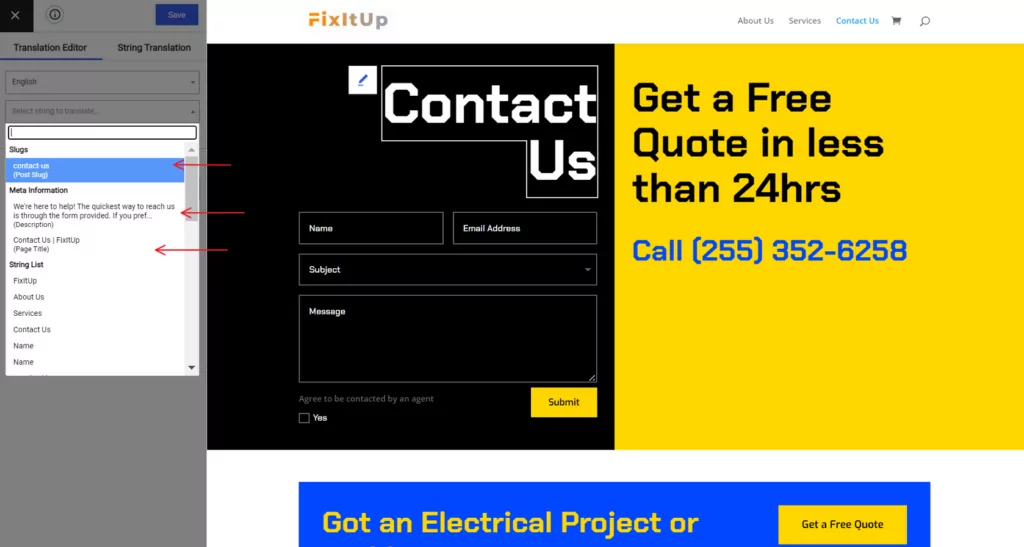
The arrows point to the slug of the page, the title and meta description. Click on either of these strings to edit them via the TranslatePress interface.
To learn more about localizing SEO settings, read this guide.
Setting up Automatic Translations
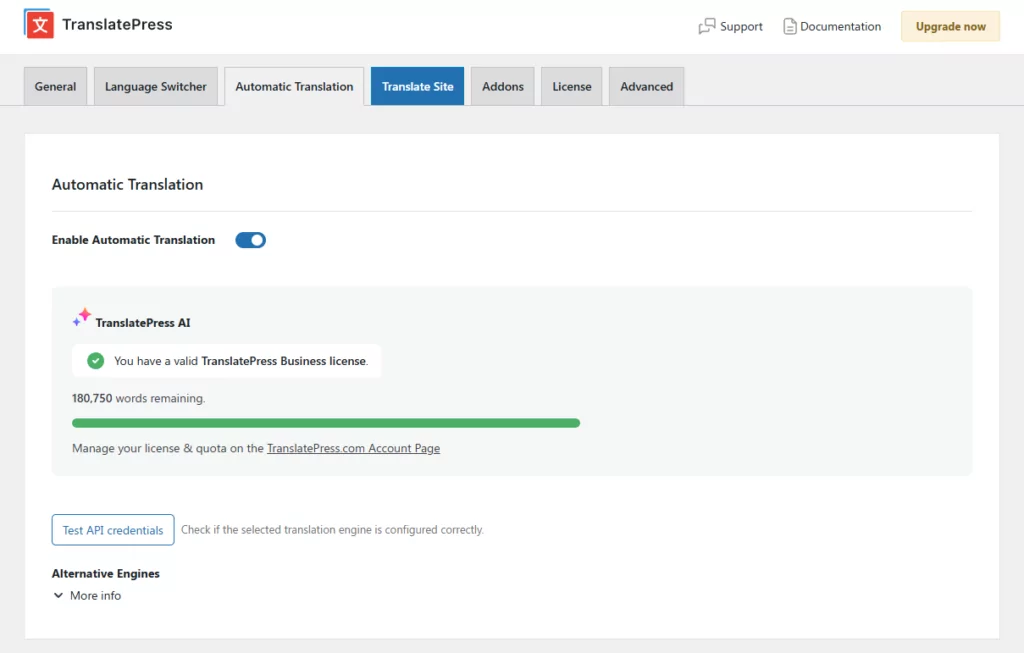
Last but not least, if you prefer to not have to do all translations by hand, TranslatePress also supports automatic translation — and it’s easy to enable.
The simplest option is TranslatePress AI, the plugin’s own built-in translation engine. It requires no external account and no API key. You can get a free TranslatePress AI license by signing up here, and paid plans include AI words to use with the engine as part of the plan. If you need more words, on a paid plan you can top up word credits from your TranslatePress account.
To enable automatic translation, go to Settings → TranslatePress and open the Automatic Translation tab. Enable automatic translation and select your preferred engine.
If you’d prefer to use an external API, TranslatePress also supports:
- Google Translate — available on all plans including the free version, using your own Google Cloud API key. Here’s how to generate one.
- DeepL — available on Business and Developer plans, using your own DeepL API key. Here’s how to generate a DeepL API.

Whichever engine you choose, automatic translations are a starting point — you can review and refine anything that sounds off directly in the visual editor.
To learn more about translating your WordPress site automatically, read this guide.
WordPress Localization for Themes and Plugins
This part of our WordPress localization guide is meant for developers working on their own WordPress products, themes, and plugins.
If you’re a user then localizing all the plugins and themes that you have installed on your site is done via the methods described above.
Keep reading if you’re a developer:
When working on a WordPress theme or plugin, your task is not as much to prepare original language versions of the product, but rather make it possible for other people to translate your creation on their own.
More or less, this is what internationalization is all about.
Luckily, although it might sound intimidating, the actual tasks that you need to perform in order to internationalize your theme or plugin are quite straightforward:
Set the Text Domain Header
This first step is about letting WordPress know that your product is ready for translations.
For themes, this is done by including the following function call in the functions.php file of the theme:
load_theme_textdomain('YOUR_THEME', THEME_PATH.'/languages');
Use “gettext” Functions
There are two PHP functions available in WordPress that make internationalizing your theme / plugin really easy.
They are:
_e()__()
These are what we call “gettext” functions.
You should use them each time you want to display any string of text on the screen.
So, instead of doing this:
<?php echo 'Welcome to Great Theme!'; ?>
You would do this:
<?php _e('Welcome to Great Theme!', 'YOUR_THEME'); ?>
This function looks up the translation file (more on this in a sec), matches the string you’ve provided as the parameter, and then prints its translated version (for the language that’s currently set).
- The difference between the
_e()and__()functions is that the first one prints/echoes its result and the second one returns it. - The other parameter,
'YOUR_THEME', is your theme’s template path.
⚠️ I want to emphasize this again; you should use these “gettext” functions every time you want to display any string of text to the user.
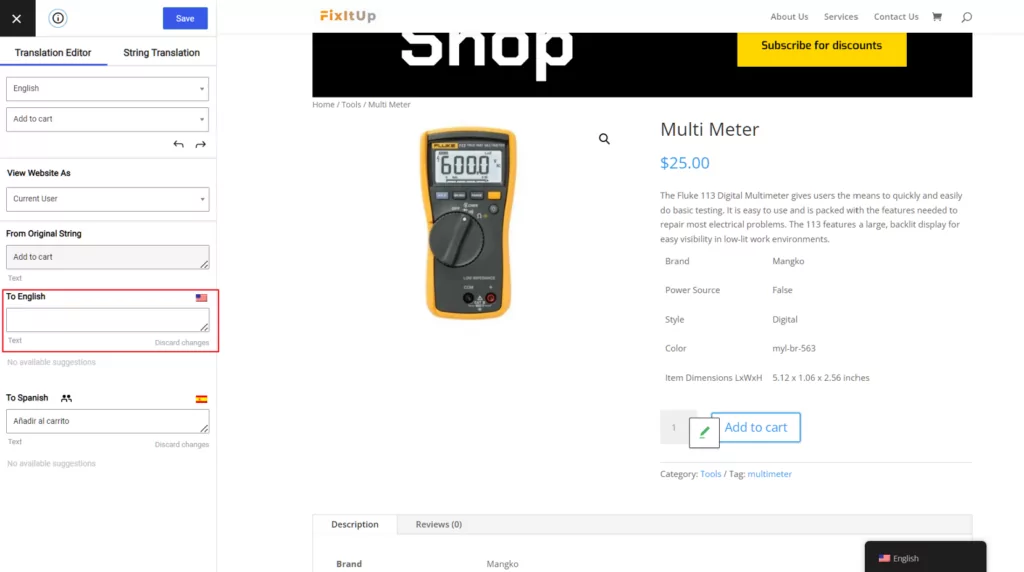
The “gettext” functions are not only about translating website content, but their output can also be intercepted by plugins like TranslatePress in other circumstances. For example, WooCommerce users will be happy to know that changing the standard texts like “Add to cart” or “Sale” is easy to do exactly because WooCommerce uses “gettext” functions when displaying them.
To see how this works, activate TranslatePress (free version), and click on Translate Page when viewing any of your product pages. As you hover your mouse cursor over the “Add to cart” button, you’ll see a green pencil icon. This icon indicates that the text can be translated and that it comes from a “gettext” function. (Alternatively, blue pencil icons indicate texts created by the user – as part of a post, page or a product description.)
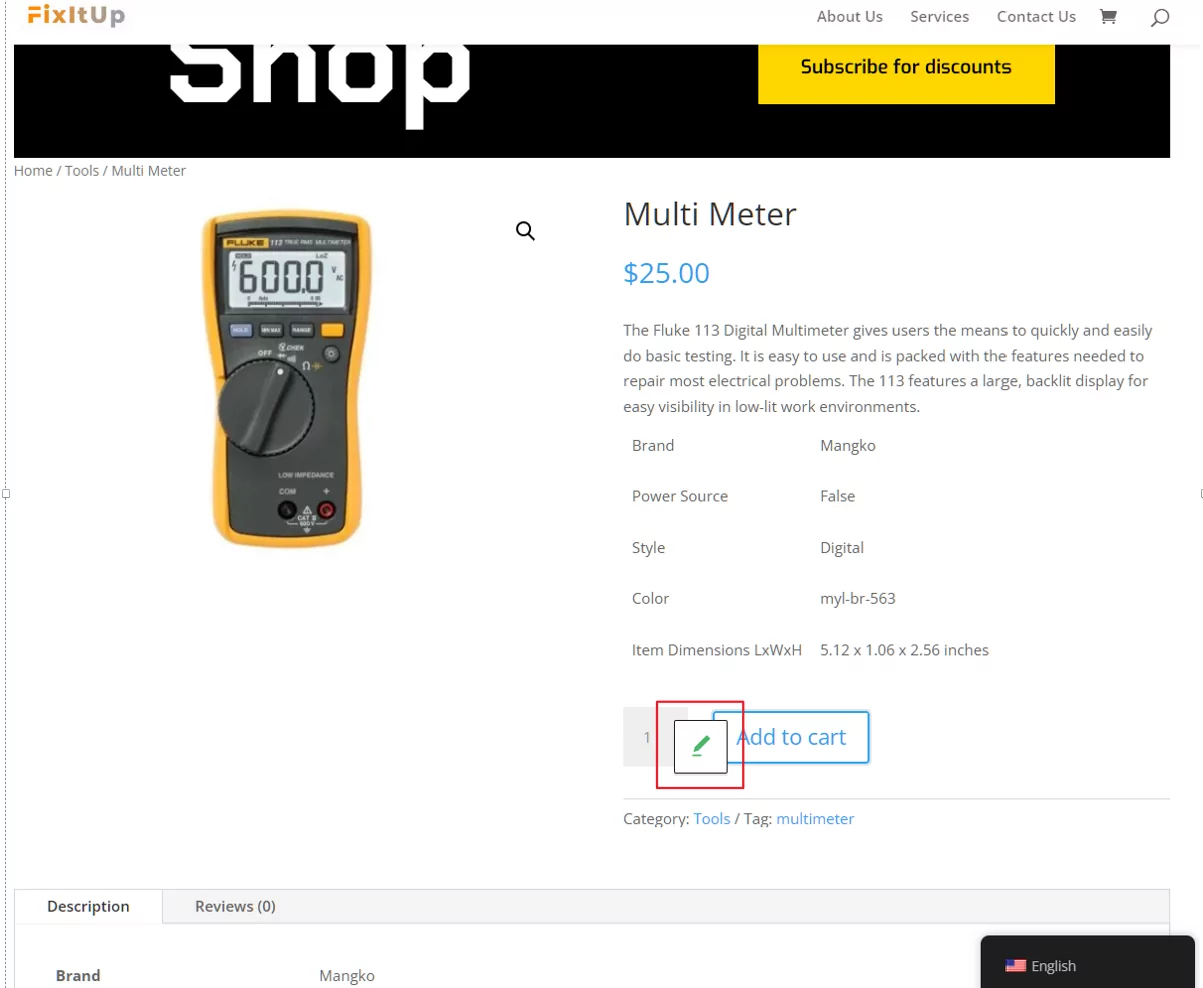
When you click on the pencil icon, you’ll be able to add not only a new language version of the text, but also change the primary language version – in case you want to go with “Buy now” instead of “Add to cart”.
A simple change like this wouldn’t be possible without “gettext” functions.
Create a Translation File
The last step to making your theme or plugin ready for translations is to create what’s called a POT file. A POT file is basically a table. It links original strings of text with translated versions of them.
POT files can be created and edited using a tool like Poedit, for example. It’s open-source and has versions for all major operating systems.
The idea behind a POT file is that all the strings that your theme or plugin outputs to the user through the “gettext” functions should be listed in the file.
Name your POT file after your theme, save it with the .pot extension and put it in the languages sub-directory in your theme’s / plugin’s main directory.
With that done, your theme is ready for translations!
Should You Worry About Dynamic Text Strings?
Dynamic strings are everything that your theme stores in other places than WordPress’ main content tables (wp_posts or wp_postmeta) or the POT files.
Depending on how sophisticated your theme is, and the degree of customization it offers, you may be forced to store some of the theme’s text data either in the wp_options table or even in the theme’s own tables.
Again, this is about text strings that you want to make customizable to the user. A typical scenario where strings like this are used is on custom homepages. Many themes offer original blocks of content and custom designs on their homepages. The raw content that’s on those pages is often difficult to store in the database in a standard way.
The problem with dynamic strings is that they are often problematic from the perspective of WordPress localization.
Depending on which localization plugin the user has, they may or may not be able to translate those strings.
TranslatePress, for example, comes with required tools already built in. It allows users to work with their current theme’s dynamic strings like with any other texts they see on the page.
Overall, whenever you can avoid using dynamic strings in your theme or plugin, try doing so.
Learn more about localizing dynamic strings in WordPress.
WordPress Localization: Conclusion
Navigating your way through WordPress localization may sound like an intimidating task at first, but it’s actually not that hard once you get to work. That is, if you have quality tools at your disposal.
As you’ve seen, TranslatePress can help quite a bit in getting your website localized quickly and your international audiences happy.
Nearly everything that’s been described above can be done with the 100% free version of the plugin.
If you also want to increase your chances of ranking your multilingual content in Google, consider upgrading to one of the TranslatePress pro plans. The SEO add-on that’s part of the offer will handle all your multilingual SEO needs. You’ll also get access to a lot of powerful add-ons, like unlimited translation languages, automatic user language detection, translator accounts and more.
TranslatePress Multilingual
And, of course, if you have any questions about WordPress localization, don’t hesitate to ask in the comments.
If you found this post helpful, please check out our YouTube channel, where we constantly upload short & easy-to-follow video tutorials. You can also follow us on Facebook and Twitter to be the first to know each time we post.


Karol, this is a fantastic piece that really drives home the importance of adapting a business’s online presence to their target market, taking into account cultural sensitivities and language. The way you broke it down makes it not only easy to follow but also can definitely help those just starting out in localizing WordPress while keeping SEO in mind. Thank you for sharing!