
Dans ce post
Qu'est-ce que la localisation WordPress, vraiment ? Le terme semble assez mystérieux. ? Il n'est donc pas étonnant que de nombreux propriétaires de sites Web WordPress aient du mal à comprendre ce qu'est la localisation WordPress, et comment la réaliser efficacement.
- La localisation WordPress consiste-t-elle à rendre votre site multilingue et à le traduire pour les marchés étrangers ?
- S'agit-il d'afficher une version locale de votre site dans la langue du lecteur en fonction de sa provenance ?
- Et, si vous êtes un développeur, s'agit-il de préparer votre thème ou votre plugin à la traduction ?
Nous allons répondre à toutes ces questions dans ce guide de localisation WordPress.
Tout d'abord :
La localisation WordPress
En bref :
La localisation est le processus d'adaptation d'un produit (ou d'un contenu) à un lieu, une langue ou un marché local spécifiques.
Ce processus d'adaptation implique généralement la traduction de l'élément en question dans une langue locale.
La localisation est également souvent appelée “ l10n ” car il y a dix lettres entre les lettres “ l ” et “ n ” dans “ localisation ”.
Localisation vs. Internationalisation
(Lisez si vous êtes développeur) ?
Maintenant, on passe aux choses sérieuses !
Dans le langage courant, localisation et internationalisation sont utilisés indifféremment l'un pour l'autre. Mais c'est une erreur, techniquement. (Bien que vous ne soyez pas poursuivi si vous êtes coupable.)
Internationalisation (ou “ i18n ” – encore une fois, 18 lettres entre le “ i ” et le “ n ” dans “ internationalisation ”) est le processus de construction de votre produit d'une manière qui permet à l'utilisateur de le localiser.
En d'autres termes, pour les développeurs WordPress, l'internationalisation consiste à suivre des conventions spécifiques qui sont en accord avec les directives de traduction de WordPress.
Dans l'ensemble, internationalisation arrive en premier, et peut ensuite être suivi par localisation.
Exemples de localisation
La localisation WordPress va bien au-delà de la simple traduction de contenu. Voici quelques exemples et idées de localisation WordPress :
Traduction du contenu du site Web pour les marchés cibles
C'est la chose la plus élémentaire et la plus intuitive à faire lorsque vous débutez dans la localisation de votre site WordPress.
L'idée est simple : vous prenez tout le contenu textuel de votre site et le traduisez dans une ou plusieurs versions localisées.
En fonction des outils dont vous disposez, ces traductions peuvent être réalisées manuellement ou de manière automatisée à l'aide de Google Translate ou d'outils modernes de traduction basés sur l'IA. (Plus d'informations à ce sujet plus tard dans ce guide.)
Adapter les graphismes aux marchés cibles
Les images et les photos que vous avez sur le site prolongent l'expérience que les visiteurs ont avec votre contenu. Ces éléments graphiques ont d'autant plus d'importance lorsqu'il s'agit de localisation.
En termes simples, vous voulez que vos graphiques soient aussi localisés que tout autre contenu sur votre site.
Laissez-moi vous donner un exemple ; voici une image de présentation que vous pourriez joindre à un article de blog :

Si vous traduisez ensuite le site en espagnol, vous devriez également obtenir une image localisée appropriée pour accompagner la version espagnole ; comme celle-ci :

Adapter le contenu aux goûts et aux habitudes de consommation des marchés cibles
Par exemple, les sites d'actualités sportives en Europe ne s'intéressent pas beaucoup à ce qui se passe dans la NFL. De même, le public américain ne se préoccupe pas autant de ce qu'il appelle football.
Avec une bonne localisation de site Web, vous pouvez filtrer des catégories entières de contenu et ajuster ce que chaque région voit.
Adapter la conception et la mise en page pour afficher correctement le texte traduit
En général, vous n'avez rien à faire avec la mise en page ou la conception de votre site lorsque changer d'une version linguistique à une autre. Mais il y a des exceptions :
C'est là qu'interviennent les scripts RTL (de droite à gauche).
Quand translated to French les langues, être capable d'ajuster la structure du site rendra la lecture beaucoup plus facile pour les publics étrangers.
Conversion en devises et unités de mesure locales
En Europe, nous aimons afficher les valeurs monétaires ainsi : 20$. Aux États-Unis, la norme est $20 – avec le symbole de la devise avant le montant.
Une bonne localisation garantit que ceux-ci restent corrects.
En utilisant les formats locaux appropriés pour les dates, les adresses et les numéros de téléphone
Quel format de date est-ce pour vous ?
03/12/2020
Si vous êtes aux États-Unis, nous sommes le 12 mars. Partout ailleurs, nous serions le 3 décembre.
En tant que propriétaire d'un site Web, sites web dans la finance marché.
Respecter la réglementation locale et les exigences légales
Politiques de confidentialité, règles RGPD, déclarations FTC, plus des dizaines d'autres lois et réglementations locales.
Un site web doit être en conformité avec la réglementation de chaque pays où il a une présence officielle.
Fournir un support client dans la langue locale
Enfin, et ce n'est pas le moindre, nous avons ce qui est probablement la plus grande victoire pour les entreprises opérant à l'échelle internationale.
Offrant support client dans la langue maternelle du client est une victoire énorme, et rien d'autre ne leur prouvera que vous vous souciez vraiment de leur expérience.
Avantages de la localisation
La question que vous pourriez vous poser est pourquoi vous devriez vous donner toute cette peine pour localiser votre site.
Il y a d'excellents avantages à la localisation WordPress :
- Augmenter la part de marché et les revenus. Que vous vendiez des produits ou que vous partagiez simplement du contenu sur divers sujets, l'exposition à davantage de marchés entraînera des revenus plus importants (sinon directement des ventes, du moins de la publicité). En fait, les données disent que chaque $1 investi dans la localisation génère $25 de nouveaux revenus.
- Atténuer la sensibilité culturelle. Certaines expressions ou certains sujets qui sont acceptables dans un pays peuvent être entièrement pas d'accord dans un autre. En proposant du contenu localisé, vous évitez ces problèmes.
- Instaurer la confiance des clients. Rien ne renforce la confiance comme de voir que le site web que vous consultez a fait l'effort supplémentaire de traduire son contenu pour faciliter les choses au lecteur.
- Prenez un avantage concurrentiel. Être plus présent que votre concurrence est toujours une bonne chose.
- Renforcer la présence mondiale. En devenant mondial, vous rendez votre marque beaucoup plus reconnaissable.
Comment faire la localisation WordPress
Maintenant que toute la théorie est derrière nous, mettons-nous au travail et passons aux étapes nécessaires pour localiser votre site WordPress :
Nous allons vous montrer comment gérer la localisation dans quatre domaines spécifiques :
- localiser le contenu textuel ← cliquez pour ignorer
- localisation des fichiers multimédias et des images
- paramètres de référencement localisés
- la mise en place de traductions automatiques
Je vais utiliser notre plugin TranslatePress pour mener à bien cette tâche – la plupart de ces opérations peuvent être effectuées à l'aide du version gratuite du plugin.
Si vous souhaitez obtenir une version résumée de cet article de blog, voici un court tutoriel vidéo qui couvre les points principaux du processus de localisation :
Mais pour jeter un regard plus approfondi sur la localisation WordPress, continuez à lire.
Alors, pour commencer, voici comment installer et configurer le plugin :
Installation et mise en service de TranslatePress
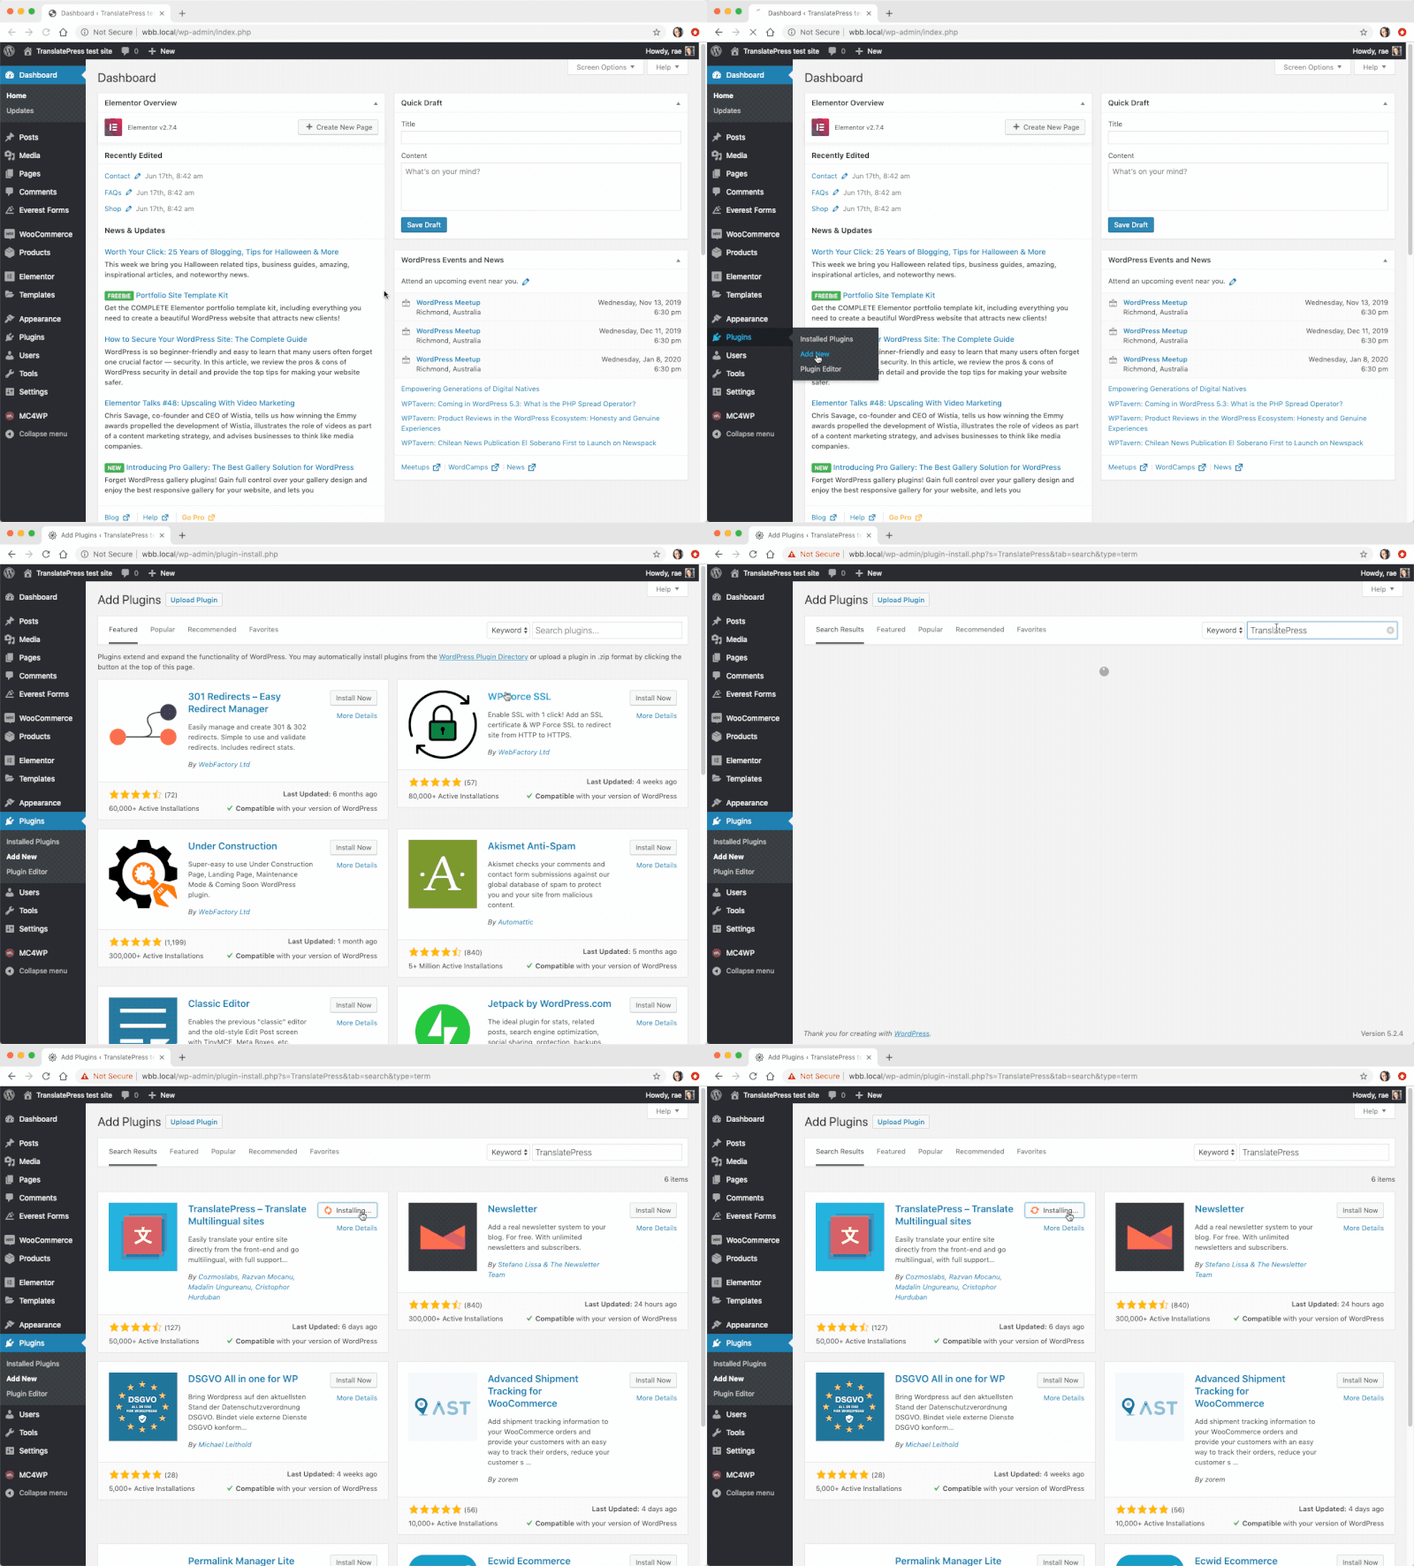
TranslatePress s'installe comme n'importe quel autre plugin WordPress gratuit. Accédez à votre tableau de bord WordPress, puis rendez-vous dans Extensions → Ajouter et entrer TranslatePress dans la barre de recherche. Ensuite, cliquez sur Installer maintenant et puis sur Activer.
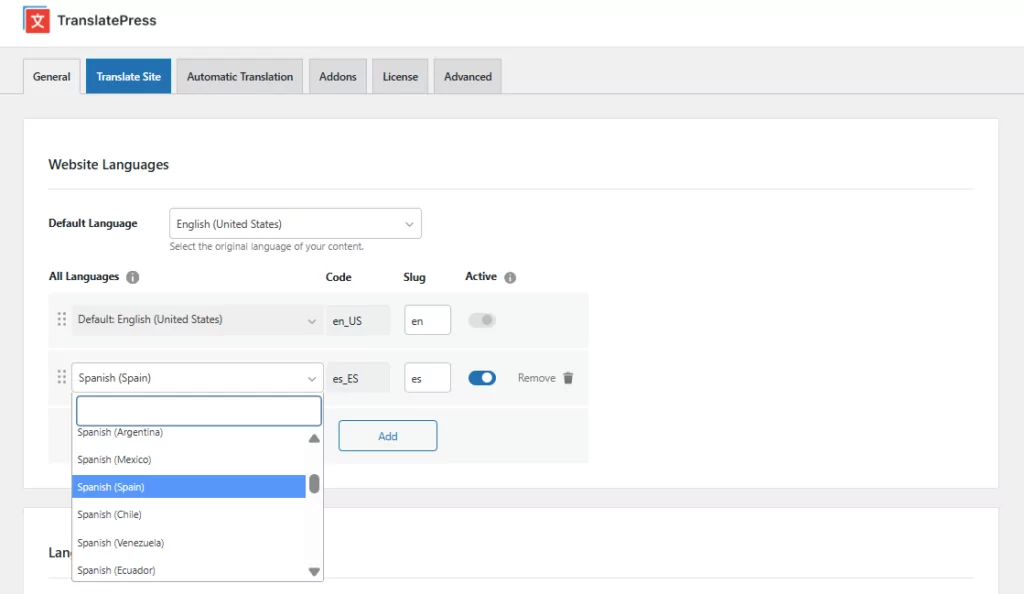
Aller à Paramètres → TranslatePress et ajoutez de nouvelles langues à votre site.
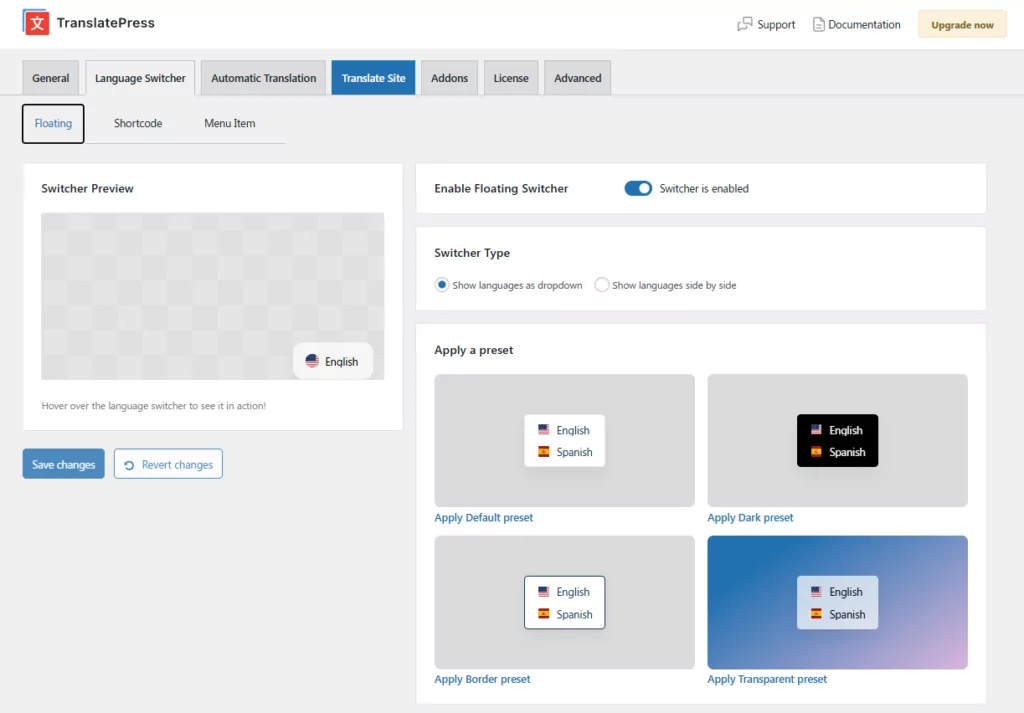
Une fois vos langues enregistrées, rendez-vous à la Sélecteur de langue onglet situé dans la barre de navigation supérieure de vos paramètres TranslatePress pour configurer la manière dont les visiteurs vont changer de langue sur votre site. Par défaut, TranslatePress ajoute un sélecteur de langue flottant dans le coin inférieur droit de chaque page ; vous n'avez donc rien à configurer si cela vous convient.
Si vous souhaitez personnaliser son apparence ou son emplacement, l'onglet Sélecteur de langue vous offre trois options, chacune disposant de son propre sous-onglet :
- Flottant — ajuster la position, les couleurs, la forme du drapeau et la disposition Bureau/Mobile du sélecteur de coin
- Code court — utiliser
- Article de menu — ajouter des options de langue à n'importe quel menu de navigation via Apparence → Menus
N'oubliez pas de cliquer sur Enregistrer les modifications quand c'est fait.
Grâce à ces actions simples, vous venez d'informer WordPress des langues que vous souhaitez utiliser sur votre site multilingue. À l'étape suivante, nous allons localiser différentes zones de votre site Web.
Traduction du contenu textuel
L'un des grands avantages de TranslatePress est qu'il vous permet de traduire l'ensemble de votre contenu de manière très intuitive, grâce à une interface de traduction visuelle. Pour commencer, il vous suffit de vous rendre sur la page que vous souhaitez traduire – quelle qu'elle soit – et de cliquer sur le Traduire la page lien qui se trouve dans la barre supérieure :
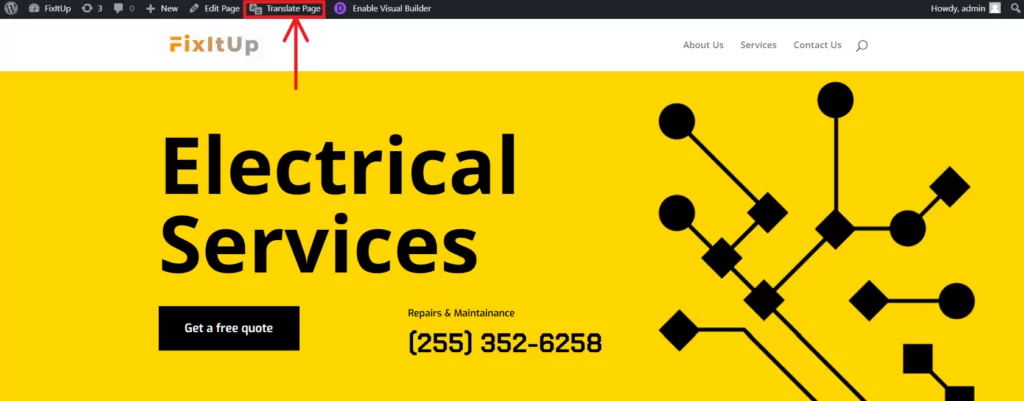
Une bonne idée est de commencer par votre page d'accueil, puis de progresser à travers toutes les autres pages qui ont besoin de traductions. Vous pouvez utiliser l'éditeur de traduction visuel pour naviguer sur votre site Web et traduire tout ce que vous voyez.
Pour traduire n'importe quel texte que vous voyez sur la page, il suffit de cliquer sur le icône de crayon à côté. Un nouveau panneau apparaîtra dans la barre latérale sur la gauche. C'est ici que vous pouvez saisir votre traduction.
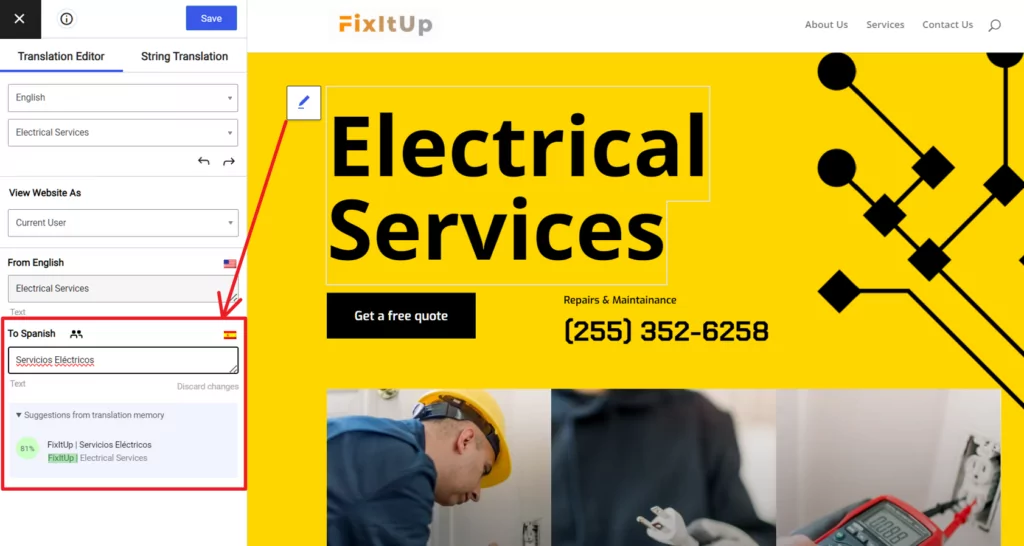
Vous pouvez parcourir chaque bloc de texte sur la page jusqu'à ce que vous finissiez par les traduire tous.
Le détail important ici est que cette méthode fonctionne sur tous les types de textes que votre thème affiche sur la page. Peu importe que le texte provienne d'un article de blog, des propres chaînes du thème, d'une chaîne dynamique, etc., TranslatePress peut tous les gérer.
N’oubliez pas de cliquer sur Sauvegarder la traduction (coin supérieur gauche).
RemarquePour accélérer les choses, vous pouvez également choisir que vos traductions soient faites automatiquement. Nous aborderons ce sujet dans l'une des sections ci-dessous.
Localisation des fichiers multimédias et des images
La localisation de vos images fonctionne exactement de la même manière que la localisation de contenu textuel. Tout ce que vous avez à faire est de cliquer sur icône de crayon à côté de l'image que vous souhaitez localiser, puis remplacez-la soit en sélectionnant une autre image de la bibliothèque de médias, soit en en téléugeant une depuis votre ordinateur.
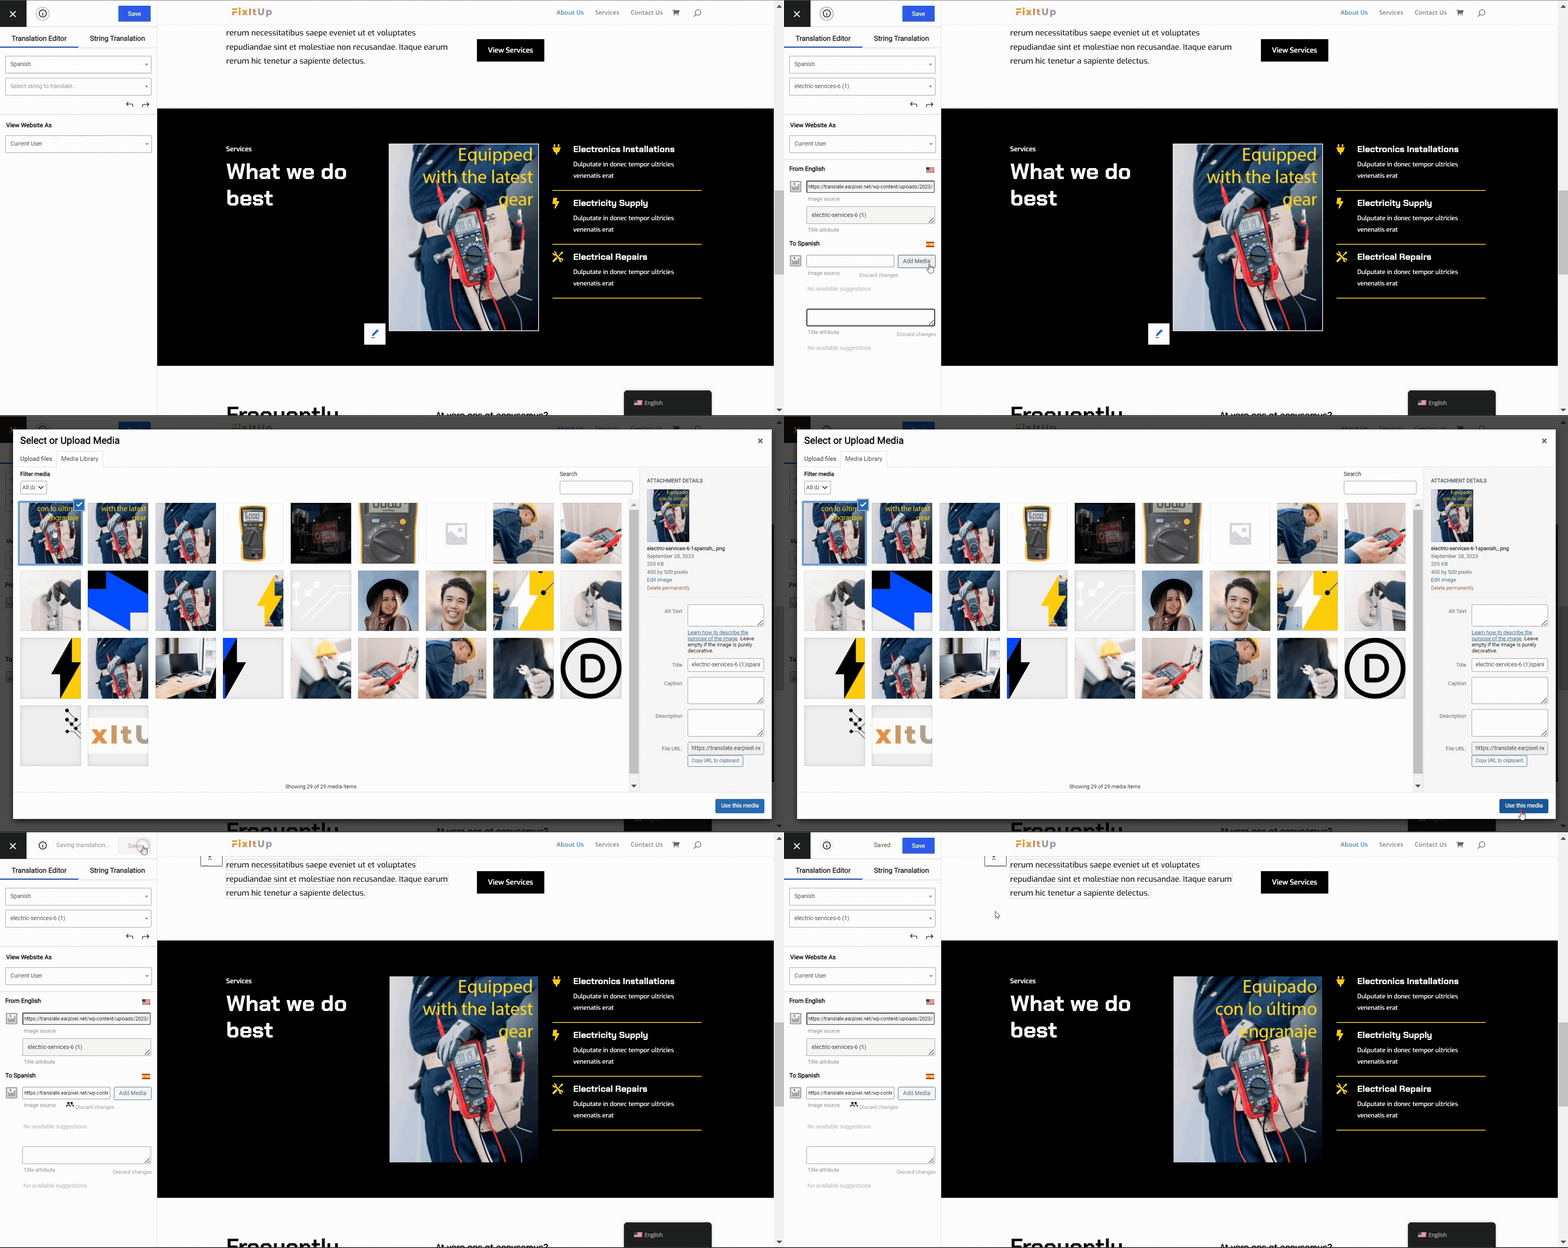
Il est important de souligner que cette fonctionnalité s'étend à tous les types de médias. Vous pouvez localiser non seulement vos images, mais aussi vos vidéos, vos fichiers audio et curseurs aussi.
Pour en savoir plus sur la localisation des images de sites Web, lisez ce guide.
Localisation des paramètres SEO
En principe, le référencement multilingue ne diffère pas du référencement classique. Vous voulez simplement vous assurer que ce n'est pas seulement la version dans la langue principale de votre site qui peut être découverte via Google, mais aussi toutes les versions localisées.
RemarquePour traduire tous les éléments SEO importants d'une page, nous utiliserons le Module complémentaire SEO Pack pour TranslatePress – disponible avec toutes les licences premium.
Pour vous assurer que votre contenu se positionne dans plusieurs langues, vous souhaitez :
- modifier le segment d'URL l'adresse web de chaque page localisée,
- traduisez le titre de la page et la méta-description,
- activer Plans de site multilingues,
- définir le bon
hreflangattributs pour vos pages localisées.
Tout cela est vraiment très simple dans TranslatePress.
Les deux dernières étapes (TranslatePress) s'effectuent automatiquement. Les deux premières – modification du slug de l'URL, du titre et de la description de la page – s'effectuent via la même interface de traduction que celle utilisée à l'étape précédente.
Pour voir toutes les chaînes SEO qui peuvent être traduites, développez le menu sous votre langue principale ; celui-ci :
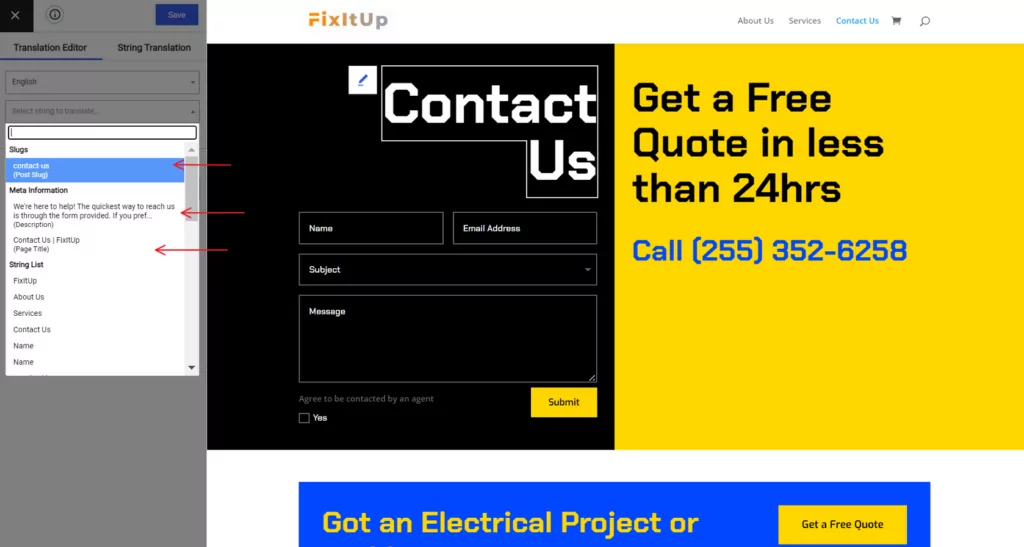
Les flèches indiquent le slug de la page, le titre et la méta-description. Cliquez sur l'un ou l'autre de ces éléments pour les modifier via l'interface TranslatePress.
Pour en savoir plus sur la localisation des paramètres SEO, lisez ce guide.
Configuration des traductions automatiques
Enfin, si vous préférez ne pas avoir à effectuer toutes les traductions manuellement, TranslatePress prend également en charge la traduction automatique — et celle-ci est facile à activer.
L'option la plus simple est TranslatePress AI, le moteur de traduction intégré au plugin. Il ne nécessite ni compte externe ni clé API. Vous pouvez obtenir une licence TranslatePress AI gratuite en inscription ici, et les formules payantes incluent un certain nombre de mots générés par l'IA à utiliser avec le moteur dans le cadre de la formule. Si vous avez besoin de plus de mots, vous pouvez, dans le cadre d'une formule payante, recharger vos crédits de mots depuis votre compte TranslatePress.
Pour activer la traduction automatique, allez dans Paramètres → TranslatePress et ouvrez le Traduction automatique onglet. Activer traduction automatique et sélectionnez votre moteur préféré.
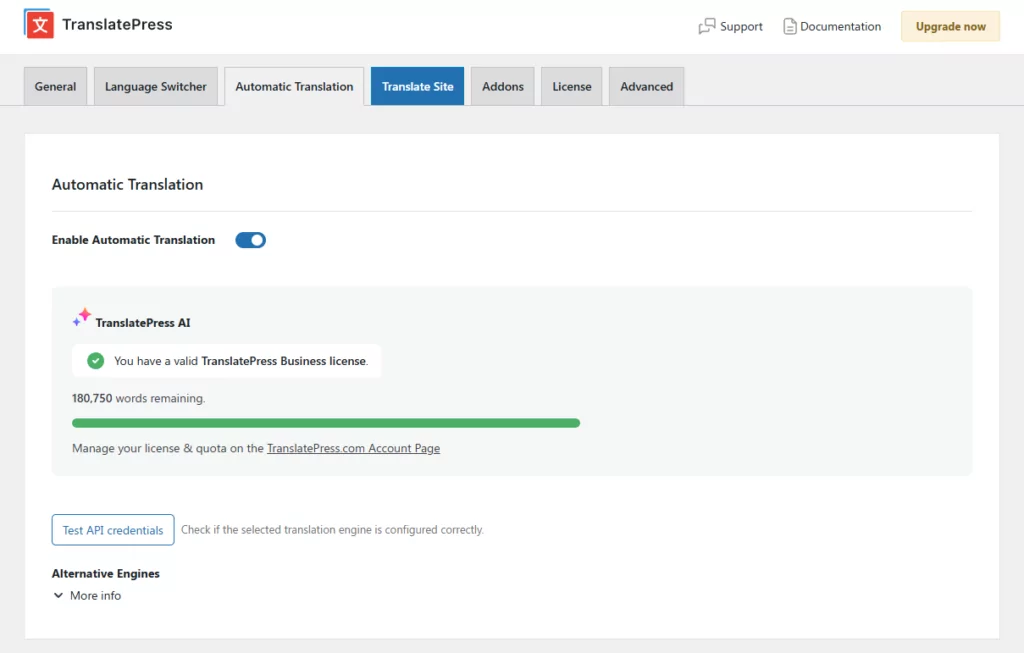
Si vous préférez utiliser une API externe, TranslatePress prend également en charge :
- Google Traduction — disponible sur tous les abonnements, y compris la version gratuite, en utilisant votre propre clé d'API Google Cloud. Voici comment en générer un.
- DeepL — disponible sur les abonnements Business et Developer, en utilisant votre propre clé API DeepL. Voici comment générer une clé API DeepL.
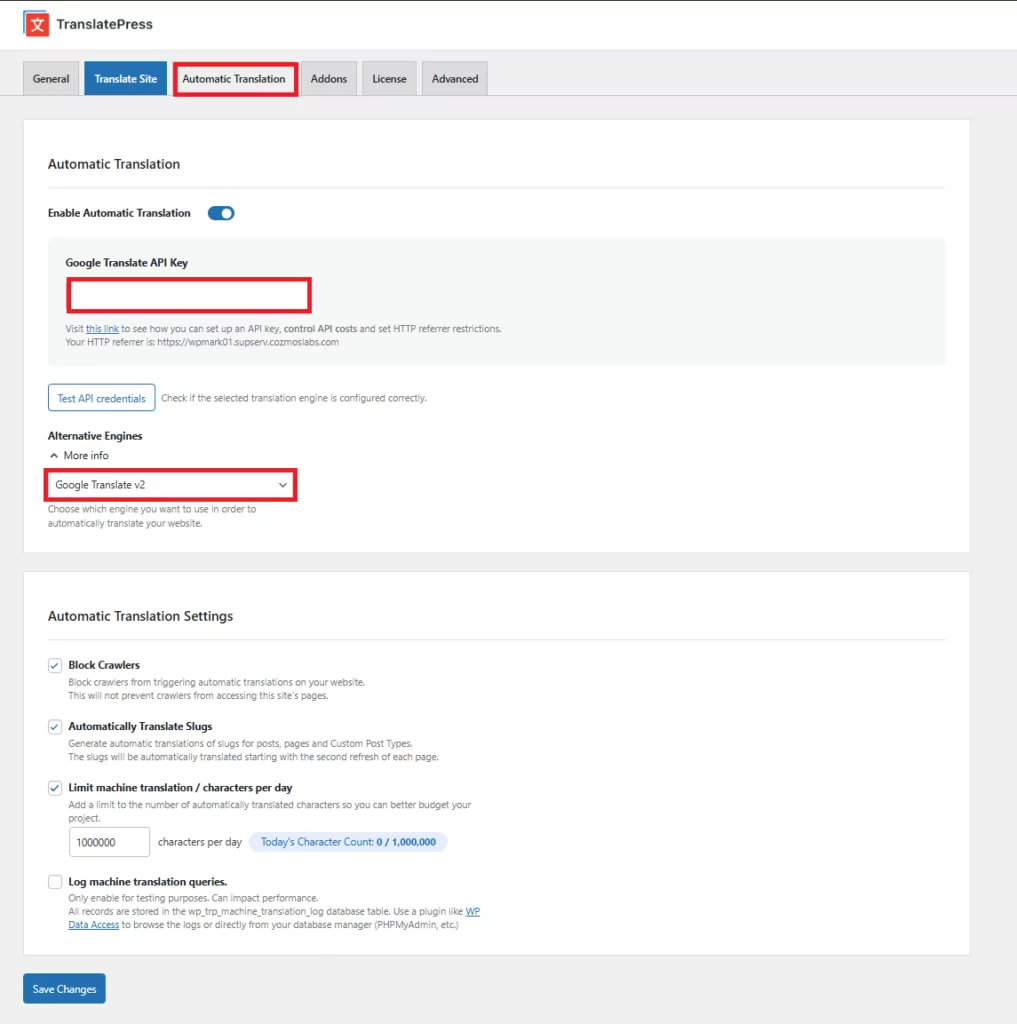
Quel que soit le moteur que vous choisissez, les traductions automatiques constituent un point de départ — vous pouvez examiner et affiner directement dans l'éditeur visuel tout ce qui semble anormal.
Pour en savoir plus sur la traduction automatique de votre site WordPress, lisez ce guide.
Localisation de WordPress pour les thèmes et plugins
Cette partie de notre guide de localisation WordPress est destinée aux développeurs travaillant sur leurs propres produits, thèmes et extensions WordPress.
Si vous êtes un utilisateur ensuite, la localisation de tous les plugins et thèmes que vous avez installés sur votre site se fait via les méthodes décrites ci-dessus.
Continuez à lire si vous êtes développeur :
Lorsque vous travaillez sur un thème ou un plugin WordPress, votre tâche consiste moins à préparer des versions linguistiques originales du produit, qu'à permettre à d'autres personnes de traduire votre création par elles-mêmes.
À peu près, c'est ce que internationalisation c'est ça, l'essentiel.
Heureusement, bien que cela puisse sembler intimidant, les tâches réelles que vous devez effectuer pour internationaliser votre thème ou votre plugin sont assez simples :
Définir l'en-tête du domaine de texte
Cette première étape consiste à faire savoir à WordPress que votre produit est prêt pour les traductions.
Pour les thèmes, cela se fait en incluant l'appel de fonction suivant dans le fonctions.php dossier du thème
load_theme_textdomain('YOUR_THEME', THEME_PATH.'/languages');
Utiliser les fonctions gettext
Il y a deux fonctions PHP disponibles dans WordPress qui facilitent grandement l'internationalisation de votre thème ou de votre extension.
Ce sont :
_e()__()
Ce sont ce que nous appelons des fonctions “ gettext ”.
Vous devez les utiliser chaque fois que vous souhaitez afficher une chaîne de texte à l'écran.
Alors, au lieu de faire cela :
<?php echo 'Welcome to Great Theme!'; ?>
Tu ferais cela :
<?php _e('Welcome to Great Theme!', 'YOUR_THEME'); ?>
Cette fonction recherche le fichier de traduction (plus de détails à ce sujet dans un instant), fait correspondre la chaîne que vous avez fournie en paramètre, puis affiche sa version traduite (pour la langue actuellement définie).
- La différence entre
_e()et__()fonctions est-ce que c'est la première affiche son résultat et le deuxième retours ça. - L'autre paramètre,
'VOTRE_THÈME', est le chemin du modèle de votre thème.
⚠️ Je tiens à le souligner à nouveau : vous devez utiliser ces fonctions “ gettext ” chaque fois que vous souhaitez afficher une chaîne de texte à l'utilisateur.
Les fonctions “ gettext ” ne servent pas uniquement à traduire le contenu d'un site web ; dans d'autres contextes, leur sortie peut également être interceptée par des plugins tels que TranslatePress. Par exemple, les utilisateurs de WooCommerce seront ravis d'apprendre qu'il est possible de modifier les textes par défaut tels que “Ajouter au panier” ou “Soldes” c'est facile à faire précisément parce que WooCommerce utilise des fonctions “ gettext ” pour les afficher.
Pour découvrir comment cela fonctionne, activez TranslatePress (version gratuite), puis cliquez sur Traduire la page lorsque vous consultez l'une de vos pages de produits. Lorsque vous passez le curseur de votre souris sur “Ajouter au panier” bouton, vous verrez un crayon vert icône. Cette icône indique que le texte peut être traduit et qu'il provient d'une fonction “ gettext ”. (Alternativement, crayon bleu Les icônes indiquent les textes créés par l'utilisateur – dans le cadre d'une publication, d'une page ou d'une description de produit.
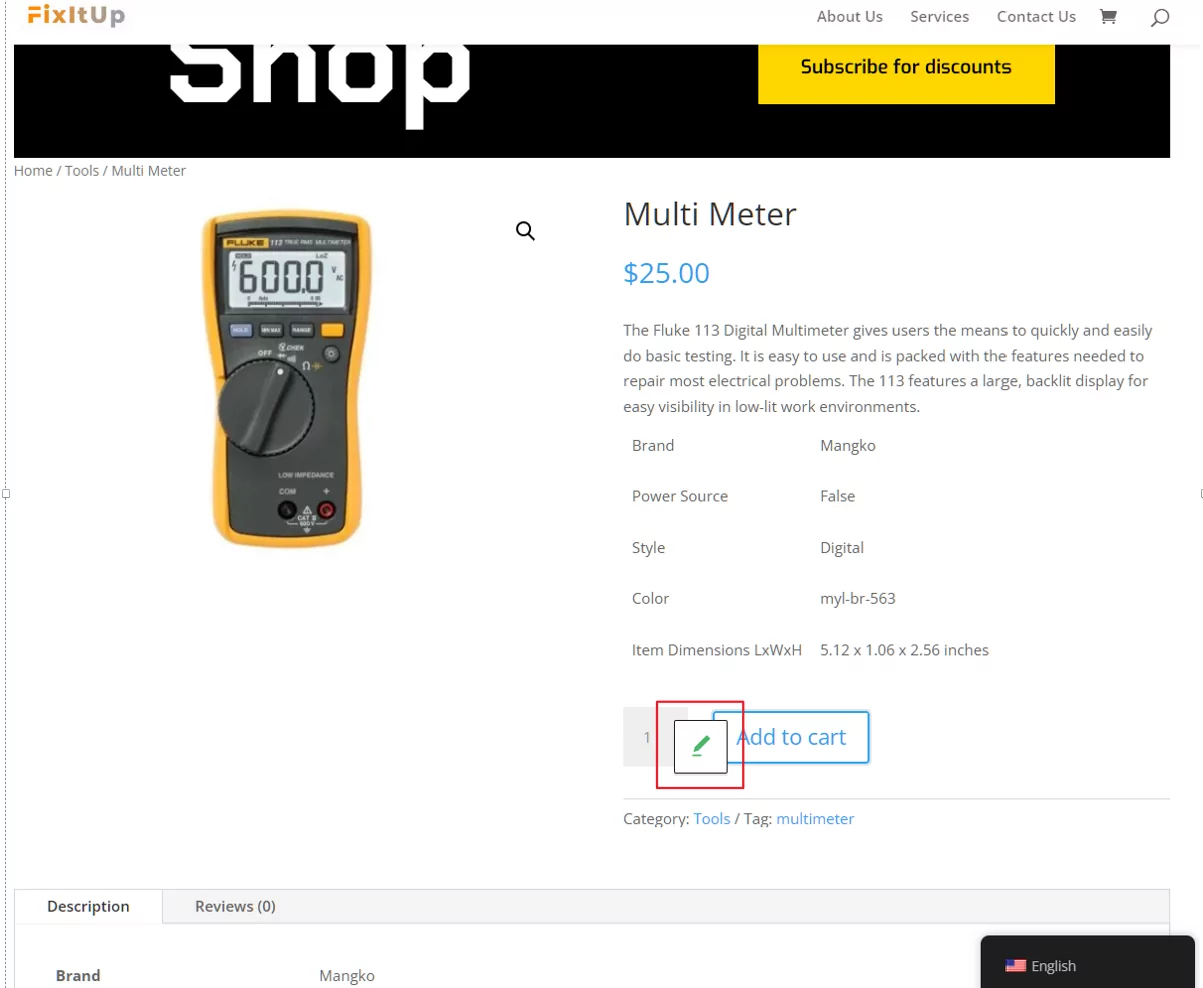
Lorsque vous cliquez sur l'icône de crayon, vous pourrez non seulement ajouter une nouvelle version linguistique du texte, mais aussi modifier la version de la langue principale — au cas où vous souhaiteriez opter pour “Acheter maintenant” au lieu de “Ajouter au panier.
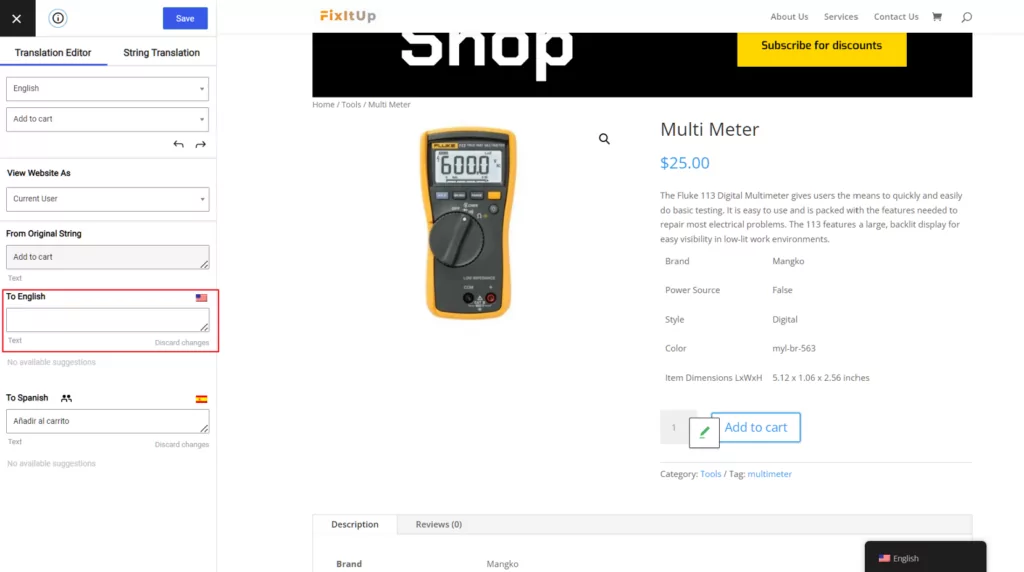
Un changement simple comme celui-ci ne serait pas possible sans les fonctions “ gettext ”.
Créer un fichier de traduction
La dernière étape pour rendre votre thème ou plugin prêt pour la traduction consiste à créer ce que l'on appelle un fichier POT. Un fichier POT est essentiellement un tableau. Il relie les chaînes de texte d'origine à leurs versions traduites.
Les fichiers POT peuvent être créés et modifiés à l'aide d'un outil tel que Poedit, par exemple. Il est open-source et possède des versions pour tous les principaux systèmes d'exploitation.
L'idée derrière un fichier POT est que toutes les chaînes que votre thème ou votre extension affiche à l'utilisateur via les fonctions “ gettext ” doivent être listées dans le fichier.
Nommez votre fichier POT d'après votre thème, enregistrez-le avec le .pot extension et placez-le dans le langues sous-répertoire du répertoire principal de votre thème / extension.
Une fois cela fait, votre thème est prêt pour les traductions !
Devriez-vous vous inquiéter des chaînes de texte dynamiques ?
Les chaînes dynamiques sont tout ce que votre thème stocke ailleurs que dans les tables de contenu principales de WordPress (wp_posts ou wp_postmetaou les fichiers POT.
Selon la complexité de votre thème et le degré de personnalisation qu'il offre, vous pourriez être contraint de stocker une partie des données textuelles du thème soit dans le wp_options tableaux ou même dans les propres tableaux du thème.
Encore une fois, il s'agit de chaînes de texte que vous souhaitez rendre personnalisables pour l'utilisateur. Un scénario typique où ce type de chaînes est utilisé se trouve sur les pages d'accueil personnalisées. De nombreux thèmes proposent des blocs de contenu originaux et des designs personnalisés sur leurs pages d'accueil. Le contenu brut présent sur ces pages est souvent difficile à stocker dans la base de données de manière standard.
Le problème avec les chaînes dynamiques est qu'elles posent souvent des difficultés du point de vue de la localisation de WordPress.
Selon le plugin de localisation que l'utilisateur possède, il peut ou non être en mesure de traduire ces chaînes.
TranslatePress, par exemple, intègre d'emblée les outils nécessaires. Il permet aux utilisateurs de manipuler les chaînes dynamiques de leur thème actuel comme s'il s'agissait de n'importe quel autre texte affiché sur la page.
De manière générale, chaque fois que vous pouvez éviter d'utiliser des chaînes dynamiques dans votre thème ou votre plugin, essayez de le faire.
En savoir plus sur la localisation de chaînes dynamiques dans WordPress.
Localisation WordPress : Conclusion
Naviguer dans la localisation de WordPress peut sembler être une tâche intimidante au début, mais ce n'est en fait pas si difficile une fois qu'on s'y met. C'est-à-dire, si vous avez des outils de qualité à votre disposition.
Comme vous l'avez vu, TranslatePress peut vous être d'une grande aide pour localiser rapidement votre site web et satisfaire vos publics internationaux.
Presque tout ce qui a été décrit ci-dessus peut être fait avec Version gratuite du plugin 100%.
Si vous souhaitez également augmenter vos chances d'améliorer le référencement de votre contenu multilingue sur Google, pensez à passer à l'une des formules TranslatePress Pro. L'extension SEO incluse dans l'offre répondra à tous vos besoins en matière de référencement multilingue. Vous aurez également accès à de nombreuses extensions performantes, telles que la traduction illimitée dans plusieurs langues, détection automatique de la langue de l'utilisateur, comptes de traducteurs et plus encore.
TranslatePress Multilingue
Et, bien sûr, si vous avez des questions sur la localisation de WordPress, n'hésitez pas à les poser dans les commentaires.
Si vous avez trouvé ce message utile, consultez notre Chaîne YouTube, où nous téléchargeons constamment des tutoriels vidéo courts et faciles à suivre. Vous pouvez également nous suivre sur Facebook et Twitter pour être le premier à savoir chaque fois que nous publions.
Karol, c'est un article fantastique qui met vraiment en valeur l'importance d'adapter la présence en ligne d'une entreprise à son marché cible, en tenant compte des sensibilités culturelles et de la langue. La façon dont vous avez structuré les choses rend non seulement la lecture facile, mais cela peut définitivement aider ceux qui débutent dans la localisation de WordPress tout en gardant le référencement (SEO) à l'esprit. Merci pour le partage !