
In diesem Beitrag
Wenn Sie eine mehrsprachige WordPress-Website erstellen möchten, ist es entscheidend, zu lernen, wie man den Inhalt von WordPress-Widgets übersetzt, um eine vollständig übersetzte Website zu erhalten. Das Übersetzen von Widget-Inhalten in WordPress ist nicht immer einfach, weshalb die Wahl des richtigen Übersetzungswerkzeugs wichtig ist.
Einige Übersetzungs-Plugins erfordern, dass Sie Widget-Felder für die Übersetzung registrieren, was entweder durch das Schreiben von Code oder über eine komplizierte Benutzeroberfläche bzw. ein komplett separates Plugin geschieht. Andere bieten schlichtweg keine Unterstützung für die Übersetzung von WordPress-Widgets. Es gibt jedoch einen einfacheren und schnelleren Weg. Einen, der keinen benutzerdefinierten Code erfordert und vollständig visuell ist (Sie übersetzen, was Sie sehen).
In diesem Tutorial konzentrieren wir uns darauf, wie man TranslatePress – ein WordPress-Übersetzungsplugin – um Widgets in WordPress zu übersetzen. Über die visuelle Front-End-Übersetzungsschnittstelle müssen Sie lediglich auf einen bestimmten Widget-Text klicken und können dessen Übersetzung in der Seitenleiste eingeben, wie hier:
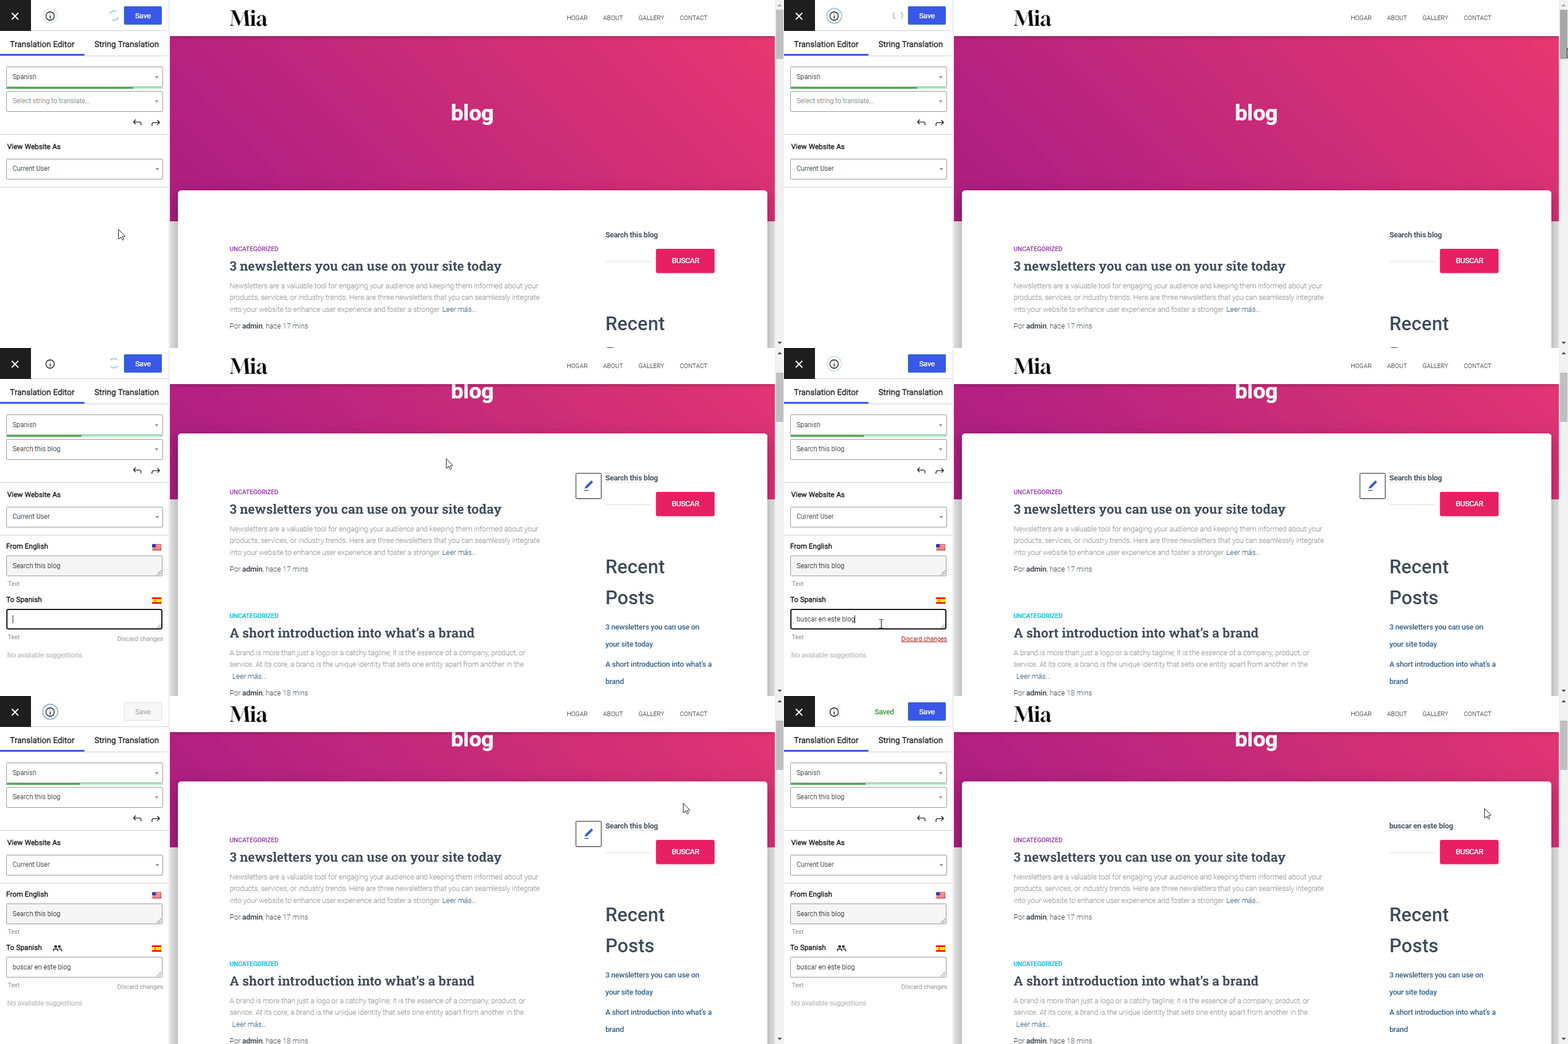
Sind Sie bereit zu erfahren, wie man das einrichtet? Hier erfahren Sie, wie Sie jedes beliebige WordPress-Widget mit TranslatePress übersetzen können.
Was sind WordPress-Widgets und warum sollte man sie überhaupt übersetzen?
WordPress-Widgets ermöglichen es Ihnen, Inhalte zur Seitenleiste oder zum Fußzeilenbereich Ihrer Website hinzuzufügen. Einige gängige Beispiele sind: das Hinzufügen eines Suchfelds zu Ihrer Website, das Auflisten von Produktkategorien für Ihren WooCommerce-Shop oder das Hinzufügen eines Dropdown-Menüs für Beitragsarchive zu Ihrem Blog. Da Plugins häufig ihre eigenen Widgets definieren, sind die verfügbaren Optionen unbegrenzt.
Das Hinzufügen von WordPress-Widgets zu Ihrer Website erfordert keine Programmiererfahrung oder Fachkenntnisse. Sie können hinzugefügt, entfernt und neu angeordnet werden mit Theme-Anpassung oder Aussehen → Widgets in der WordPress-Admin-Oberfläche.
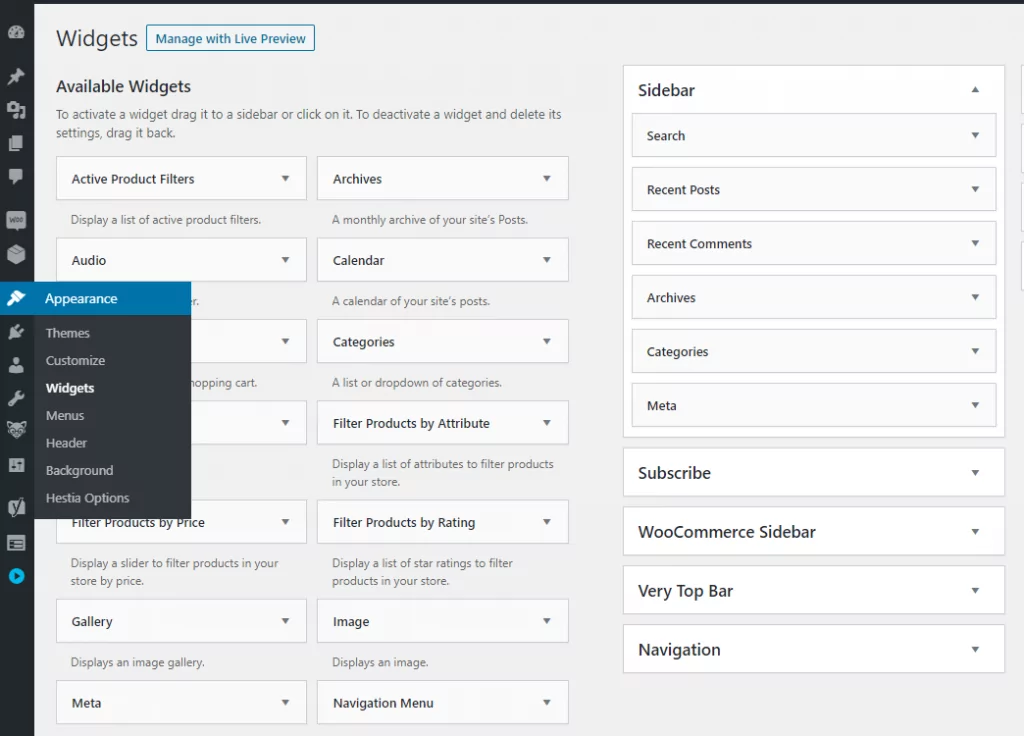
A Thema können Widget-Bereiche an beliebiger Stelle auf einer Seite platziert werden. Einige Themes ermöglichen es beispielsweise, Widgets neben den üblichen Sidebar-Standorten auch im Footer jeder Seite zu platzieren.
Für dieses Tutorial haben wir einen Blog mit einer Seitenleiste eingerichtet, in dem wir verschiedene Arten von Widgets hinzufügen werden: ein suchen Box, ein Text-/HTML-Widget, Neueste Beiträge, Archive und Kategorien. Dann werden wir sie alle mit TranslatePress übersetzen.
Bevor wir beginnen, hier ist ein kurzes Video-Tutorial, das erklärt, wie das geht:
Aber wenn Sie mehr ins Detail gehen und die Dinge in Ihrem eigenen Tempo angehen möchten, lesen Sie bitte weiter in diesem Artikel.
Widgets in WordPress mit TranslatePress übersetzen
Wenn Sie Ihre Website in mehreren Sprachen verfügbar machen möchten, benötigen Sie nur ein einziges Tool: TranslatePress.
TranslatePress Mehrsprachig
TranslatePress installieren und Sprachen auswählen
Sie können beginnen, indem Sie Folgendes installieren und aktivieren: Kostenloses TranslatePress-Plugin von WordPress.org.
Sobald Sie das Plugin aktiviert haben, navigieren Sie zu Einstellungen → TranslatePress und wählen Sie die Sprachen aus, in denen Ihre Website verfügbar sein soll.
Zuerst, wählen Sie Standardsprache, in der der Inhalt Ihrer Website derzeit verfasst ist. Fügen Sie dann neue Übersetzungssprachen hinzu, die Sie anbieten möchten.
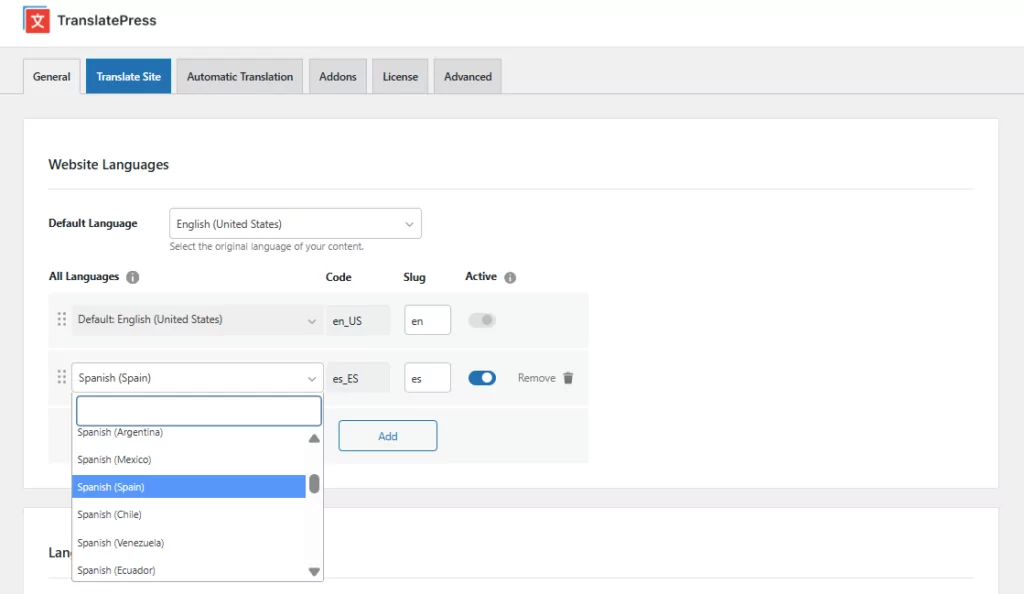
Mit der kostenlosen Version von TranslatePress können Sie Ihre Inhalte in eine neue Sprache übersetzen, während die Premium-Version bietet Unterstützung für das Hinzufügen unbegrenzter Sprachen.
In TranslatePress gibt es noch einige weitere Einstellungen, wie zum Beispiel das Hinzufügen und Anpassen eines Frontend-Sprachumschalter, aber für den Moment klicken wir einfach Änderungen speichern und fahren Sie fort, den Widget-Inhalt zu übersetzen.
Erstellen mehrsprachiger Widgets in WordPress
Wir sind jetzt bereit, mit der Übersetzung unserer zuvor hinzugefügten Widgets zu beginnen. Navigieren Sie dazu einfach zu der Seite (in unserem Fall dem Blog), auf der die Widgets angezeigt werden, und klicken Sie in der Admin-Leiste oben auf Seite übersetzen.
Und jetzt geht es erst richtig los. Dadurch wird die visuelle Benutzeroberfläche von TranslatePress geöffnet, in der Sie eine Live-Vorschau Ihrer Website sehen sollten – ähnlich wie im nativen WordPress-Customizer – sowie eine Übersetzungs-Seitenleiste auf der linken Seite.
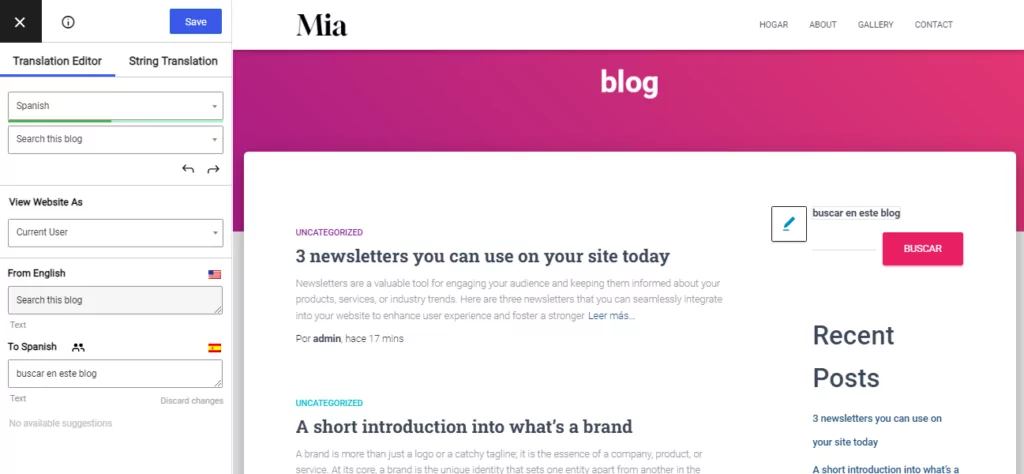
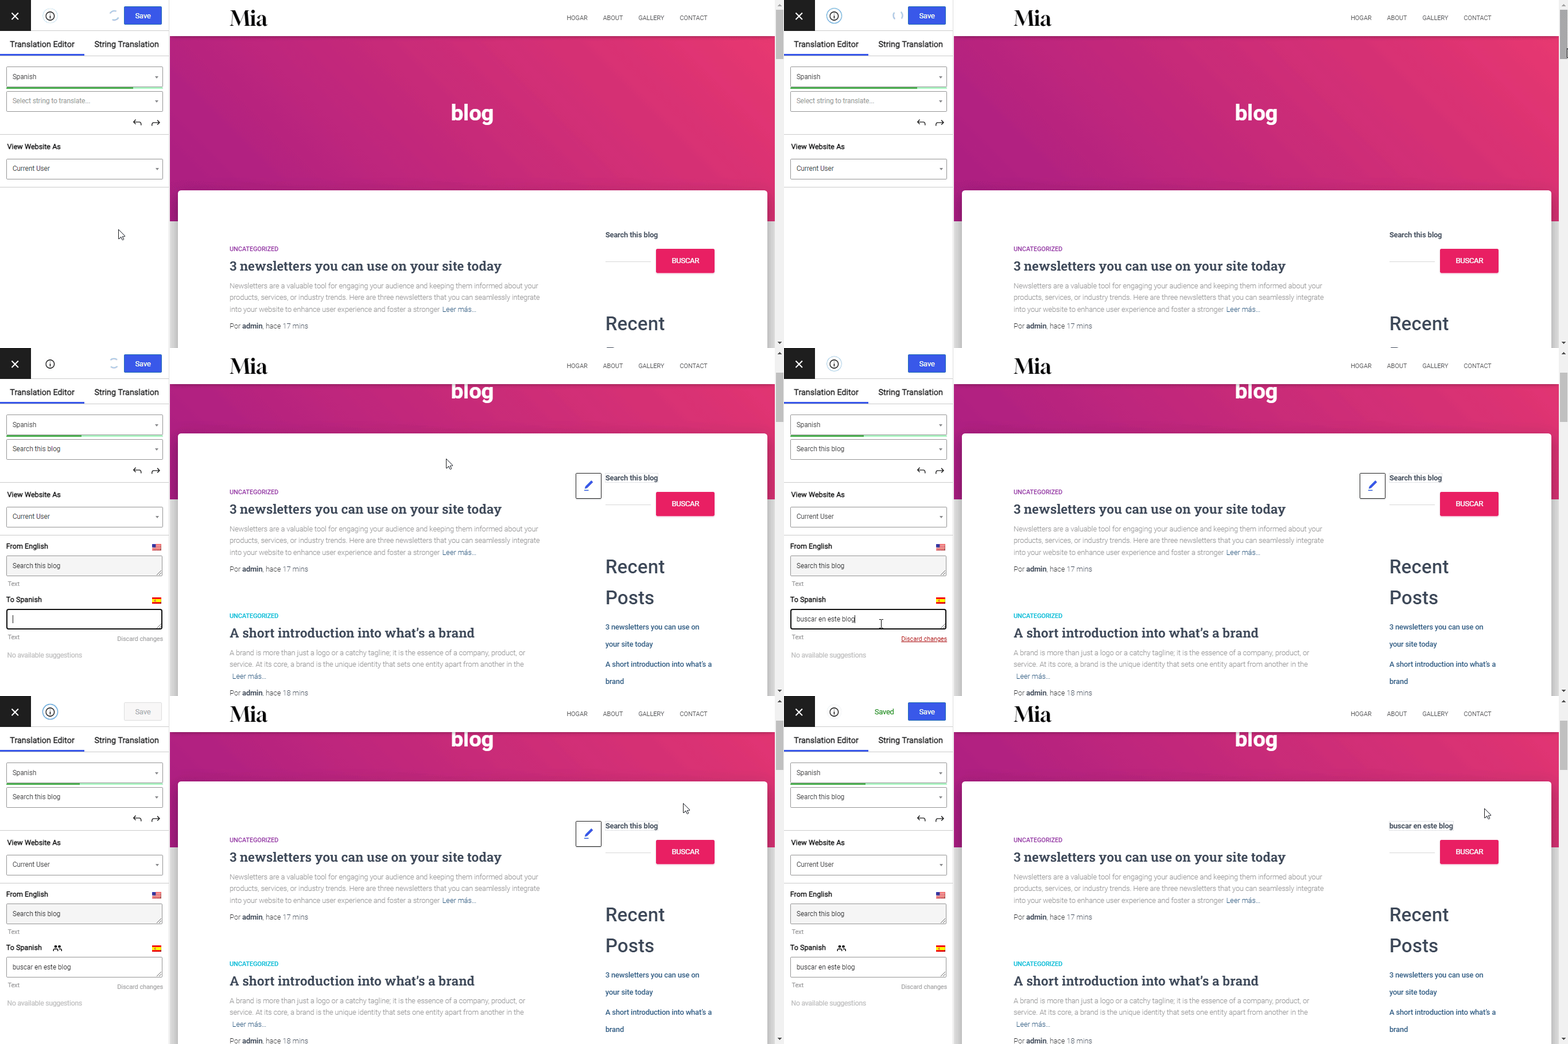
Um ein Widget zu übersetzen, müssen Sie nur mit dem Mauszeiger über den Text fahren, auf das blaue Stiftsymbol klicken und Ihre gewünschte Übersetzung eingeben. Hier erfahren Sie, wie Sie das Suchfeld ins Spanische übersetzen:
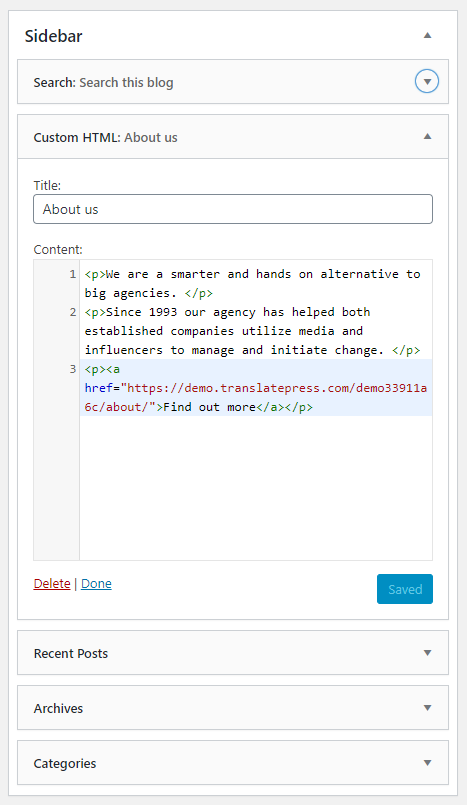
Derselbe Ansatz funktioniert für das HTML-Widget “Über uns”
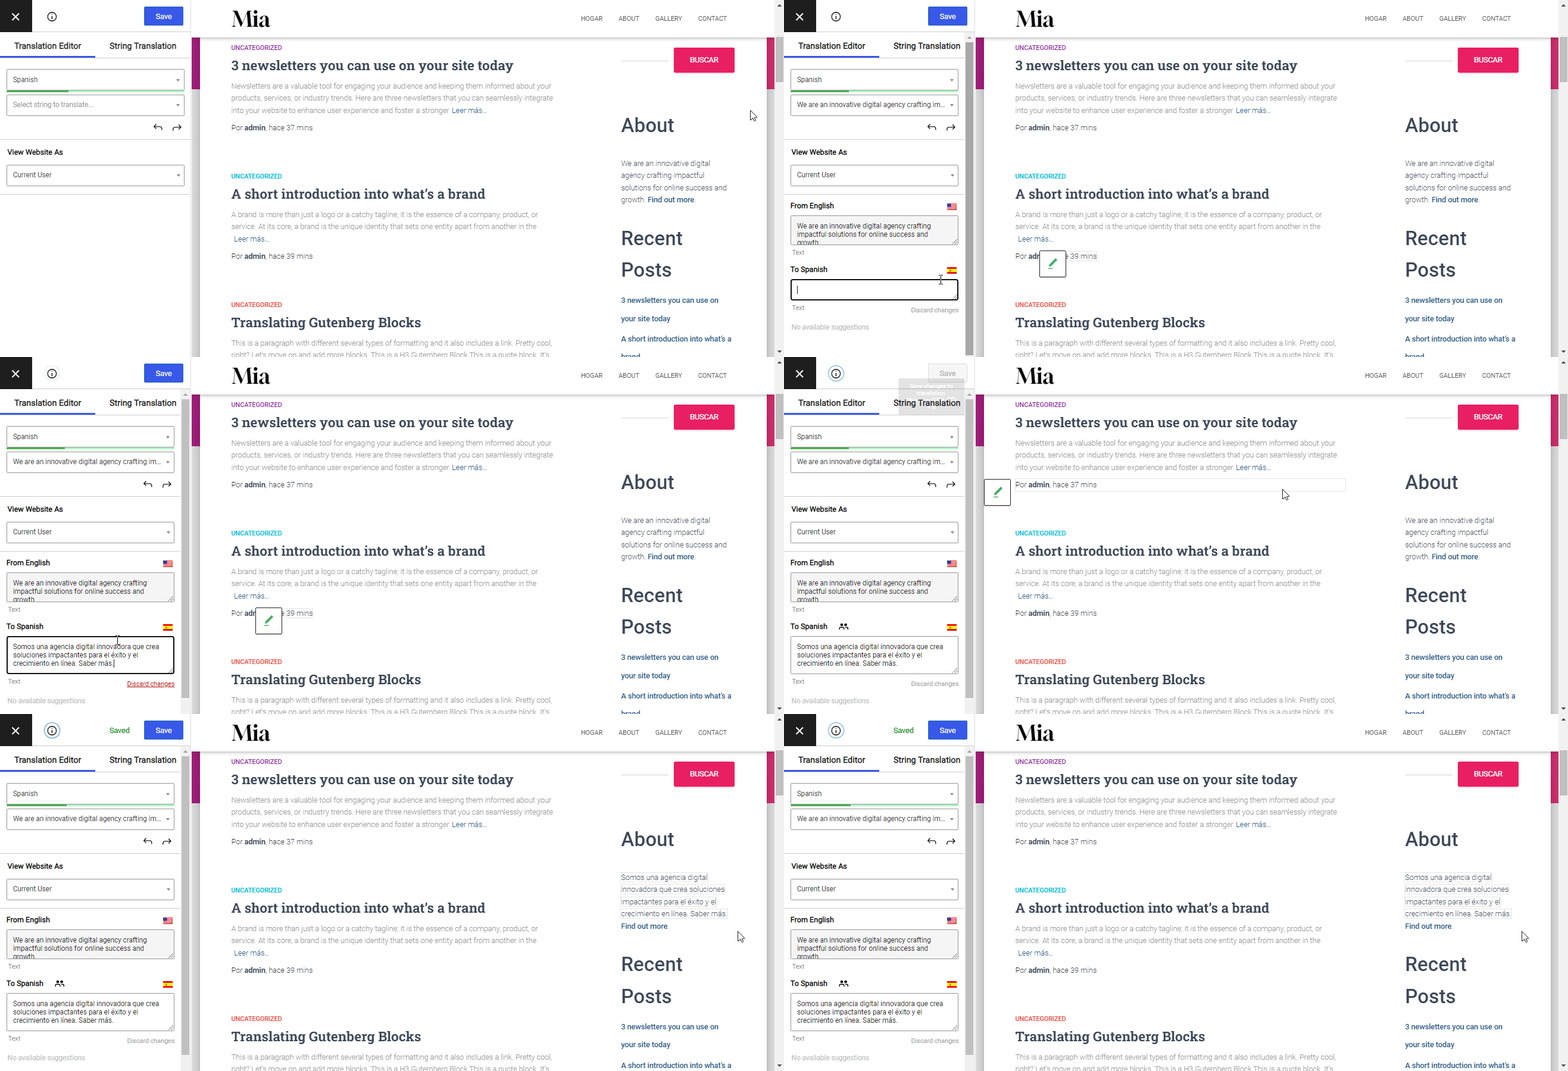
…und das gilt für jedes andere Widget, unabhängig vom Typ oder davon, ob es von einem Plugin, einem Theme oder WordPress selbst hinzugefügt wurde.
Sie klicken einfach, um einen bestimmten Text auszuwählen, geben seine Übersetzung ein, speichern und gehen zum nächsten über. Das ist schon alles.
Mit demselben Ansatz lassen sich alle Arten von Inhalten auf Ihrer Website übersetzen. Neben Standardinhalten macht es TranslatePress besonders einfach, auch komplexere Elemente wie Pops, Bilder mit Text, Regler, oder Formulare.
Eine Schritt-für-Schritt-Anleitung zur Übersetzung aller Inhalte Ihrer Website finden Sie unter Wie man eine mehrsprachige WordPress-Website erstellt.
Widgets in WordPress automatisch übersetzen
Neben der manuellen Übersetzung unterstützt TranslatePress auch automatische Übersetzung – was bedeutet, dass Sie Ihre Widget-Inhalte sofort übersetzen lassen können, ohne sich einzeln durch jede Zeichenkette klicken zu müssen.
Der schnellste Weg, dies zum Laufen zu bringen, ist TranslatePress AI, der integrierten Übersetzungsmaschine des Plugins. Es muss nichts Externes konfiguriert werden: kein Drittanbieter-Konto, kein API-Schlüssel, kein separater Dienst, für den man sich anmelden muss. Jeder Tarif — einschließlich der kostenlosen Version — beinhaltet von Anfang an eine bestimmte Anzahl an KI-Wörtern, sodass Sie ihn aktivieren und sofort mit der Übersetzung beginnen können.
Um ihn einzuschalten, gehen Sie zu Einstellungen → TranslatePress, öffne die Automatische Übersetzung Registerkarte, automatische Übersetzung aktivieren und auswählen TranslatePress AI als Ihre Engine. Wenn Sie keine Pro-Lizenz besitzen, müssen Sie hier eine kostenlos Bevor du fortfährst.
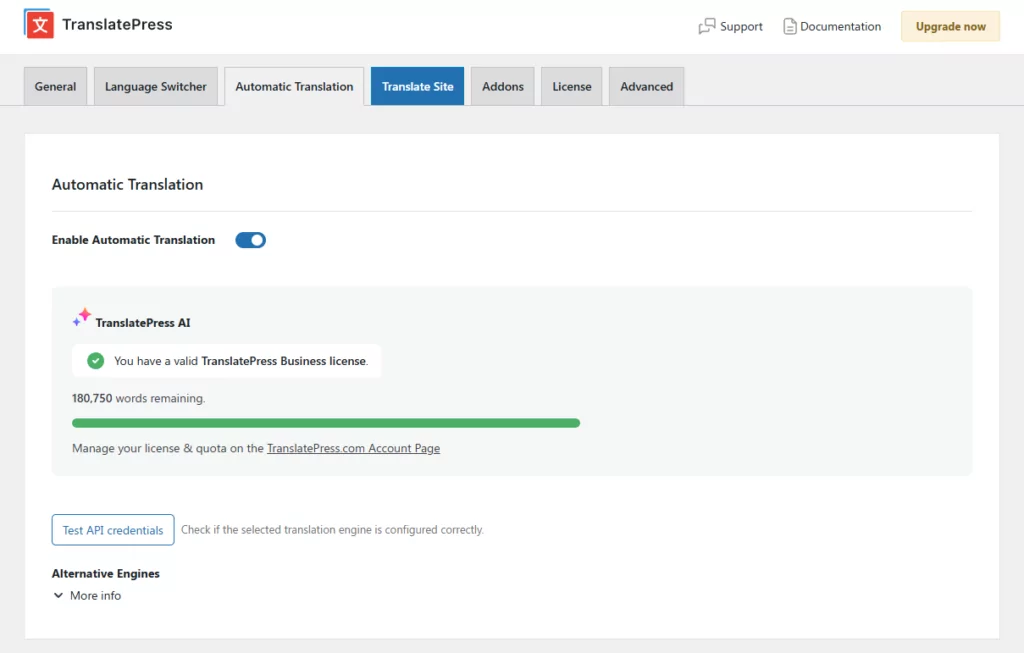
Treffer Änderungen speichern Und TranslatePress übersetzt automatisch die Inhalte Ihrer Website – einschließlich der Widgets.
So sieht unser Blog-Seiteninhalt – einschließlich aller Sidebar-Widgets – nach der Aktivierung der automatischen Übersetzung aus:
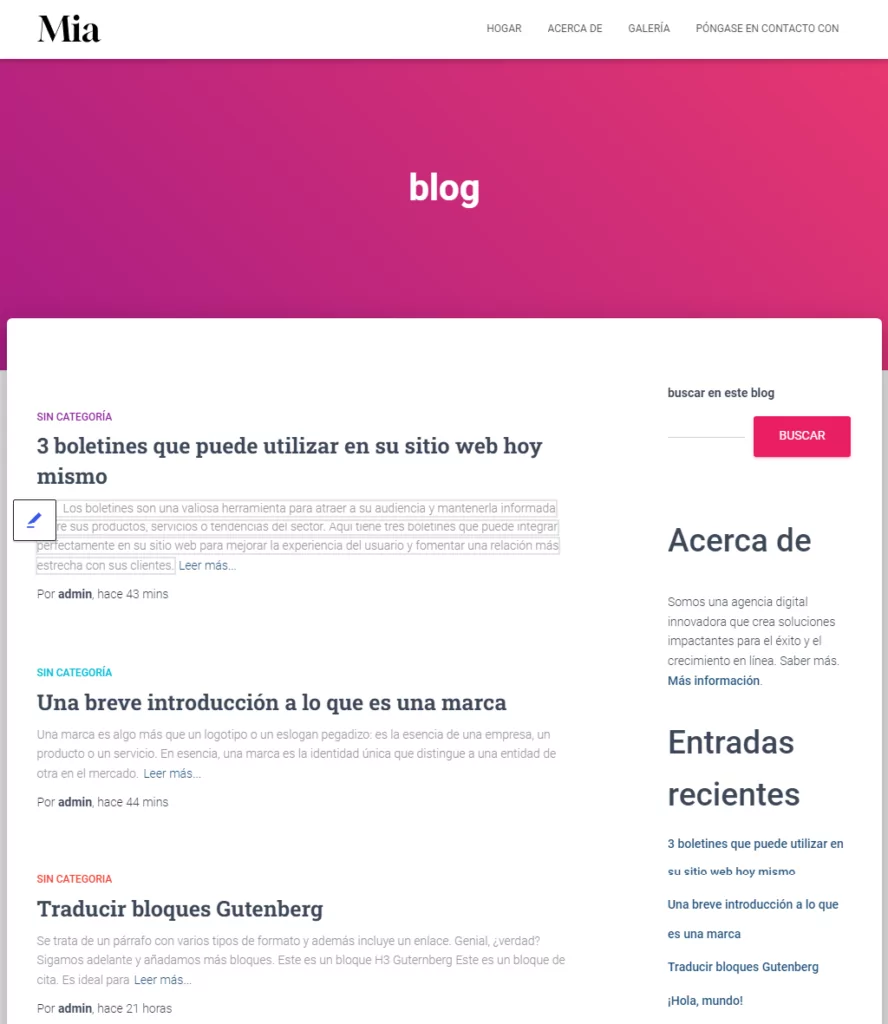
TranslatePress speichert alle Übersetzungen lokal in Ihrer Datenbank, sodass Sie die Kosten für deren Erstellung nur einmal tragen – und nicht bei jedem Seitenaufruf. Das sorgt zudem für eine schnelle Ladezeit für Ihre Besucher.
Falls Sie stattdessen lieber eine externe API nutzen möchten, lässt sich TranslatePress auch mit folgenden APIs verbinden:
- Google Übersetzer — verfügbar in allen Tarifen, einschließlich der kostenlosen Version. Erfordert einen Google Cloud Translate API-Schlüssel. Siehe unser Leitfaden zum Generieren eines Google API-Schlüssels.
- DeepL — verfügbar in den Tarifen Business und Developer. Erfordert ein DeepL API-Schlüssel.
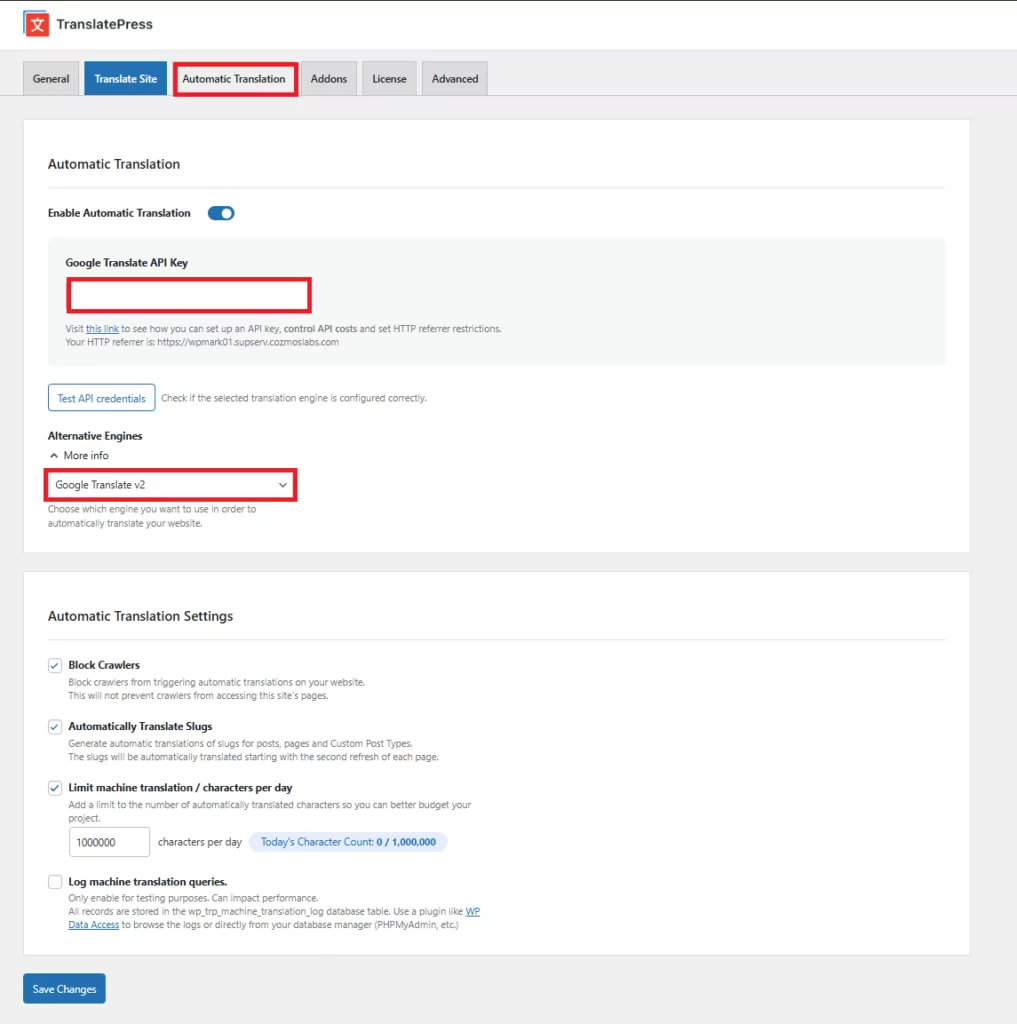
Unabhängig davon, welche Engine Sie verwenden, können Sie jede automatisch generierte Übersetzung im visuellen Editor jederzeit manuell nachbearbeiten.
So zeigen Sie verschiedene Widgets basierend auf der Sprache an
Es gibt Situationen, in denen Sie je nach Sprache unterschiedliche Widgets anzeigen möchten. Nicht einfach nur den Widget-Inhalt übersetzen, sondern ein ganz anderes Widget anzeigen und dieses übersetzen.
Das können Sie ganz einfach mit der kostenlosen Widget-Logik Plugin zusätzlich zu TranslatePress.
Installieren und aktivieren Sie einfach Widget Logic, navigieren Sie dann im WordPress-Adminbereich zum Widget-Bereich unter Aussehen → Widgets. Sie werden bemerken Widget-Logik Feld unter jedem Widget hinzugefügt.
Nehmen wir an, wir möchten das Suchfeld nur für Englisch anzeigen und es im spanischen Blog ausblenden.
Dazu fügen wir unter dem Widget-Logik-Feld Folgendes hinzu: (get_locale() == 'en_US')
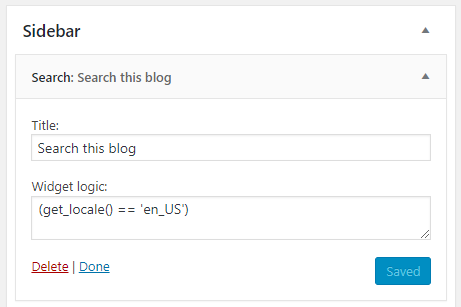
Dadurch wird das Widget nur angezeigt, wenn diese Bedingung erfüllt ist. In unserem Fall, wenn die Sprache, in der Sie surfen, auf Englisch (USA) eingestellt ist. → ‘en_US’.
Beachten Sie, wie das Suchfeld jetzt aus der spanischen Version der Website verschwunden ist:
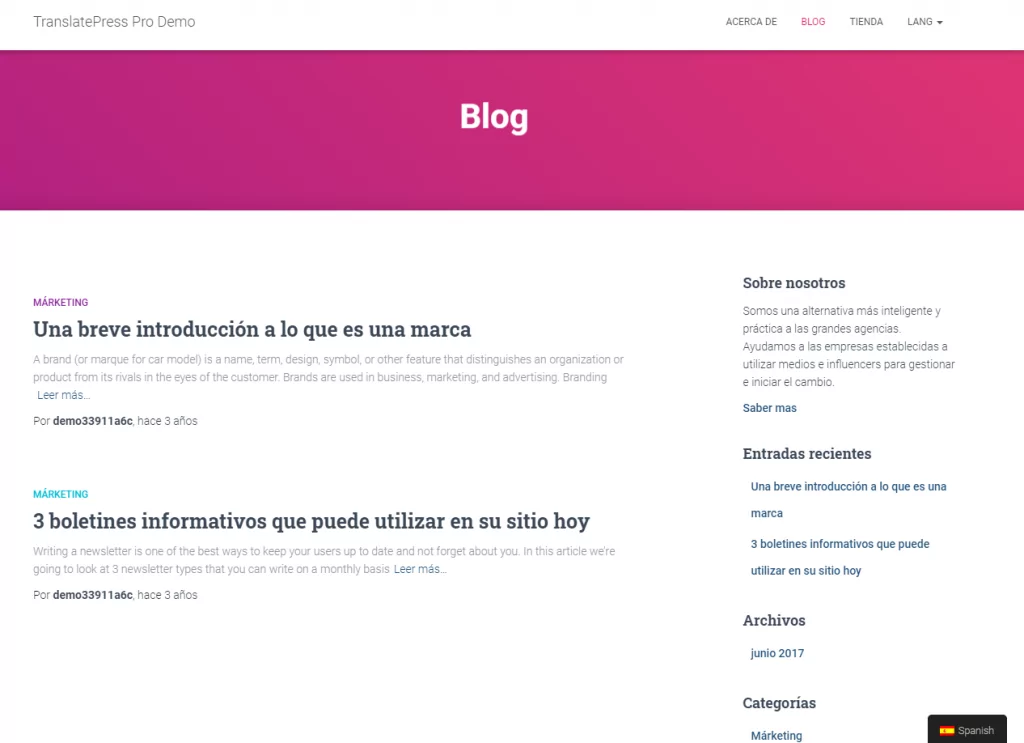
Für zusätzliche Flexibilität können Sie jede Variante der oben aufgeführten Logik verwenden, einschließlich ihrer Negierung:!(get_locale() == 'en_US'). Dadurch wird das Suchfeld auf allen anderen Sprachversionen mit Ausnahme von Englisch angezeigt.
WordPress-Sprachumschalter-Widget
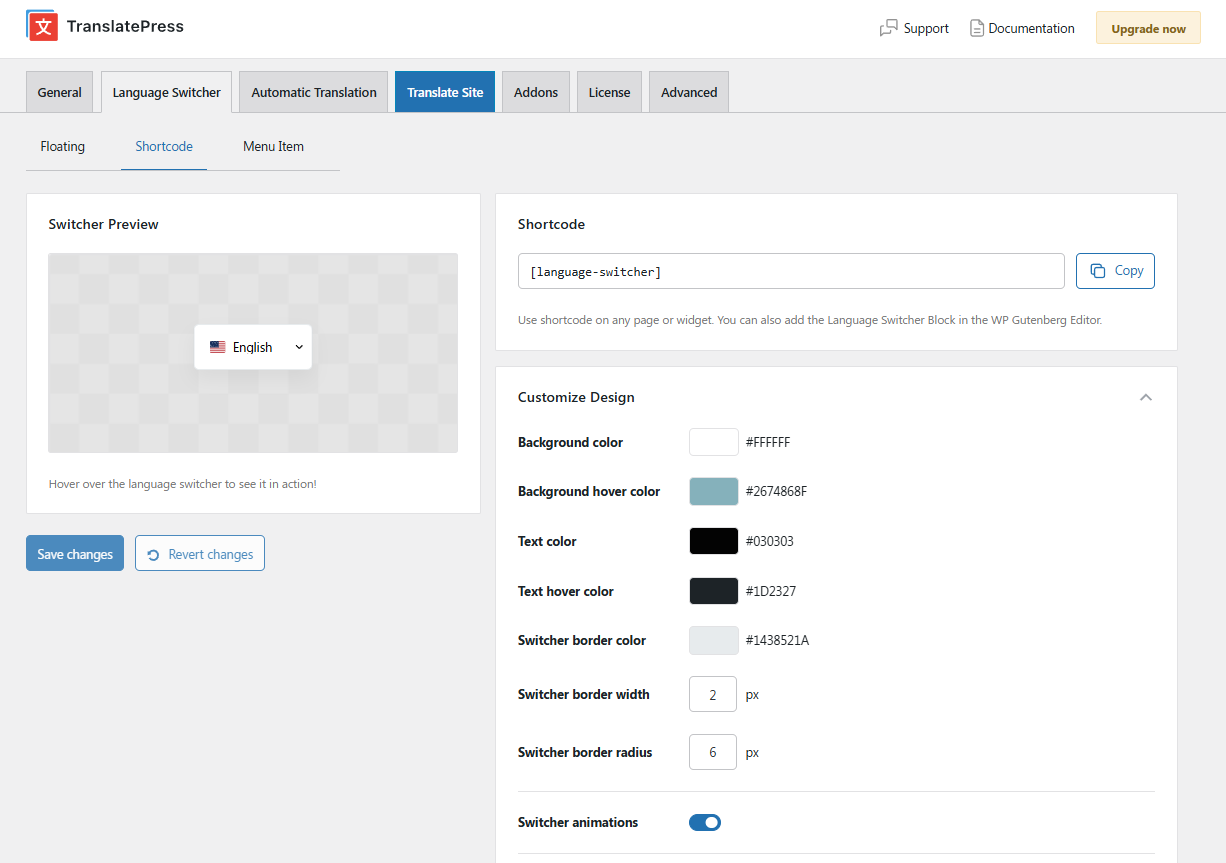
TranslatePress bietet Ihnen verschiedene Möglichkeiten, ein WordPress Sprachumschalter zu Ihrer Website. Sie finden alle Optionen unter dem dedizierten Sprachwechsler Registerkarte in der oberen Navigationsleiste Ihrer TranslatePress-Einstellungen.
Es stehen drei Schaltertypen zur Auswahl:
- Schweben — ein dauerhaft eingebauter Umschalter, der in einer Ecke jeder Seite fixiert ist, sodass Besucher ihn immer finden können, egal wo sie sich auf Ihrer Website befinden.
- Kurzcode — Platzieren Sie den Umschalter beliebig mit
- Menüpunkt — ge zu Darstellung → Menüs um Sprachoptionen direkt zu jedem Navigationsmenü hinzuzufügen. Der Umschalter übernimmt automatisch das vorhandene Menü-Styling Ihres Themes.
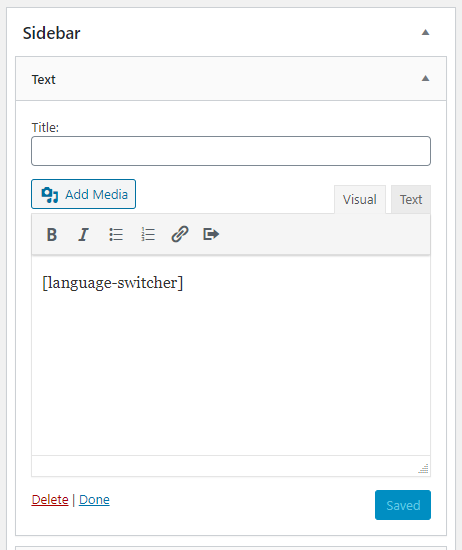
Um ein Sprachumschalter-Widget zu erstellen, ist der Shortcode-Ansatz genau das Richtige. Setzen Sie
Um das Aussehen des Shortcode-Switchers anzupassen – Farben, Flaggenform, Format des Sprachnamens, ob er sich bei Klick oder Hover öffnet –, gehen Sie zu Sprachwechsler Registerkarte in Ihren TranslatePress-Einstellungen und öffnen Sie die Kurzcode Unterregisterkarte. Eine Live-Vorschau wird aktualisiert, während Sie Änderungen vornehmen.
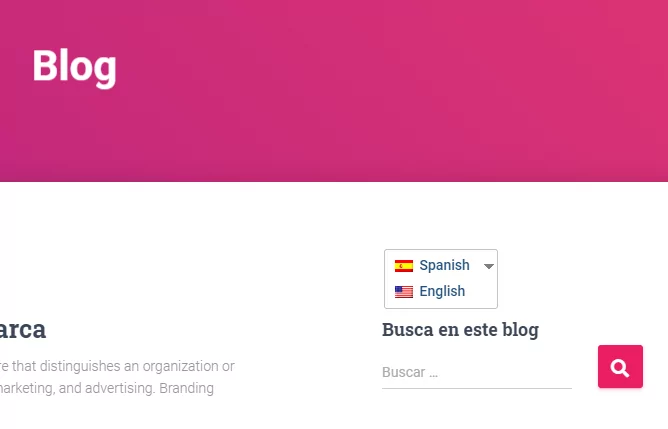
Im Frontend wird das Sprachumschalter-Widget als Dropdown-Menü dargestellt, mit dem Besucher die Sprache mit einem einzigen Klick wechseln können:
WordPress-Widgets heute!
Mit TranslatePress lassen sich WordPress-Widgets ganz einfach direkt im Frontend über eine äußerst intuitive visuelle Benutzeroberfläche übersetzen. Der gleiche Ansatz lässt sich auch auf die Übersetzung aller Inhalte Ihrer Website anwenden, um diese in mehrere Sprachen.
TranslatePress Mehrsprachig
Um zu beginnen, können Sie die Kostenlose Version von TranslatePress. Dann, Upgrade auf einen Premium-Tarif für unbegrenzte Übersetzungssprachen, verbessertes mehrsprachiges SEO, automatische Übersetzung über DeepL, automatische Erkennung der Benutzersprache und mehr.
Haben Sie noch Fragen zur Übersetzung von Widgets in WordPress? Lassen Sie es uns in den Kommentaren unten wissen!
Wenn Sie diesen Beitrag hilfreich fanden, schauen Sie sich bitte unsere an YouTube-Kanal, wo wir ständig kurze und leicht verständliche Video-Tutorials hochladen. Sie können uns auch folgen auf Facebook und X um der Erste zu sein, der jedes Mal Bescheid weiß, wenn wir etwas posten.