In this post
In this post
Want to learn how to translate a website online? Or maybe you’re struggling to translate your own website without resorting to clunky PO editors, code, or other complicated setups.
That’s what this post is about. We’ll start by sharing how you can easily translate any website using Google Translate… but also why that approach doesn’t work very well if you want to translate your own website for your visitors.
We’ll show you how to translate a website online using WordPress and the free TranslatePress plugin. By the end, you’ll be able to translate a website right from your WordPress dashboard using a simple visual editor like this:

Translating your website can help you create a better experience for your visitors, improve your marketing, and just generally create a more successful and user-friendly website.
However, you want to make sure that you’re translating the website properly and effectively, without wasting time on the technical details.
Sound good? Let’s get started!
How to Translate a Website Online With Google Translate
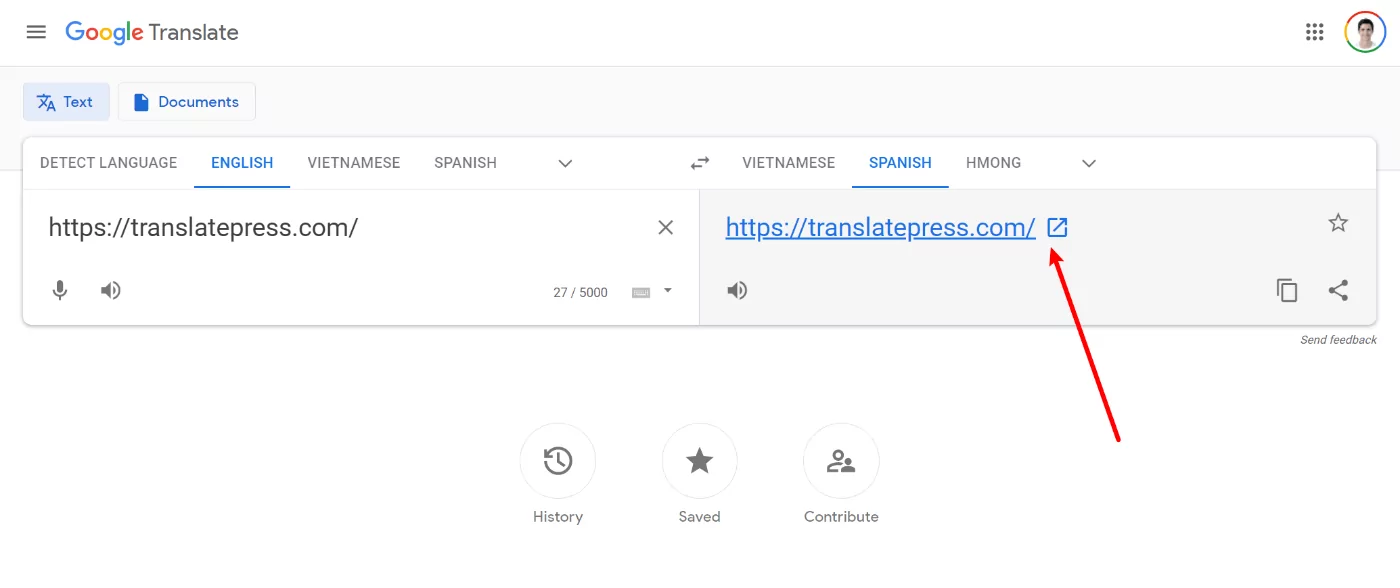
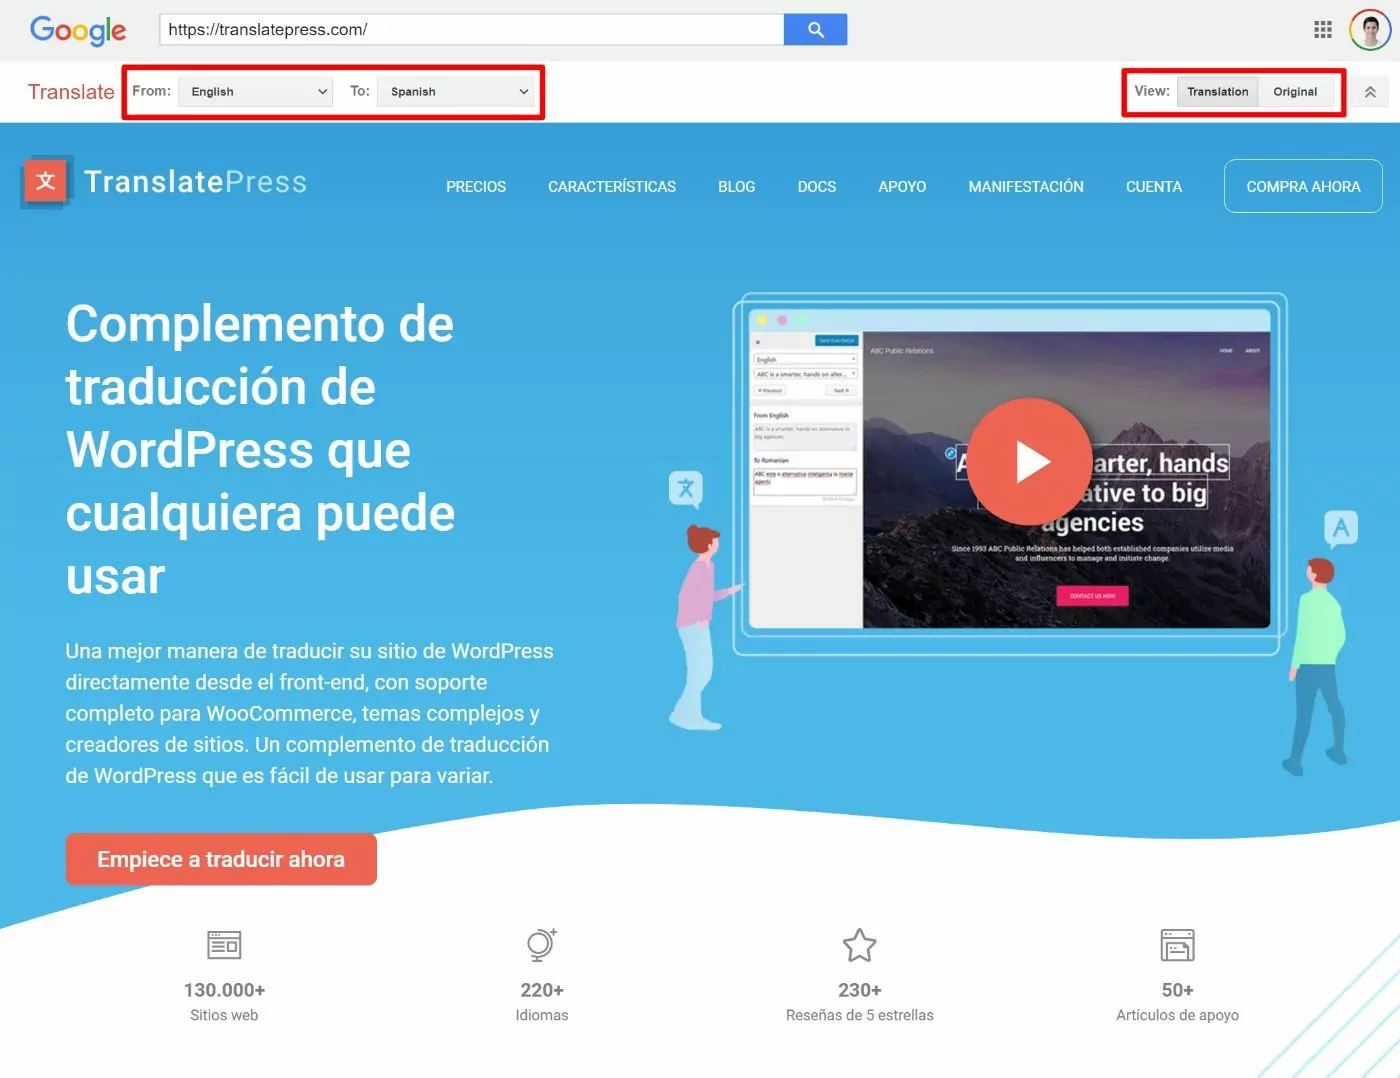
If you’re looking for an easy solution to translate someone else’s website online, you can use Google Translate:
- Go to the Google Translate website;
- Choose the language that the website you want to translate currently exists in;
- Select the destination language into which you want to translate the website’s content;
- Paste in the URL of the website on the left side;
- Click the URL of the website on the right-hand side to open the translation.
That will open up a new window that shows you the website, but translated into the destination language that you selected. If needed, you can use the options at the top to choose different languages. You can also quickly toggle back-and-forth between the original website and the translated version:
And with this simple approach, you can translate any website online. However, this approach isn’t great if you’re looking to create your own multilingual website…
Why Google Translate Isn’t a Good Option for Translating Your Own Website
The above Google Translate method works if you visited someone else’s site and it doesn’t offer your preferred language. However, it’s really not a good solution if you want to translate your own website. There are a few reasons for this…
First, using Google Translate like this relies on dynamically translating a website – it doesn’t create a static translated version of your content. This means that search engines like Google won’t be able to index and rank your translated content, nor will your human visitors be able to share your translated content on social media.
Basically, you miss out on almost all of the marketing benefits of creating a multilingual website because there’s no permanent version of your translated content.
Second, because Google Translate doesn’t statically store your translations anywhere, you won’t be able to manually make any edits or refinements to the translations that Google Translate generates.
While Google has gotten a lot more accurate, especially for popular languages, it’s still not perfect. There are definitely going to be situations where you want to make some manual edits for clarity or tone, but you won’t be able to do that if you just use Google Translate by itself.
Finally, you’ll make it harder for visitors to choose their preferred language, because you won’t be able to do things like redirect visitors to their local language based on their location.
TranslatePress Fixes Those Problems for WordPress Sites
In the tutorial, we’ll show you how TranslatePress can fix all of those issues and help you translate a WordPress website from a simple visual editor – all online.
TranslatePress still gives you the option to use Google Translate to generate your translations, but the key difference is that it then store’s those translations in your WordPress site which means that:
- You can create static content that’s indexable by search engines and shareable on social media;
- You can fully edit every single word in your translations (or you can even skip Google Translate and just add all of your translations from scratch).
In the next section, we’ll go over some general best practices for translating a website. Then, we’ll show you step-by-step how to use TranslatePress to translate a WordPress website.
Three Tips and Best Practices for Translating a Website
Now that you know that just offering a Google Translate button isn’t enough to translate a website online, let’s go over some of the most important best practices for creating a multilingual site. Then, in the next section, you’ll learn how to implement these best practices on WordPress by following a detailed step-by-step tutorial.
1. Choose the Languages That Your Visitors Prefer
As you’d expect, most people want to browse the web in their preferred language and some people just flat out won’t browse the web in languages other than their own. For example, in a Gallup survey from the EU, 90% of respondents said they prefer to browse in their native languages and 47% said they won’t browse a website if it’s not available in their native language.
Moral of the story – you want to make sure to offer your website in the languages that your visitors prefer so that they don’t have to resort to suboptimal workarounds like the Google Translate method we showed you above.
However, that brings up a question – which languages do your visitors prefer?
You might already have a good idea based on the areas that your website targets – that’s a great place to start. However, if you’re using Google Analytics or a similar web analytics tool, you can turn to the data instead of guessing.
In the Google Analytics interface, go to Audience → Geo → Language to see the web browser language that your visitors use. Because most visitors set their web browser language to their native/preferred language, this is a pretty good proxy to understand which languages your visitors prefer:
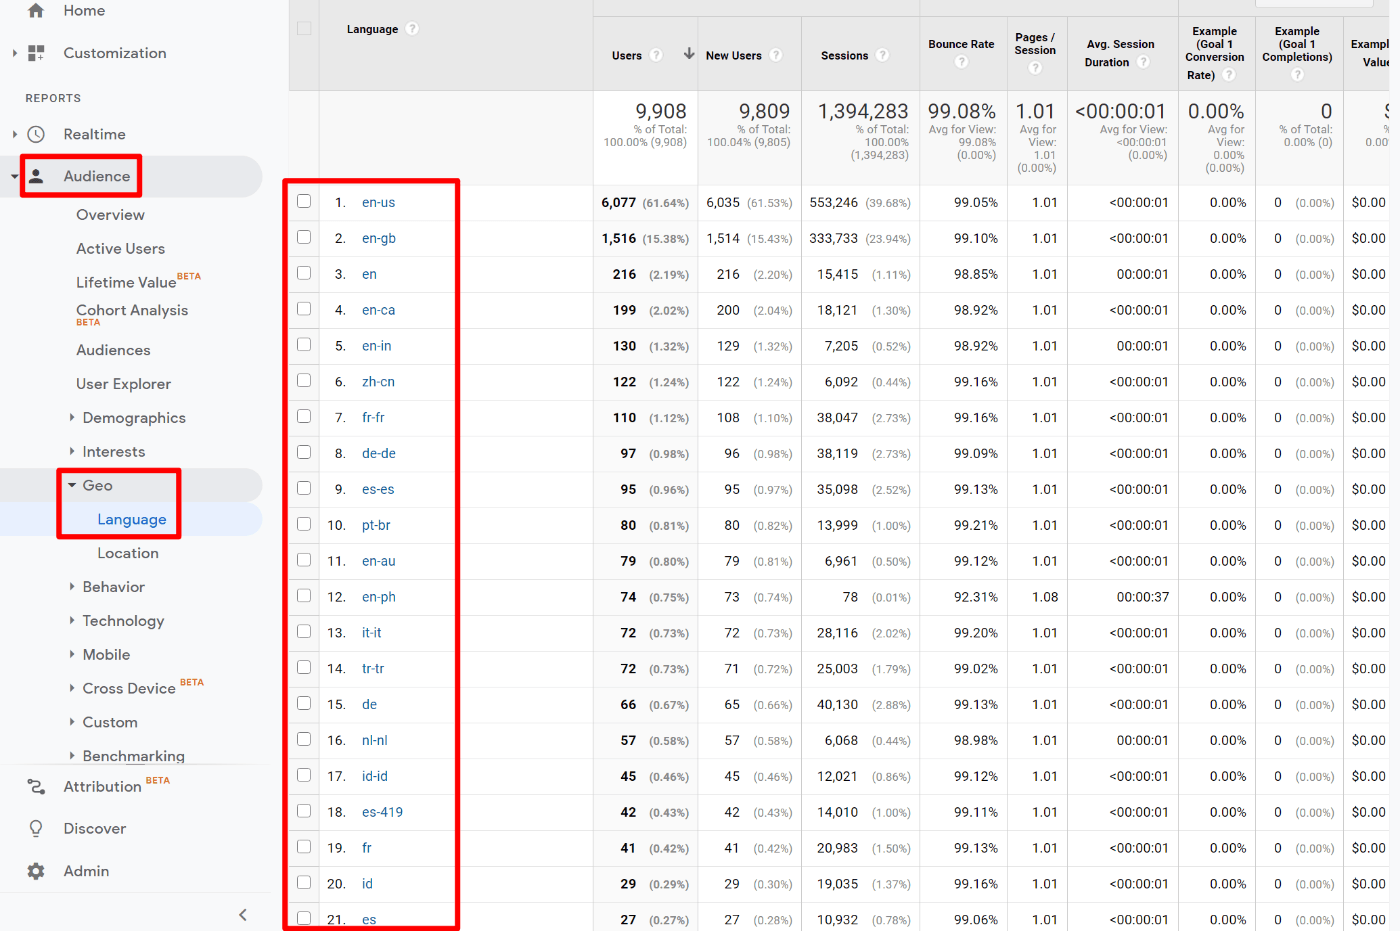
If you see a decent percentage of visitors for a language, that’s a good sign that you should consider translating your website’s content into that language.
2. Decide How to Translate Your Content (Automatic vs Machine Translation)
Once you choose the languages into which you want to translate your website’s content, your next decision is how to go about translating your content.
There are two general approaches:
- Manual translation – you can manually enter your translations from scratch. You could do it by yourself (if you’re multilingual) or by hiring a freelance translator or professional translation service.
- Automatic machine translation – you can use a service such as the Google Translate API or DeepL to automatically generate all of your site’s translations.
Both approaches have pros and cons:
- Manual translation is accurate in both context and tone, but it takes more time and/or money.
- Automatic translation is fast and affordable (maybe even free), but it’s not 100% accurate when it comes to context and tone.
Because both approaches have advantages and disadvantages, we think that a hybrid approach is the best option for most people, which essentially gets you the best of both worlds.
With a hybrid approach, you can use automatic translation to generate the baseline translations for your site, while still having the ability to go back and manually edit and refine those automatic translations as needed.
TranslatePress, the online translation tool that we’ll show you how to use in the tutorial, lets you use all three approaches. That is, you can use:
- 100% manual translation;
- 100% automatic machine translation;
- A hybrid approach with both automatic and manual translation.
3. Use an Optimized Multilingual URL Structure
In order to make it so that Google can index your translated content and your visitors can share it, you need to give each piece of content its own static URL on your site. This is a key part of multilingual SEO, along with other tactics such as creating a multilingual sitemap and using the hreflang attribute.
For example, if the original English post is located at yoursite.com/hello-world, then the Spanish version might be located at yoursite.com/es/hola-mundo. You can see that the URL is translated and it also sits behind the “/es/“, which indicates the Spanish-language version of the site.
There are a few different approaches that you can use to create this multilingual URL structure – for all of these examples, assume that the original piece of content is located at yoursite.com/hello-world:
- Subfolder – the same as the example above – yoursite.com/es/hola-mundo.
- Subdomain – you separate each language into a subdomain – es.yoursite.com/hola-mundo.
- Separate domains – you can purchase separate localized domains for each version – yoursite.es/hola-mundo.
According to Google, all three of these methods are acceptable. However, we recommend the subfolder approach because it’s the easiest to set up. Using either a subdomain or separate domain will require some additional technical setup, while the subfolder captures the same benefits with zero technical setup.
How to Translate a Website Online With WordPress and TranslatePress
Now, let’s get into the actual step-by-step guide for how to translate a website online that will address the shortcomings of the Google Translate method that we showed you at the beginning.
For this tutorial, the only thing that we’ll assume is that your website is built with WordPress, which is the website-building software that powers more than 40% of all websites on the Internet.
To add the ability to translate a website without leaving your WordPress dashboard, you can use the free TranslatePress plugin.
With TranslatePress, you’ll be able to manage all of your website’s translations using a simple visual translation interface like this:

You’ll be able to translate 100% of your website’s content, including images and content from your theme and plugins.
TranslatePress Multilingual
Here’s how to do it:
1. Install TranslatePress and Choose Language(s)
To get started, install and activate the free TranslatePress plugin from WordPress.org.
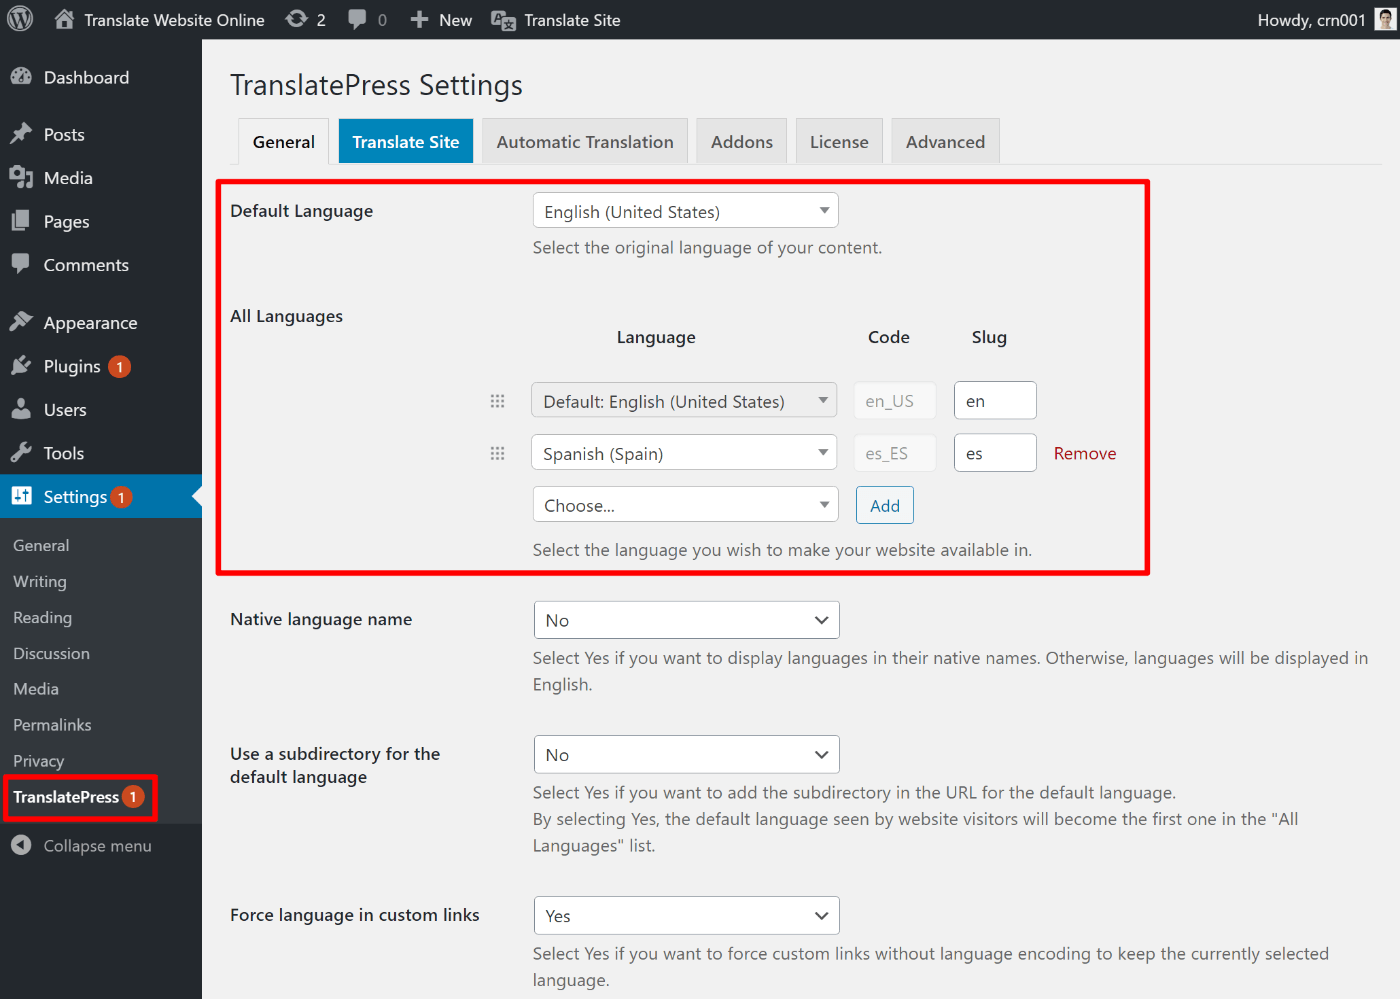
Once you’ve done so, go to Settings → TranslatePress to choose the language(s) into which you want to translate your content:
- Default Language – the language that your site’s content currently exists in.
- All Languages – one or more new languages into which you want to translate the site.
The free version of TranslatePress supports one new language (two languages total). To translate your content into unlimited new languages, you can upgrade to the TranslatePress Personal license:
If you don’t see your desired language in the list, TranslatePress also lets you add your own custom language. With this feature, you can add literally any language, from real-world languages such as Hmong to fictional languages such as Klingon or Pirate.
2. Set Up Automatic Translation (Optional)
You can skip this step if you want to exclusively use manual translation. However, if you want to use automatic translation or the hybrid automatic/manual approach, your next step is to set up your preferred automatic translation service.
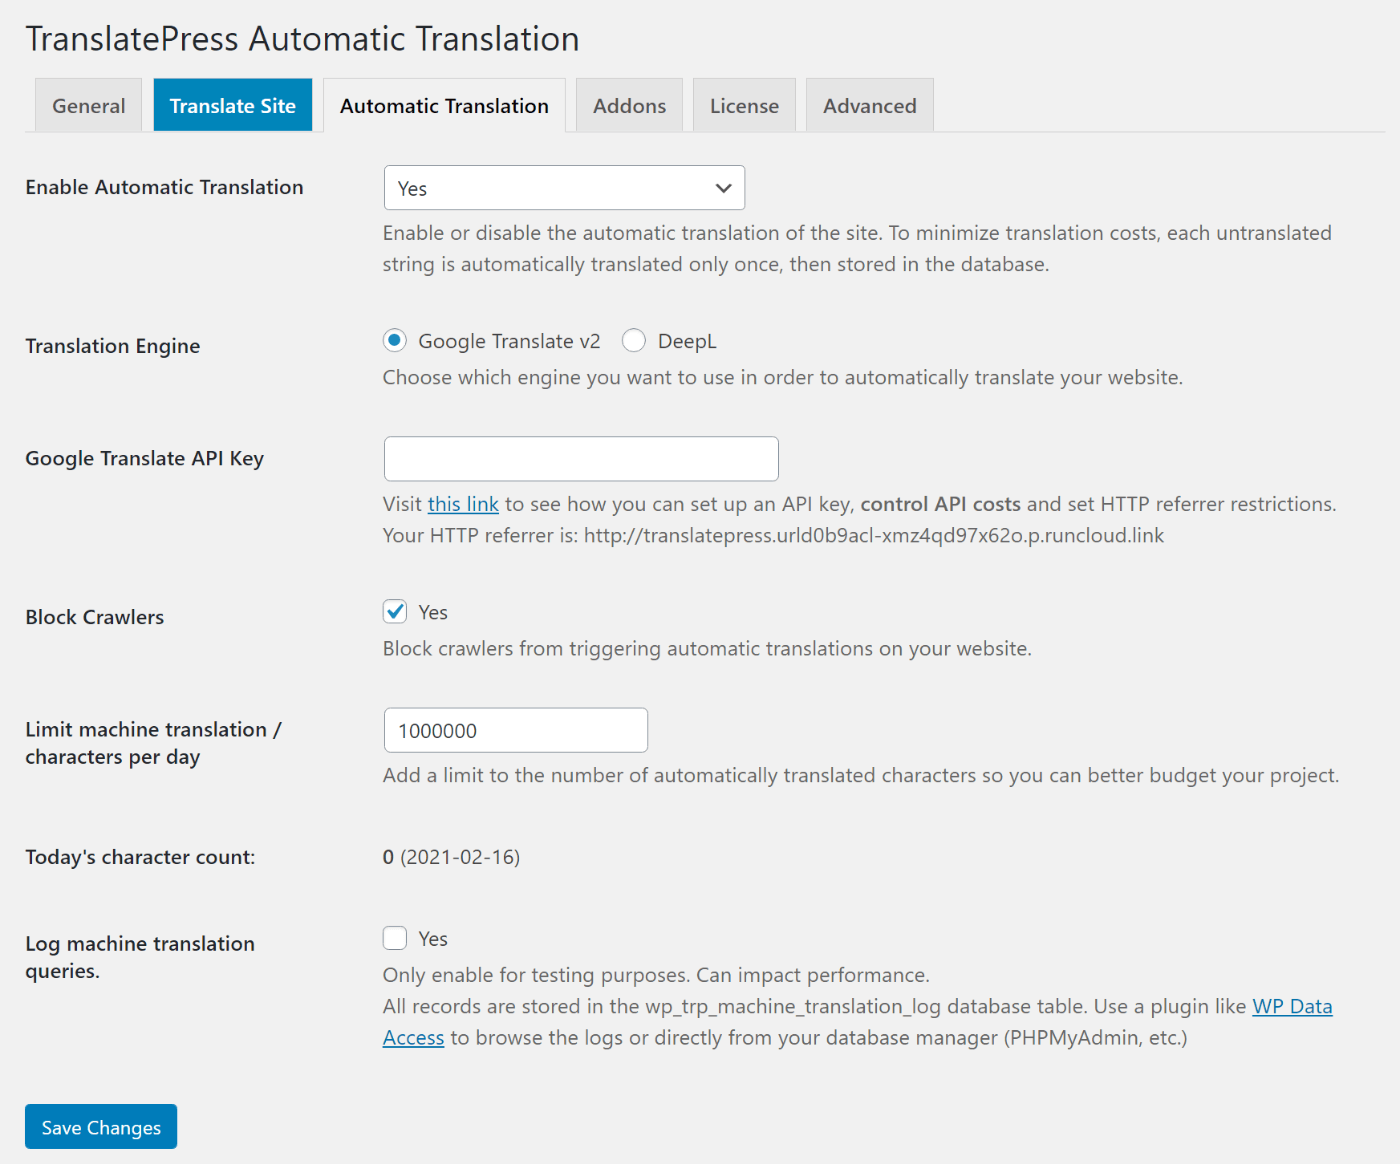
TranslatePress supports two different services:
- Google Translate API – available in the free version of TranslatePress.
- DeepL – you’ll need to purchase the TranslatePress Business license.
To set up either service, go to the Automatic Translation tab in the TranslatePress settings area and choose your preferred service:
For detailed setup instructions, check out these guides:
TranslatePress doesn’t charge you anything extra based on your usage of these services, but you may need to pay a fee directly to the service based on the number of words/characters you translate (though Google Translate offers a free tier).
To control your billing, TranslatePress gives you tools to limit the number of machine translation characters per day.
3. Translate Your Content (or Refine Your Automatic Translations)
Now, you’re ready to translate your content from scratch (if using only manual translation) or refine your machine translations (if using automatic translation).
Either way, you’ll use the same visual translation editor from TranslatePress.
To access the translation editor, open the page that you want to translate on the front-end of your site. Then, click on the Translate Page option on the WordPress toolbar:
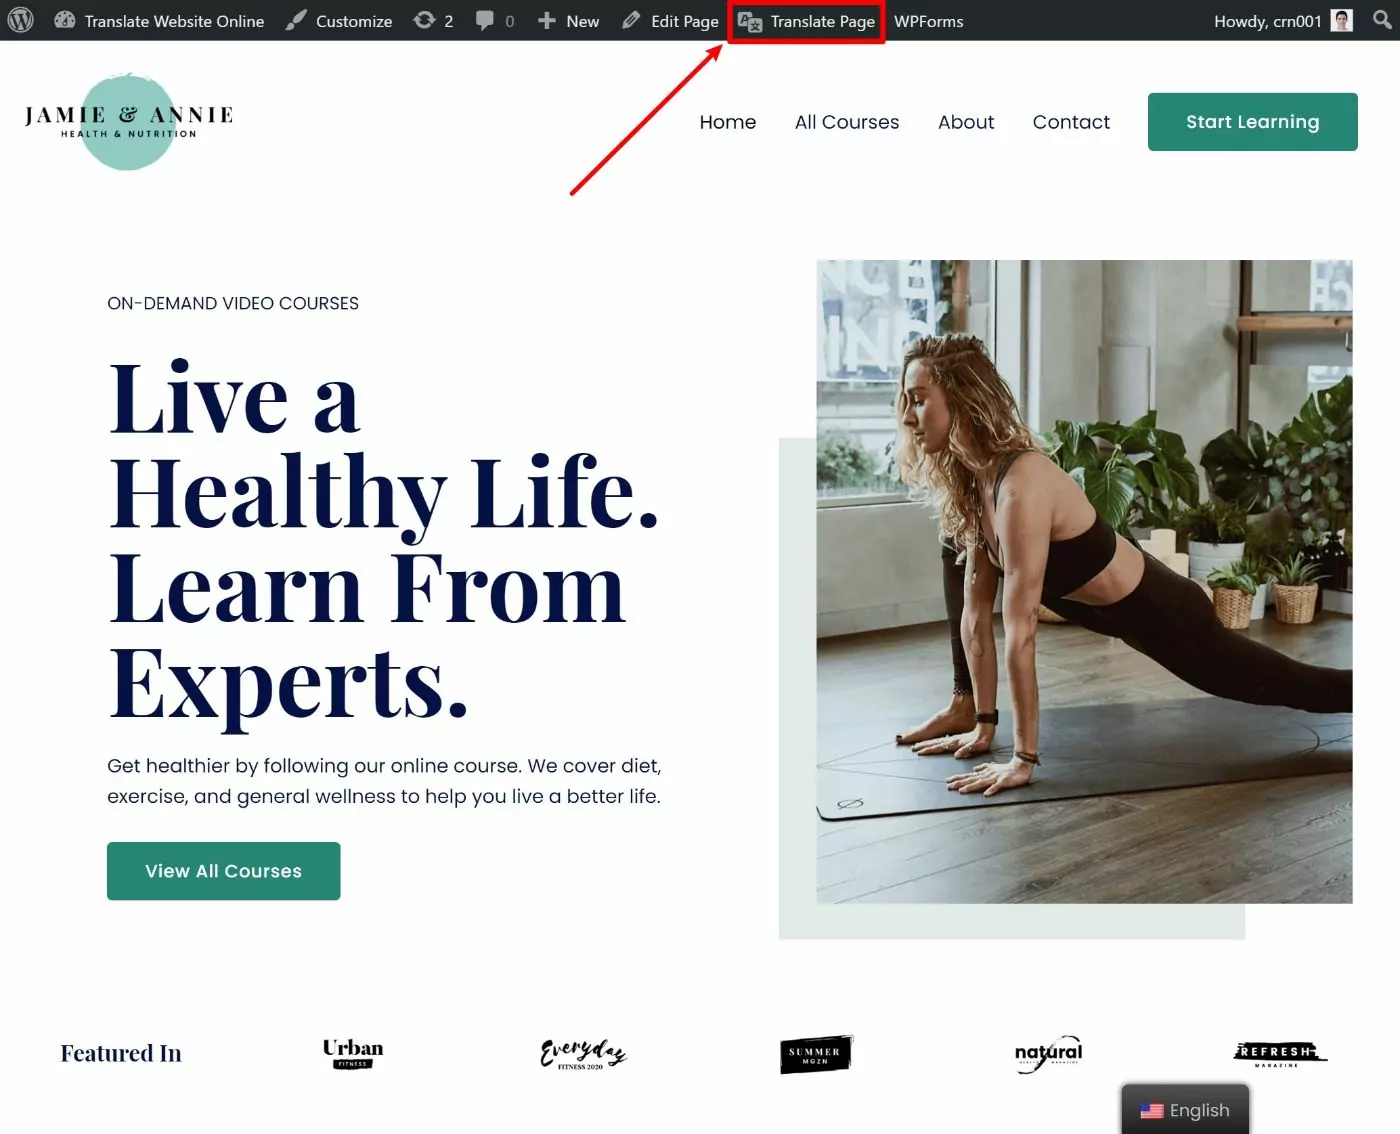
In the translation editor, you should see a live preview of your site on the right side and a sidebar on the left where you can manage your site’s translation.
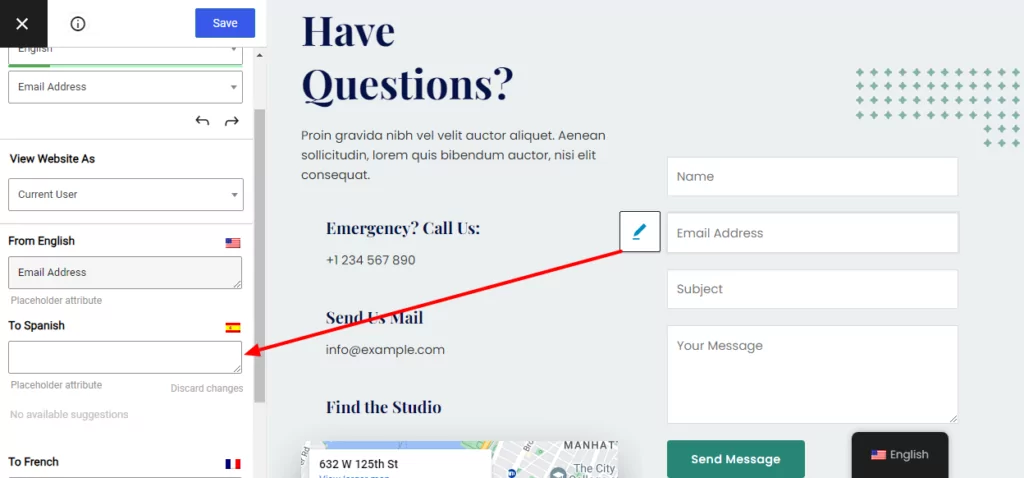
To translate any element on your site, hover over it on the live preview and click the pencil icon. That will open that translation in the sidebar, where you can add the translation or edit the existing translation from your automatic service:

And that’s all there is to it – you can repeat the process to translate your website, no matter where each piece of content comes from. This approach even works for content that comes from plugins or themes. Or, you can even use it to translate non-text content, like images.
How to Translate Other Content
Again, the process is the same for all your content – hover and click on the pencil icon. But if you want to see more specific examples for different types of WordPress content, you can check out these guides:
- Images
- Editor (Gutenberg) blocks
- Custom fields
- Custom post types
- WordPress forms
- WordPress menus
- Popup content
- Sliders
- WooCommerce products
- Elementor (page builder)
- Divi (page builder)
- Oxygen (website builder)
For example, to translate an image, you hover over the image and click the pencil icon. Then, you’ll be able to choose a different image file from the WordPress Media Library. This works for standalone images, image sliders, galleries, and more:

Or, you can translate a menu item by hovering over it and clicking the pencil icon:

The free version of TranslatePress lets you fully translate all of your menu items. But if you upgrade to the Business license you’ll be able to create completely separate menus based on a user’s chosen language, which is useful for creating fully localized experiences.
You can even translate the form placeholders from your favorite WordPress form plugin:
Basically, if it appears on your site, you can probably translate it by hovering over it and clicking the pencil icon!
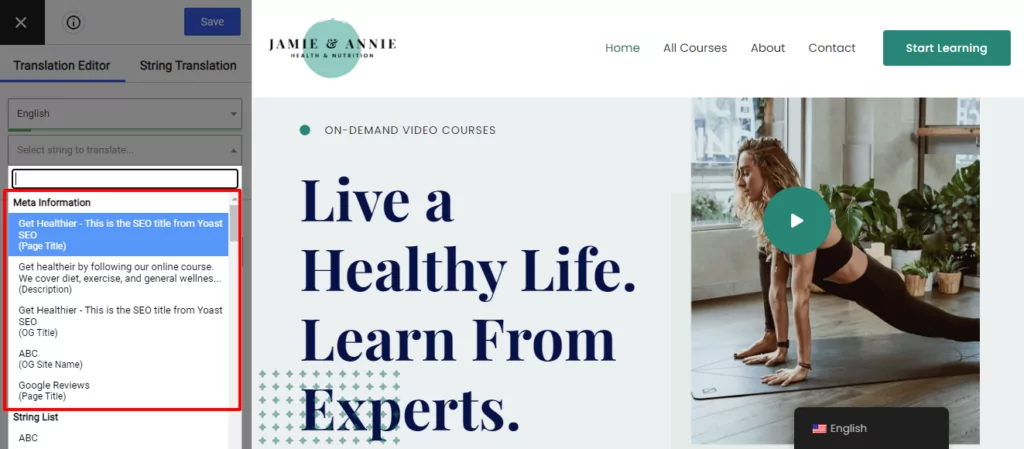
Translate URL Slugs and SEO Metadata
If you want to benefit from multilingual SEO, it’s important to also fully translate your site’s more behind-the-scenes content such as URL slugs and SEO metadata.
To fully translate these elements, you need the TranslatePress SEO Pack add-on, which is available if you upgrade to the TranslatePress Personal license.
Once you install and activate the SEO Pack add-on, you’ll be able to translate SEO metadata from the same visual translation editor by using the drop-down in the sidebar:
You can also open the new String Translation editor to be able to translate all of your site’s sitewide URL slugs.
The SEO Pack addon also helps you implement other multilingual SEO best practices such as creating a multilingual sitemap.
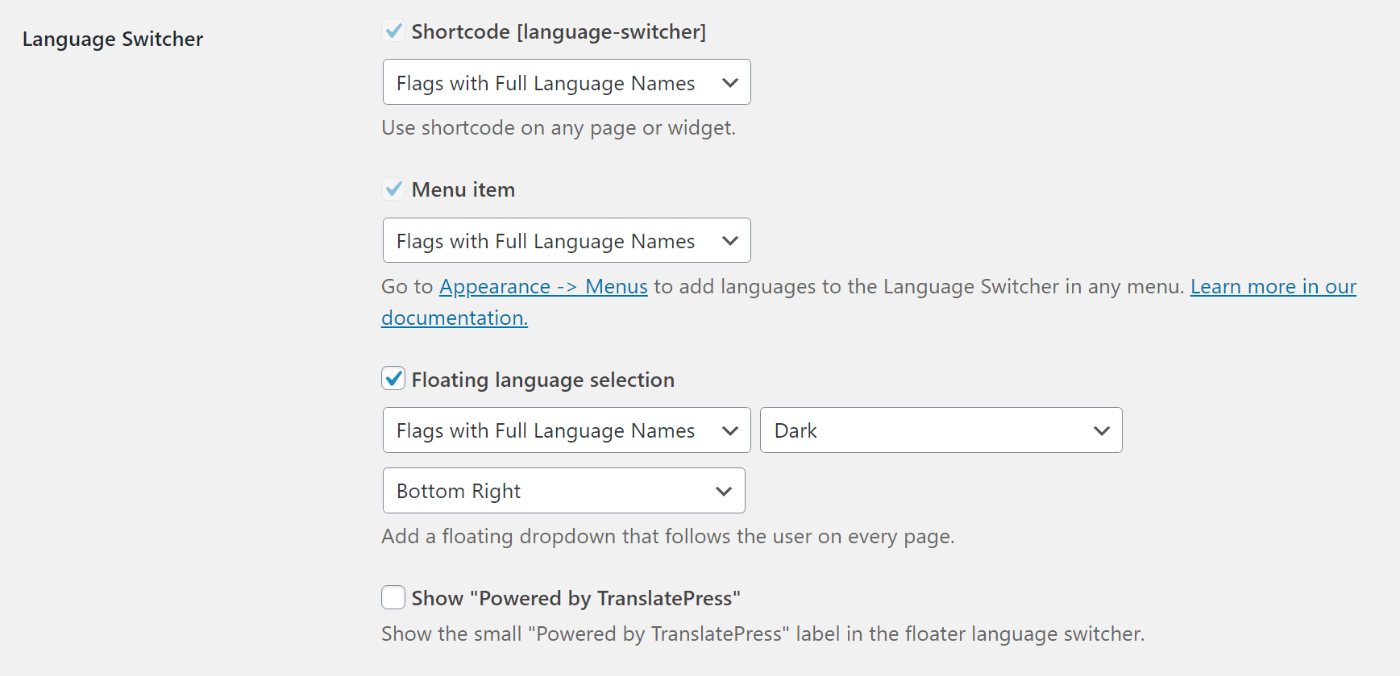
4. Configure Your Language Switcher
By default, TranslatePress adds a floating language switcher to the bottom-right corner of your site to let users choose their preferred languages (if you upgrade to the Business license you can also automatically redirect users to their preferred languages).
However, you can also move this language switcher to another location and/or customize its content/style.
You can place your language switcher:
- As a menu item;
- With a shortcode anywhere on your site (including in a sidebar or footer widget);
- With a PHP function directly in your theme’s template files.
You can also access additional language switcher settings by going to Settings → TranslatePress:
To learn more, check out our guide on how to add a WordPress language switcher.
Translate Your Website Online Today
Creating a multilingual website helps you offer a better user experience and also improve your marketing with multilingual SEO and the ability to share translated content on social media.
In this post, we’ve shown you how you can translate a website from the WordPress dashboard, without needing to use PO files, offline editors, code, or any other complicated tactics.
If you’re ready to get started, install the free version of TranslatePress on your WordPress site and begin translating. Then, upgrade to the premium version to get access to useful features such as:
- Unlimited language support;
- Multilingual SEO features;
- Automatic translation via DeepL;
- Dedicated translator accounts to work with freelancers;
- Automatic redirects to users’ preferred languages;
- Option to create different menus based on users’ chosen languages;
- …and plenty more!
TranslatePress Multilingual
Still have any questions about how to translate a website on WordPress? Ask us in the comments!
If you found this post helpful, please check out our YouTube channel, where we constantly upload short & easy-to-follow video tutorials. You can also follow us on Facebook and Twitter to be the first to know each time we post.