
Dans ce post
Si vous cherchez à créer un site WordPress multilingue, apprendre à traduire le contenu des widgets est essentiel pour avoir un site web entièrement traduit. La traduction du contenu des widgets dans WordPress n'est pas toujours simple, c'est pourquoi il est important de choisir le bon outil de traduction.
Certains plugins de traduction exigent que vous enregistriez les champs de widgets pour la traduction, ce qui se fait soit en écrivant du code, soit en utilisant une interface compliquée / ou un plugin entièrement séparé. D'autres n'offrent tout simplement pas la prise en charge de la traduction des widgets WordPress. Il existe cependant un moyen plus simple et plus rapide. Un moyen qui ne nécessite aucun code personnalisé et qui est entièrement visuel (vous traduisez ce que vous voyez).
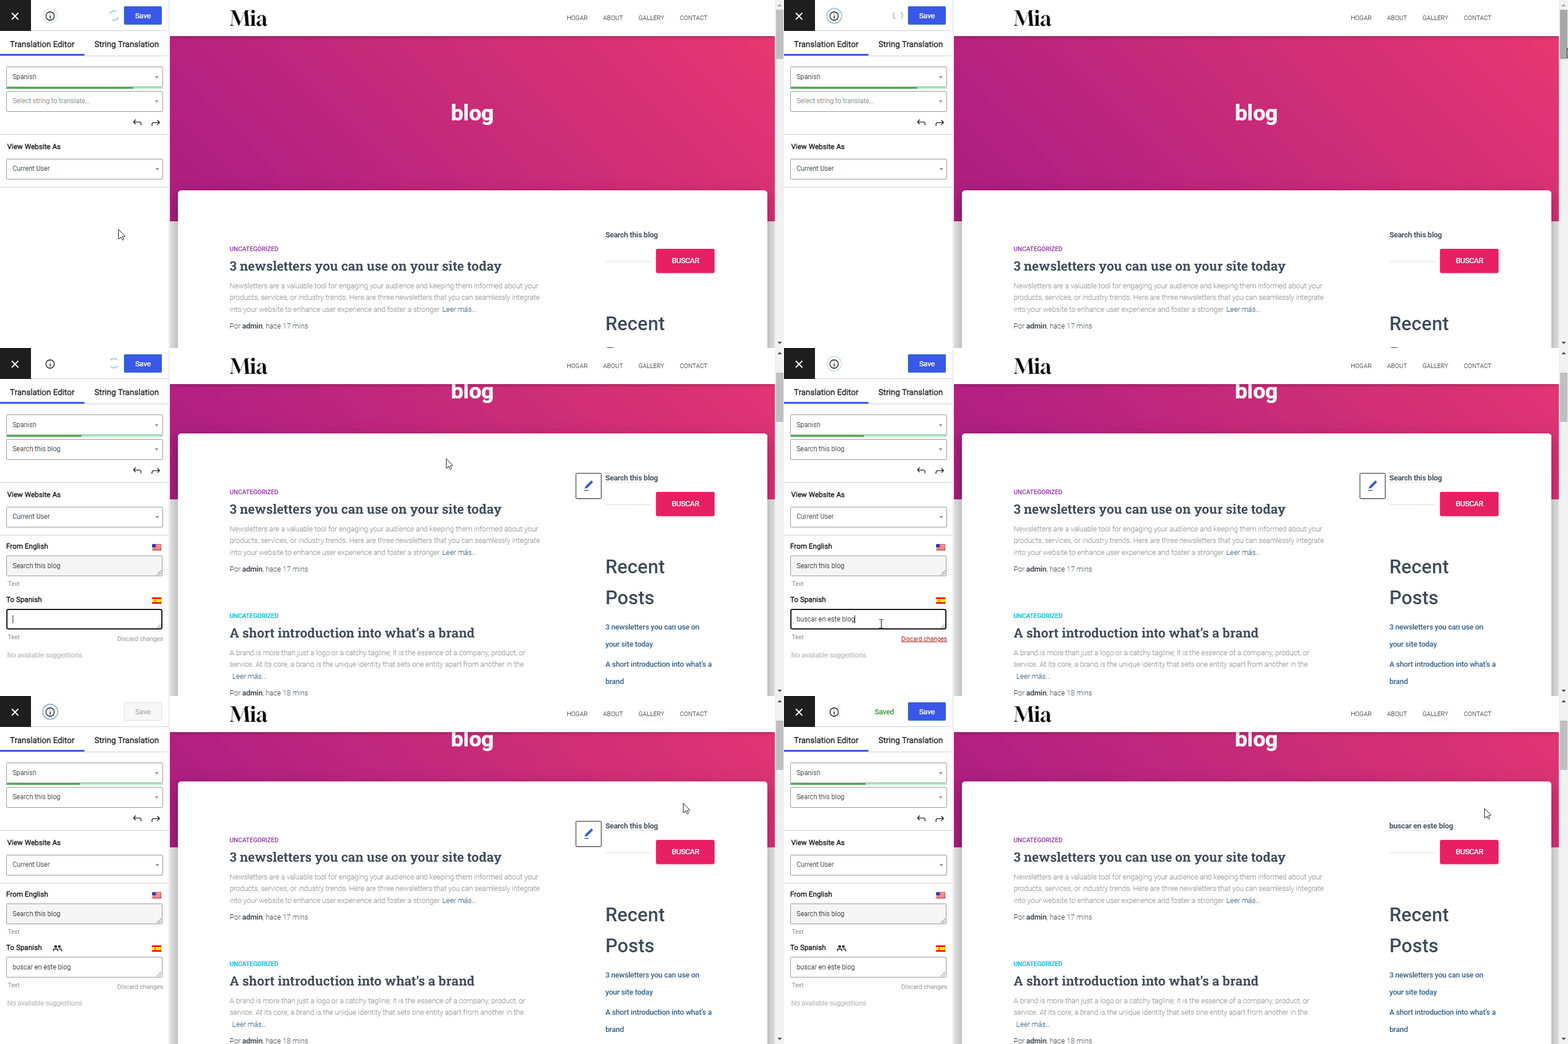
Dans ce tutoriel, nous nous concentrerons sur la façon d'utiliser TranslatePress – un plugin de traduction WordPress – pour traduire les widgets dans WordPress. En utilisant son interface de traduction visuelle front-end, tout ce que vous avez à faire est de cliquer sur un certain texte de widget et vous pouvez entrer sa traduction dans la barre latérale, comme ceci :
Prêt à découvrir comment le configurer ? Voici comment traduire n'importe quel widget WordPress à l'aide de TranslatePress.
Que sont les widgets WordPress et pourquoi les traduire en premier lieu ?
Les widgets WordPress vous permettent d'ajouter du contenu à la barre latérale ou à la zone de pied de page de votre site Web. Voici quelques exemples courants : l'ajout d'une barre de recherche à votre site, l'affichage de la liste des catégories de produits pour votre boutique WooCommerce, ou l'ajout d'un menu déroulant des archives d'articles à votre blog. Comme les extensions définissent souvent leurs propres widgets, les options disponibles sont illimitées.
Ajouter des widgets WordPress à votre site Web ne nécessite aucune expérience ni compétence en codage. Ils peuvent être ajoutés, supprimés et réorganisés à l'aide de Personnalisateur de thèmes ou Apparence → Widgets dans l'interface d'administration de WordPress.
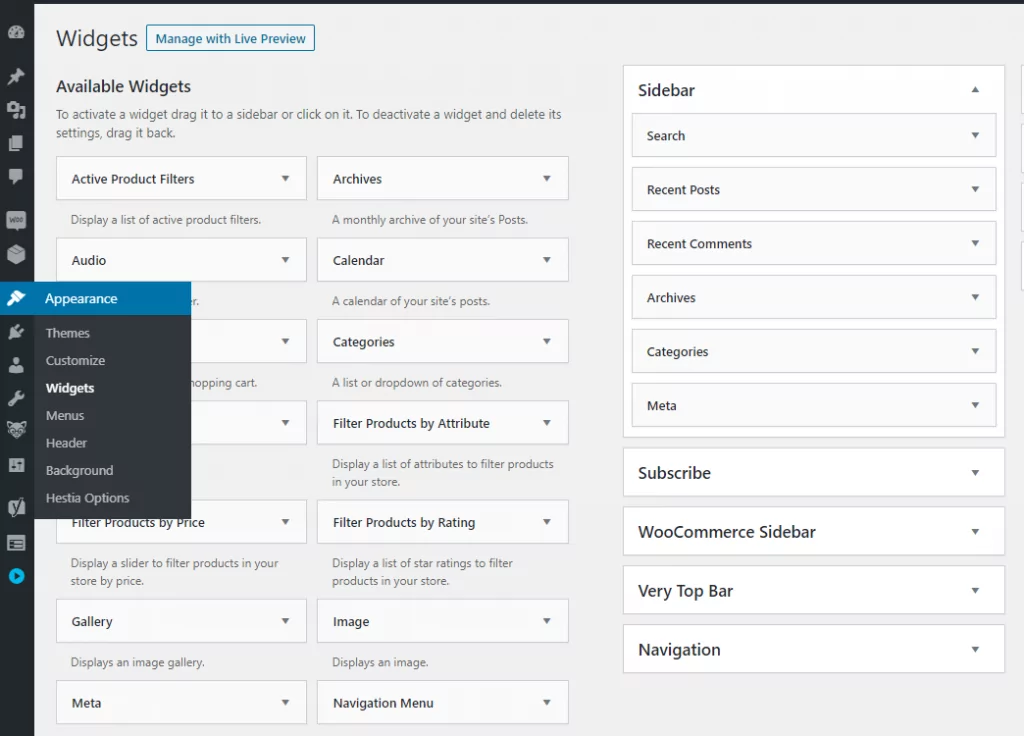
A thème peut placer des zones de widgets n'importe où sur une page. Par exemple, outre les emplacements de barres latérales habituels, certains thèmes vous permettent également de placer des widgets dans le pied de page de chaque page.
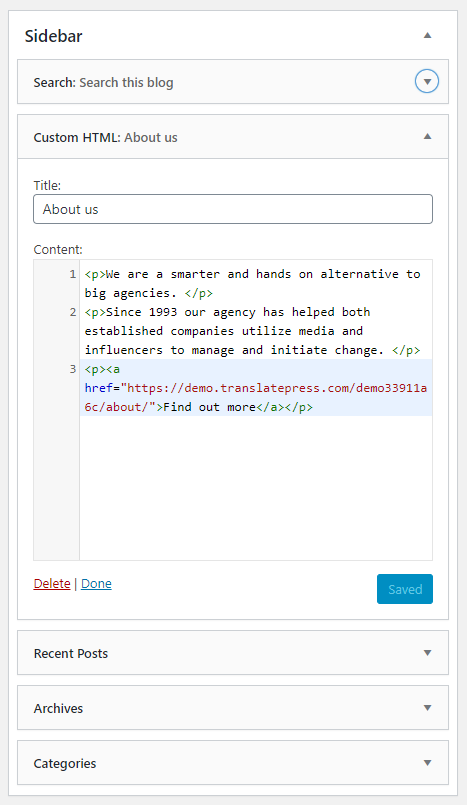
Pour ce tutoriel, nous avons créé un blog doté d'une barre latérale dans laquelle nous allons ajouter différents types de widgets : un rechercher encadré, un widget « texte/html », « Articles récents », « Archives » et Catégories. Ensuite, nous utiliserons TranslatePress pour les traduire toutes.
Avant de commencer, voici un bref tutoriel vidéo expliquant comment faire ceci rapidement :
Mais si vous souhaitez entrer davantage dans les détails et progresser à votre rythme, continuez à lire cet article.
Traduire les widgets dans WordPress à l'aide de TranslatePress
Si vous souhaitez proposer votre site web en plusieurs langues, un seul outil vous suffira : TranslatePress.
TranslatePress Multilingue
Installez TranslatePress et sélectionnez les langues
Vous pouvez commencer par installer et activer le Plugin TranslatePress gratuit disponible sur WordPress.org.
Une fois le plugin activé, rendez-vous sur Paramètres → TranslatePress et choisissez les langues dans lesquelles vous souhaitez rendre votre site web disponible.
Pour commencer, choisissez le Langue par défaut, qui est la langue dans laquelle le contenu de votre site Web est actuellement rédigé. Ensuite, ajoutez de nouvelles langues de traduction que vous souhaitez proposer.
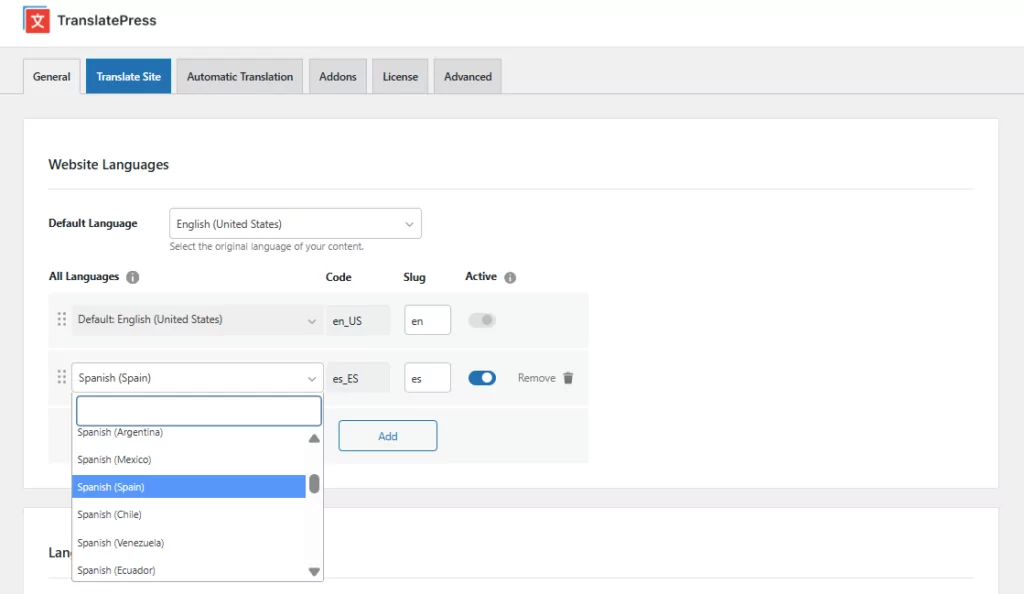
La version gratuite de TranslatePress vous permet de traduire votre contenu dans une nouvelle langue, tandis que la version premium permet d'ajouter un nombre illimité de langues.
Il existe quelques autres paramètres dans TranslatePress, comme l'ajout et la personnalisation d'un sélecteur de langue front-end, mais pour l'instant, nous allons simplement cliquer sur Enregistrer les modifications puis passez à la traduction du contenu du widget.
Création de widgets multilingues dans WordPress
Nous sommes désormais prêts à commencer à traduire les widgets que nous avons ajoutés précédemment. Pour cela, il suffit de vous rendre sur la page (dans notre cas, « Blog ») où s'affichent les widgets, puis de cliquer, depuis la barre d'administration en haut de la page, sur Traduire la page.
C'est là que la magie opère. Cela ouvrira l'interface visuelle de TranslatePress, dans laquelle vous devriez voir un aperçu en direct de votre site, un peu comme dans le Customizer natif de WordPress, ainsi qu'une barre latérale de traduction à gauche.
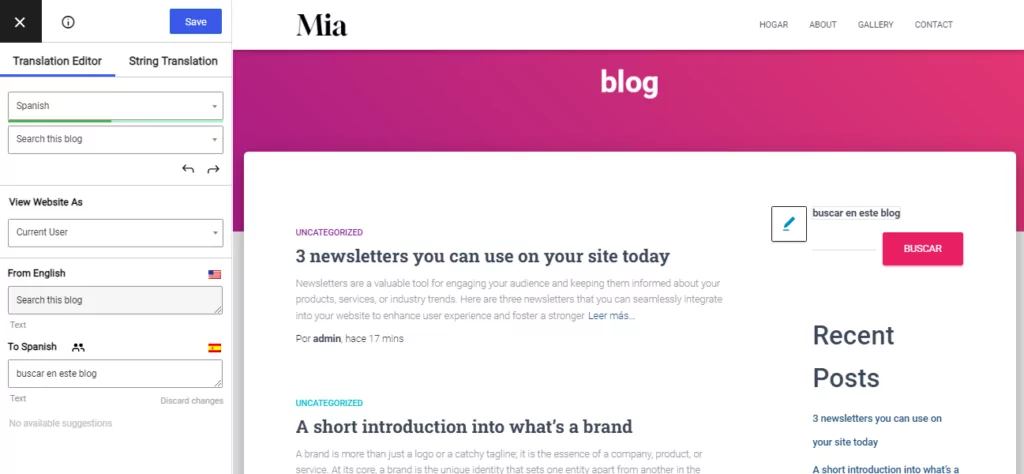
Pour traduire un widget, il vous suffit de survoler son texte, de cliquer sur l'icône de crayon bleu et d'entrer la traduction souhaitée. Voici comment traduire la boîte de recherche en espagnol :
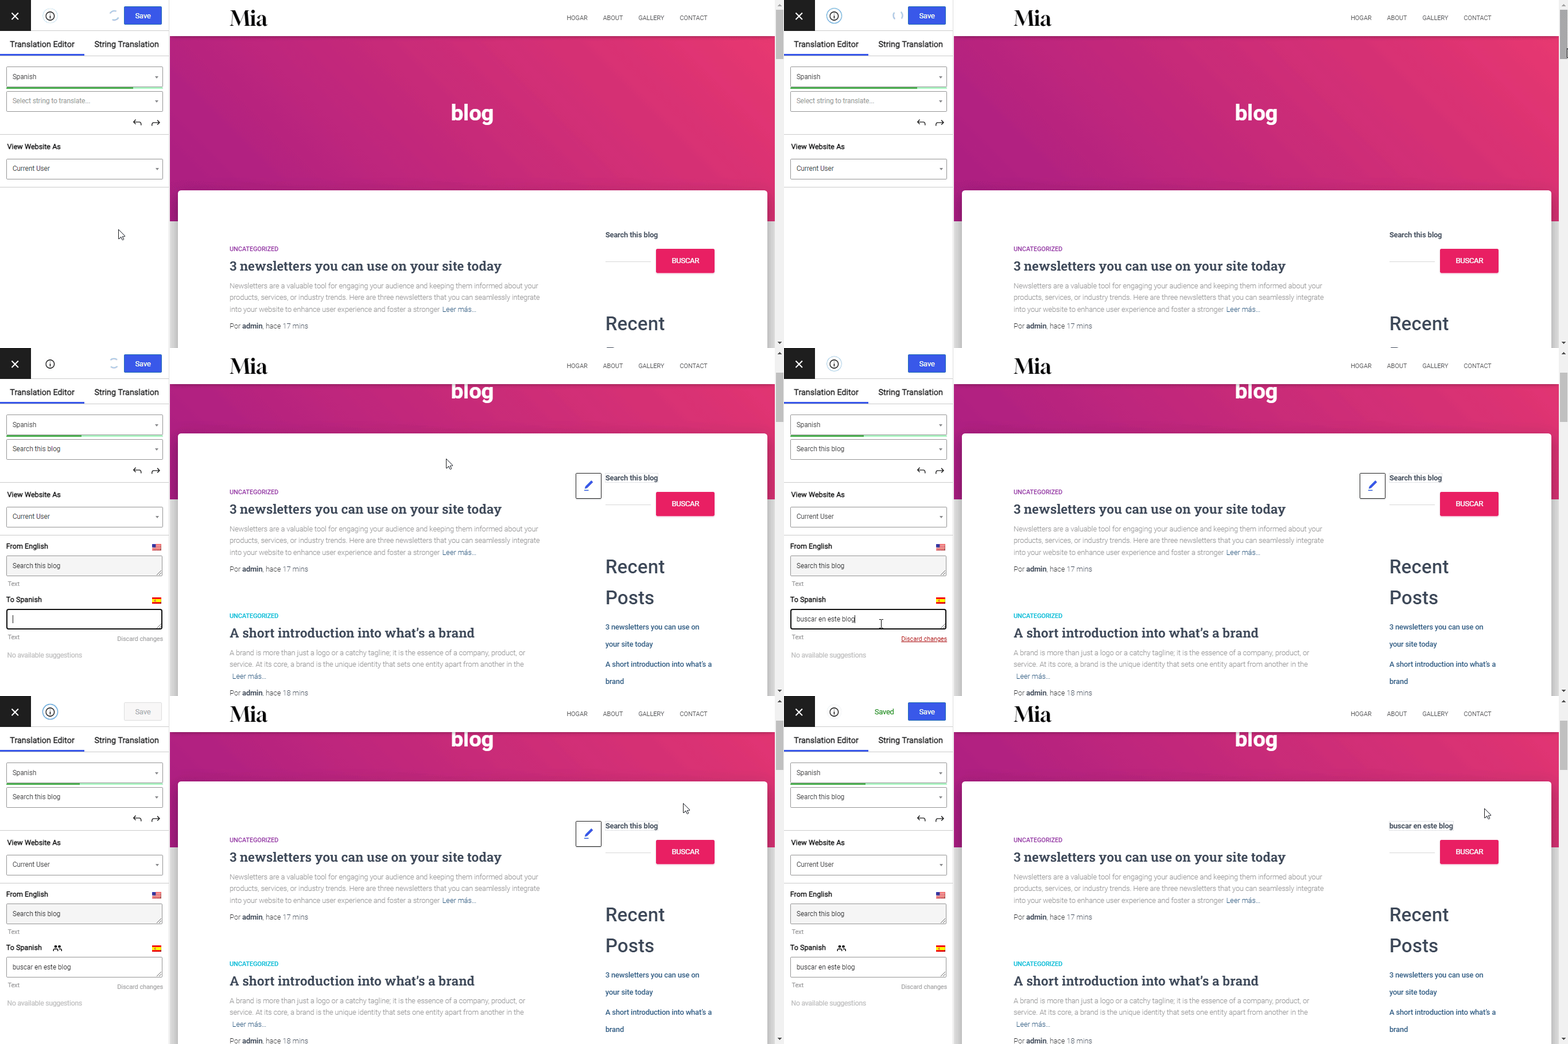
La même approche fonctionne pour le widget HTML “ À propos de nous ”
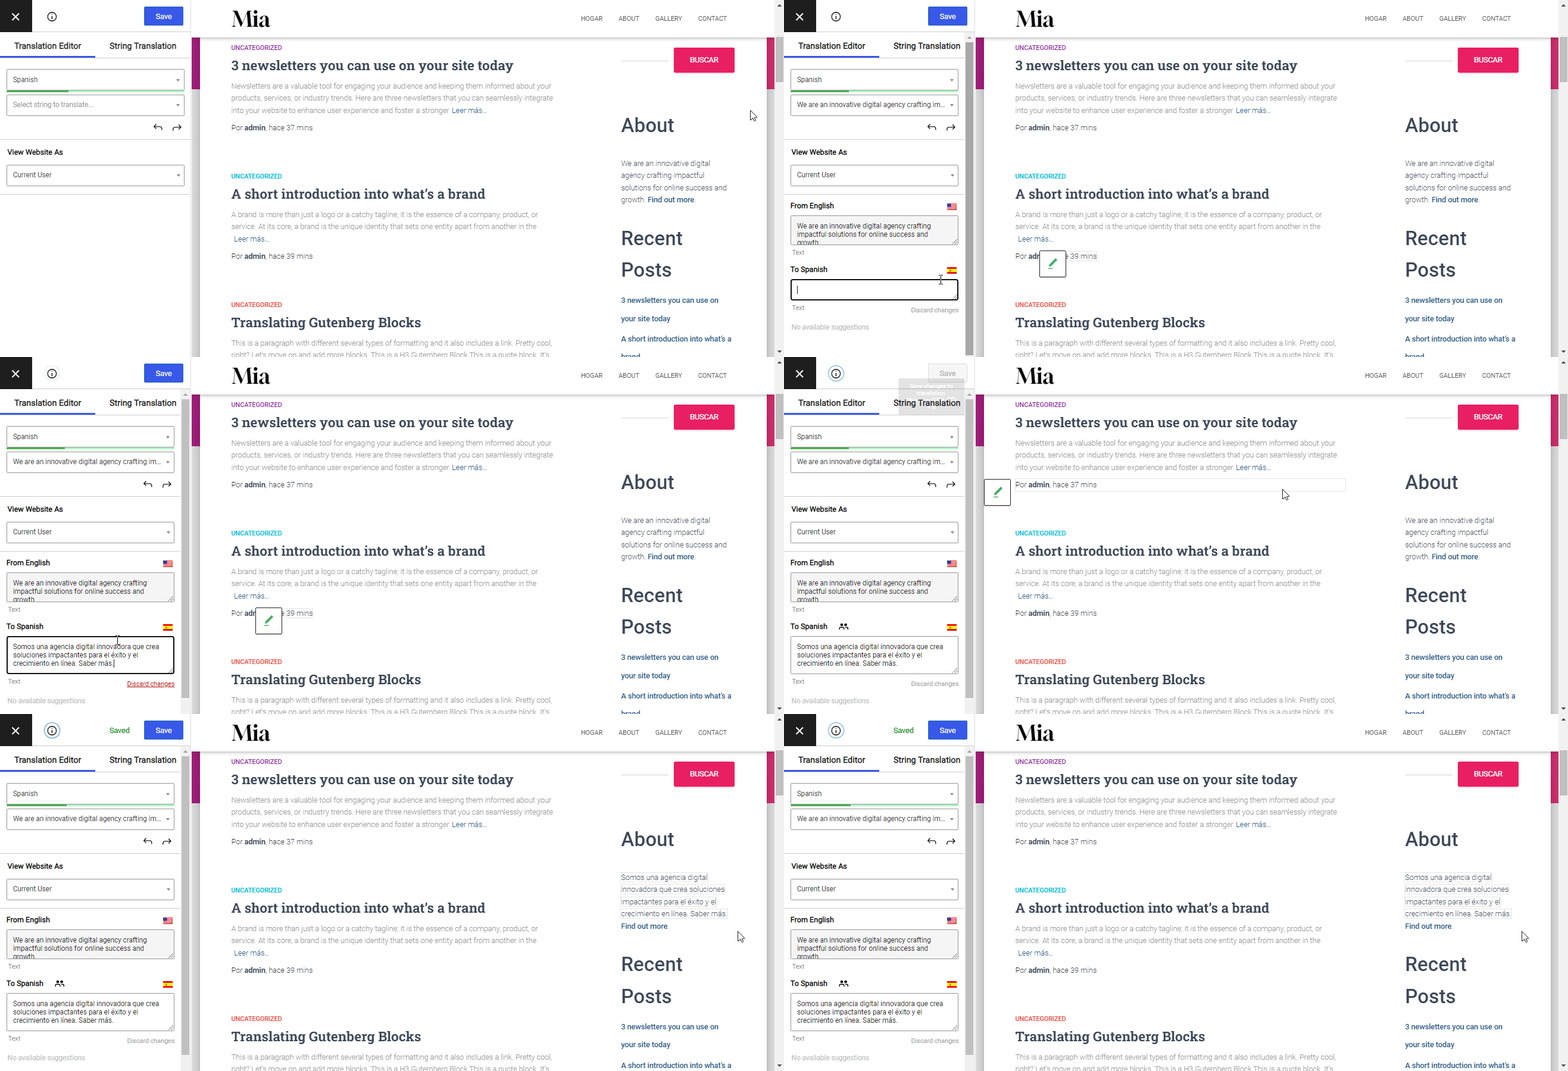
…et il en va de même pour n'importe quel autre widget, quel que soit son type et qu'il ait été ajouté par un plugin, un thème ou WordPress lui-même.
Il suffit de cliquer pour sélectionner un passage, de saisir sa traduction, d'enregistrer, puis de passer au suivant. C'est tout.
Cette même approche peut être utilisée pour traduire tout type de contenu présent sur votre site web. Outre le contenu standard, TranslatePress facilite grandement la traduction d'éléments plus complexes tels que popus, images avec du texte, curseurs, ou formes.
Pour un guide détaillé expliquant comment traduire l'intégralité du contenu de votre site, consultez Comment créer un site WordPress multilingue.
Traduire automatiquement les widgets dans WordPress
Outre la traduction manuelle, TranslatePress prend également en charge traduction automatique — ce qui signifie que vous pouvez faire traduire le contenu de votre widget instantanément, sans avoir à cliquer sur chaque chaîne de caractères une par une.
La manière la plus rapide de le faire fonctionner est la suivante : TranslatePress AI, le moteur de traduction intégré au plugin. Il n'y a aucun élément externe à configurer : pas de compte tiers, pas de clé API, pas de service distinct auquel s'inscrire. Chaque formule — y compris la version gratuite — comprend d'emblée un nombre défini de mots traduits par l'IA ; vous pouvez donc l'activer et commencer à traduire immédiatement.
Pour l'allumer, allez à Paramètres → TranslatePress, ouvrez le Traduction automatique onglet, activer la traduction automatique et sélectionner TranslatePress AI comme moteur. Si vous ne disposez pas d'une licence Pro, c'est ici que vous devrez créer un gratuit un avant de passer à autre chose.
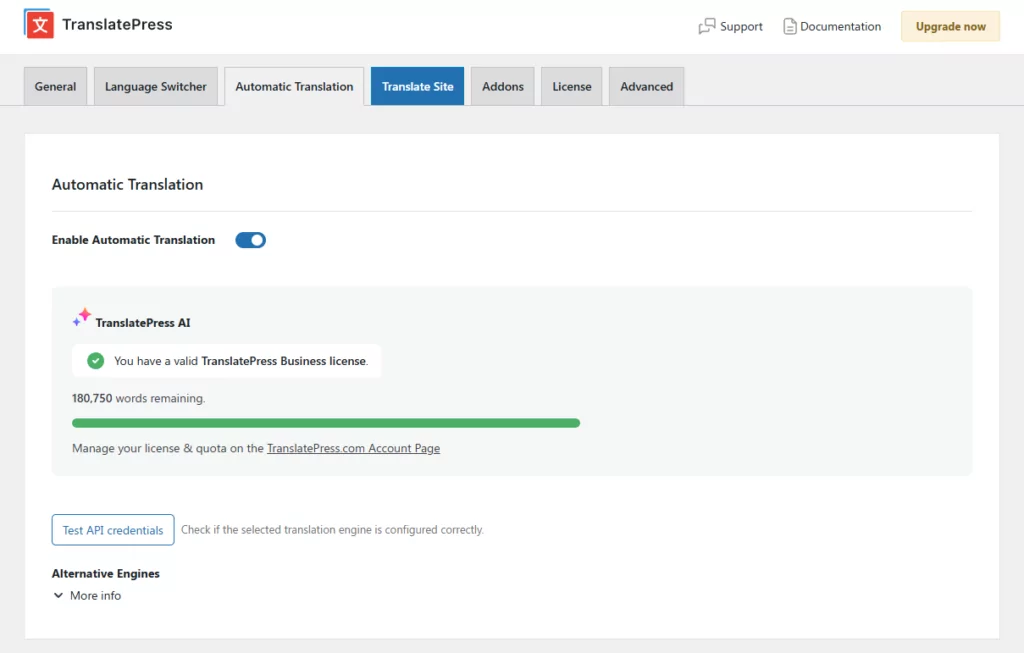
Succès Enregistrer les modifications et TranslatePress traduira automatiquement le contenu de votre site, widgets compris.
Voici à quoi ressemble le contenu de notre page de blog — y compris tous les widgets de la barre latérale — après avoir activé la traduction automatique :
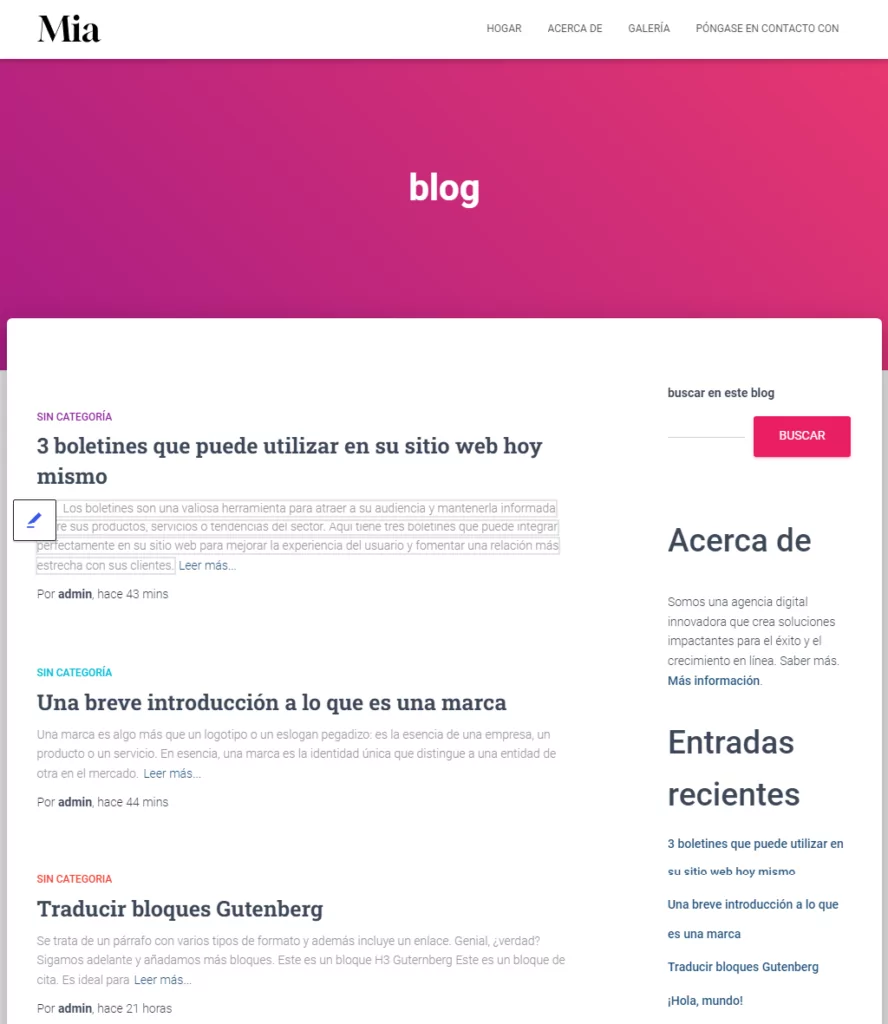
TranslatePress stocke toutes les traductions localement dans votre base de données ; vous ne payez donc qu'une seule fois le coût de leur génération, et non à chaque chargement de page. Cela permet également d'assurer une navigation fluide pour vos visiteurs.
Si vous préférez utiliser une API externe, TranslatePress se connecte également à :
- Google Traduction — disponible sur tous les abonnements, y compris la version gratuite. Nécessite une clé d'API Google Cloud Translate. Voir notre guide sur la génération d'une clé API Google.
- DeepL — disponible dans les forfaits Business et Developer. Nécessite un Clé API DeepL.
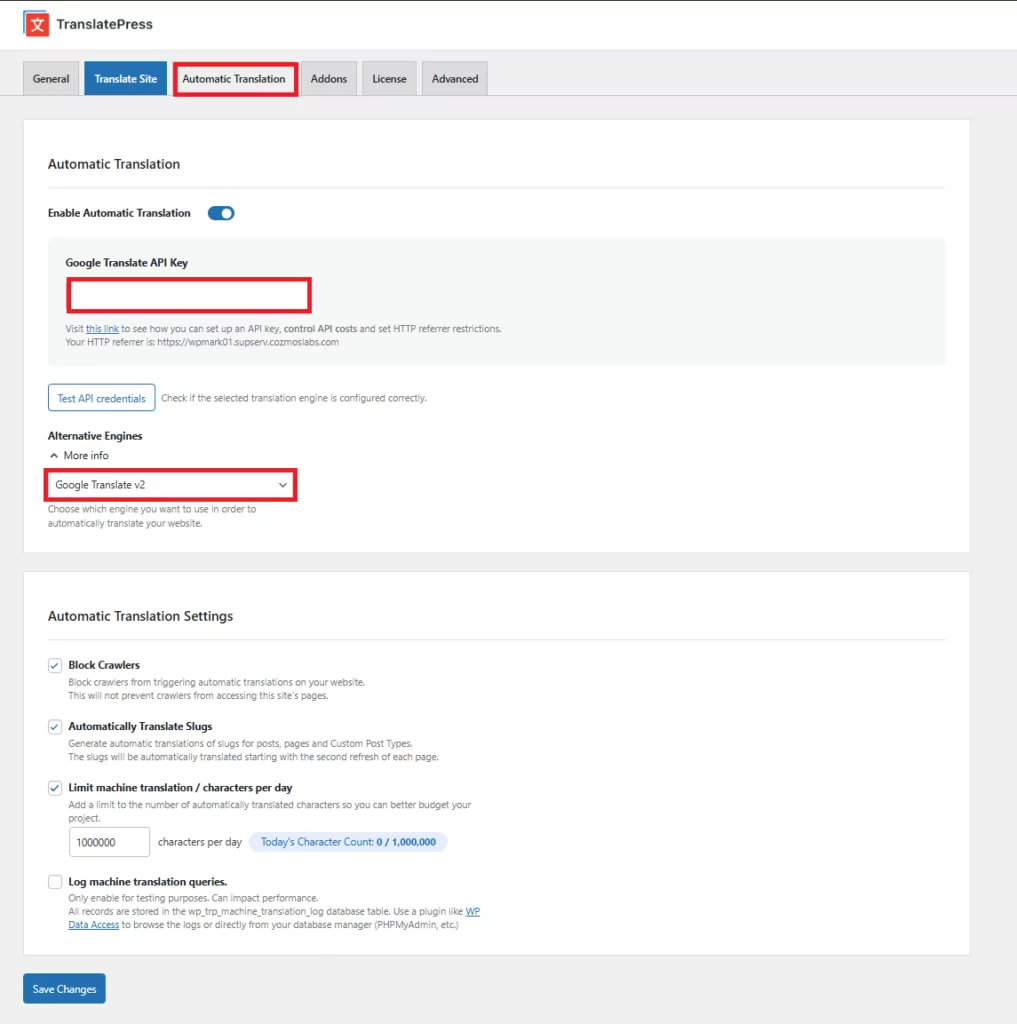
Quel que soit le moteur que vous utilisez, vous pouvez toujours peaufiner manuellement toute traduction générée automatiquement dans l'éditeur visuel.
Comment afficher différents widgets selon la langue
Il y a des situations où vous pourriez vouloir afficher différents widgets en fonction de la langue. Pas simplement traduire le contenu du widget, mais afficher un widget totalement différent et traduire celui-ci.
Vous pouvez facilement y parvenir en utilisant le gratuit Logique des widgets plugin en plus de TranslatePress.
Installez et activez simplement Widget Logic, puis dans l'administration de WordPress, accédez à la zone des widgets sous Apparence → Widgets. Vous remarquerez un Logique des widgets champ ajouté sous chaque widget.
Disons que nous voulons afficher la barre de recherche uniquement pour l'anglais et la masquer sur le blog espagnol.
Pour cela, sous le champ de logique du widget, nous ajoutons : (get_locale() == 'en_US')
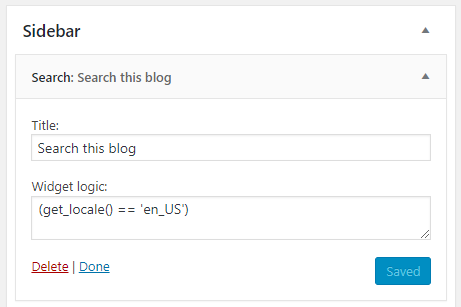
Cela n'affichera le widget que lorsque cette condition sera remplie. Dans notre cas, lorsque la langue de navigation est définie sur l'anglais (États-Unis). → ‘fr_FR.
Remarquez comment la barre de recherche a disparu de la version espagnole du site maintenant :
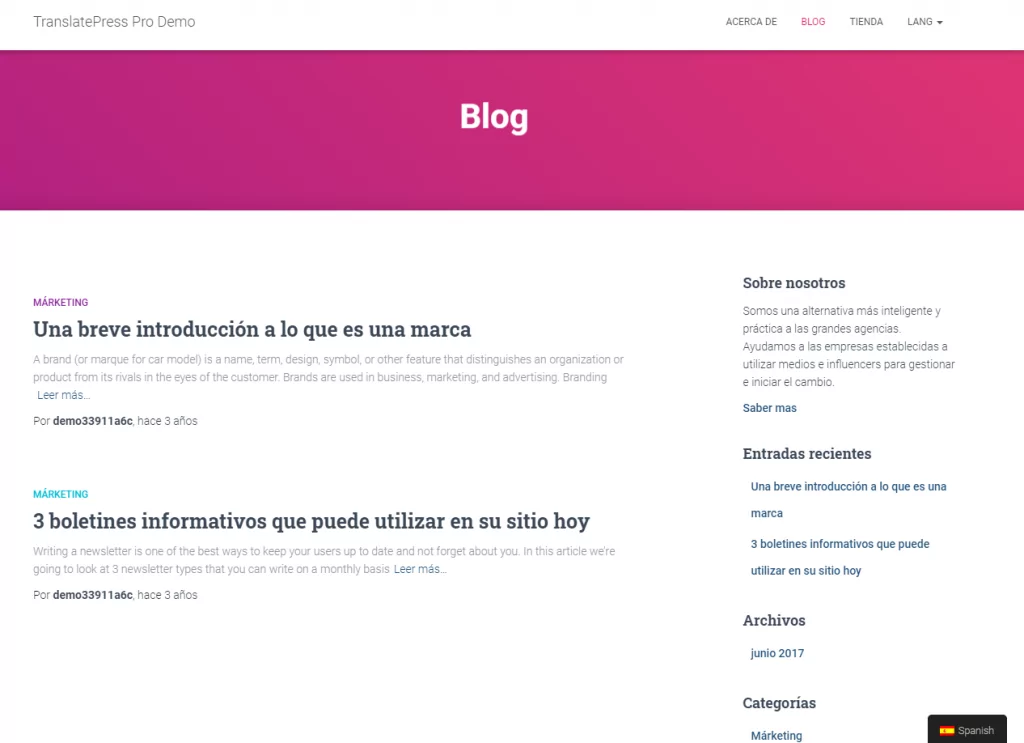
Pour plus de flexibilité, vous pouvez utiliser toutes les variations de la logique énumérée ci-dessus, y compris en l'inversant :!(get_locale() == 'en_US'). Cela fera apparaître la barre de recherche sur toutes les autres versions linguistiques, à l'exception de l'anglais.
Widget de sélecteur de langue WordPress
TranslatePress vous propose plusieurs façons d'ajouter un Sélecteur de langue WordPress sur votre site. Vous trouverez toutes les options sous la rubrique dédiée Sélecteur de langue onglet situé dans la barre de navigation supérieure de vos paramètres TranslatePress.
Il y a trois types de commutateurs au choix :
- Flottant — un sélecteur persistant fixé dans un coin de chaque page, afin que les visiteurs puissent toujours le trouver, peu importe où ils se trouvent sur votre site.
- Code court — placez le commutateur n'importe où en utilisant
- Article de menu — aller à Apparence → Menus pour ajouter des options de langue directement à n'importe quel menu de navigation. Le sélecteur adopte automatiquement le style du menu de votre thème.
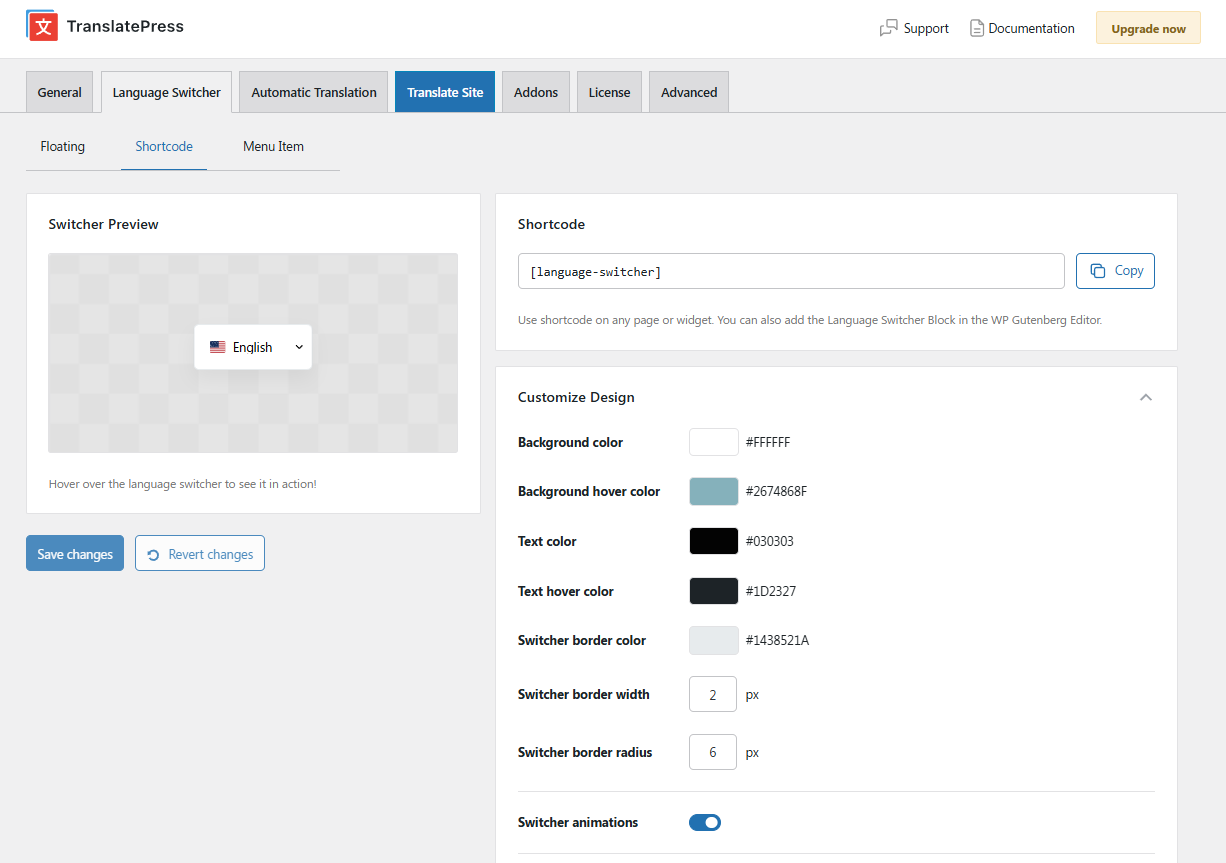
Pour créer un widget de changement de langue, l'approche par code court (shortcode) est celle qu'il vous faut. Déposez
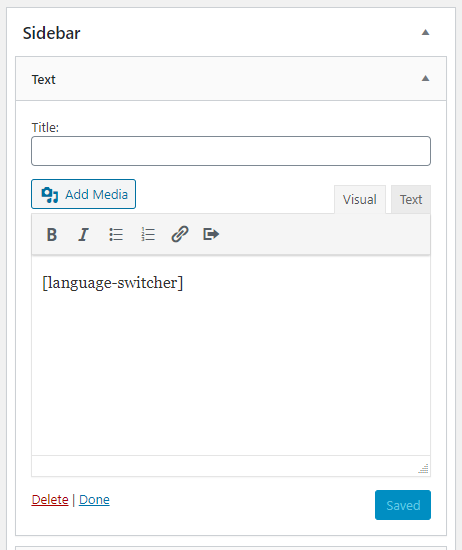
Pour personnaliser l'apparence du sélecteur de code court — les couleurs, la forme du drapeau, le format du nom de la langue, s'il s'ouvre au clic ou au survol — allez sur Sélecteur de langue onglet dans vos paramètres TranslatePress, puis ouvrez le Code court sous-onglet. Un aperçu en direct se met à jour au fur et à mesure que vous effectuez des modifications.
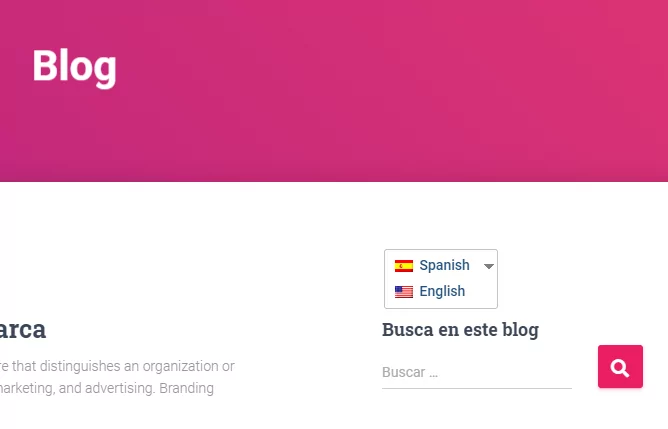
Sur le front-end, le widget de changement de langue s'affiche sous forme de menu déroulant qui permet aux visiteurs de changer de langue en un seul clic :
Traduisez les widgets WordPress aujourd'hui !
TranslatePress permet de traduire très facilement n'importe quel widget WordPress, directement depuis l'interface publique grâce à une interface visuelle extrêmement intuitive. Cette même approche peut être étendue pour traduire l'ensemble du contenu de votre site et le rendre disponible en plusieurs langues.
TranslatePress Multilingue
Pour commencer, vous pouvez télécharger le version gratuite de TranslatePress. Ensuite, passer à un forfait premium pour un nombre illimité de langues de traduction, un référencement multilingue amélioré, une traduction automatique via DeepL, la détection automatique de la langue de l'utilisateur, et plus encore.
Avez-vous encore des questions sur la manière de traduire les widgets dans WordPress ? N'hésitez pas à nous en faire part dans les commentaires ci-dessous !
Si vous avez trouvé ce message utile, consultez notre Chaîne YouTube, où nous téléchargeons constamment des tutoriels vidéo courts et faciles à suivre. Vous pouvez également nous suivre sur Facebook et X pour être le premier à savoir chaque fois que nous publions.