
En esta publicación
Traducir un sitio web requiere algo más que una simple traducción del contenido. Por ejemplo, una gran preocupación es cómo traducir un menú de WordPress. El menú es uno de los primeros elementos de un sitio que los usuarios notan, y basan en él su primera impresión.
Al crear un menú de WordPress multilingüe, hay varios aspectos a los que debes prestar atención. Algunas de tus páginas o productos pueden estar relacionados o disponibles solo para ciertos países, por lo que es posible que tengas que ocultar esos elementos del menú para determinados idiomas.
La traducción también afecta al diseño del menú. Por ejemplo, es bien sabido que las palabras alemanas son, por término medio, más largas que las inglesas, lo que influye en el espaciado entre los elementos del menú.
TranslatePress es un plugin de traducción de WordPress que te ayuda a traducir cualquier menú de WordPress, en solo un par de clics, utilizando un editor de traducción visual.
A continuación, veremos los sencillos pasos para lograr esto.
Relacionado: Cómo traducir los campos personalizados en WordPress
Configuración de un menú de WordPress
Gracias a su diseño, TranslatePress funciona desde el primer momento con cualquier tema o plugin, por lo que puedes utilizar el tema de WordPress de tu elección o incluso un plugin de menú. La mayoría de los temas admiten un menú principal y de pie de página, pero algunos ofrecen a los usuarios más opciones para mostrar menús.
Para crear un menú de WordPress, ve a Apariencia → Menús → Editar menús determina su estructura y añade los elementos de menú deseados.
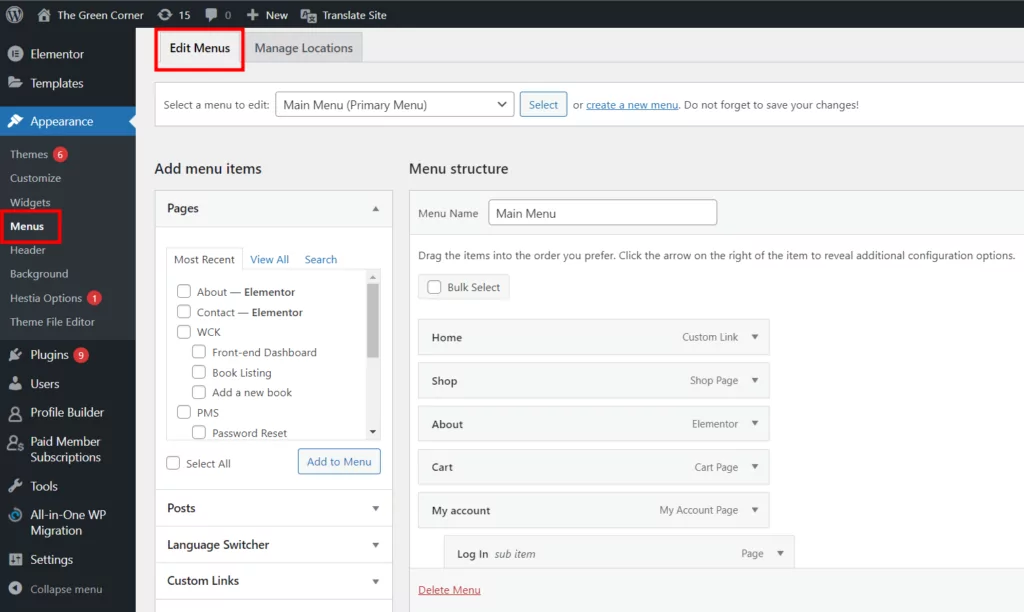
A continuación, ve a Apariencia → Menús → Administrar ubicaciones para elegir la ubicación de los menús. Las ubicaciones disponibles están definidas por el tema que estés usando.
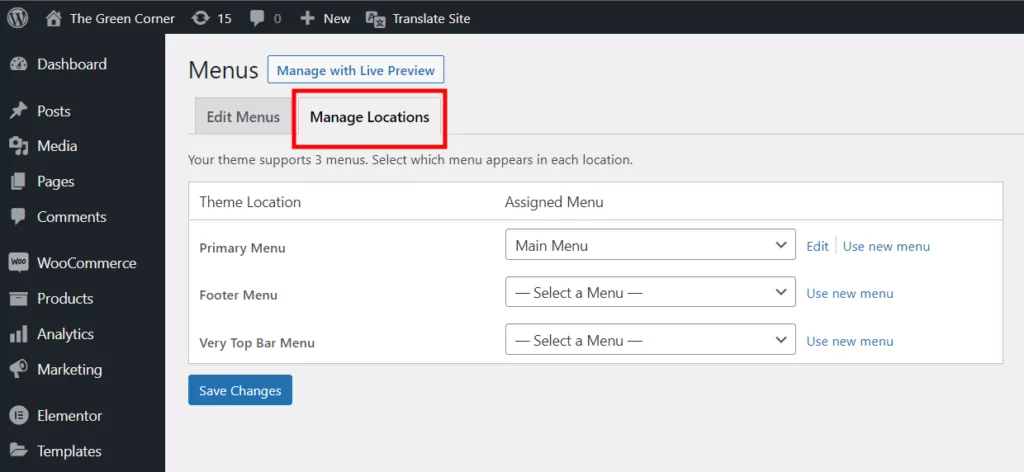
Supongamos que ya tienes un menú principal lleno de elementos y subelementos que deben traducirse. En nuestro ejemplo aquí, traduciremos el menú principal, que es la navegación principal de tu sitio web.
Instalación y configuración de TranslatePress
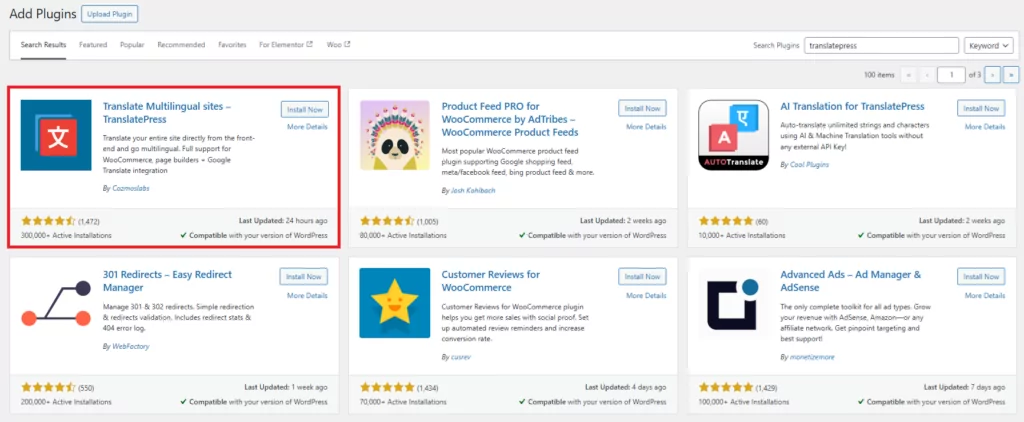
Una vez creado nuestro menú de WordPress, pasaremos a instalar y configurar TranslatePress. Solo tienes que ir a Complementos → Añadir Nuevo en el panel de administración de WordPress y escribe “TranslatePress” en el campo de búsqueda. Busca el plugin TranslatePress, instálalo y actívalo.
A continuación, ve a TranslatePress Configuración → General para elegir la configuración adecuada para tu sitio web multilingüe.
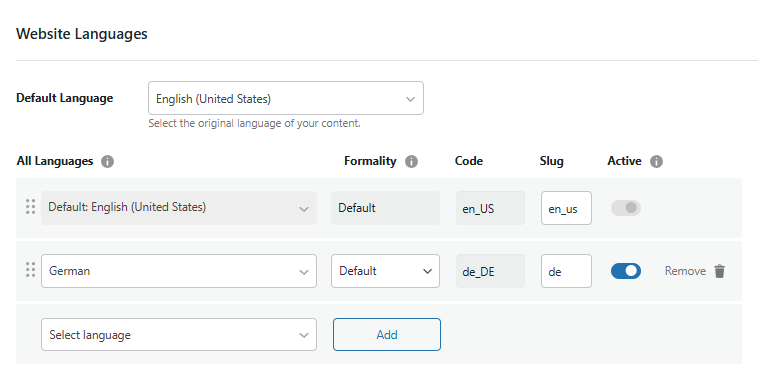
Empieza por elegir el idioma predeterminado —el inglés en nuestro ejemplo— y el idioma al que quieres traducir el menú —el alemán en nuestro ejemplo—. A continuación, configura el plugin según tus necesidades. Puedes Activar Google Translate para la traducción automática, utiliza directorios para el idioma predeterminado, o personalizar el selector de idioma.
Cómo traducir los elementos del menú de WordPress
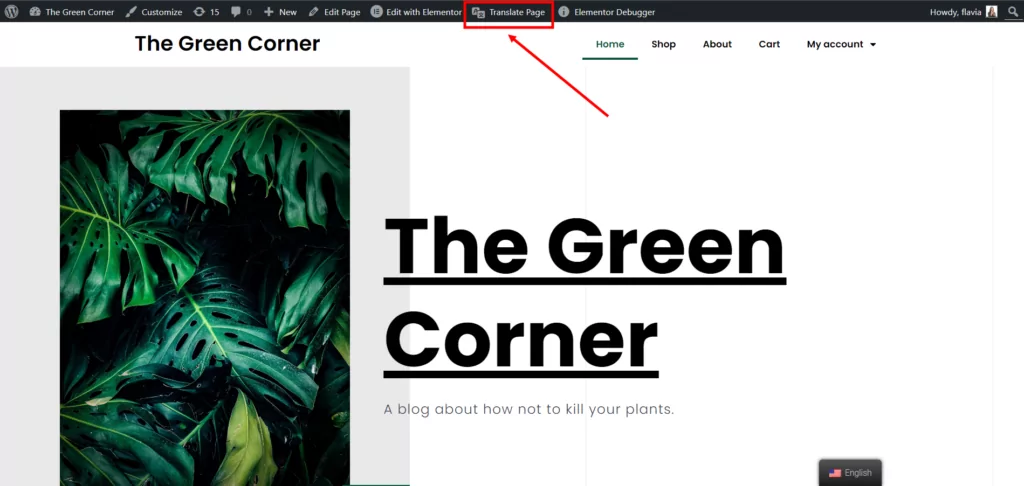
En nuestro ejemplo, traduciremos el menú de WordPress de un blog. Una vez que termine la creación de su menú, haga clic en el Traducir página enlace en la barra de administración superior. Esto abrirá una interfaz de traducción visual y le permitirá traducir el contenido de su sitio.
A continuación, simplemente pasa el ratón por encima del primer elemento del menú y aparecerá un icono de un lápiz azul. Haz clic en él y en la barra lateral asegúrate de introducir el término traducido del idioma predeterminado al idioma deseado (del inglés al alemán en este caso). Haz esto para cada elemento principal del menú.
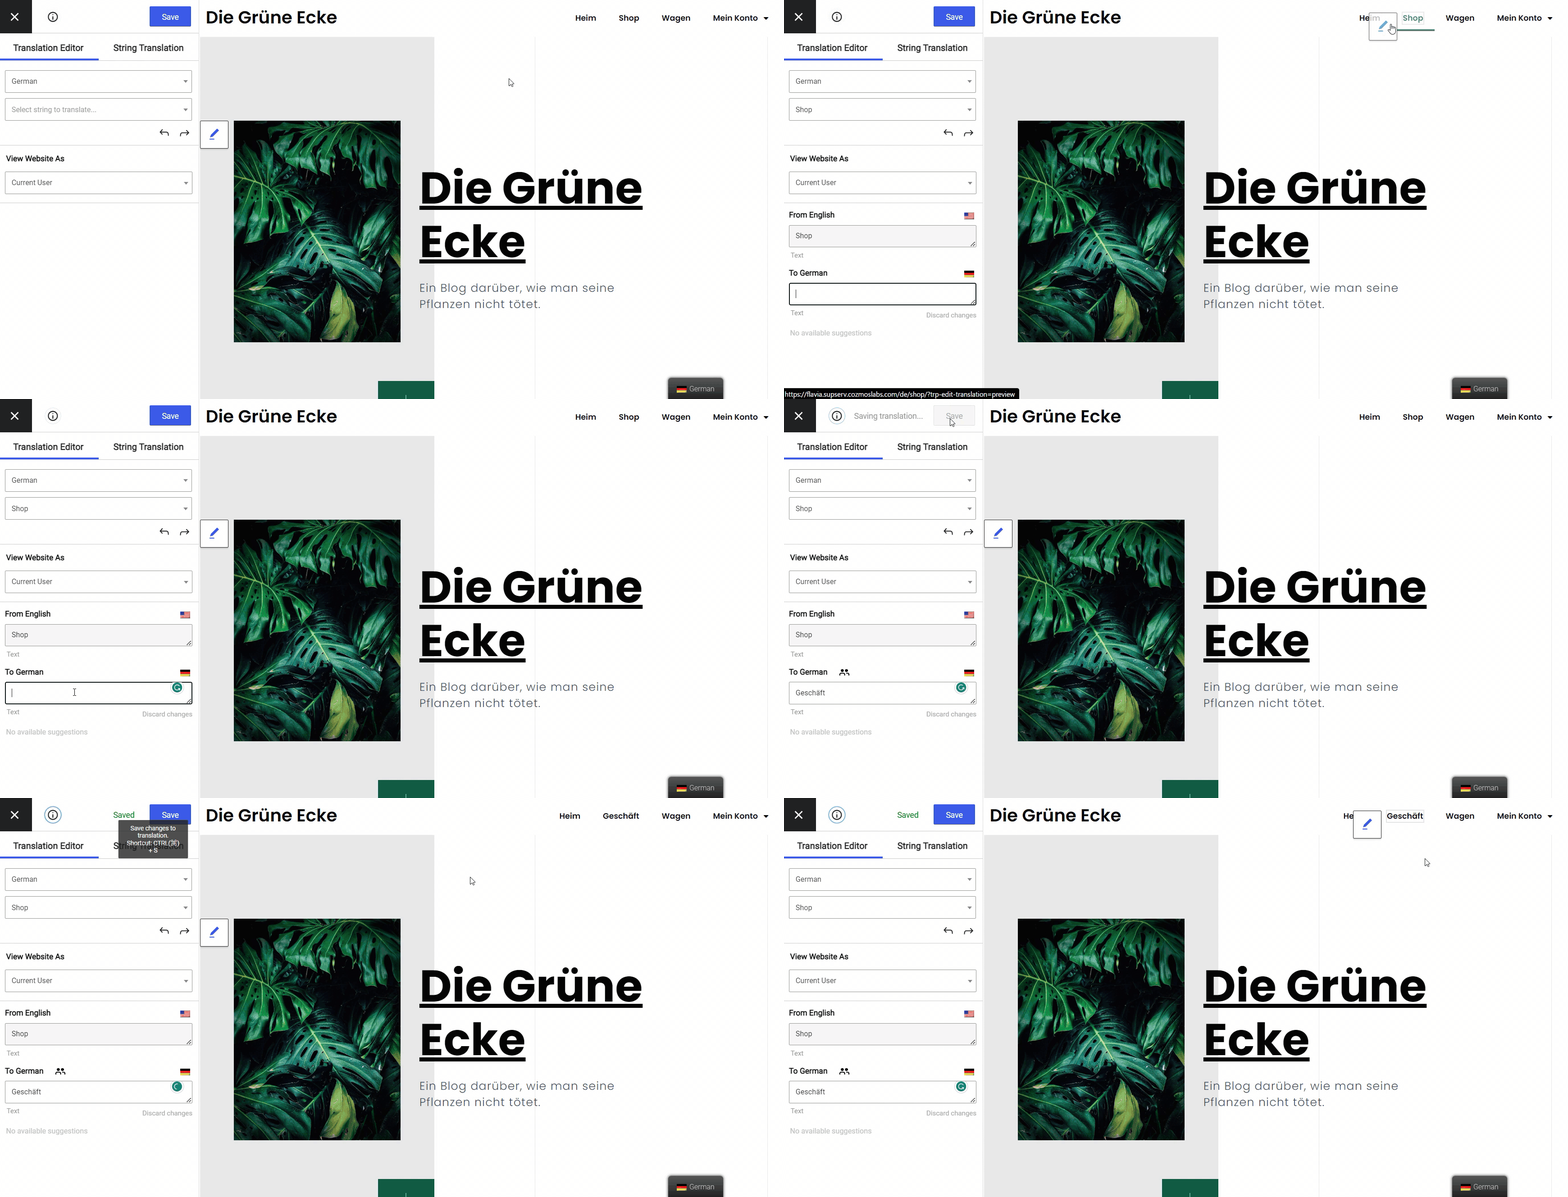
Notará que al pasar el cursor sobre algunos elementos, el icono del lápiz azul es reemplazado por un icono de flecha verde. Eso significa que el plugin ha detectado el cadenas generadas por el tema y complementos (cadenas de gettext). No te preocupes, el proceso de traducción es similar.
En esta etapa, deberías tener traducidos todos los elementos principales del menú, aquellos visibles por defecto. A continuación, aplica el mismo proceso para los elementos del submenú. Pasa el cursor sobre cada elemento del submenú e introduce la traducción en la barra lateral.
Y así de simple, ¡todo tu menú ya está traducido!
Mostrar diferentes elementos del menú para diferentes idiomas
Hay situaciones en las que es posible que desees tener una estructura de menú diferente según el idioma seleccionado. Esto es útil cuando deseas mostrar diferentes páginas para diferentes idiomas, o cuando cierto contenido no está traducido a un idioma específico y no deseas que aparezca en el menú para ese idioma.
TranslatePress incluye algunos complementos y funciones que amplían sus prestaciones.
Por ejemplo, puedes traducir solo ciertas páginas si quieres, mientras tienes el complemento prémium Navegación basada en el idioma Puedes mostrar fácilmente diferentes elementos del menú para diferentes idiomas.
Esto te otorga mucha flexibilidad en cuanto a qué elementos del menú mostrar en ciertos idiomas, así como qué contenido puedes excluir de ser traducido.
Configuración de la navegación basada en el complemento de idioma
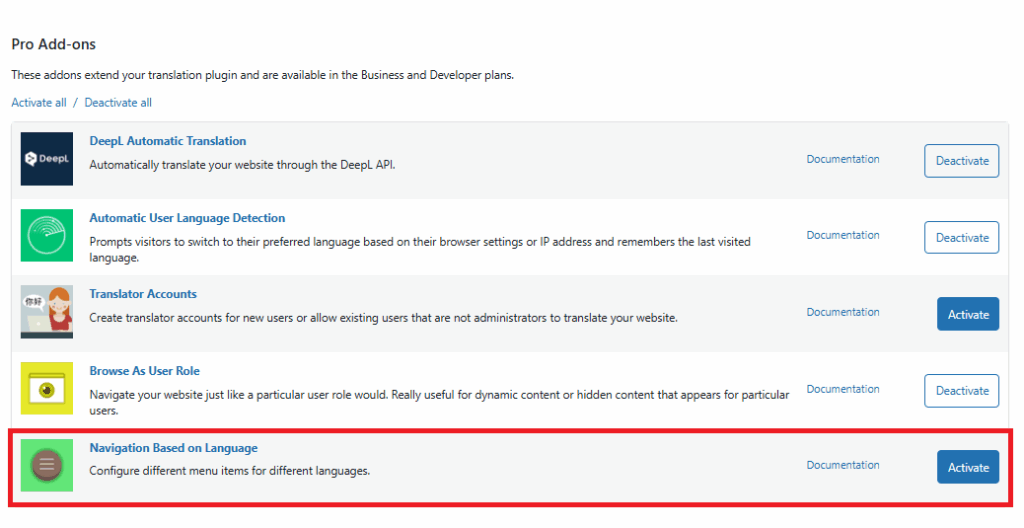
El Navegación basada en el idioma el complemento está disponible en el versiones «pro» de TranslatePress. Después de la compra, puedes activar el complemento navegando a Configuración → TranslatePress → Add-ons pestaña. Localiza el complemento en la Complementos Pro sección y haga clic en el Activar botón a su derecha.
A continuación, ve a Apariencia → Menús → Estructura del menú y al abrir cierto elemento de menú verás la opción de Limitar este elemento del menú a determinados idiomas. Asegúrate de seleccionar solo los idiomas en los que deseas mostrar ese elemento de menú.
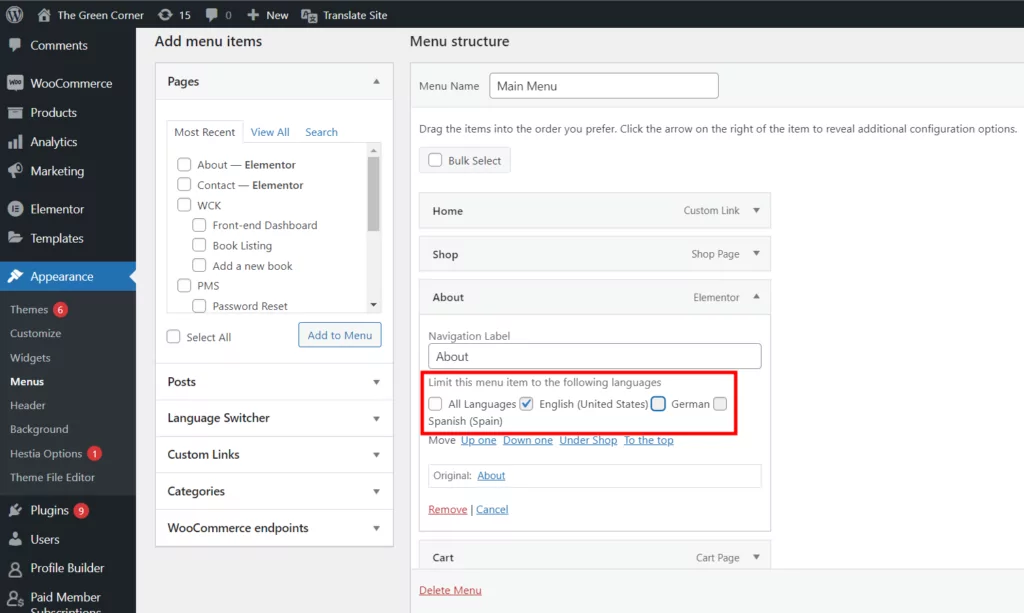
Para nuestro ejemplo, quiero eliminar el Acerca de página de las versiones en alemán y español del sitio. Para hacer esto, desmarcaré la Todos los idiomas casilla de verificación y solo marque la Inglés idioma en su lugar. Ahora, puede ver que este elemento está oculto al visitar la versión alemana del sitio.

Traduce todo tu sitio web
Convertir tu sitio en multilingüe no termina con solo traducir el menú de WordPress. Tienes que traducir todos los elementos de tu futuro sitio web multilingüe. El mismo proceso de traducción visual se puede aplicar a cualquier texto de tu sitio.
Además de la traducción de texto estándar, puedes utilizar TranslatePress para traducir diferentes tipos de elementos, como imágenes que contiene texto, Productos de WooCommerce, campos personalizados Y tipos de publicaciones, formularios, ventanas emergentes, etc. O si creó su sitio web utilizando un creador de páginas popular, como Elementor o Beaver Builder, podrás traducirlo fácilmente con TranslatePress. Funciona nada más instalarlo, sin necesidad de compatibilidad adicional.
Solo tienes que navegar por cada página con el editor de traducción TranslatePress, seleccionar y traducir cada parte del contenido, y pasar a la siguiente. Tendrás tu sitio web traducido en un abrir y cerrar de ojos.
Si buscas acelerar el proceso de traducción, consulta el Traducción automática Función disponible en TranslatePress. Utilizando herramientas de traducción automática como Google Translate o DeepL, TranslatePress hará que traduce automáticamente tu sitio al instante.
A continuación, puedes pulir manualmente las traducciones y asegurarte de que el contenido traducido sea de alta calidad.
Cerrando
Traducir un menú de WordPress es realmente sencillo con TranslatePress. Hemos resumido todos los pasos explicados anteriormente en este breve vídeo que aparece a continuación:
En nuestro ejemplo, utilicé solo un idioma de traducción con fines educativos y para simplificar su incorporación, pero puede traducir un menú de WordPress (y todo su sitio) a tantos idiomas como necesite.
Además, puedes utilizar el complemento de navegación por idioma para personalizar qué elementos del menú se muestran en función del idioma activo.
TranslatePress Multilingüe
Si aún no has utilizado TranslatePress, asegúrate de prueba la demo o echa un vistazo a la versión gratuita.
¿Todavía tienes dudas sobre cómo traducir los menús de WordPress? ¡Cuéntanoslo en los comentarios!
Si encontraste útil esta publicación, por favor visita nuestro Canal de YouTube, donde subimos constantemente tutoriales en video cortos y fáciles de seguir. También puedes seguirnos en Facebook y X ser el primero en enterarte cada vez que publicamos.