
In diesem Beitrag
Die Übersetzung einer Website erfordert mehr als eine einfache Übersetzung des Inhalts. Ein großes Anliegen ist beispielsweise, wie man Menü in WordPress übersetzen. Das Menü ist eines der ersten Elemente einer Website, die Nutzer wahrnehmen, und sie stützen ihren ersten Eindruck darauf.
Beim Erstellen eines mehrsprachigen WordPress-Menüs gibt es einige Aspekte, die Sie beachten müssen. Einige Ihrer Seiten oder Produkte sind möglicherweise miteinander verknüpft oder nur in bestimmten Ländern verfügbar, sodass Sie diese Menüpunkte für bestimmte Sprachen ausblenden müssen.
Die Übersetzung wirkt sich auch auf das Menüdesign aus. Zum Beispiel ist allgemein bekannt, dass deutsche Wörter im Durchschnitt länger sind als englische Wörter, was den Abstand zwischen den Menüpunkten beeinflusst.
TranslatePress ist ein WordPress-Übersetzungsplugin, mit dem Sie jedes WordPress-Menü mit nur wenigen Klicks über einen visuellen Übersetzungseditor übersetzen können.
Nachfolgend gehen wir auf die einfachen Schritte ein, um dies zu erreichen.
Verwandt: So übersetzen Sie benutzerdefinierte Felder in WordPress
Ein WordPress-Menü einrichten
Aufgrund seiner Konzeption funktioniert TranslatePress sofort mit jedem Theme und jedem Plugin, sodass Sie das WordPress-Theme Ihrer Wahl oder sogar ein Menü-Plugin. Die meisten Themes unterstützen ein primäres und ein Footer-Menü, aber einige bieten Benutzern mehr Optionen zum Anzeigen von Menüs.
Um ein WordPress-Menü zu erstellen, gehen Sie zu Aussehen → Menüs → Menüs bearbeiten Bestimmen Sie dessen Struktur und fügen Sie die gewünschten Menüpunkte hinzu.
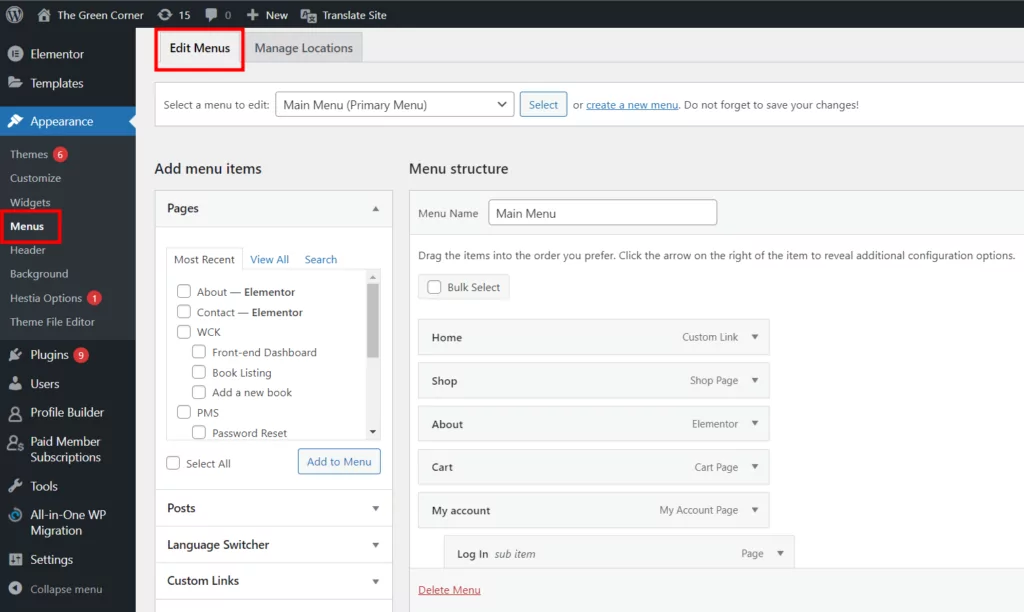
Als nächstes gehen Sie zu Aussehen → Menüs → Standorte verwalten den Ort der Menüs auszuwählen. Die verfügbaren Orte werden durch das von Ihnen verwendete Theme definiert.
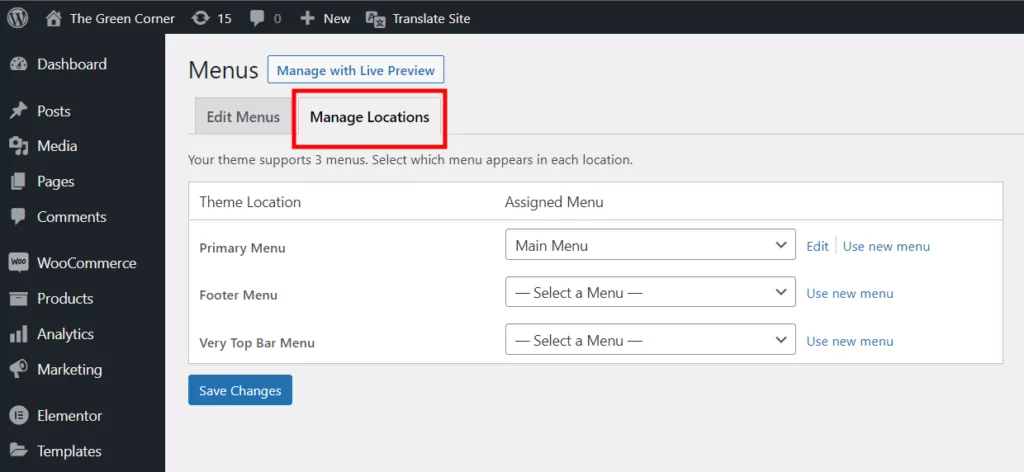
Nehmen wir an, Sie haben bereits ein primäres Menü mit Einträgen und Untereinträgen, die übersetzt werden müssen. In unserem Beispiel hier übersetzen wir das primäre Menü, das die Hauptnavigation Ihrer Website ist.
Installation und Einrichtung von TranslatePress
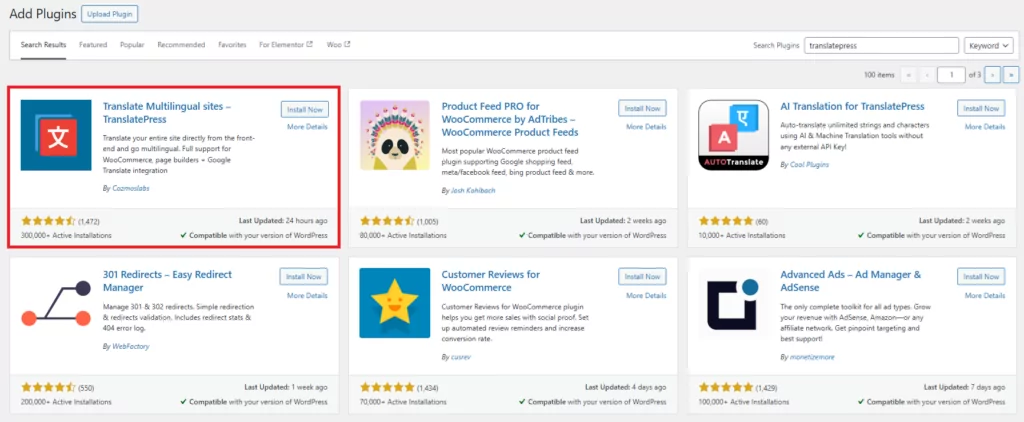
Nachdem wir unser WordPress-Menü erstellt haben, fahren wir mit der Installation und Konfiguration von TranslatePress fort. Navigieren Sie einfach zu Plugins → Neu hinzufügen im WordPress-Admin-Dashboard und geben Sie “TranslatePress” in das Suchfeld ein. Suchen Sie das TranslatePress-Plugin, installieren und aktivieren Sie es.
Dann gehe zu TranslatePress Einstellungen → Allgemein das passende Setup für Ihre mehrsprachige website.
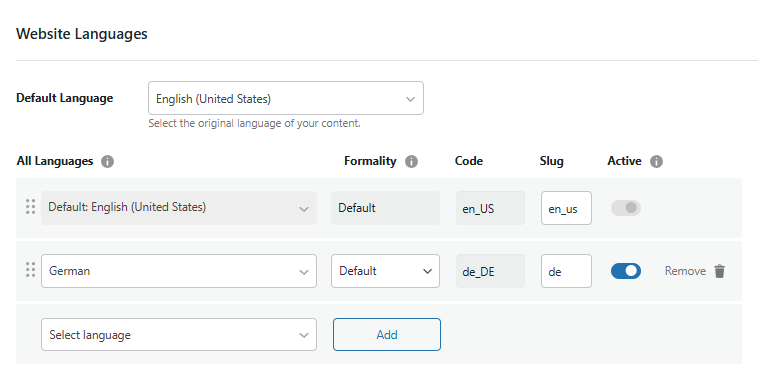
Beginnen Sie mit der Auswahl der Standardsprache – in unserem Beispiel Englisch – und der Sprache, in die Sie das Menü übersetzen möchten – in unserem Beispiel Deutsch. Richten Sie anschließend das Plugin nach Ihren Bedürfnissen ein. Sie können Google Translate für die automatische Übersetzung aktivieren, benutze Verzeichnisse für die Standardsprache, oder passen Sie die Sprachumschalter.
Wie man WordPress-Menüeinträge übersetzt
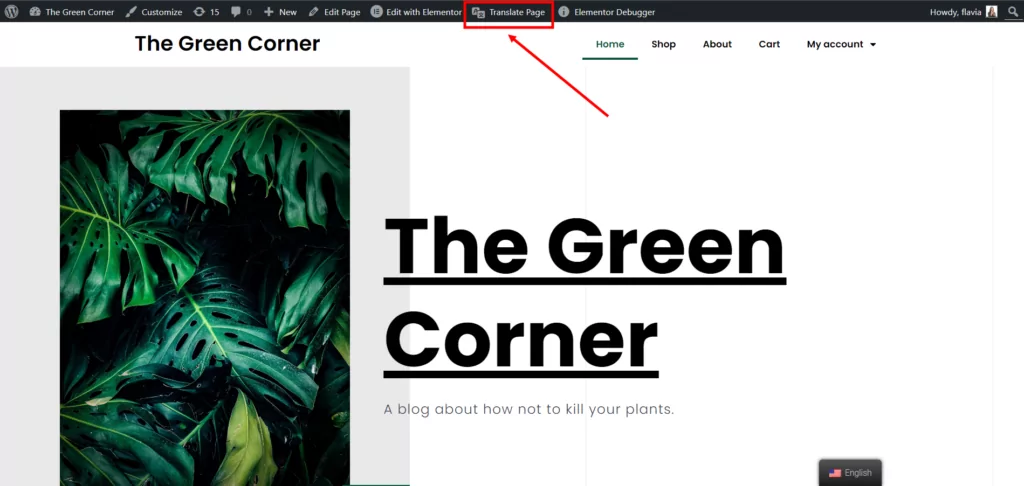
In unserem Beispiel übersetzen wir das WordPress-Menü eines Blogs. Sobald Sie mit der Erstellung Ihres Menüs fertig sind, klicken Sie auf Seite übersetzen Link in der oberen Administrationsleiste. Dadurch wird eine visuelle Übersetzungsoberfläche geöffnet und Sie können Ihre Website-Inhalte übersetzen.
Bewegen Sie als Nächstes einfach den Mauszeiger über das erste Element im Menü, woraufhin ein blaues Stiftsymbol angezeigt wird. Klicken Sie darauf und stellen Sie in der Seitenleiste sicher, dass Sie den übersetzten Begriff von der Standardsprache in die Zielsprache (hier von Englisch nach Deutsch) eingeben. Tun Sie dies für jedes Hauptelement im Menü.
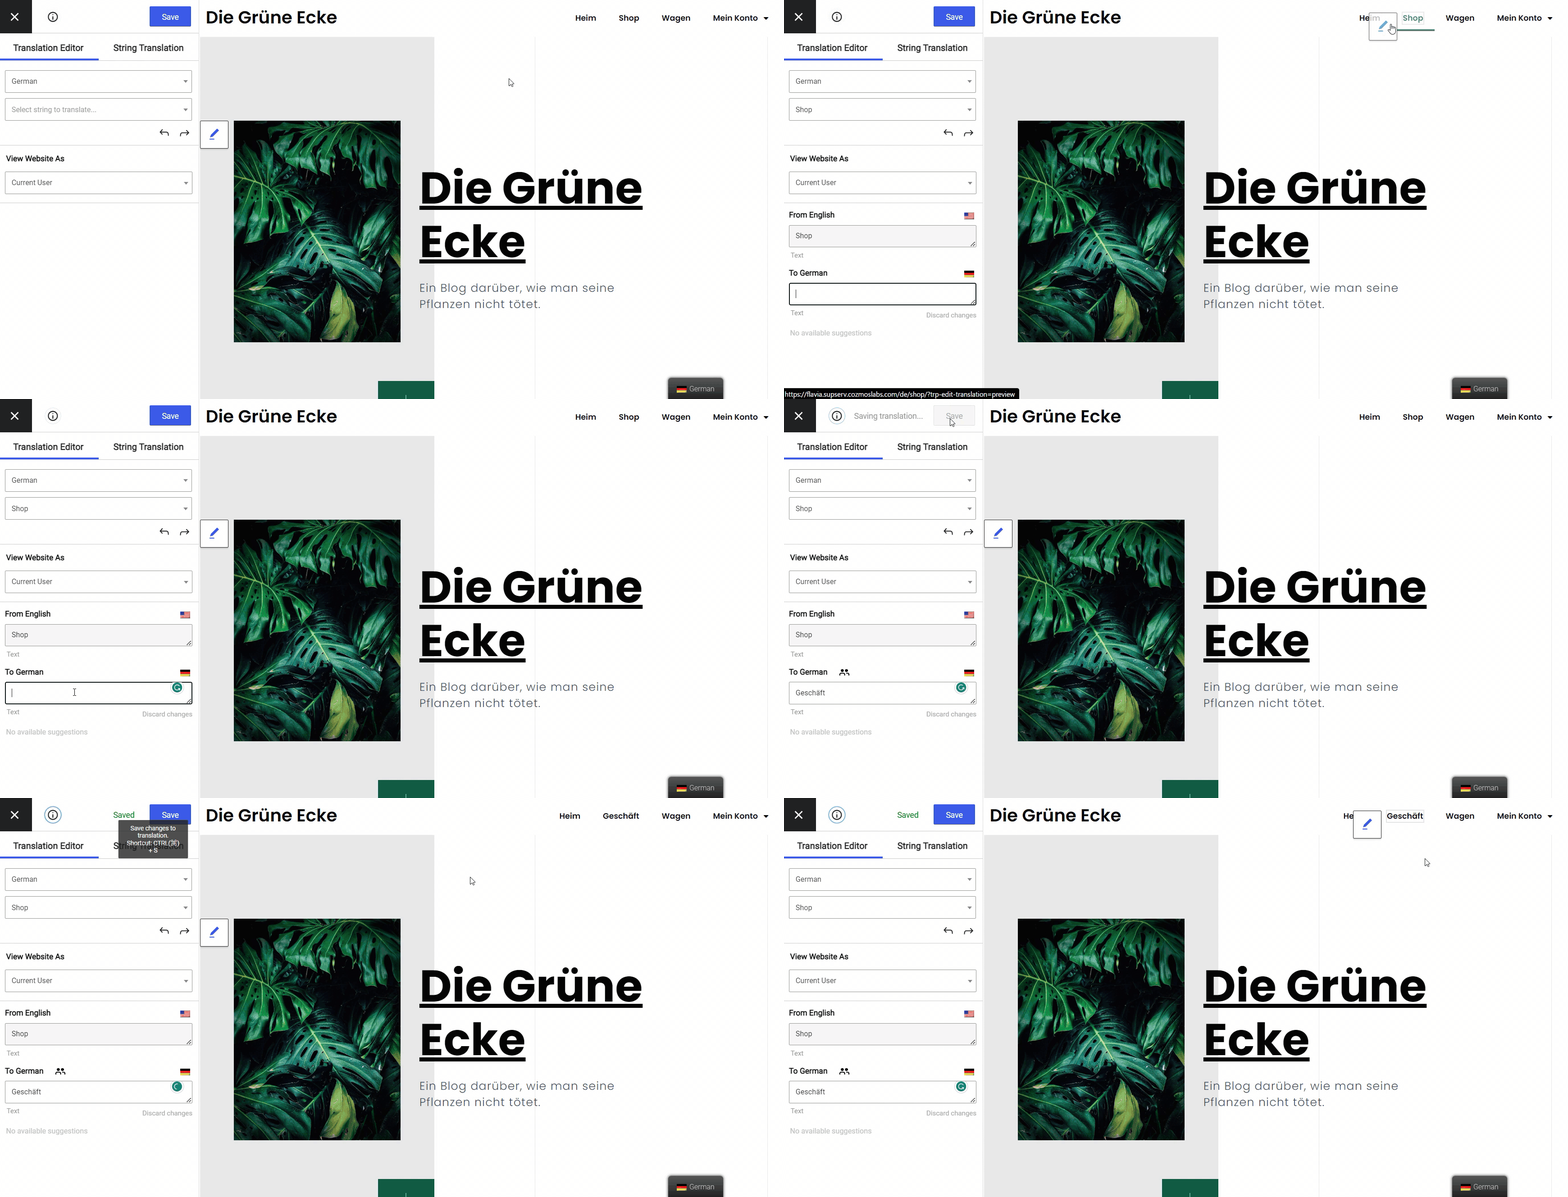
Sie werden feststellen, dass beim Überfahren einiger Elemente mit der Maus das blaue Stiftsymbol durch ein grünes Pfeilsymbol ersetzt wird. Das bedeutet, dass das Plugin Folgendes erkannt hat: vom Theme generierte Strings und Plugins (Gettext-Strings). Keine Sorge, der Übersetzungsprozess ist ähnlich.
In dieser Phase sollten Sie alle Hauptmenüpunkte – die standardmäßig sichtbaren – übersetzt haben. Wenden Sie als Nächstes denselben Prozess für die Untermenüpunkte an. Bewegen Sie den Mauszeiger über jeden Untermenüpunkt und geben Sie die Übersetzung in der Seitenleiste ein.
Und ganz einfach so ist Ihre gesamte Speisekarte nun übersetzt!
Verschiedene Menüelemente für verschiedene Sprachen anzeigen
Es gibt Situationen, in denen Sie basierend auf der ausgewählten Sprache eine andere Menüstruktur wünschen. Dies ist nützlich, wenn Sie verschiedene Seiten für verschiedene Sprachen anzeigen möchten. Oder wenn bestimmte Inhalte nicht in eine bestimmte Sprache übersetzt wurden und Sie nicht möchten, dass sie im Menü für diese Sprache erscheinen.
TranslatePress verfügt über einige Erweiterungen und Funktionen, die den Funktionsumfang erweitern.
Zum Beispiel können Sie nur bestimmte Seiten übersetzen wenn Sie möchten, während mit dem Premium-Add-on Navigation basierend auf Sprache Sie können ganz einfach verschiedene Menüeinträge für verschiedene Sprachen anzeigen.
Dies gibt Ihnen große Flexibilität hinsichtlich der Menüpunkte, die in bestimmten Sprachen angezeigt werden sollen, sowie der Inhalte, die Sie von der Übersetzung ausschließen können.
Einrichten der sprachabhängigen Navigation (Add-on)
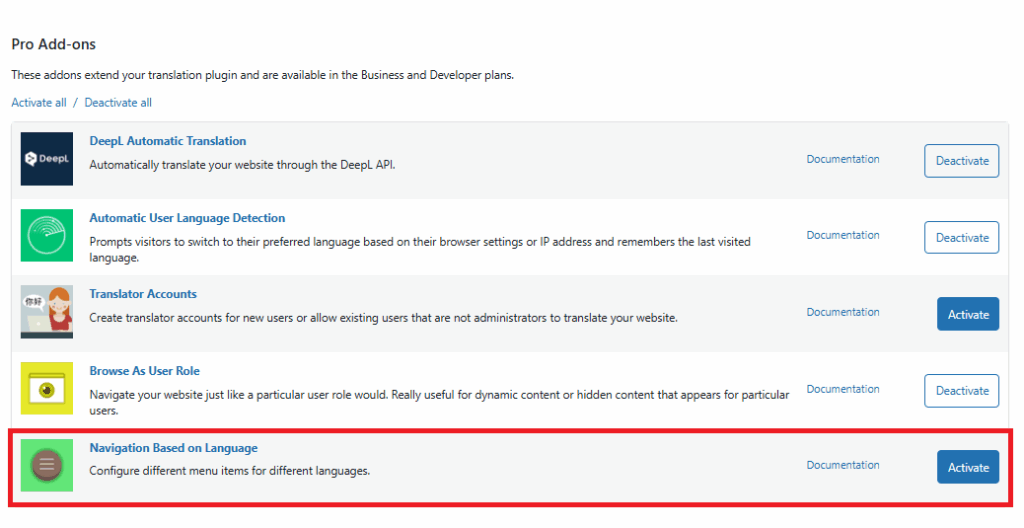
Der Navigation basierend auf Sprache Das Add-on ist verfügbar im Pro-Versionen von TranslatePress. Nach dem Kauf können Sie das Add-on aktivieren, indem Sie zu Einstellungen → TranslatePress → Add-ons Registerkarte. Suchen Sie das Add-on in der Pro-Add-ons Abschnitt und klicken Sie auf Aktivieren Knopf rechts davon.
Als nächstes gehen Sie zu Aussehen → Menüs → Menüstruktur und durch das Öffnen eines bestimmten Menüelements sehen Sie die Option, Beschränken Sie diesen Menüpunkt auf bestimmte Sprachen. Stellen Sie sicher, dass Sie nur die Sprachen auswählen, in denen dieses Menüelement angezeigt werden soll.
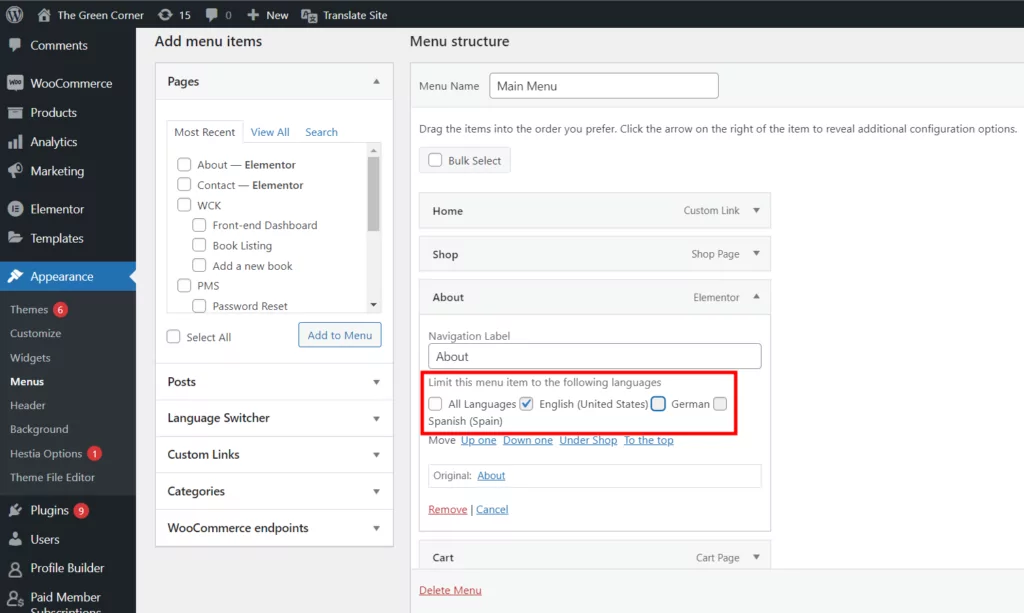
Für unser Beispiel möchte ich das eliminieren Über uns Seite der deutschen und spanischen Versionen der Website. Dazu deaktiviere ich das Alle Sprachen Kontrollkästchen und nur das Englisch Sprache stattdessen. Nun können Sie sehen, dass dieses Element ausgeblendet ist, wenn Sie die deutsche Version der Website besuchen.

Übersetzen Sie Ihre gesamte Website
Die Mehrsprachigkeit Ihrer Website endet nicht allein mit der Übersetzung des WordPress-Menüs. Sie müssen alle Elemente Ihrer zukünftigen mehrsprachigen Website übersetzen. Derselbe visuelle Übersetzungsprozess lässt sich auf jeden Text auf Ihrer Website anwenden.
Neben der Übersetzung von Standardtexten können Sie mit TranslatePress auch verschiedene Arten von Elementen übersetzen, wie zum Beispiel Bilder der Text enthält, WooCommerce-Produkte, Benutzerdefinierte Felder & Beitragstypen, Formulare, Pop-ups, usw. Oder wenn Sie Ihre Website mit einem beliebigen Page Builder erstellt haben, wie Elementor oder Biber-Builder, dann können Sie es ganz einfach mit TranslatePress übersetzen. Es funktioniert sofort, ohne dass zusätzliche Kompatibilitätsmaßnahmen erforderlich sind.
Navigieren Sie einfach mit dem TranslatePress-Übersetzungseditor durch die einzelnen Seiten, wählen Sie die jeweiligen Inhalte aus und übersetzen Sie sie, bevor Sie zur nächsten Seite übergehen. So ist Ihre Website im Handumdrehen übersetzt.
Wenn Sie den Übersetzungsprozess beschleunigen möchten, schauen Sie sich das Automatische Übersetzung Funktion, die in TranslatePress verfügbar ist. Durch die Verwendung automatischer Übersetzungstools wie Google Übersetzer oder DeepL, TranslatePress wird Übersetzen Sie Ihre Website automatisch sofort.
Danach können Sie die Übersetzungen manuell verfeinern und sicherstellen, dass Ihre übersetzten Inhalte von hoher Qualität sind.
Abschluss
Mit TranslatePress ist das Übersetzen eines WordPress-Menüs wirklich kinderleicht. Wir haben alle oben beschriebenen Schritte in diesem kurzen Video unten zusammengefasst:
In unserem Beispiel habe ich zu Lernzwecken und zur Vereinfachung Ihrer Einarbeitung nur eine Übersetzungssprache verwendet, aber Sie können ein WordPress-Menü (und Ihre gesamte Website) in beliebig viele Sprachen übersetzen, die Sie benötigen.
Darüber hinaus können Sie das sprachbasierte Navigations-Add-on verwenden, um anzupassen, welche Menüpunkte basierend auf der aktiven Sprache angezeigt werden.
TranslatePress Mehrsprachig
Falls Sie TranslatePress noch nicht genutzt haben, sollten Sie unbedingt Mit der Demo spielen oder schauen Sie sich an kostenlose Version.
Haben Sie noch Fragen zum Übersetzen von WordPress-Menüs? Lassen Sie es uns in den Kommentaren wissen!
Wenn Sie diesen Beitrag hilfreich fanden, schauen Sie sich bitte unsere an YouTube-Kanal, wo wir ständig kurze und leicht verständliche Video-Tutorials hochladen. Sie können uns auch folgen auf Facebook und X um der Erste zu sein, der jedes Mal Bescheid weiß, wenn wir etwas posten.