In this post
In this post
Searching for a way to make WooCommerce multilingual for free?
If you have an online store with a multilingual audience, going multilingual is a great decision because a significant chunk of people won’t shop at a store if it’s not available in their native language(s).
But if you’ve browsed some other WooCommerce translation solutions, you might have been put off by their price and/or complexity. Thankfully, there are ways to translate a WooCommerce store for free, which is what this post is about.
Below, we’re going to show you an easy, non-technical way to make WooCommerce multilingual for free. You can use manual or automatic translation (or both) and you’ll be able to manage all of your store’s content from a simple visual translation editor like this one:

Ready to begin? Let’s start translating!
What You Need to Make WooCommerce Multilingual for Free
To translate WooCommerce for free, you can use the free TranslatePress plugin.
As you saw in the GIF above, TranslatePress lets you manage the translations for all of your store’s content using a simple visual editor. From the visual editor, you can translate 100% of your site’s content, whether it comes from the WordPress editor, WooCommerce, other plugins, your theme, or pretty much anywhere else.
TranslatePress has full support for WooCommerce, so you’ll be able to translate everything about your store, from the navigation menu to the add to cart button down to the footer.
You can either translate your store manually from scratch or you can use automatic translation powered by Google Translate. Or, you can use both! You can generate baseline translations with Google Translate but then go back and manually edit them as needed.
Unlike some other solutions, TranslatePress also doesn’t impose any word count limits on the free version. Whether your store has 10,000 words or 1,000,000 words (or more!), you’ll be able to translate it completely using TranslatePress.
The only translation limit on the free plan is that you’re only able to translate your store into one new language (you can gain support for unlimited languages by purchasing the premium version).
In the step-by-step tutorial below, we’ll only focus on the free features to deliver on our promise of making WooCommerce multilingual for free.
After the tutorial, though, we’ll mention a few reasons why you might want to consider the premium version of TranslatePress in the future.
How to Make WooCommerce Multilingual for Free With TranslatePress
Now, let’s get into the step-by-step guide for how you can create a multilingual WooCommerce store using the free version of the TranslatePress plugin.
For this tutorial, the only thing that we’ll assume is that you already have your WooCommerce store up and running in the original language. Once you have that, we’ll cover all the steps to turn that single-language store into a multi-language store.
1. Install TranslatePress and Choose Languages
To get started, install the free version of TranslatePress from WordPress.org.
Then, go to Settings → TranslatePress to choose the languages that you want to use on your store:
- Default Language – the language that your store currently exists in.
- All Languages – the new language into which you want to translate your store’s content. TranslatePress lets you translate your store into one new language for free. To add support for unlimited languages, you need to upgrade to the premium version.
For example, if your store is currently in English and you want to offer it in both English and Spanish, you would configure the plugin like this:
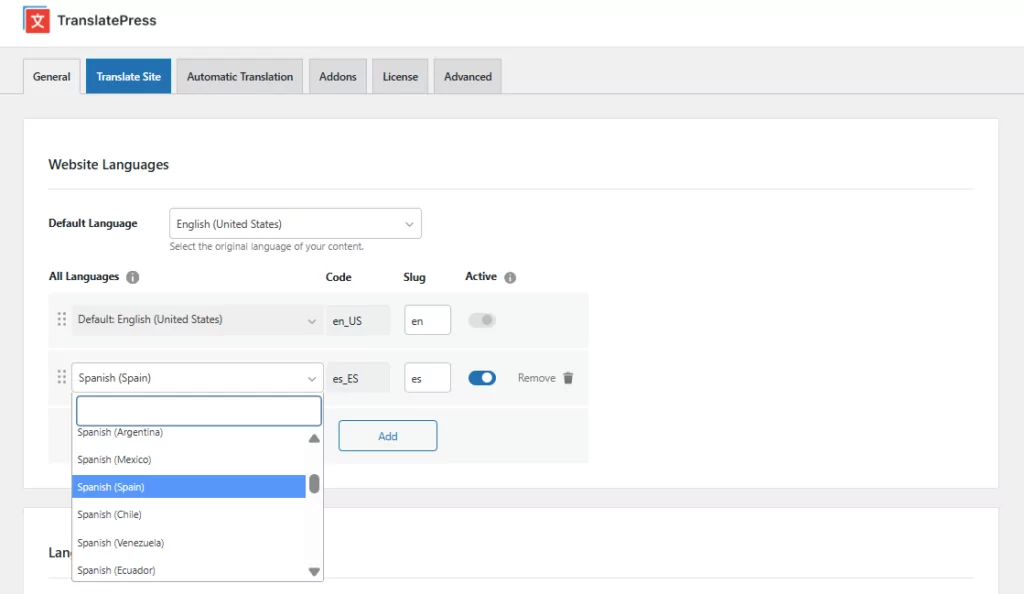
If you don’t see your language in the drop-down, you can also add a custom language.
2. Optional: Set Up Automatic Translation from Google Translate
As we mentioned earlier, TranslatePress gives you two ways to translate your store:
- Automatic translation — generate baseline translations instantly, then refine them as needed.
- Manual translation — translate everything from scratch using the visual editor.
You can also use both: start with automatic translation to cover your content quickly, then go back and edit anything that needs a more personal touch.
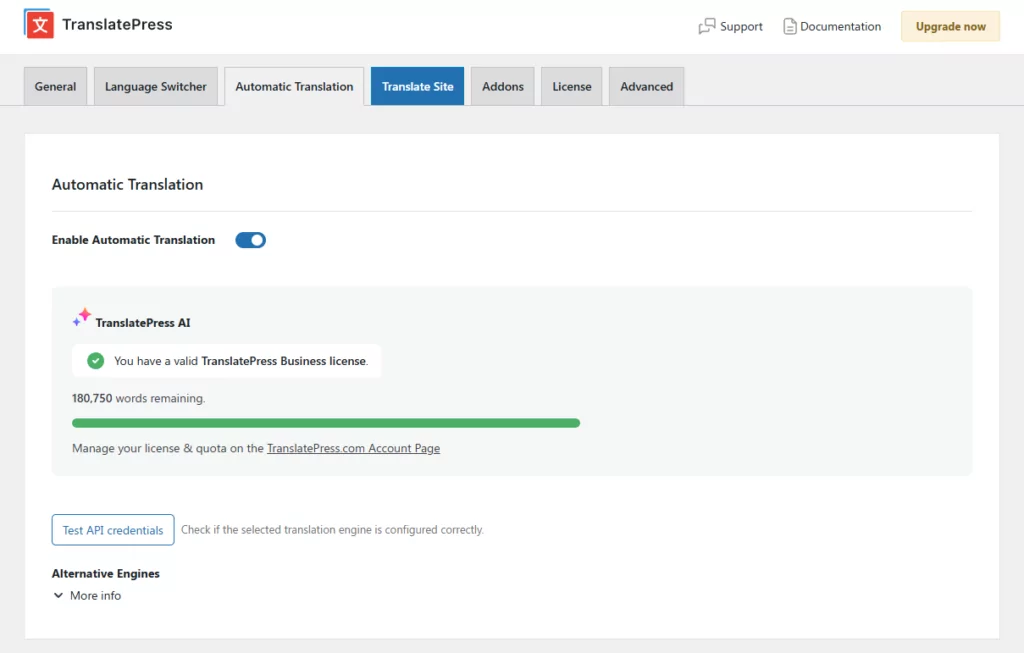
The easiest way to get started: TranslatePress AI
TranslatePress has its own built-in translation engine — TranslatePress AI — and it’s the fastest way to get your store translated. Unlike other automatic translation options, it requires no external account, no API key, and no separate billing setup. Every plan, including the free version, comes with a set number of AI words included so you can start translating immediately.
To enable it, go to the Automatic Translation tab in your TranslatePress settings, toggle automatic translation on, and select TranslatePress AI as your engine.
You will need to create a free license at this step if you don’t have one yet. This will provide you with 2000 AI words you can use with TranslatePress AI for free.
Alternative: Google Translate
If you’d prefer to use Google Translate, that’s also available on the free plan — though it does require generating a Google Cloud Translate API key first. You can follow our documentation here to set that up.

TranslatePress doesn’t charge you anything to use Google Translate, but Google’s own pricing applies if your store is large. The Google Translate API includes up to 500,000 characters per month for free (~100,000 words). After that, you’ll pay $20 per million characters. If you want to stay within the free tier, TranslatePress includes a built-in usage limiter to help you do that.
For more details, you can check out our full guide on how to automatically translate WooCommerce.
Whether you use TranslatePress AI, Google Translate, or skip automatic translation entirely, all of your translations are fully editable in the visual editor — which is what we’ll set up next.
3. Translate Content Using the Visual Editor
Now, you’re ready to use the visual translation editor to manage your site’s translations. You’ll use the same editor whether you set up automatic translation or are translating everything from scratch:
- If you’re translating manually, the translated version of your content will be empty and you’ll need to add translations from scratch. The one exception is the translations for WooCommerce plugin content, which TranslatePress will pre-fill using the relevant WooCommerce language pack.
- If you used automatic translation, the translated version will be pre-filled with the automatic translation from Google Translate, but you can fully edit it if needed.
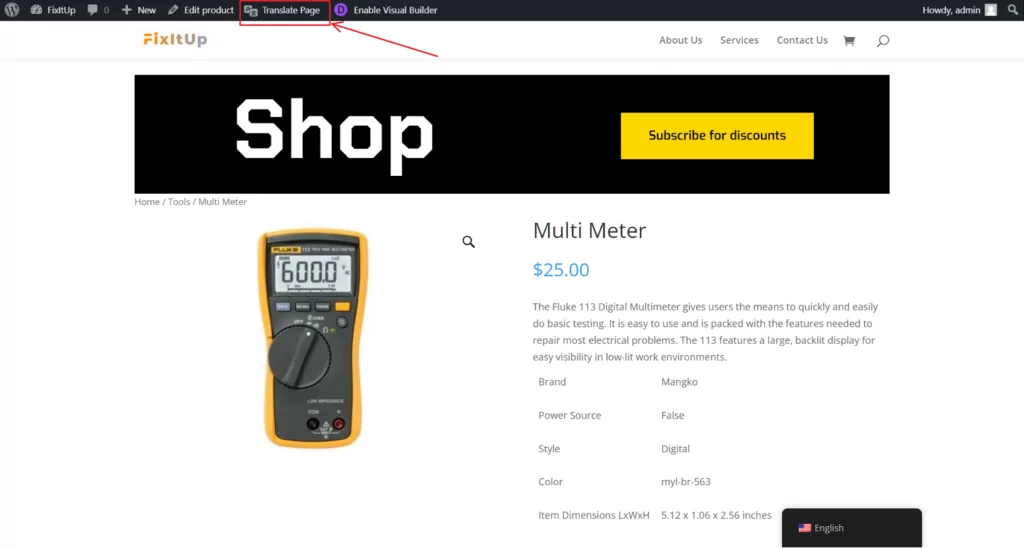
To open the visual translation editor, go to the piece of content that you want to translate on the front-end of your site – e.g. a WooCommerce product. Then, click the Translate Page option on the WordPress toolbar:
Now, you should see a live preview of your site on the right along with a sidebar on the left where you can manage your translations.
To translate a piece of content, all you need to do is hover over it on the live preview and click the pencil icon. That will open the content’s translation in the sidebar, where you can add the translation using the editor field:
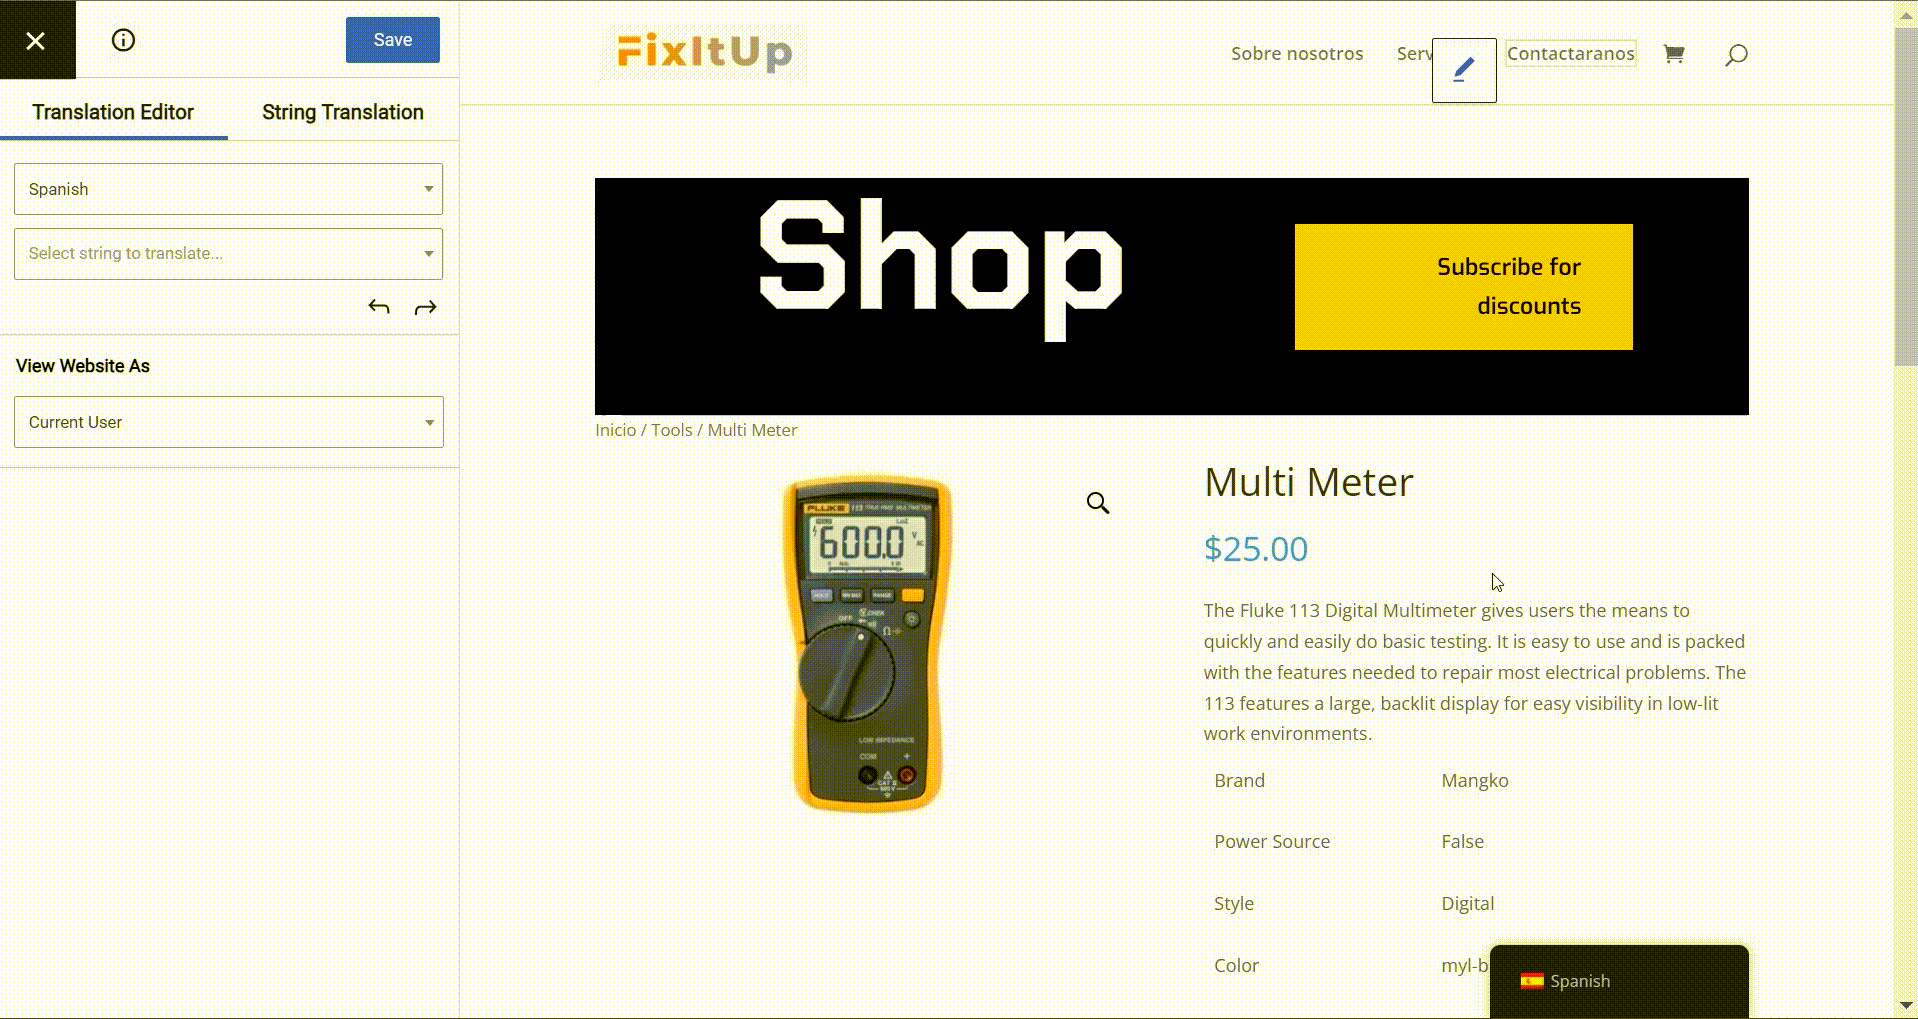
The pencil icon will be green if you’re translating content that comes directly from the WooCommerce plugin (like the “Add to Cart” button) and blue if you’re translating content that’s unique to your site (like a product’s title or description).
How to Translate Other Content
You can use this same point-and-click approach to translate 100% of your store’s content, whether it comes from the WordPress editor, the WooCommerce product editor, the WooCommerce plugin, your theme, other plugins (like page builders), etc.
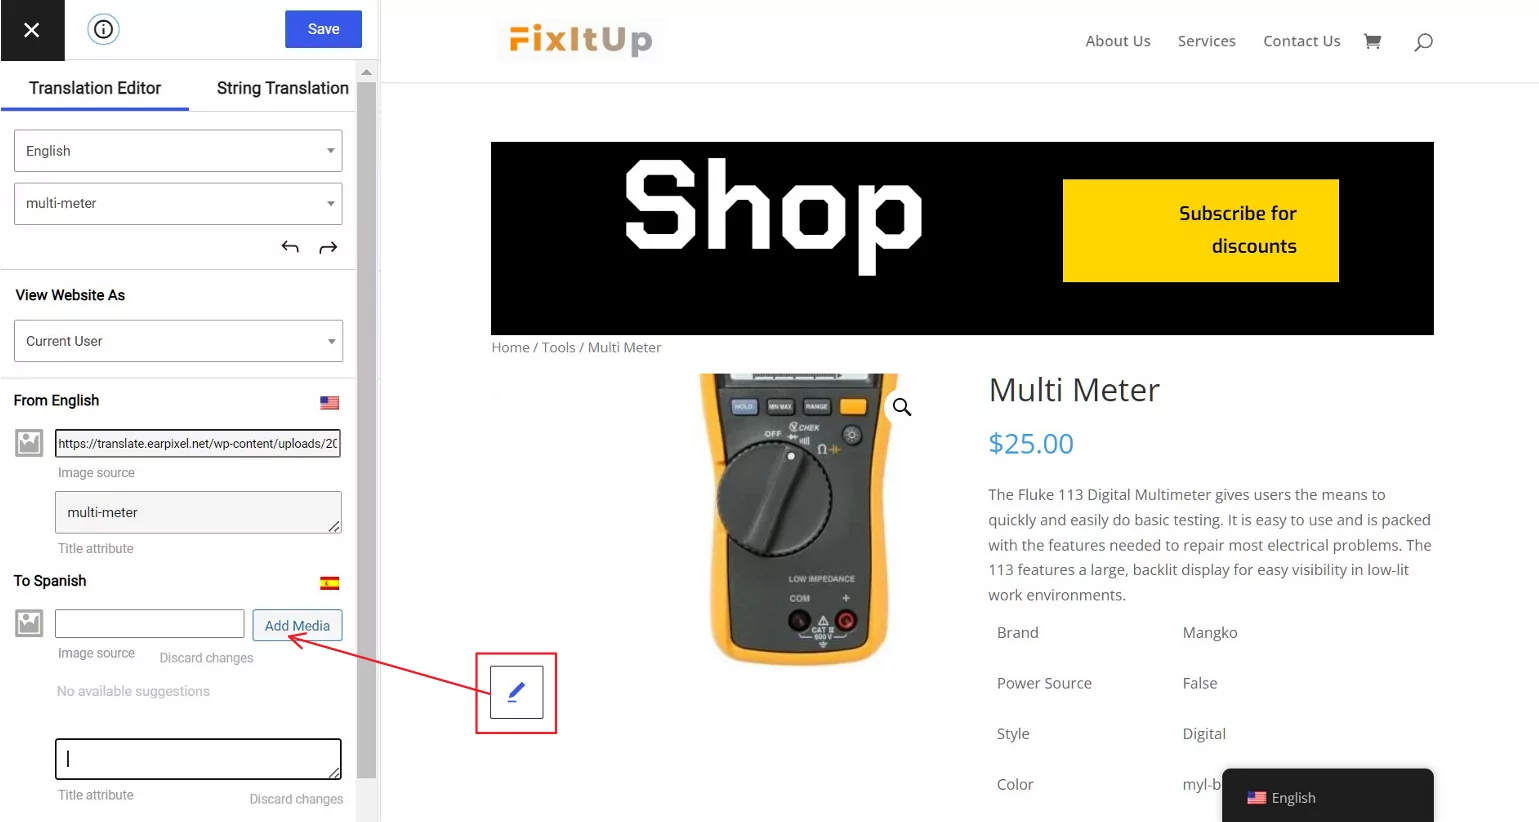
You can even “translate” WooCommerce product images by hovering over an image and clicking the pencil icon. This will let you select a different image from the Media Library for people browsing in that language:
If you’d like to see more detailed guides for translating different types of content, you can check out these posts:
- Images
- Editor (Gutenberg) blocks
- Custom fields
- Custom post types
- WordPress forms
- WordPress menus
- Popup content
- Sliders
- WooCommerce products
- Elementor (page builder)
- Divi (page builder)
- Oxygen (website builder)
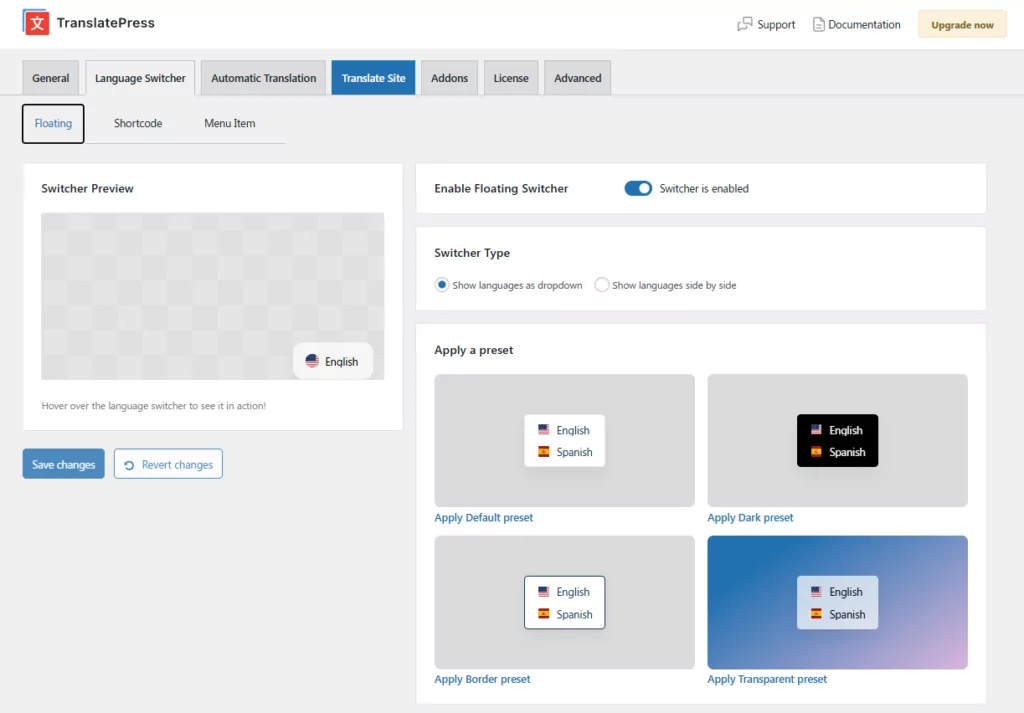
4. Configure Your Store’s Language Switcher
By default, TranslatePress adds a floating language switcher to the bottom-right corner of your store as soon as you add a translation language — so your shoppers can switch languages without you having to configure anything first.
To customise how it looks and where it appears, go to the Language Switcher tab in the top navigation of your TranslatePress settings. You’ll find three sub-tabs, each controlling a different switcher type:
- Floating — the persistent corner switcher. Here you can choose its position, apply a design preset, customize colors and flag shape, and set separate layouts for Desktop and Mobile. A live preview updates as you make changes.
- Shortcode — place the switcher anywhere on your store using the
 English
 - Menu Item — add language options directly to any WordPress navigation menu via Appearance → Menus. The switcher inherits your theme’s menu styling automatically, so no colour configuration is needed.

For a deeper look at all the customisation options, check out our full post on how to add a WordPress language switcher.
And that’s it! You just created a free multilingual WooCommerce store, without ever needing to look at a single line of code.
When Should You Upgrade to the Premium Version of TranslatePress?
This tutorial is about how to make WooCommerce multilingual for free, so we’ve focused exclusively on the free features of TranslatePress for the guide above.
Using just the free version, you can create a fully functioning multilingual WooCommerce store in one new language (two languages total).
However, there still are a few reasons why you might want to consider upgrading to the premium version of TranslatePress once you have the budget to do so.
TranslatePress Multilingual
Unlimited Languages
Reason number one would be if you need to translate your store into multiple new languages. The free version of TranslatePress lets you translate all of your store’s content into one new language, but the Pro version adds support for unlimited languages.
Multilingual WooCommerce SEO
The second big reason is multilingual SEO. The free version of TranslatePress will create static, indexable versions of all your translated content, so you will be able to rank your translated content/products in Google and other search engines.
However, with its SEO Pack add-on, the premium version of TranslatePress goes further and gives you a lot of features to optimize your store’s multilingual SEO.
For example, the SEO Pack add-on lets you also translate your SEO titles and meta descriptions, like those you’ve added with Yoast SEO or Rank Math.
It also integrates with most SEO plugins to turn the plugins’ automatically generated sitemaps into a multilingual XML sitemap that includes all of your site’s translated content.
Finally, it also lets you more fully translate all of your store’s URL slugs, including WooCommerce URL slugs.
If you’re serious about multilingual WooCommerce SEO, having these features is really useful for ranking your translated content.
DeepL Support
The free version of TranslatePress supports the Google Translate API for automatic translation. But if you go Pro, you can use DeepL, which some people find to be a bit more accurate than Google Translate for the languages that it supports (mainly European languages, but it does also support Chinese and Japanese).
Other Premium Features
Beyond the three key areas above, the premium version of TranslatePress also offers a number of other useful features including the following:
- Translator Accounts – create dedicated translator accounts – great for working with freelancer translators or professional translation services.
- Navigation based on user language – show completely different navigation menus based on a user’s language (versus just translating the same navigation menu like you can with the free version).
- Automatic user language detection – automatically redirect users to their preferred languages as soon as they land on your site instead of requiring them to manually use the language switcher.
Translate Your WooCommerce Store Today
If you’re looking to make WooCommerce multilingual for free, TranslatePress provides an easy solution that supports automatic translation from Google Translate and lets you manage all of your translations using a simple visual editor.
Unlike some other free translation solutions, there are no word limits on the free plan – you can translate 100% of your store’s content into one new language 100% for free.
Try it out today by installing the free TranslatePress plugin from WordPress.org.
Then, once you have your multilingual store up and running, consider upgrading to the premium version of TranslatePress for improved multilingual SEO, unlimited language support, and lots of other useful features.
TranslatePress Multilingual
Do you still have any questions about how to translate a WooCommerce store for free? Ask us in the comments section and we’ll try to help out!
If you found this post helpful, please check out our YouTube channel, where we constantly upload short & easy-to-follow video tutorials. You can also follow us on Facebook and Twitter to be the first to know each time we post.