In this post
In this post
Are you looking for an alternative to Lokalise to translate your WordPress website? Are you unsure if there is a better tool out there to meet your translation needs? Good news! You have come to the right place to find out.
In the following, we will review Lokalise and its features as well as go over how to use it to translate your WordPress site. After that, in case you feel like the translation platform is not really fulfilling your needs, we are going over why TranslatePress is one of the best alternatives to Lokalise out there. Finally, we compare the pros and cons of both products and talk about when Lokalise is the better choice and in which case it makes more sense to go for TranslatePress.
Obviously, as the developers of TranslatePress, you might think we are a bit biased. However, we’re going to aim to be objective in this post and highlight both where our plugin is stronger and when Lokalise is the more suitable alternative.
What Is Lokalise and How Can You Use It to Translate Your WordPress Website?
First things first, what even is Lokalise? In short, it’s a cloud-based localization and translation management platform. It helps you translate and localize digital content, from apps over documents to real-time customer service, games, and marketing assets. The platform supports over 400 languages, ensuring a wide reach for global audiences.
In addition, you can also translate WordPress websites with Lokalise. Since that is chiefly what we are interested here, let’s go over how to do it first, then talk about additional features that the platform offers.
1. Create a Lokalise Account
The first thing you need to do is sign up for an account. For that, go to the Lokalise website and click on one of the many calls to action.
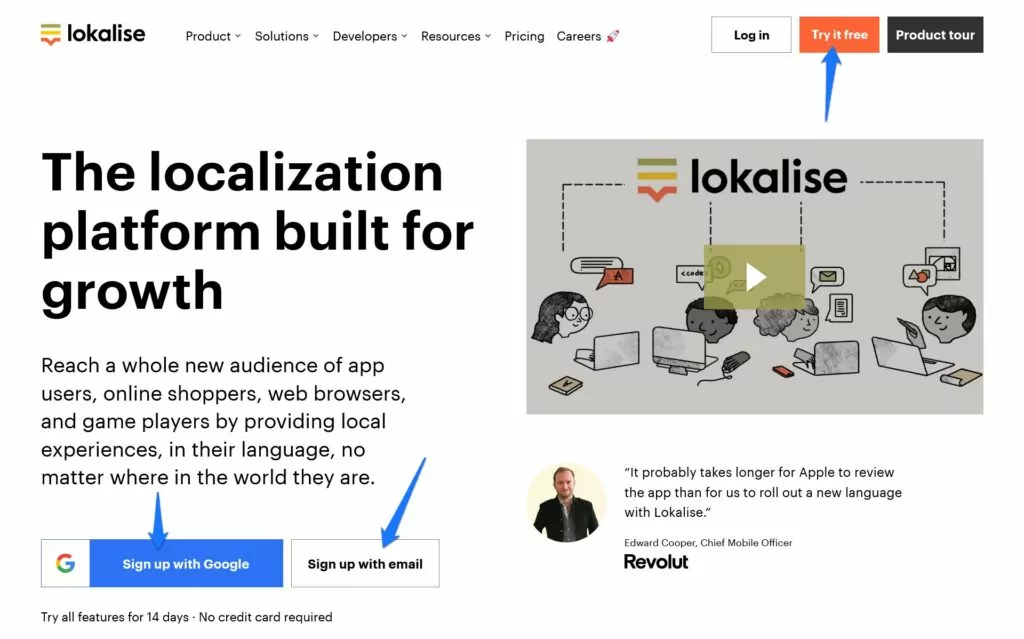
You can use your Google, Github, or Microsoft credentials as well as email address to sign up. During the setup, Lokalise will ask you for some information such as your company details and what your goals are. It will also prompt you to create your first project, choose a base and target language, and define your platforms (iOS, Android, web, etc.).
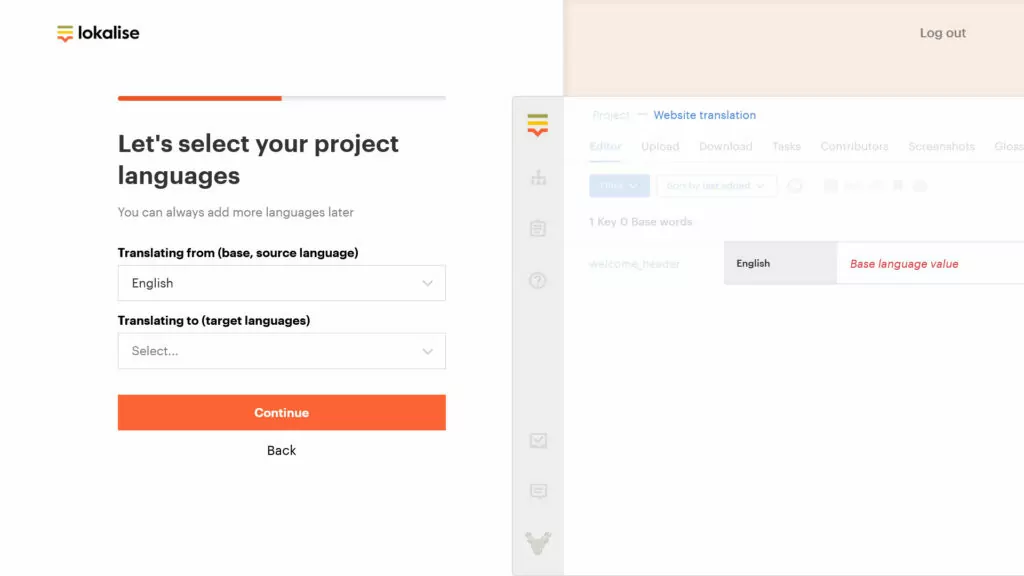
Once done, you land on the main dashboard.
2. Install WPML or Polylang on Your Site
After that, it’s time to connect Lokalise with your WordPress website. However, here, we run into the first snag: Lokalise does not actually offer any capabilites to manage multilingual content on your site itself. It only works as an interface to manage and create the translations. To display multilingual content, you still need a separate plugin and the only two alternatives that Lokalise supports at this point are WPML and Polylang.
Therefore, if you want to use Lokalise to turn your WordPress site into a multilingual website, you need to have either of those two plugins present and configured on your site. Otherwise, you can’t even connect your site to Lokalise.
Check out our articles linked above to see which one is the better choice for you. For this tutorial, we are going with WPML.
3. Install the Lokalise Plugin
Next up, you need to install the Lokalise companion plugin. This is what connects your site to the translation platform. You can do this in the usual way under Plugins → Add New.
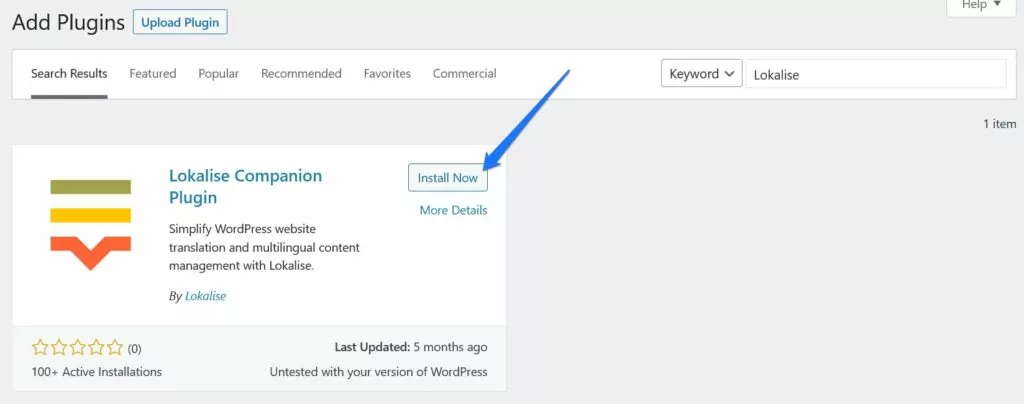
Once installed and active, go to Settings → Lokalise, where you find the secret key that you need to establish the connection.

Keep the page open, you will require this information soon.
4. Connect Lokalise With WordPress
When you are done, it’s time to turn back to your Lokalise account. Here, click on Apps in the top menu.
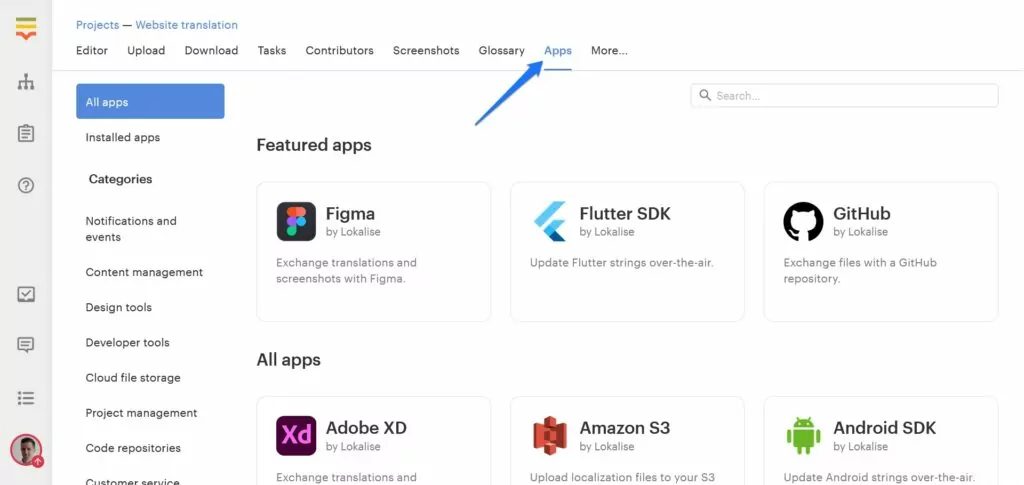
After that, find WordPress in the Content Management category or simply search for it by name.
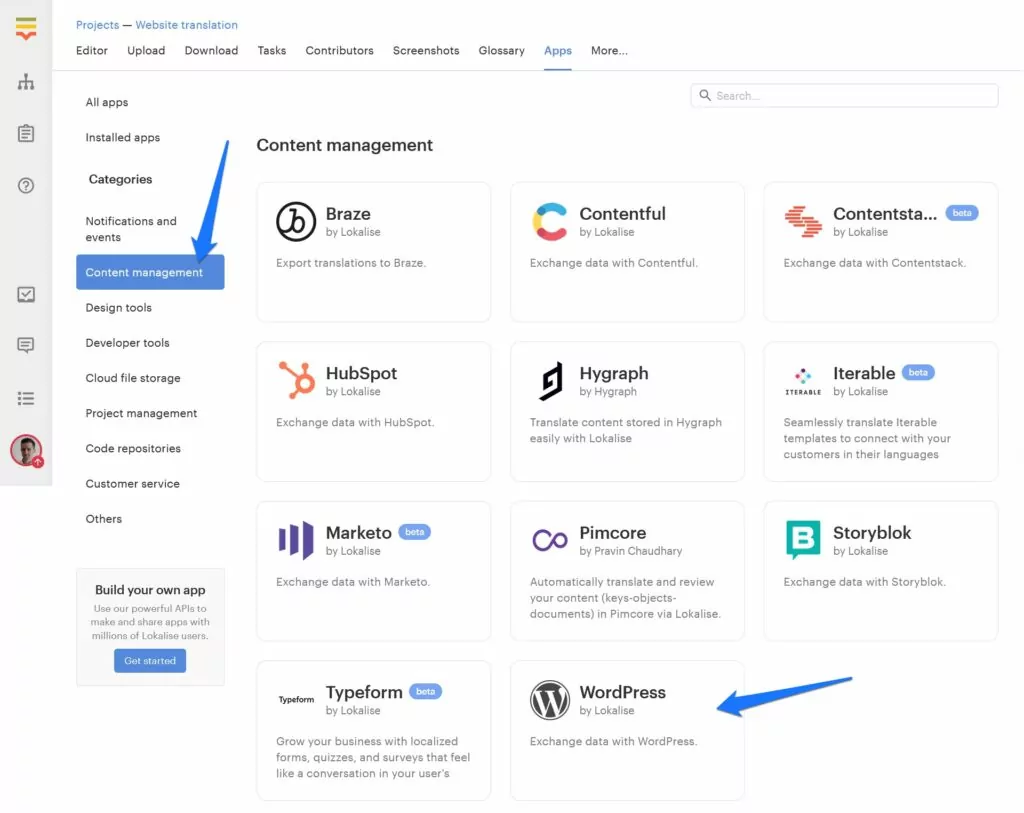
When you’ve found it, click on it and, in the menu that pops up, hit Install. Lokalise will show a dialog where it asks for both the REST API address of your site (usually your normal website URL appended by /wp-json) and secret key.
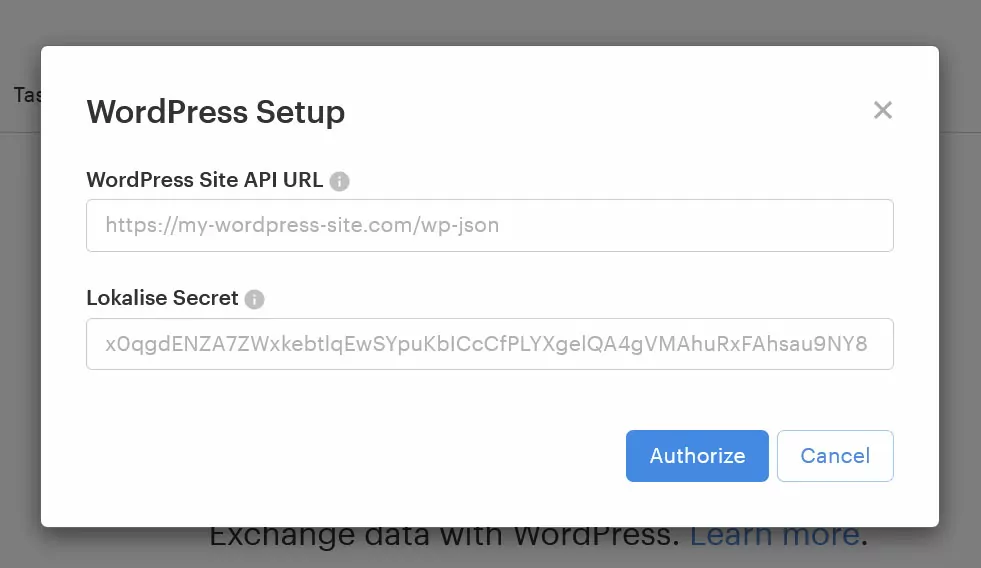
Luckily, we have already figured out where to find the second part. So, go back to your website, copy the key on the page and enter it. When you now click the Authorize button, it should manage to connect your site (there might be additional prompts to authorize the connection).
5. Import Content to Translate
If everything works as it is supposed to, Lokalise will automatically list the content present on your website.
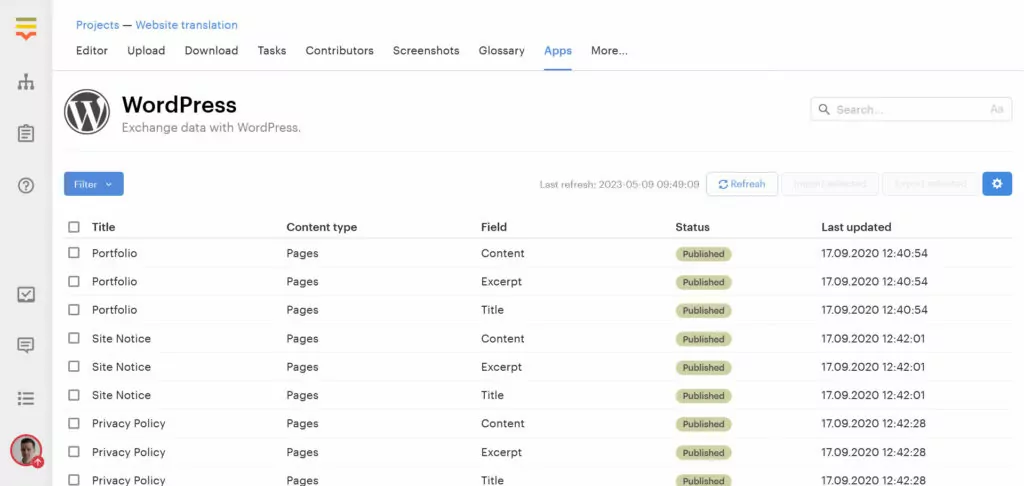
You can see if it is published or in draft form, the type of content (post, page, content, excerpt, title), and when it was last updated. You are also able to filter and sort the list as needed.
Tick the boxes of every piece of content you want to create translations for, then click on Import selected at the top.
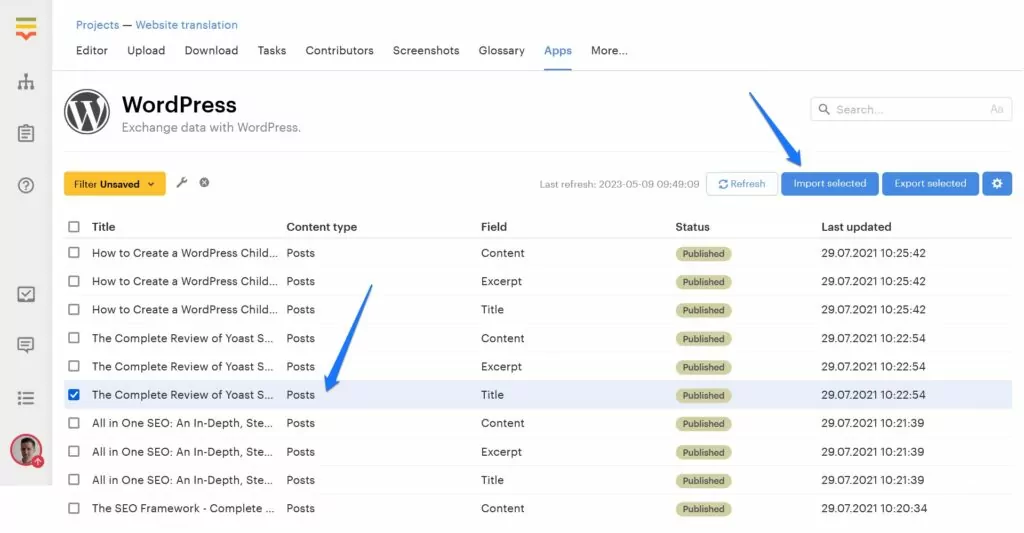
Lokalise will ask you to review which languages it should import and give you some additional options such as the ability to assign tags. When ready, click Ok and it will pull in the requested content and turn it into keys.
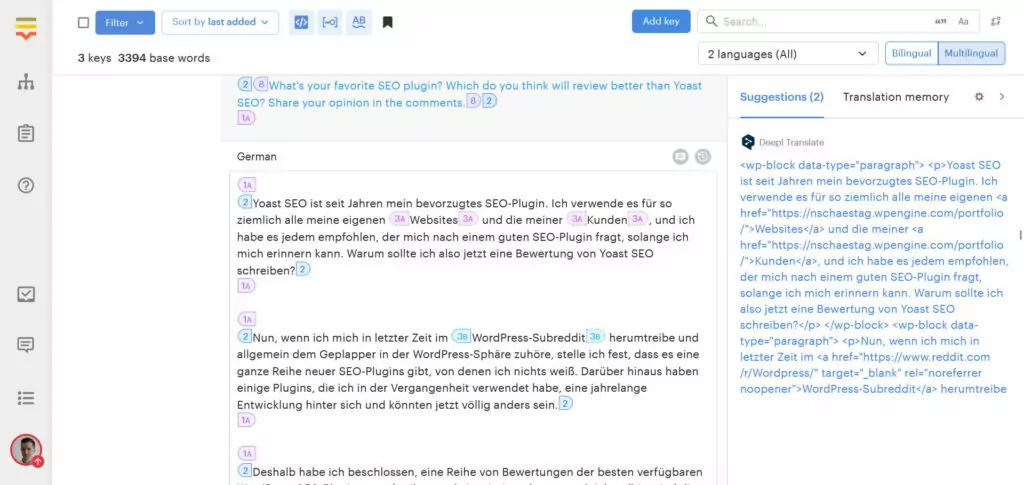
6. Translating Your WordPress Strings With Lokalise
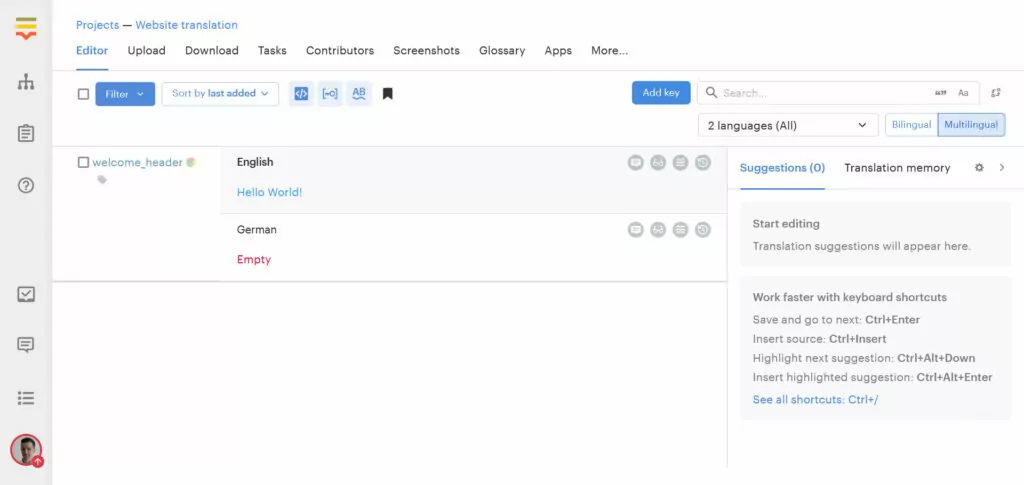
For our first example, let’s say we only imported an article title. As you can see below, Lokalise has set it up as an individual key and automatically assigned it to the English language.
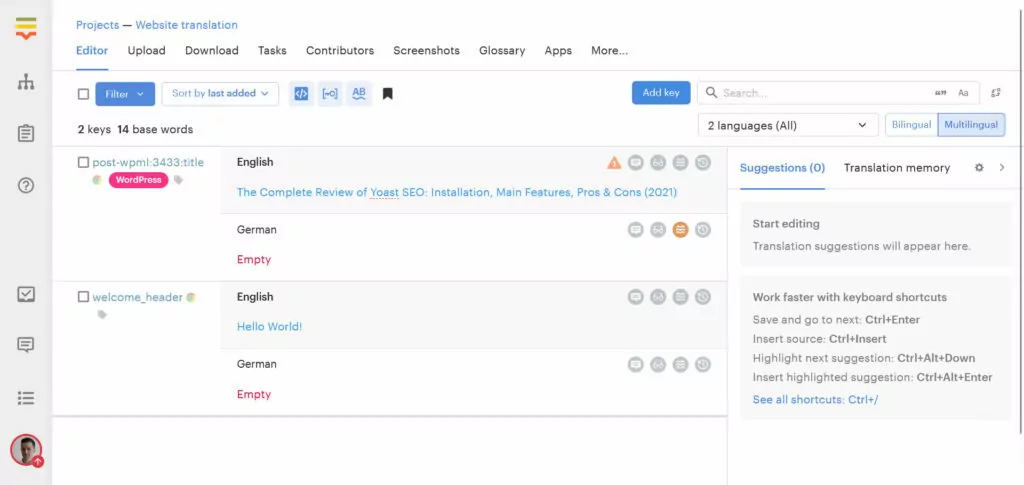
When you now click into the row for German (our target language), Lokalise automatically shows suggestions from different machine translation services on the right side.
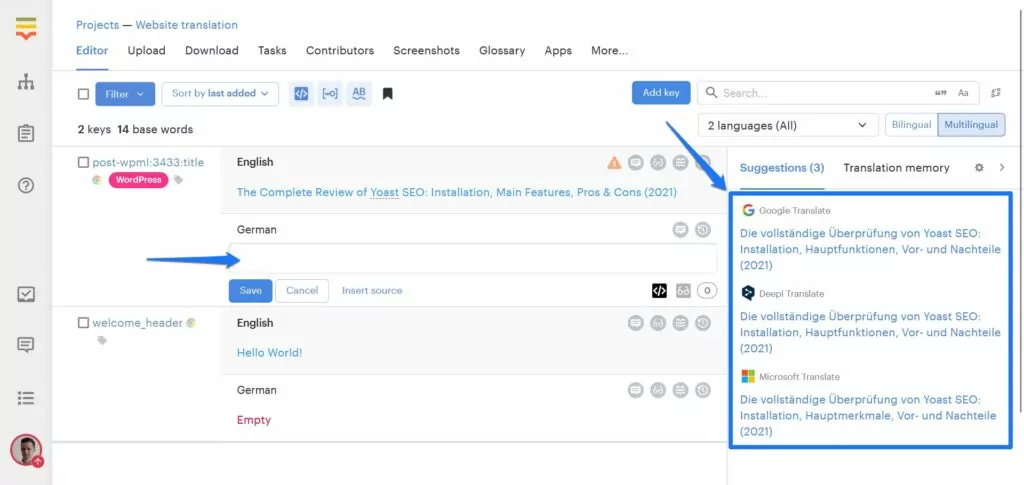
A click on any of them automatically imports the suggestion into the translation field, where you can review them and make adjustments as needed.
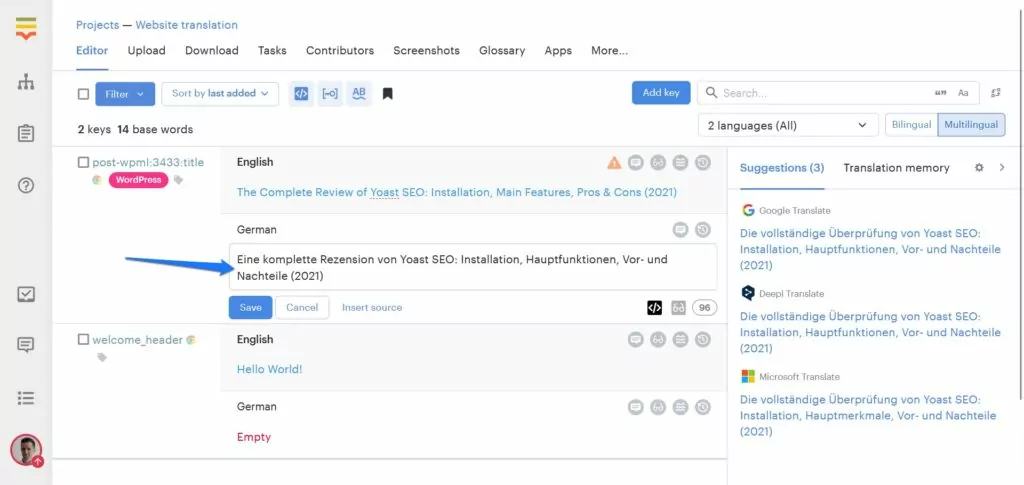
When satisfied, hit the Save button.
7. Exporting Translations to Your Website
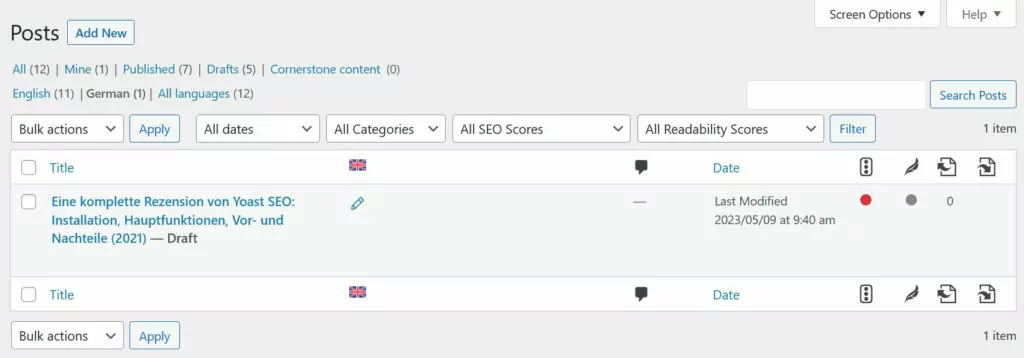
Getting the translated strings back onto your site is also not very hard. Go back to Apps, find the WordPress app again, click on it, and then on Manage.
In the list that follows, find the translated content (from memory, unfortunately, it’s not marked in any way), check its box, and then click on Export selected at the top.
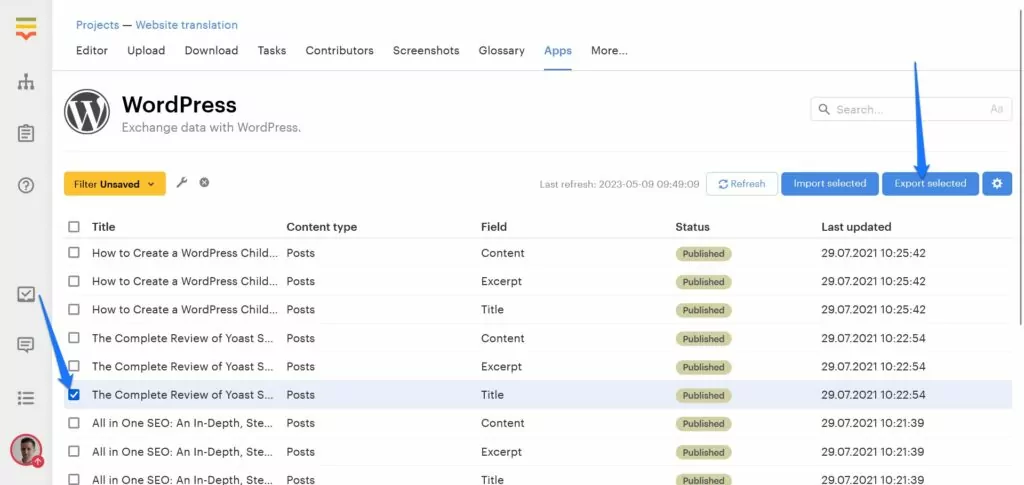
After confirmation, Lokalise will automatically push the translated strings to your site. As you can see below, WPML now has a translated title for the article in question.
Quick note: theoretically, you can also export your translations as a file that WordPress can read (.po). Lokalise offers this under the Download tab.
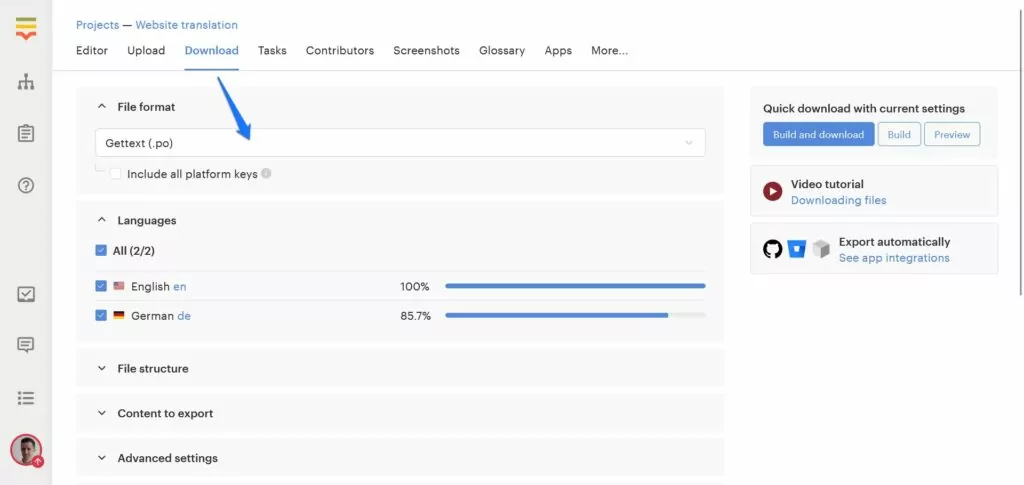
However, this would require a whole other article, so we are just mentioning it here as a possibility.
8. Translating Entire Articles
So far, so easy. However, a problem arises when you want to translate an entire article (as will be common when running a blog). That’s because Lokalise imports the entire post as a single translation key.
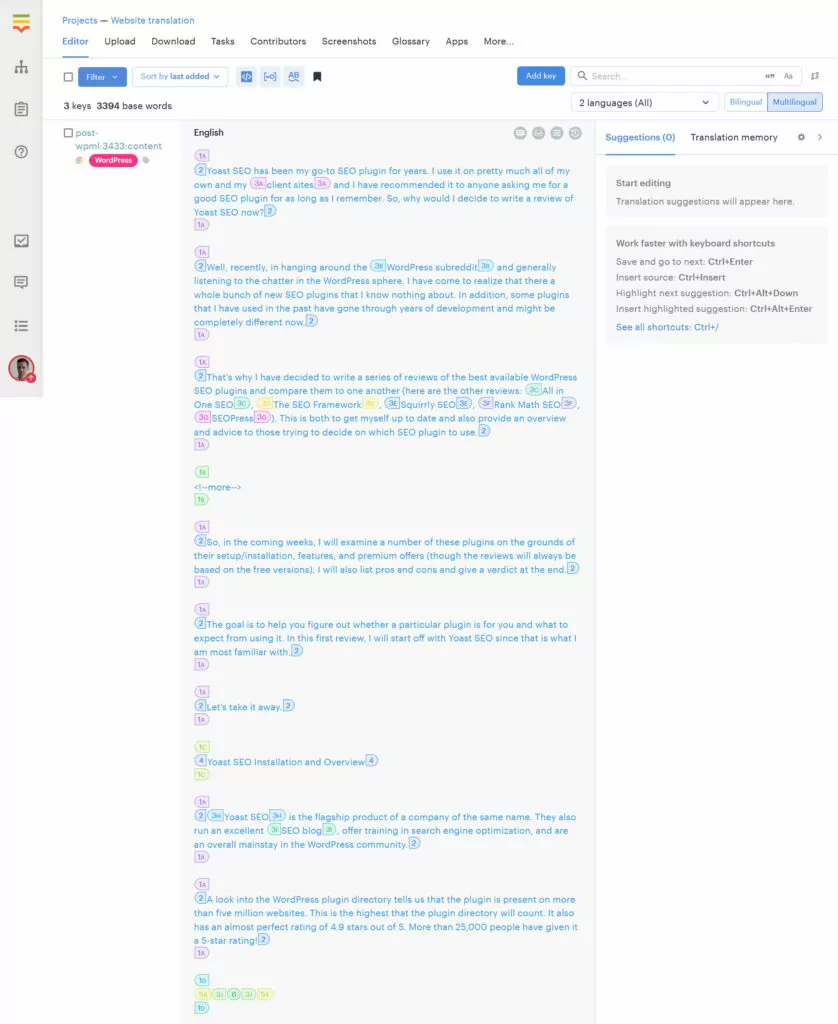
That makes the process of localizing it kind of difficult to manage, for one, because it results in a lot of scrolling up and down. In addition, the platform also imports all the HTML markup used for the Gutenberg editor that you have to work around.
It feels a bit like a throwback to the beginning of the Internet, where you had to write web pages in a code editor.
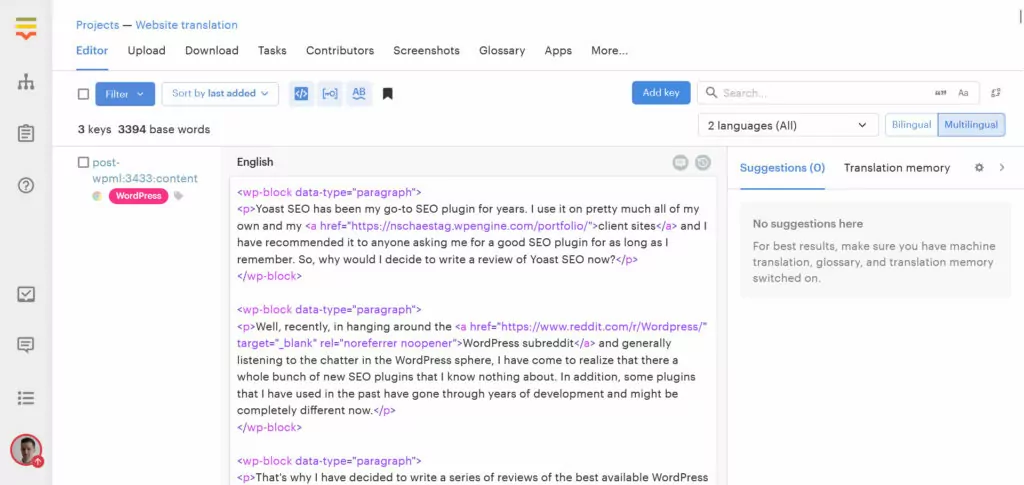
Lokalise does replace the HTML with placeholders, probably to increase readability. However, when you click on any of them they change position and there seems to be no other way to put them back into their original place other than Ctrl+Z or keyboard copy and paste. Not the most user-friendly solution.
The only saving grace is that Lokalise still provides automatic translation suggestions for entire posts that include said markup.
That way, you don’t have to start from scratch but can use it as a jump-off point to adjust to your needs.
Other Notable Lokalise Features
Above is the general workflow for translating WordPress content with Lokalise. Besides that, the platform comes with a bunch of other features that are worth mentioning:
- Centralized dashboard — Lokalise offers a single point of control for managing translations and localization projects. You can assign tasks, follow up on progress, see what your entire team is up to, assign different roles, and see the progress and state of your project at a glance.
- Collaboration tools and workflows — The platform enables seamless collaboration between translators, reviewers, and project managers. There is a chat and comment function and users can create custom translation workflows to suit their specific needs.
- In-context editing and CAT tools — You have the ability to provide real-time previews for accurate translations within context. There are also spelling and grammar checks and a multilingual glossary.
- Translation memory and version control — Lokalise stores previously translated phrases for reuse, reducing translation time and costs. It also keeps track of changes made to translations and has the ability to revert to previous versions.
- Integrations — You can connect the platform to popular platforms like GitHub, Slack, and Trello. It also integrates with popular development tools like Adobe XD and Figma, so you can run your localization efforts parallel to building your product.
- Developer features — Lokalise offers a robust API, CLI, mobile SDKs, and more. It also has the ability to automatically pull language file updates from a repo.
Lokalise Pricing
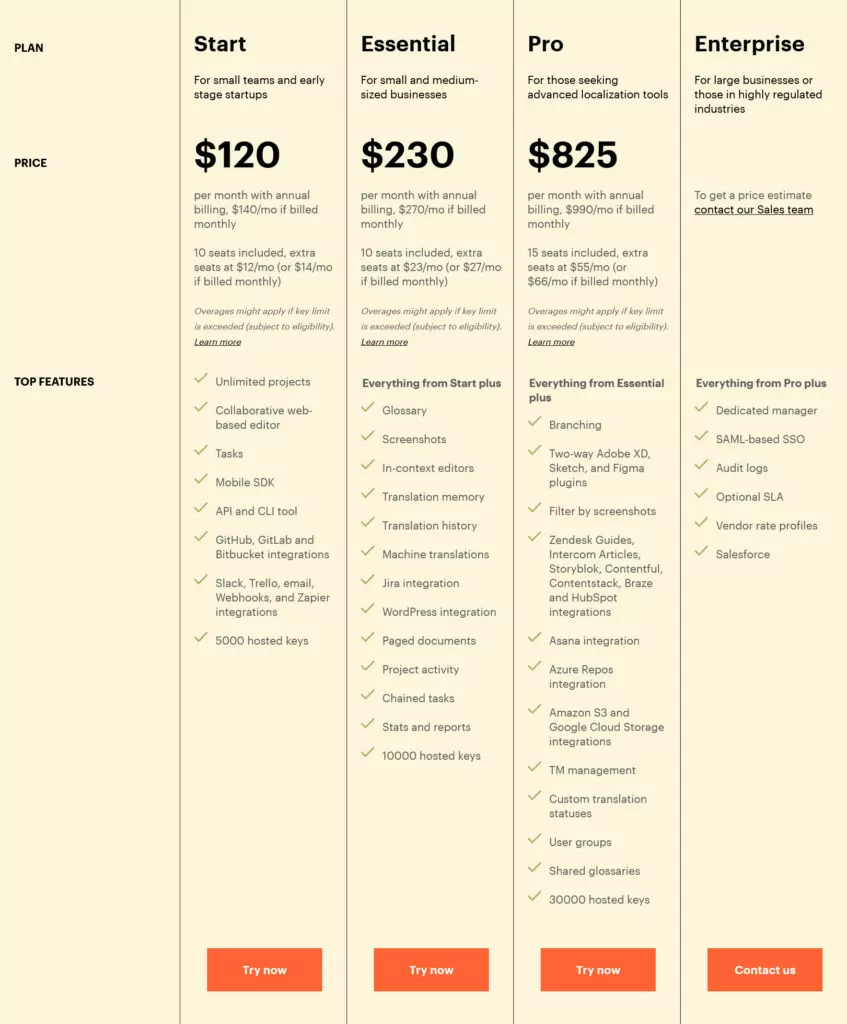
Finally, let’s review the pricing of Lokalise. It comes in four license tiers (all prices below are for annual billing, monthly is more expensive):
- Start ($120/month) — Offers unlimited projects, and access to mobile SDKs, API and CLI. The plan has 10 seats included, offers basic integrations, and 5,000 hosted keys.
- Essential ($230/month) — All of the above plus glossaries, the ability to post screenshots, translation memory and history, machine translations, chained tasks as well as reports and stats. It also comes with 10,000 keys and WordPress integration.
- Pro ($825/month) — Adds branching, and integration with design tools, Asana, and cloud storage providers, as well as user groups, shared glossaries, and 30,000 keys.
- Enterprise (price upon inquiry) — Gets you a dedicated manager, Salesforce integration, and other enterprise-level features.
As you can see, to use Lokalise with WordPress, you need at least the Essential plan. There is a 14-day free trial period with every plan so you can test before you buy.
Best Lokalise Alternative for WordPress: TranslatePress
If you feel that the above is not really the best or most comfortable way of translating your WordPress website and are looking for an alternative to Lokalise, at this point, we want to humbly suggest TranslatePress. For WordPress users, it provides a much more intuitive and smooth experience for building a multilingual website.
TranslatePress Setup
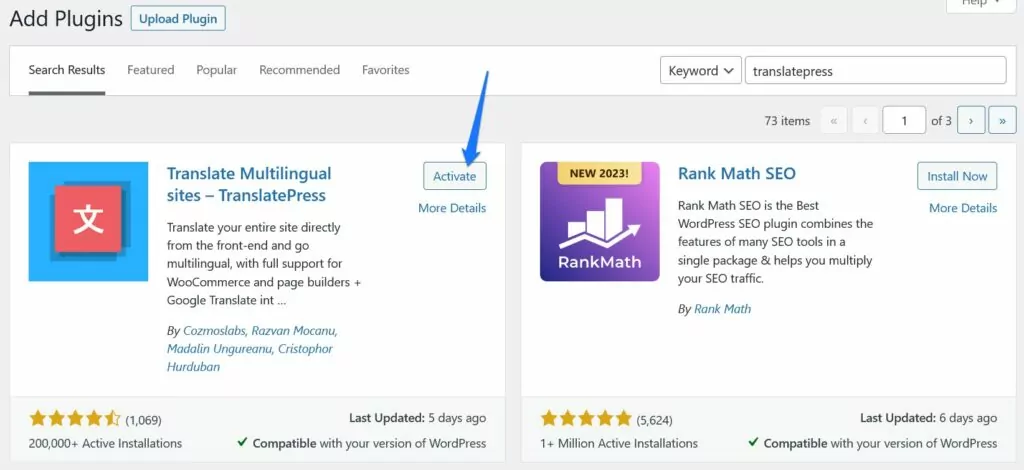
As a native WordPress plugin, there is no need to connect to third-party services or use additional translation plugins. Instead, all you need to do is install TranslatePress via the usual way in Plugins → Add New (or use the Upload Plugin option if you have purchased the premium plugin).
When activated, it automatically takes you to the settings page where you can make any necessary adjustments.
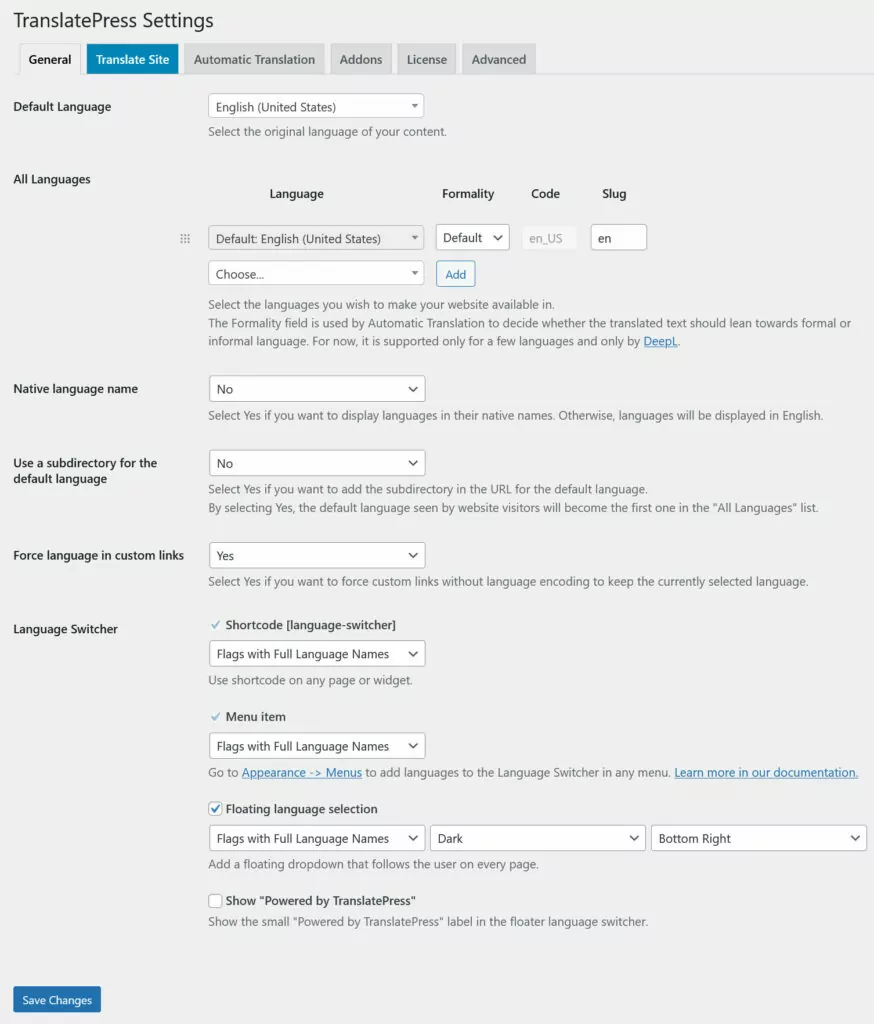
The most important here is to pick the site’s default and target language. There are additional options, especially for the design of the language picker, but for the beginning, no more is necessary. Don’t forget to save your changes!
Translating Content on Your WordPress Site
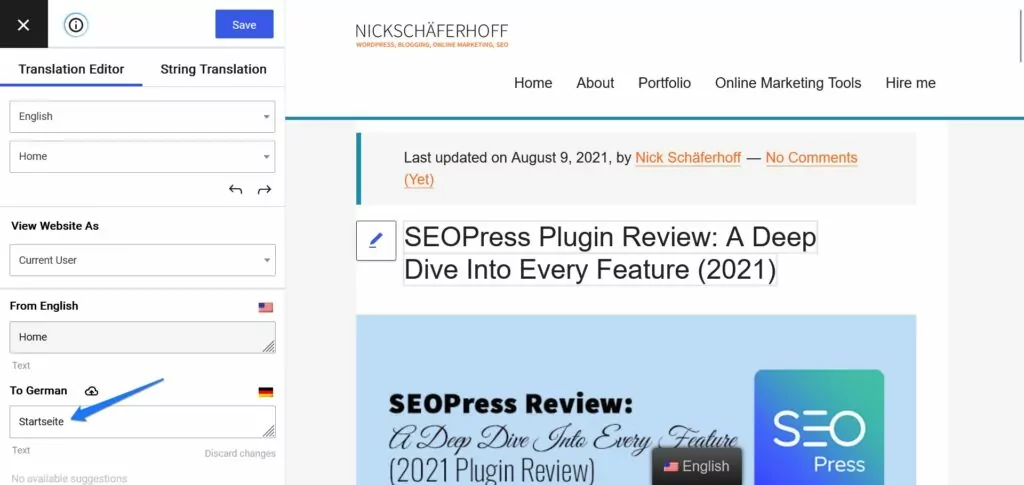
The real magic happens when you start adding more languages to your website. You can do so either by clicking on Translate Site in the TranslatePress settings or on Translate Page in the WordPress admin bar at the top.

Either opens your site in a visual editor where you can create translations while previewing the changes at the same time. It’s pretty much the only interface you’ll use for this purpose, there is no need to switch back and forth between different UIs.
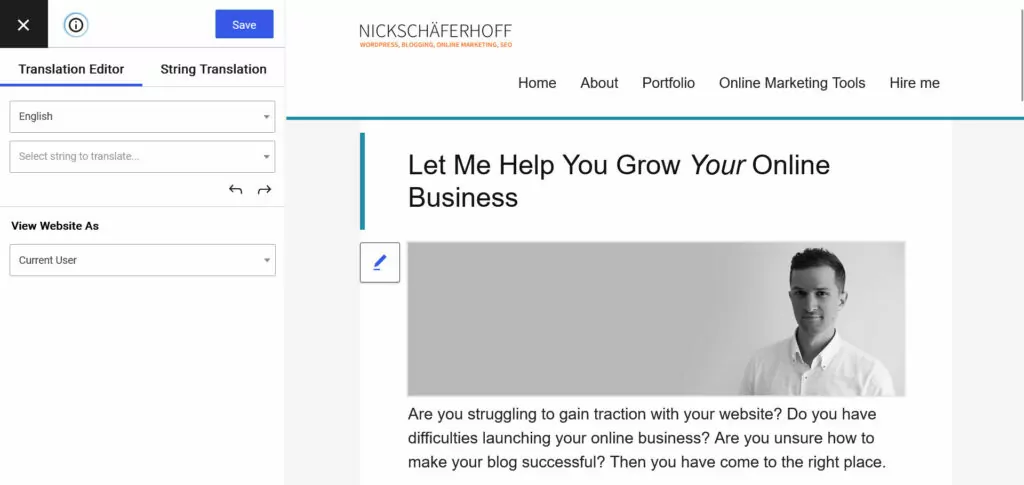
On the left side, you have all the controls for localizing strings on your site while on the right side, you see the page you are currently working on. To pick content to translate, either use the drop-down list at the top to pick specific strings, click the arrow buttons to go through them one by one, or choose elements on the page directly and click the pencil icon.
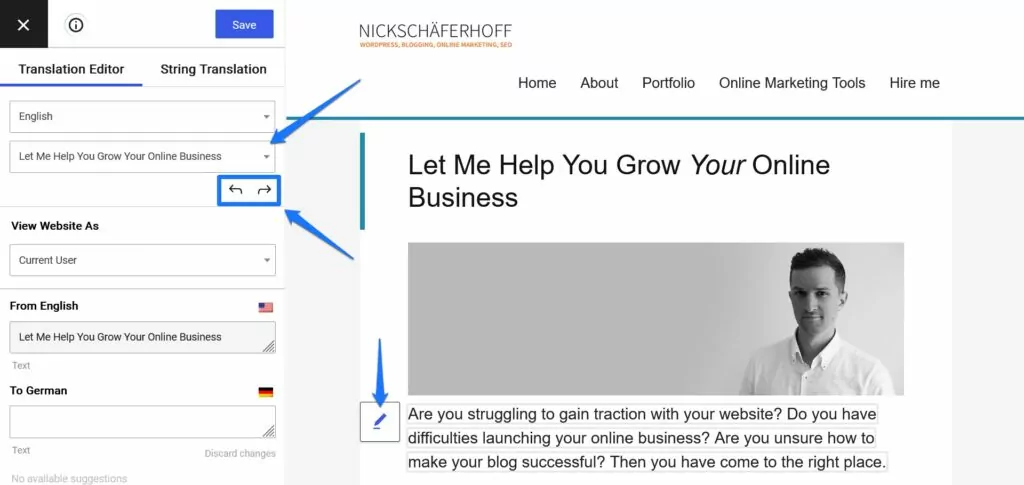
After that, add your translation to the target language field.
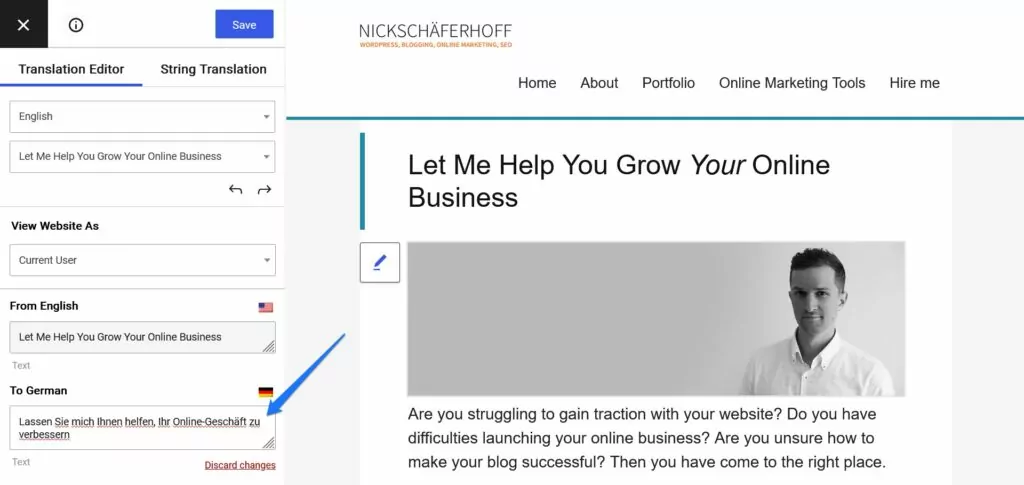
Once satisfied, click the Save button. From now on, whenever someone accesses the page in question and switches to another language, they will see the translated strings.
It’s really that easy. In addition, in most cases, you will not encounter HTML markup that you need to take into account when providing a translation. That’s because TranslatePress directly reads your site content from the HTML and is able to provide only text, not markup.
Understanding the “String Translation” Menu
There is one more option in the editor screen that says String Translation.
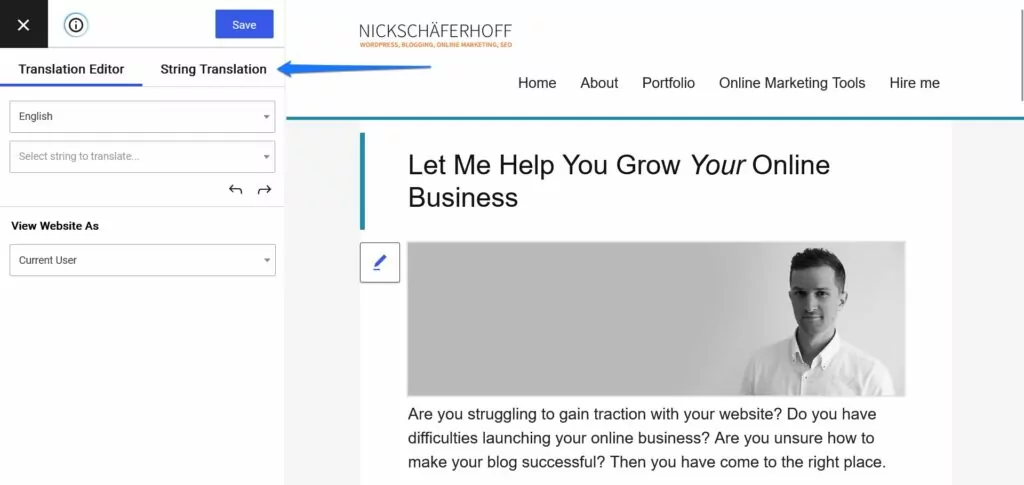
Among other things, here you can translate your URL slugs if you have the SEO add-on. For the most part, you use it to localize strings that come from themes and plugins. TranslatePress automatically scans them for translatable text and then lists them in one place.
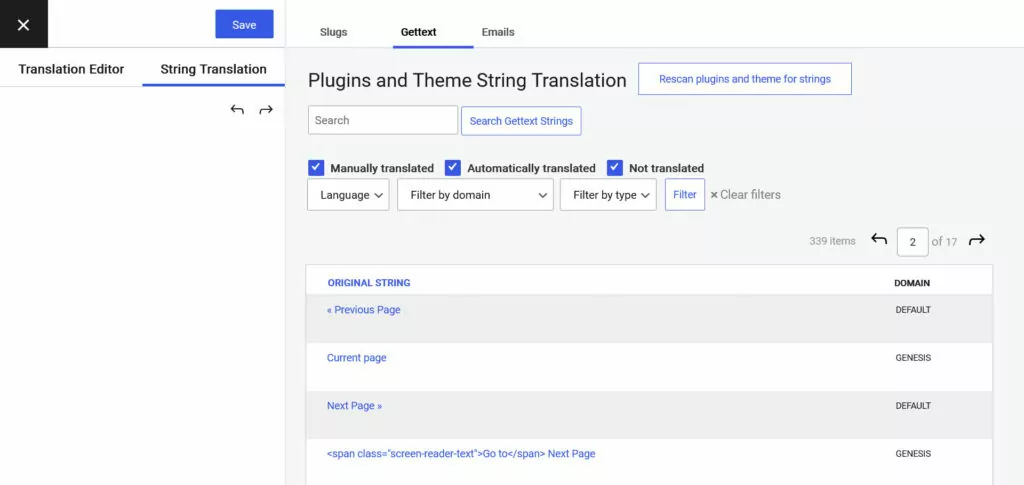
That way, you can provide translations for them all at once. This is especially useful for repetitive strings such as for post meta, etc.
Adding Automatic Translation in TranslatePress
Finally, like its alternative Lokalise, TranslatePress lets you take advantage of automatic translations. For that, you only have to connect it to a translation service. This happens in the settings under Automatic Translation.
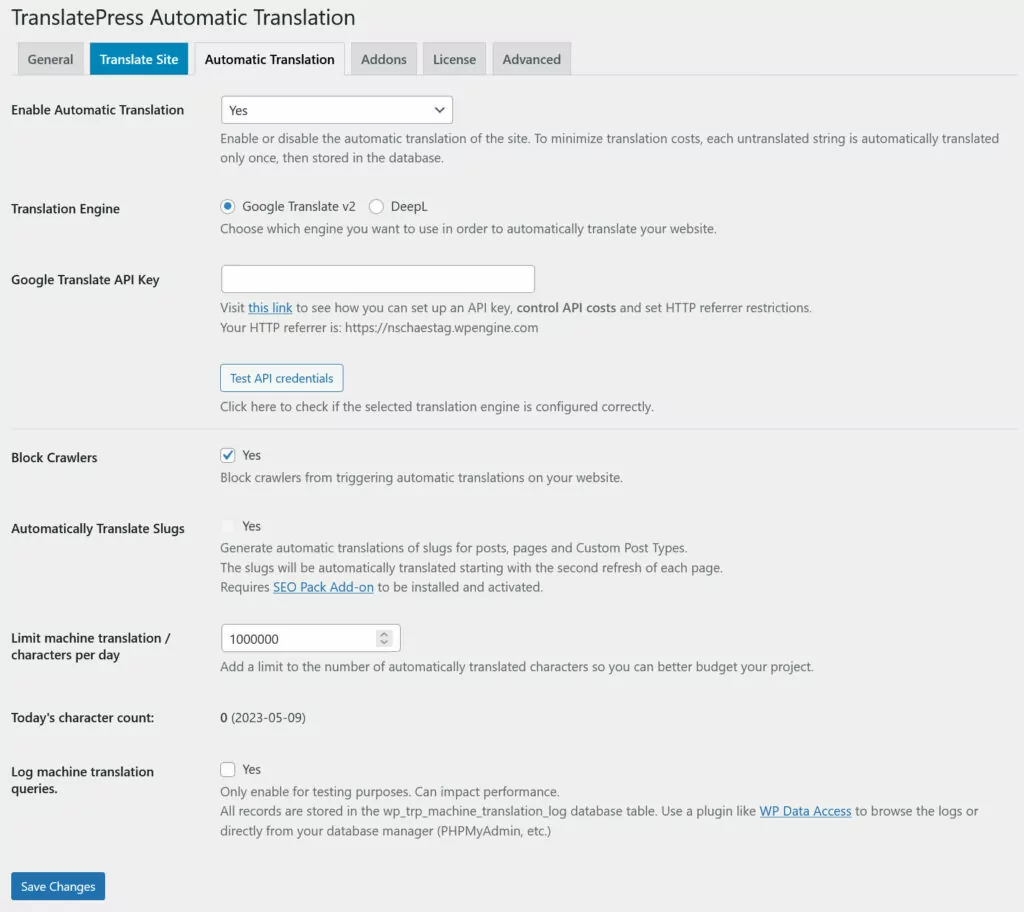
In the free version, you can only connect to the Google Translate API. With a business license, DeepL is also an option (they also have a free license).
The best thing: there is no additional cost for this in TranslatePress. Any fees that might occur will only be from the translation provider. However, you can also set limits on automatic translations in TranslatePress so you don’t overrun your contingent.
Once set up, you can use machine translation to create a baseline that you can refine afterwards. The automatic translation will simply show up in the translation interface when you access it.
Here you’ll be able to edit these pre-filled translations as you wish.
Other TranslatePress Features
Besides the translation options above, TranslatePress comes with a number of additional features worth mentioning:
- High compatibility — The plugin works with virtually all types of WordPress content, from posts and pages over custom fields, custom post types, plugin and theme strings to shortcode output, menus, forms, and more.
- SEO friendly — Translated content is fully indexable by Google and other search engines, giving you an SEO boost in different markets. In addition to that, SEO features like translating Yoast SEO metadata, multilingual sitemaps, and automatic redirects to the user’s browser language are also available.
- Translator accounts — You can have user accounts for translators to make working with freelancers or agencies for professional translations easier.
TranslatePress Pricing
To figure out if it’s a valid alternative to Lokalise, naturally we also have to look at the pricing situation of TranslatePress.
Free Version Available
In contrast to Lokalise, which only has a 14-day free trial to get your feet wet, TranslatePress has a forever-free version. You can download it from the WordPress plugin directory and create a multilingual website for one additional language without paying a dime.
Fair Premium Pricing
Aside from that, the paid version of TranslatePress is a lot more affordable than Lokalise.
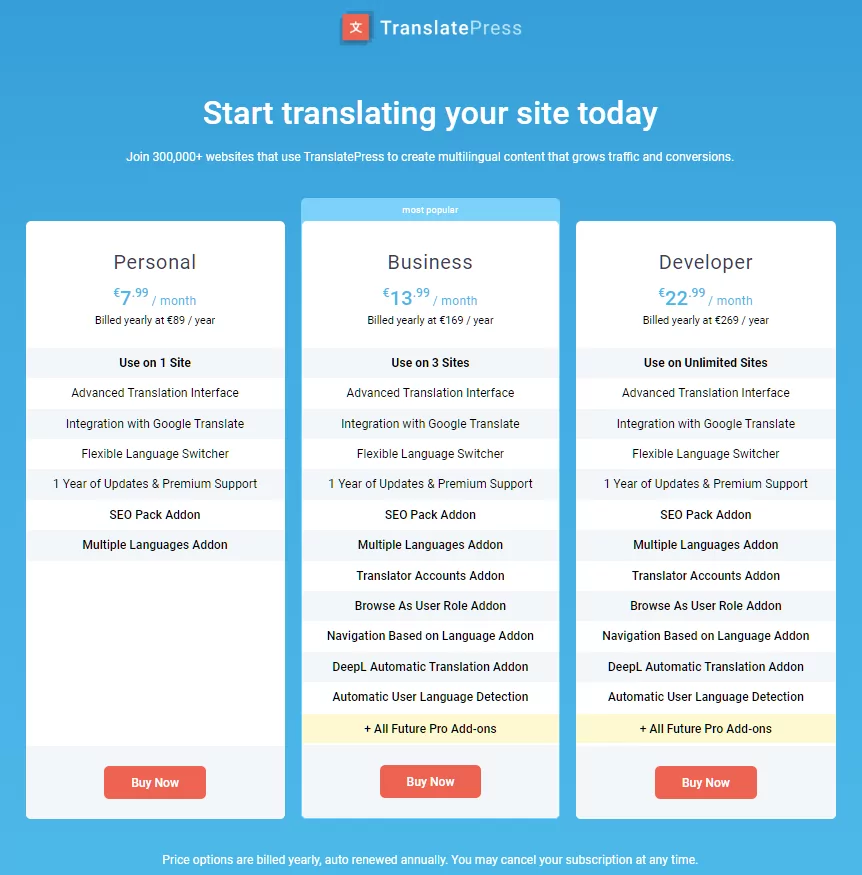
As you can see, there are three types of licenses:
- Personal (€7.99/month) — Valid for one site. Provides one year of updates and support, contains the SEO Pack addon, and offers integration with the Google Translate API.
- Business (€12.99/month) — In addition to the above, you gain the ability to view your site as different user roles, connect to DeepL for automatic translations, redirect user browsers to their preferred language, add translator accounts, and more. You can also use TranslatePress on three sites.
- Developer (€20.99/month) — Same as the business license but for unlimited sites.
As in Lokalise, licenses are charged yearly. You also get a 15-day money-back guarantee.
Lokalise vs TranslatePress: Pros and Cons
So, in the end, which one is more suitable for your site? Is TranslatePress a better alternative for WordPress than Lokalise? In which case does each tool make more sense? Let’s summarize the main pros and cons.
Lokalise
We are starting off with the positives:
- Great collaboration and organization tools make it really good for translation management, especially if you are working with a large team and many (external) collaborators.
- Awesome translation tools ensure you can give the localization of your project the care and attention that it needs and deserves.
- Works for more than websites. You can translate apps, games, and more. TranslatePress works only for WordPress websites.
- Integrates with a lot of different tools and can become part of your overall development workflow. Lokalise is also very scalable.
On the other hand, there are also these things to keep in mind:
- While the platform has a WordPress plugin, it doesn’t come with a native workflow to translate WordPress websites. You need a separate plugin for that, of which only two exist that are supported.
- The setup and translation process is a bit elaborate. You need to connect different parts with each other as well as import and export translations. The user interface is also more complicated.
- The translation workflow for WordPress is not that great. You end up working around a lot of HTML markup and and, unlike its alternative, Lokalise doesn’t process content into separate strings.
- The platform is expensive. Licenses start at more than $100 per month and it does not have a free product with fewer features. This is especially a problem for smaller businesses or startups.
In the end, Lokalise is a translation platform, not a real alternative for those looking for a WordPress translation plugin. While it’s great for large projects, it is neither that suitable nor affordable for smaller websites.
TranslatePress
Here’s what TranslatePress has to offer when it comes to translating your WordPress website:
- A native WordPress plugin. You directly work on your site, it works out of the box on pretty much any website, and the setup process is minimal.
- The plugin automatically processes on-page content into singular strings without HTML markup, making it much easier to work with without the risk of messing up your layout.
- There is a single UI. Virtually all translation work happens in the same interface. Once you get used to it, you don’t have to learn anything else.
- It’s much more affordable and costs only a fraction of what Lokalise is going for. You can even use the free version if you only have one target language.
On the other hand, in comparison to Lokalise, TranslatePress has the following shortcomings:
- Fewer collaboration tools. While the plugin comes with the ability to create separate accounts for translators, Lokalise does offer more features and workflows that aid working on translation projects as a team.
- Lokalise offers three different types of automatic translations and machine-translated suggestions out of the box at no extra cost. In TranslatePress, you get two options – DeepL or Google Translate – and might incur extra costs.
- The plugin is limited to WordPress. Naturally, if your goal is to translate anything else than a WordPress site, TranslatePress is not the right choice.
TranslatePress: The Best Lokalise Alternative for WordPress?
So, should you choose TranslatePress or Lokalise for your WordPress website? If you are working on a WordPress site specifically, TranslatePress is certainly the better alternative. It’s a much simpler and more direct way of adding multilingual capabilities to your site.
In addition, the plugin is better for non-technical users and more affordable. So, if your goal is to offer your website in more than one language, TranslatePress is a much quicker and easier way to do so.
While Lokalise has other strengths and is probably the more suitable solution for translation teams, larger projects, and things outside of WordPress, we feel confident in saying that TranslatePress is the best option specifically for WordPress and also for smaller websites and projects.
Want to check it out for yourself? Install the free version to give it a try and check out our premium licenses for when you want more features.
TranslatePress Multilingual
And please, let us know if you have any questions or thoughts in the comment section! We’d especially like to hear from you if you are looking for an alternative to Lokalise and have anything you want to ask about TranslatePress.