In this post
In this post
Struggling with how to add Google Translate to your website?
Google Translate is an attractive option because it lets you instantly offer your website in one or more new languages without requiring any manual translation on your part. You just hook your site up to Google Translate, let it work its magic, and you get all the benefits of a multilingual website (such as improved user experience, multilingual SEO, etc).
But if you want to add Google Translate to your website, there’s a right and a wrong way to do it.
In this post, we’re going to show you step-by-step how to add Google Translate the “right” way so that you can benefit from its automatic translation while still creating a great experience for your visitors and maximizing your site’s SEO.
With TranslatePress, the method that we’ll show you in this post, you’ll be able to automatically translate your entire site using Google Translate while also creating static versions of your translated content and being able to manually adjust those translations using a simple visual editor like this:
Ready to learn how it works? Let’s dig in!
The Right and Wrong Way to Add Google Translate to Your Website
If you want to add Google Translate to your website, there are two popular approaches:
- Dynamic Google Translate widget
- Using Google Translate to generate static translations
The approach that you choose will have a huge effect on how effective your multilingual efforts are. So, before we get to our step-by-step tutorial, it’s important to explain these two methods and their pros and cons.
Dynamic Google Translate Widget
The simplest way to go about adding Google Translate to your website is via a dynamic website translation tool or widget. Google used to provide its own discontinued website widget that could easily be added to a website, but there are other alternatives now.
With these widgets, you can add one button that gives users the option to choose from any one of the hundreds of languages that Google Translate supports.
When they choose their language, Google Translate will automatically translate your site’s content into that language.
Sounds amazing, right? With one button, you can give people access to hundreds of languages. What’s not to like?
Well, as you can probably guess, there’s a catch.
Because this Google Translate widget is only dynamically translating your site, there are several drawbacks:
- SEO – Google won’t be able to index the translated content, so you can still only rank your site in its original language. This means you’re missing out on all the benefits of multilingual SEO.
- Social media – visitors won’t be able to share your translated content on social media. So even if someone goes to your site, translates the content into their native language, and loves it… they still won’t be able to share it with their friends in that language.
- Translation accuracy – you won’t be able to manually edit and refine the translations, which isn’t good for user experience (especially on high-value pages). Even though Google Translate has gotten a lot more accurate, it’s still not perfect, so you’ll need to put up with some inaccurate or awkward translations.
Because of those three drawbacks, adding Google Translate to your website in this way isn’t the most optimal strategy. Instead, you should consider another approach…
Using Google Translate for Static Translations
A better way to use Google Translate on your website is to use it to fully translate your site but then statically store those translations on your website’s server.
With this approach, you still get to save time by using Google Translate to translate your entire website, rather than manually translating everything from scratch.
However, this approach fixes all the drawbacks of the dynamic method:
- SEO – because the translations are stored locally on your server, you can create static versions of your site in each language, which lets you rank each language’s content in Google and other search engines.
- Social media – visitors will be able to share your content on social media (or anywhere else) in their preferred languages.
- Translation accuracy – you’ll be able to manually edit all of your translations to improve accuracy and clarity where needed.
You’ll also get other benefits, such as the ability to fully localize your site beyond translating content. For example, you could localize the prices of products in a user’s local currency rather than just showing the same currency to all visitors (which would be how it works with a dynamic Google Translate widget).
In the rest of this post, we’ll be focused on helping you implement this more optimal static approach on your WordPress website.
How to Add Google Translate to Your WordPress Website
Now, let’s get into the actual step-by-step part of this post and we’ll take you through adding Google Translate to your WordPress website using the free TranslatePress plugin.
TranslatePress is a full solution for creating a multilingual WordPress website. It lets you translate 100% of your site and manage all of your translations using a simple, point-and-click visual editor.
It also has a built-in Google Translate integration that lets you send your site’s content to Google Translate for translation but then store those translations locally on your server.
Once you’ve translated your site’s content, TranslatePress adds a front-end language switcher so that your site’s visitors can easily choose their preferred languages.
Depending on whether you’re using the free or premium version of TranslatePress, you’ll also get lots of other goodies such as:
- Multilingual SEO tools – rank your site in multiple languages by translating SEO metadata, creating multilingual XML sitemaps, and more.
- Automatic redirection – automatically send users to their preferred languages.
- Custom menus – show completely different navigation menus based on a user’s language (rather than just translating the same set of menu items).
Keep reading to learn how to use TranslatePress to add Google Translate to your website…
TranslatePress Multilingual
0. Install the TranslatePress Plugin
Before you jump into the tutorial, make sure to install and activate the free TranslatePress plugin from WordPress.org. You only need the free version to connect to Google Translate, but there are a few reasons you might want to upgrade to the premium version that we’ll mention in the tutorial.
1. Choose Languages
To get started, you’ll first want to choose the languages that you want to use on your site. Go to Settings → TranslatePress and make the following choices:
- Default Language – the current language of your site.
- All Languages – one or more new languages into which you want to translate your site’s content using Google Translate.
The free version of TranslatePress lets you use Google Translate to add one new language to your site, while upgrading to the premium version lets you add unlimited new languages to your site.
If you don’t see the language that you want to use, TranslatePress also lets you add your own custom language to WordPress. However, you’ll only be able to use Google Translate with your custom language if Google Translate supports it. You can see a full list of the languages that Google Translate supports in this Google help article.
When setting up your custom language, make sure that you use the proper ISO code (from the help article above) so that Google Translate is able to recognize your custom language.
2. Set Up Google Translate for Automatic Translation
Once you’ve chosen your languages, the next step is to configure your site so that it’s able to connect to and access the Google Translate service.
To do this, you’ll need to generate something called an API key, which you can do via the Google Cloud Platform interface. This process is not especially technical, but there are a few steps you need to run through and a lot of buttons you need to click (it’ll take you about five to ten minutes to set up).
To see the full process to generate your Google Translate API key, you can check out our step-by-step tutorial here or watch this short video guide:
One thing to pay special attention to when setting up your API key is billing restrictions (which we detail in the help article).
While TranslatePress doesn’t charge you anything to use the Google Translate API, you may need to pay Google directly depending on the amount of content on your website.
Google Translate lets you translate 500,000 characters per month for free (~80,000-100,000 words per month, though it depends on your content). If you exceed that limit, you’ll need to pay for your usage, starting at $20 per one million characters over the free limit (full pricing here).
If you want to stay within Google Translate’s free tier, TranslatePress includes tools to throttle your site’s usage (you can also set up usage restrictions when you generate your Google Translate API key). However, keep in mind that, if you throttle your usage, you might need to wait a few months to have TranslatePress fully translate your site using just the free tier if you have a lot of content.
Once you have your Google Translate API key…
- Go to the Automatic Translation tab in the TranslatePress settings in your WordPress dashboard.
- Enable automatic translation and choose Google Translate v2 as your service in the Alternative Engines section.
- Add your Google Translate API key.
- Optionally set up restrictions using the Limit machine translation / characters per day setting to better control your budget or stay within the free tier.
- After that, click Save Changes at the bottom.
TranslatePress AI is the default translation engine in TranslatePress as it’s the most convenient option, but you can easily switch to Google Translate as an alternative engine.
3. Configure Your Front-End Language Switcher
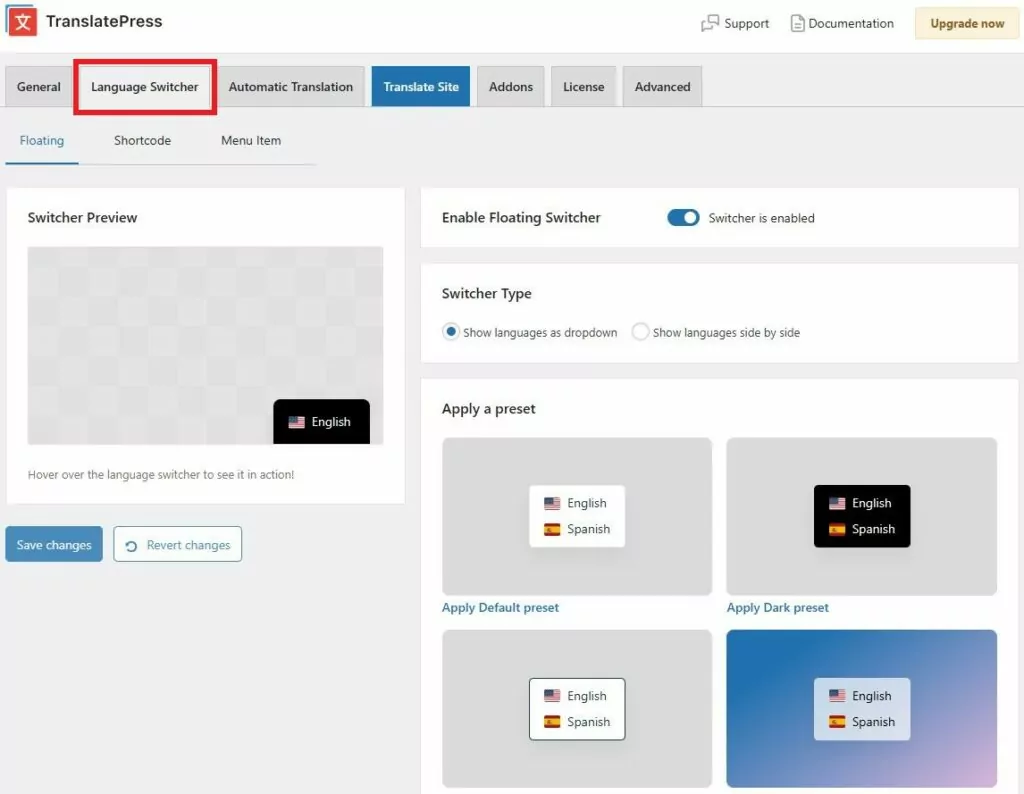
At this point, you’ve succeeded in adding Google Translate to your website. To help your visitors use those translations, TranslatePress adds a floating language switcher to the bottom-right corner of your site where visitors can choose their preferred languages. This selector will stay on top of every page on your website, following the readers along as they browse it.
However, TranslatePress also gives you the option to move the language dropdown to a different location and/or change its behavior (such as choosing whether or not to show flags for each language).
Apart from the floating selector that is enabled by default, to place your language switcher, you also get the following options:
- A dedicated menu item that you can add to any WordPress menu (Appearance → Menus).
- A shortcode (or Gutenberg block) that you can add to a sidebar or footer widget or anywhere else on your site.
You can access the settings for your language switcher by going to Settings → TranslatePress → Language Switcher tab:
4. Manually Refine Your Translations (Optional)
At this point, you’ve already used Google Translate to fully translate your WordPress site. However, as we discussed earlier, one of the benefits of this approach over the dynamic approach is that you also have the option to manually refine the translations from Google Translate if needed.
You could do this sitewide or you could choose to focus on just your most high-value pages. Either way, you’ll be able to manage all of your translations via a simple visual editor.
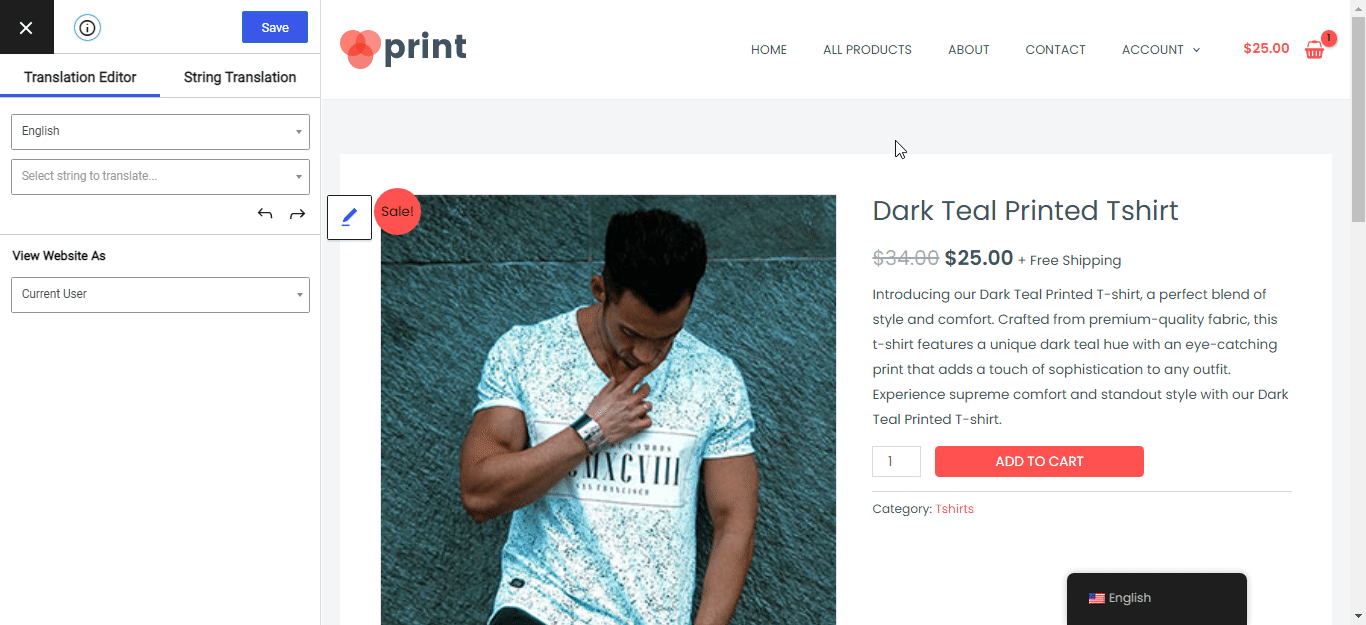
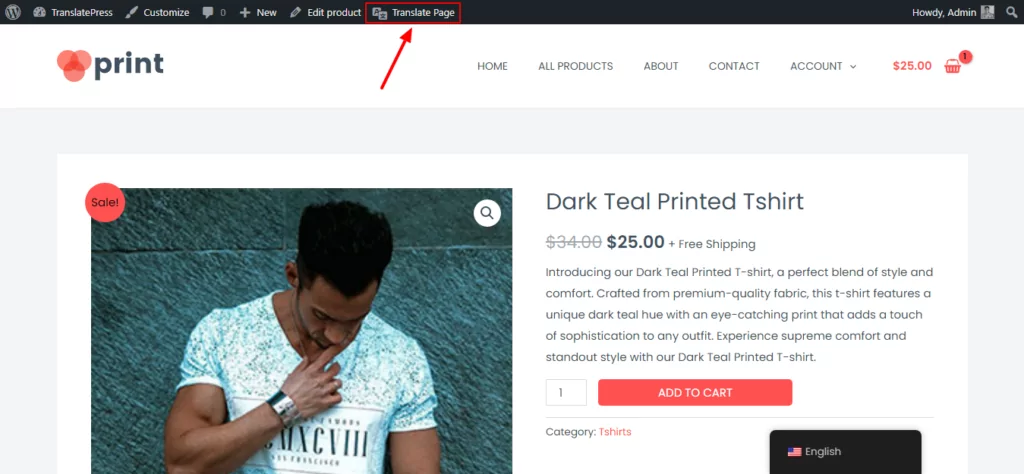
To open the visual translation editor, open a page with translations that you want to edit on the front-end of your site. Then, click the Translate Page option on the WordPress toolbar:
To edit the translation for any element on your page, all you need to do is hover over the content that you want to translate and click the pencil icon.
This will open that content’s translation in the sidebar. The translation field will already be pre-filled with the translation from Google Translate, but you can fully customize the translation as needed by clicking in the box and typing:

You can repeat the process to edit the translations for all the content on your site.
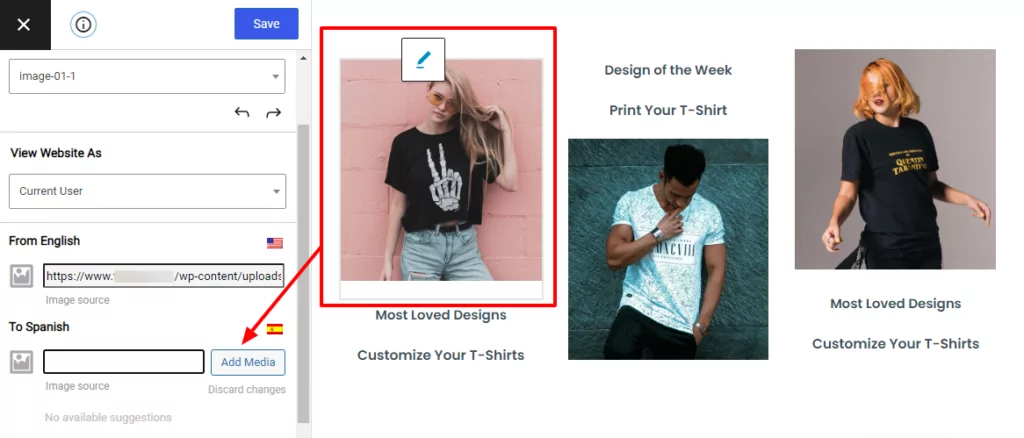
The visual translation editor also lets you go beyond just text, which isn’t something Google Translate does by itself. For example, you can “translate” your site’s images to show a different image based on a user’s chosen language:
You can use the same basic point-and-click approach to handle all of your site’s translations. But if you want to see more detailed guides for specific types of content, we have lots of tutorials that show you how to translate everything from sliders to forms and page builder content:
- Images
- Editor (Gutenberg) blocks
- Custom fields
- Custom post types
- WordPress forms
- WordPress menus
- Pop-up content
- Sliders
- WooCommerce products
- Elementor (page builder)
- Divi (page builder)
- Oxygen (website builder)
5. Upgrade to Translate SEO Details (Optional)
The free version of TranslatePress lets you use Google Translate to translate all of the front-end content that your human visitors will see. But if you want to benefit from multilingual SEO and rank your translated content in Google, you can consider upgrading to the premium version of TranslatePress.
With the premium version and its SEO Pack add-on, you gain the ability to translate your SEO titles and descriptions from plugins like Yoast SEO, as well as your social media metadata (for when people share your translated content on social media).
Once you purchase at least the TranslatePress Personal license and install the SEO Pack add-on, you’ll be able to manage your metadata translations using the drop-down in the same visual editor from above:
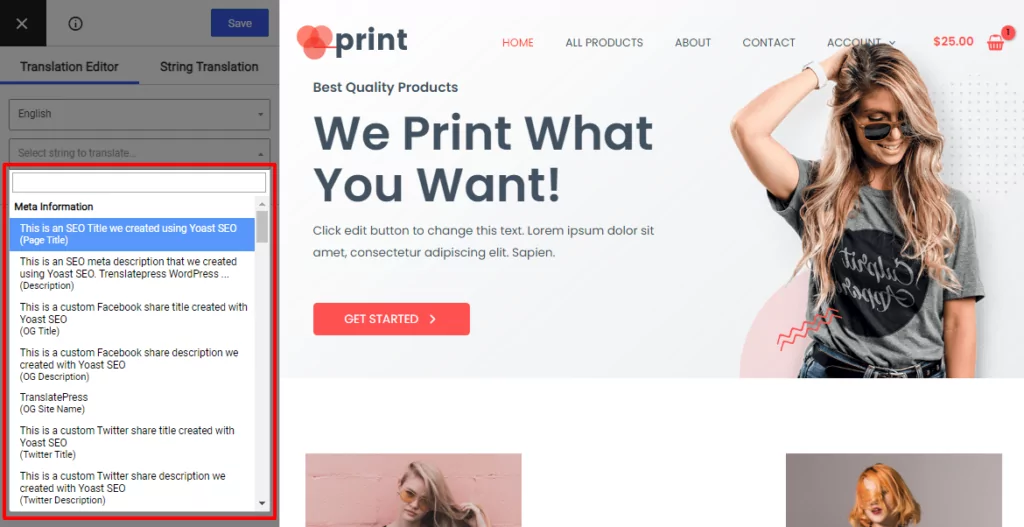
Beyond that, the SEO Pack add-on also includes lots of other multilingual SEO improvements such as multilingual XML sitemaps.
Add Google Translate to Your WordPress Website Today
Adding Google Translate to your website is a great way to quickly start offering your site in one or more new languages.
However, there’s a right way and a wrong way to go about adding Google Translate. Because of the simplicity of adding the dynamic widget, you might be tempted to go with this approach. However, there are several major drawbacks to using Google Translate’s dynamic translation:
- Google can’t index your translations in its search engine, so you won’t benefit from multilingual SEO.
- Your visitors won’t be able to share your translated content on social media or in other ways.
- You can’t manually refine your translations, which is important because Google Translate still isn’t perfect.
Plus, the popular Chrome browser already includes this type of dynamic translation as a core feature, so most of your visitors can still access dynamic translation if they really want it.
If you’re using WordPress, TranslatePress lets you still use Google Translate while solving all of the issues above by storing Google Translate’s translations as static, editable content on your WordPress website.
This short video sums up the steps we covered for using TranslatePress together with Google Translate for automatically translating your entire site.
If you only want to offer your content in one new Google Translate-powered language, you can get started with the free version of TranslatePress at WordPress.org.
Then, upgrade to the premium version to get access to support for unlimited languages, including all the languages that Google Translate supports as well as your own custom languages if needed.
The premium version also helps you improve your site’s multilingual SEO and gives you other useful features such as automatic redirects based on a visitor’s language.
You also gain access to TranslatePress AI, which makes integrating with Google Translate (among other translation services) even easier. The feature allows you to instantly translate your website content without fumbling with any API key while making use of all top-tier neural machine translation services (like Google Translate) depending on your language pairs.
TranslatePress Multilingual
Do you still have any questions about adding Google Translate to your website? Give us a shout in the comments and we’ll try to help out!
If you found this post helpful, please check out our YouTube channel, where we constantly upload short & easy-to-follow video tutorials. You can also follow us on Facebook and X to be the first to know each time we post.