
En esta publicación
Si posees una plataforma de comercio electrónico multilingüe y utilizas WordPress y WooCommerce para gestionarla, probablemente ya te hayas encontrado con el problema de la traducción de los correos electrónicos de WooCommerce. Lo sabemos por propia experiencia, ya que esta es una de esas preguntas que recibimos constantemente de nuestros clientes. Entonces, ¿cómo se traducen los correos electrónicos de WooCommerce?
Bueno, hablemos de esto en esta entrada de blog.
Estoy seguro de que ya sabes lo importantes que son los correos electrónicos que envía WooCommerce, tanto para ti como para tus clientes. Estos correos ayudan a los usuarios a mantenerse informados y tener la seguridad de que sus acciones en tu sitio se llevaron a cabo. Estos son correos que confirman su registro, pedidos, pagos, restablecimientos de contraseña, etcétera. Al mismo tiempo, WooCommerce también te ayuda a realizar un seguimiento de las acciones de los usuarios, enviándote a ti (o al administrador) correos electrónicos sobre nuevos pedidos, pagos, etc.
Ahora, cuando conviertes tu tienda en multilingüe, es ahí donde las cosas se complican un poco. Lo más probable es que también quieras traducir estos correos electrónicos, teniendo en cuenta la preferencia de idioma de cada usuario.
Dicho esto, permíteme arrojar un poco de luz sobre este tema y explicarte cómo funcionan estas traducciones de correos electrónicos cuando utilizas uno de los plugins multilingües más fáciles de usar para WordPress, TranslatePress.
Cómo gestiona TranslatePress la traducción de los correos electrónicos de WooCommerce
Entonces, antes de entrar en cómo traducir manualmente los correos electrónicos de WooCommerce y editar cada idioma usando TranslatePress, déjeme mostrarle cómo el plugin maneja estos correos electrónicos.
En primer lugar, hay dos tipos de correos electrónicos que WooCommerce envía:
- Correos electrónicos enviados a los clientes de su sitio web cuando realizan una determinada acción (como comprar, autorizar un pago, reservar, etc.);
- Correos electrónicos enviados al administrador o administradores o al gestor de la tienda del sitio (como avisos de nuevos pedidos, avisos de pedidos fallidos, etc.).
Por defecto, TranslatePress gestiona estas dos instancias de forma diferente entre sí, así que veamos cada una de ellas por separado.
Traducción de correos electrónicos de clientes de WooCommerce
En los correos electrónicos que WooCommerce envía a tus clientes, TranslatePress utiliza el idioma en el que cada usuario haya navegado por última vez en tu página web para las traducciones.
Por lo tanto, para los usuarios conectados, su idioma preferido se actualiza automáticamente al último idioma en el que visitaron el sitio web. En consecuencia, los correos electrónicos de WooCommerce se enviarán en ese mismo idioma.
En el caso de los sitios web que no requieren iniciar sesión antes de realizar la compra, TranslatePress utilizará el idioma seleccionado en la página de pago en el momento de realizar el pedido para identificar la preferencia del usuario. Este es el idioma que se utiliza para enviar correos electrónicos a este tipo de usuarios.
Si no tienes un selector de idioma en tu sitio web para que los clientes puedan elegir fácilmente su idioma preferido, aquí tienes un tutorial sobre Cómo añadir un selector de idioma en WordPress.
Traducción de Correos Electrónicos de WooCommerce para Administrador/Gerente de Tienda
En el caso de los correos electrónicos enviados a un administrador del sitio o al responsable de la tienda, se utilizará el idioma preferido de dicho usuario. En otras palabras, el idioma que haya configurado personalmente en su perfil desde el panel de control de WordPress (Usuarios → Perfil → Idioma).
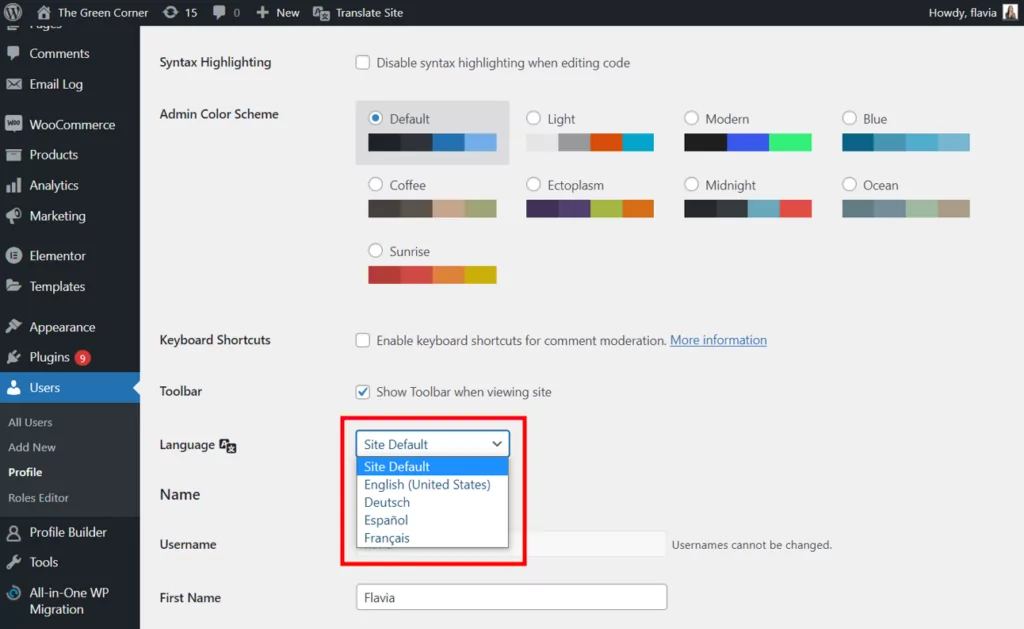
Si configuras un correo electrónico de destinatario diferente desde WooCommerce → Ajustes → Correos electrónicos, se utilizará el idioma del panel de WordPress de ese usuario para los correos electrónicos.
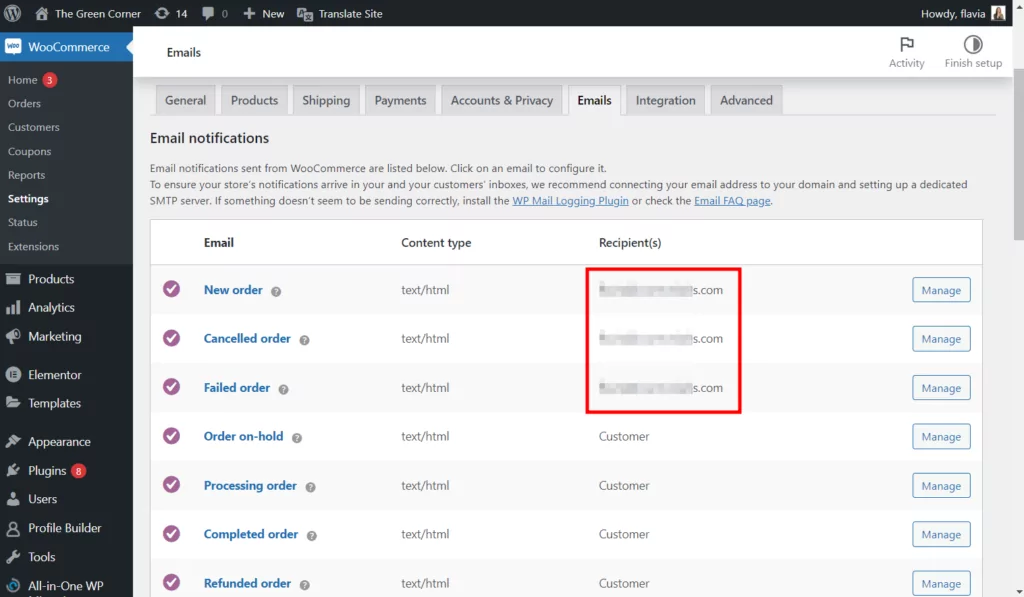
Si hay más de un destinatario para este tipo de correo electrónico, el mensaje se enviará en el idioma predeterminado configurado en el Configuración de TranslatePress para todos los destinatarios.
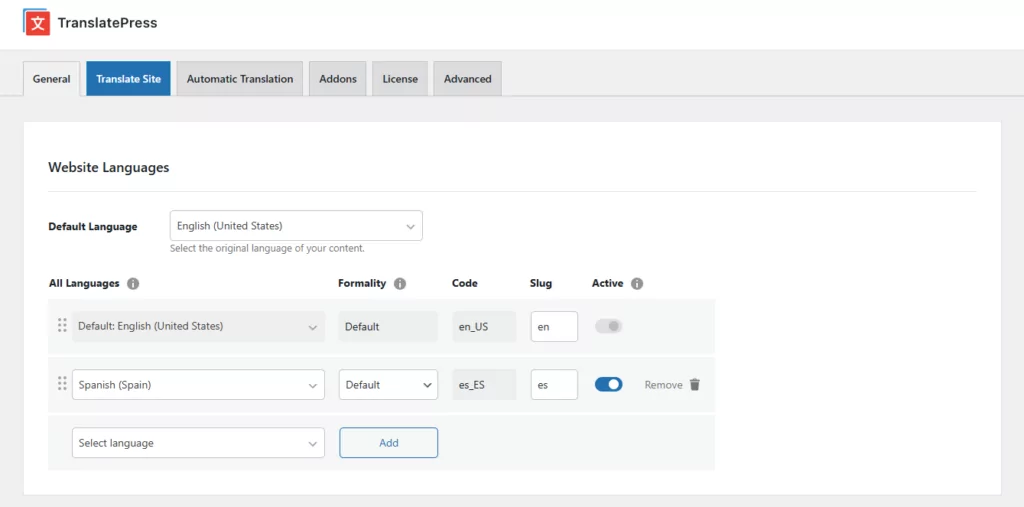
Nota: En el caso de que el idioma establecido para un perfil de administrador no esté configurado en el Configuración de TranslatePress Además, una vez más se utilizará el idioma predeterminado.
Cómo traducir correos electrónicos de WooCommerce
Lo primero es lo primero: necesitarás un plugin de traducción para llevar a cabo esta tarea. Por lo tanto, el primer paso para traducir los correos electrónicos de WooCommerce es instalar y activar TranslatePress en tu sitio web.
Pero antes de entrar en el tutorial detallado, aquí tienes un breve vídeo que cubre los puntos principales:
1. Instalar TranslatePress y configurar los idiomas
A efectos de esta entrada del blog, dedicada a la traducción de correos electrónicos en WooCommerce, puedes utilizar la versión gratuita de TranslatePress, disponible para descargar en WordPress.org.
Si te gustaría ver otras funcionalidades adicionales, como Traducción de los slugs de las URL o Elementos de SEO, tendrás que comprar un plan pro desde aquí.
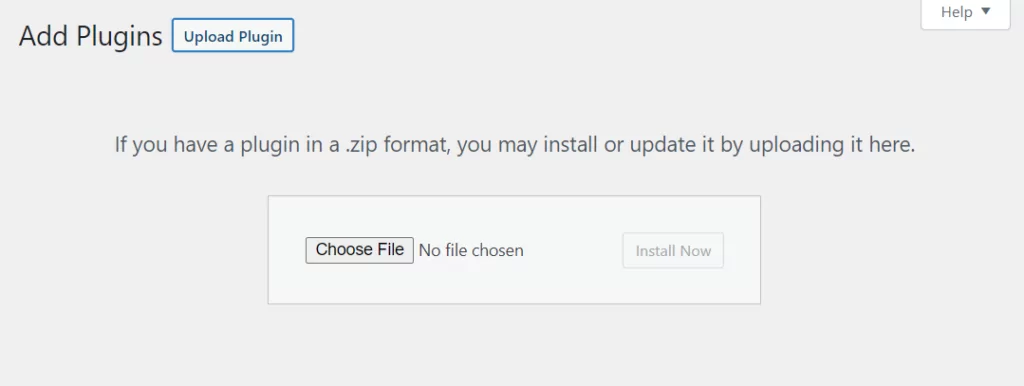
Una vez que hayas elegido tu complemento, instálalo como cualquier otro complemento en tu sitio, desde el Complementos sección del panel de control de WordPress.
A continuación, ve a Configuración → TranslatePress para añadir tus idiomas. Elige tu idioma predeterminado y luego añade tu(s) idioma(s) secundario(s) desde el menú desplegable.
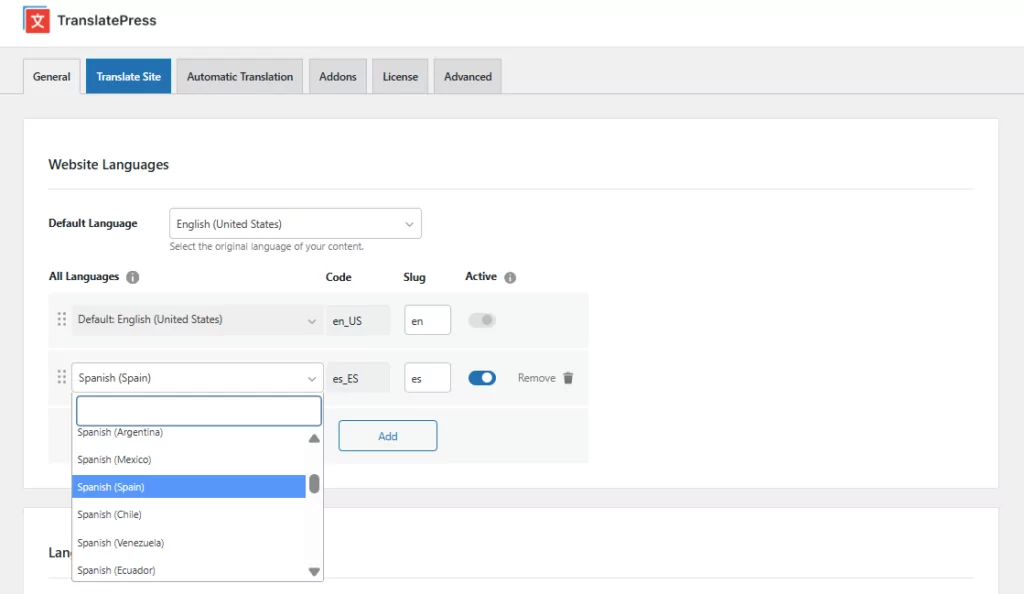
No te olvides de hacer clic Añadir una vez que hayas hecho tu selección. A continuación, pulsa Guardar cambios en la parte inferior de la página cuando hayas terminado.
2.1. Traducir automáticamente los correos electrónicos de WooCommerce
Si no necesitas demasiadas opciones de personalización, puedes simplemente configurar traducción automática en tu página web y deja que TranslatePress se encargue de todo por ti.
WooCommerce ofrece una extensa lista de paquetes de idiomas para muchos idiomas a los que puedes traducir tu sitio web. Por lo tanto, si estás utilizando los correos electrónicos predeterminados de WooCommerce, las traducciones se obtendrán del paquete de idiomas adecuado según las reglas presentadas en la sección anterior.
¿Pero qué pasa si ya has personalizado los correos electrónicos con tu propio contenido desde WooCommerce → Ajustes → Correos electrónicos pestaña
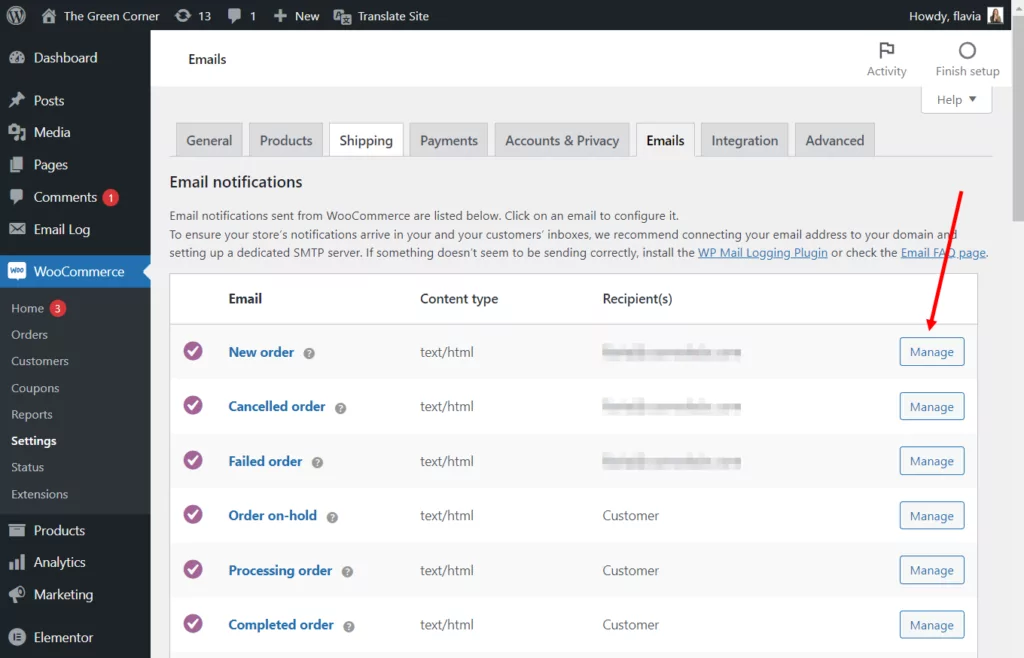
En este caso, TranslatePress utilizará el Traducción automática función para gestionar las traducciones de los correos electrónicos de WooCommerce.
Para activar la traducción automática en tu sitio web, ve a Configuración → TranslatePress → Traducción automática pestaña. Establecer la funcionalidad en Sí del menú desplegable y se mostrarán más ajustes.
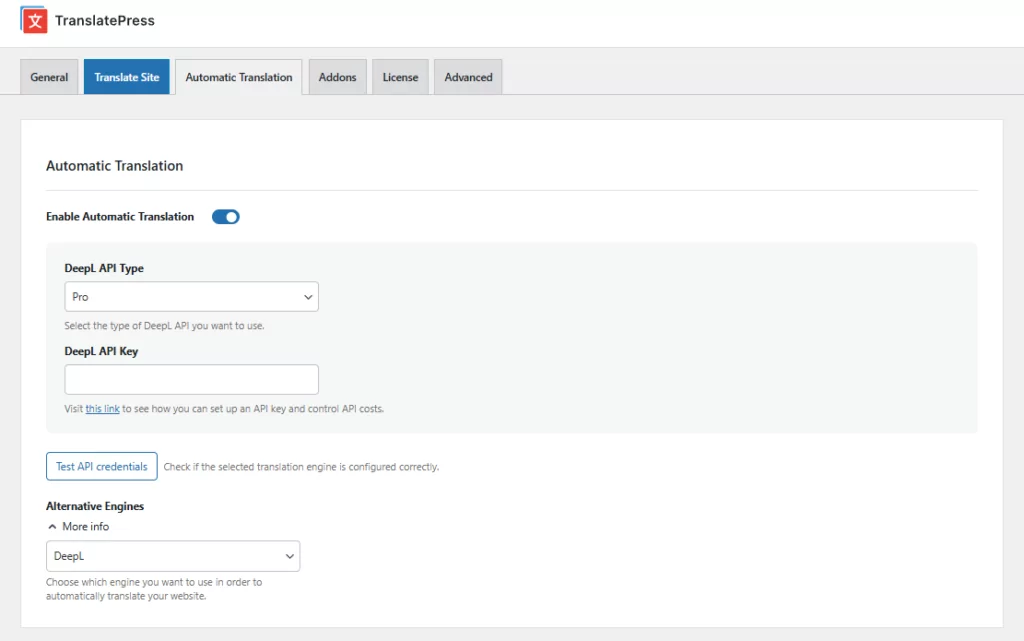
A continuación, deberás elegir tu motor de traducción preferido y obtener una clave de API. Si necesitas un poco de ayuda con esto, puedes consultar estos tutoriales para obtener una:
No olvides guardar tus cambios cuando termines. Ahora, tus correos electrónicos personalizados también deberían traducirse automáticamente según las reglas antes mencionadas.
Nota: Las traducciones automáticas no siempre son perfectas, así que asegúrate de revisarlas antes de empezar a entregarlas a tus clientes.
2.2. Traducir manualmente los correos electrónicos de WooCommerce
Ahora bien, dado que la traducción automática no es 100% precisa, quizá te interese optar por la traducción manual a la hora de traducir los correos electrónicos de WooCommerce.
Pero ya sea que quieras optar por la traducción manual desde el principio o simplemente necesites revisar y ajustar las traducciones automáticas, así es como puedes hacerlo.
Abrir el Editor de Traducción
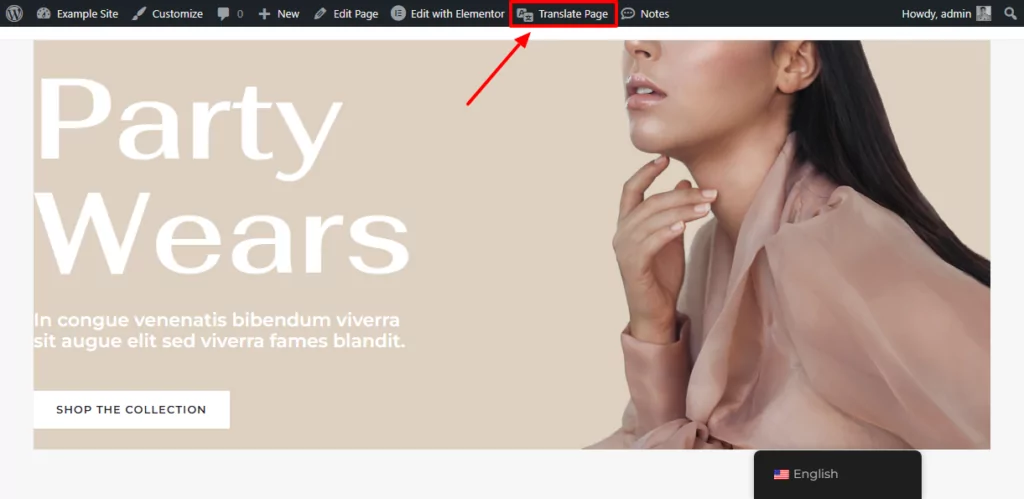
En primer lugar, tendrás que abrir el editor de traducción de TranslatePress. Para ello, puedes hacer clic en el Traducir página botón de la interfaz de usuario de su sitio:
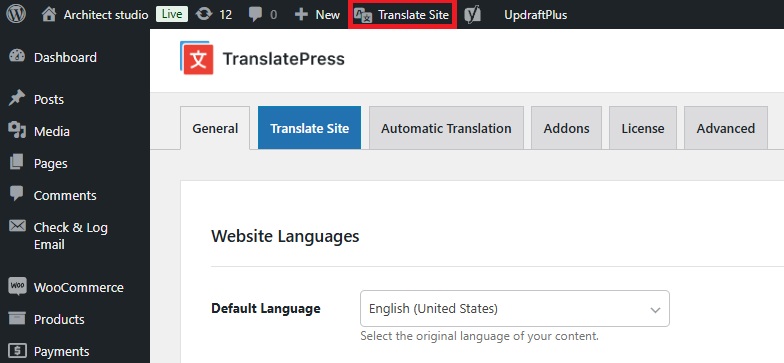
O el Traducir sitio botón del panel de control de WordPress:
Esto abrirá el Editor de Traducción Visual. Una vez aquí, cambia al Traducción de cadenas pestaña situada en la parte izquierda de la pantalla.
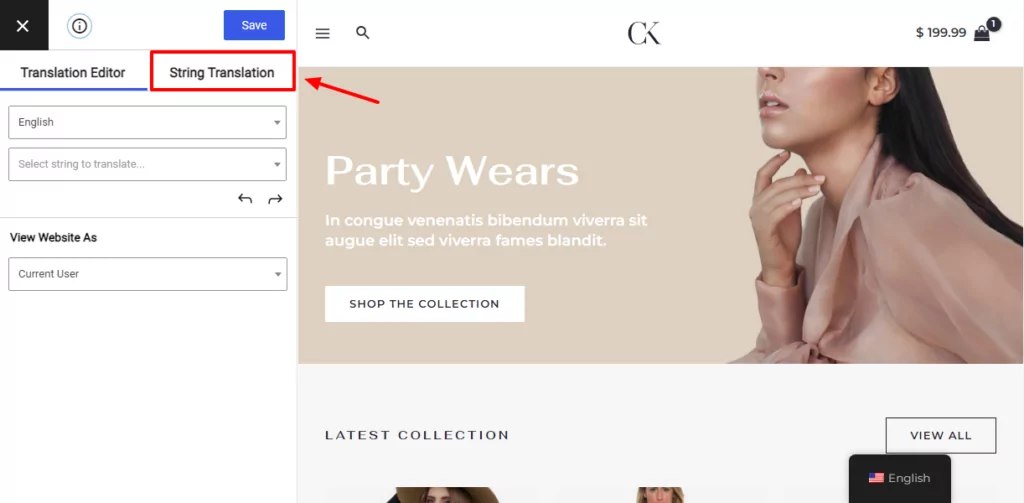
Aunque el Editor visual es el lugar donde puedes editar cualquier contenido visible con solo hacer clic en él desde la vista previa de la página, el Editor de traducción de cadenas es donde puedes editar contenido oculto que no es visible en la interfaz pública.
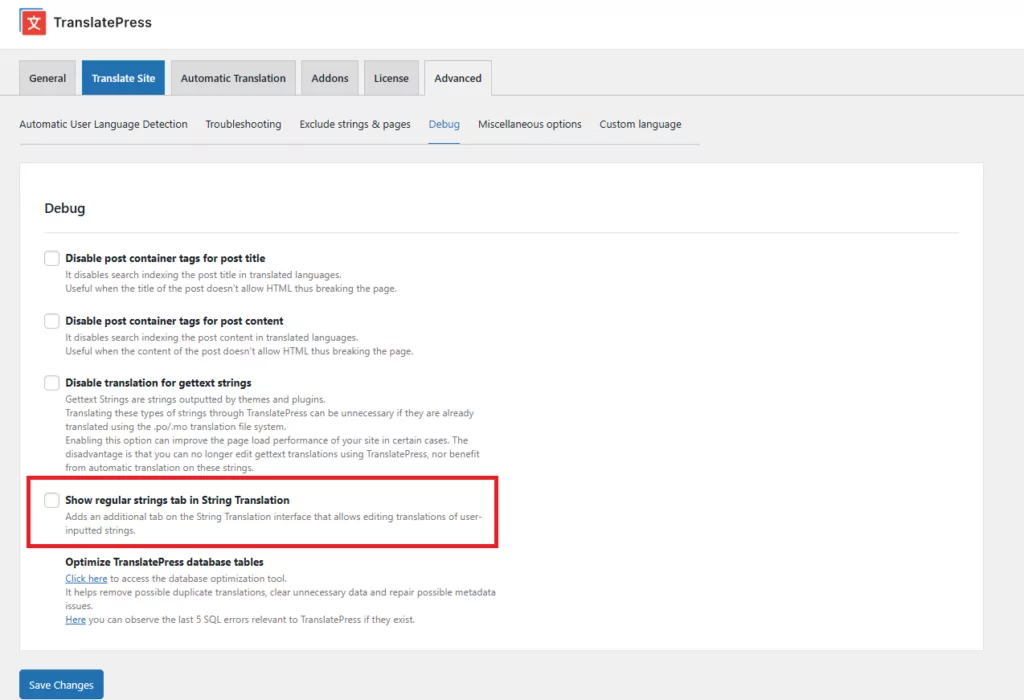
Aquí es también donde podrás ver una lista de todas las traducciones en tu sitio para que puedas revisarlas fácilmente e identificar cadenas específicas utilizando una interfaz de estilo de búsqueda y filtrado. Para hacer esto, sin embargo, necesitarás habilitar el Regular pestaña yendo a Configuración → TranslatePress → Avanzado pestaña → Depurar sección.
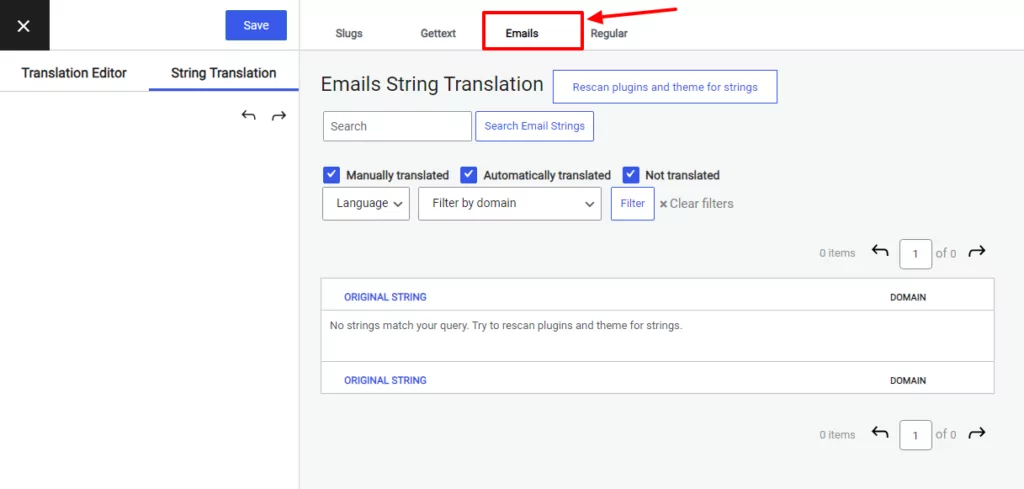
Cuando abres el Traducción de cadenas editor; por defecto, TranslatePress te llevará a la Babosas pestaña. Por lo tanto, para editar los correos electrónicos de WooCommerce, tendrás que hacer clic en la Correos electrónicos pestaña.
A continuación, haz clic en el Reescanear plugins y tema para cadenas de texto botón. De este modo, te aseguras de que la pestaña se rellene correctamente con todos tus correos electrónicos de WooCommerce.
Luego elige WooCommerce en el Filtrar por dominio desplegable y haz clic en el Filtro botón.
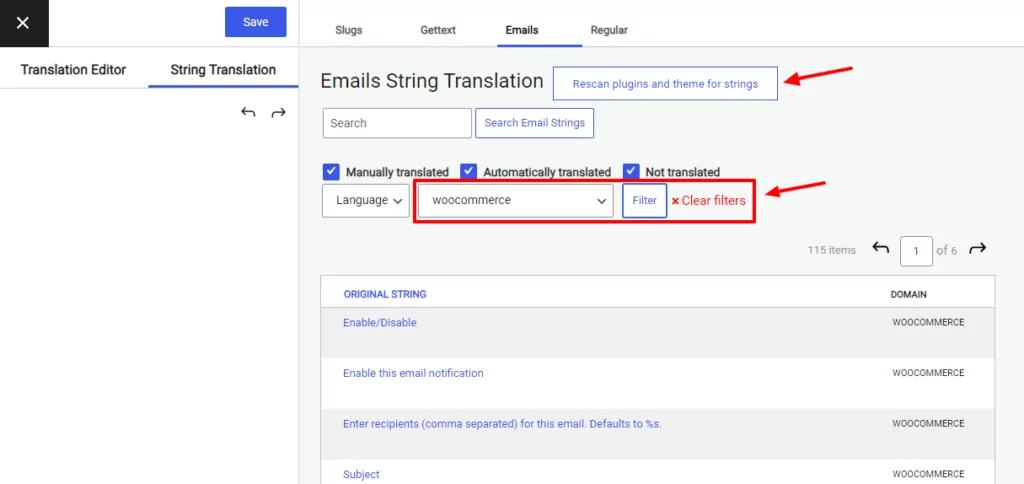
Ahora debería poder ver todas las cadenas encontradas en los correos electrónicos de WooCommerce aquí. Pero tenga en cuenta que solo se mostrarán las cadenas localizadas del complemento. Si ya ha personalizado algunos de los correos electrónicos predeterminados de WooCommerce, los encontrará en los mencionados anteriormente. Regular pestaña.
Editar las traducciones de los correos electrónicos de WooCommerce
Para editar la traducción de una cadena concreta, solo tienes que hacer clic en ella. La barra lateral de traducción situada a la izquierda mostrará ahora la cadena en el idioma original y dos (o más) campos para introducir las traducciones.
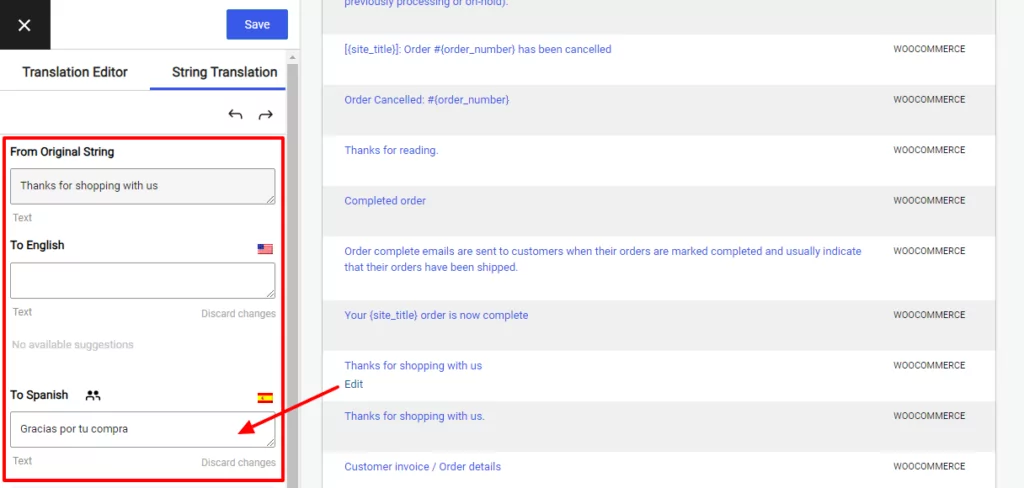
El primer campo te brinda la capacidad de modificar el texto original en el mismo idioma. Esto es en caso de que no apruebes la selección de palabras predeterminada de WooCommerce.
El segundo campo es donde querrás introducir tu traducción. Si ya has activado la traducción automática y solo estás revisando los textos, este campo vendrá prellenado. Pero puedes modificar manualmente estas traducciones automáticas en cualquier momento desde aquí.
Si has añadido más idiomas a tu sitio web, TranslatePress mostrará un campo para cada idioma.
Ahora puedes tomar todas las cadenas una por una y traducir cada una, o buscar una cadena específica usando la barra de búsqueda. Lo mismo se aplica si deseas revisar la traducción automática.
En el ejemplo que te muestro a continuación, quiero traducir el correo electrónico que WooCommerce envía a mis clientes cuando se completa su pedido. Lo traduciré al español.
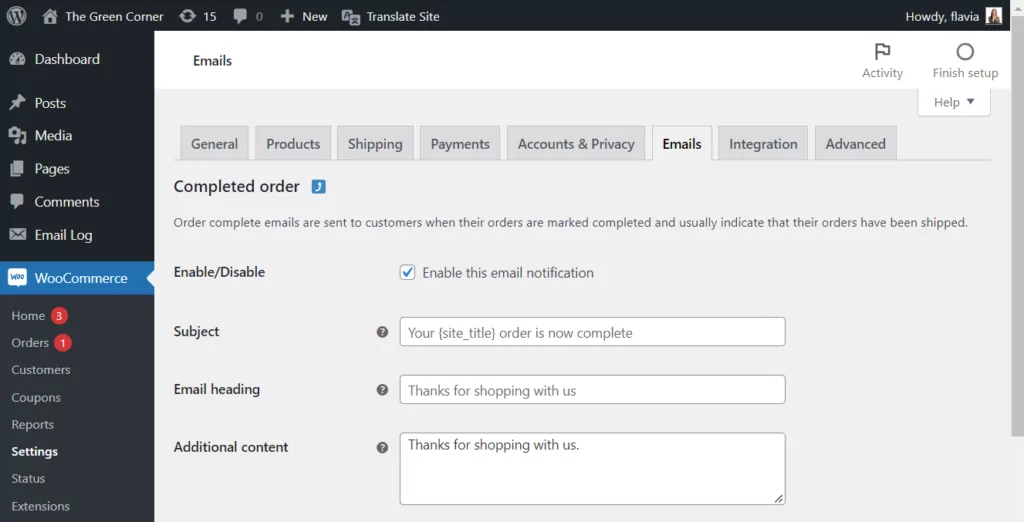
Así que, para encontrar las cadenas de texto concretas de ese correo electrónico, simplemente las buscaré una por una en la barra de búsqueda. Después, solo tengo que hacer clic en la cadena y añadir la traducción al español en la barra lateral de la izquierda. Ahora solo queda hacer clic en Guardar.
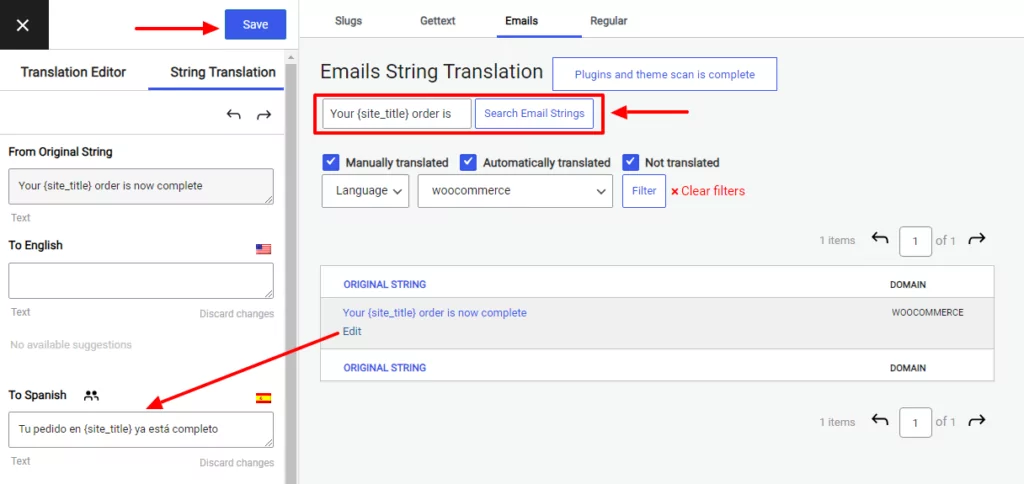
A continuación, haré lo mismo para todas las cadenas de ese correo electrónico.
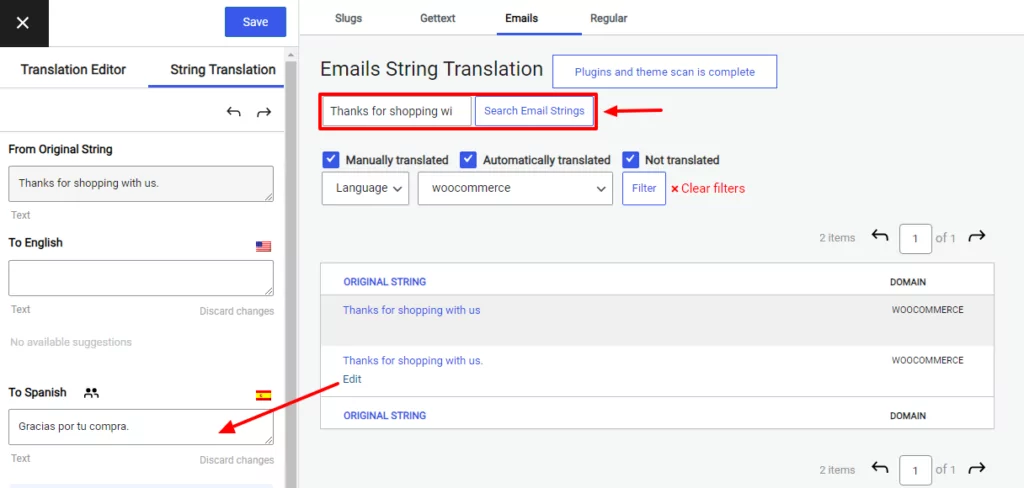
También te recomiendo que le eches un vistazo a uno anterior Pedido completado correo electrónico (o cualquier tipo de correo electrónico que estés traduciendo) enviado en tu idioma predeterminado para asegurarte de que no se te pase por alto ninguna cadena. Solo tienes que copiar todas las cadenas de ese correo electrónico y pegarlas en la barra de búsqueda de la Correos electrónicos pestaña de la Traducción de cadenas editor. Si no puedes encontrar una cadena allí, intenta buscar en el Gettext y Regular pestañas también.
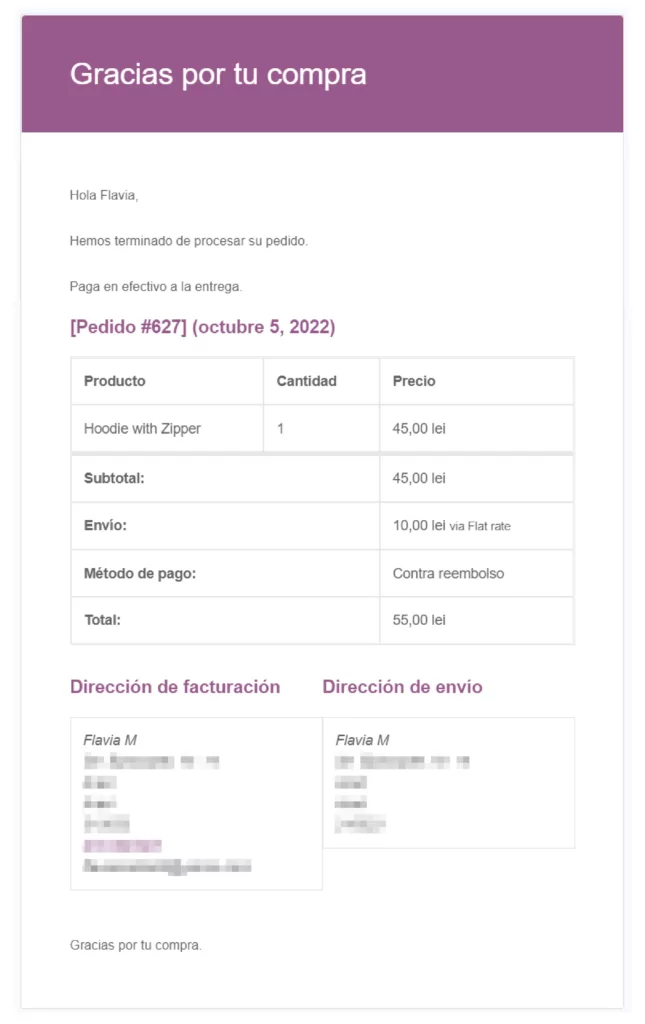
A partir de ahora, cuando se complete un pedido de un cliente hispanohablante, este recibirá este correo electrónico en español:
Nota: Se requiere WooCommerce versión 6.8.0 o superior para que esta función funcione correctamente. Asegúrate de tener la última versión activa en tu sitio.
Comienza hoy la traducción de correos electrónicos de WooCommerce
Usando el editor de traducción de cadenas, puedes editar fácilmente las traducciones de los correos electrónicos predeterminados de WooCommerce y también de los personalizados. Esto te ayuda a adaptarte a todos tus clientes, ofreciéndoles la información que necesitan en un idioma que entienden.
Pero aparte de eso, el mismo editor también te permite realizar traducciones para todo tipo de otro contenido oculto en tu sitio, como Slugs de URL, cadenas de gettext y contenido mostrado dinámicamente. Estas son cadenas que normalmente no se pueden ver en la interfaz pública de su sitio y no se pueden traducir usando el editor visual. Puede leer más sobre todo lo que puede hacer con el Editor de traducción de cadenas aquí.
Y, por supuesto, TranslatePress también facilita la traducción de cualquier sitio web de WordPress, tanto de forma manual como automática. Así que, si necesitas ayuda con eso, echa un vistazo a esta guía sobre el la mejor manera de traducir un sitio web.
TranslatePress Multilingüe
¿Todavía tienes preguntas sobre cómo traducir los correos electrónicos de WooCommerce? ¡Háznoslo saber en los comentarios!
Si encontraste útil esta publicación, por favor visita nuestro Canal de YouTube, donde subimos constantemente tutoriales en video cortos y fáciles de seguir. También puedes seguirnos en Facebook y Twitter ser el primero en enterarte cada vez que publicamos.