In this post
In this post
If you own a multilingual eCommerce platform and use WordPress and WooCommerce to run it, you’ve probably already run into the issue that is WooCommerce email translation. We know this from first-hand experience since this is one of those questions we keep getting from our customers. So, how do you translate WooCommerce emails?
Well, let’s talk about this in this blog post.
I’m sure you already know how important the emails WooCommerce sends are, both to you and your customers. These emails help users stay in the loop and rest assured their actions on your site went through. These are emails that confirm their registration, orders, payments, password resets, and so on. At the same time, WooCommerce also helps you keep track of user actions, sending you (or the admin) emails about new orders, payments, etc.
Now, when you turn your store multilingual, that’s where things get a little complicated. You’d most probably want to translate these emails as well, taking each user’s preferred language choice into consideration.
That being said, let me shed a little light on this issue and explain how these email translations work when you use one of the friendliest WordPress multilingual plugins, TranslatePress.
How TranslatePress Handles WooCommerce Email Translation
So, before we get into how to manually translate WooCommerce emails and edit each language using TranslatePress, let me show you how the plugin handles these emails.
First off, there are two types of emails WooCommerce sends:
- Emails sent to your website customers when they do a certain action (such as purchase, authorize payment, pre-order, etc.);
- Emails sent to the admin/s or shop manager of the site (such as new order notice, failed order notice, etc.).
By default TranslatePress manages these two instances differently from one another, so let’s take a look at each of them individually.
WooCommerce Customer Email Translation
For the emails WooCommerce sends to your customers, TranslatePress uses the language each user has last browsed your website for translations.
Therefore, for logged-in users, their preferred language is automatically updated to the last language they visited the website in. Hence, the WooCommerce emails will be sent in that same language.
For websites that don’t require login before purchase, TranslatePress will use the language selected on the checkout page at the time the order was placed to identify the user’s preference. This is the language used for sending emails to this type of user.
If you don’t have a language selector on your site so customers can easily pick their preferred language, here’s a tutorial on how to add a language switcher in WordPress.
WooCommerce Admin/Shop Manager Email Translation
For the emails sent to a site admin or shop manager, they will use that user’s preferred language. In other words, the language he has personally set on his profile from the WordPress dashboard (Users → Profile → Language).
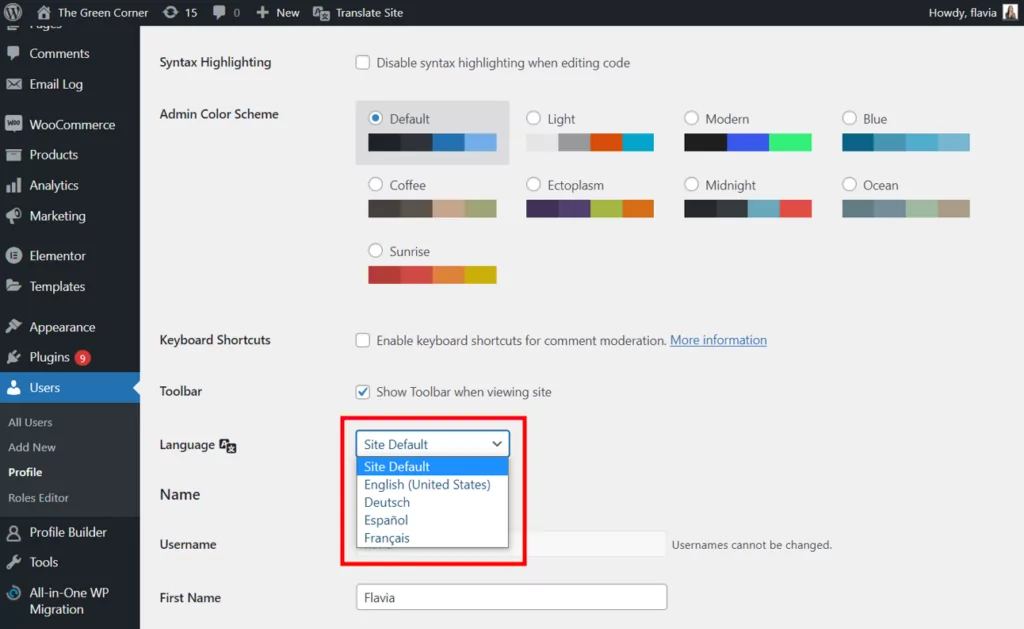
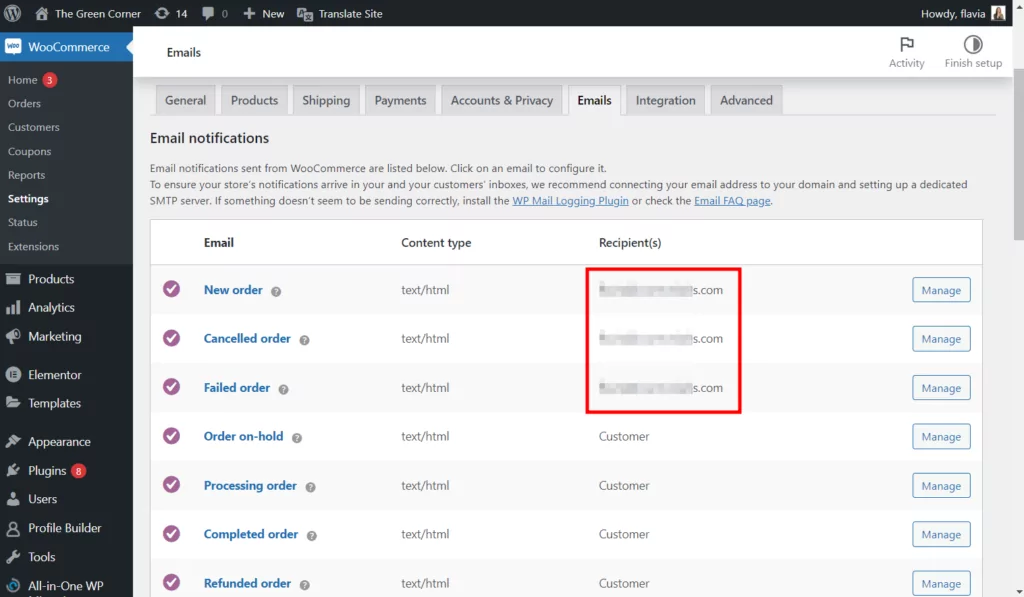
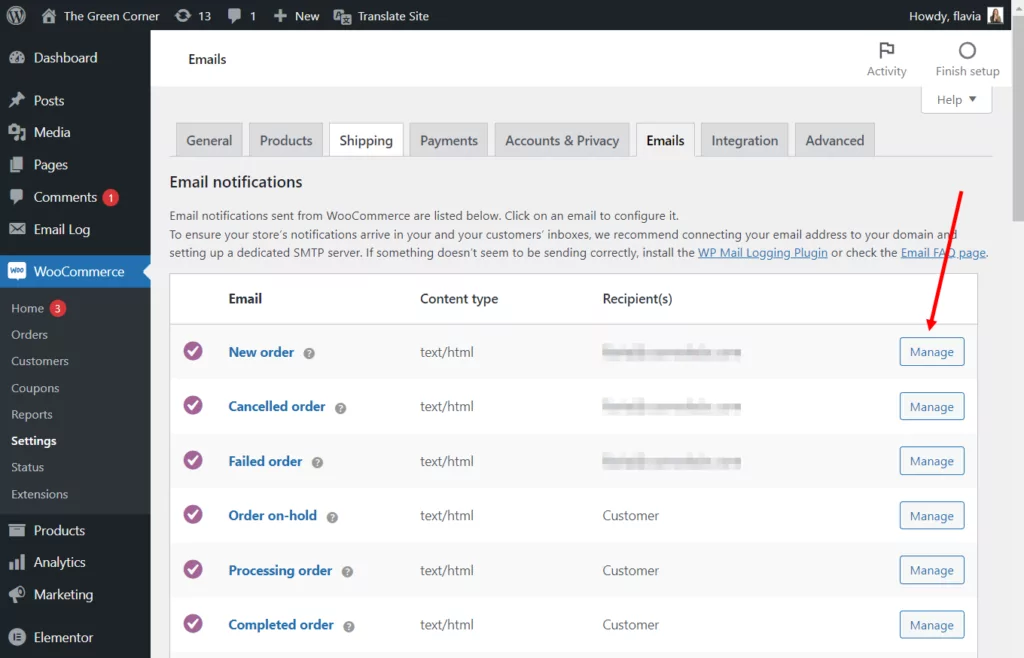
If you configure a different recipient email from WooCommerce → Settings → Emails, that user’s WordPress dashboard language will be used for emails.
Having more than one recipient for this type of email will result in sending the email in the default language set up in the TranslatePress Settings for all recipients.
Note: In the eventuality that the language set for an admin profile is not configured in the TranslatePress Settings as well, once again the default language will be used.
How to Translate WooCommerce Emails
First things first, you’ll need a translation plugin to handle this job. So, the first step to WooCommerce email translation is to install and activate TranslatePress on your site.
But before we get into the detailed tutorial, here’s a short video covering the main points:
1. Install TranslatePress and Set Up Languages
For the purpose of this blog post, which is WooCommerce email translation, you can use the free version of TranslatePress available for download at WordPress.org.
If you’d like to check out other extra functionalities, like translating URL slugs or SEO elements, you’ll have to purchase a pro plan from here.
Once you picked your plugin, install it like any other plugin on your site, from the Plugins section of the WordPress dashboard.
Next, go to Settings → TranslatePress to add your languages. Pick your default language and then add your secondary language(s) from the dropdown.
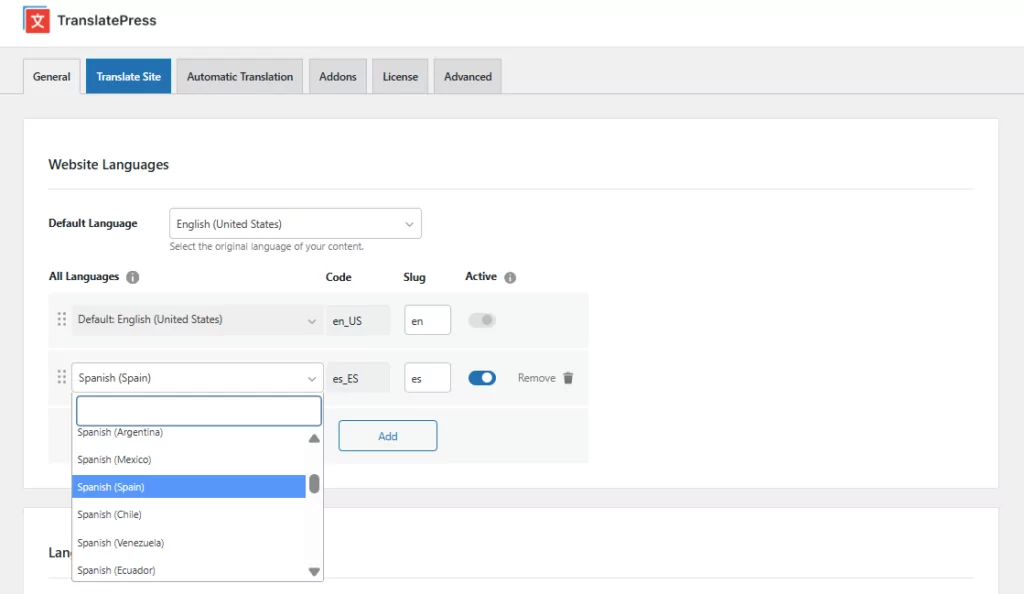
Don’t forget to click Add once you’ve made your selection. Then hit Save Changes from the bottom of the page when you’re done.
2.1. Automatically Translate WooCommerce Emails
If you don’t need too much customization, you can easily just set up automatic translation on your website and let TranslatePress do the work for you.
WooCommerce does provide an extensive list of language packs for many languages you may translate your website into. Therefore, if you’re using the default WooCommerce emails, the translations will be fetched from the appropriate language pack based on the rules presented in the previous section.
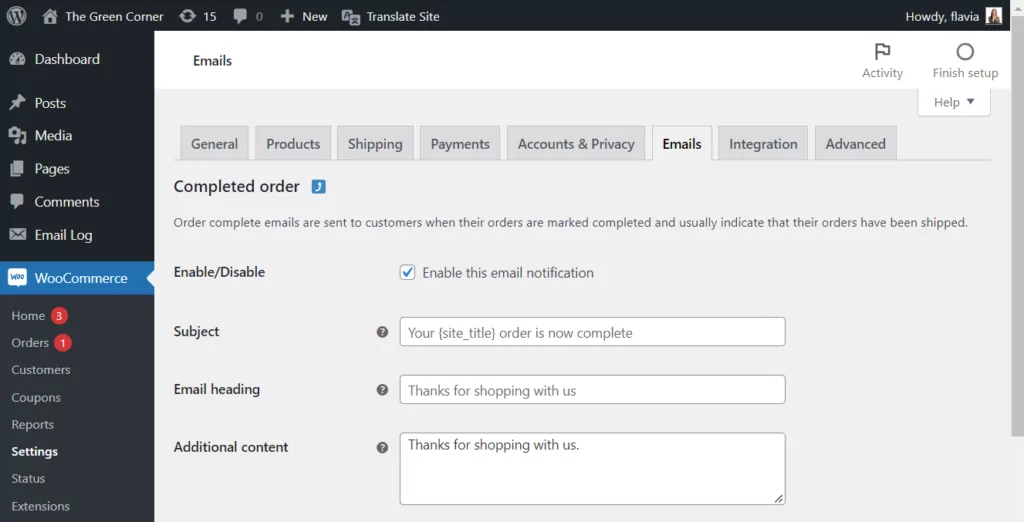
But what if you’ve already customized the emails with your own content from WooCommerce → Settings → Emails tab?
In this case, TranslatePress will use the Automatic Translation feature to handle those WooCommerce email translations.
To enable automatic translation on your site, go to Settings → TranslatePress → Automatic Translation tab. Set the functionality to Yes from the dropdown and more settings will be displayed.
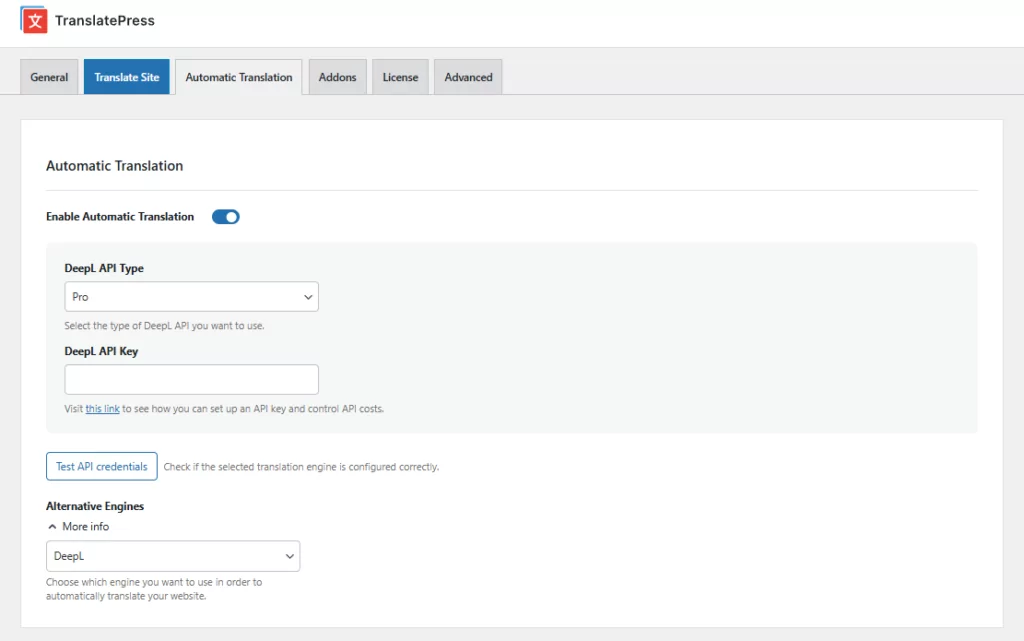
Next, you’ll need to choose your preferred translation engine and get an API key. If you need a little help with this, you can check these tutorials for retrieving a:
Don’t forget to save your changes when you’re done. Now, your custom emails should also be automatically translated based on the aforementioned rules.
Note: Automatic translations are not always perfect, so make sure to review them before you start delivering them to your customers.
2.2. Manually Translate WooCommerce Emails
Now, because automatic translation is not 100% accurate, you might want to take the manual route when translating WooCommerce emails.
But whether you want to go with manual translation from the get-go or just need to review and tweak the automatic translations, this is how you can do it.
Open the Translation Editor
First, you’ll want to open the TranslatePress translation editor. You can do this either by clicking the Translate Page button from the front end of your site:

Or the Translate Site button from your WordPress dashboard:
This will open up the Visual Translation Editor. Once here, switch to the String Translation tab from the left side of the screen.
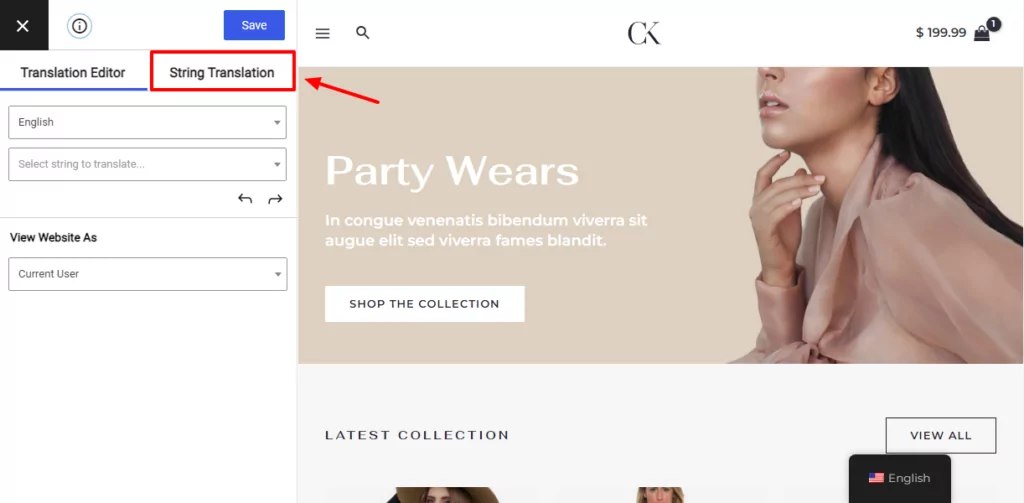
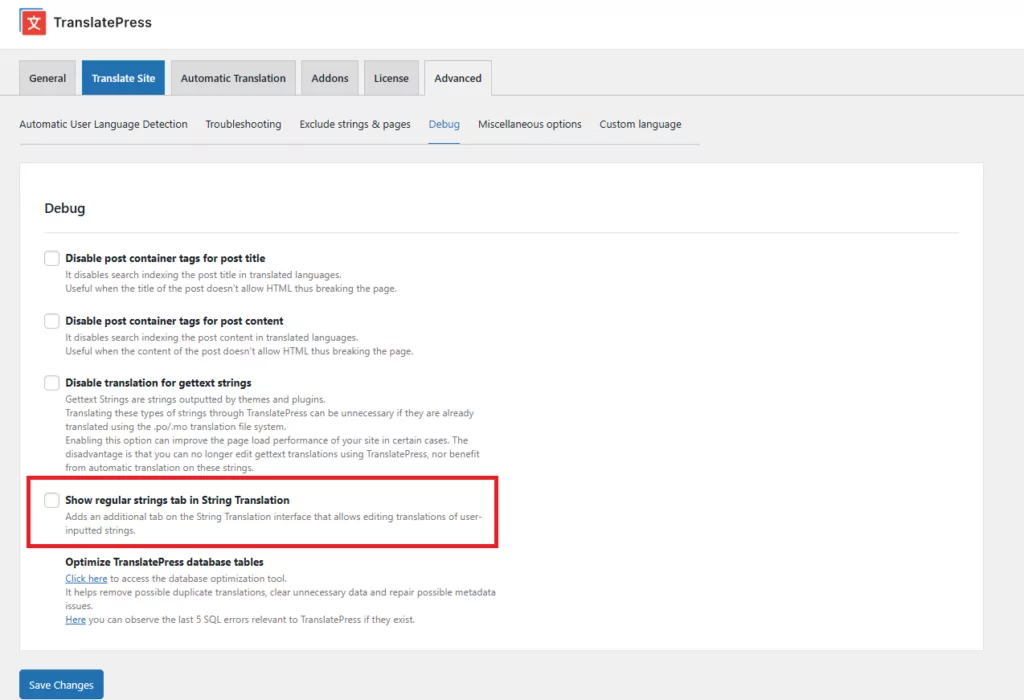
While the Visual Editor is the place where you can edit any visible content just by simply clicking on it from the site preview, the String Translation Editor is where you can edit hidden content that is not visible on the front end.
This is where you’ll also be able to view a list of all the translations on your site so you can easily review them and identify specific strings using a search & filter style interface. To do this, however, you’ll need to enable the Regular tab by going to Settings → TranslatePress → Advanced tab → Debug section.
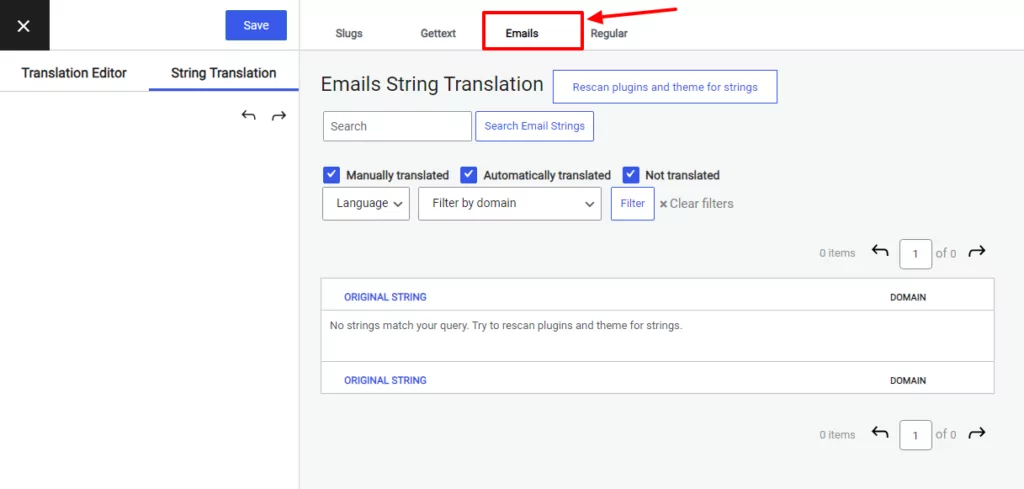
When you open the String Translation editor, by default, TranslatePress will take you to the Slugs tab. So, in order to edit WooCommerce emails, you’ll have to click the Emails tab.
Next, click the Rescan plugins and theme for strings button. This assures that the tab is properly populated with all your WooCommerce emails.
Then choose WooCommerce in the Filter by domain dropdown and click the Filter button.
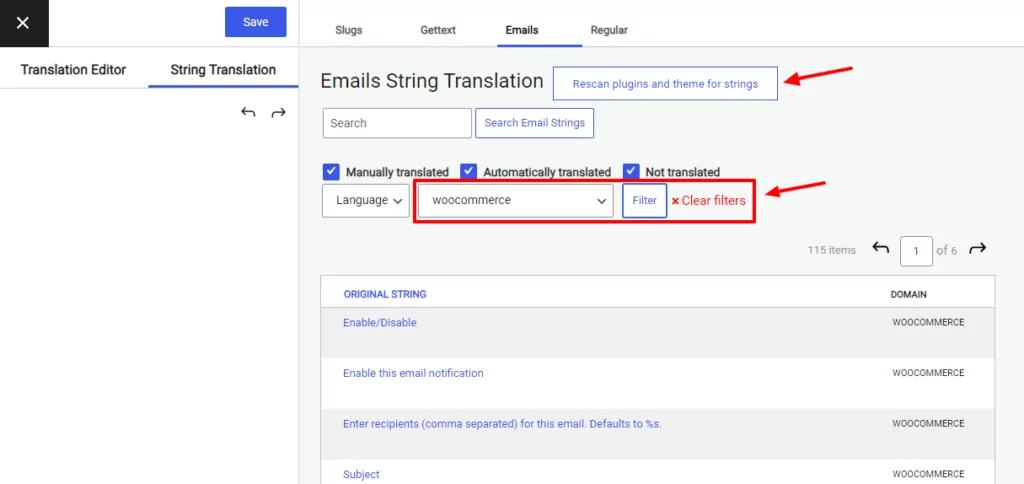
Now, you should be able to see all the strings found in WooCommerce emails here. But take note that only the plugin localized strings will be displayed. If you’ve already customized some of the default WooCommerce emails, you will find those in the previously mentioned Regular tab.
Edit WooCommerce Email Translations
In order to edit the translation for a specific string, all you have to do is click on it. The translation sidebar to the left will now display the string in the original language and two (or more) fields for inputting translations.
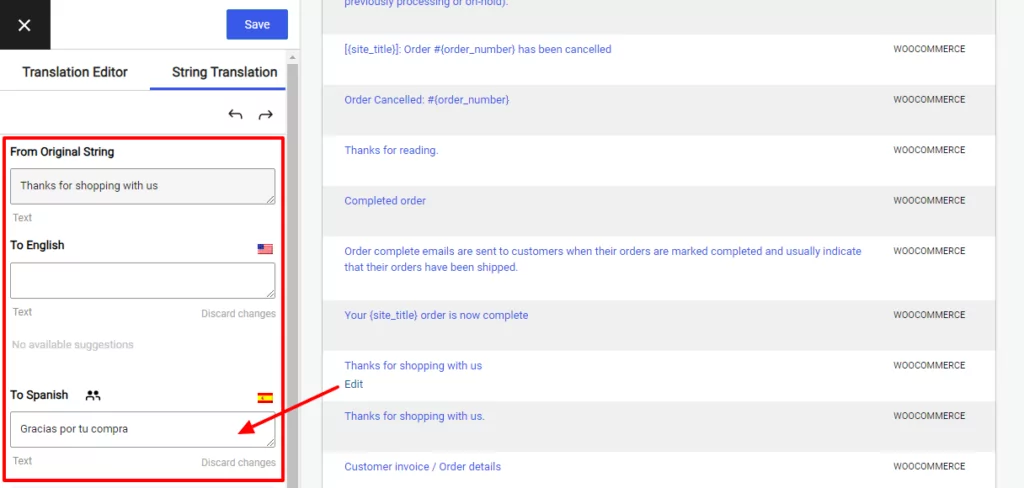
The first field gives you the ability to modify the original text in the same language. This is in case you don’t approve of WooCommerce’s default choice of words.
The second field is where you’ll want to fill in your translation. If you’ve already enabled automatic translation and you’re just reviewing the texts, this field will be pre-filled. But you can manually modify these automatic translations at any time from here.
If you have more languages added to your site, TranslatePress will display a field for each language.
Now you can either take all the strings one by one and translate each one, or search for a specific string using the search bar. The same applies if you want to review the automatic translation.
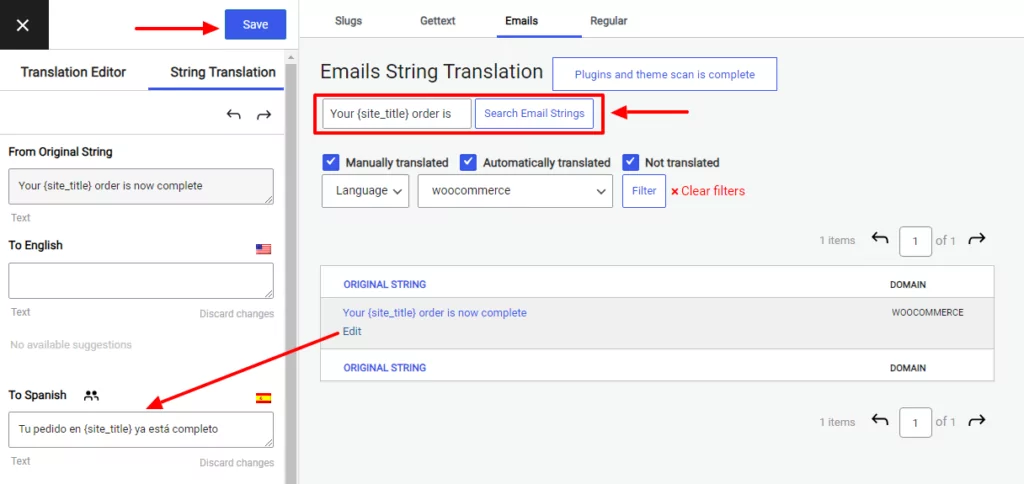
In my example below, I want to translate the email WooCommerce sends to my customers when their order is complete. I will translate it into Spanish.
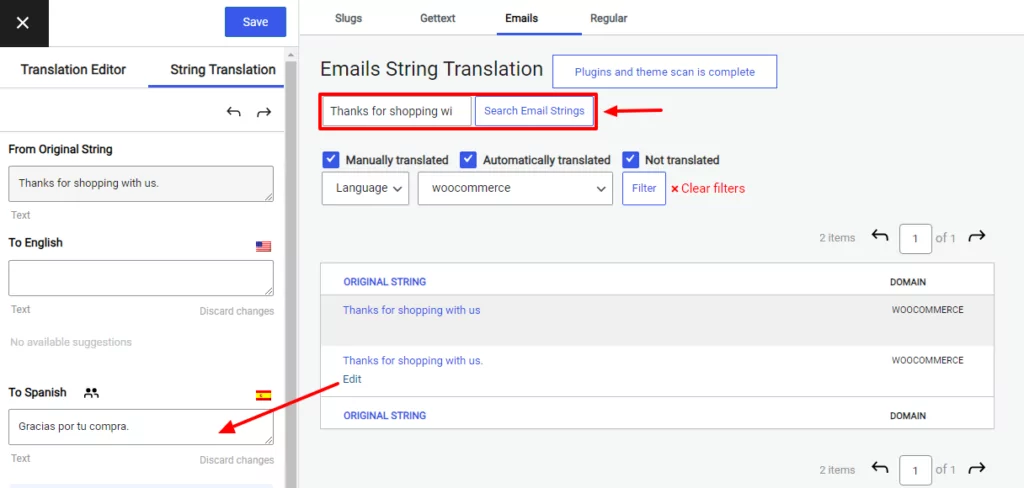
So, to find the specific strings of that email, I will simply search for them one by one in the search bar. Then I can just click on the string and add the Spanish translation in the sidebar to the left. Now all that’s left is clicking Save.
Next, I will do the same for all of the strings in that email.
I also recommend you take a look at a previous Completed order email (or whatever email type you are translating) sent in your default language to make sure you don’t miss any strings. Just copy every string in that email and paste it into the search bar of the Emails tab of the String Translation editor. If you can’t find a string there, try searching in the Gettext and Regular tabs as well.
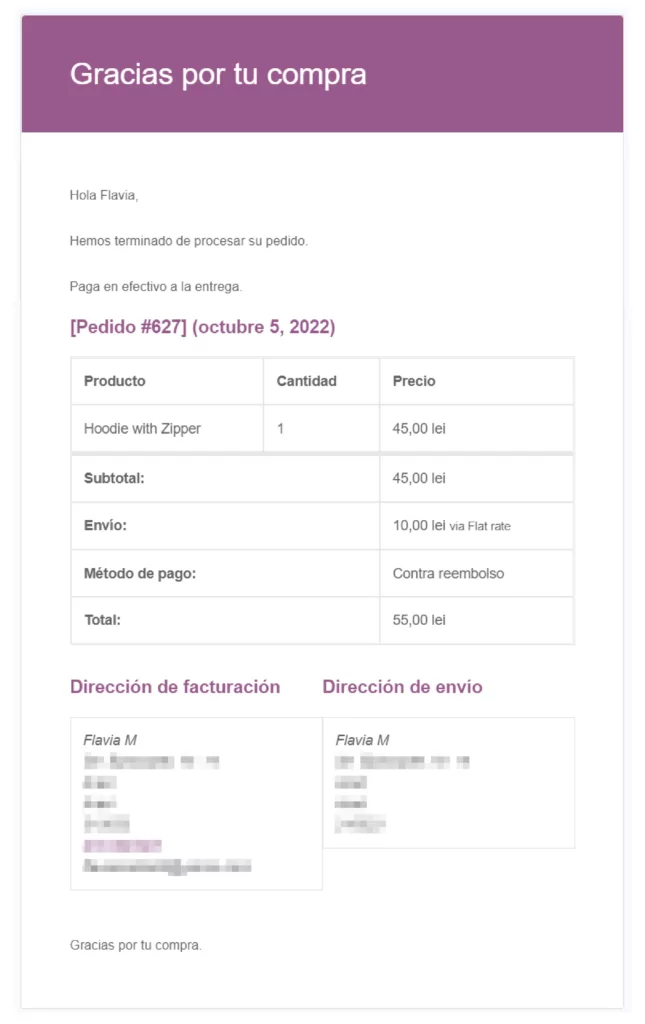
Now, when an order from a Spanish-speaking customer is completed, they will receive this email in Spanish:
Note: WooCommerce version 6.8.0+ is required for this feature to work properly. Make sure you have the latest version active on your site.
Start WooCommerce Emails Translation Today
Using the String Translation editor you can easily edit translations for the default WooCommerce emails, and also the custom ones. This helps you accommodate all of your customers, serving them the information they need in a language they understand.
But apart from that, the same editor also lets you perform translations for all types of other hidden content on your site, like URL slugs, gettext strings, and dynamically displayed content. These are strings that you can’t normally see on the front end of your site, and can’t translate using the visual editor. You can read more about everything you can do with the String Translation editor here.
And, of course, TranslatePress also makes it easy to translate any WordPress website, both manually and automatically. So if you need help with that check out this guide on the best way to translate a website.
TranslatePress Multilingual
Still have questions about how to translate WooCommerce emails? Let us know in the comments!
If you found this post helpful, please check out our YouTube channel, where we constantly upload short & easy-to-follow video tutorials. You can also follow us on Facebook and Twitter to be the first to know each time we post.