
In diesem Beitrag
A Website-Sprachauswahl könnte eines der wichtigsten Tools sein, die Sie Ihrer Website hinzufügen können. Wenn Sie mit Ihren Inhalten ein globales Publikum erreichen und ihm die bestmögliche Nutzererfahrung bieten möchten, müssen Sie zunächst sicherstellen, dass es Ihre Website in der richtigen Sprache anzeigen kann.
Sprachauswahl-Tools gibt es in einer Vielzahl verschiedener Formate. Sie können je nach Ihren Vorlieben einen Textlink zu Ihrer Website, einen Button oder ein Dropdown-Menü hinzufügen. Normalerweise finden Sie WordPress-Sprachauswahl-Tools im Kopf- oder Fußzeile einer Website.
Im Wesentlichen ermöglichen diese Tools Ihren Nutzern, Ihre Inhalte sofort in ihre bevorzugte Sprache zu übersetzen. Ganz gleich, ob Sie einen E-Commerce-Shop oder einen Blog betreiben, Ihr Sprachauswahl-Tool wird die Nutzererfahrung für Ihre Kunden verbessern.
Im heutigen Tutorial schauen wir uns an, wie Sie einen Sprachwähler für Websites zu WordPress hinzufügen und dieses Tool effektiv nutzen können.
Die Vorteile der Verwendung eines Website-Sprachwählers
Der offensichtlichste Vorteil eines Website-Sprachwählers besteht darin, dass er Ihren Nutzern ermöglicht, ihr Erlebnis auf Ihrer Website an ihre Bedürfnisse anzupassen. In jedem Webdesign- oder Entwicklungsprojekt, Ihr Hauptaugenmerk als Unternehmer sollte darauf liegen, eine herausragende Benutzererfahrung zu bieten. Je besser die “UX” Ihrer Website ist, desto wahrscheinlicher ist es, dass Ihre Kunden Ihre Seiten wieder besuchen und mit Ihrer Marke interagieren.
Mit einem WordPress-Sprachwähler können Sie Erstelle eine globale Website das den Kunden ein lokales Erlebnis bietet. Sie können per Mausklick die Sprache auswählen, in der Ihre Seiten angezeigt werden sollen. In einigen Fällen können Sie sogar automatische Spracherkennung Funktionen auf Ihren Seiten. Dadurch kann die Website den Standort des Benutzers erkennen und Ihre Sprache automatisch umstellen.
Beispielsweise sehen Google-Nutzer mit einem Google-Konto alle Inhalte automatisch in der Sprache, die für sie basierend auf ihren Einstellungen relevant ist.
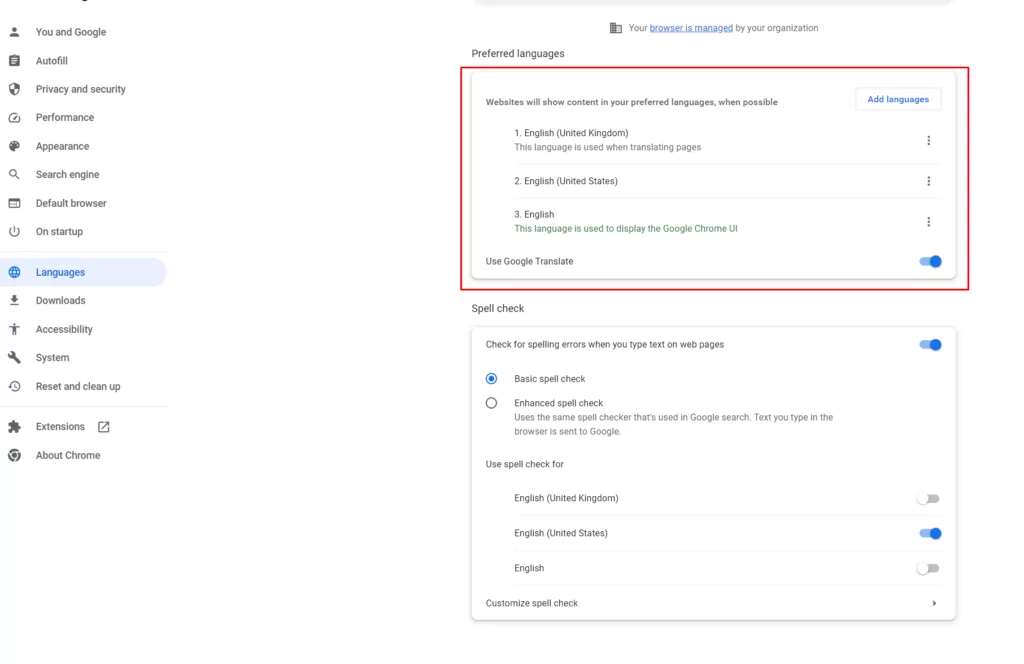
So fügen Sie Ihrer Website einen WordPress-Sprachumschalter hinzu: 3 Wege
Wenn Sie eine eigene WordPress-Website haben, lässt sich eine Sprachauswahl am einfachsten mithilfe eines Plugins einrichten. Das mit Abstand beste Plugin dafür ist TranslatePress. Es bietet Ihnen eine Reihe verschiedener Möglichkeiten, Sprachauswahl-Tools auf Ihren Seiten einzubinden, auf die wir im Folgenden näher eingehen werden.
Hier ein kurzer Überblick:
Schritt 1: TranslatePress installieren
Bevor Sie Änderungen an Ihrer Website vornehmen, müssen Sie natürlich zunächst das Plugin installieren. Melden Sie sich bei Ihrem WordPress-Konto an und klicken Sie auf Plugins. Geben Sie in die Suchleiste “TranslatePress” ein” dann klicken Sie Installieren gefolgt von Aktivieren.
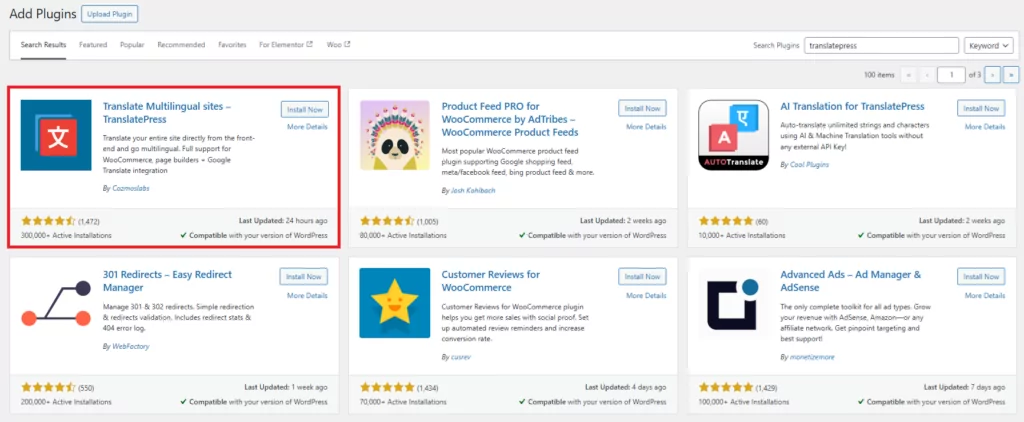
Nachdem Sie Ihr neues Plugin aktiviert haben, können Sie Ihre gesamte WordPress-Website mithilfe einer intuitiven visuellen Benutzeroberfläche ganz einfach übersetzen. Das TranslatePress-Plugin unterstützt die Übersetzung aller Elemente, von Benutzerdefinierte Beitragsarten, zu Kontaktformularen und Bilder mit Text.
Dieses benutzerfreundliche Tool funktioniert auch problemlos mit anderen beliebten Plugins wie Elementor oder WooCommerce. Die Lösung nutzt DeepL oder Google Translate, um Inhalte automatisch zu übersetzen. Sie können Ihre Übersetzungen auch nach der Erstellung bearbeiten.
Schritt 2: Wählen Sie Ihre Sprachen
Zuerst müssen Sie entscheiden, welche Sprachen Sie zu Ihrer Website hinzufügen möchten. Gehen Sie in Ihr WordPress Einstellungen Seite und klicken Sie dann auf TranslatePress. Im Allgemein Einstellungsseite wirst du deine Hauptsprache sowie alle weiteren Sprachen auswählen können, die du zu deinen WordPress-Seiten hinzufügen möchtest.
In diesem Beispiel verwende ich Spanisch, aber mit TranslatePress Premium können Sie so viele Sprachen hinzufügen, wie Sie möchten.
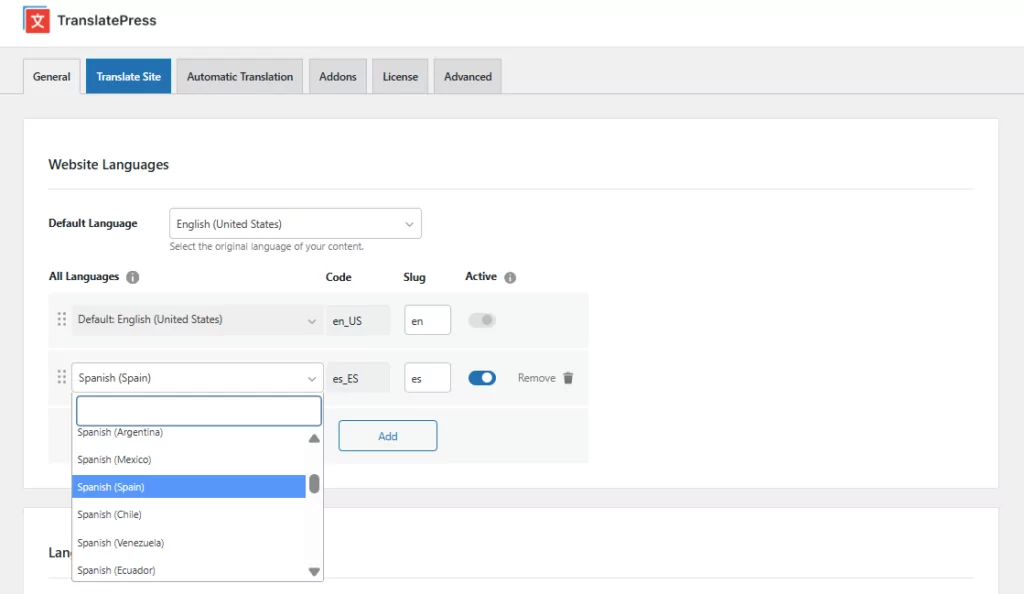
Hier finden Sie die Möglichkeiten zur Einrichtung einer der drei von TranslatePress angebotenen Optionen zur Sprachauswahl auf der Website.
Schritt 3: Wählen Sie Ihren Sprachwähler
Sobald Sie Ihre Sprachen eingestellt haben, scrollen Sie nach unten Allgemein Seite, bis Sie das sehen Sprachwechsler Abschnitt. Hier können Sie auswählen, wie Sie Ihrer Website einen Sprachwähler hinzufügen möchten. Es gibt drei Optionen:
- KurzcodeDies zeigt auf jeder Seite oder jedem Widget einen Sprachwähler an.
- Menüpunkt: Dies ermöglicht es Ihnen, ein Menüelement zu Ihrer Website hinzuzufügen, bei dem mehrere Sprachen zur Auswahl stehen.
- Schwebende Sprachauswahl: Dadurch wird ein schwebendes Dropdown-Menü hinzugefügt, das auf allen Seiten Ihrer Website angezeigt wird.
Schauen wir uns jede Option genauer an.
1. Shortcode-Sprachumschalter
Mit dem Shortcode-Sprachwähler können Sie einen WordPress-Sprachwähler zu jedem Bereich Ihrer Website hinzufügen, der Shortcodes unterstützt. Um auf diese Funktion zuzugreifen, scrollen Sie nach unten zu dem Sprachwechsler Abschnitt des Allgemein Seite für TranslatePress und aktivieren Sie das Kontrollkästchen neben Kurzcode.
Im Dropdown-Menü unten können Sie festlegen, wie Ihre Sprachauswahl angezeigt werden soll. Sie können beispielsweise Flaggen mit kurzen oder langen Sprachnamen oder einfach nur die Namen verwenden.
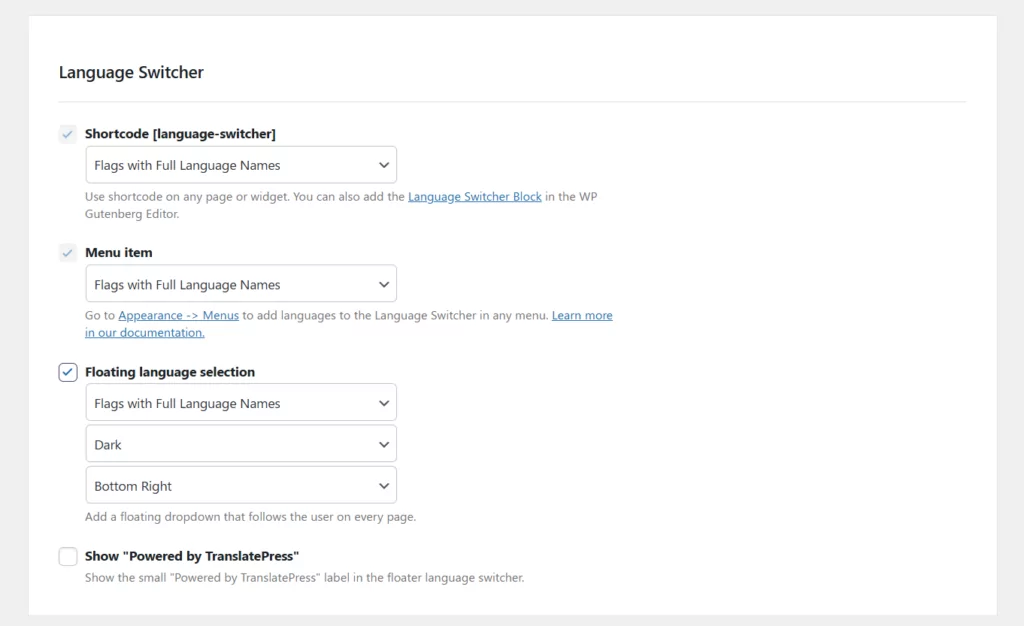
Wählen Sie Ihre Option und klicken Sie Änderungen speichern. Verwende als Nächstes
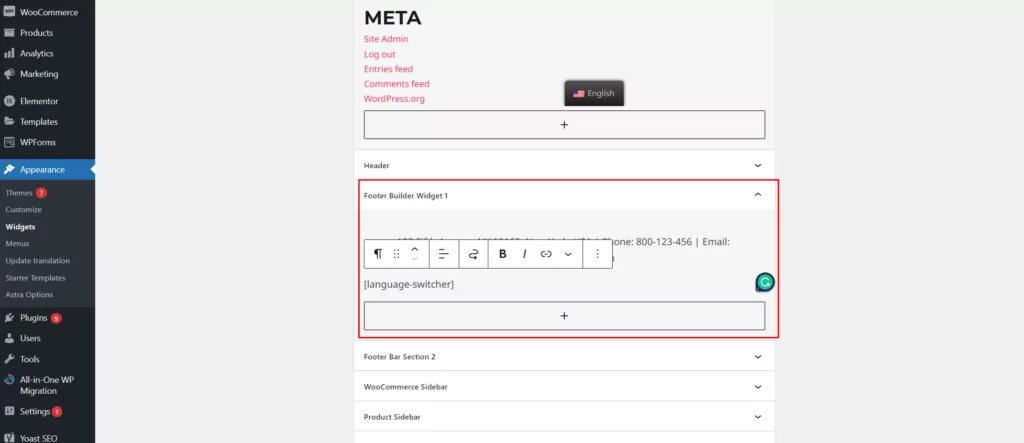
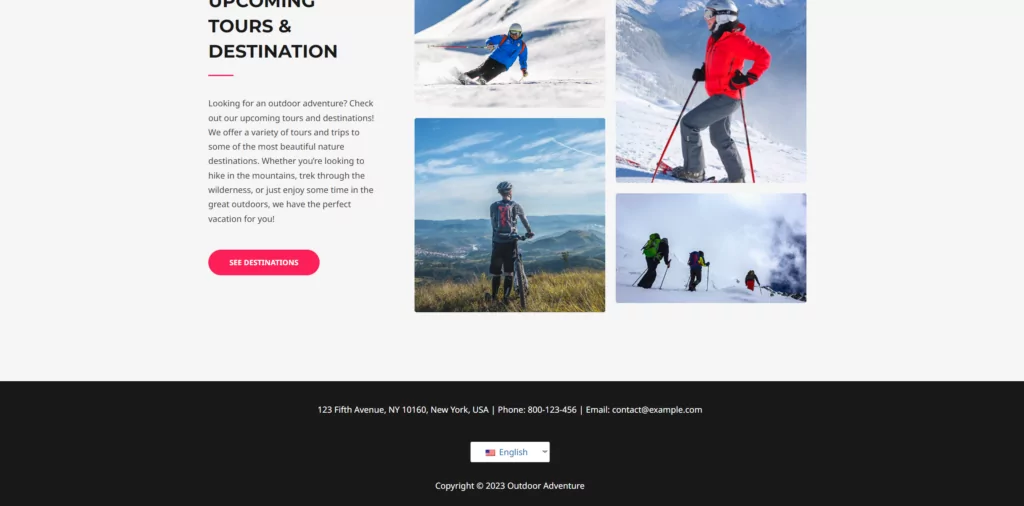
Im Frontend sollte Ihre Website eine neue Sprachschaltfläche anzeigen, die bei Hover eine Dropdown-Liste öffnet:
2. Menüelement-Sprachauswahl
Die Menüpunkt-Option ermöglicht es Ihnen, Sprachoptionen zum Navigationsmenü Ihrer Website hinzuzufügen. Es gibt wiederum einige verschiedene Optionen dafür, was der WordPress-Sprachwähler anzeigen wird. Sie können wählen, ob nur Flaggen, Flaggen mit langen oder kurzen Namen oder nur lange oder kurze Namen angezeigt werden sollen.
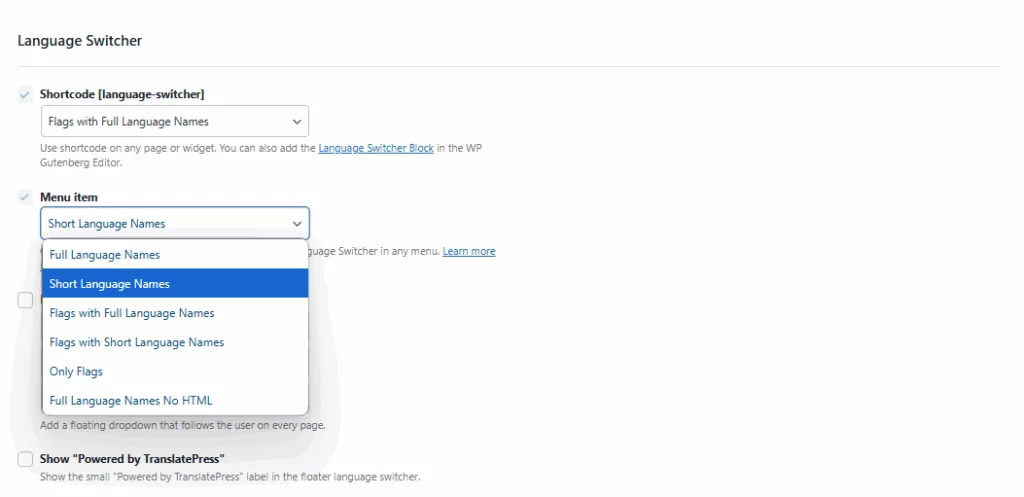
Wählen Sie eine dieser Optionen und begeben Sie sich dann in die Darstellung → Menüs um die Navigationsoption zu Ihrer Website hinzuzufügen. In der Menüs bearbeiten Registerkarte, einfach anklicken Sprachwechsler alle Kästchen für die gewünschten Sprachen zu aktivieren. Klicken Sie anschließend Zum Menü hinzufügen.
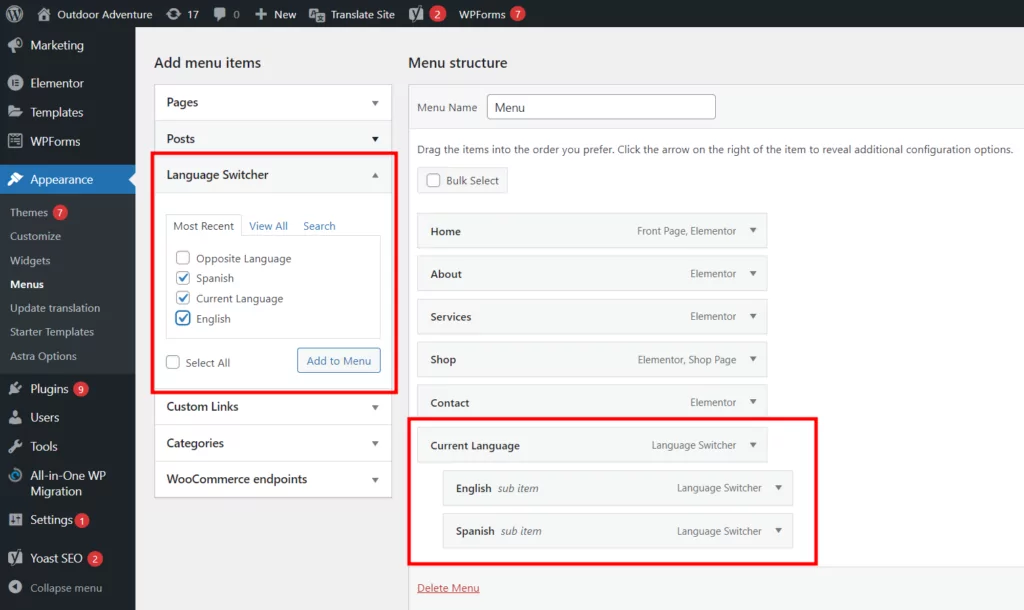
Das Hinzufügen von Aktuelle Sprache Artikel und die für Ihr Menü ausgewählten Sprachelemente zeigen einen klassischen Sprachumschalter an, der sich beim Hovern öffnet.
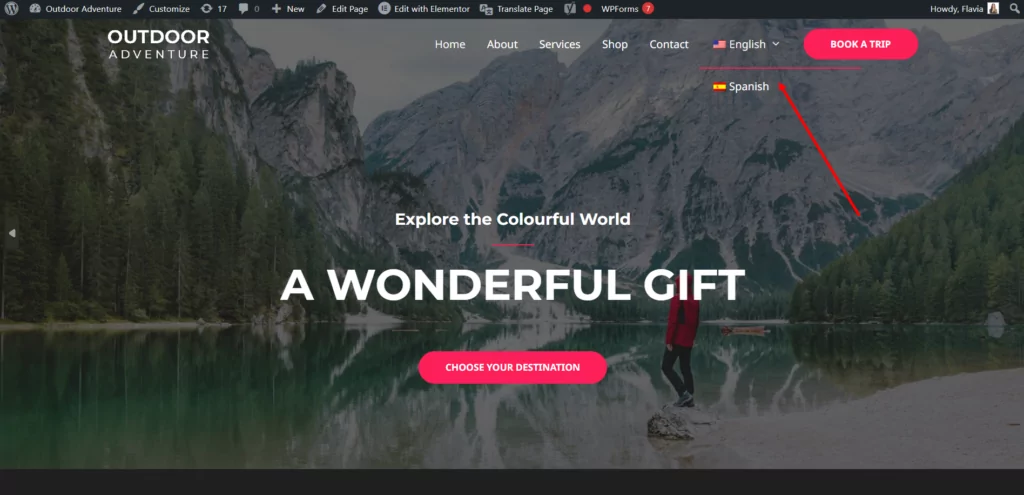
Sie können auch das Gegensätzliche Sprache Option, die nur eine Schaltfläche für die Zweitsprache anzeigt. Wenn beispielsweise die Hauptwebsite auf Englisch ist, zeigt die Schaltfläche nur “Spanisch” an und es gibt kein Dropdown-Menü. Dies funktioniert nur, wenn Ihre Website zweisprachig ist.
Auf dem Frontend Ihrer Website sollten Sie einen neuen Menüeintrag für den Sprachumschalter sehen, der neben Ihren bestehenden Menüeinträgen platziert ist.
Schwebender Sprachwähler
Schwebende Dropdown-Menüs in Ihrem Shop bieten Nutzern eine bequeme Möglichkeit, ihre bevorzugte Sprache auszuwählen. Sie werden auf jeder Seite Ihrer Website angezeigt. Mit TranslatePress können Sie festlegen, wie Ihr schwebendes Auswahlmenü funktionieren und dargestellt werden soll.
Sie können wählen, ob Sie den vollständigen Namen der Sprache, einen Kurznamen und eine Flagge anzeigen möchten. Außerdem können Sie sich je nach Design Ihrer Website für dunkle oder helle Themes entscheiden. Es gibt auch eine Option festzulegen, wo genau Ihre Sprachleiste dargestellt werden soll.
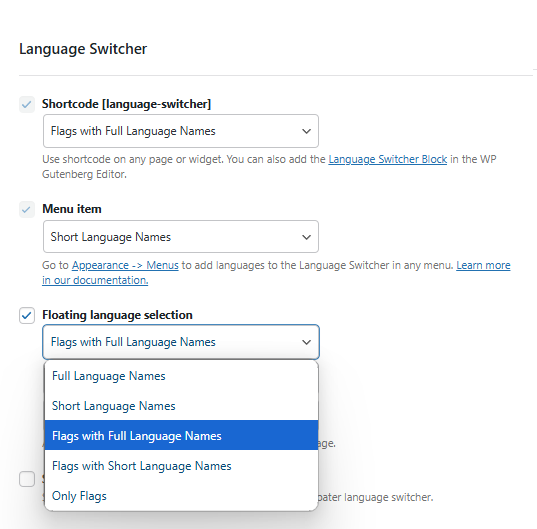
Treffen Sie Ihre Auswahl und klicken Sie Änderungen speichern.
Sobald Sie fertig sind, aktualisieren Sie das Frontend Ihrer Website, und Sie werden sehen, wie die schwebende Leiste für Ihre Besucher aussieht:

Ziemlich einfach, oder?
Egal, für welche der drei Optionen Sie sich entscheiden, Sie werden Ihren Website-Besuchern garantiert eine bessere Erfahrung bieten. Denken Sie daran, dass Sie auch die übrigen Einstellungen im Translate Press-Plugin konfigurieren können. Dadurch können Sie entscheiden, ob Sie die automatische maschinelle Übersetzung nutzen möchten oder nicht. Gehen Sie dazu auf Einstellungen → Automatische Übersetzung.
Sobald Ihre Einrichtung abgeschlossen ist, brauchen Sie nur noch Ihre Website Seite für Seite zu durchsuchen, und sie werden automatisch übersetzt. Sie können auch den visuellen Übersetzungseditor verwenden, um einen bestimmten Textabschnitt auszuwählen und zu bearbeiten, wenn Sie mit der automatischen Übersetzung nicht zufrieden sind. Weitere Tipps finden Sie unter Wie man in diesem Leitfaden eine mehrsprachige WordPress-Website erstellt.
Die besten Tipps für die Verwendung eines WordPress-Sprachwählers
Mit TranslatePress lässt sich im Handumdrehen die ultimative mehrsprachige Website erstellen. Es gibt jedoch noch einige zusätzliche Schritte, die Sie möglicherweise unternehmen sollten, um sicherzustellen, dass die Sprachauswahl Ihrer Website so effektiv wie möglich ist. Hier sind einige kurze Tipps, die Ihnen den Einstieg erleichtern sollen.
1. Wählen Sie die richtige Platzierung
Mit TranslatePress haben Sie völlige Freiheit bei der Platzierung der Sprachauswahl auf Ihrer Website. Am besten sorgen Sie dafür, dass Ihre Kunden das Tool leicht finden können. Wenn Ihre Kunden die Sprachauswahl nicht finden, klicken sie möglicherweise einfach auf die Zurück-Schaltfläche.
Meistens erwarten Website-Besucher Sprachoptionen am oberen oder unteren Rand ihrer Seiten. Das Hinzufügen einer Sprachauswahl zu Ihrer Fußzeile oder Kopfzeile ist normalerweise eine gute Idee. Unter dem Gesichtspunkt der Auffindbarkeit ist die unten rechte Ecke der Seite meistens die beste Option. Es gibt hier jedoch keine strengen Regeln. Alles hängt davon ab, was für Ihre Kunden funktioniert.
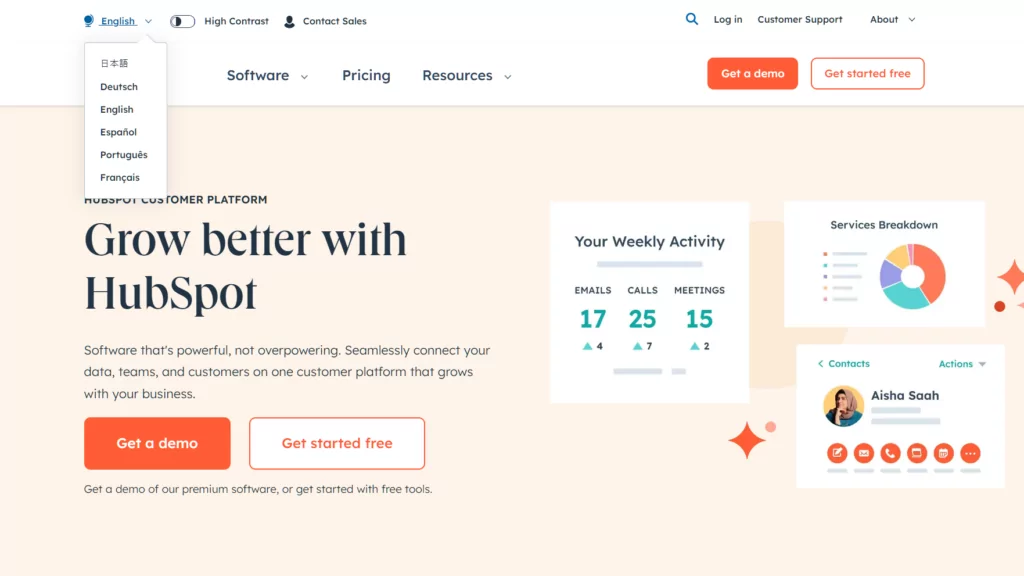
HubSpot hat den Sprachwähler in die obere Navigationsleiste integriert.
2. Stellen Sie sicher, dass der Stil zu Ihrer Website passt
Denken Sie daran, dass jedes neue Widget und jedes neue Tool, das Sie zu Ihrer Website hinzufügen, zum Design Ihrer Website passen sollte. Aus Sicht der Benutzeroberfläche ist es wichtig sicherzustellen, dass alles konsistent ist. Achten Sie auf die Farben, Schriftarten und das Gesamterscheinungsbild Ihrer Schaltflächen und Menüs.
Einige WordPress-Sprachauswahl-Tools erfordern, dass Sie die CSS-Datei Ihrer Website oder des Themes bearbeiten, um das Aussehen des Buttons zu konfigurieren. TranslatePress, nutzt hingegen das bestehende Design Ihrer Website, um eine ergänzende Sprachschaltfläche zu generieren. Das bedeutet, dass Sie selbst keinen Code anpassen müssen.
Sie könnten auch in Erwägung ziehen, ein Symbol für die Sprachauswahl auf Ihrer Website einzufügen, beispielsweise einen Globus oder eine Sprechblase. Wenn Sie jedoch mit dem TranslatePress-Plugin eine Flagge anzeigen, sollten Sie kein zusätzliches Symbol benötigen, um die Auffindbarkeit zu verbessern.

3. Sprachnamen und Initialen korrekt anzeigen
Nachdem Sie Ihrer Website einen Sprachwähler hinzugefügt haben, haben Sie die Möglichkeit, den vollständigen Namen oder die Abkürzung der Sprache anzuzeigen. Beide Optionen sollten für Ihre Besucher relativ einfach zu navigieren sein. Noch wichtiger ist jedoch die Option, jede Sprache in ihrem eigenen Format aufzuführen. Anstelle von Spanisch würden Sie beispielsweise Español verwenden.

Leser, die ein anderes Alphabet verwenden, wie zum Beispiel russische Muttersprachler, würden die englischen Versionen ihrer Sprachen nicht unbedingt sofort erkennen. Die Verwendung des richtigen Formats ist entscheidend für die Verbesserung der Benutzererfahrung.
4. Halten Sie es einfach
Wenn Sie eine globale Website entwickeln möchten, könnte es verlockend sein, Ihre Seiten mit so vielen Sprachen wie möglich auszustatten. TranslatePress bietet Ihnen in den Pro-Tarifen zwar die Möglichkeit, eine unbegrenzte Anzahl von Sprachen hinzuzufügen. Sie sollten jedoch bedenken, dass ein komplexes Menü oder komplexe Schaltflächen die Benutzerfreundlichkeit beeinträchtigen können.
Je mehr Sprachen Sie in Ihrer Sprachauswahl aufführen, desto länger wird das Menü oder das Dropdown-Menü. Beschränken Sie sich zunächst nur auf die Sprachen, von denen Sie wissen, dass Ihre Kunden sie nutzen. Denken Sie daran, dass Sie später auf Basis des Nutzerfeedbacks jederzeit weitere Sprachen hinzufügen können.
5. Probieren Sie die automatische Spracherkennung aus
Eine der besten Möglichkeiten, die Nutzererfahrung auf Ihrer Website für Ihre Besucher zu verbessern, besteht darin, den Arbeitsaufwand für sie zu verringern. Durch die Implementierung einer automatischen Spracherkennung müssen sie sich keine Gedanken mehr über das Klicken auf Schaltflächen oder das Suchen von Selektoren machen.
Automatische Sprachweiterleitung ermöglicht es der Website, anhand von IP- oder Browsereinstellungen automatisch zu erkennen, wo sich der Nutzer befindet. Auf diese Weise kann die Lösung die Sprache ohne weiteres Zutun des Nutzers übersetzen.
ASOS ist ein hervorragendes Beispiel für eine Marke, die diesen automatischen Ansatz nutzt. Der Shop erkennt automatisch Ihren Standort und stellt Ihnen Inhalte basierend darauf zur Verfügung.
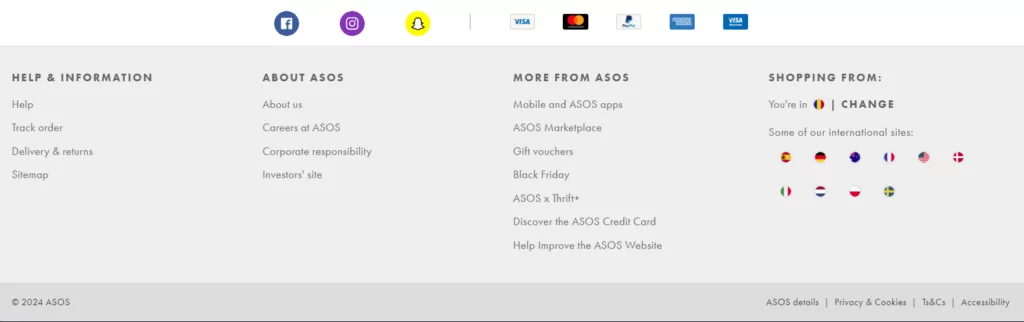
Wenn Sie das Gleiche auf Ihrer Website umsetzen möchten, können Sie dies mit TranslatePress realisieren. Automatische Spracherkennung Funktion.
Fügen Sie noch heute ganz einfach einen WordPress-Sprachwähler zu Ihrer Website hinzu
Das Hinzufügen einer Sprachauswahl zu Ihrer Website ist eine hervorragende Möglichkeit, die Benutzererfahrung zu verbessern. Sie können sicherstellen, dass jeder Besucher Ihrer Website, egal woher er kommt, sein Erlebnis an seine Bedürfnisse anpassen kann. Das Ergebnis können mehr Verkäufe und ein besserer Ruf der Marke sein.
Glücklicherweise lässt sich mit TranslatePress im Handumdrehen eine Sprachauswahl auf Ihrer Website einrichten. Sie können aus einer Reihe verschiedener Optionen wählen. Außerdem können Sie die Sprachauswahl ganz nach Ihren Wünschen anpassen.
TranslatePress Mehrsprachig
Haben Sie noch Fragen zu Spracheuswahlen auf Websites? Lassen Sie es uns in den Kommentaren unten wissen!