In this post
In this article, we want to talk about different ways to translate a German website to English. We will concentrate on two different angles for that.
For one, we will show you how you can translate any German website you encounter on the web into English. At the same time, and more importantly, we also cover how to permanently convert your own website from the German language to English if that is what you are trying to do.
You will find that either way doesn’t pose too much of a problem when using the right tools.
Translate Any Website From German to English With Our Free Translator Tool
Let’s first cover an easy way to translate German websites to English with a free and easy online tool. This is, for example, if you encountered a German site while surfing the web and you think it might contain important information but you don’t sufficiently speak German to understand it.
Or maybe you would like to purchase something from a German website. Maybe a cuckoo clock, a rulebook, or a pound of Sauerkraut? (Ok, enough with the stereotypes about my people.) In order to avoid translation fails, you are looking for a way to translate the entire web page into English.
Fortunately, there is nothing easier than that with our free website translator tool.
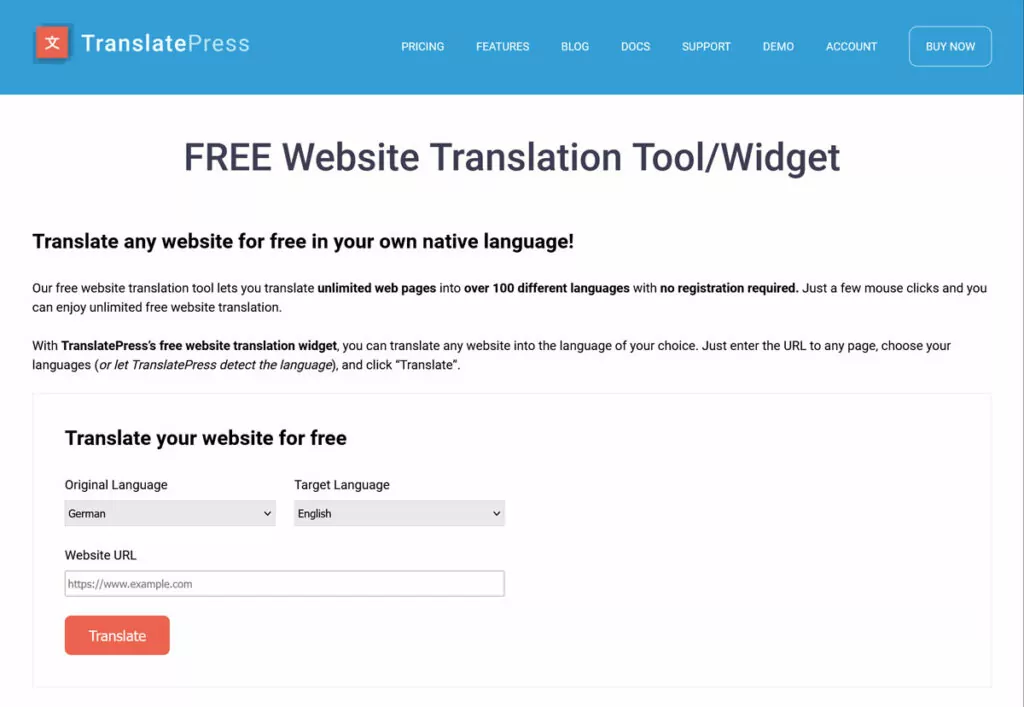
Simply click on the link to open it, then follow these steps:
- Choose the language of the website you want to translate, in this case, German.
- Pick your desired target language, e.g. English.
- Enter the URL of the web page or website you want to see in English.
- Click the Translate button.
When you do so, it automatically opens the translated website version for you.
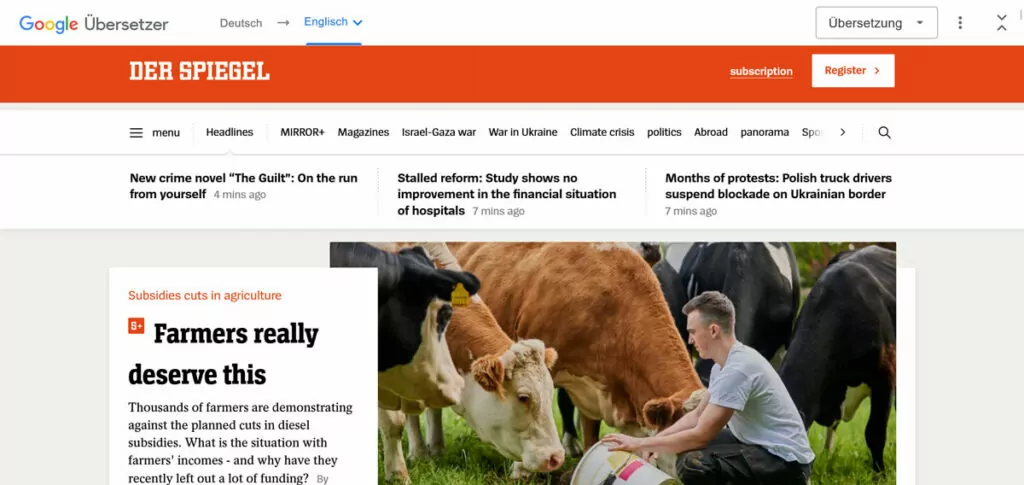
Now, you can get the information in your desired language.
This is a great quick solution for when you want to see any third-party site in another language. But what if you want to translate your own website from German to English permanently, to help out your visitors? Let’s talk about that now.
How to Translate a German WordPress Website to English
While German is not one of the hardest languages, it is not necessarily known for easy pickup (even as a native German, I still struggle on a daily basis). And even though it is one of the most common languages on the Internet, the group of people who speak it is still relatively small, compared to English. Therefore, if you have a German website, translating it to English can be a good idea to make it accessible to a larger audience (for example, to do multilingual e-commerce).
The good news is that, if your website is built with WordPress, you can easily do so with the free TranslatePress plugin. It makes your website multilingual and allows you to translate it into a multitude of languages, including German and English.
TranslatePress also includes machine translation features that make converting your website much quicker. But you are also free to do the translation by hand via a handy-dandy interface.
The best part: If all you need is one additional language, the process is completely free! Let’s go over how to translate your website from German to English step by step.
1. Install TranslatePress
The first thing to do is install the TranslatePress WordPress plugin.
As mentioned, you can do the entire thing with only the free version of TranslatePress. However, there are advantages to using the Pro version, which we will in the course of this tutorial. If you start with the free version and later decide you want some Pro features, you can always upgrade without losing any of your work.
So, let’s get started.
As a first step, log in to your WordPress site and go to Plugins → Add New. Here, search for TranslatePress by name and click the Install Now button when it appears.
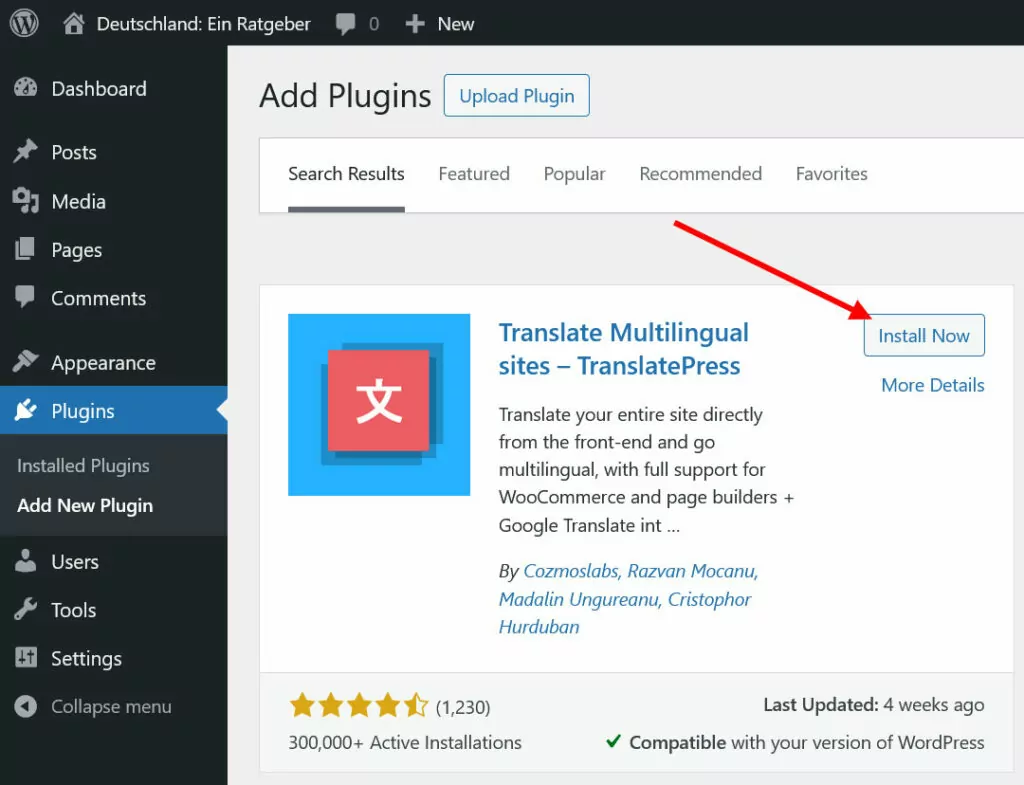
After the plugin has finished downloading, click the Activate button that appears.
2. Choose Your Languages
With TranslatePress active on your site, it’s time to pick the desired languages for your website. This happens under TranslatePress → Settings in the WordPress back end.
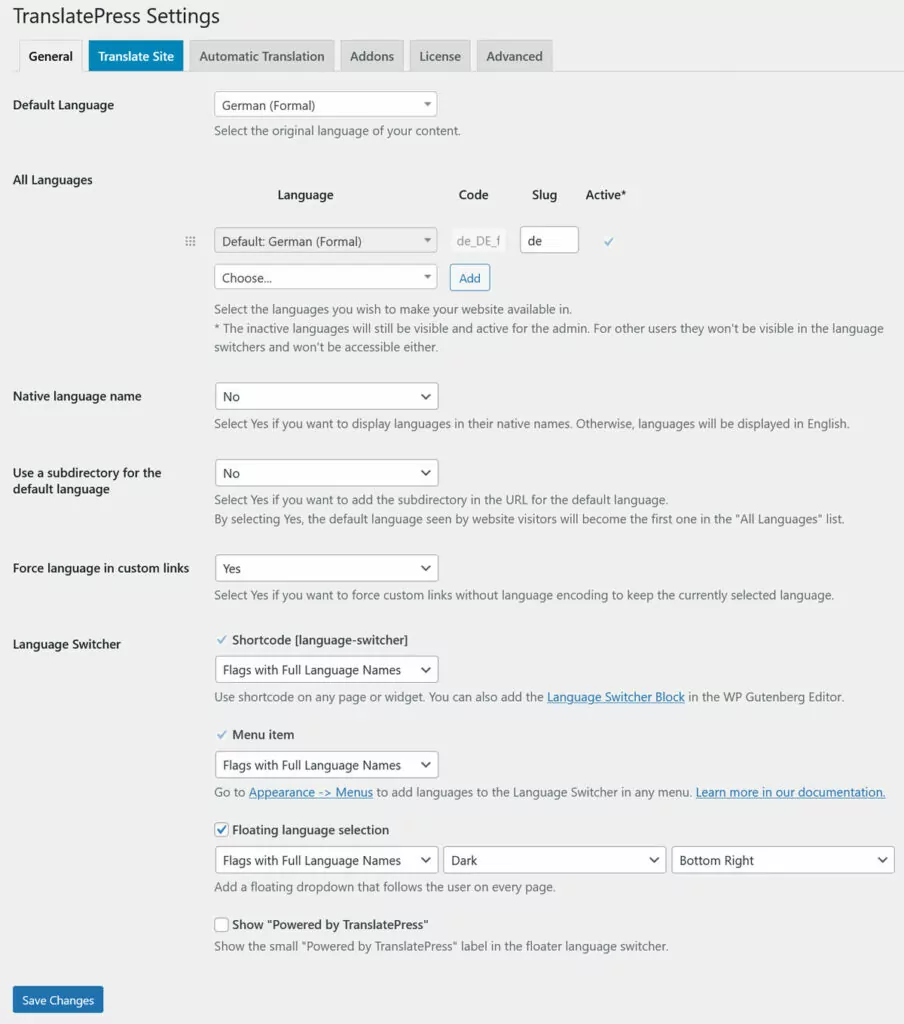
At the top, choose your default language, in this case German. You have several options. Since German is spoken in several countries, you can also choose Austrian and Swiss German as well as formal or informal varieties (which change the pronouns used to address someone — yes, German is fun!). You can also change the level of formality after the fact.
In this case, we are choosing German (Formal).
After that, it’s time to determine your target language. For that, use the drop-down menu under All Languages to pick English.
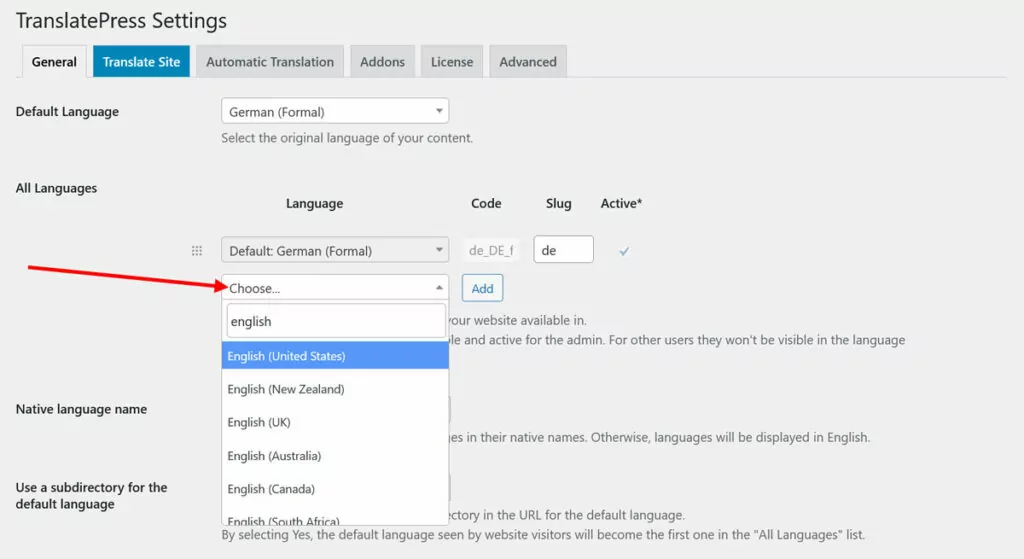
TranslatePress also recognizes different varieties, like US and UK English as well as varieties spoken in Canada, South Africa, and New Zealand. Pick the one that is most appropriate. We are going with US English here.
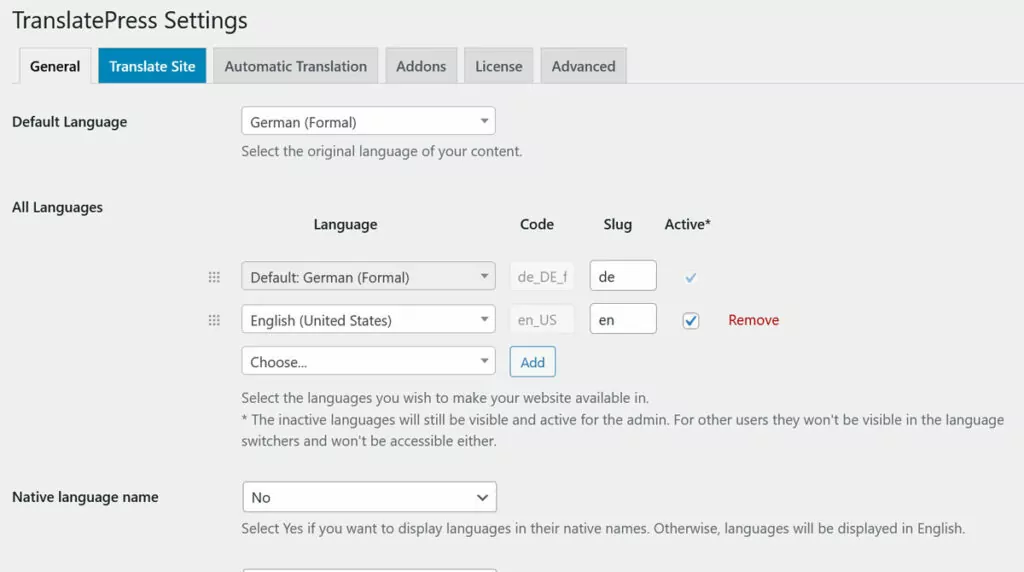
When satisfied, click Add to submit your choice, then save at the bottom.
3. (Optionally) Enable Automatic Translation
This step isn’t a must but it can save you a lot of time in the translation process. TranslatePress allows you to automatically translate your website with the help of machine translation services like Google Translate and DeepL. Both are AI translation tools known for their quality and speediness.
In the free version, you are limited to Google Translate. TranslatePress Pro also has the option to use DeepL, which is more accurate than Google Translate.
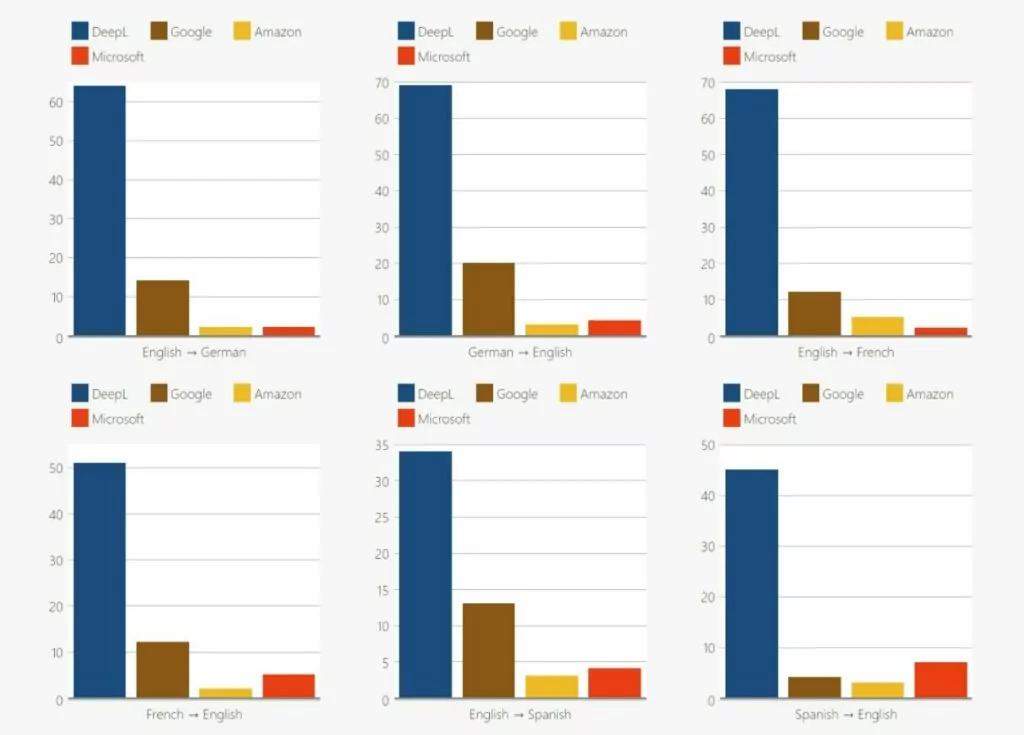
However, for German to English, Google Translate does a decent job and you can always just use it as a baseline and manually correct and refine the automatic output.
If that is something you are interested in, head on over to Automatic Translations in the TranslatePress settings.

Here, the first thing to do is set the drop-down menu under Enable Automatic Translation to Yes. After that, you get access to additional options.
The most important one is where you choose your translation engine. As mentioned, in the free version you only have Google Translate available.
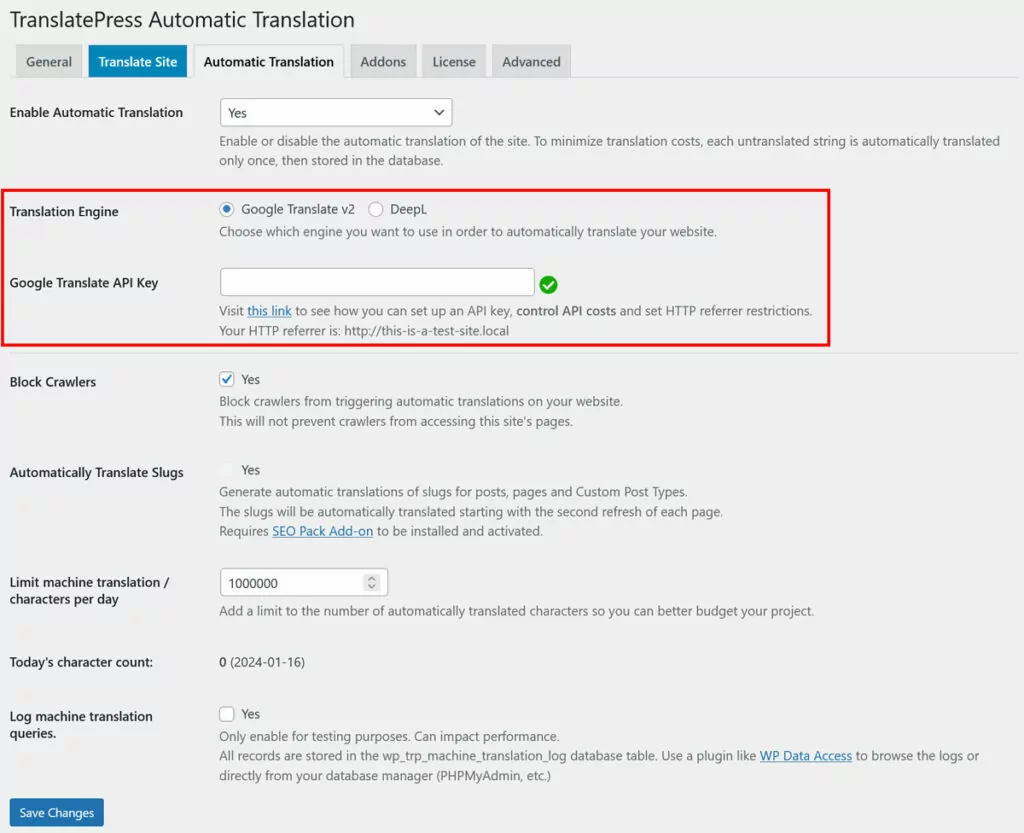
Then, you need to acquire an API key and paste it into the respective field. There is a link to instructions on how to acquire one below but we also have them here for the Google Translate API and DeepL API. After you have pasted the key, save it at the bottom.
You might also want to check out the other options, especially the setting to limit translation to a certain number of characters per day since that can be a cost factor. Be aware, however, that this is something between you and the translation service, it’s not up to TranslatePress.
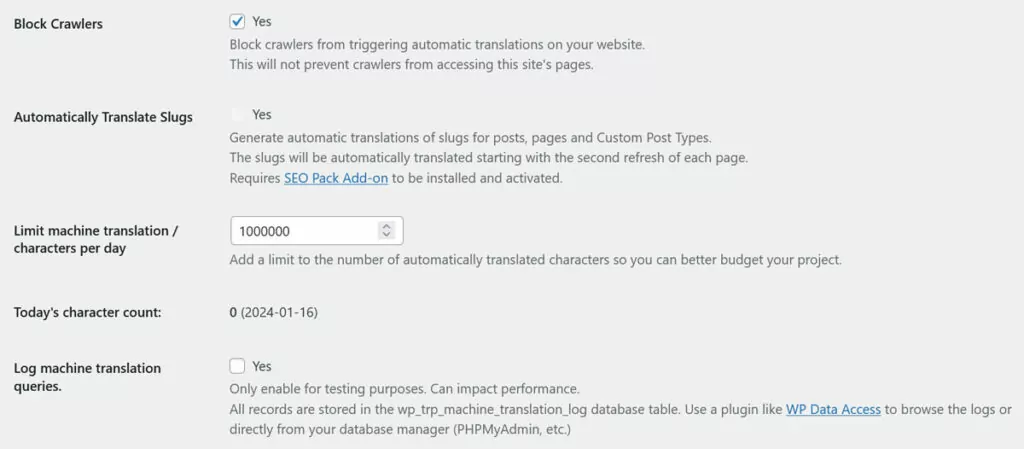
Once you are satisfied, it’s time to move on.
4. Translate Your Site in the Translation Interface
Almost all translation work in TranslatePress happens in the same interface. You can access it by clicking Translate Site or Translate Page in the TranslatePress settings or the WordPress taskbar.

This lands you on the main TranslatePress translation interface.
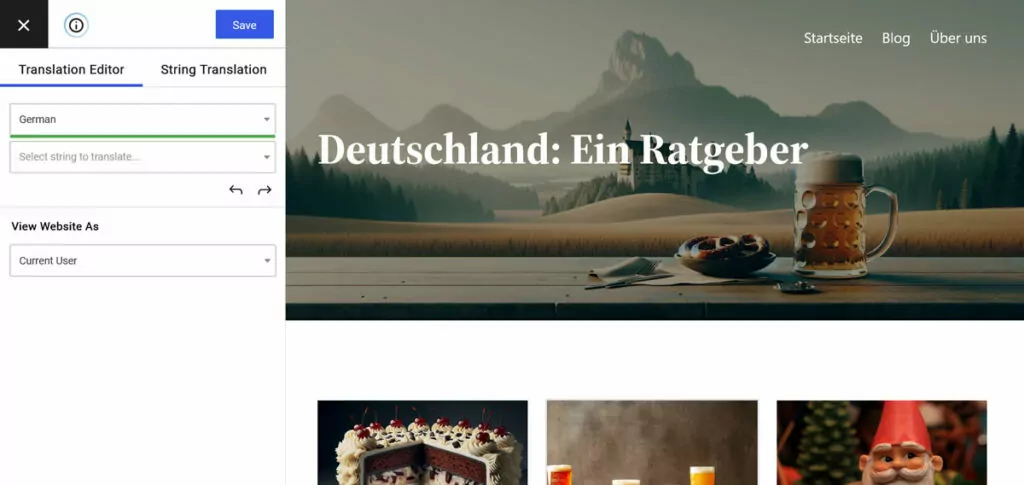
It consists of two parts. On the right, you have a preview window in which you can not only see a live preview of your soon-to-be translated site but also use it to navigate the site and choose content to convert to English. On the left, on the other hand, you have the sidebar in which you provide the translation.
The process is conceivably easy. Pick any text (also called “string”) via the preview window. You can do so directly by hovering over some text and clicking the pen symbol, using the drop-down list at the top left to choose any of the strings present on the page or cycle through them with the backward and forward arrows below it.
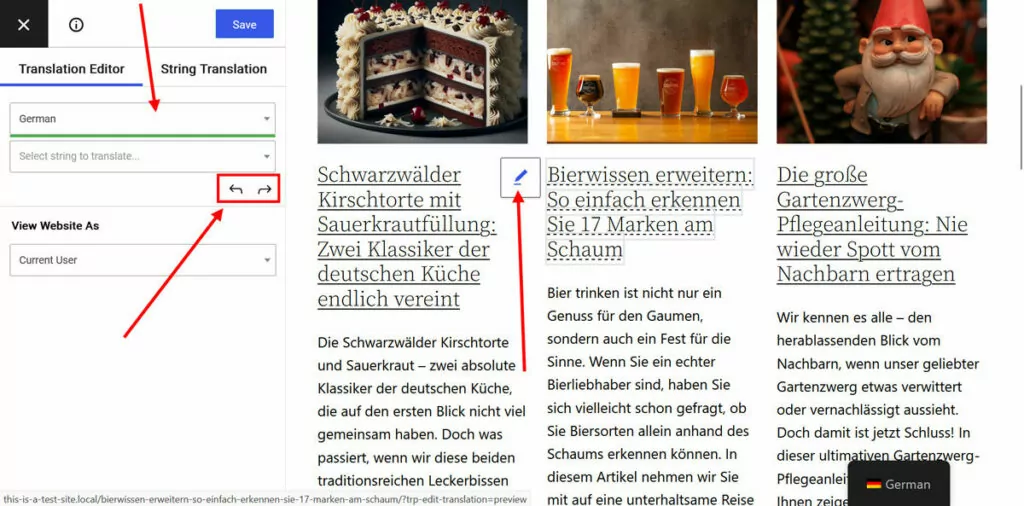
Once you do that, you’ll see a new field appear in which you can input the translated string. Even better: if you have enabled automatic translation, the translation will appear automatically.
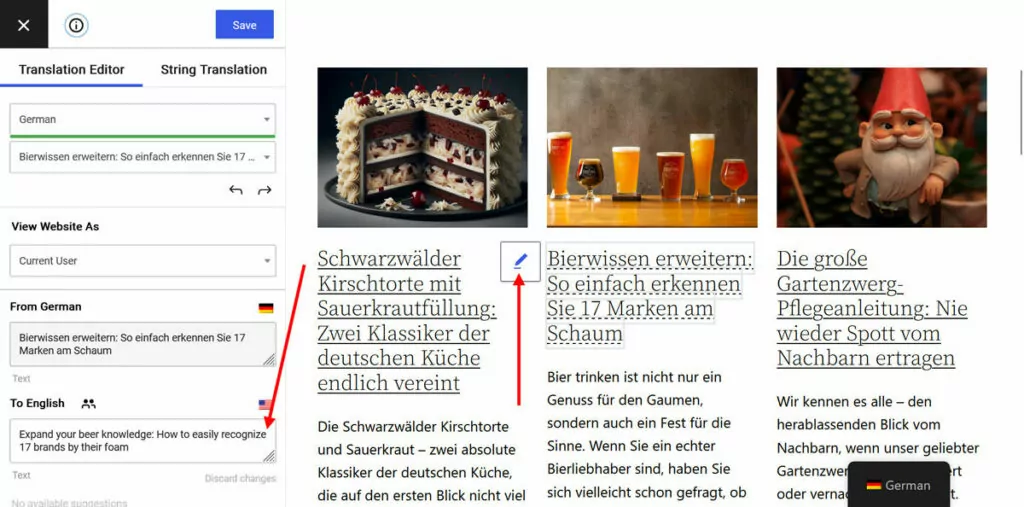
Make any changes and refinements necessary. Once satisfied, click the Save button at the top to make the translation live on your site — that’s it! From now on visitors can access the different language versions and they will start appearing in search engines.
What Content Can You Translate?
This works for all types of content, from menu items over headings to forms, buttons, and more. You can translate your homepage, other pages, header and footer, and every other part of your website.
Plus, TranslatePress offers the possibility to provide different images for various languages, meaning you can include alternative versions that might have translated text or are simply more culturally appropriate for a certain language market. This is important for transcreation and localization and it works the same same way as for text. Hover over an image, click the pen symbol, then provide an alternative in the sidebar.
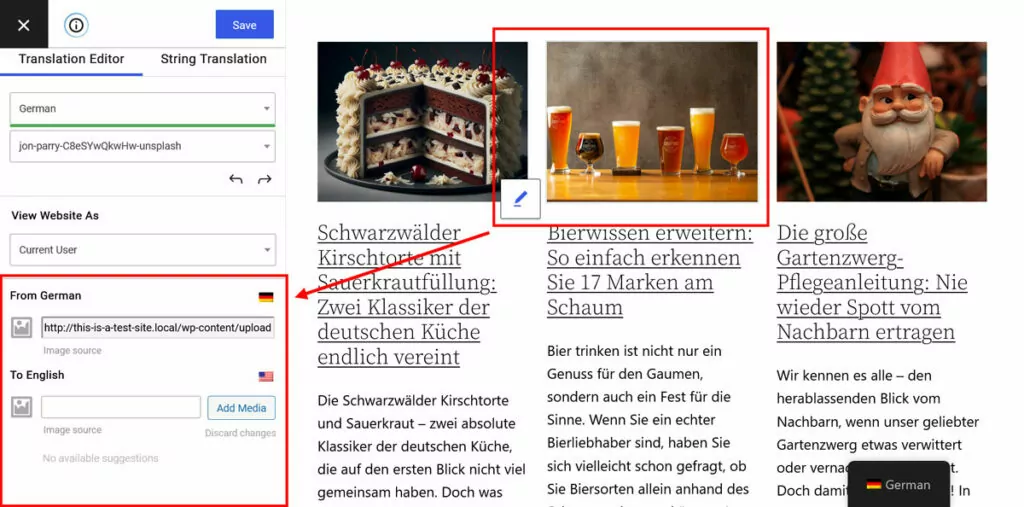
Be sure to brush up on how to do image SEO while you are at it!
In addition, if you are not versed in German and don’t trust automatic translation, you might decide to work with freelance translators or a professional translation service to get your translation done. If that is the case, the TranslatePress Business license lets you create dedicated translator accounts so that whoever you hire can work directly on your website. Just for your info.
5. String Translations from Themes, Plugins, Etc.
As mentioned above, most of the translation work happens in the same interface. Unlike other translation plugins, TranslatePress scans the page HTML for text to translate and works directly with what appears on the site.
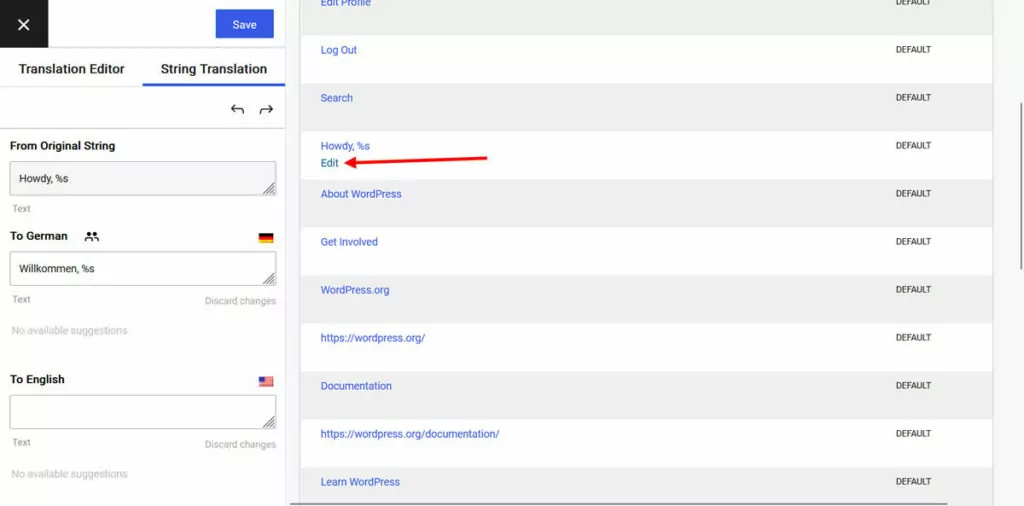
However, there are also some strings that are added to your site by themes and plugins. You can find those in the String Translation menu.
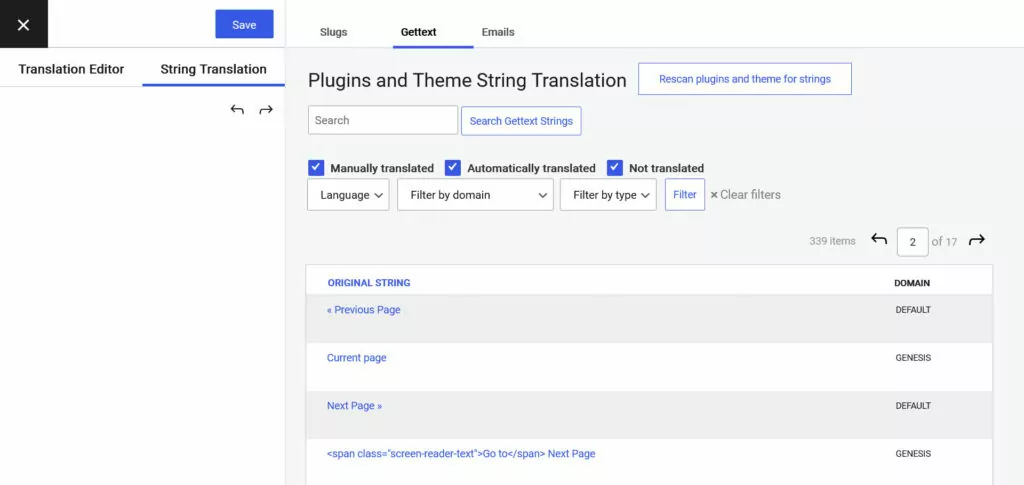
When you click it and choose Gettext at the top, you find a list of strings TranslatePress found while scanning plugin and theme output.
Hover over any of them and click Edit to open the same translation options as for the rest of your site. Easy peasy.
Under Emails, you can find text that shows up in emails send from plugins, such as notifications.
In the Pro version, this menu is also where you can translate URL slugs of your pages so that they have web addresses in their own language, which is great for SEO.
6. Set Up Your Language Switcher
Once you have new languages on your site, you need to give visitors the possibility to access them. This happens with a language switcher, which, by default, appears as a floating menu in the bottom right corner of your website.
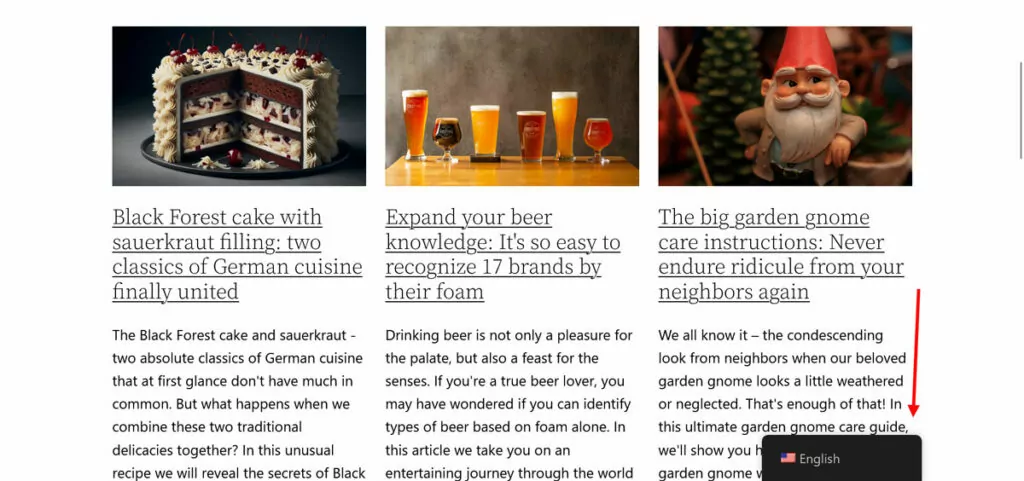
If that’s not up to your liking, there are plenty of customization options. You find them in the TranslatePress settings at the bottom.
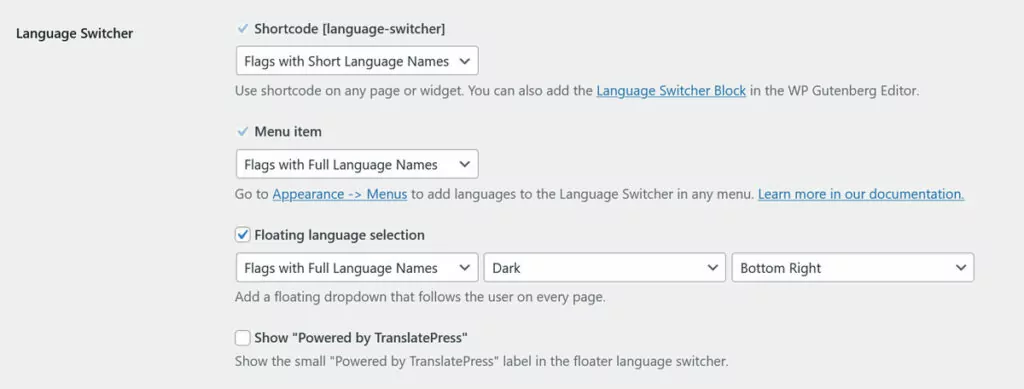
Let’s go through them one by one.
Available Options
The first option is to place the language switcher as a shortcode. That means, you can post [language-switcher] anywhere on your site where you want the switch to appear.
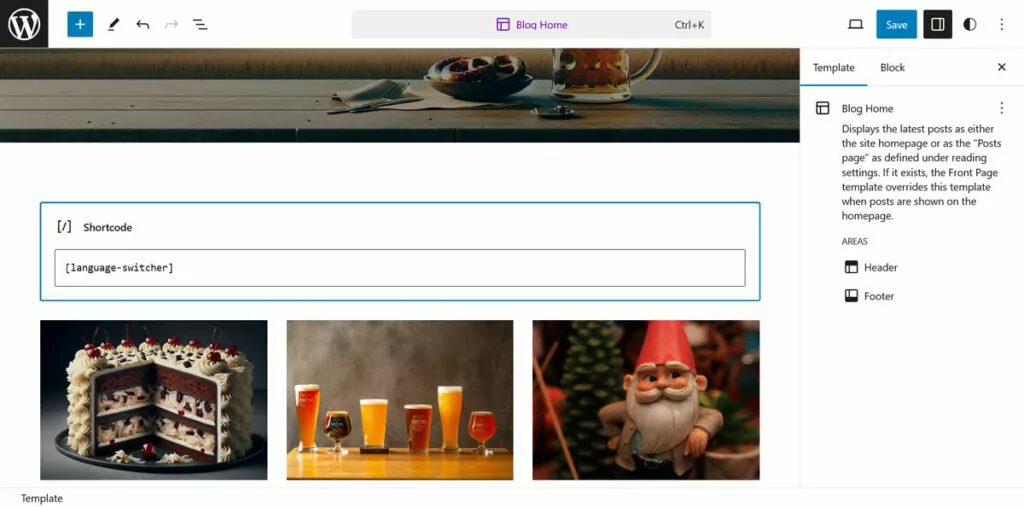
There is also a language switcher block for the WordPress block and Site Editor to achieve the same thing.
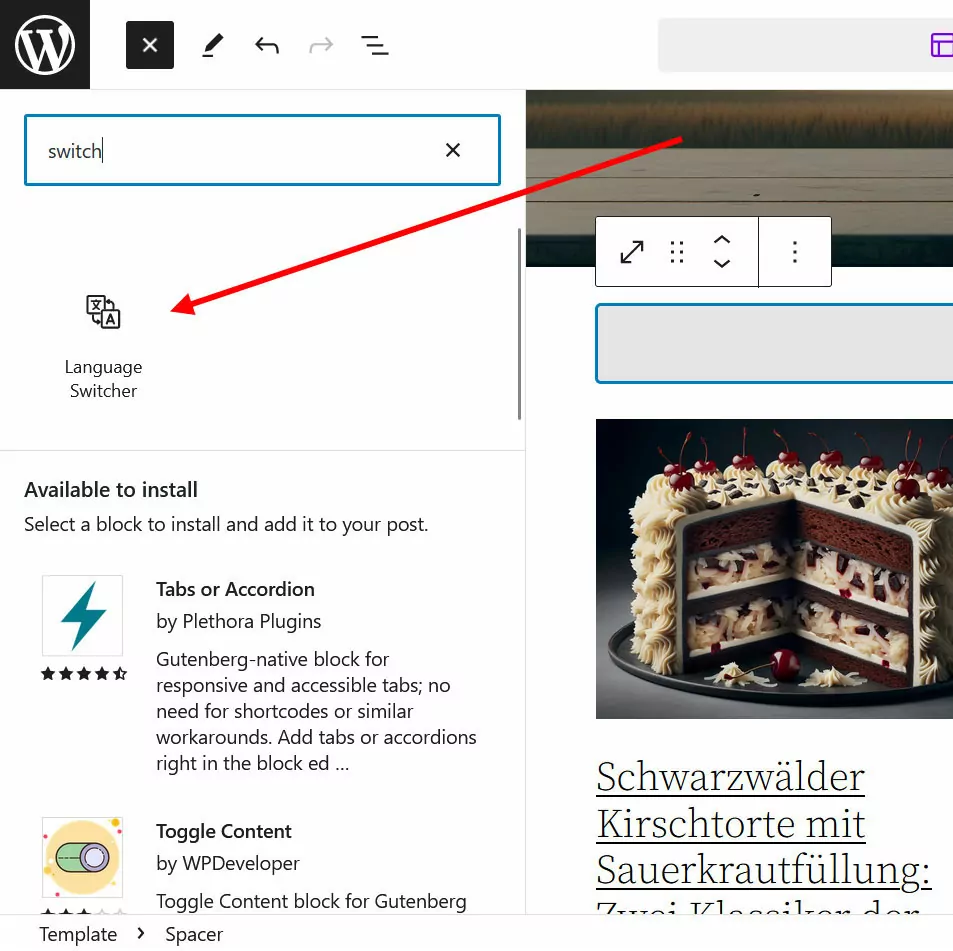
In the settings, you can decide what you want the switcher to display: a language flag with the full name, flags with abbreviated names, only the full or short name, or only flags.
The second option is to enable the language switcher as a menu item. In that case, you are able to add it to the WordPress menu.
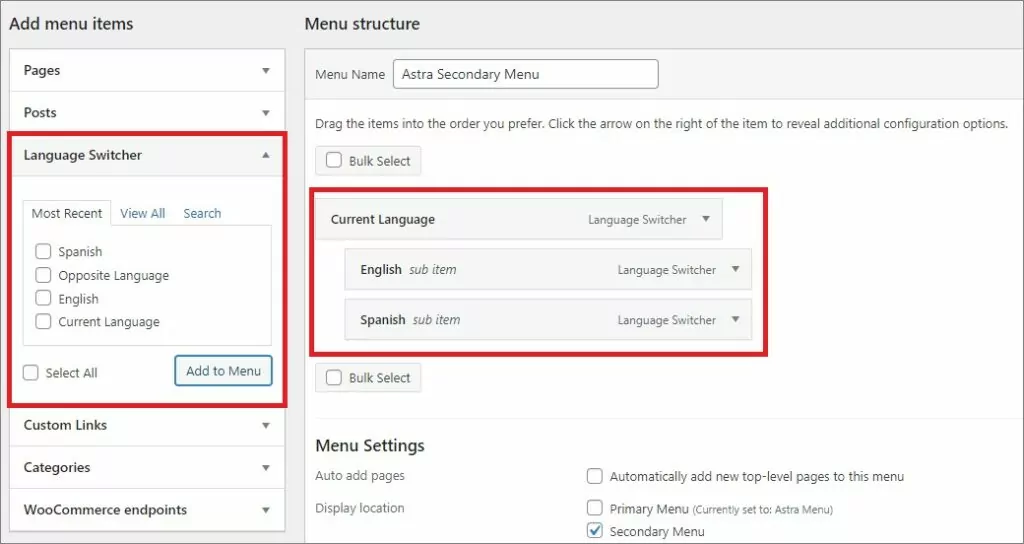
Note that this only works with classic menus, so it depends on the WordPress theme your site is using. You have the the same options for customizing the appearance as for the shortcode.
The final option is the default floating language switcher. You can switch it on and off in the settings, decide what it contains (flags, names, etc.), pick a theme (light or dark), and a position (one of the four website corners).

Any changes you make here, save them to apply them to your site. If you are using Elementor, we also have an article on how to add an Elementor language switcher.
By the way, in the free TranslatePress version, visitors will manually have to switch to their preferred language version. If you upgrade to a Business license, you can also redirect them automatically dependent on their browser language or IP address.
7. Take Advantage of Advanced Features
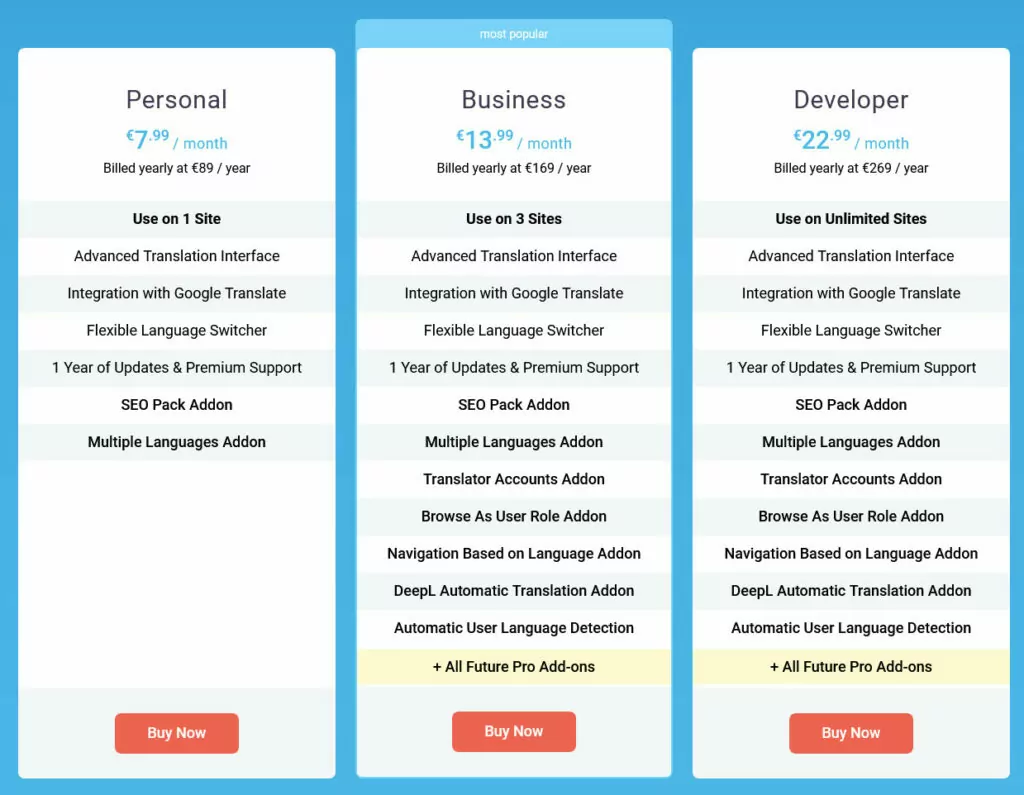
As mentioned, you can achieve all of the above with the free plugin version. However, there is also TranslatePress Pro with additional features besides those mentioned above, including:
- Multilingual SEO pack — Allows you to translate your page URLs, SEO titles, meta descriptions, ALT tags, and other important SEO markers. This helps your translated pages to get found on Google.
- Browse as user role – Look at your site as a specific user role in the translation editor.
- User language-specific navigation – Display different menus for different languages.
Purchase TranslatePress Pro now to get access to these features and more.
Easily Translate Your Website From German to English
In this guide, we have covered how to translate websites from German to English, both for third-party sites as well as your own. To reiterate, for the first, you can use our free website translator tool, and for the second the TranslatePress translation plugin.
TranslatePress Multilingual
Translating your website happens in a simple interface. You can also use automatic translation for faster turnaround and to create a baseline to work with.
Best of all, all of the above is possible with the free version. If you want more, give TranslatePress Pro a try.

