In this post
In this post
Want to add an Elementor language switcher so that you’re able to offer your Elementor designs in multiple languages?
Elementor is the most popular WordPress page builder plugin and it lets you build amazing, dynamic websites. But if you want to offer those websites in multiple languages, you’ll need the help of a third-party plugin.
TranslatePress is a free WordPress multilingual plugin that offers deep support for Elementor, including letting you add a flexible Elementor language switcher to various parts of your designs.
In this post, we’ll show you how you can use the free TranslatePress plugin to add a language switcher to Elementor, including also translating your Elementor content manually or via tools like Google Translate.
Here’s an example of adding a language switcher to a Theme Builder template, but you’ll also get other options for placing your language switcher:

In addition to letting you add the language switcher, TranslatePress also includes some other Elementor integrations, such as letting you show or hide certain Elementor widgets and sections based on the language that a visitor chose.
Before we start off, here’s a quick video tutorial explaining how to do this in short:
But if you want to get into more detail and take things at your own pace, please continue reading this article.
Ready to go? Here’s how to set it up…
How to Add an Elementor Language Switcher for Free
To create your language switcher, you need the free TranslatePress plugin.
TranslatePress is a complete WordPress multilingual plugin, which means it helps you both translate your content and add a front-end language switcher that your visitors can use.
TranslatePress lets you use both automatic and manual translation (or a mix of both) and you’ll be able to manage all of your translations via a visual point-and-click editor – just like how Elementor lets you use a visual editor to create your designs:
As an added bonus, TranslatePress also includes some special integrations for Elementor, such as letting you show or hide certain widgets and sections based on the language a user has chosen.
You’ll be able to use the free version of TranslatePress to add your language switcher and translate your Elementor site’s content into one new language. To add support for unlimited languages and access some other advanced features, you can also upgrade to the paid version of TranslatePress. We’ll be sure to note any features that require the paid version.
TranslatePress Multilingual
Here’s the basic process:
- Install TranslatePress and choose your languages;
- Customize your Elementor language switcher;
- Translate your content.
Let’s look at each step in detail…
1. Install TranslatePress and Choose Languages
To get started, install and activate the free TranslatePress plugin from WordPress.org.
Once you’ve activated the plugin, go to Settings → TranslatePress to choose the languages that you want to offer on your site:
- Default Language – the language that your Elementor site’s content currently exists in.
- All Languages – one or more new languages into which you want to translate your Elementor site’s content. The free version supports one new language while the premium version of TranslatePress allows unlimited languages.

These are also the languages that will appear as options in your language switcher.
For the TraslatePress installation and setup process, you can also watch this video tutorial:
2. Customize Your Elementor Language Switcher
By default, TranslatePress adds a floating language switcher to the bottom-right corner of your site that includes all of the languages that you selected in the previous step. This language switcher will appear on every page*, whether or not you’ve built the page with Elementor.
* Note – if you exclude certain content from translation, the language switcher will not appear on pages where you’ve disabled translation.
If you want to adjust the location, TranslatePress also lets you place your language switcher using a shortcode or menu item, including changing behavior (such as only showing the language name and hiding the flag).
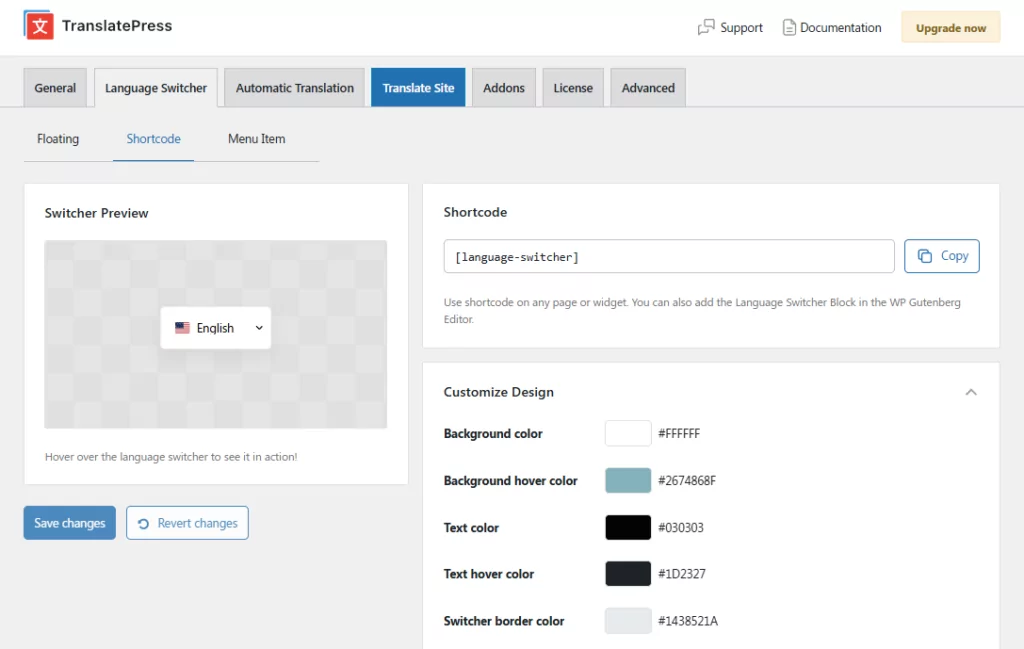
You can manage all of these settings from the Language Switcher tab in the TranslatePress settings area (Settings → TranslatePress → Language Switcher).
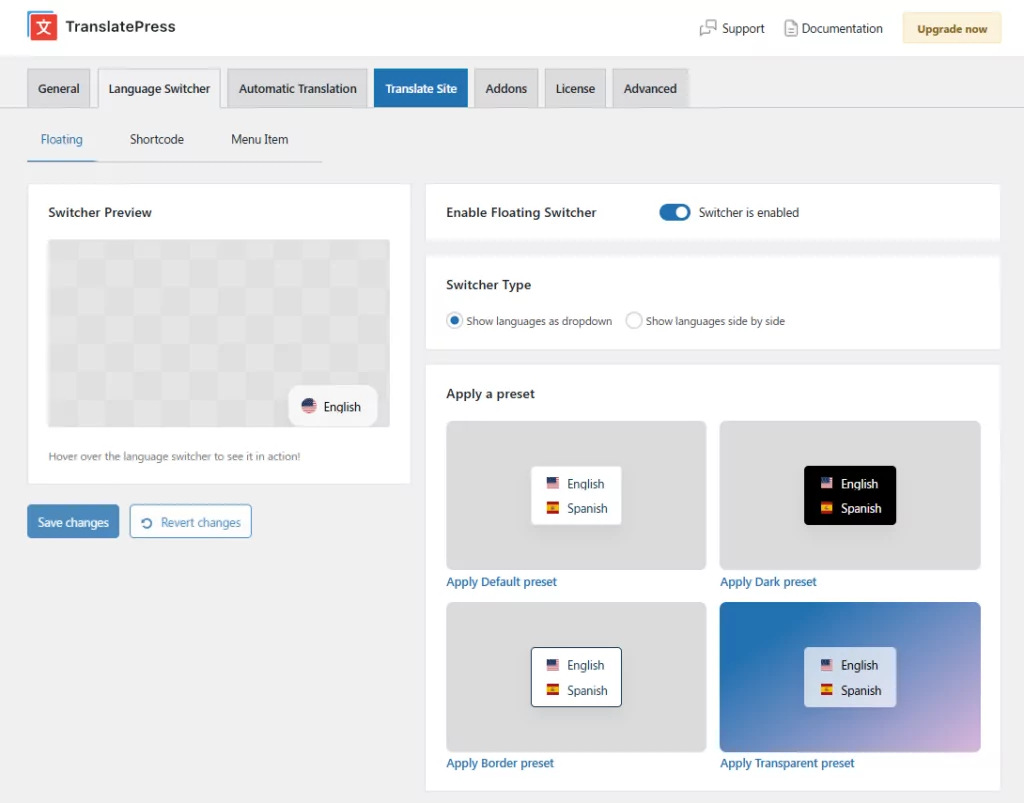
Here, you’ll see three options to add a language switcher to your Elementor site, and you’ll also find a lot of customization options for how it looks and acts.
Now, let’s look at how you can use these options to place your language switcher in Elementor designs.
Using the Language Switcher Shortcode in Elementor
For example, to add a floating switcher that stays on top of every page of your site and follows the reader throughout their visit, simply enable the Floating Switcher. This is the easiest and most convenient setup.
You can simply apply a design preset and leave it as is, or start from a preset and customize it to perfectly match your site’s design. Feel free to play with colors, sizes, borders, animations, flags, and more.
You’ll see a live preview of your switcher on the left side of the screen which updates in real time as you make changes.
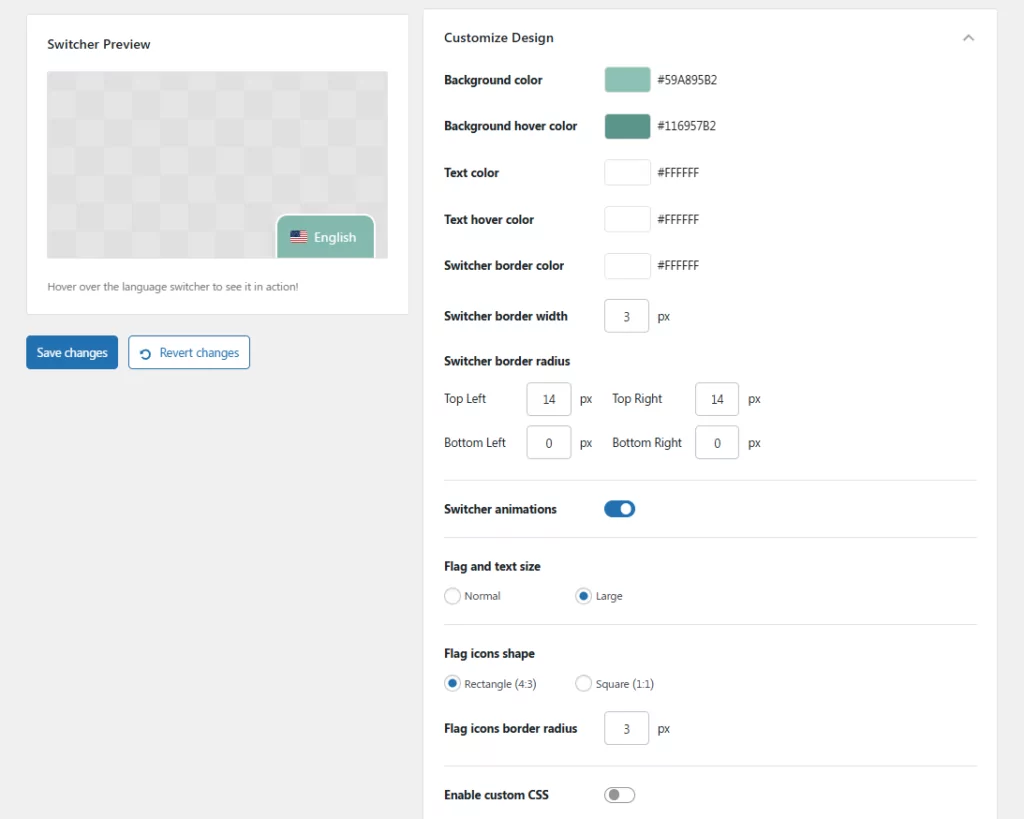
Next, you can customize its layout — things like the position on the screen, the width, padding, or flag position in relation to the language name.

If you only have 2 languages on your site, in the Additional Settings section you’ll be able to configure your switcher to always show the opposite language of the one currently displayed on the site. This will transform your switcher dropdown into a clickable button.
Using the Language Switcher Shortcode in Elementor
Now, if you want your switcher in a fixed position on your site and need the flexibility to do so, you can use the Shortcode option.
You can customize this switcher just like the previous option, and then add it wherever you want it on your site using the [language-switcher] shortcode. You can place it anywhere in your Elementor designs using Elementor’s Shortcode widget:
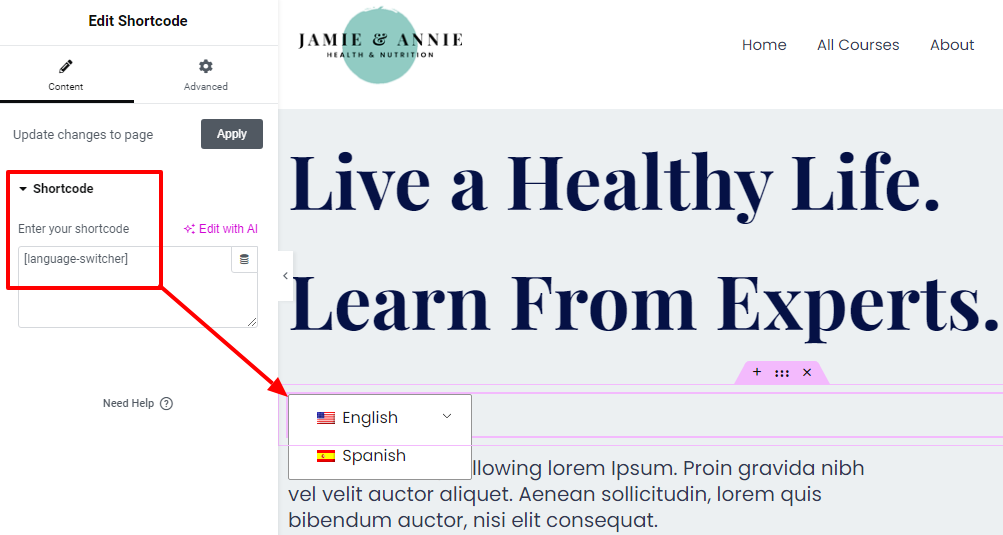
In the Advanced tab of the widget’s settings, you can use all of the normal Elementor settings to control spacing, positioning, etc.
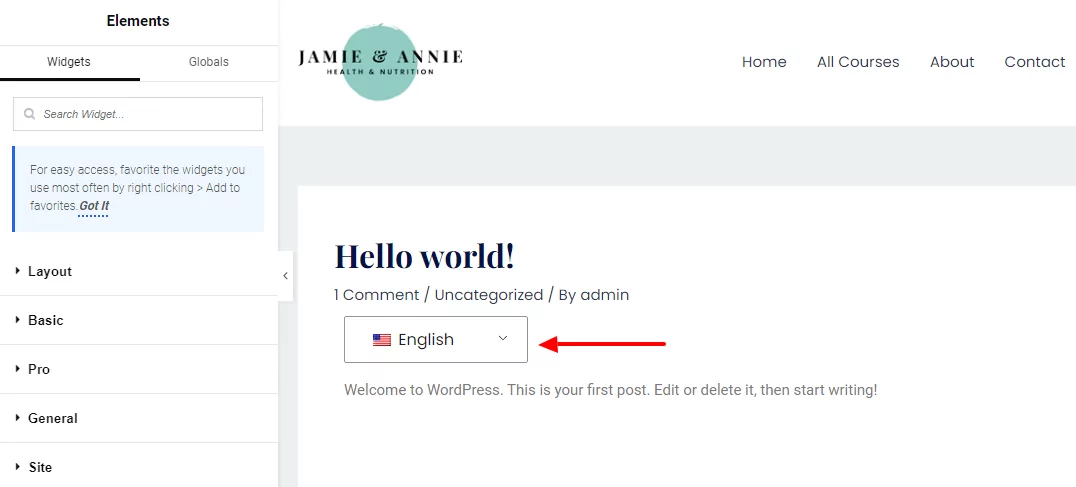
If you’re using Elementor Pro and its Theme Builder, you can also include the language switcher shortcode in the templates that you create with Theme Builder. For example, you could create a template for your individual blog posts and include the language switcher below the post title.
Here’s a simple example that uses the shortcode block to place a language switcher underneath the post title and info:
Using the Language Switcher Menu Item in Elementor
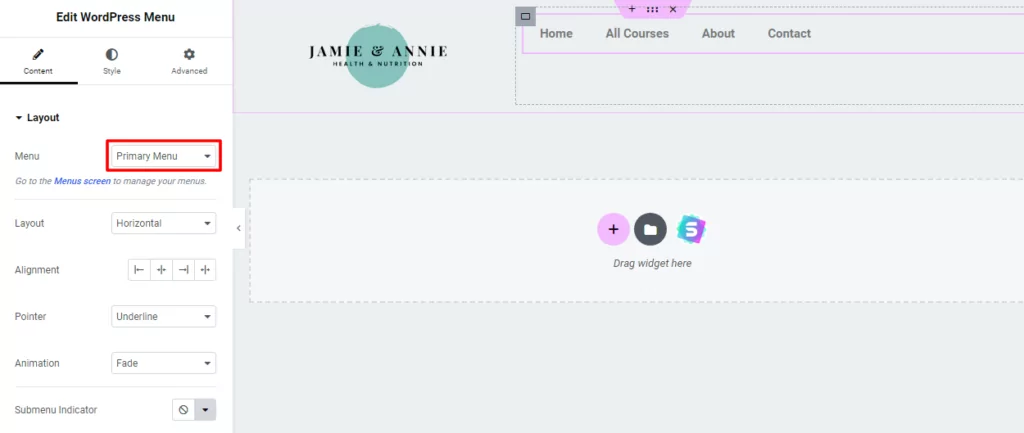
If you’re using Elementor Theme Builder to design your own custom header, you can also place your language switcher in that header template by using the dedicated language switcher menu item that TranslatePress provides.
First, open the header template that you created with Elementor Theme Builder to check the name of the menu that you’re using in the Nav Menu widget. In this example, the menu name is “Primary Menu”:
Then, go to Appearance → Menus in your WordPress dashboard to edit that menu. Make sure you’re editing the right menu by using the drop-down at the top. Then, you can add your language switcher to the menu using the dedicated Language Switcher menu items.
You can either add each language as a top-level menu item. Or, you can set the Current Language as the top-level item and add the other languages as sub-menus (pictured below):
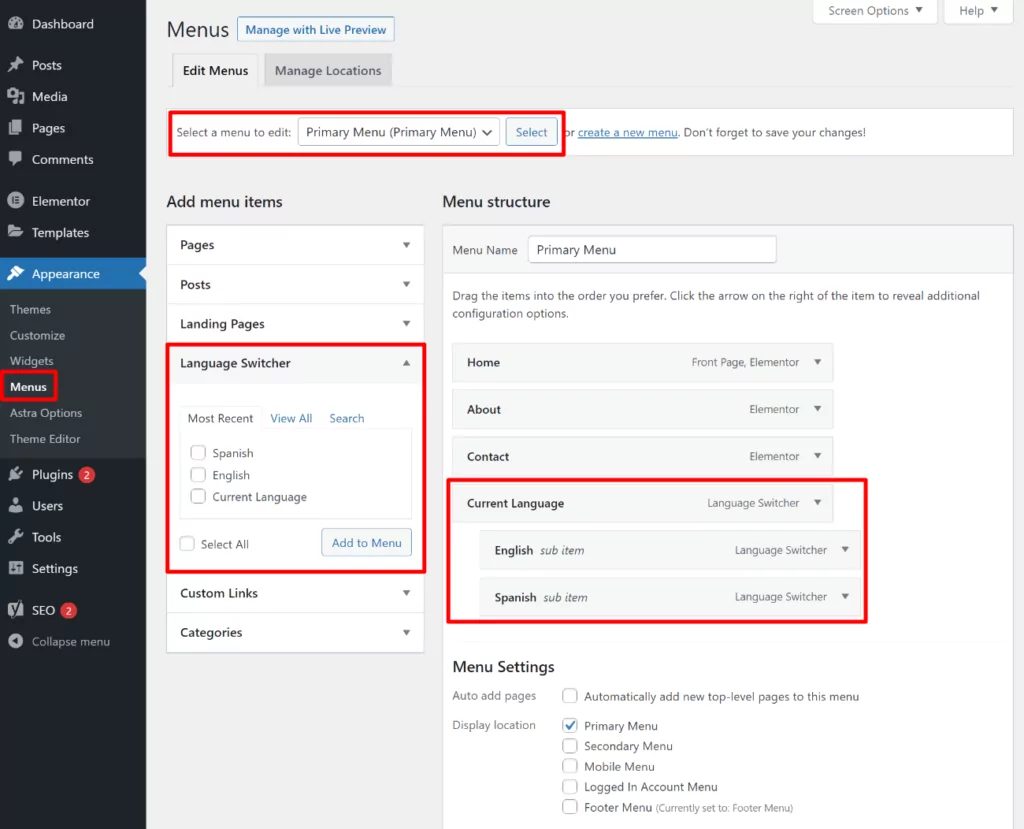
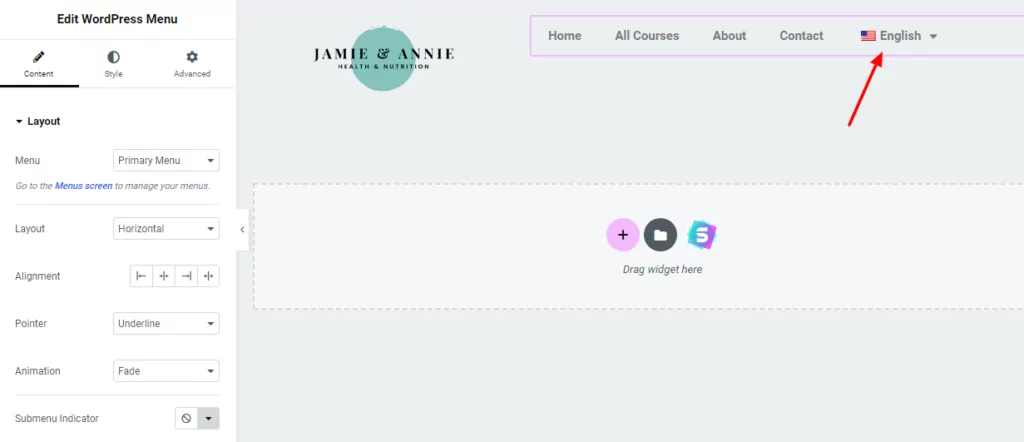
Once you save your changes, you’ll see your language switcher appear in the menu of your Elementor header template:
If your Elementor website only has 2 languages, you can also opt for a clickable language button where your switcher always displays the alternate language option. For this, all you have to do is add the Opposite Language item from the list. There is no need to add the languages when going for this option.
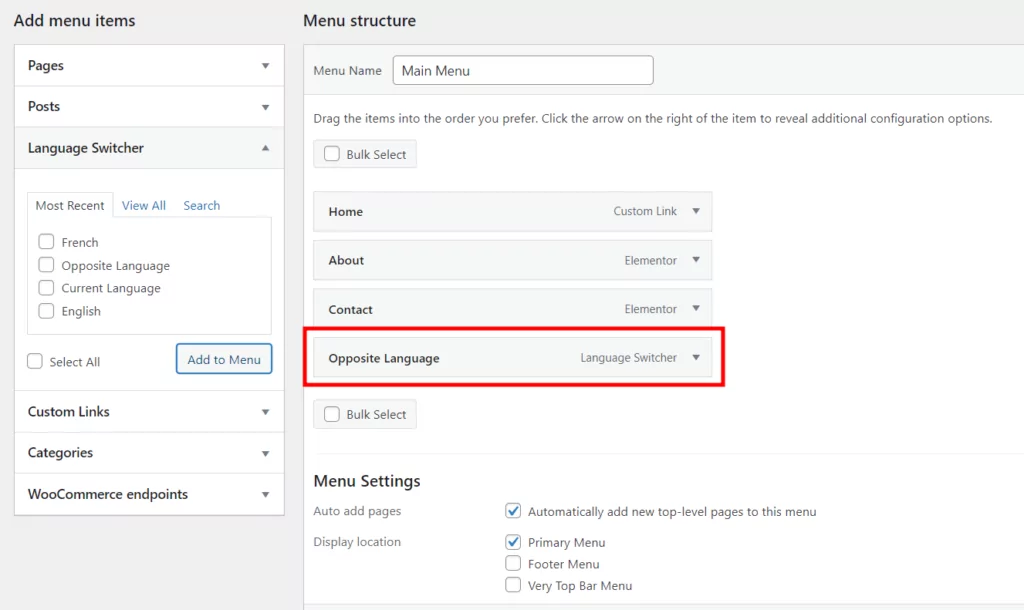
Now, when you save your changes, if your site is displayed in English, your switcher will only display Spanish (or the language you chose to translate it into). Once the visitor switches to Spanish, the button will now display English.
You can also use this same exact approach to add your language switcher to a footer template that you create with Elementor Pro (or really anywhere where you use Elementor’s Nav Menu widget).
3. Translate Your Content
Once you’ve added your Elementor language switcher (or language switchers – you can add multiple language switchers in different positions if needed), your next step is to actually translate your site’s content so that visitors can see your translated content when they choose a non-default language via the language switcher.
TranslatePress supports two methods for translation:
- Automatic machine translation – you can automatically generate your site’s translations using TraslatePress AI, DeepL, or Google Translate (available in the free version of TranslatePress).
- Manual translation – you can manually add or edit your site’s translations using the visual editor.
You can also mix and match the two approaches – so you could use automatic translation to generate your site’s baseline translations but then go back and manually adjust those machine translations as needed.
We’ll show you quickly how translation works in this section. However, if you want a detailed look, we’ve also written full guides on translating Elementor:
- How to translate Elementor sites in general
- How to translate Elementor popup content for multilingual sites
Set Up Automatic Translation (Optional)
This step is 100% optional – you can also just move to the next step to manually translate your content.
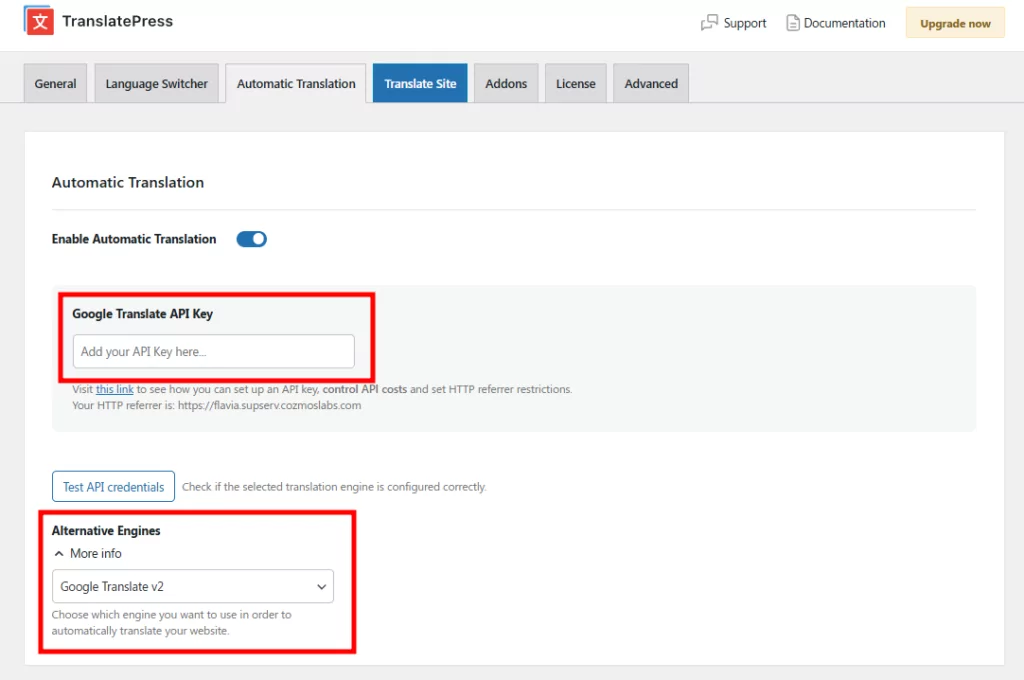
If you want to enable automatic translation via Google Translate or DeepL, go to Settings → TranslatePress → Automatic Translation. Enable the functionality and then configure your preferred automatic translation service.
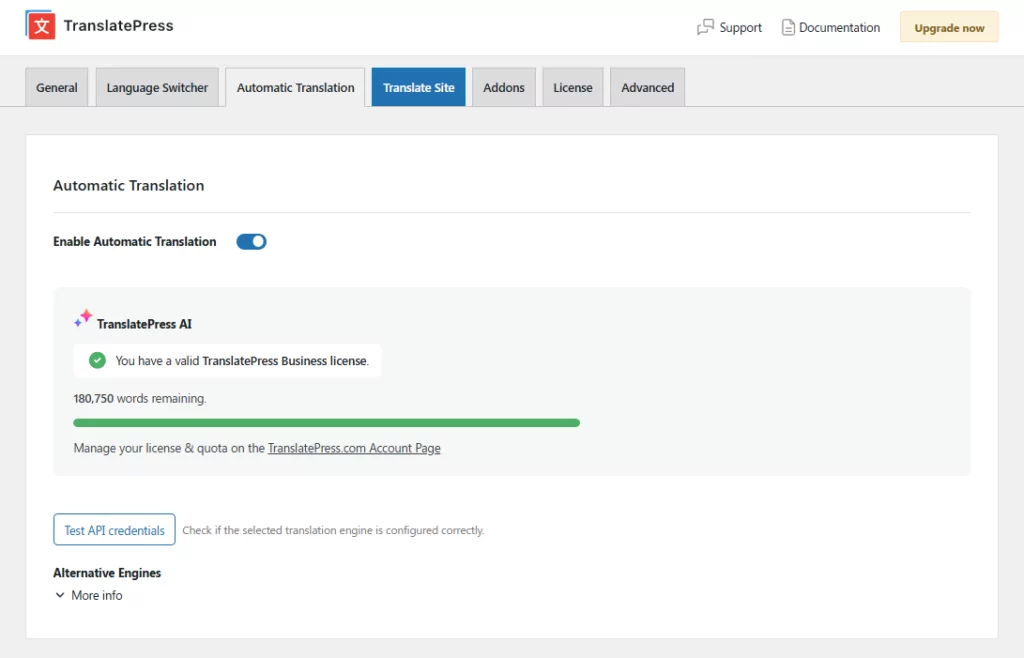
Pro Tip: If you use any premium version of TranslatePrerss, you can skip the manual work of setting up Google Translate and DeepL API keys using the integrated TranslatePress AI solution.
Translating your website using TranslatePress AI involves three steps: activate your license, choose your languages, enable automatic translation, and voila – your work is done!
This makes automatically translating your entire website content (including SEO metadata) 100x faster.
However, you can still connect directly to the Google Translate or DeepL API if for some reason you prefer this method. This requires a bit more setup on your part, but it could save you a more money if you have a small website.
We have a detailed guide on how to automatically translate WordPress and WooCommerce, along with dedicated setup guides for both services:
Note, however, that the free version of TranslatePress doesn’t support translation via the DeepL API. For that, you will need the premium version.
Use the Visual Translation Editor
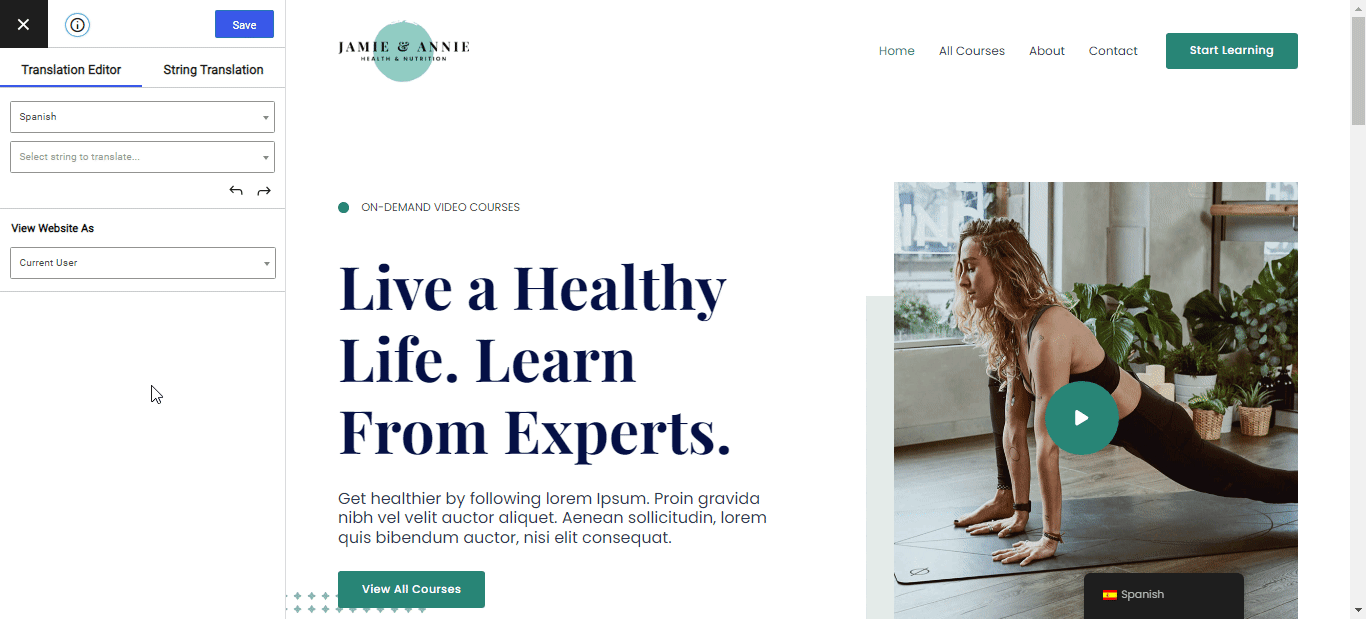
To manually add or edit your translations, you can use the visual translation editor in TranslatePress, which we previewed a little earlier in this post.
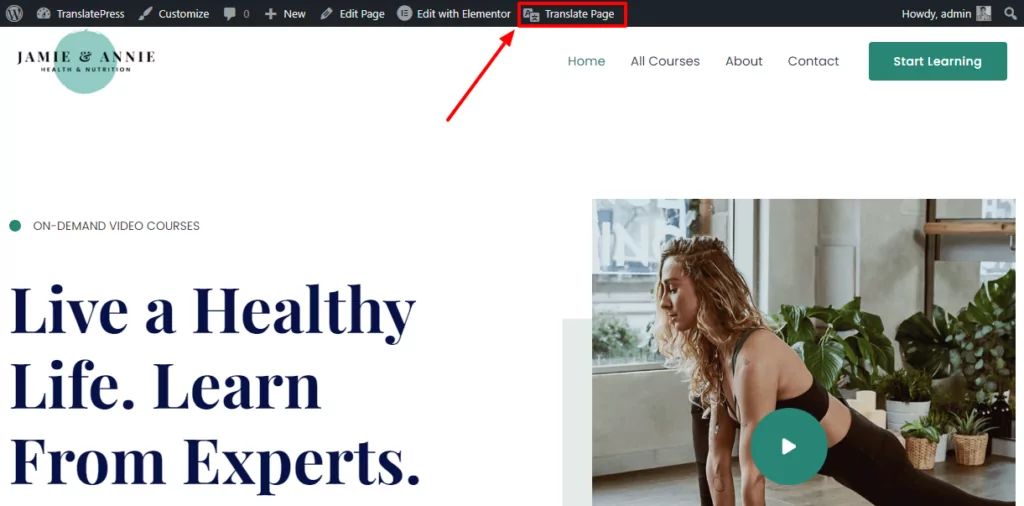
To open the editor, go to the piece of content that you want to translate on the front-end of your site and click the Translate Page option on the WordPress toolbar:
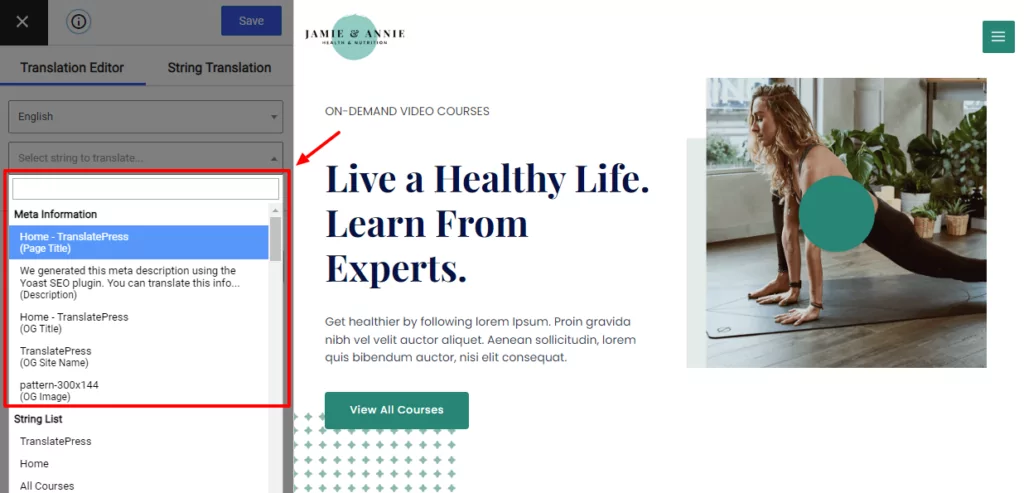
You should see a live preview of your site along with a sidebar on the left where you can manage your translations. To edit the translation for any piece of content, you can hover over that piece of content on the live preview of your site and click the pencil icon.
This will open the content’s translation in the sidebar, where you can add the translation (or edit the existing translation, if you used automatic translation):
You can repeat the process to translate all of your content, whether it comes from Elementor, the native WordPress block editor, or another plugin. You can also “translate” images to display a different image depending on the language a user chose.
The process is always the same – point and click. But if you want to see in-context examples for specific types of content, we have lots of guides to help you out:
- Images
- Editor (Gutenberg) blocks
- Custom fields
- Custom post types
- WordPress forms
- WordPress menus
- Popup content
- Sliders
- WooCommerce products
Translate Behind-the-Scenes Metadata (Like SEO Titles)
With the premium version of TranslatePress and its SEO Pack add-on, you can also use this same approach to translate behind-the-scenes information like Yoast SEO titles and meta descriptions, for example, social media graph information, and more.
Once you upgrade and install the SEO Pack add-on, you can access these translations by using the drop-down in the translation editor sidebar:
You’ll also get a new String List section that lets you translate all of the various URL slugs on your site.
Bonus: Show/Hide Elementor Widgets and Sections Based on Language
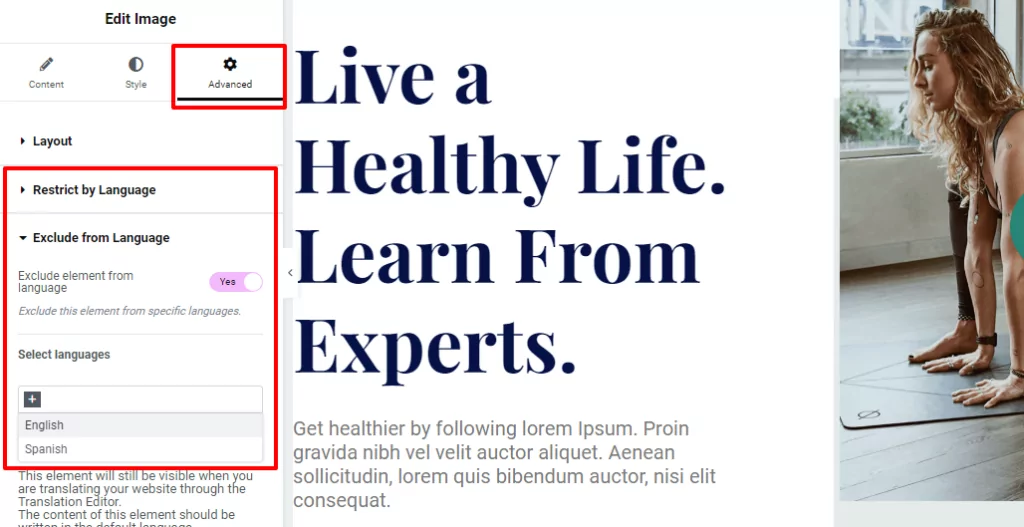
In addition to helping you create a language switcher, TranslatePress also includes a special Elementor integration that lets you show/hide certain Elementor widgets or sections based on the language that a user selected.
For example, you could create a special widget that only displays for people browsing in English. Or, you could create a special widget that displays for everyone except for people browsing in English.
You’ll be able to access this feature from inside the Elementor interface. When you edit any widget or section, you’ll get two new options in the Advanced tab:
- Restrict by Language – only show this widget or section to people browsing in a certain language.
- Exclude by Language – show this widget or section to all visitors except for people browsing in a certain language.
Create Your Elementor Language Switcher Today
With TranslatePress, you can easily add an Elementor language switcher and translate your Elementor site’s content into one or more new languages.
TranslatePress offers out-of-the-box support for translating Elementor content, even letting you translate designs that you create with Elementor Popup Builder or Theme Builder.
Beyond that, you’ll also get special Elementor integrations, such as showing or hiding widgets or sections based on the language a user chose in the language switcher.
You can get started with the free version from WordPress.org to translate your site into one new language and access all of the language switcher settings.
Then, upgrade to the premium version to be able to add unlimited languages, translate SEO and social media metadata, and access other useful features like:
- DeepL support for automatic translation.
- Automatically redirecting users to their preferred languages.
- Translator accounts.
- Showing separate menus based on a user’s language (rather than just translating the same set of menu items).
TranslatePress Multilingual
Do you still have any questions about working with your Elementor site’s language switcher? Let us know in the comments!
If you found this post helpful, please check out our YouTube channel, where we constantly upload short & easy-to-follow video tutorials. You can also follow us on Facebook and Twitter to be the first to know each time we post.