
Dans ce post
A sélecteur de langue du site Web pourrait être l'un des outils les plus importants que vous puissiez ajouter à votre site web. Si vous souhaitez toucher un public mondial avec votre contenu et lui offrir la meilleure expérience utilisateur possible, vous devez d'abord vous assurer qu'il peut consulter votre site dans la bonne langue.
Les outils de sélection de langue se présentent sous différents formats. Vous pouvez ajouter un lien textuel à votre site, un bouton ou un menu déroulant, selon vos préférences. Généralement, vous trouverez les outils de sélection de langue WordPress situés dans le en-tête ou pied de page d'un site.
Essentiellement, ce que font ces outils, c'est permettre à vos utilisateurs de traduire instantanément votre contenu dans leur langue préférée. Que vous gériez une boutique de commerce électronique ou un blog, votre outil de sélection de langue améliorera l'expérience utilisateur de vos clients.
Dans le tutoriel d'aujourd'hui, nous allons voir comment vous pouvez ajouter un sélecteur de langue de site web à WordPress et comment utiliser cet outil efficacement.
Les avantages d'utiliser un sélecteur de langue de site Web
Le bénéfice le plus évident d'un sélecteur de langue de site Web est qu'il permet à votre utilisateur d'adapter son expérience sur votre site à ses besoins. Dans n'importe projet de conception ou de développement web, votre objectif principal en tant que propriétaire d'entreprise doit être de fournir une expérience utilisateur extraordinaire. Plus l“” UX » de votre site Web est bonne, plus vos clients sont susceptibles de revisiter vos pages et d'interagir avec votre marque.
Avec un sélecteur de langue WordPress, vous pouvez créer un site mondial qui offre aux clients une expérience locale. Ils pourront choisir dans quelle langue ils souhaitent voir vos pages en un clic. Dans certains cas, vous pouvez même utiliser sélection automatique de la langue fonctionnalités sur vos pages. Cela permet au site de détecter l'emplacement d'un utilisateur et de convertir votre langue automatiquement.
Par exemple, les utilisateurs de Google disposant d'un compte Google verront automatiquement tout le contenu présenté dans la langue qui leur correspond en fonction de leurs paramètres.
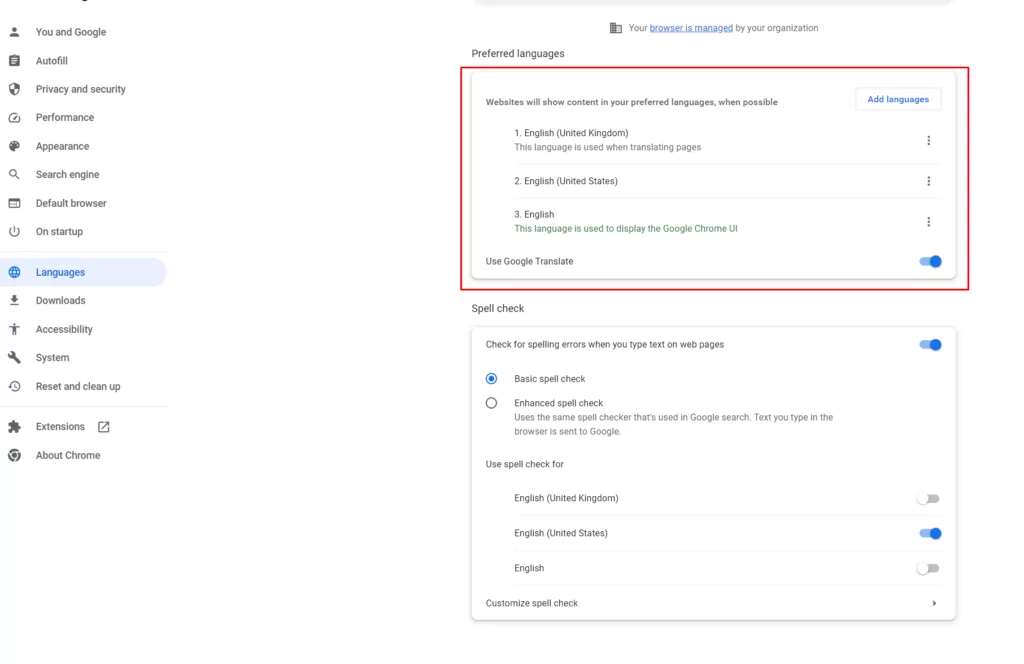
Comment ajouter un sélecteur de langue WordPress à votre site : 3 méthodes
Si vous disposez de votre propre site WordPress, le moyen le plus simple d’ajouter un sélecteur de langue est d’utiliser un plugin. Le meilleur plugin disponible à ce jour est, de loin, TranslatePress. Il vous offre toute une gamme de possibilités pour ajouter des outils de sélection de langue à vos pages, que nous aborderons ci-dessous.
Voici un bref résumé :
Étape 1 : Installer TranslatePress
Avant de commencer à apporter des modifications à votre site, vous devrez bien sûr ajouter l'extension. Connectez-vous à votre compte WordPress et cliquez sur Plugins. Dans la barre de recherche, saisissez “ TranslatePress ” puis cliquez Installer suivi par Activer.
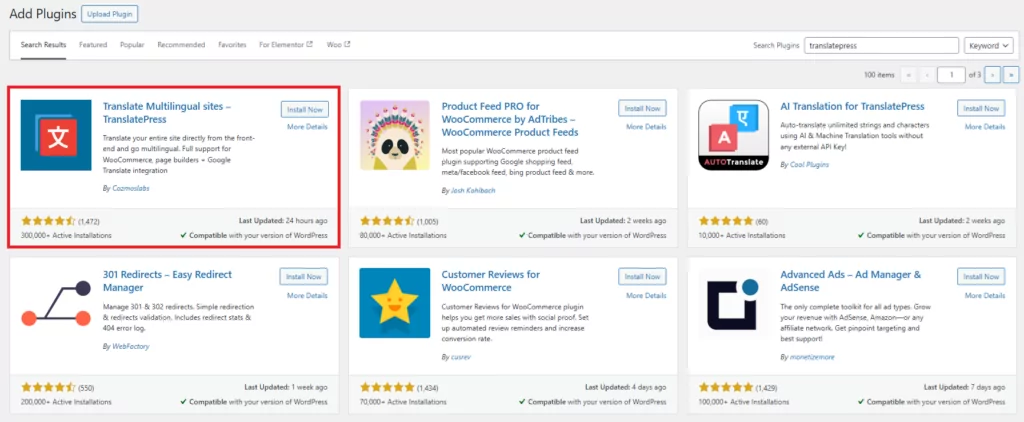
Une fois votre nouveau plugin activé, vous pourrez traduire facilement l'intégralité de votre site WordPress grâce à une interface visuelle intuitive. Le plugin TranslatePress prend en charge la traduction de tous les éléments, depuis types de publications personnalisées, aux formulaires de contact, et images contenant du texte.
Cet outil convivial fonctionne également sans problème avec d'autres plugins populaires comme Élémentor ou WooCommerce. Cette solution utilise DeepL ou Google Translate pour traduire automatiquement le contenu. Vous pouvez également modifier vos traductions une fois qu'elles ont été générées.
Étape 2 : Choisissez vos langues
Tout d'abord, vous devrez décider quelles langues vous souhaitez ajouter à votre site Web. Rendez-vous dans votre WordPress Paramètres page, puis cliquez sur TranslatePress. Dans le Général page des réglages, vous pourrez sélectionner votre langue principale, puis toutes les autres langues que vous souhaitez ajouter à vos pages WordPress.
Dans cet exemple, j'utilise l'espagnol, mais vous pouvez ajouter autant de langues que vous le souhaitez avec la version premium de TranslatePress.
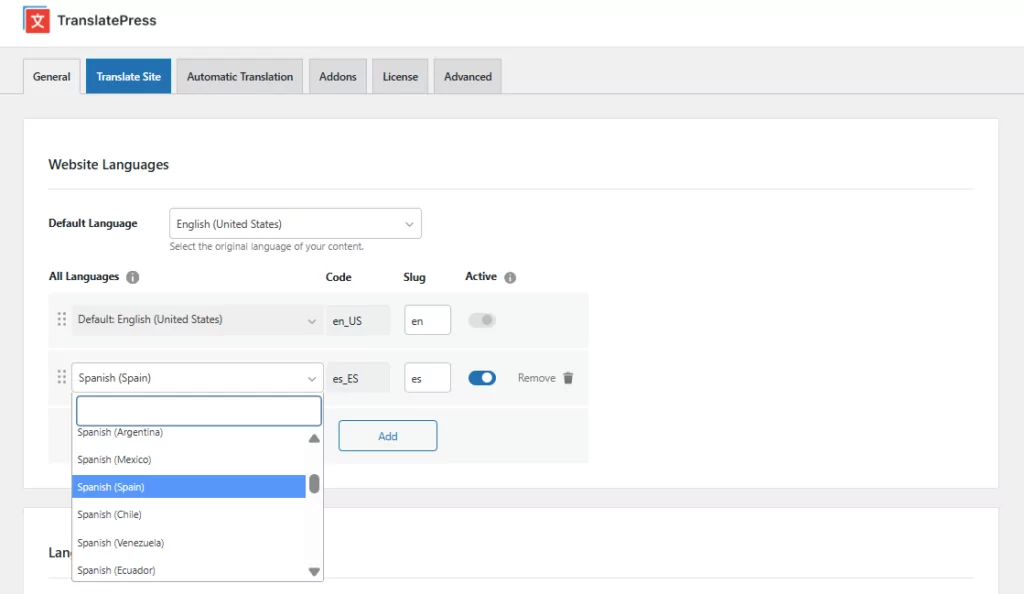
Voici les différentes possibilités qui s'offrent à vous pour configurer l'une des trois options de sélection de la langue du site proposées par TranslatePress.
Étape 3 : Choisissez votre sélecteur de langue
Une fois que vous avez défini vos langues, faites défiler vers le bas de Général page jusqu'à ce que vous voyiez le Sélecteur de langue section. C'est ici que vous pouvez choisir comment vous allez ajouter un sélecteur de langue à votre site. Il y a trois options :
- Code courtCeci affiche un sélecteur de langue sur n'importe quelle page ou widget.
- Élément du menu : Cela vous permet d'ajouter un élément de menu à votre site avec plusieurs langues au choix.
- Sélection de langue flottante : Cela ajoute un menu déroulant flottant qui apparaît sur toutes les pages de votre site Web.
Examinons de plus près chaque option.
1. Sélecteur de langue par code court
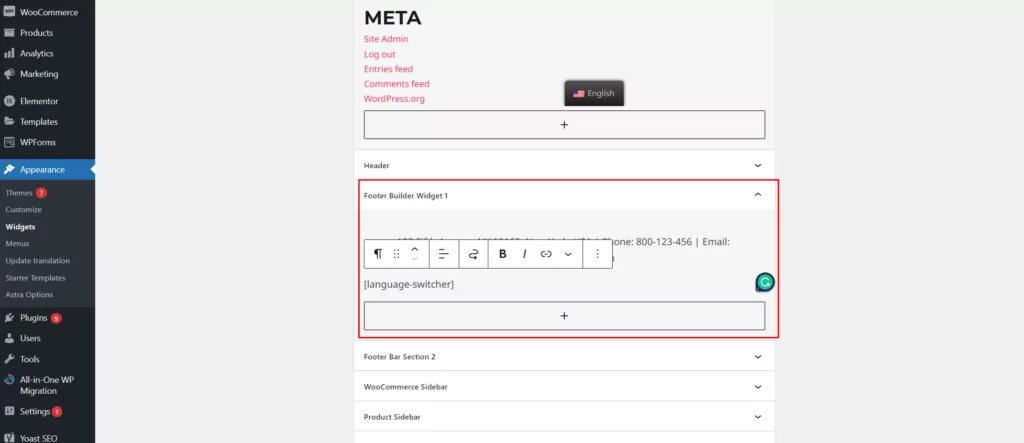
Le sélecteur de langue par code court vous permet d'ajouter un sélecteur de langue WordPress à n'importe quelle partie de votre site qui accepte les codes courts. Pour accéder à cette fonctionnalité, faites défiler vers le bas jusqu'à Sélecteur de langue section de la Général page pour TranslatePress et cochez la case à côté de Code court.
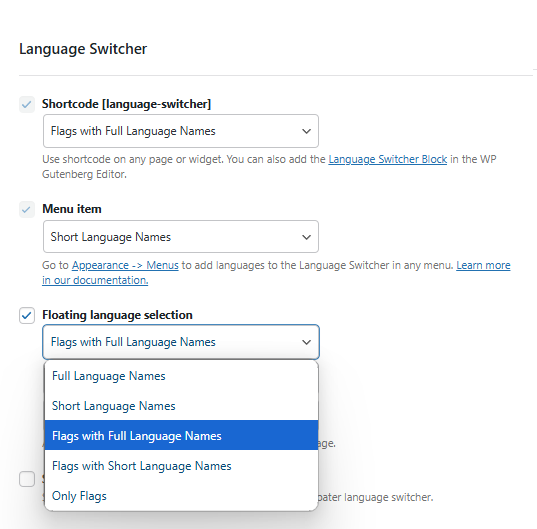
Dans le menu déroulant ci-dessous, vous pourrez déterminer l'apparence de votre sélecteur de langue. Par exemple, vous pouvez utiliser des drapeaux avec des noms de langues courts ou longs, ou simplement les noms.
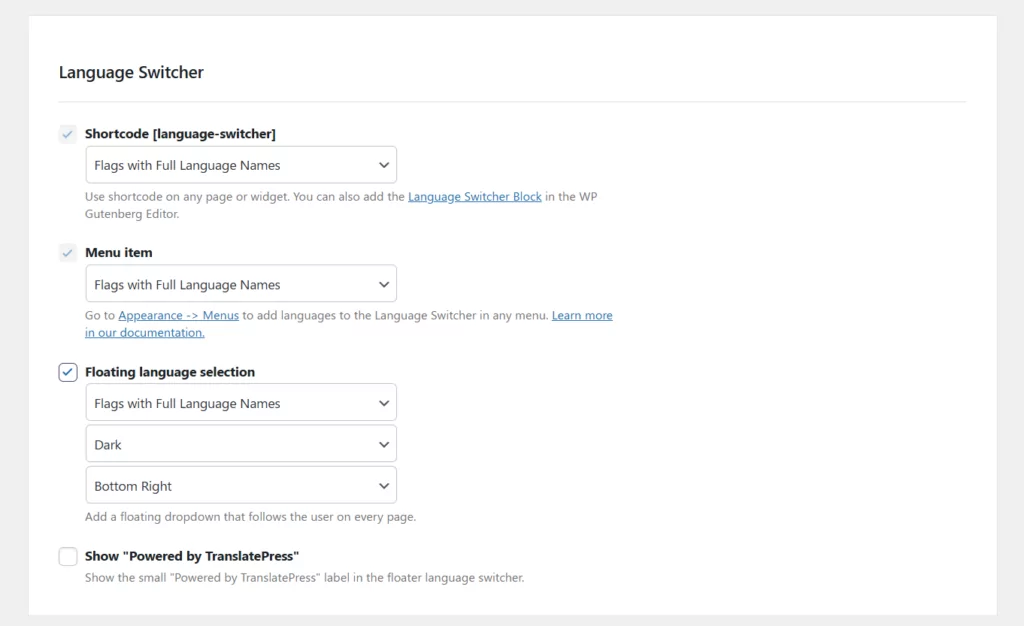
Sélectionnez votre option et cliquez Enregistrer les modifications. Ensuite, utilisez le
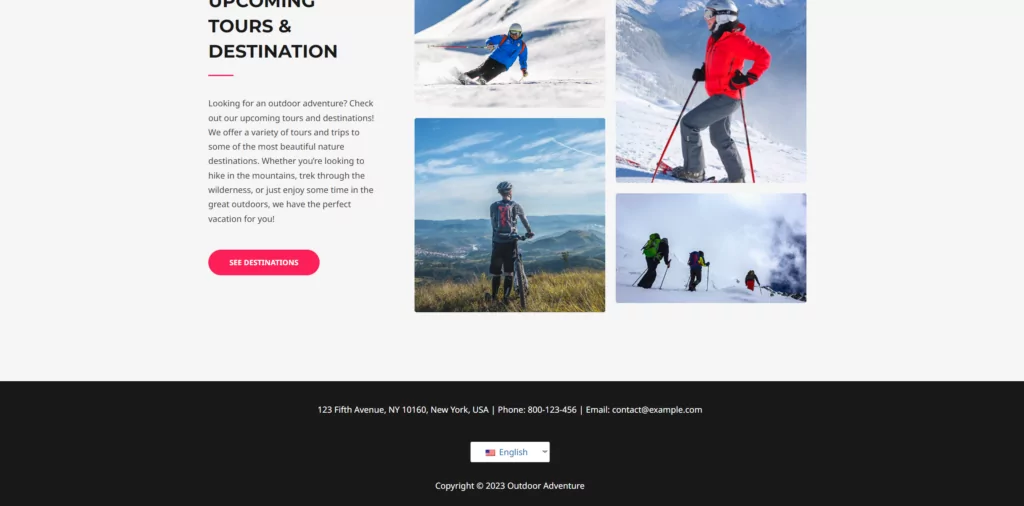
Sur le front-end, votre site doit afficher un nouveau bouton de langue qui ouvre une liste déroulante au survol :
Sélecteur de langue des éléments de menu
L'option de menu vous permettra d'ajouter des options de langue au menu de navigation de votre site. Il existe à nouveau quelques options différentes pour ce que le sélecteur de langue WordPress affichera. Vous pouvez choisir d'afficher uniquement les drapeaux, les drapeaux avec des noms longs ou courts, ou simplement des noms longs ou courts.
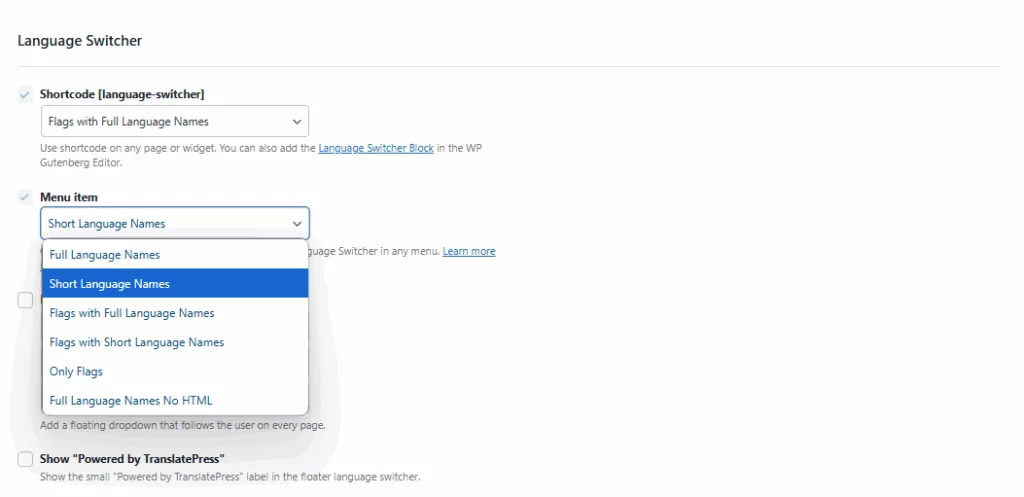
Sélectionnez l'une de ces options, puis rendez-vous dans Apparence → Menus pour ajouter l'option de navigation à votre site. Dans le Modifier les menus onglet, il suffit de cliquer Sélecteur de langue pour cocher toutes les cases correspondant aux langues de votre choix. Ensuite, cliquez Ajouter au menu.
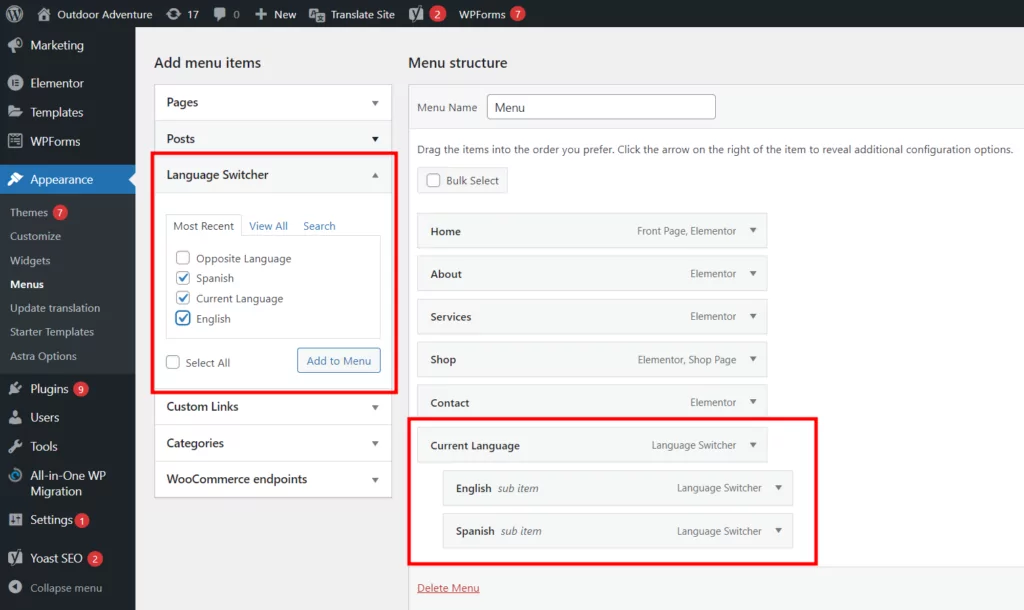
Ajout de Langue actuelle l'élément et les éléments de langue que vous avez choisis pour votre menu afficheront un sélecteur de langue classique qui s'ouvre au survol.
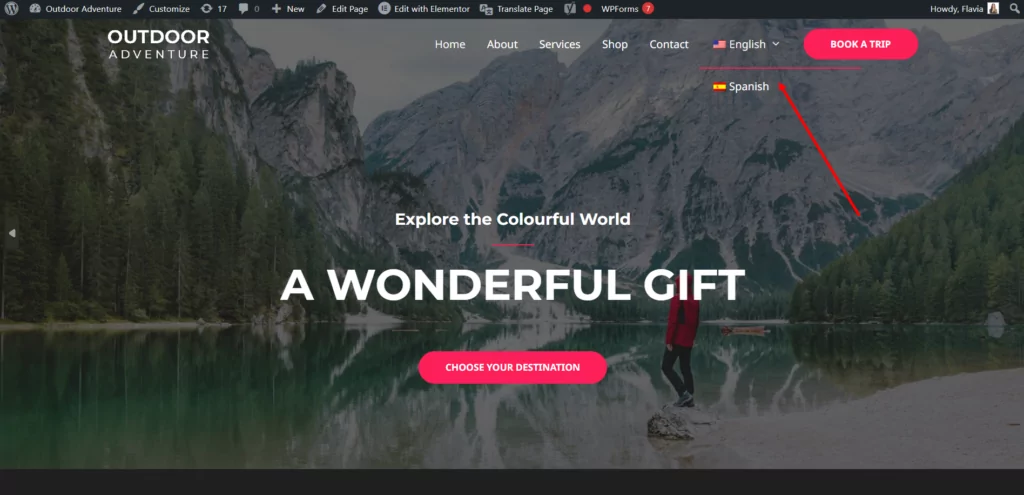
Vous pouvez aussi ajouter le Langue opposée option qui affichera un bouton pour la langue secondaire uniquement. Par exemple, si le site web principal est en anglais, le bouton affichera uniquement “ Spanish ” et il n'y aura pas de menu déroulant. Cela ne fonctionne que si votre site web est bilingue.
Sur l'interface de votre site Web, vous devriez voir un nouvel élément de menu de changement de langue, placé à côté de vos éléments de menu existants.
3. Sélecteur de langue flottant
Les menus déroulants flottants de votre boutique permettent aux utilisateurs d'accéder facilement à leur langue préférée. Ils s'affichent sur toutes les pages de votre site web. Avec TranslatePress, vous pouvez choisir le fonctionnement et l'apparence de votre sélecteur flottant.
Vous pourrez choisir d'afficher le nom complet de la langue, un nom abrégé et un drapeau. De plus, vous pouvez opter pour des thèmes sombres ou clairs selon le design de votre site Web. Il existe également une option pour déterminer l'emplacement exact où votre barre de langue sera affichée.
Faites vos choix et cliquez Enregistrer les modifications.
Une fois que vous avez terminé, actualisez l'interface de votre site et vous verrez à quoi ressemble la barre flottante pour vos visiteurs :

Assez simple, n'est-ce pas ?
Peu importe laquelle des trois options vous choisissez, vous êtes assuré d'offrir une meilleure expérience aux visiteurs de votre site Web. N'oubliez pas que vous pouvez également configurer le reste des paramètres dans l'extension Translate Press. Cela vous permettra de décider si vous souhaitez utiliser ou non la traduction automatique par machine. Pour ce faire, allez sur Paramètres → Traduction automatique.
Une fois votre configuration terminée, il vous suffit de parcourir votre site, une page à la fois, et elles seront traduites automatiquement. Vous pourrez également utiliser l'éditeur de traduction visuelle pour sélectionner un texte particulier et le modifier si vous n'êtes pas satisfait de la traduction automatique. Vous trouverez plus de conseils sur comment créer un site WordPress multilingue dans ce guide.
Meilleurs conseils pour utiliser un sélecteur de langue WordPress
TranslatePress vous permet de créer facilement et en un clin d'œil le site web multilingue idéal. Cependant, vous souhaiterez peut-être suivre quelques étapes supplémentaires pour vous assurer que le sélecteur de langue de votre site web soit aussi efficace que possible. Voici quelques conseils rapides pour vous mettre sur la bonne voie.
1. Choisissez le bon emplacement
TranslatePress vous offre une liberté totale quant à l'emplacement du sélecteur de langue de votre site web. Le plus important est de veiller à ce que vos clients puissent trouver facilement cet outil. Si vos clients ne parviennent pas à trouver le sélecteur de langue, ils risquent tout simplement de cliquer sur le bouton « Retour ».
La plupart du temps, les utilisateurs d'un site Web s'attendent à trouver des options de langue en haut ou en bas de leurs pages. Ajouter un sélecteur de langue dans votre pied de page ou votre en-tête est généralement une bonne idée. Du point de vue de la découvrabilité, le coin inférieur droit de la page est généralement la meilleure option. Cependant, il n'y a pas de règles strictes et immuables ici. Tout dépend de ce qui convient à vos clients.
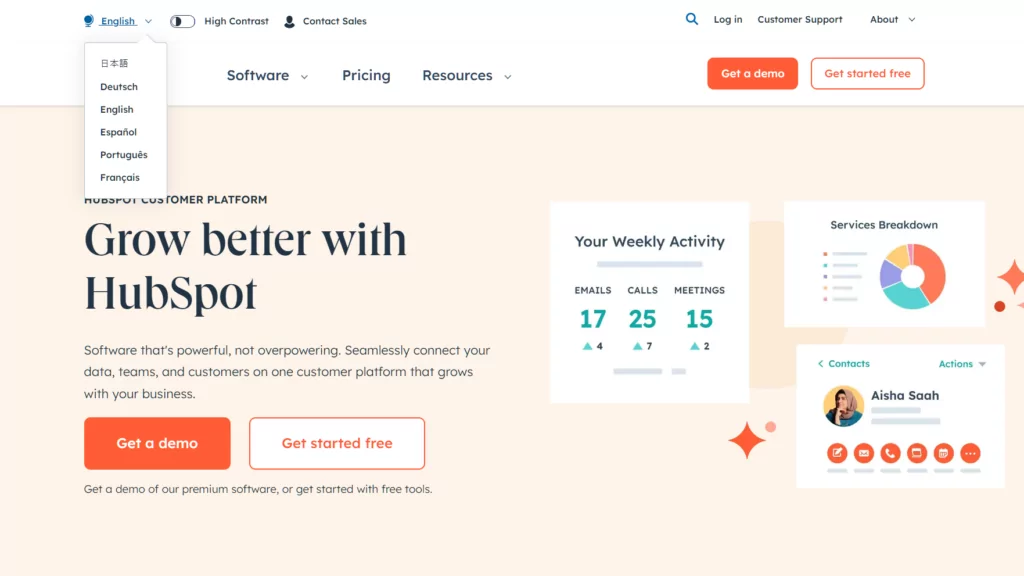
HubSpot a placé son sélecteur de langue sur sa barre de navigation supérieure.
2. Assurez-vous que le style correspond à votre site
N'oubliez pas que chaque nouveau widget ou outil que vous ajoutez à votre site Web doit correspondre à la conception de votre site. Du point de vue de l'interface utilisateur, il est important de veiller à ce que tout soit cohérent. Portez attention aux couleurs, aux polices et à l'apparence générale de vos boutons et de vos menus.
Certains outils de sélection de langue pour WordPress vous obligent à modifier le fichier CSS de votre site web ou du thème pour configurer l'apparence du bouton. TranslatePress, d'un autre côté, utilise le design existant de votre site pour générer un bouton de langue complémentaire. Cela signifie que vous n'avez pas à modifier vous-même le code.
Vous pourriez également envisager d'ajouter une icône de sélection de langue à votre site, comme un globe terrestre ou une bulle de dialogue. Toutefois, si vous affichez un drapeau à l'aide du plugin TranslatePress, vous ne devriez pas avoir besoin d'une icône supplémentaire pour améliorer la visibilité de votre site.

3. Afficher correctement les noms et initiales des langues
Après avoir ajouté un sélecteur de langue à votre site, vous aurez la possibilité d'afficher le nom complet ou l'abréviation de la langue. L'une ou l'autre option devrait être relativement simple à parcourir pour vos visiteurs. Mais ce qui est plus important, c'est la possibilité de répertorier chaque langue dans son format d'origine. Par exemple, au lieu de espagnol, vous utiliseriez Español.

Les lecteurs qui utilisent un alphabet différent, comme les russophones par exemple, ne reconnaîtraient pas nécessairement tout de suite les versions anglaises de leurs langues. Utiliser le bon format est essentiel pour améliorer l'expérience utilisateur.
4. Restez simple
Si vous souhaitez créer un site web international, vous pourriez être tenté d’ajouter autant de langues que possible à vos pages. TranslatePress vous offre effectivement la possibilité d’ajouter un nombre illimité de langues avec ses formules Pro. Cependant, il convient de garder à l’esprit qu’un menu ou un bouton trop complexe peut nuire à l’ergonomie du site.
Plus vous incluez de langues dans votre sélecteur de langue, plus le menu ou le menu déroulant du bouton sera long. Limitez-vous d'abord uniquement aux langues dont vous savez que vos clients se servent. N'oubliez pas que vous pourrez toujours ajouter d'autres langues par la suite, en fonction des commentaires des utilisateurs.
5. Essayez la détection automatique de la langue
L'un des meilleurs moyens d'améliorer l'expérience utilisateur de votre site pour vos visiteurs est de réduire la quantité d'efforts qu'ils doivent fournir. La mise en place d'une détection automatique de la langue leur évite d'avoir à se soucier de cliquer sur des boutons ou de chercher des sélecteurs.
La redirection automatique de langue permet au site de percevoir automatiquement où se trouve l'utilisateur en fonction de son adresse IP ou des paramètres de son navigateur. Ainsi, la solution peut traduire la langue sans aucune action supplémentaire de la part de l'utilisateur.
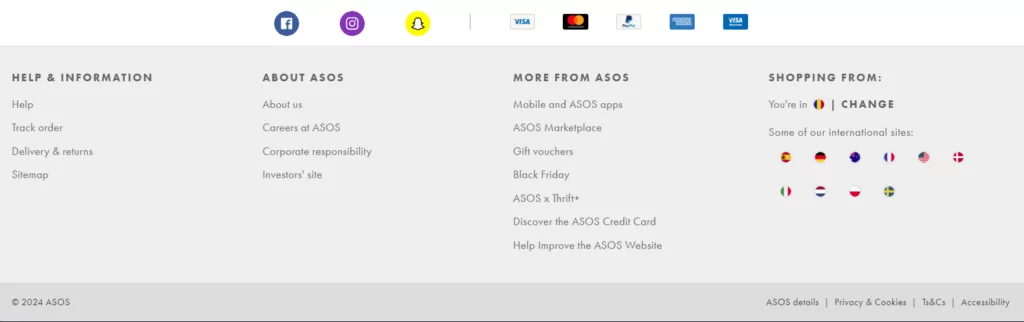
ASOS est un excellent exemple de marque qui a exploité cette approche automatique. Le magasin détecte automatiquement votre emplacement et vous propose du contenu en fonction de l'endroit où vous vous trouvez.
Si vous souhaitez faire la même chose sur votre site, vous pouvez le mettre en œuvre grâce à TranslatePress Détection automatique de la langue fonction.
Ajoutez facilement un sélecteur de langue WordPress à votre site dès aujourd'hui
Ajouter un sélecteur de langue à votre site web est un excellent moyen d'améliorer l'expérience utilisateur. Vous pouvez ainsi garantir que chaque visiteur de votre site, d'où qu'il vienne, peut personnaliser son expérience selon ses besoins. Le résultat peut se traduire par une augmentation des ventes et une meilleure réputation de marque.
Heureusement, TranslatePress vous permet d'ajouter rapidement et facilement des sélecteurs de langue à votre site. Vous avez le choix entre plusieurs options différentes. De plus, vous pouvez personnaliser votre sélecteur de langue comme bon vous semble.
TranslatePress Multilingue
Avez-vous encore des questions sur les sélecteurs de langue de site web ? Faites-le-nous savoir dans la section des commentaires ci-dessous !