
En esta publicación
Si quieres crear un tienda de comercio electrónico multilingüe, aprender a traducir automáticamente WooCommerce puede ahorrarte muchísimo tiempo y dinero.
En lugar de traducir minuciosamente cada detalle del producto desde cero, puedes utilizar la traducción automática para crear tus traducciones base y luego volver y refinarlas manualmente según sea necesario.
En esta entrada, aprenderás a traducir automáticamente tu tienda de WooCommerce utilizando la API de Google Translate y un plugin gratuito de traducción para WordPress.
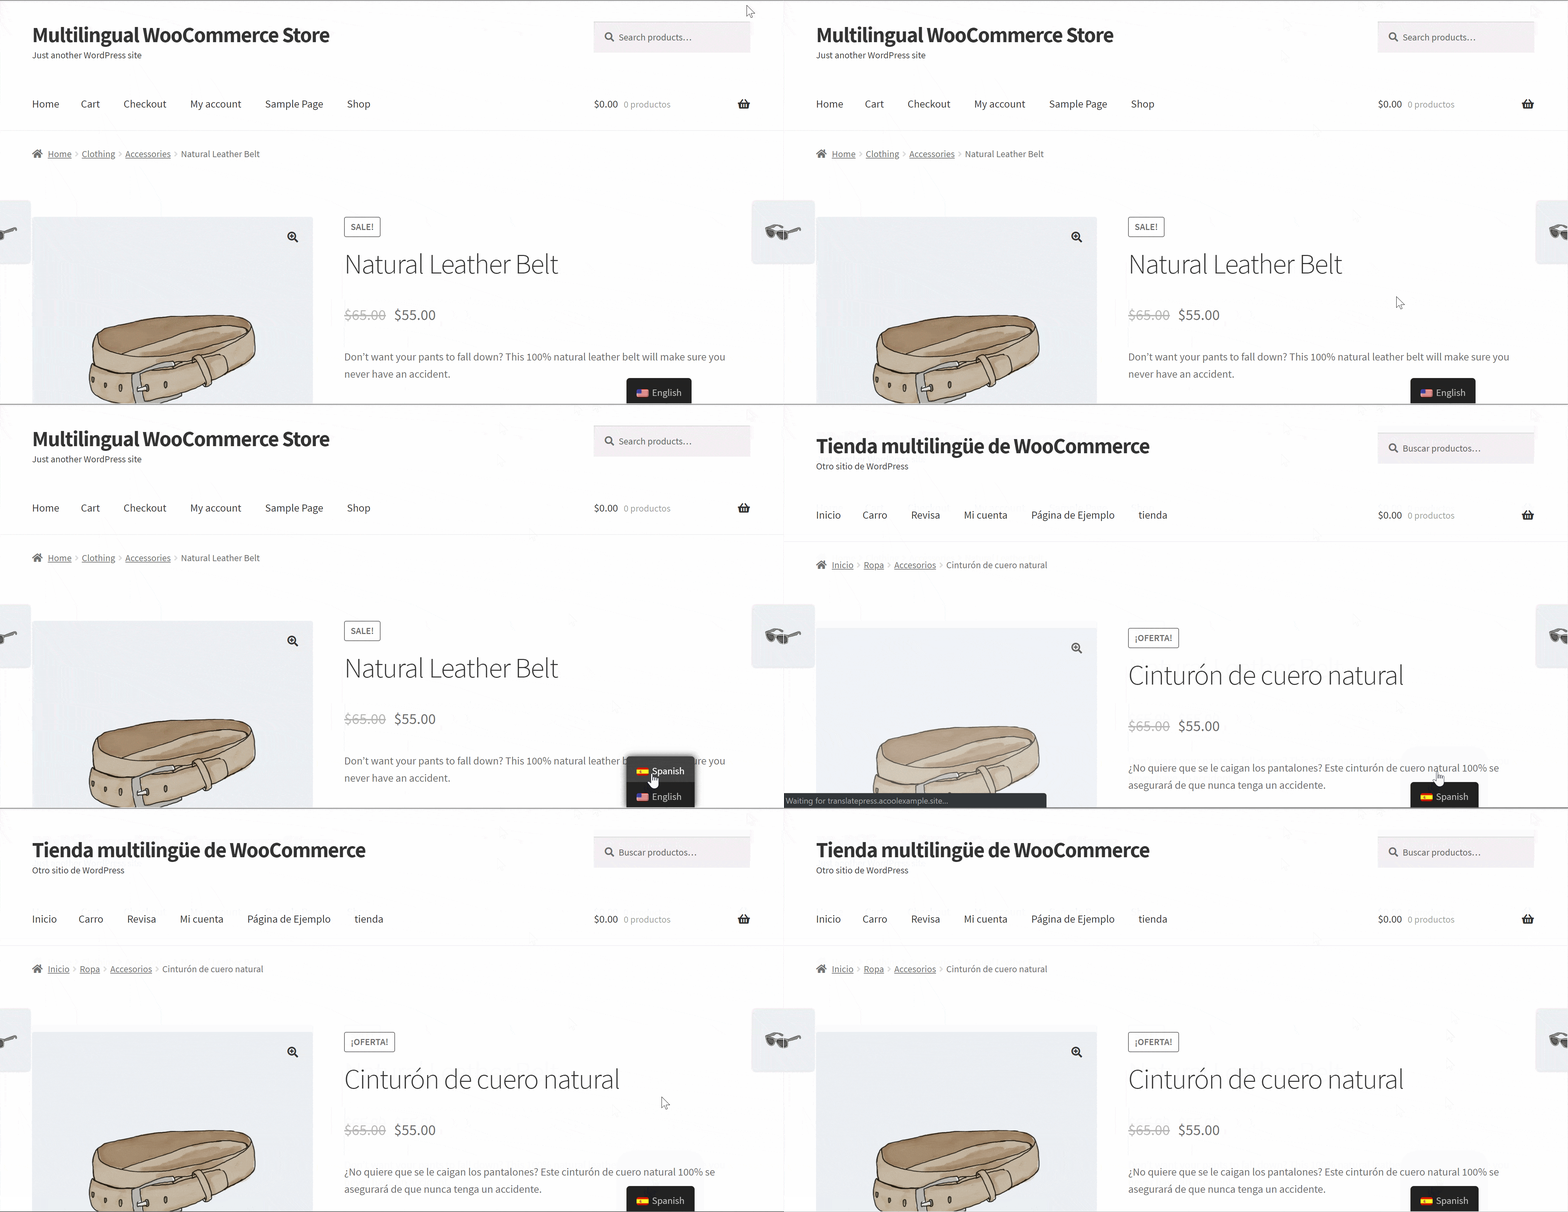
Podrás crear traducciones estáticas y optimizadas para SEO para cada página de producto y de tienda. Y si es necesario, también puedes volver y editar manualmente cualquiera de tus traducciones automáticas utilizando una interfaz de traducción visual sencilla.
¿Listo para empezar a traducir? Vamos a profundizar...
Cómo traducir automáticamente WooCommerce con TranslatePress
Traducir tu tienda WooCommerce de forma automática es increíblemente fácil usando TranslatePress y su función de traducción automática.
Para traducir automáticamente una tienda de WooCommerce, el plugin TranslatePress ofrece una solución rápida y sencilla TranslatePress AI característica.
TranslatePress AI te ofrece traducciones automáticas instantáneas gracias a varios motores de traducción automática neuronal, entre los que se incluyen DeepL, Google Translate y Microsoft Translator.
Gracias a la inteligencia artificial de última generación, TranslatePress AI selecciona el mejor motor de traducción para tus pares de idiomas, lo que da como resultado traducciones más precisas y adaptadas al contexto de lo que permitiría un único servicio de traducción.
Además de TranslatePress AI, TranslatePress te permite traducir toda tu tienda de WooCommerce utilizando tu propia API de Google Translate o tu clave API de DeepL. No obstante, te recomendamos que utilices TranslatePress AI si quieres la forma más fácil y rápida de traducir tu tienda automáticamente.
Así es, para configurar TranslatePress AI no hace falta generar una API ni conectarse a ella. Solo tienes que activar el complemento, elegir los idiomas y habilitar la traducción automática. Así de sencillo.
A continuación, TranslatePress almacenará esas traducciones localmente y te permitirá editarlas manualmente mediante una sencilla interfaz visual de gestión de traducciones, si fuera necesario (más adelante hablaremos de esto con más detalle). Esto te ahorra muchos costes adicionales, al tiempo que garantiza traducciones de alta calidad.
Para mostrar cómo traducir automáticamente WooCommerce, hemos creado una página de demostración utilizando el tema Storefront y los datos de demostración de WooCommerce, pero TranslatePress funciona con cualquier tema de WooCommerce y con cualquier extensión de WooCommerce que estés utilizando.
Para empezar, te explicaremos cómo traducir automáticamente tu tienda de WooCommerce utilizando TranslatePress AI.
Luego, destacaremos algunas otras características que pueden ayudarte a crear un éxito tienda WooCommerce multilingüe.
1. Instalar y activar TranslatePress
Para empezar, debes instalar el plugin TranslatePress en tu tienda de WooCommerce. Aunque hay una versión gratuita de TranslatePress en WordPress.org, necesitas una de las licencias premium para utilizar TranslatePress AI.
Además de darte acceso a TranslatePress AI, las licencias premium te ofrecen muchas otras funciones fantásticas, como un número ilimitado de idiomas, una mejor funcionalidad de SEO multilingüe, cuentas de traductor y mucho más.
Puedes compra tu licencia aquí – Los planes empiezan desde tan solo €99.
Si tu presupuesto es ajustado, siempre puedes utilizar la versión gratuita de TranslatePress, que te permite conectarte a tu propia API de Google Translate. Sin embargo, este método no es tan sencillo como el de TranslatePress AI. No obstante, más adelante te mostraremos cómo utilizar TranslatePress y la API de Google Translate.
Una vez que compres la versión prémium, estarás listo para la parte divertida. Deberás instalar complementos gratuitos y prémium para acceder a Traducción con IA.
Esto es sencillo:
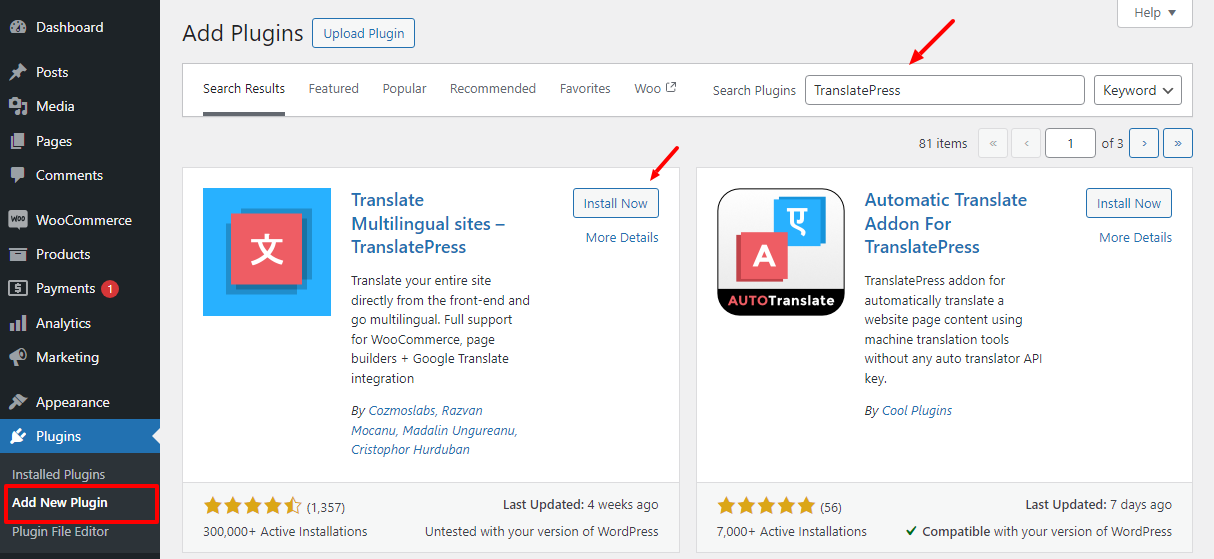
Instalar el Plugin gratuito TranslatePress. Puedes instalarlo como cualquier otro plugin gratuito: ve a Complementos → Añadir nuevo complemento y busca “TranslatePress”.
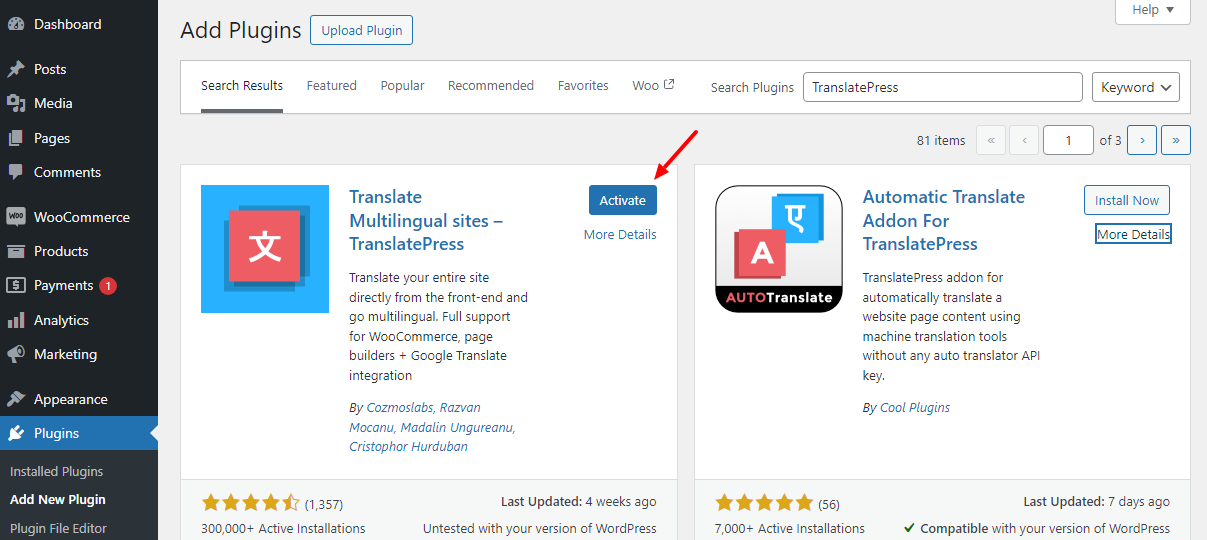
Después de eso, Activar el complemento
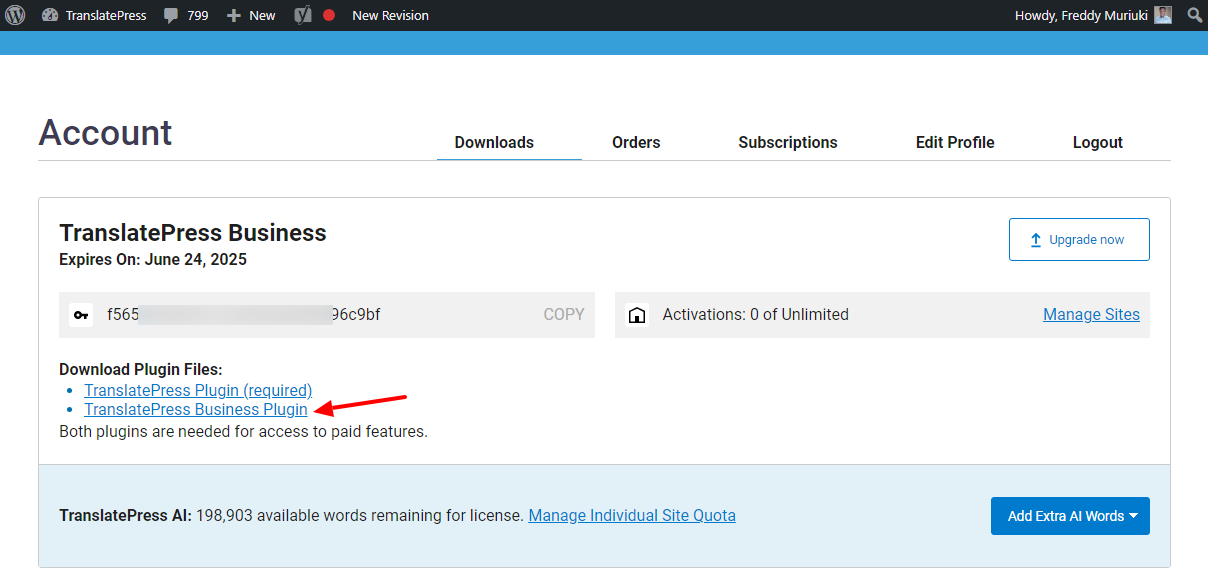
Luego instala el Plugin TranslatePress Premium, que puedes descargar desde tu Cuenta TranslatePress después de haber comprado su licencia.
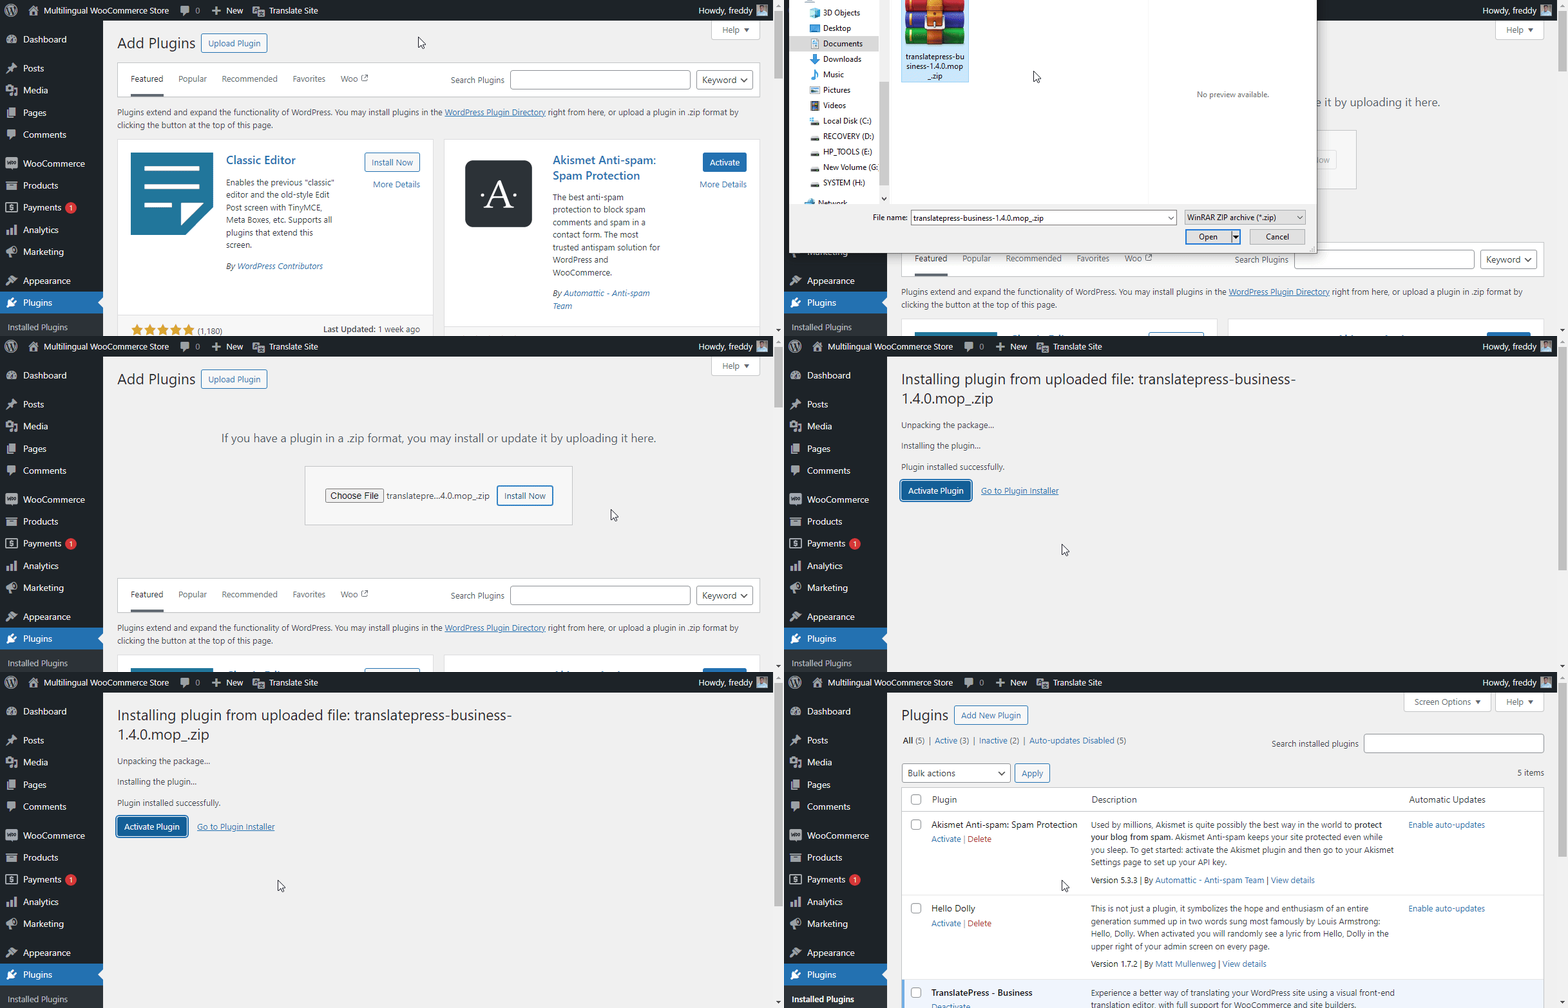
Puedes instalarlo yendo a Complementos → Añadir nuevo complemento y luego haciendo clic Subir plugin para subir el archivo Zip:
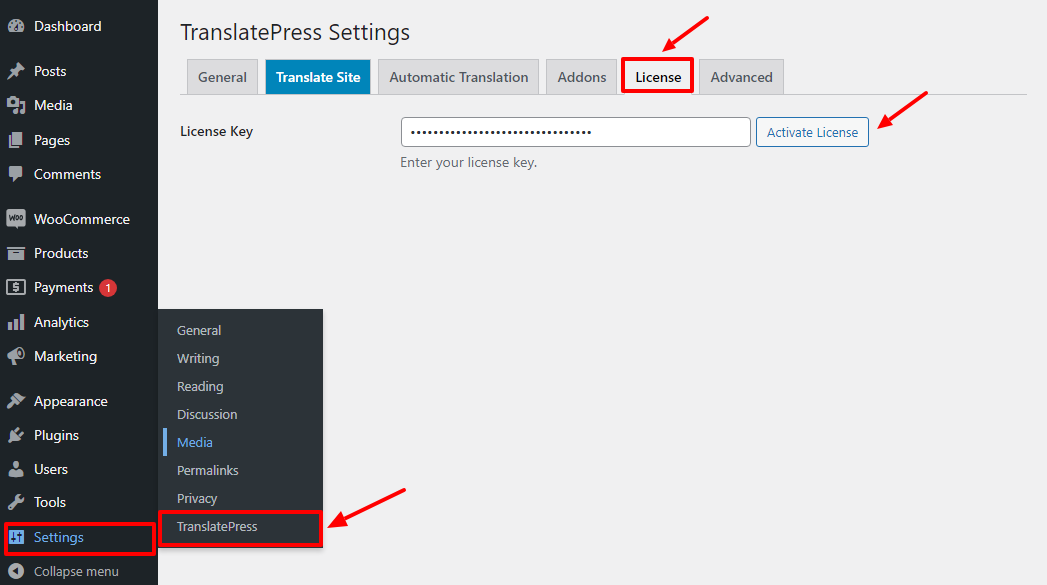
A continuación, debes activar tu licencia premium de TranslatePress, lo cual también es muy sencillo.
- Ir a Configuración → TranslatePress en tu panel de WordPress;
- Seleccionar Licencia pestaña;
- Pega tu clave de licencia en el cuadro. Puedes obtener tu clave de licencia en tu Cuenta TranslatePress;
- Hacer clic en Activar licencia botón.
Después de activar su licencia, está listo para empezar.
2. Elige tus idiomas
Una vez que hayas instalado y activado TranslatePress, el primer paso es elegir los idiomas que quieres ofrecer en tu tienda de WooCommerce.
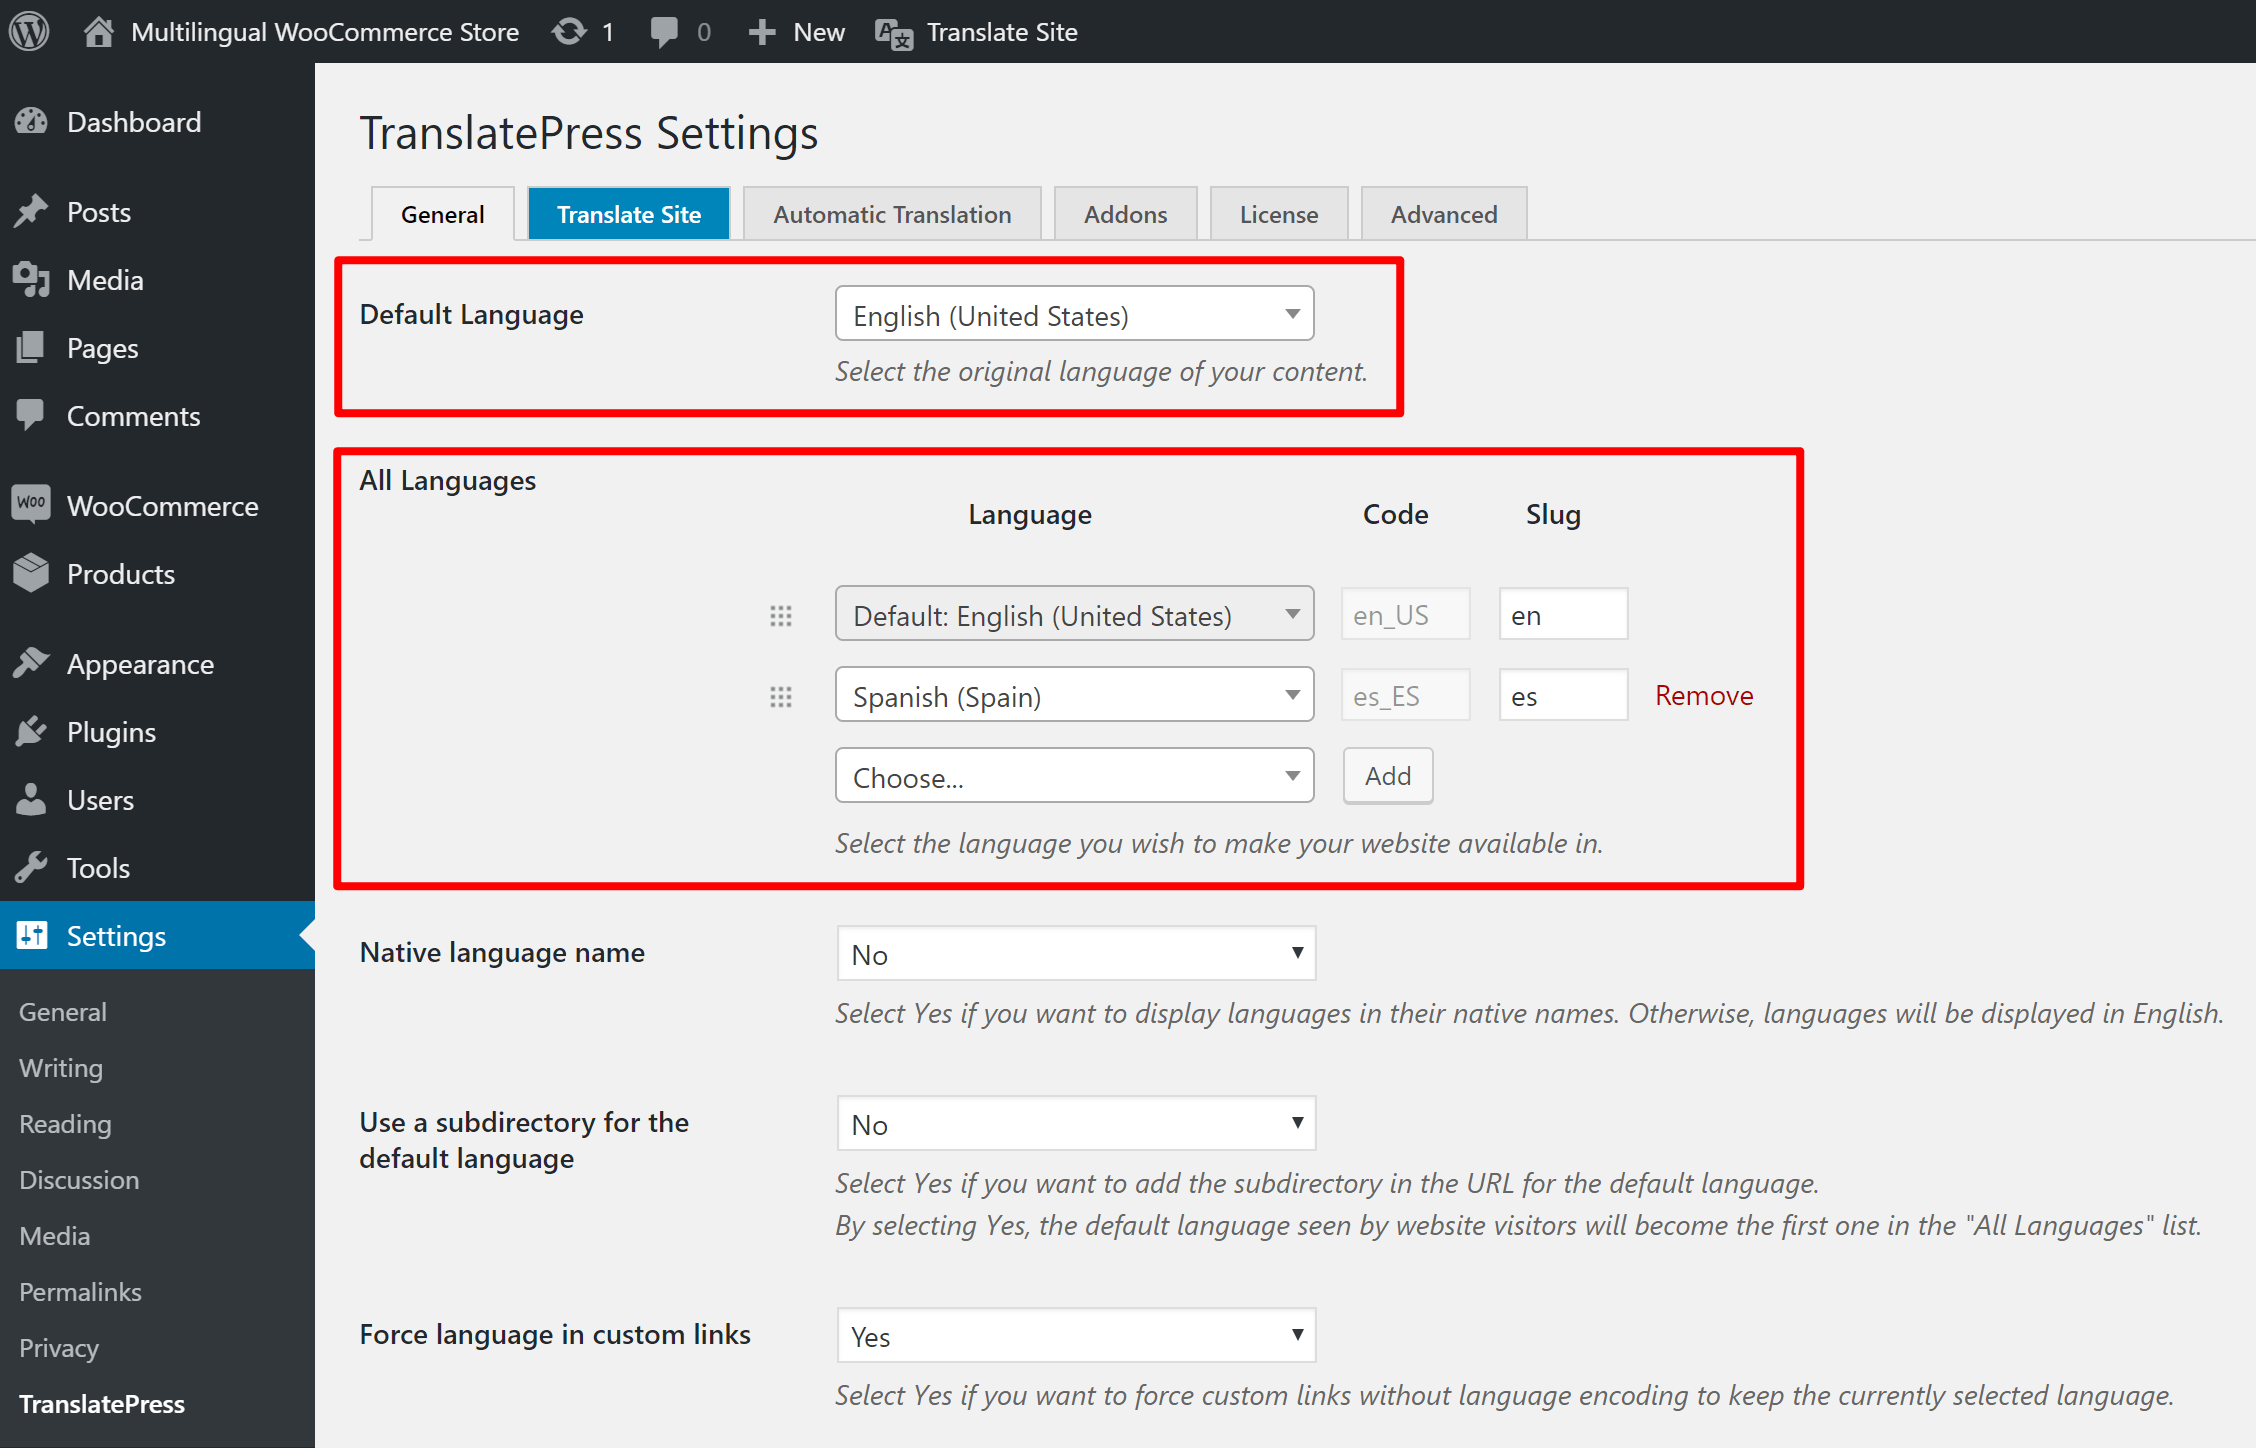
Para hacer eso, ve a Configuración → TranslatePress.
Primero, usa el Idioma predeterminado desplegable para indicar el idioma en el que existe actualmente su tienda.
Luego, usa el Todos los idiomas configuración para seleccionar el o los idiomas a los que deseas traducir automáticamente el contenido de tu tienda.
Por ejemplo, para traducir una tienda en inglés al español, la configurarías así:
Tenga en cuenta que puede elegir varios idiomas con una licencia prémium.
Siéntete libre de hojear todas las demás configuraciones generales (como personalizar la selector de idioma) y asegúrate de hacer clic Guardar cambios en la parte inferior de la página una vez que hayas terminado.
3. Habilitar la traducción automática
Activar la traducción automática a través de TranslatePress AI es muy sencillo. En la misma página de configuración, ve a la Traducción automática pestaña, elegir Sí abajo de la Activar Traducción Automática desplegable y guarde sus cambios:
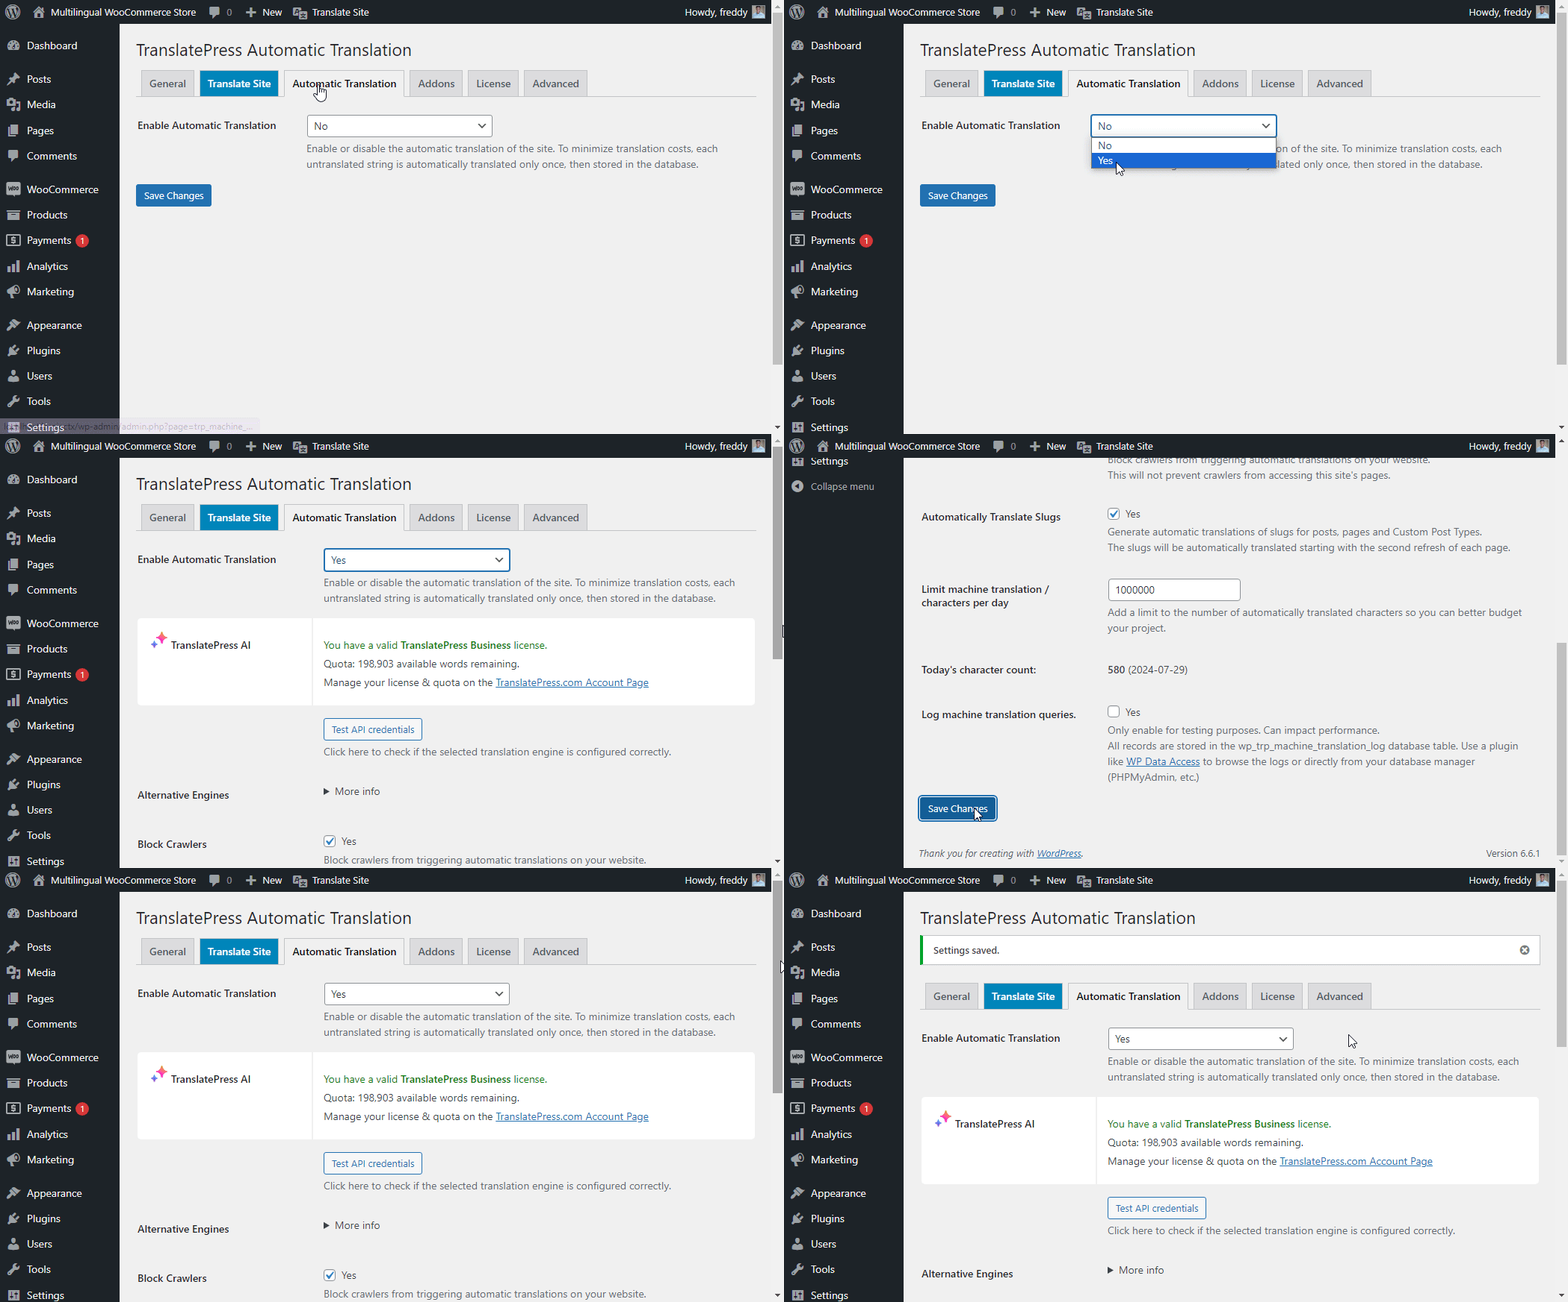
¡Y ya está! A partir de ahora, TranslatePress AI traducirá automáticamente toda tu tienda de WooCommerce utilizando el servicio de traducción automática más adecuado para tu caso.
Para ver los resultados, visite su sitio web en la interfaz pública y elija su idioma preferido, como se muestra a continuación.
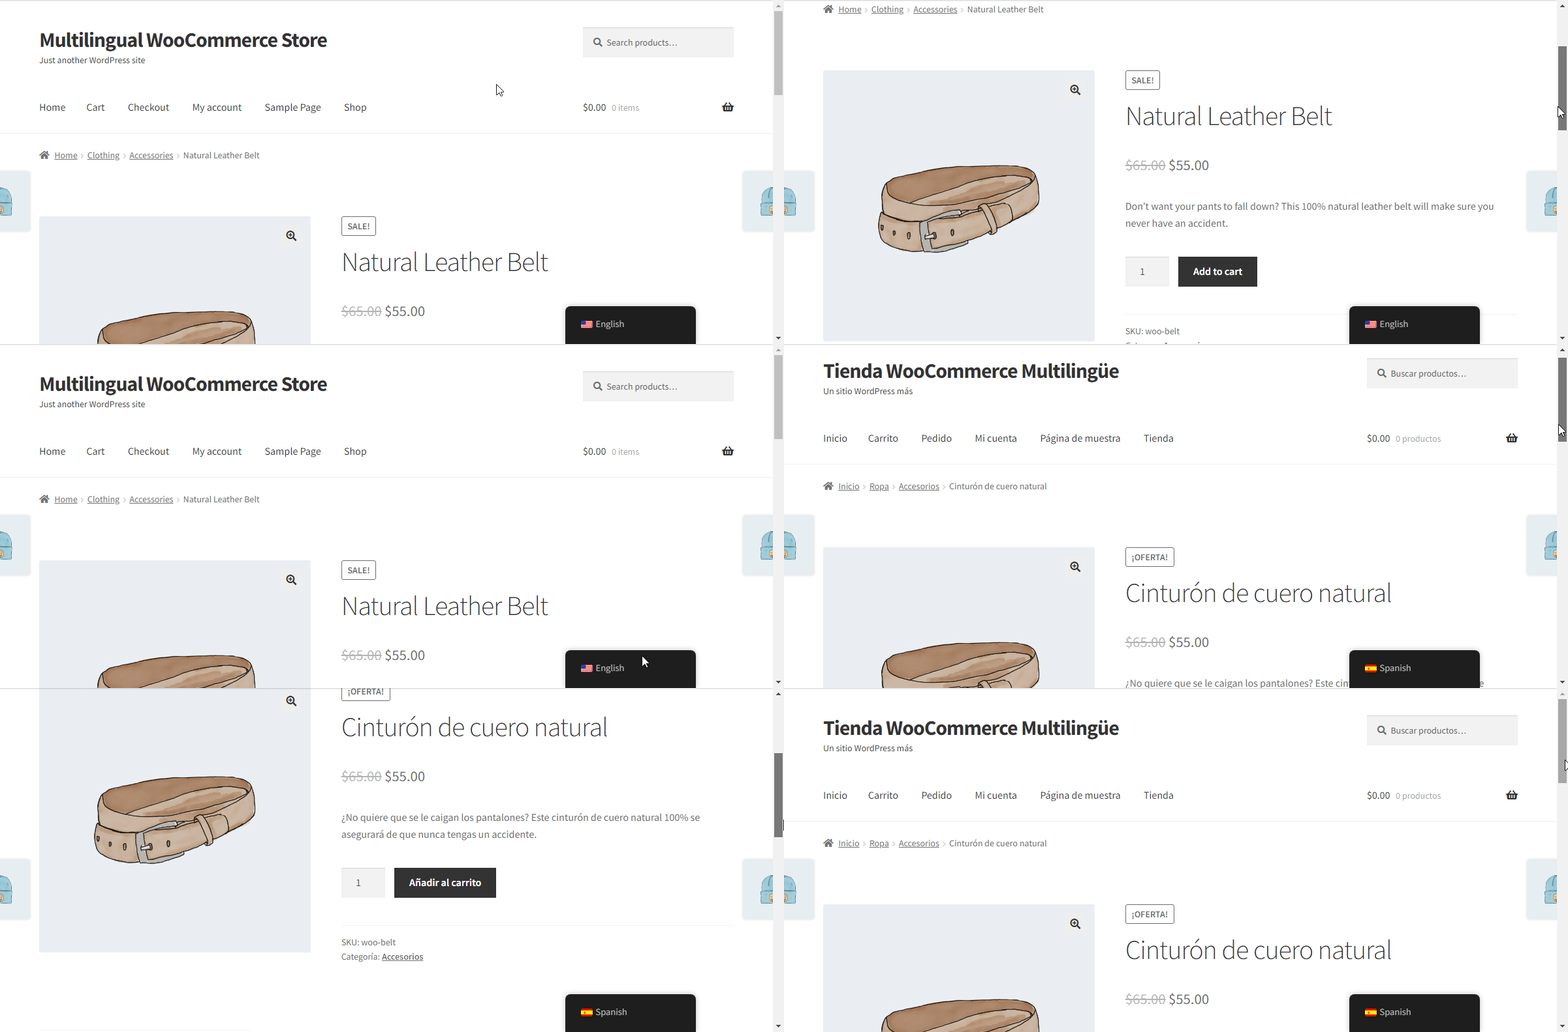
Ahí lo tienes. Tan sencillo como A, B, C.
Algunas notas...
Cuando habilite la traducción automática, debería ver la cuota de palabras de traducción gratuita asociada a su licencia:
- Personal – 50.000 palabras gratis.
- Business – 200.000 palabras gratis.
- Developer – 500 000 palabras gratis.
Estas deberían ser suficientes para la mayoría de los sitios, lo que significa que no hay costos adicionales al usar traducción automática.
Sin embargo, si alguna vez necesita exceder la asignación gratuita asociada con su licencia, también puede comprar más palabras en Tu área de usuario de TranslatePress, con un precio inicial de 24 € por 100.000 palabras adicionales.
¿Y si tu presupuesto es ajustado? Aún así, puedes traducir tu página web automáticamente utilizando las API de TranslatePress y Google Translate.
Cómo traducir automáticamente tu tienda de WooCommerce utilizando TranslatePress y Google Translate
Esta opción es ideal para principiantes y pequeñas empresas. Además, resulta tediosa y puede que no funcione en algunos casos (como cuando Google Translate exige una tarjeta de crédito para verificar tu cuenta), por lo que recomendamos TranslatePress AI.
Además, en la versión gratuita de TranslatePress solo puedes elegir un idioma. Tampoco podrás disfrutar de las fantásticas funciones que incluye una licencia de TranslatePress.
Dicho esto, sigamos adelante.
Después de elegir tus idiomas, tal como hicimos antes...
1. Seleccione su servicio de traducción automática
Debes elegir un Alternativa Motor de traducción después de habilitar la traducción automática.
TranslatePress ofrece dos servicios diferentes que puedes utilizar para traducir automáticamente WooCommerce:
- API Google Translate – Se trata de la misma API de traducción que utiliza Google Translate.
- DeepL – muchas personas consideran Las traducciones de DeepL para ser más preciso.
TranslatePress te permite utilizar Google Translate de forma gratuita, mientras que DeepL está disponible en el versiones premium de TranslatePress.
Aunque TranslatePress en sí no te cobra por utilizar Google Traductor, Google cobra $20 por cada millón de caracteres que se traduzcan mediante la API.
Al mismo tiempo, Google te ofrece un crédito de $10 al mes, lo que te permite traducir unos 500 000 caracteres al mes de forma gratuita, lo que debería ser suficiente para la mayoría de las tiendas de WooCommerce.
Es importante tener en cuenta que TranslatePress solo tiene que traducir tu contenido una vez, lo que ayuda a mantener sus costos bajos, significativamente.
Así que, si tu tienda tiene 1 millón de caracteres, pagarías ~$20 como tarifa única a la API de traducción para traducir ese contenido. Luego, no hay tarifas continuas (más allá de traducir cualquier contenido nuevo que agregues a tu tienda).
Para controlar aún mejor tu presupuesto, TranslatePress te permite establecer un número máximo de caracteres que se pueden traducir al día. De este modo, evitas sorpresas en el presupuesto y puedes fijar una cantidad máxima que estés dispuesto a gastar en traducción automática cada día.
Para este tutorial, utilizaremos la API de Google Translate, ya que está disponible en la versión gratuita de TranslatePress y Google te permite traducir hasta 500 000 caracteres de forma gratuita:
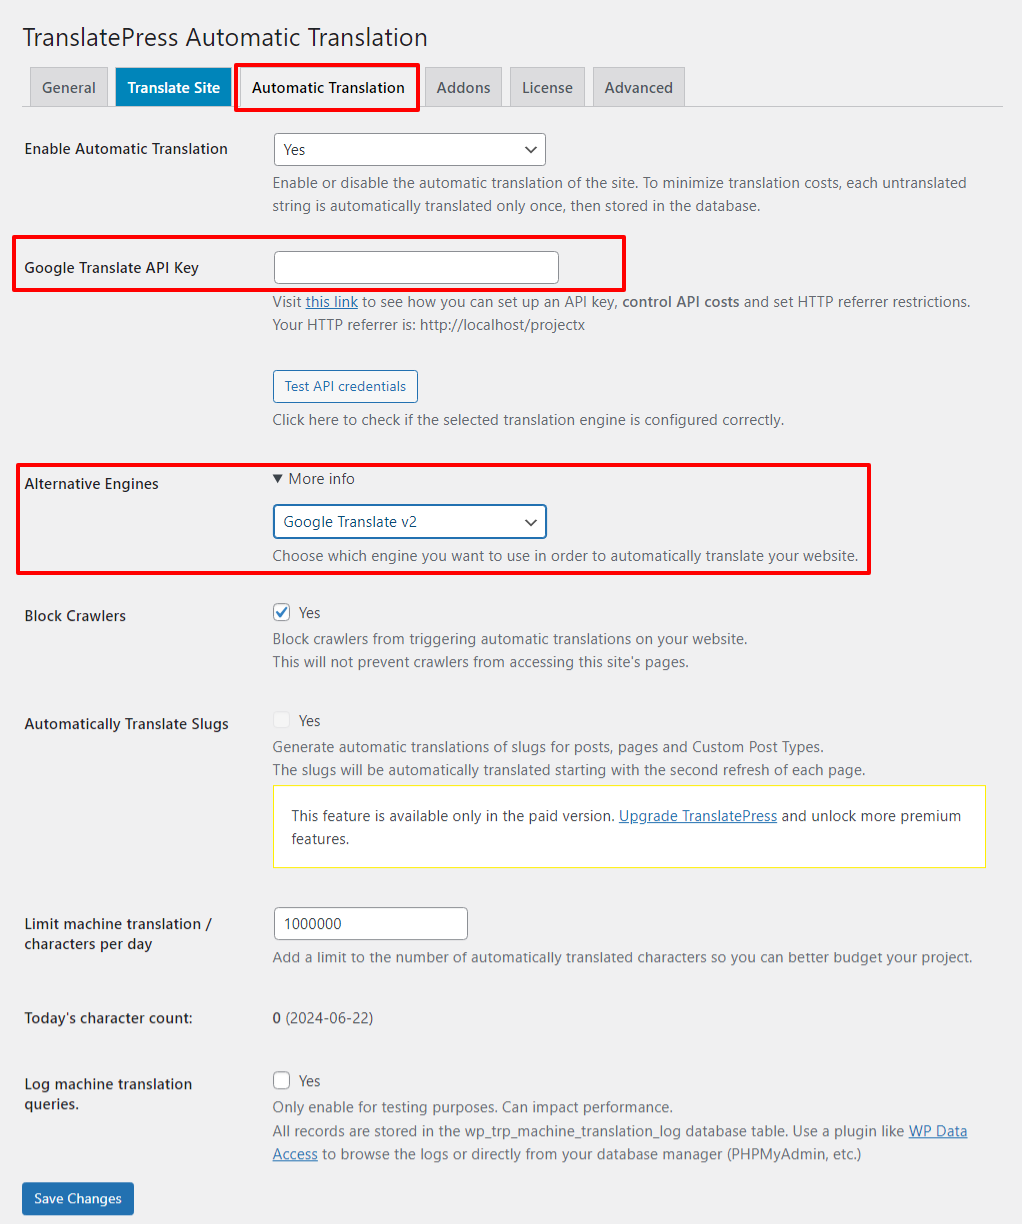
2. Generar una clave API de Google Translate
A continuación, necesitas generar una clave API de Google Translate desde la Plataforma de Google Cloud API y Servicios Panel de control. Esto es lo que permite que tu sitio web se conecte al servicio Google Translate.
Esta es la parte más complicada de todo el proceso, pero te guiaremos paso a paso...
Para empezar, abre la consola y crear un nuevo proyecto si es necesario.
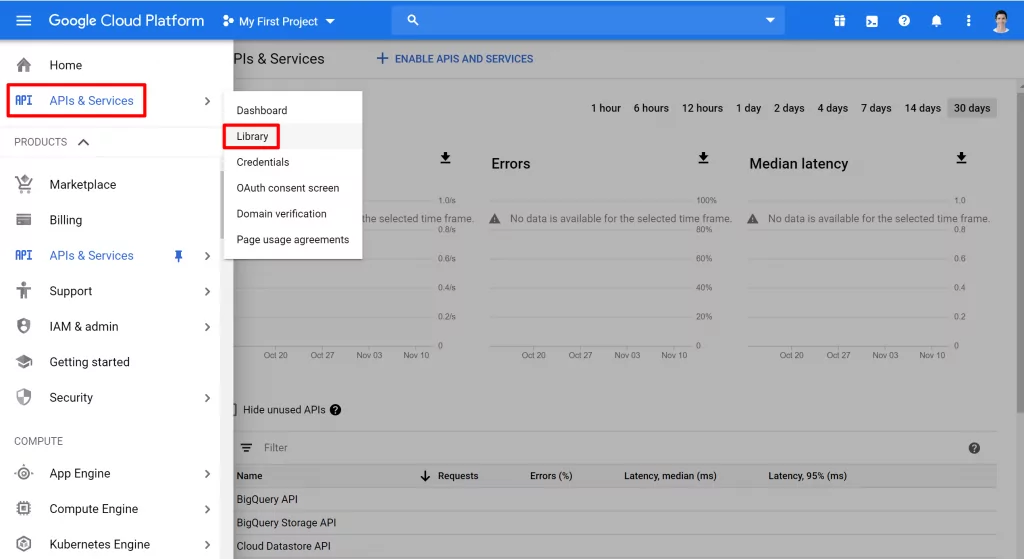
Con su proyecto abierto, haga clic en el icono de hamburguesa para abrir el menú. Luego, vaya a APIs y servicios → Biblioteca:
Busque “Traducir” y seleccione el API de Traducción en la Nube resultado
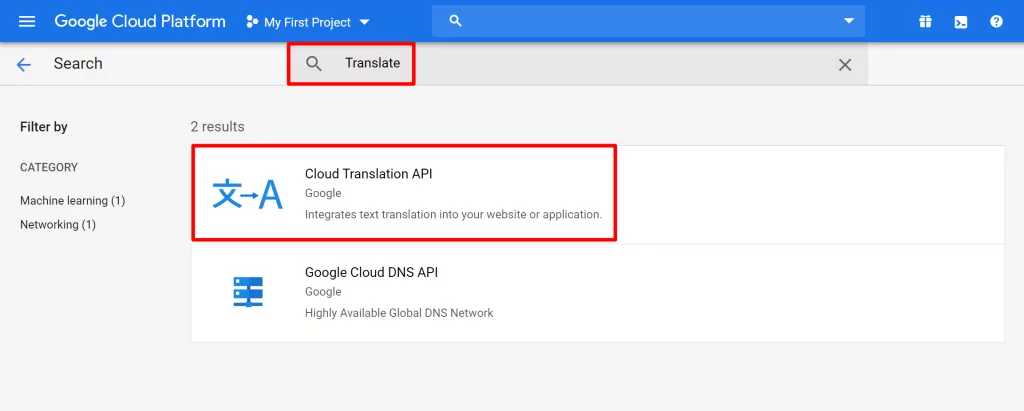
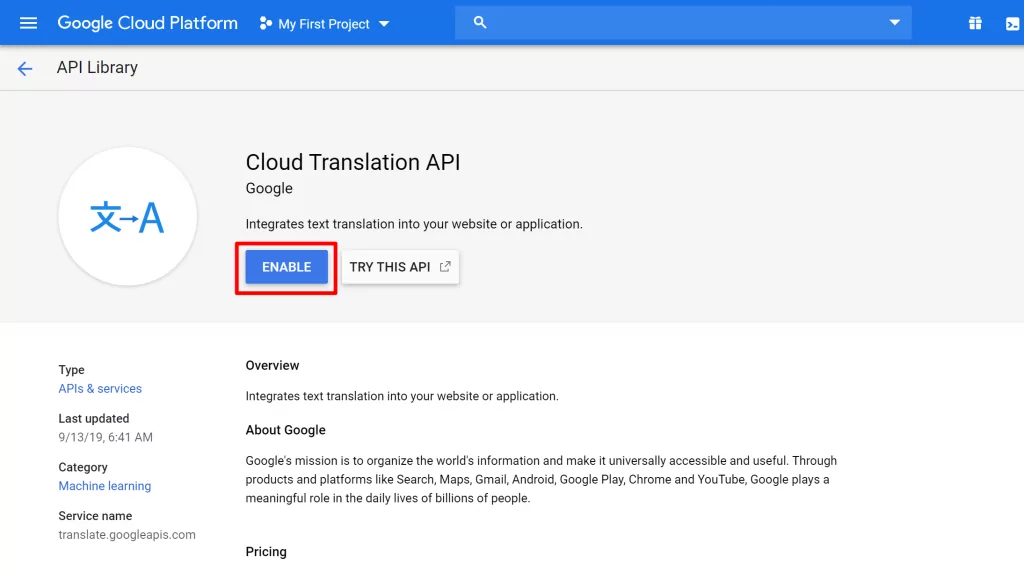
Entonces, Habilitar el servicio:
Para controlar mejor tu facturación, te recomendamos encarecidamente que también configures límites de uso. TranslatePress también puede ayudarte a configurar esos límites desde tu panel de control de WordPress, pero te recomendamos que hagas ambas cosas.
Para establecer cuotas, vaya a la Cuotas establece y define tus límites:
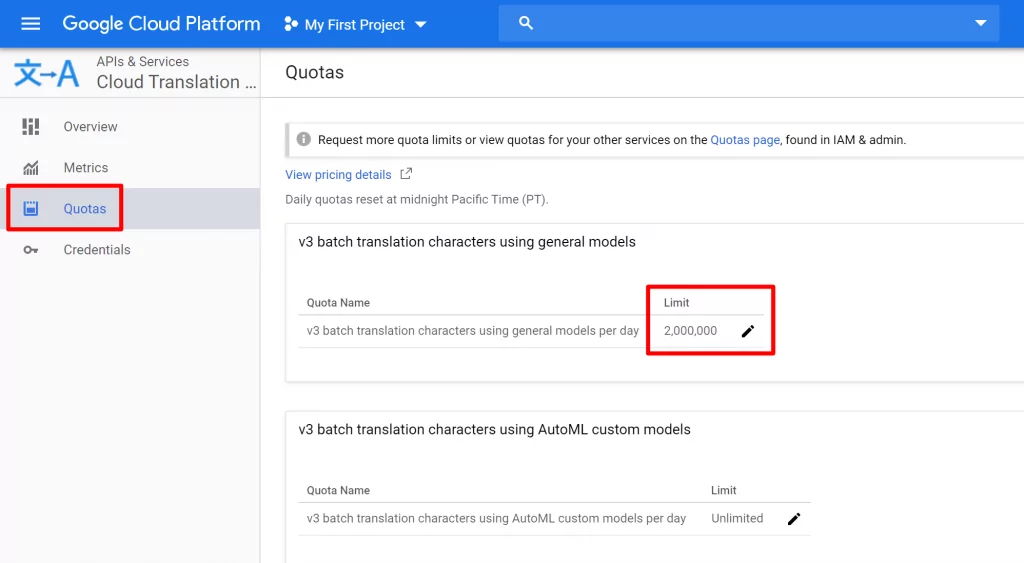
Recuerda que la API Google Translate cobra $20 por cada millón de caracteres. Así que, si fijas tu límite en un millón, nunca pagarás más de $20 al día. Y recuerda, solo pagas una vez por la traducción porque TranslatePress almacena localmente tu contenido traducido.
A continuación, abre el menú y ve a APIs y servicios → Credenciales:
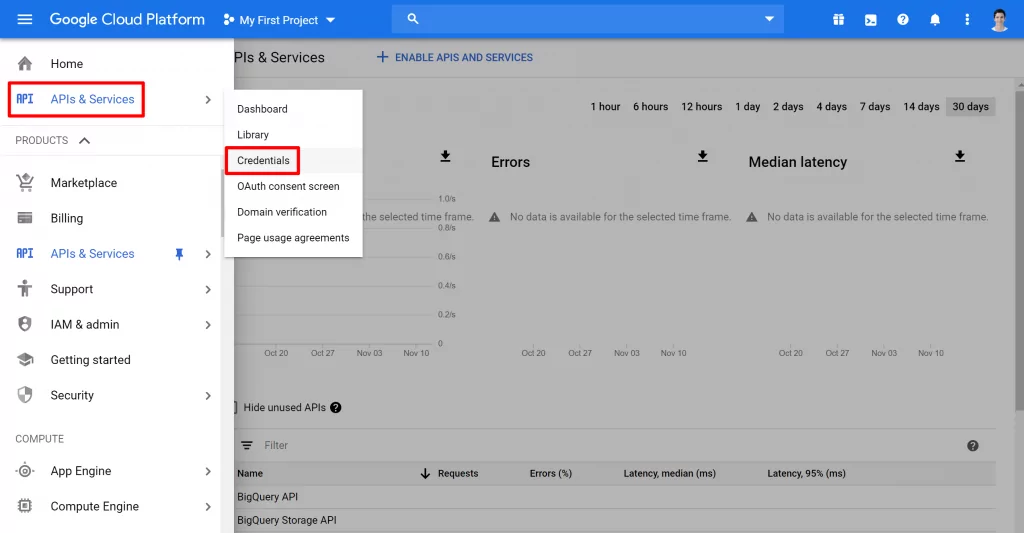
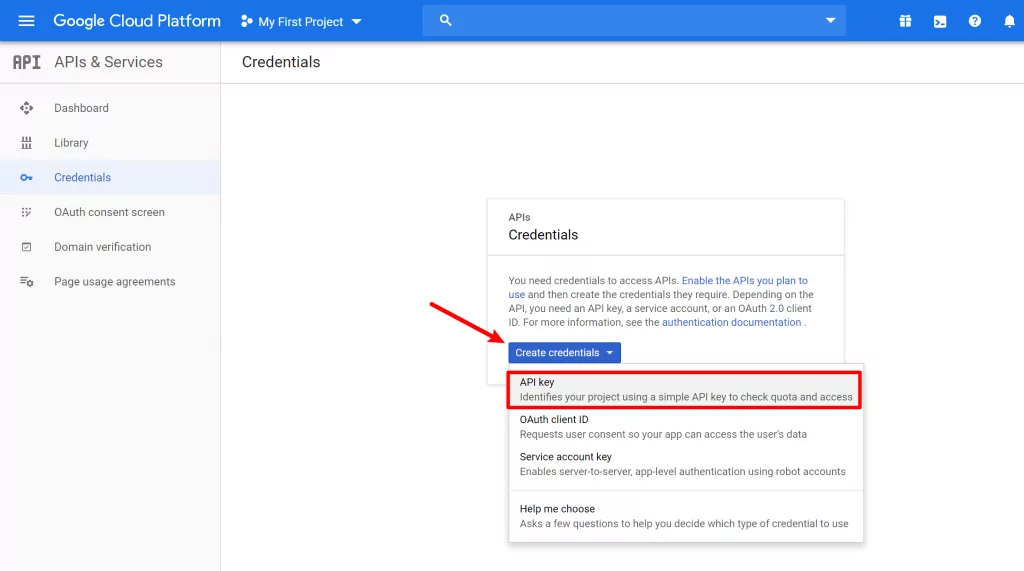
En el Credenciales interfaz, haz clic en el botón para Crear credenciales y seleccionar Clave de API del menú desplegable:
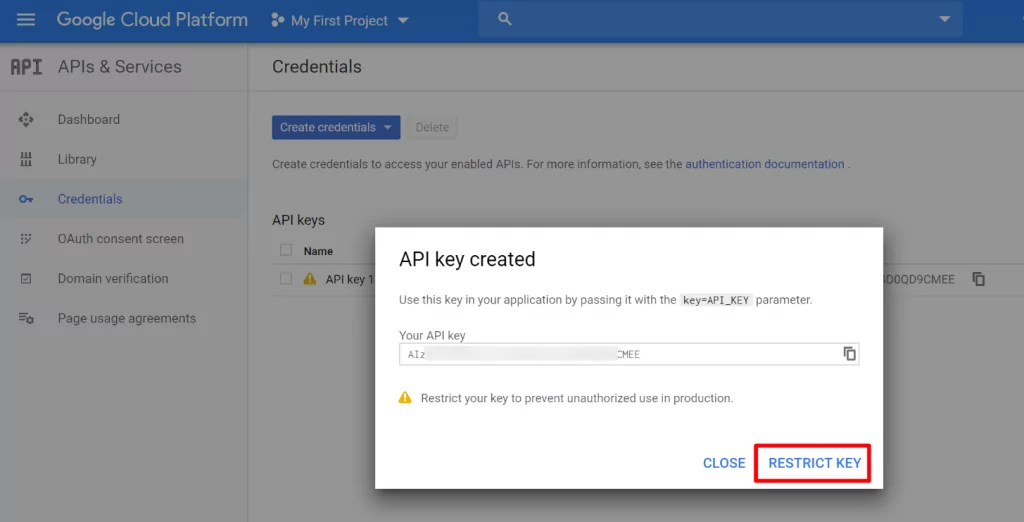
Debería ver una ventana emergente que contiene su clave de API; haga clic en el botón para Clave de restricción:
En la siguiente pantalla, elige Referencias HTTP debajo Restricciones de aplicaciones y pega la URL de tu instalación de WordPress:
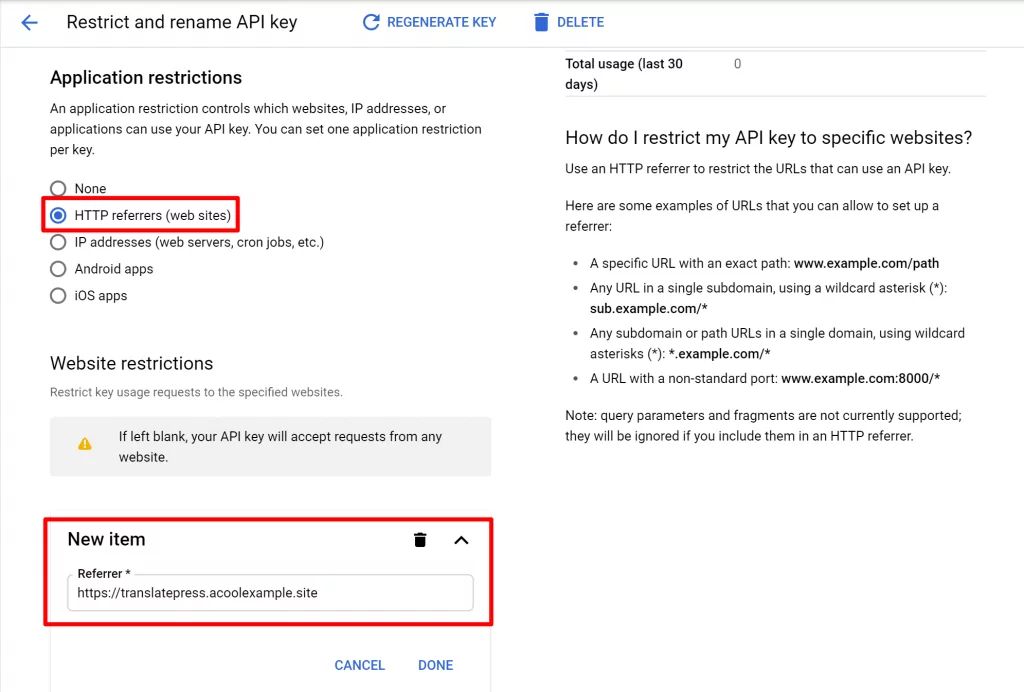
Si no estás seguro de qué URL poner, puedes encontrar esta información en el Traducción automática pestaña de la configuración de TranslatePress.
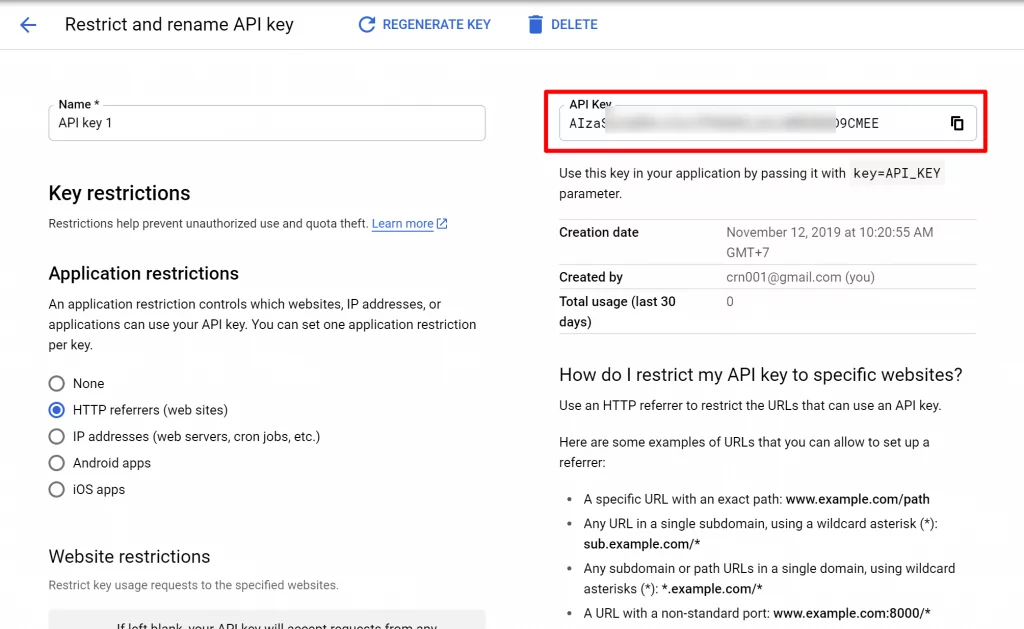
Guarde sus cambios. Luego, mantenga esta ventana a mano porque necesitará su clave de API en el siguiente paso:
3. Añade la clave API a TranslatePress para traducir automáticamente WooCommerce
Ahora que ha configurado su clave de API, está listo para traducir su tienda de WooCommerce automáticamente.
Copia la clave de API desde tu panel de Google Cloud Platform y pégala en el Clave de API de Google Translate casilla de la configuración de TranslatePress.
También puedes establecer otro límite en TranslatePress para controlar tu presupuesto:
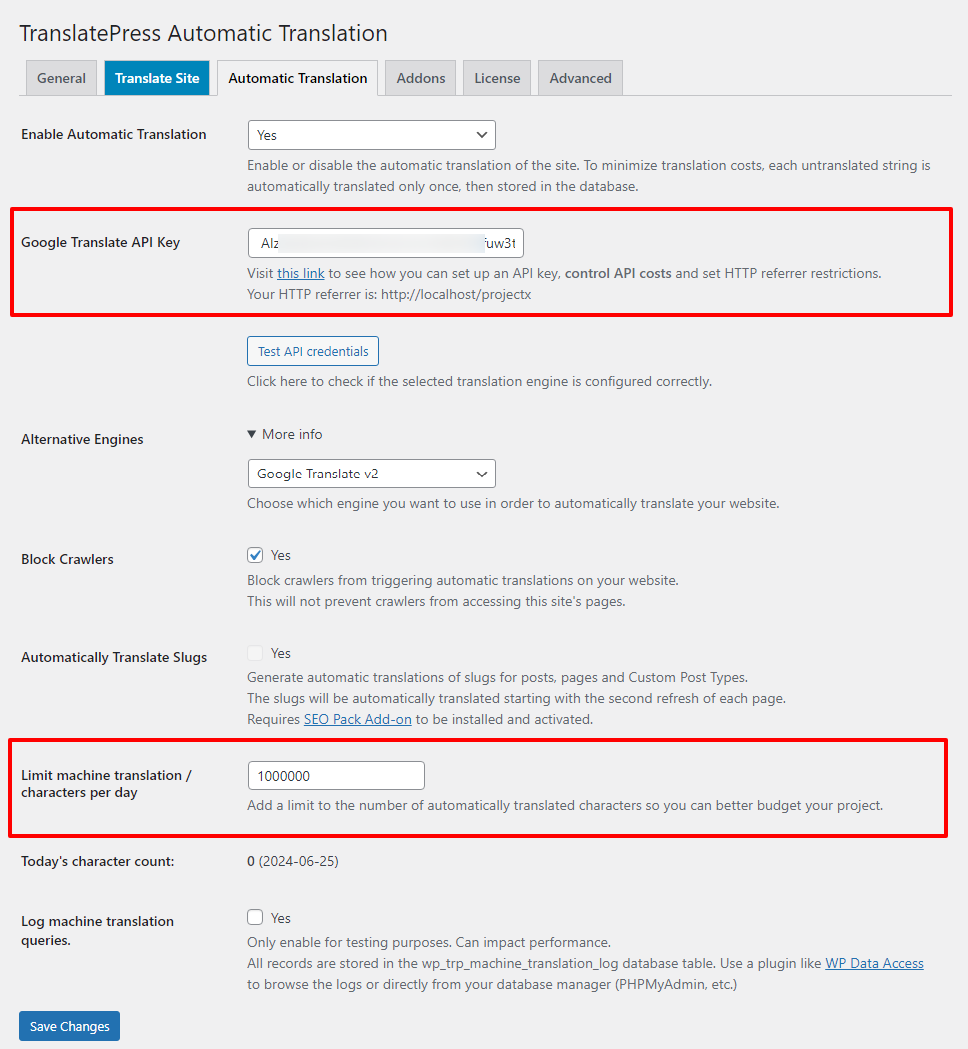
En cuanto guardes los cambios, TranslatePress traducirá automáticamente 100% del contenido de tu tienda al idioma que hayas seleccionado en el paso #1, incluyendo tu…
- Páginas de tienda y archivo
- Páginas de producto individual
- Página del carrito
- Página de pago
- Etc.
Cómo refinar manualmente tus traducciones automáticas
En este momento, tu tienda ya debería estar totalmente traducida mediante traducciones automáticas de la API de Google Translate.
Si quieres editar manualmente cualquiera de esas traducciones, TranslatePress ofrece una interfaz visual desde la que puedes modificar cada fragmento de texto traducido.
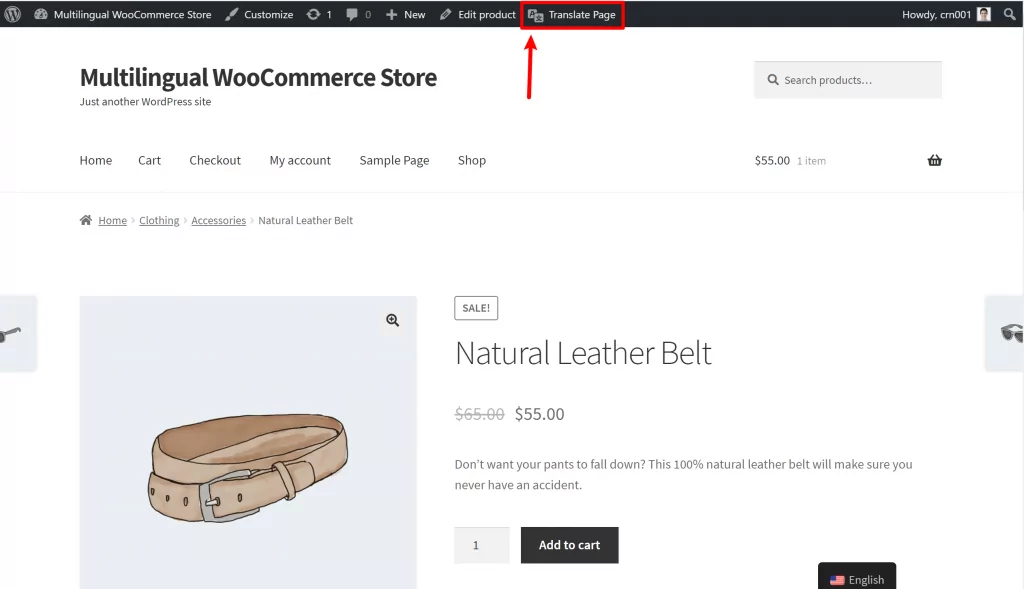
Para abrir el editor de traducción manual, ve a cualquier página o producto de tu tienda y haz clic en Traducir página botón en la barra de herramientas de WordPress:
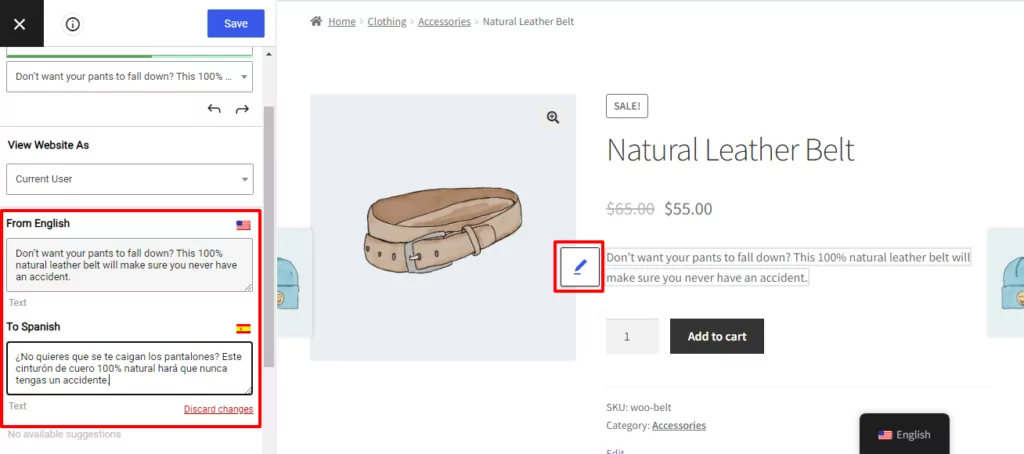
Para editar cualquier cadena de texto, puedes pasar el cursor sobre ella en la vista previa en vivo y hacer clic en el icono del lápiz. A continuación, podrás editar la versión de traducción automática en la barra lateral:
Si pasa el cursor sobre un elemento y ve un icono de lápiz verde, eso indica que la cadena se utiliza en varias partes de su sitio. Estas son cadenas dinámicas o cadenas de gettext, procedentes de tu tema listo para traducir o un plugin. Ejemplos comunes de WooCommerce son los…
- Botón de añadir al carrito
- Insignias de ofertas
- Metadatos
- Etc.
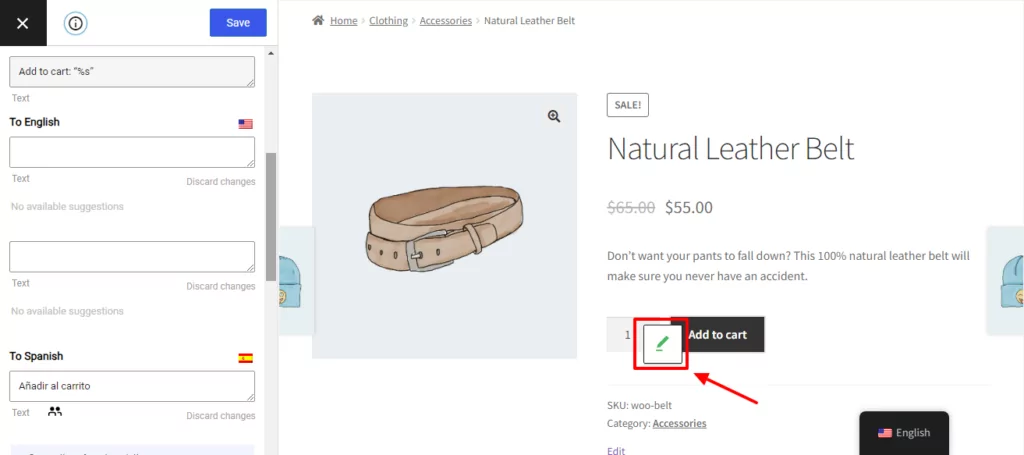
Cuando editas cualquiera de esos elementos, el cambio se actualizará automáticamente en todas las páginas donde se use ese elemento.
También puede utilizar esta interfaz para editar otros elementos, incluidos:
Mejora tu SEO multilingüe para WooCommerce
La versión gratuita de TranslatePress te permite utilizar la traducción automática para traducir todo el contenido de la interfaz de usuario de tu tienda WooCommerce, pero si quieres que tus páginas de productos y de la tienda traducidas aparezcan en los resultados de motores de búsqueda como Google, quizá te interese el complemento SEO Pack para TranslatePress.
Con el complemento SEO Pack, también podrás traducir información SEO importante como:
- Producto Slugs de URL
- Títulos SEO y metadescripciones para tus páginas de productos y de tienda
- Etiquetas alt de imágenes de productos
- Etiquetas Open Graph de producto para compartir en varios idiomas en Facebook
- El mapa del sitio multilingüe de su tienda
Puedes conseguir el Paquete SEO complemento como parte del Plan Personal – cómpralo aquí.
Considera DeepL para una mejor traducción automática
Como se ha mencionado anteriormente, TranslatePress también es compatible con la API de traducción automática de DeepL.
Muchos consideran que la calidad de las traducciones de DeepL es superior a la de Google Translate. Por ejemplo, en una prueba a ciegas (patrocinado por DeepL), los traductores prefirieron las traducciones de DeepL sobre otros servicios por un factor de 3:1.
DeepL cobra una tarifa fija de €4,99 al mes. más €20 por cada millón de caracteres, lo que lo hace un poco más caro que el Google Translate, aunque no mucho más.
DeepL está disponible en Empresas y desarrolladores planes. Una vez que descargues e instales el complemento de traducción automática de DeepL, podrás sigue estas instrucciones para configurar DeepL.
Actualización: Todas las versiones premium de TranslatePress incluyen ahora TranslatePress AI, que se integra con Google Translate, DeepL y Microsoft Translator sin necesidad de generar claves de API. Esto hace que la traducción automática del contenido de tu página web sea mucho más fácil y rápida.
Traducir WooCommerce Automáticamente Hoy
Si quieres crear una tienda WooCommerce multilingüe, traducirla automáticamente con TranslatePress es una forma estupenda de empezar.
TranslatePress Multilingüe
El uso de la traducción automática te proporciona una base sólida para todas las traducciones de tu tienda. Pero, al mismo tiempo, también puedes revisar y pulir manualmente las páginas más importantes si es necesario.
Para empezar, sigue este tutorial. A continuación, si te gustan los resultados, plantéate consultando los planes prémium para un SEO multilingüe mejorado, acceso a DeepL, detección automática del idioma del usuario y más.
¿Todavía tienes preguntas sobre cómo traducir WooCommerce automáticamente? ¡Déjanos saber en los comentarios!
Si encontraste útil esta publicación, por favor visita nuestro Canal de YouTube, donde subimos constantemente tutoriales en video cortos y fáciles de seguir. También puedes seguirnos en Facebook y X ser el primero en enterarte cada vez que publicamos.

Hola, ¿ofrecéis también traducción automática de los correos electrónicos para las notificaciones estándar de WooCommerce? Por ejemplo: un cliente inglés recibe los correos de los pedidos en inglés, uno italiano en italiano, uno francés en francés, etc.
Yo también estoy esperando esta función… ¡Ojalá TranslatePress la incorpore pronto!