In this post
When you are running an eCommerce store based on WordPress, figuring out how to translate WooCommerce products can be a crucial factor. Offering your store in several languages is a great way to extend your reach and win over new customers.
Thanks to the Internet, these days any online shop can compete globally. If you put your wares online, you can sell to worldwide customers – at least theoretically. In reality, that doesn’t always happen and one of the main reasons for that is whether you have your site translated or not.
As it turns out, language is a major selling factor. 56.2 % of consumers state that the ability to get product information in their own language is more important to them than price. As a consequence, if you translate your offerings (and the rest of your site) into the language of your visitors, you can dramatically increase your chances of turning them into paying customers.
This article will tell you exactly how to do that. In the following, we will go over how to translate different parts of your WooCommerce products including product title, description, and category. You will also learn how to translate product attributes of variable products, strings included in the WooCommerce plugin as well as the product URL and page title.
If you need to save some time, we’ve also prepared a short video tutorial for you, explaining how to tackle this:
But if you’ve got enough time on your hands however, I suggest you keep reading since we do go into more detail in this post.
Related: Multilingual SEO – 7 Tips to Rank in All Languages
Here’s What You Will Need
In order to translate WooCommerce products, you need a few things. Naturally, the first prerequisite is that you have set up your e-commerce site with WooCommerce.
Secondly, to follow the steps in this tutorial, you also need to have TranslatePress installed. You can find it for free in the WordPress directory. You can also install it from the WordPress back-end, simply by going to Plugins → Add New and searching for it by name. When you find it in the list, click the Install Now button to get it onto your site.
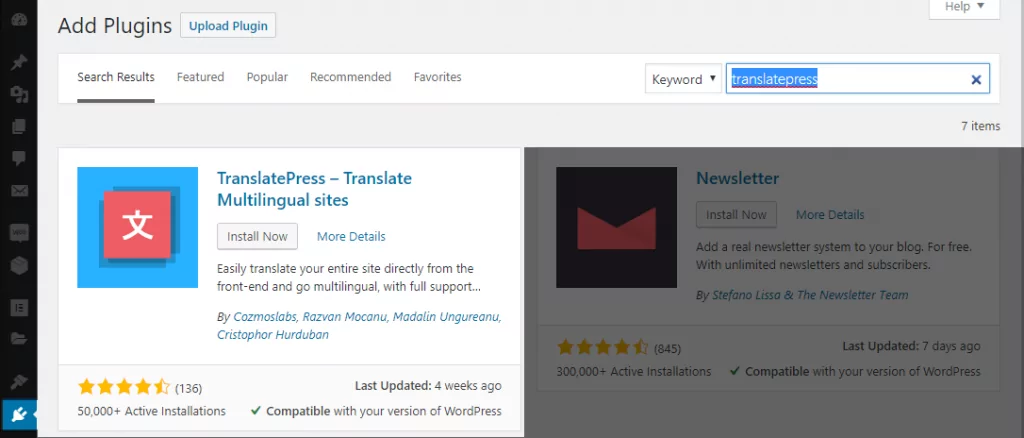
When the plugin is done downloading, don’t forget to activate it. After that, you are good to go.
Just one quick note: for some parts of this tutorial, you also need the SEO Pack (included in TranslatePress Premium). However, I will let you know about that when we get to it.
How to Add a New Target Language to Your Site
Before you can translate your WooCommerce products, you first need to add another language that you want your products available in. First, decide which languages you will add.
In TranslatePress adding a new language is pretty easy. Just go to Settings → TranslatePress and, in the General tab, you’ll find these options:
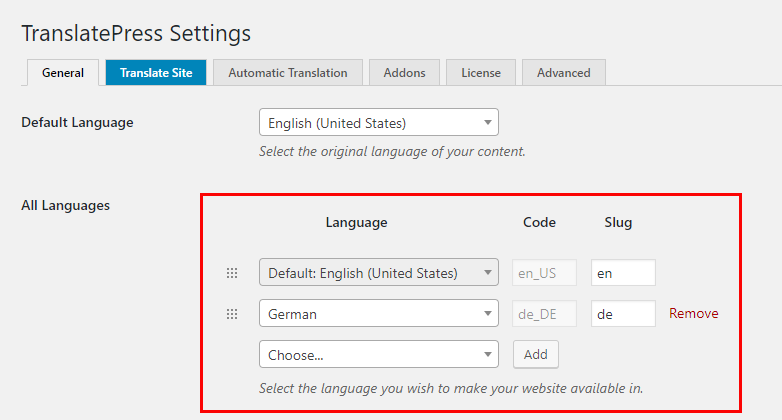
First, at the top of the screen, pick your default language. After that, under All Languages, you are able to add one more if you are using the free version—the pro version comes with unlimited new languages though. Use the drop-down menu to choose a language from the list. In my case, I want German as my site’s second language. Save any changes at the bottom and you are done.
Translate WooCommerce Products with TranslatePress
After this, you are ready to start translating. The first thing we will do is add new language options to a normal WooCommerce product. Here’s how to do that.
Changing the Language of the Product Title
The first thing to do to translate a single product is to go to the front-end of your site and open it in your browser. For this example, we want to translate the sunglasses on the right.
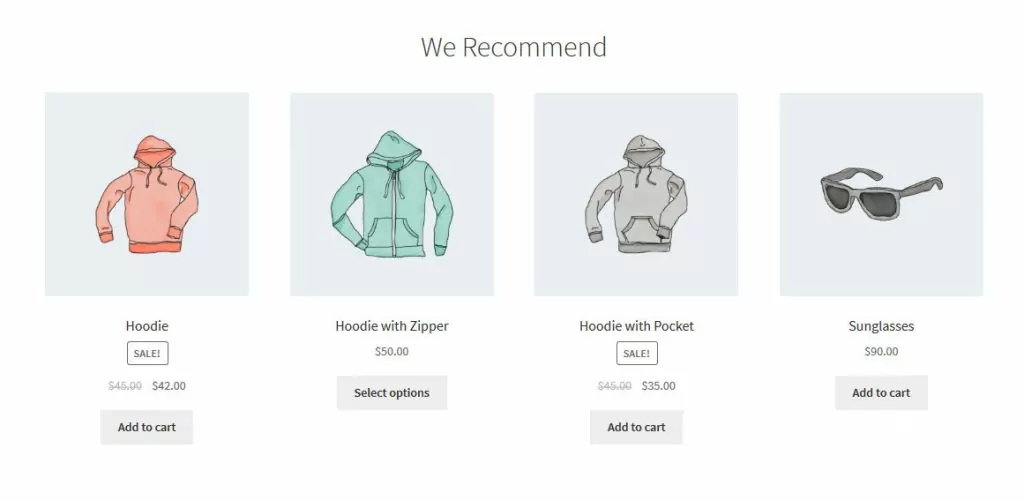
To do so, the first thing you would do is click on that specific product. After that, hit Translate Page in the WordPress admin bar.
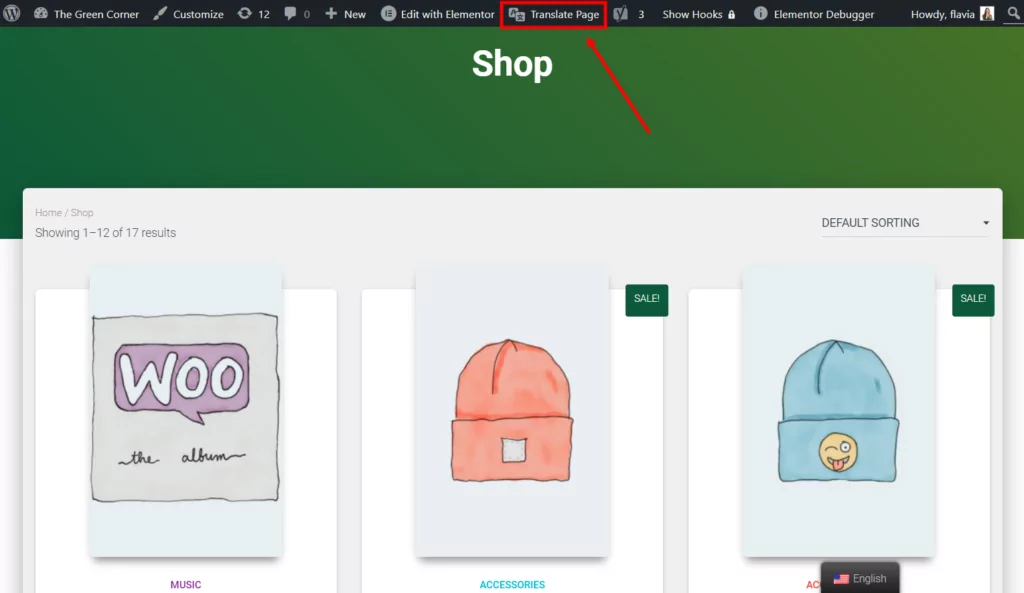
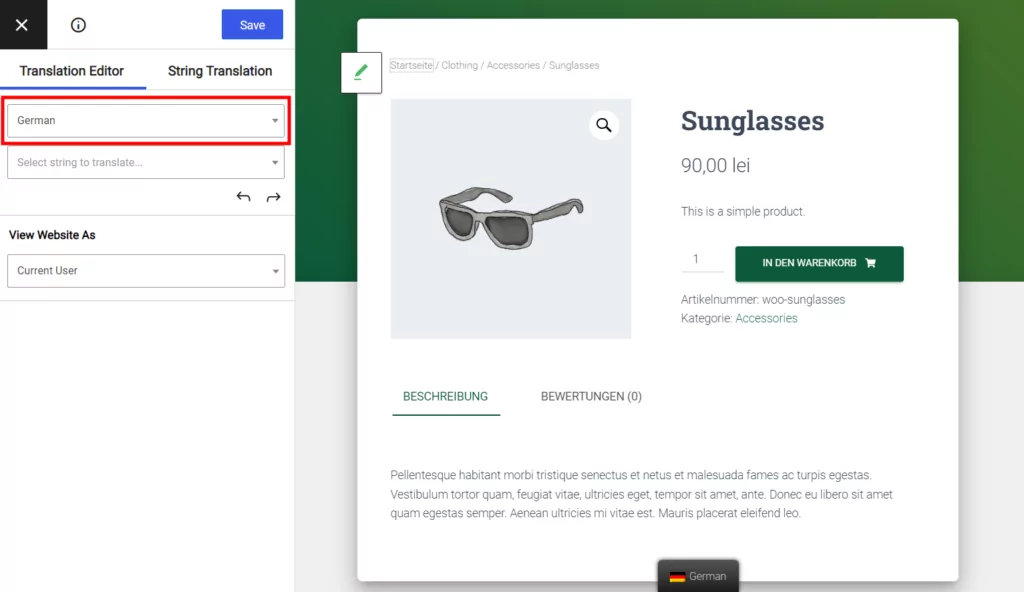
This gets you to the main translation screen. The first thing you want to do here is, using the drop-down menu at the very top left, choose the language you are translating into. This way, you will be able to see the changes on your site instantly.
When you now hover over the product name, a little blue icon appears.
Click it and you will see the original string on the left in the From English box.
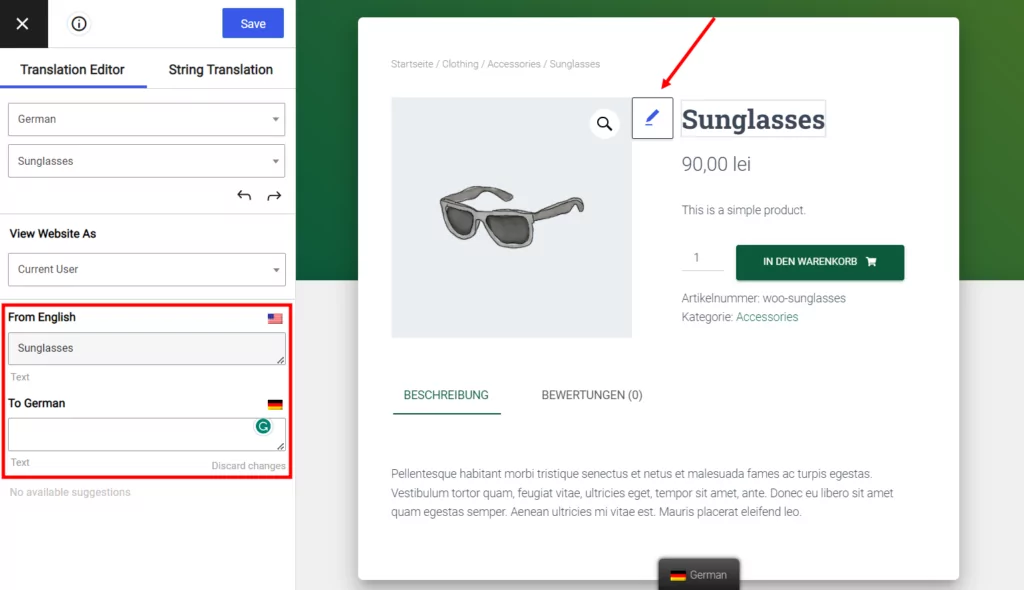
To add a translation for another language, simply insert it into the box at the bottom, which is for the language you will be translating into. When you then hit Save at the top, the page will automatically show the title on the page in the second language.
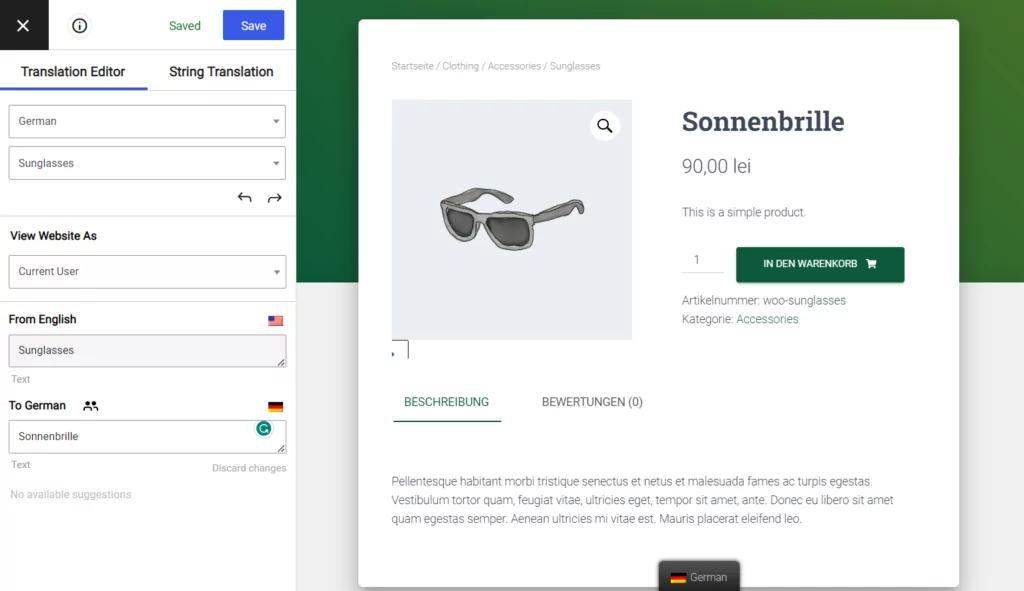
It’s that easy.
Translating Other Parts of the Product Listing
Moving on from here, you can do the same thing with the product’s short description, description, and product category. Simply hover over the part you want to localize, click the edit button, add a translation, and save. Yet, there are also alternative ways to achieve this. For one, you can use the string list (right below where you pick the language) to choose any of the strings on the page for translating.
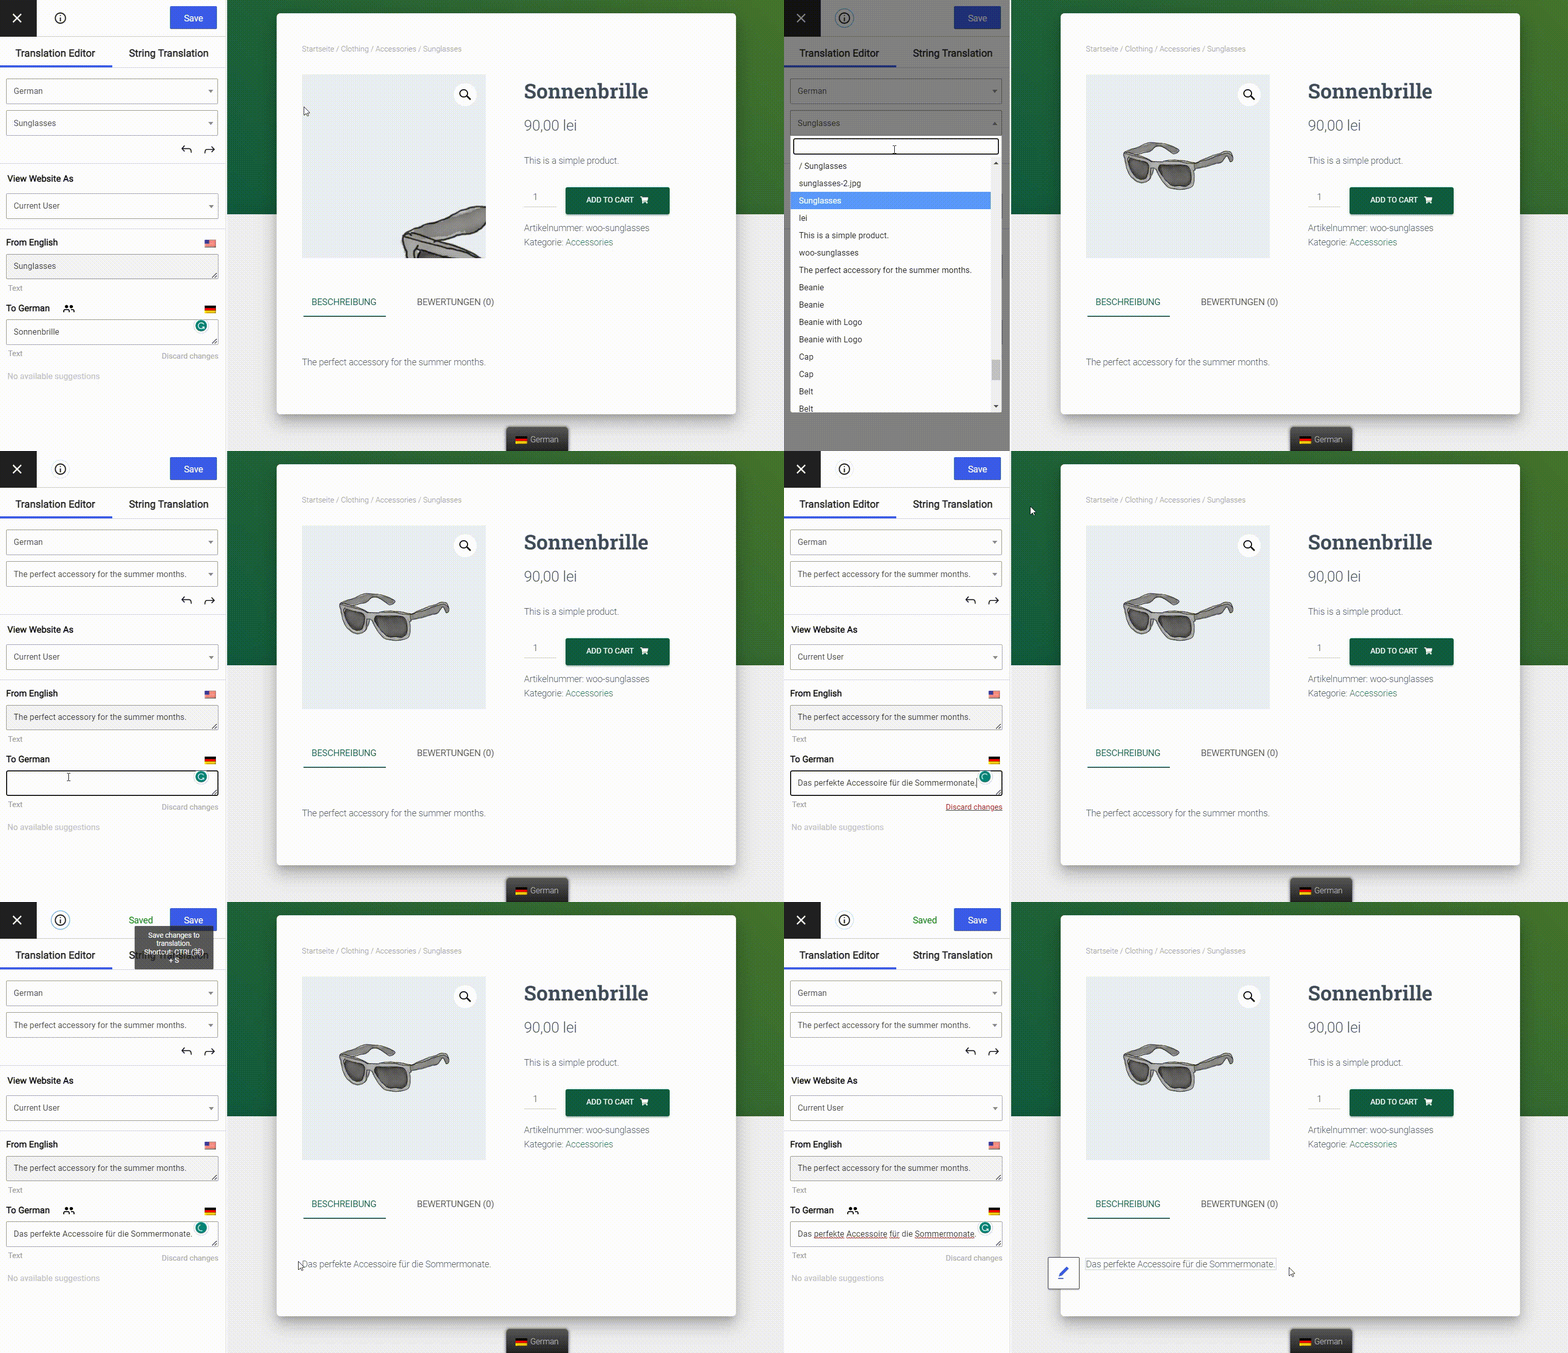
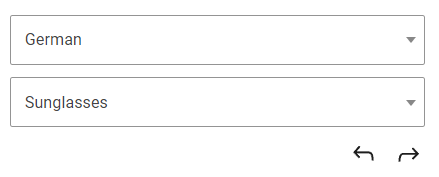
This way, you don’t manually have to look around the page to see what else needs to be localized, and can also make sure you catch everything. Even easier than that, use the Next and Previous arrow buttons to cycle through all available strings.
To speed up the translation process you can also use the available keyboard shortcuts inside the visual translation editor.
Translate WooCommerce Product Image
There may be situations when you need to display different product images for different languages.
Let’s say the t-shirts you’re selling have an English text on them, and you want to display the same product to German buyers but instead use a t-shirt image with the text in German.
The same visual translation interface can be used for product image translation.
How to Translate a Variable Product in WooCommerce
In addition to the above, you can also use TranslatePress to translate variable products. These are products that can come with different attributes such as color and size.
Adding more language options to them works pretty much the same way. Just create a variable product and enter the translation options.
When you have done that, you can find any product attributes under Additional information. Here, simply start translating them by hovering over them and clicking the edit button.
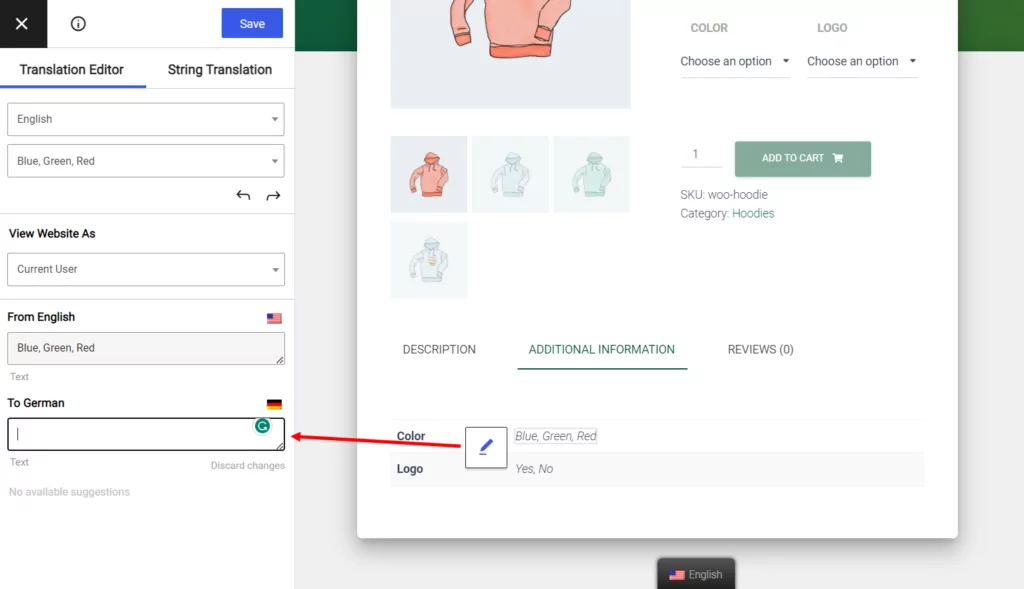
For convenience’s sake, you can also cycle through the attributes with the Previous and Next buttons. The same works for any tags you might have added.
Translating or Modifying Dynamic Strings
However, in the course of doing all of this, you might have noticed that there are a bunch of strings on your pages that are still in the original language. These are all the things that WooCommerce adds automatically and that you can not edit from the product page or similar. Examples include the Add to Cart button or the content of the drop-down menus to choose different variants.
Usually, you would have to modify these inside theme or plugin files but TranslatePress also helps you edit plugin strings too. It just works slightly differently.
The beginning is the same. Simply hover over what you want to change and click the edit button.
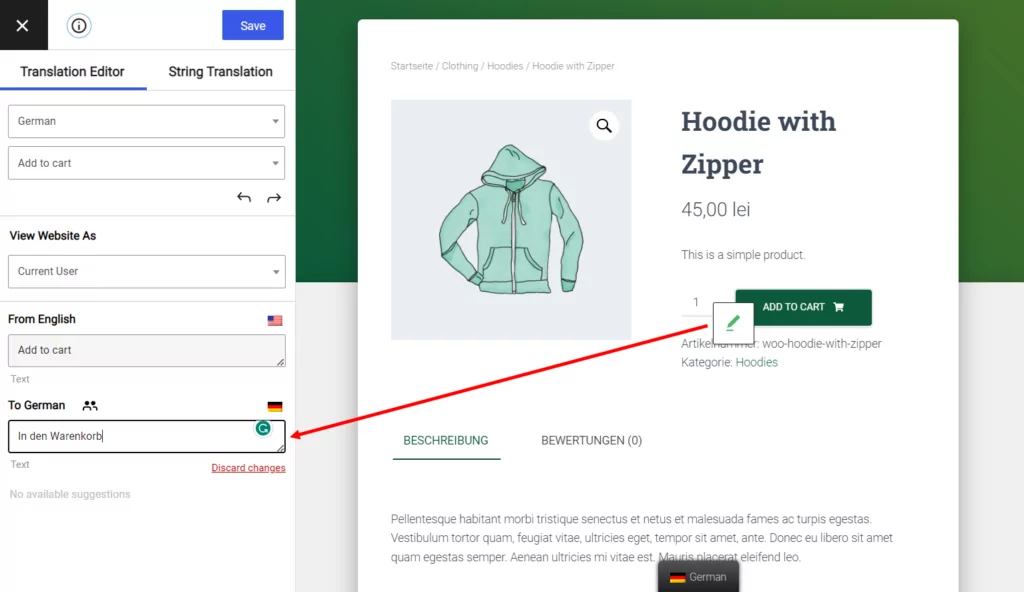
The first thing you will notice is that the icon is green in this case. That’s how you understand that this is a dynamic string coming from a theme or plugin. Another thing that is obvious is when you click, you get more fields to add translations to, including one for your default language. This is quite useful, as it allows you to change strings coded into WooCommerce directly. If you are not satisfied with the choice of words, you can change it to anything you want.
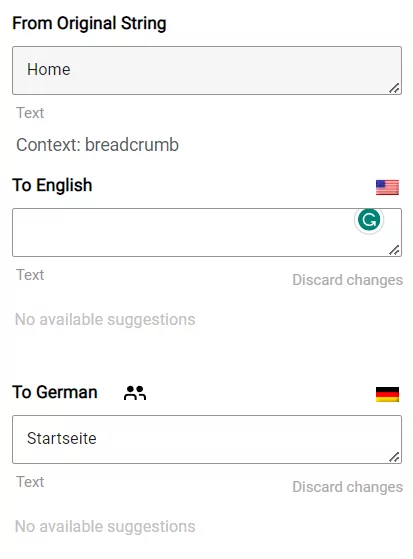
Aside from that, of course, you can also use TranslatePress to simply add a translation for your secondary language, whether they are for the original strings or your own version.
However, you will notice that there are some strings that you cannot access in the usual way, namely anything inside a drop-down menu. If that is the case, you can still go the route via the menu on the side. Here, you’ll find everything added to the page by plugins and themes. Go through the entire list so you don’t miss anything.
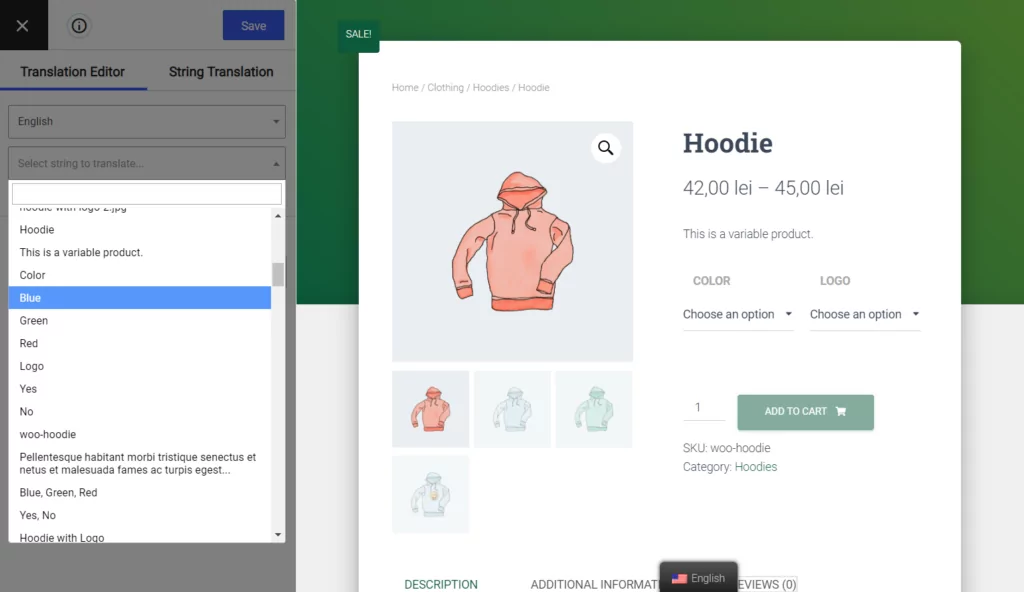
Be aware though that some strings only appear after you have taken an action. For example, after you add something to your cart, you get this message.

Once it appears on screen, you can translate it like everything else, however, before that, you have no access to it. Keep that in mind so you test your site thoroughly for hidden strings.
Another way to go about making sure you don’t miss anything is by using the String Translation interface.
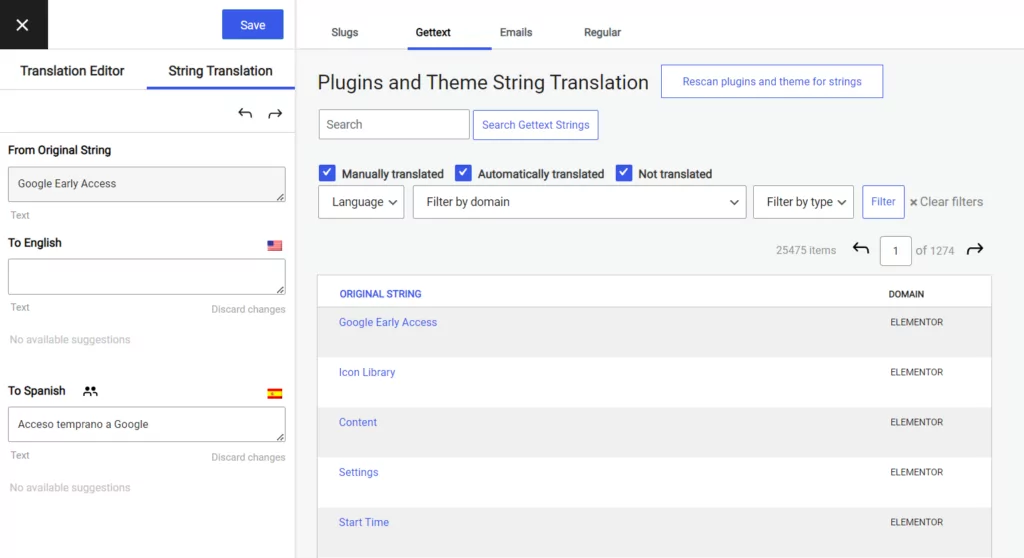
Here, you can use the Gettex tab to look for any string coming from a plugin or theme. You can use the filters to pick a certain plugin you’re looking for and even filter out the strings that have already been translated. The translation editor works in a similar way to the visual interface, you simply input the translation in the sidebar.
Product Slug and Page Title
For the final part of this tutorial, you will need the aforementioned SEO Pack Add-on. It allows you to translate more technical aspects of your site that are important for search engines. When you have installed it on your site, the translation menu shows some extra options.
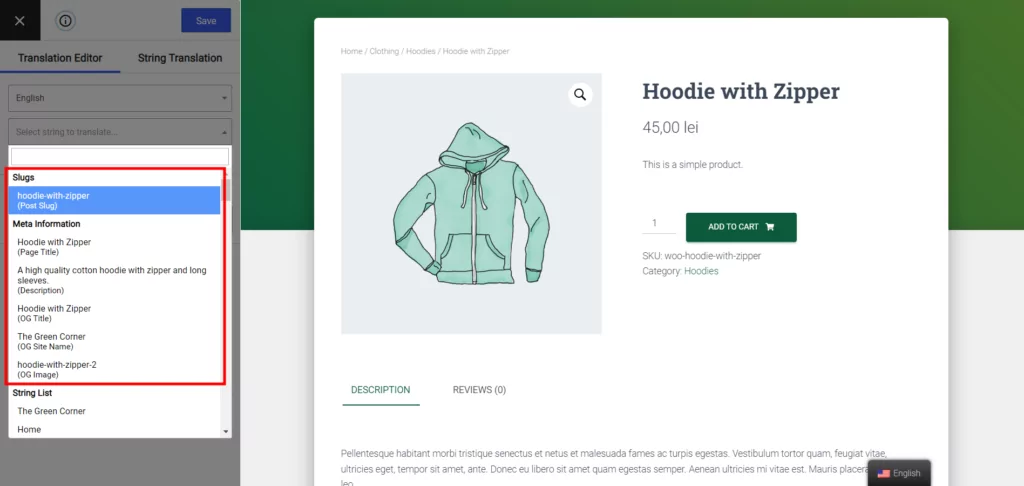
Under Meta Information, you are able to translate both the post slug and page title. These are the last part of the product URL and the title that will appear in search engines and browser tabs.
Translating them works the same way. Just pick the options from the list and fill in the information in the box for your secondary language, then save.
After that, you will be able to see the new page slug and title in your browser window.

Automatically Translate WooCommerce Products
To make things even easier, you can use the built-in automatic translation from TranslatePress and have all your WooCommerce products automatically translated.
For this, simply navigate to the Automatic Translation tab, under TranslatePress settings, and enable automatic translation.
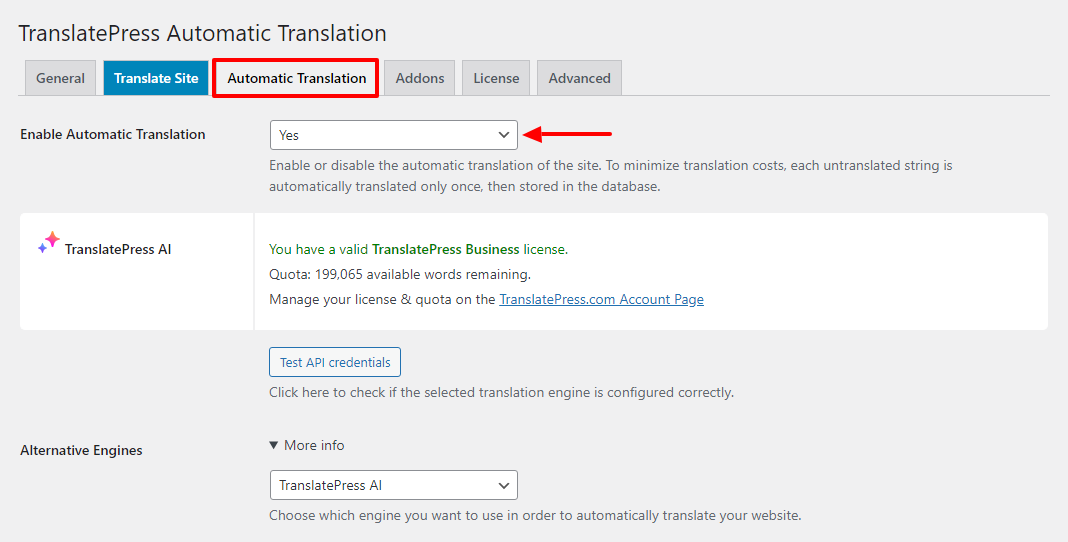
TranslatePress supports two different approaches that you can use to automatically translate WooCommerce:
- Google Translate API (the most popular automatic translation API, that’s also behind Google Translate) or DeepL API (many people consider DeepL Translator’s translations to be more accurate).
- TranslatePress AI (the fastest and most accurate approach to automatic translation).
TranslatePress lets you use Google Translate for free, while DeepL is available in the premium versions of TranslatePress.
Premium versions of TranslatePress also come with TranslatePress AI, a brilliant feature that saves you the trouble of fetching API keys and setting things up. It integrates seamlessly with all leading neural machine translation engines (like DeepL, Google Translate, and Microsoft Translator) using AI to choose the most suitable service for each language pair you want to translate. This makes things a lot easier and faster and guarantees maximum translation accuracy.
To optimize both speed and costs significantly, TranslatePress will automatically translate your content just once, and then save and load the translation from your database.
Rather than translating each product detail from scratch, you can use machine translation to create your baseline translations and then manually refine them where needed.
In Short, Translating WooCommerce Products Isn’t Hard
Knowing how to translate WooCommerce products is an important part of running an online shop. It helps you open up new customer segments and serve your clients better. It also allows you to compete in a global market and is a huge trust indicator.
Above, you have learned how to translate key parts of your WooCommerce product pages with TranslatePress. From product titles, descriptions, and categories over attributes, strings added by your theme or plugin, and even the URL and title tag, everything can be translated in a matter of clicks.
TranslatePress also adds support for multilingual search, making it really easy for your customers to find products in their selected language. Plus, it’s fast and it won’t slow down your website.
TranslatePress Multilingual
Armed with this knowledge, you are now able to create a truly multilingual WooCommerce store for your clientele.
Do you have questions or comments about how to translate WooCommerce products? Let us know in the comments section below!
If you found this post helpful, please check out our YouTube channel, where we constantly upload short & easy-to-follow video tutorials. You can also follow us on Facebook and Twitter to be the first to know each time we post.


You did a great job in providing an easy to use translation plugin! Much easier than Polylang that I have tried earlier.
I find no problem in translating my posts from English to Chinese. Here, English is the default language, and Chinese is the second language.
However, when my visitors try to search a post with words in Chinese, it turned out nothing! The search results for English words are perfect.
Do I need to do something on my site to let visitors to search posts in the second language?
Thanks.
Hi Simon.
Unfortunately the search in secondary languages doesn’t work right now because the content in the database is in the default language. We’ll need to add support for this in a future update, but for the time being we don’t have a workaround or quick solution for it.
Thanks for your reply. I do look forward to your support for search in secondary language. Other than that, TranslatePress is so much better than other translation plugins. Please advise when support is available. Thank you very much!
Hi Christian,
Are there any news on this search in secondary language problem? Can you find a solution for it? It’s quite a big problem on Woocommerce shops. Thanks!
Hi Harri,
We did find a solution and it’s now available in TranslatePress. You can read more here: https://translatepress.com/multilingual-wordpress-search/
He every one,
it seems an interesting plugin. I just tested it for a simple test shop. I found an issue and that is:
when I am on the shop page, I can see some products in my default language (EN). I click on one product and I go its page. Now using the “translate site” in the admin bar above, I try to translate (to German) the content of the page and save it. I check the german version of the product and I can see the translated version. Everything is fine So far. The problem happens when I go back to the shop page while I am still in german mode. Now if I click on the product, I get forwarded to 404 page because the slug of that product is translated to “produkt”. I am sure the slug translation is unchecked in the settings of the plugin. Plus, the shop page itself is translated automatically without I set the automatic translation. I appreciate any response.
Best Regards,
Manu
Hi,
This shouldn’t happen. Try flushing your permalinks and see if the issue persists. If it does please get in touch via our support channel.
Regarding the automatic translation, this does not happen, what you’re seeing are the translated gettext strings from WooCommerce which we are loading automatically for a certain language (German in your case). This way you don’t have to translate them again.
Hi, can TranslatePress translate the currency? Now I can only show one currency for all languages. I believe this is very import for a lot of people as well. Is it possible?
If you want to sell in different currencies, you’ll need an extension so you can convert your default currency on the fly to display prices in your shopper’s native currency.
Some popular options include Booster for WooCommerce, WooCommerce Multi-Currency, and WooCommerce Multi Currency.
Hello,
any idea how to exclude product title and brand from being translated ?
thanks in advance
If you mean with automatic Translation, you can do that from TranslatePress -> Settings -> Advanced. There you can exclude strings from automatic translation.
yes i mean the automatic translation, is there a product title and brand code ?
or should i write every product title i have ?
thanks
Thanks for the guide share
Hello
I am using this plugin with the default language as Catalan, and with the secondary language as Spanish. The thing is, I can set up translations for spanish, for the labels generated by woocommerce (which are in english). But I can’t do so for my default language (catalan).
Is there a way of translating generated labels for the default language, if that is different from english?