In this post
In this post
There are a lot of ways to translate a WordPress website. You can do it manually, use a plugin or machine translation, or even hire a professional to do it for you. However, regardless of which approach you choose, it pays to understand how to edit WordPress language files manually.
Understanding how WordPress localization works and which files are involved in the process can come in handy when adding new languages to your site. It’s also crucial if you intend to translate the plugins and themes you use as well. This ensures that any text they provide for your site is available in all the languages you require.
In this article, we’ll go over the types of language files that WordPress uses. Then, we’ll show you how to edit them manually, as well as alternative approaches to localization. Let’s get right to it!
An Introduction to WordPress Language Files
When you download a popular theme or plugin, you may notice that in some cases, it’s available in more than one language:
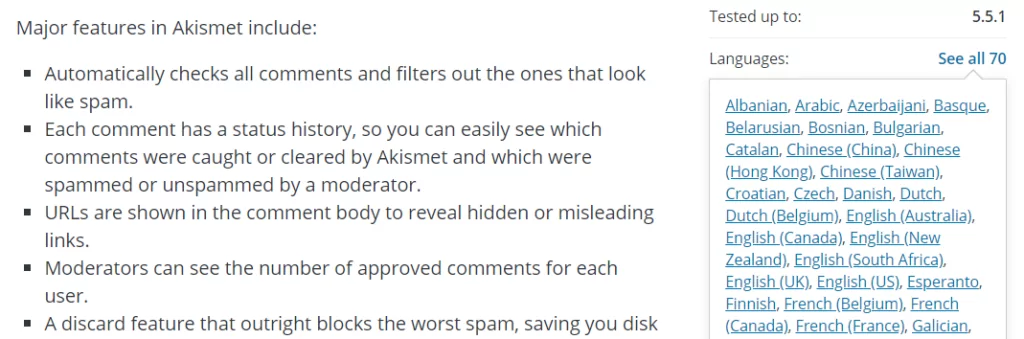
However, this doesn’t mean that there are several different versions of the theme or plugin for download. Instead, it indicates that the product in question comes with additional language files. These enable you to switch between languages depending on your needs.
Let’s say, for example, that you’re using a contact form plugin and want users to be able to fill it out in Spanish. If your WordPress website’s language is set to Spanish and the plugin includes the corresponding language file, its settings should be localized automatically:
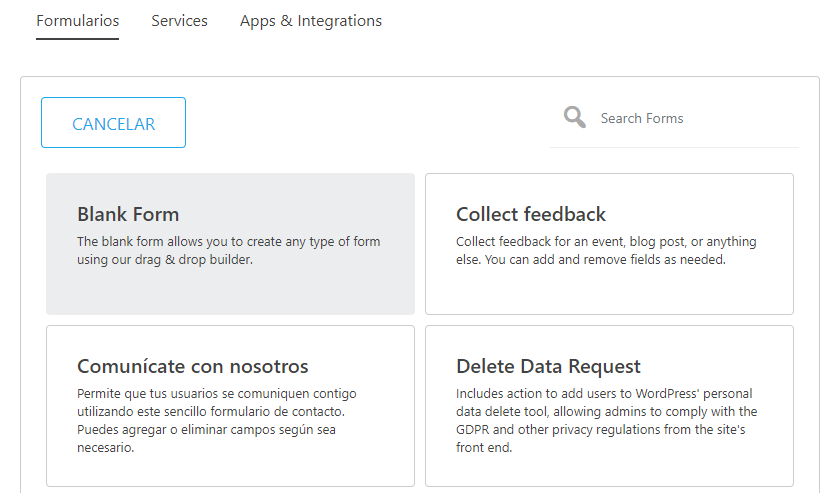
In the example above, you can see that only some of the plugin’s options appear in Spanish. That’s because while the plugin is “translation-ready”, it’s only partly localized. Some of its strings have been translated in its language files, but others haven’t.
By “strings”, we mean the text components of any given element on your website, including your pages’ content. For a plugin or theme to be “translation-ready”, it needs to include a Portable Object Template (POT) file. This file will include all of its text strings in their original language.
For a theme to be”translation-ready” it needs to store its strings using the gettext system. In a nutshell, this means the text isn’t hard-coded, but that each string can have multiple translations.
PO vs MO WordPress Language Files
For each language that you add to a plugin or a theme, you’ll also need to use the following two file types:
- Portable Object (PO) files. For every language you add, you need a new PO file that includes the target language’s code. This is the file you need to edit to translate your site manually.
- Machine Object (MO) files. This type of language file is machine-readable and generated from a corresponding PO file. MO files are not meant to be read or modified by humans. They’re simply the version of your PO files that computers can understand.
If you have a POT file for a plugin you put together yourself (e.g. my-plugin.pot), it might look something like this:
"Language: English\n"

"MIME-Version: 1.0\n"

"Content-Type: text/plain; charset=UTF-8\n"

"Content-Transfer-Encoding: 8bit\n"

"Plural-Forms: nplurals=2; plural=(n != 1);\n"

msgid "Hello"

msgstr ""
This example POT file is in English. For each string in this hypothetical plugin, you’d need to add msgid ” ” including its text. The msgstr line includes a translation into a single language for that string.
You shouldn’t include any translations within the original POT file. After all, that’s what PO files are for. If you want to add a German translation for that file, you could name it ‘my-plugin-de-DE.po‘, and it would look something like this:
"Language: German\n"

"MIME-Version: 1.0\n"

"Content-Type: text/plain; charset=UTF-8\n"

"Content-Transfer-Encoding: 8bit\n"

"Plural-Forms: nplurals=2; plural=(n != 1);\n"

msgid "Hello"

msgstr "Hallo"
Your PO file can include a full or partial translation of the strings within the original POT. However, if it’s only a partial localization, WordPress will revert to the plugin or theme’s original language when it can’t find a translation.
How to Edit WordPress Language Files Manually (In 3 Steps)
We’ve covered a lot of theory, so let’s check out how editing WordPress language files works in practice. In this section, we’re going to show you how to create and edit WordPress language files manually in just three steps.
Step 1: Generate a POT File for Your Theme or Plugin
If you’re translating a WordPress theme or plugin that already has a POT file, then you can skip this step. However, if your site has elements that have not been prepared for localization, or if you’re developing your own product and want to make it translatable, then you’ll need to generate one.
To create a new POT file for a theme or plugin, you’ll need to use the WordPress Command Line (WP-CLI). If you’re not familiar with using WP-CLI, we recommend you familiarize yourself with the tool before you get to work on your site’s language files.
When you’re ready, you can navigate to any plugin or theme’s directory on your server using Secure Shell (SSH). With WP-CLI installed, you can then use the following command to generate a POT file:
wp i18n make-pot . languages/my-plugin.pot
This command will create a new folder called languages within your plugin’s directory, as well as a POT file for it. Now you can take a look inside that file using a text editor.
Step 2: Translate Strings Using a Text Editor
Once your POT file is ready, you can edit it using your favorite text editor. Any editor will do the job, but using a non-specialized tool can be cumbersome if you’re dealing with massive numbers of text strings.
To give you an idea of what you might be in for, here’s a quick example of a Spanish PO file from the Twenty Twenty theme:
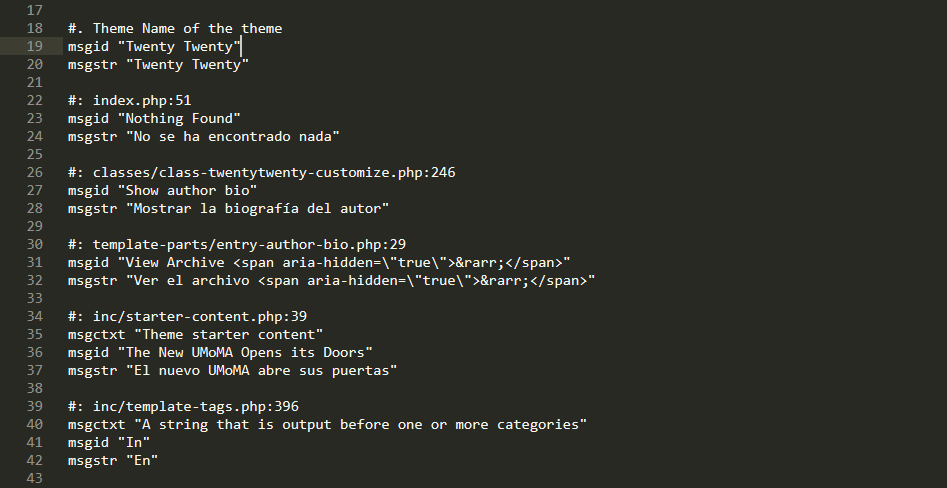
This PO file is over 500 lines long and would be extremely tedious to translate. In most cases, your best bet is to use a specialized translation editor such as Poedit:
Poedit is a translation editor that works perfectly with POT and PO files, and it’s available for all major Operating Systems (OS). Here’s how the Twenty Twenty Spanish PO file looks when you edit it using Poedit:
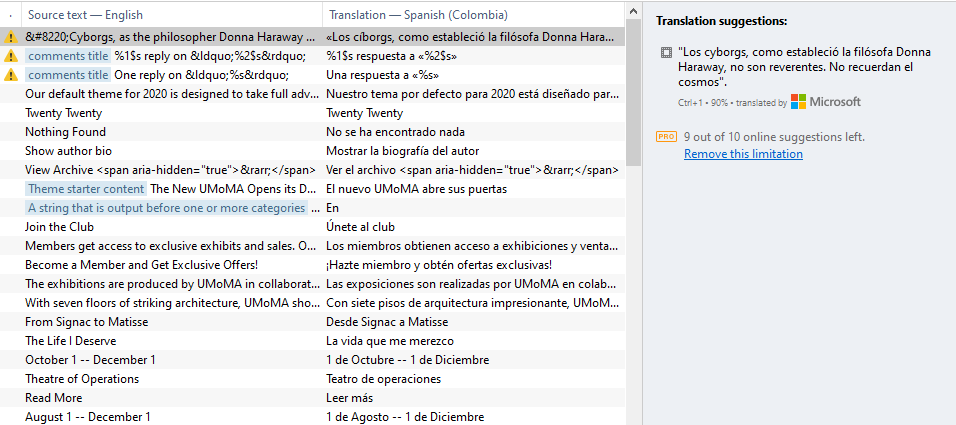
To the left, you have the theme’s original text strings. You can add translations one by one on the right. The editor even includes machine translation suggestions, which can help speed up the process.
Step 3: Compile Your PO Files into MO Files
Once you’ve translated all the strings for your plugin or theme, you can compile your PO file into the MO format. As you might remember, MO stands for “machine object” and this is the file that WordPress uses to localize your site’s strings.
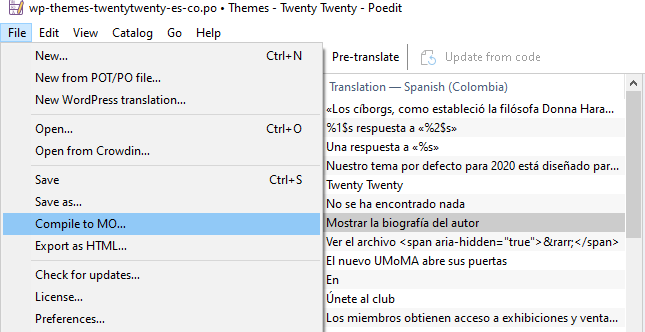
To compile a PO file into the MO format in Poedit, open the File menu and select the Compile to MOoption:
The process should be almost instantaneous. The result will be an MO file that includes a full localization of your plugin or theme in your target language. Now, if you switch your WordPress website’s language, you should be able to see the fruits of your labor.
How a Translation Plugin Makes it Easier to Edit WordPress Language Files
Although translating WordPress language files manually isn’t all that complicated, it can be overwhelming. Most include hundreds if not thousands of strings, and translating everything by yourself is a tall order. Also, all those strings are out of context, so making sure you’re adding the best translation given the lack of context can be quite hard.
More importantly, the approach we’ve explored so far doesn’t help you if you want to create a fully multilingual website. In that scenario, your best bet would be to use a translation plugin such as TranslatePress.
TranslatePress offers several advantages over manual translation. You can use it to translate content that uses gettext, as well as user-generated strings and even regular content on your site.
All of this is possible using a simple front-end visual interface that enables you to click on any string on your website and translate it:
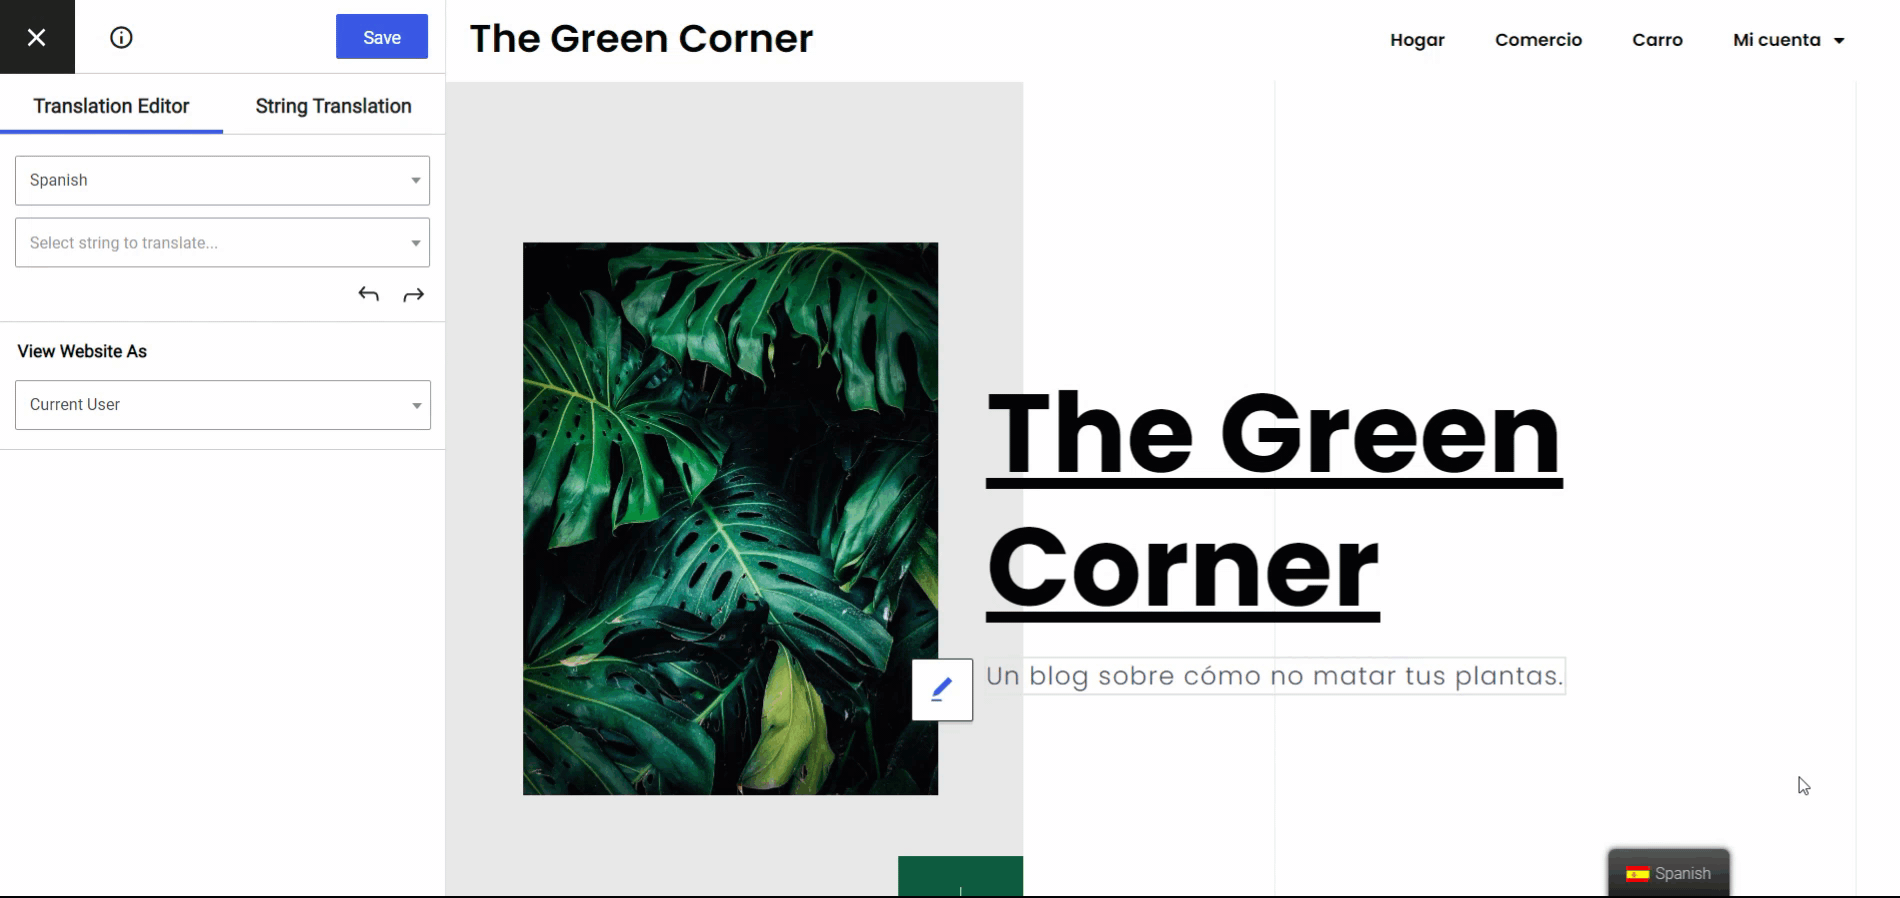
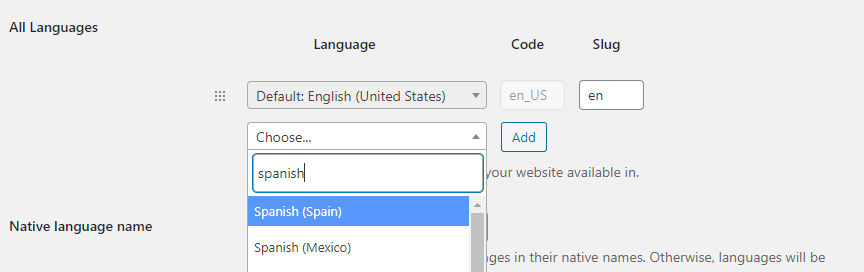
To get started, all you have to do is add a new language to your website. You can do so by navigating to Settings → TranslatePress → General and going to the All Languages section. Here, use the Choose… drop-down menu to find your new target language and click on the Add button next to it:
Save the changes to the plugin’s settings, then click on the Translate Site button in your WordPress top admin menu.
Ultimately, the biggest advantage of using a plugin for localization is that you can access machine translation assistance. Each TranslatePress license comes with access to the easiest way to automatically translate your theme, TranslatePress AI.
TranslatePress AI uses a combination of top-tier neural machine translation engines and picks the right one for each language pair and situation. This provides site owners with instant accurate AI website translations.
Alternatively, TranslatePress also connects directly to both Google Translate and DeepL and enables you to use either platform to translate all of your site’s content automatically. This does take a bit more time to set up but it can save you some money.
If you choose to go down that route, you can save massive amounts of time over editing each string manually. Instead, you can simply proofread your translations to ensure they’re accurate, and your website will be ready for visitors in no time.
Conclusion
Editing WordPress language files by hand isn’t all that complicated. However, using a text editor can be cumbersome, especially if you don’t have a lot of experience with this type of platform. This translation process also lacks context. This goes especially for complex plugins and themes with hundreds of text strings to translate.
If you want to avoid unnecessary headaches, the easiest way to translate your WordPress website is by using a multilingual plugin such as TranslatePress. It can automatically detect your plugin or theme’s gettext strings and it enables you to edit them through an intuitive visual interface. You’ll be able to translate everything you see, directly from the front-end.
TranslatePress Multilingual
Do you have any questions about how to edit WordPress language files? Let’s talk about them in the comments section below!
If you found this post helpful, please check out our YouTube channel, where we constantly upload short & easy-to-follow video tutorials. You can also follow us on Facebook and Twitter to be the first to know each time we post.