In this post
In this post
If you want to create a multilingual eCommerce store, learning how to automatically translate WooCommerce can save you a ton of time and money.
Rather than painstakingly translating each product detail from scratch, you can use machine translation to create your baseline translations and then go back and manually refine them as needed.
In this post, you’ll learn how to automatically translate your WooCommerce store using the Google Translate API and a free WordPress translation plugin.
You’ll be able to create static, SEO-friendly translations for each product and shop page. And if needed, you can also go back and manually edit any of your machine translations using a simple visual translation interface.
Ready to start translating? Let’s dig in…
How to Automatically Translate WooCommerce Using TranslatePress
Translating your WooCommerce store automatically is incredibly easy using TranslatePress and it’s automatic translation feature.
To automatically translate a WooCommerce store, the TranslatePress plugin comes with the fast and easy TranslatePress AI feature.
TranslatePress AI offers you instant automatic translations powered by multiple neural machine translation engines, including DeepL, Google Translate, and Microsoft Translator.
Using next-gen artificial intelligence, TranslatePress AI chooses the best translation engine for your language pairs, resulting in more accurate and contextual translations than a single translation service would allow.
On top of TranslatePress AI. TranslatePress lets you translate your entire WooCommerce store using your own Google Translate API or DeepL API key. However, we recommend using TranslatePress AI if you want the easiest and quickest way to translate your store automatically.
That’s right, setting up TranslatePress AI doesn’t require you to generate and connect to an API. Simply activate the plugin, choose your languages, and enable automatic translation. It’s as simple as that.
TranslatePress will then store those translations locally and let you manually edit them using a simple visual translation management interface if needed (more about this later). This saves you a lot of extra costs while ensuring high-quality translations.
To demonstrate how to automatically translate WooCommerce, we’ve set up a demo site using the Storefront theme and the WooCommerce demo data, but TranslatePress will work with any WooCommerce theme and any WooCommerce extensions that you’re using.
To get started, we’ll take you through how to automatically translate your WooCommerce store using TranslatePress AI.
Then, we’ll highlight some other features that can help you create a successful multilingual WooCommerce store.
1. Install and Activate TranslatePress
To start, you must install the TranslatePress plugin on your WooCommerce store. While there is a free version of TranslatePress at WordPress.org, you need one of the premium licenses to use TranslatePress AI.
On top of giving you access to TranslatePress AI, premium licenses offer you many other brilliant features, such as unlimited languages, better multilingual SEO functionality, translator accounts, and more!
You can purchase your license here – plans start at just €99.
If you’re on a tight budget, you could still use the free version of TranslatePress, which allows you to connect to your own Google Translate API. However, this method isn’t quite as simple as TranslatePress AI. Later, we will show you how to use TranslatePress and the Google Translate API, though.
Once you purchase the premium version, you’re ready for the fun part. You’ll need to install free and premium plugins to access Translation AI.
This is simple:
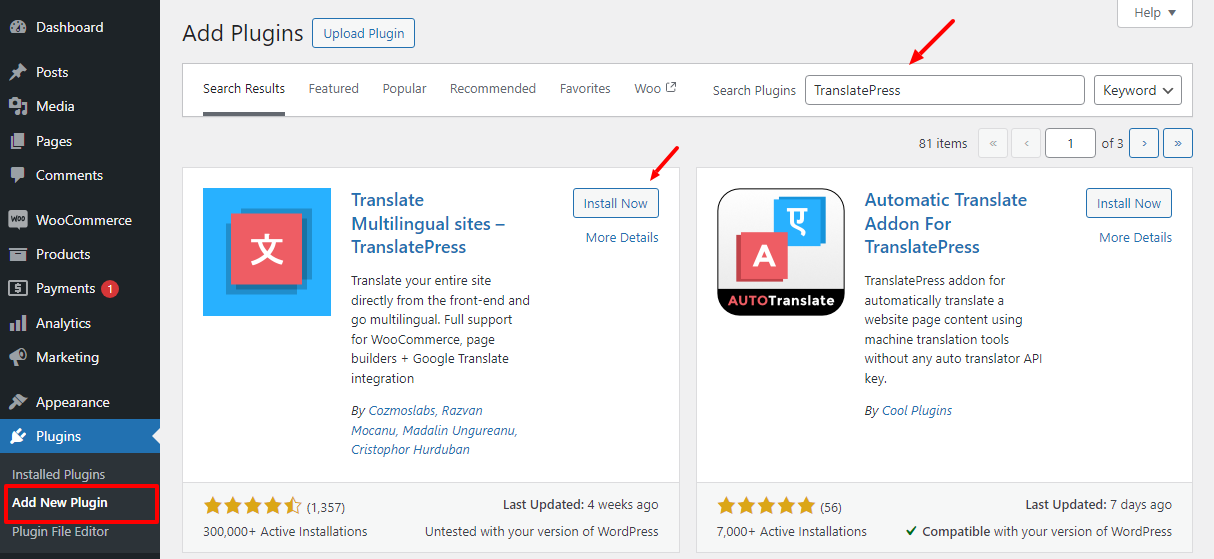
Install the free TranslatePress plugin. You can install it just like any other free plugin – go to Plugins → Add New Plugin and search for “TranslatePress”.
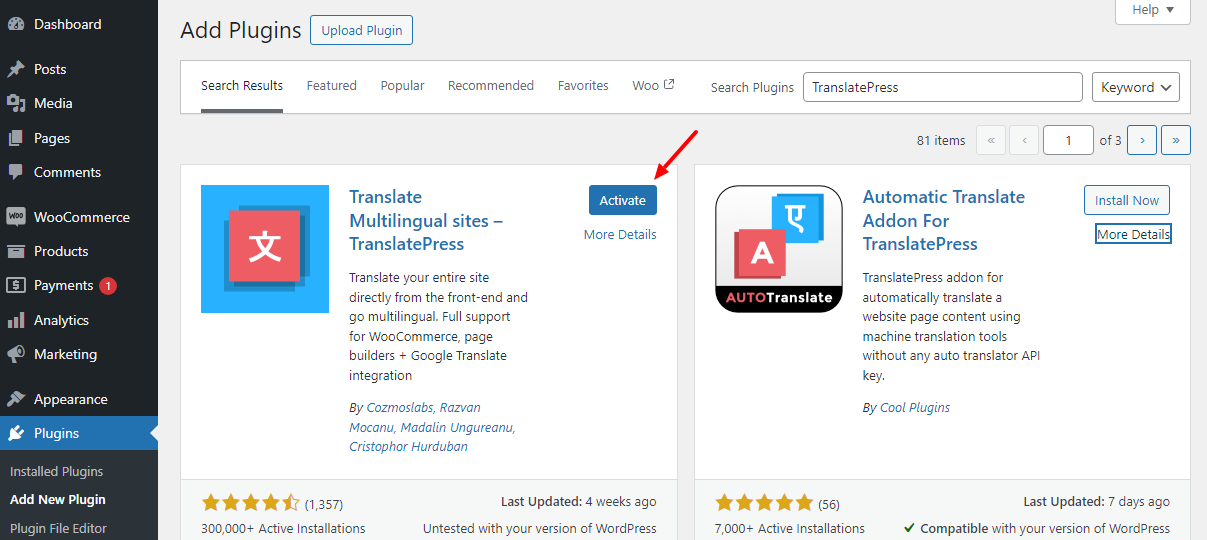
After that, Activate the plugin:
Then install the TranslatePress Premium plugin, which you can download from your TranslatePress Account after you’ve purchased your license.
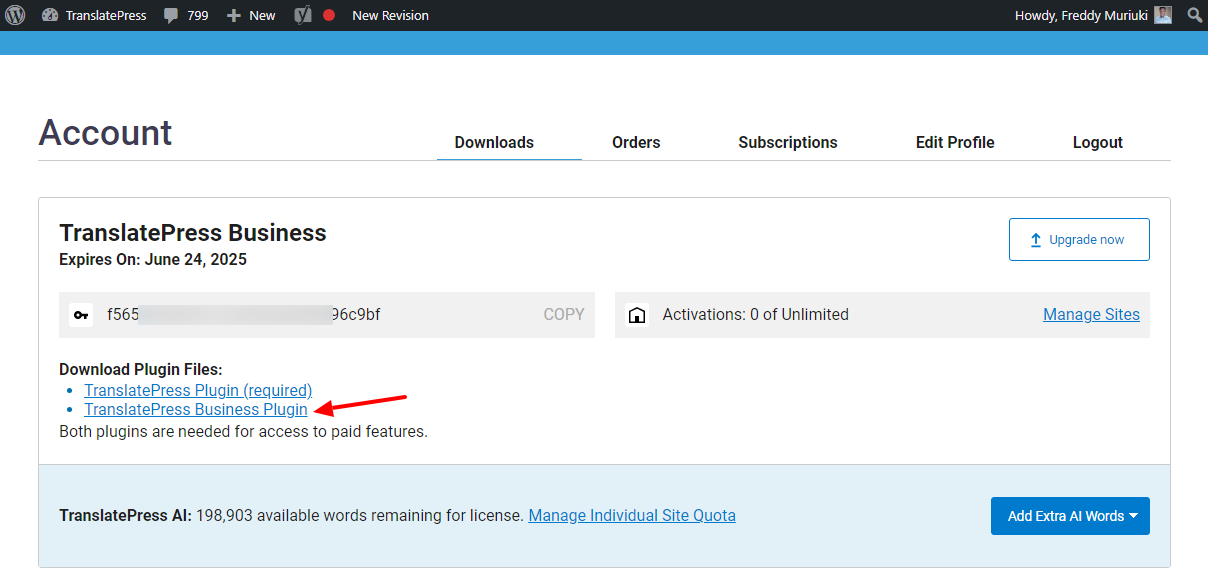
You can install it by going to Plugins → Add New Plugin and then clicking Upload Plugin to upload the Zip file:
After that, you must activate your TranslatePress premium license, which is also simple.
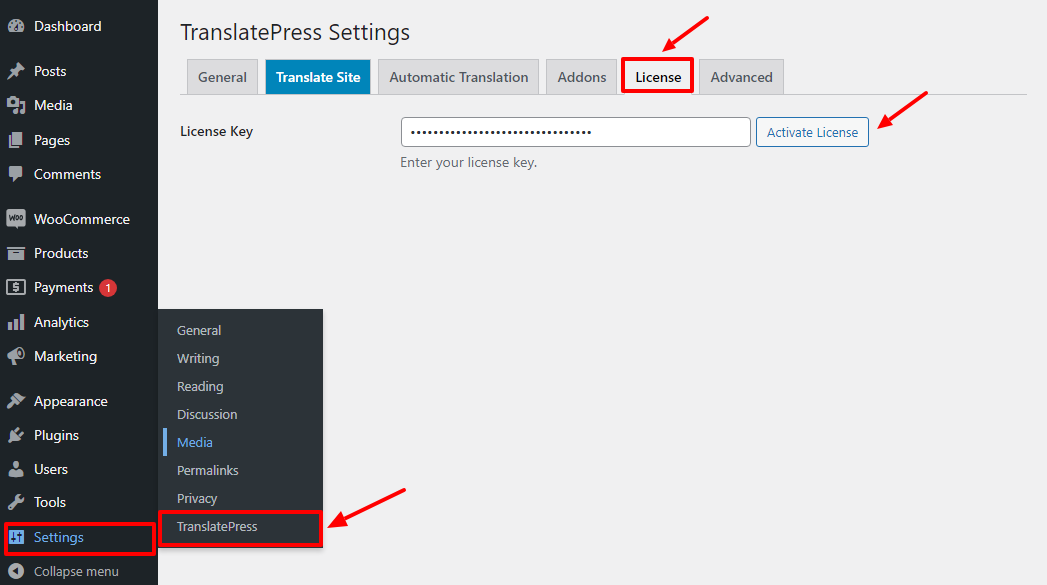
- Go to Settings → TranslatePress in your WordPress dashboard;
- Select the License tab;
- Paste your license key into the box. You can get your license key from your TranslatePress Account;
- Click the Activate License button.
After activating your license, you’re ready to rock and roll.
2. Choose Your Languages
Once you’ve installed and activated TranslatePress, your first step is to choose the languages you want to offer on your WooCommerce store.
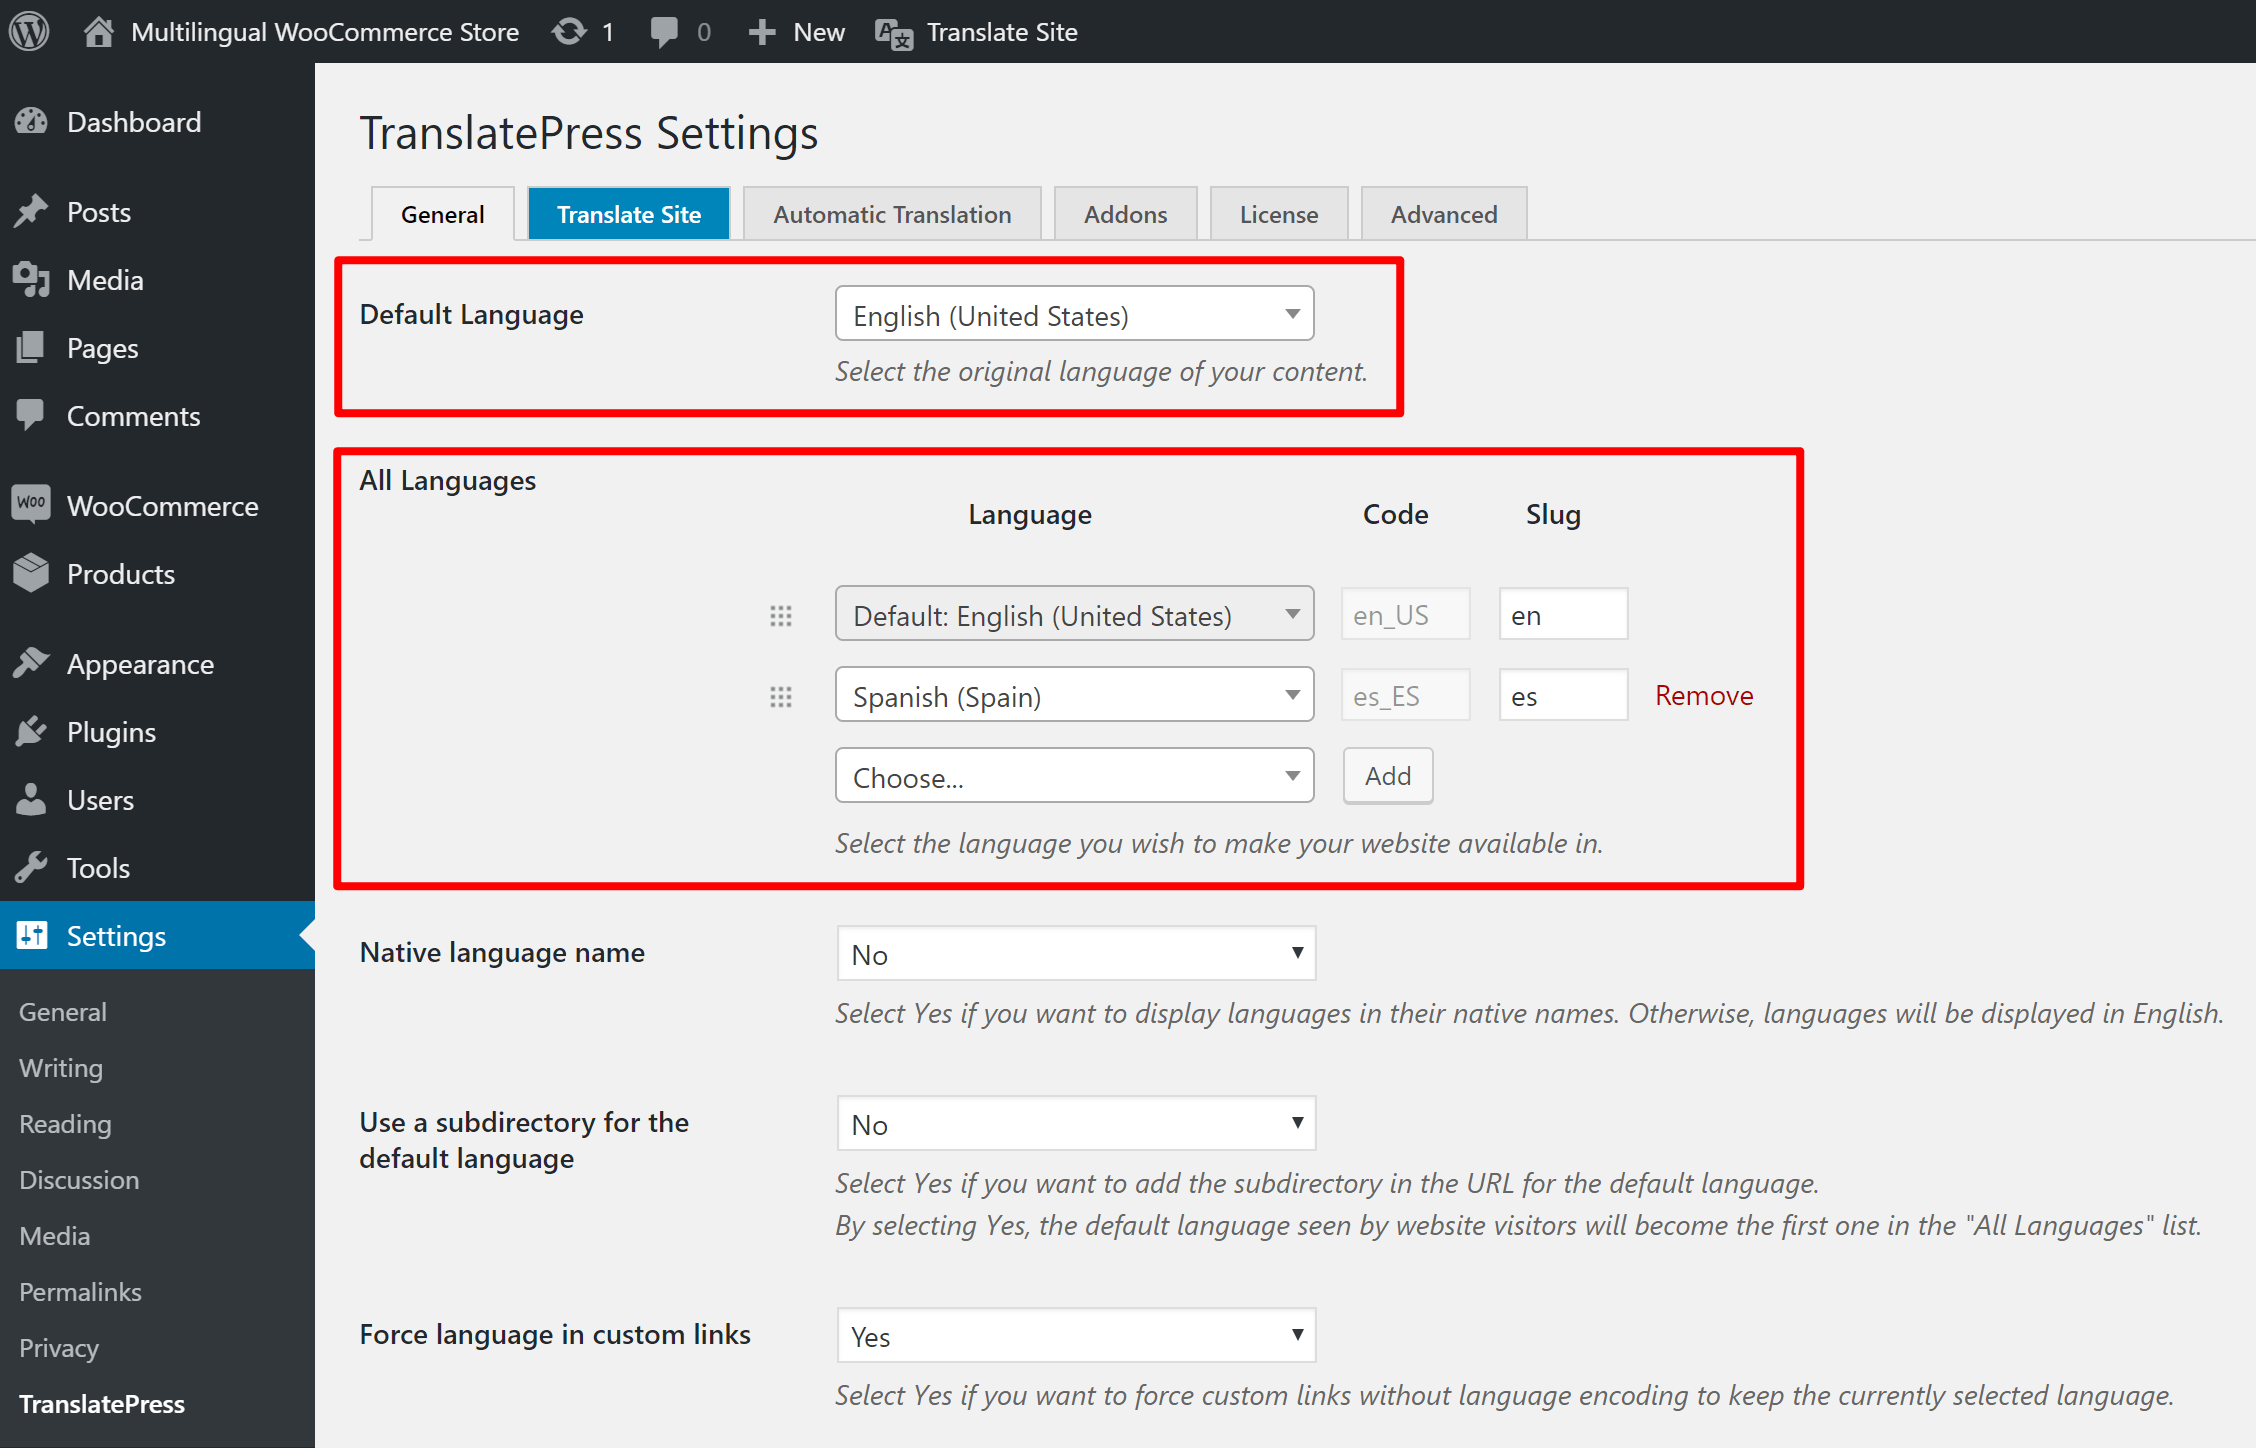
To do that, go to Settings → TranslatePress.
First, use the Default Language drop-down to indicate the language that your store currently exists in.
Then, use the All Languages settings to select the language(s) into which you want to automatically translate your store’s content.
For example, to translate an English-language store into Spanish, you’d set it up like this:
Note that you can choose multiple languages with a premium license.
Feel free to peruse all the other general settings (like customizing the language switcher) and make sure to click Save Changes at the bottom of the page once you’re done.
3. Enable Automatic Translation
Activating automatic translation via TranslatePress AI is straightforward. On the same settings page, go to the Automatic Translation tab, choose Yes under the Enable Automatic Translation drop-down, and save your changes:

And that’s it! TranslatePress AI will now automatically translate your entire WooCommerce store using the most optimal machine translation service for your situation.
To see the results, view your website on the frontend and choose your preferred language, as shown below.

There you have it. As simple as A, B, C.
A few notes…
When you enable automatic translation, you should see the free translation words quota associated with your license:
- Personal – 50,000 free words.
- Business – 200,000 free words.
- Developer – 500,000 free words.
These should be plenty for most sites, which means there are no added costs to using automatic translation.
However, if you ever need to exceed the free allocation associated with your license, you can also purchase more words from your TranslatePress Account area, starting at €24 for an extra 100,000 words.
What if you’re on a tight budget? You can still translate your website automatically using TranslatePress and Google Translate API.
How to Translate Your WooCommerce Store Automatically using TranslatePress and Google Translate
This option is ideal for beginners and small businesses. Also, it is tedious and might not work in some cases (like when Google Translate demands a credit card to verify your account), which is why we recommend TranslatePress AI.
On top of that, you can only choose one language in the free version of TranslatePress. You will also miss out on the fantastic features that come with a TranslatePress license.
That being said, let us move on.
After choosing your languages, just like we did earlier…
1. Select Your Automatic Translation Service
You must choose an Alternative Translation Engine after enabling automatic translation.
TranslatePress supports two different services that you can use to automatically translate WooCommerce:
- Google Translate API – this is the same translation API that powers Google Translate.
- DeepL – many people consider DeepL’s translations to be more accurate.
TranslatePress lets you use Google Translate for free, while DeepL is available in the premium versions of TranslatePress.
While TranslatePress itself doesn’t charge you to use Google Translate, Google charges $20 per 1 million characters that you translate with the API.
At the same time, Google gives you a $10 credit per month, which lets you translate ~500k characters per month for free, which should be enough for most WooCommerce stores.
It’s important to understand that TranslatePress only has to translate your content one time, which helps keep your costs down, significantly.
So if your store has 1 million characters, you’d pay ~$20 as a one-time fee to the translation API to translate that content. Then, there are no ongoing fees (beyond translating any new content that you add to your store).
To further control your budget, TranslatePress lets you set a maximum number of characters to translate per day. This avoids any budget surprises and lets you set a maximum you’re willing to spend on machine translation per day.
For this tutorial, we’ll use the Google Translate API because it’s available in the free version of TranslatePress and Google lets you translate up to 500k characters for free:

2. Generate Google Translate API Key
Next, you need to generate a Google Translate API key from the Google Cloud Platform APIs & Services dashboard. This is what lets your site connect to the Google Translate service.
This is the most complicated part of the whole process, but we’ll take you through every step…
To get started, open the console and create a new project if needed.
With your project open, click on the hamburger icon to open the menu. Then, go to APIs & Services → Library:
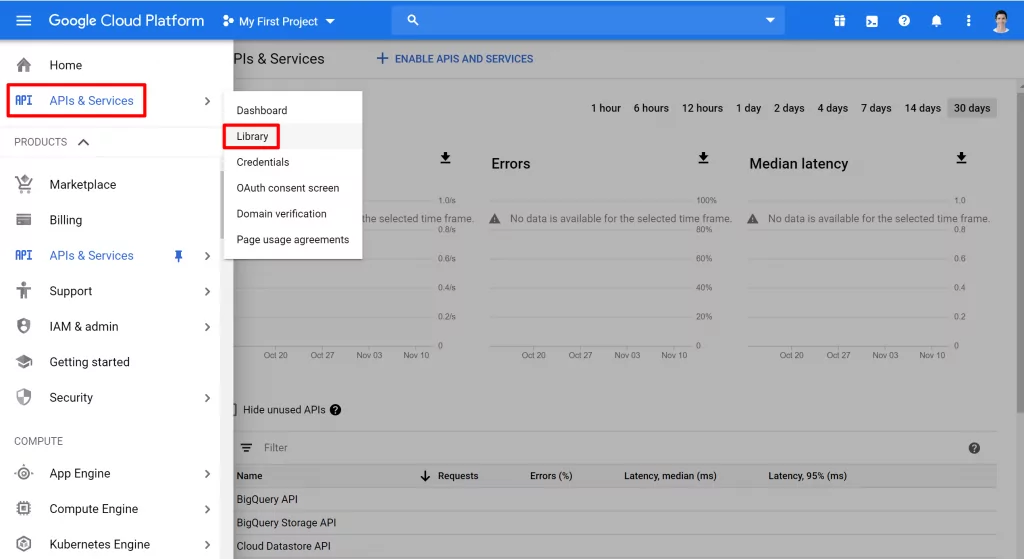
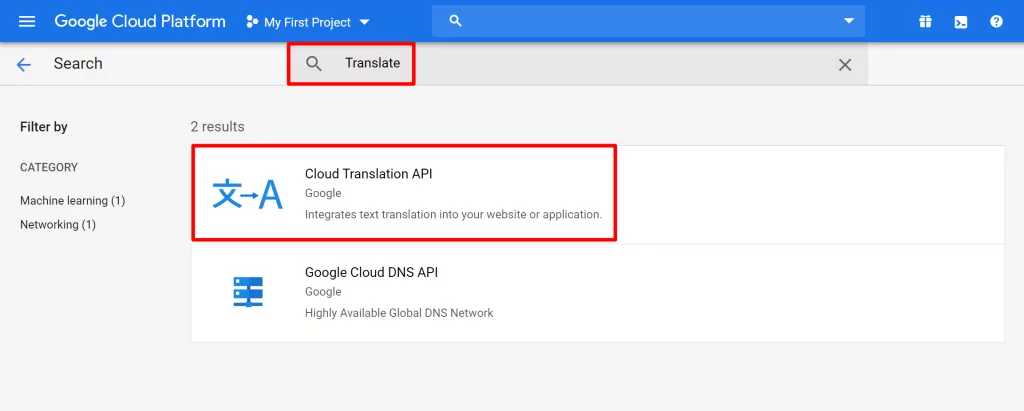
Search for “Translate” and select the Cloud Translation API result:
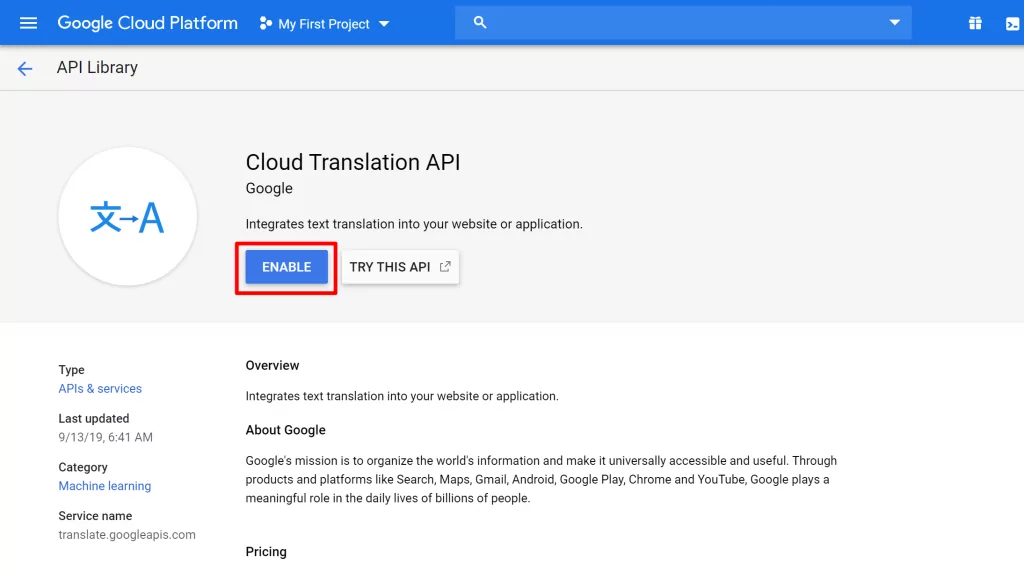
Then, Enable the service:
To better control your billing, we highly recommend that you also set up quotas to limit your usage. TranslatePress can also help you set quotas from your WordPress dashboard – but we’d recommend doing both.
To set quotas, go to the Quotas tab and set your limits:
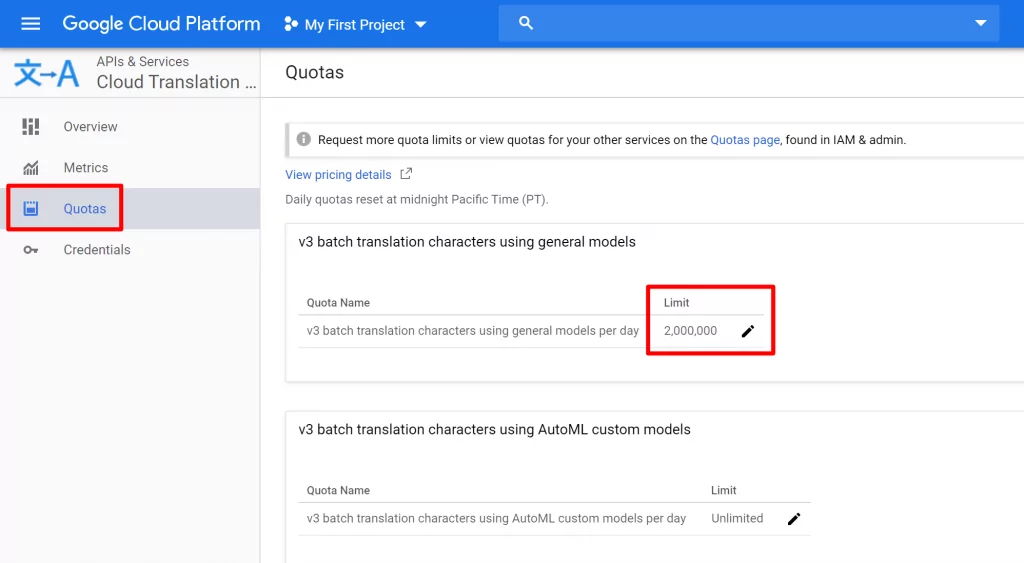
Remember, the Google Translate API charges $20 per 1 million characters. So if you set your limit to 1 million, you’ll never pay more than $20 per day. And remember, you only pay one time for translation because TranslatePress locally stores your translated content.
Next, open the menu and go to APIs & Services → Credentials:
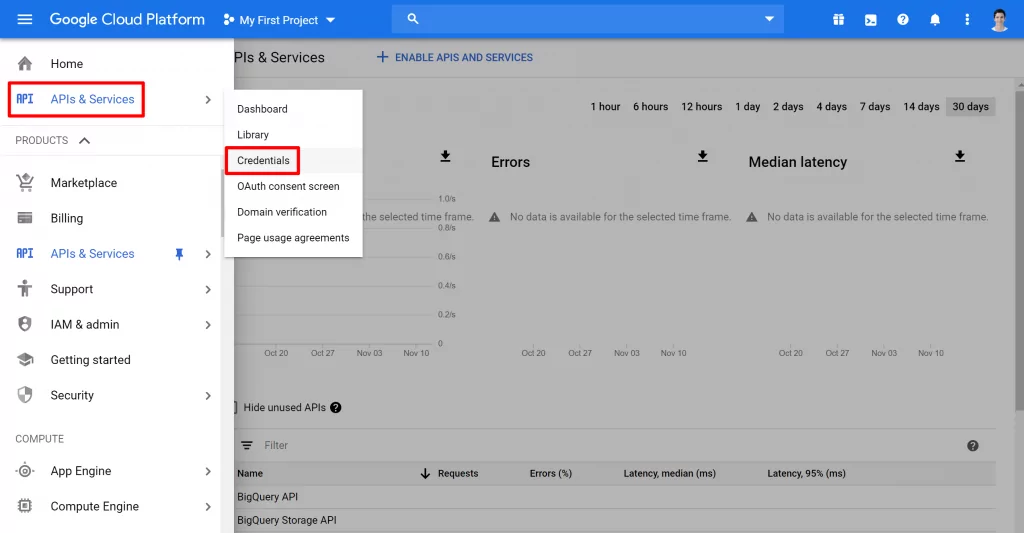
In the Credentials interface, click the button to Create credentials and select API key from the drop-down:

You should see a popup that contains your API key – click the button to Restrict Key:

On the next screen, choose HTTP referrers under Application restrictions and paste in the URL to your WordPress install:
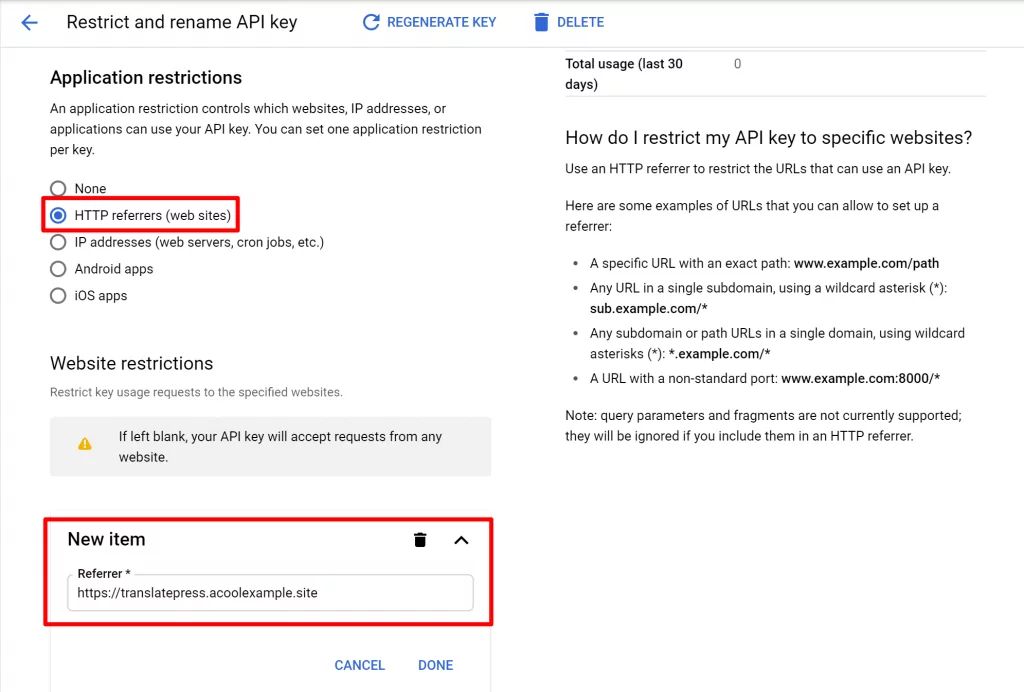
If you’re not sure which URL to put, you can find this information in the Automatic Translation tab of the TranslatePress settings.
Save your changes. Then, keep this window handy because you’ll need your API Key in the next step:
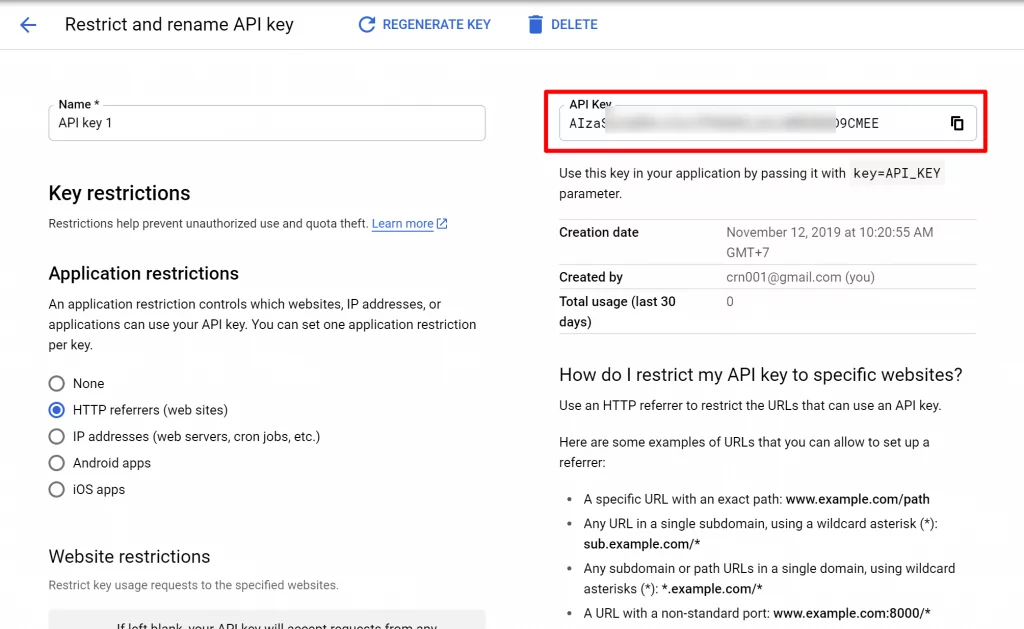
3. Add API Key to TranslatePress to Automatically Translate WooCommerce
Now that you’ve set up your API key, you’re ready to translate your WooCommerce store automatically.
Copy the API key from your Google Cloud Platform dashboard and paste it into the Google Translate API Key box in the TranslatePress settings.
You can also set another limit in TranslatePress to control your budget:
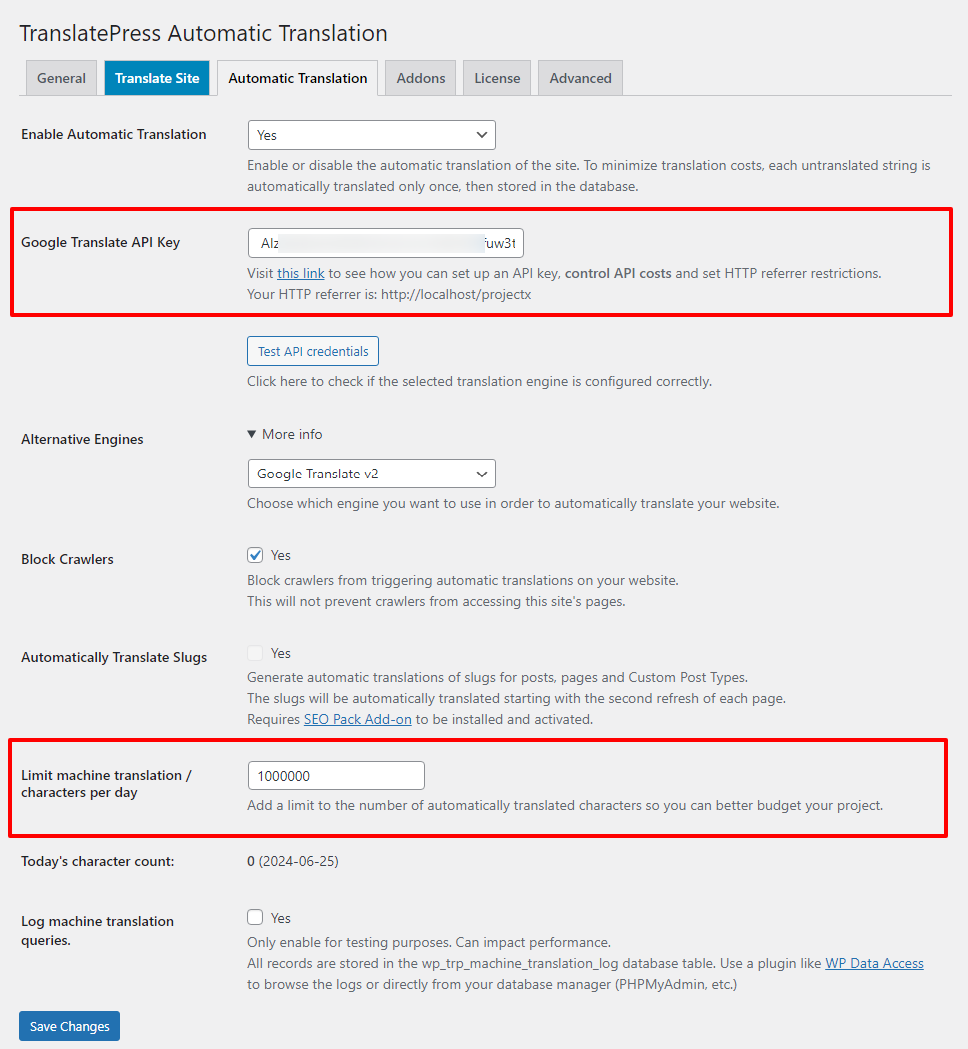
As soon as you save your changes, TranslatePress will automatically translate 100% of your store’s content into the language you selected in Step #1, including your…
- Shop and archive pages
- Single product pages
- Cart page
- Checkout page
- Etc.
How to Manually Refine Your Automatic Translations
At this point, your store should be fully translated using machine translations from the Google Translate API.
If you want to manually edit any of those translations, TranslatePress provides a visual interface from which you can edit every piece of translated text.
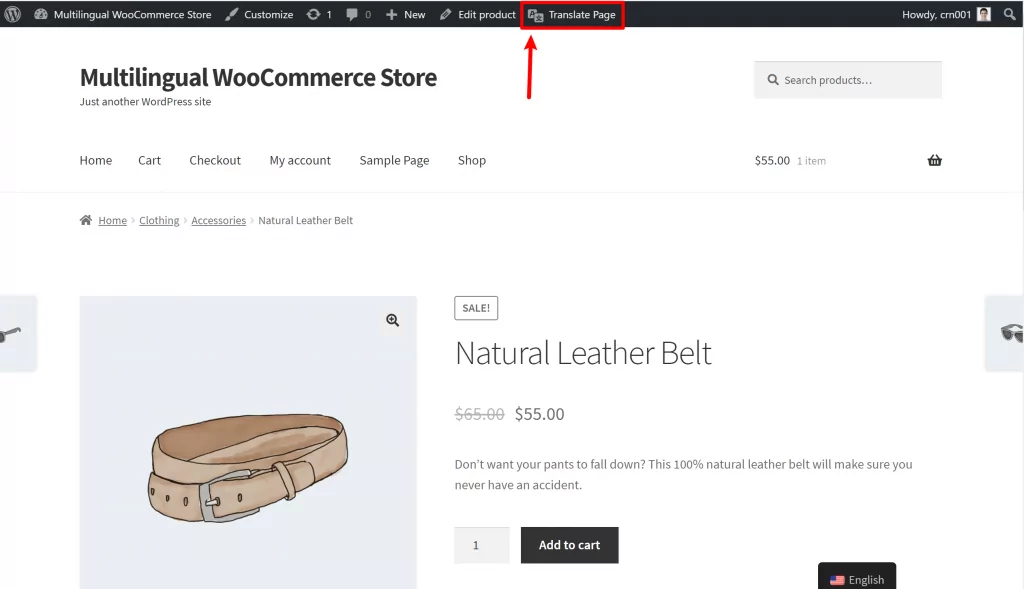
To open the manual translation editor, go to any page or product on your store and click the Translate Page button on the WordPress toolbar:
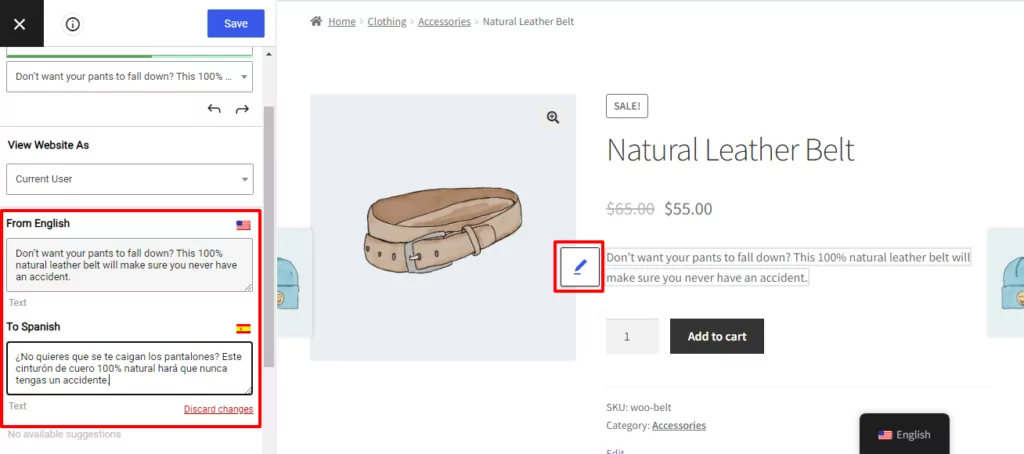
To edit any string, you can hover over it on the live preview and click the pencil icon. You’ll then be able to edit the machine translation version in the sidebar:
If you hover over an element and see a green pencil icon, that indicates that the string is used on multiple parts of your site. These are dynamic strings or gettext strings, coming from your translation-ready theme or a plugin. Common examples from WooCommerce are the…
- Add to cart button
- Sales badges
- Metadata
- Etc.
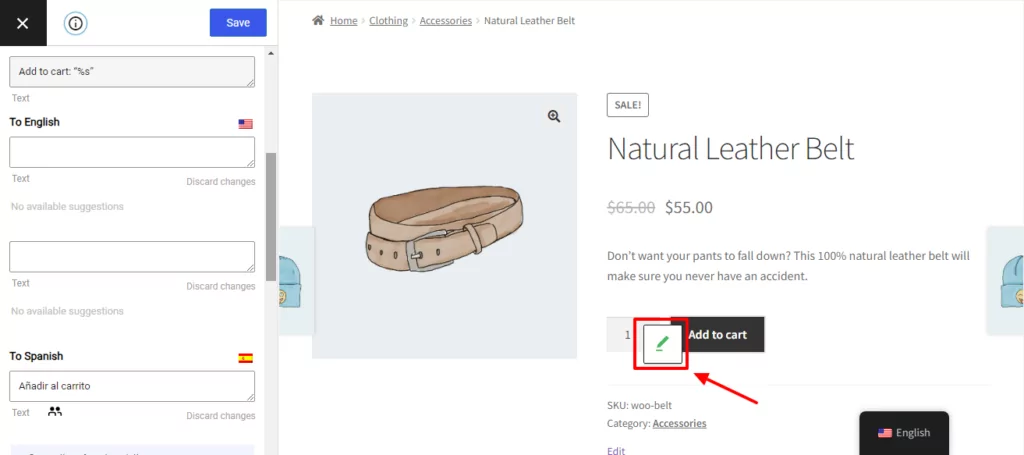
When you edit any one of those elements, the change will automatically update on every page where that element is used.
You can also use this interface to edit other elements, including:
Increase your Multilingual WooCommerce SEO
The free version of TranslatePress helps you use automatic machine translation to translate all of your WooCommerce store’s front-end content, but if you want to rank your translated product and shop pages in search engines like Google, you might want the SEO Pack addon for TranslatePress.
With the SEO Pack addon, you’ll also be able to translate important SEO information like:
- Product URL slugs
- SEO titles and meta descriptions for your products and shop pages
- Product image alt tags
- Product Open Graph Tags for multilingual sharing on Facebook
- Your store’s multilingual sitemap
You can get the SEO Pack add-on as part of the Personal Plan – purchase it here.
Consider DeepL for Better Automatic Translation
As mentioned above, TranslatePress also supports the DeepL automatic translation API.
Many consider DeepL’s translation quality to be superior to Google Translate. For example, in a blind test (sponsored by DeepL), translators preferred DeepL’s translations over other services by a factor of 3:1.
DeepL charges a flat €4.99 fee per month plus €20 per 1 million characters, which makes it a little more expensive than Google Translate, but not by too much.
DeepL is available in the Business & Developer plans. Once you download and install the DeepL Automatic Translation add-on, you can follow these instructions to set up DeepL.
Update: All premium versions of TranslatePress now come with TranslatePress AI, which integrates with Google Translate, DeepL, and Microsoft Translator without the need to generate API keys. This makes translating your website content automatically a lot easier and faster.
Automatically Translate WooCommerce Today
If you want to create a multilingual WooCommerce store, automatically translating your store using TranslatePress is a great way to start.
TranslatePress Multilingual
Using machine translation gives you a solid baseline for all your store’s translations. But at the same time, you can also go back and manually refine high-value pages if needed.
To get started, follow this tutorial. Then, if you’re happy with the results, consider checking out the premium plans for improved multilingual SEO, access to DeepL, automatic user language detection, and more.
Do you still have questions on how to automatically translate WooCommerce? Let us know in the comments!
If you found this post helpful, please check out our YouTube channel, where we constantly upload short & easy-to-follow video tutorials. You can also follow us on Facebook and X to be the first to know each time we post.
Hi there do you provide also automatic email translation for WooCommerce standard email notifications? Eg: english customer receives orders emails in english, italian customer in italian , french in french, etc.
I’m looking for this feature as well… hopefully, TranslatePress will implement this feature soon!