In this post
Translating a website requires more than a simple translation of the content. For instance, a major concern is how to translate a WordPress menu. The menu is one of the first elements of a site that users notice, and they base their first impression on it.
When building a multilingual WordPress menu, there are several aspects you need to pay attention to. Some of your pages or products may be related or available only to some countries, so you may have to hide those menu items for certain languages.
The translation also impacts the menu design. For example, it’s well known that German words are on average longer than English words, which influences the spacing between menu items.
TranslatePress is a WordPress translation plugin that helps you translate any WordPress menu, in just a couple of clicks, using a visual translation editor.
Below we’ll go into the simple steps to achieve this.
Related: How to Translate Custom Fields in WordPress
Setting Up a WordPress Menu
Due to the way it’s built, TranslatePress works out of the box with any theme or plugin, so you can use the WordPress theme of your choice or even a menu plugin. Most themes support a primary and footer menu, but some give users more options for displaying menus.
To create a WordPress menu go to Appearance → Menus → Edit Menus determine its structure and add the desired menu items.
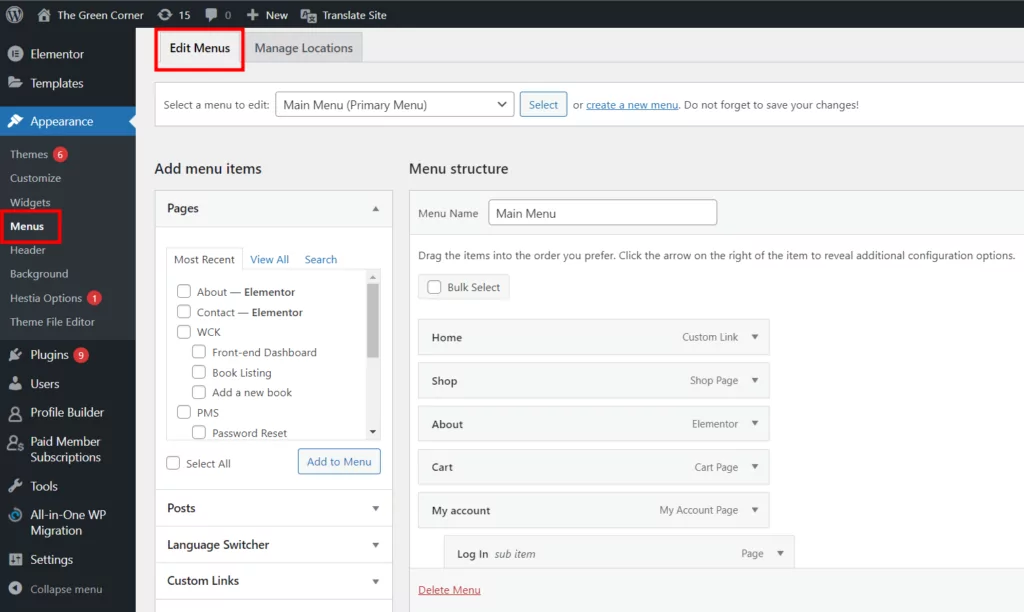
Next, go to Appearance → Menus → Manage Locations to choose the location of the menus. The available locations are defined by the theme you’re using.
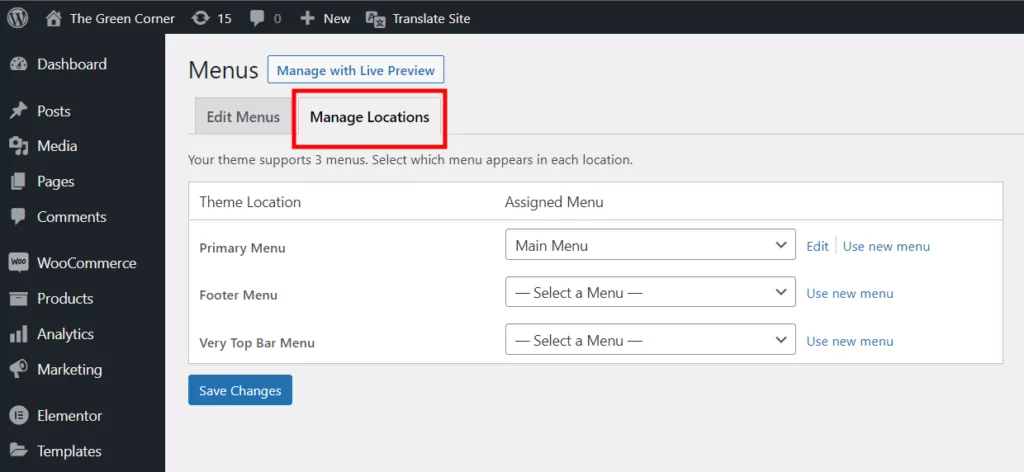
Let’s assume that you already have a primary menu filled with items and subitems that need to be translated. In our example here, we will translate the primary menu which is the main navigation of your website.
Install and Setup TranslatePress
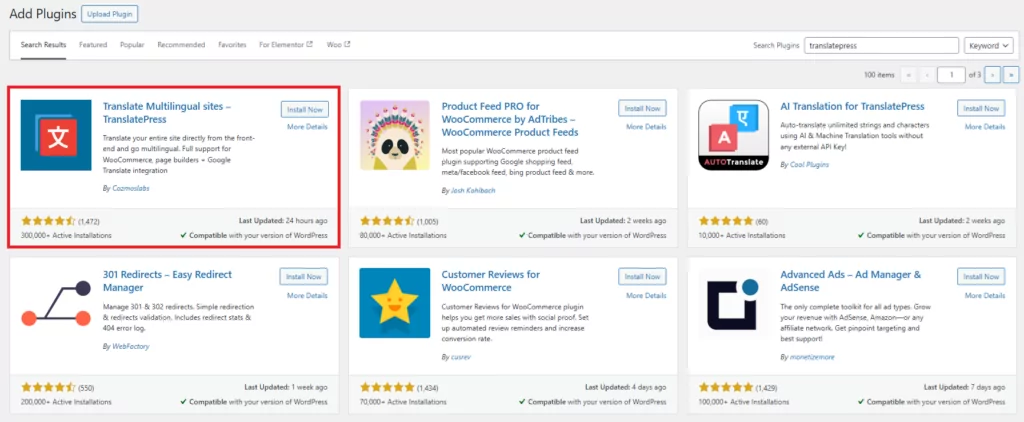
After creating our WordPress menu, we’ll move forward to install and configure TranslatePress. Simply navigate to Plugins → Add New in the WordPress admin dashboard and type “TranslatePress” into the search form. Find the TranslatePress plugin, install and activate it.
Then go to TranslatePress Settings → General to choose the proper setup for your multilingual website.
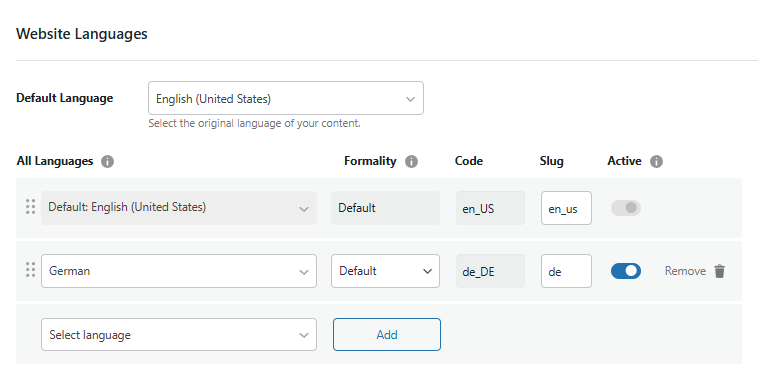
Start with choosing the default language—English in our example—and the language you want to translate the menu into—German in our example.Next, set up the plugin to suit your needs. You can enable Google Translate for automatic translation, use directories for the default language, or customize the language switcher.
How to Translate WordPress Menu Items
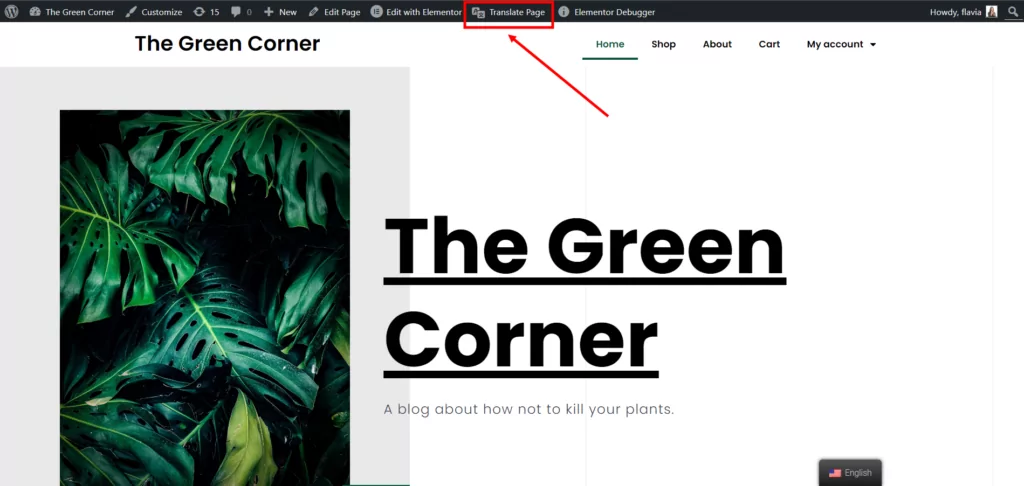
In our example, we will translate the WordPress menu of a blog. Once you finish the creation of your menu, click the Translate Page link in the top admin bar. This will open a visual translation interface and allow you to translate your site content.
Next, simply hover the mouse over the first item in the menu and it will display a blue pencil icon. Click it and in the sidebar make sure to input the translated term from the default language to the desired language (English to German here). Do this for each main item on the menu.
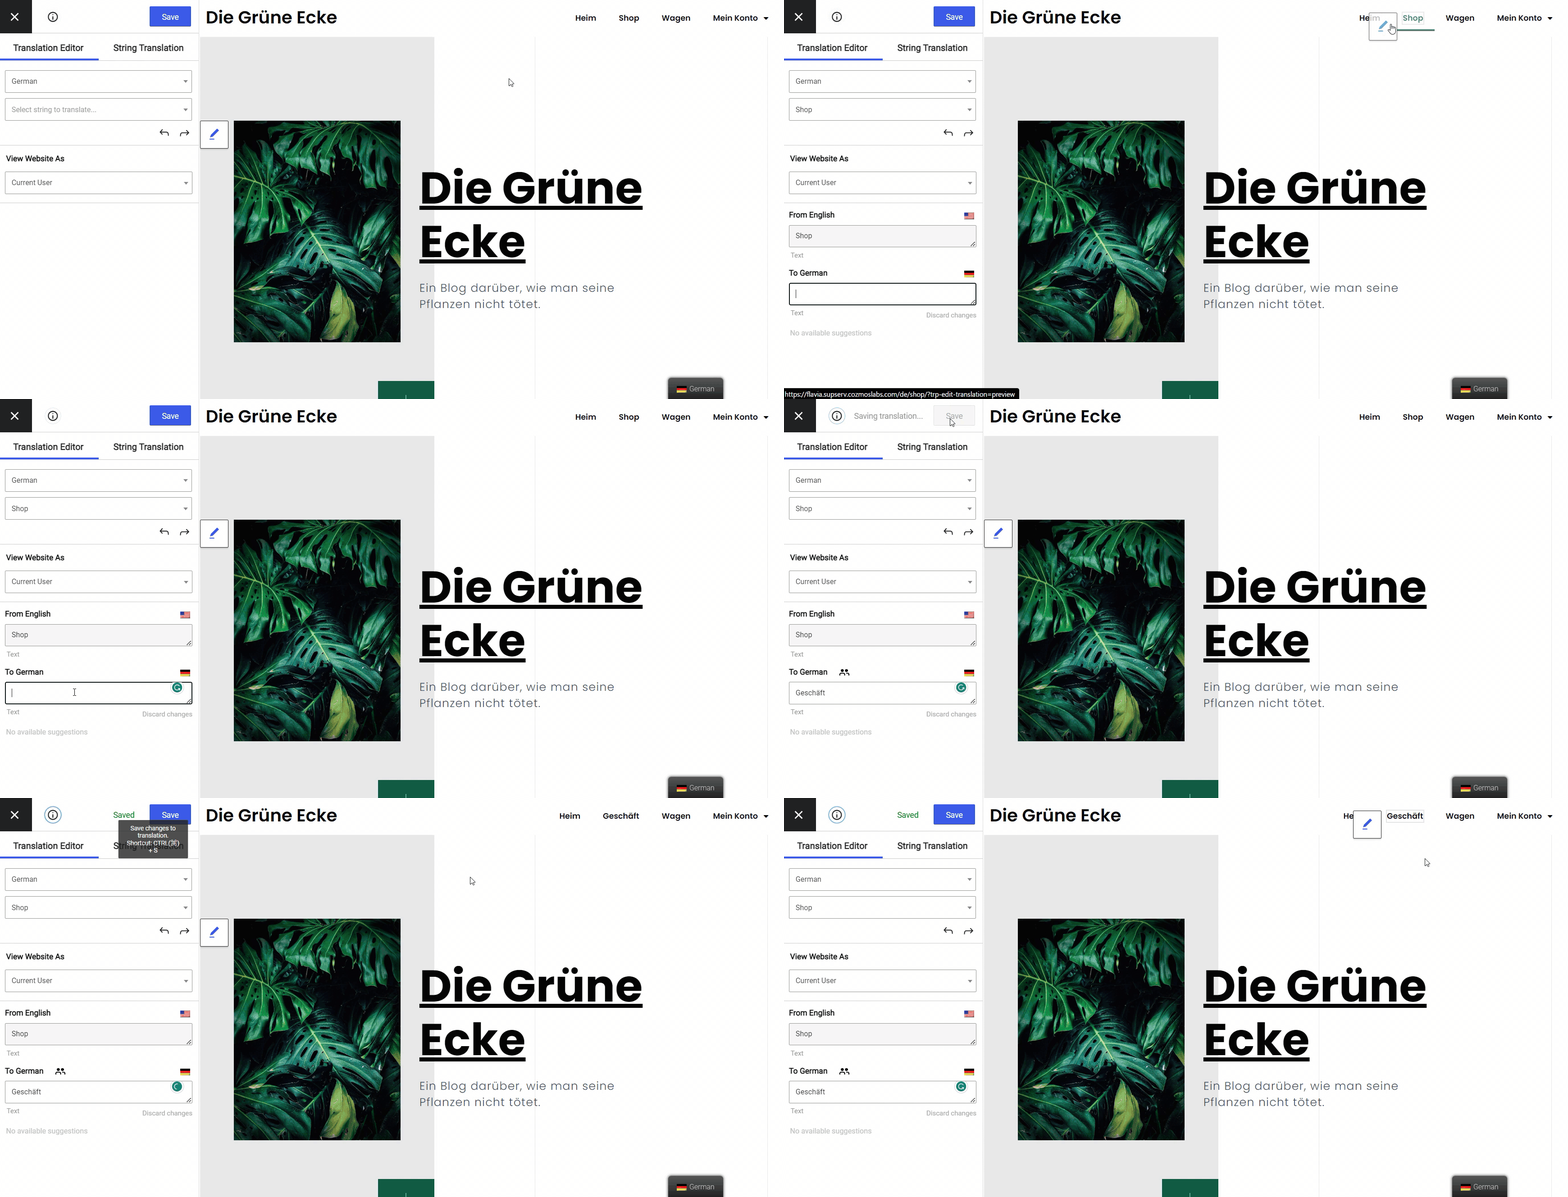
You will notice that when hovering over some items, the blue pencil icon is replaced by a green arrow icon. That means that the plugin has detected the strings generated by the theme and plugins (gettext strings). Don’t worry, the translation process is similar.
At this stage, you should have all the main menu items—the ones visible by default—translated. Next, apply the same process for the submenu items. Hover over each submenu item and input the translation in the sidebar.
And as simple as that, your entire menu is now translated!
Show Different Menu Items for Different Languages
There are situations where you may want to have a different menu structure based on the selected language. This is useful when you want to display different pages for different languages. Or for when certain content is not translated into a specific language and you don’t want it to appear in the menu for that language.
TranslatePress comes with a few add-ons and features for extended functionality.
For instance, you can translate only certain pages if you want to, while with the premium add-on Navigation Based on Language you can easily display different menu items for different languages.
This gives you a lot of flexibility as to what menu items to display in certain languages, as well as what content you can exclude from being translated.
Setting Up the Navigation Based on Language Add-On
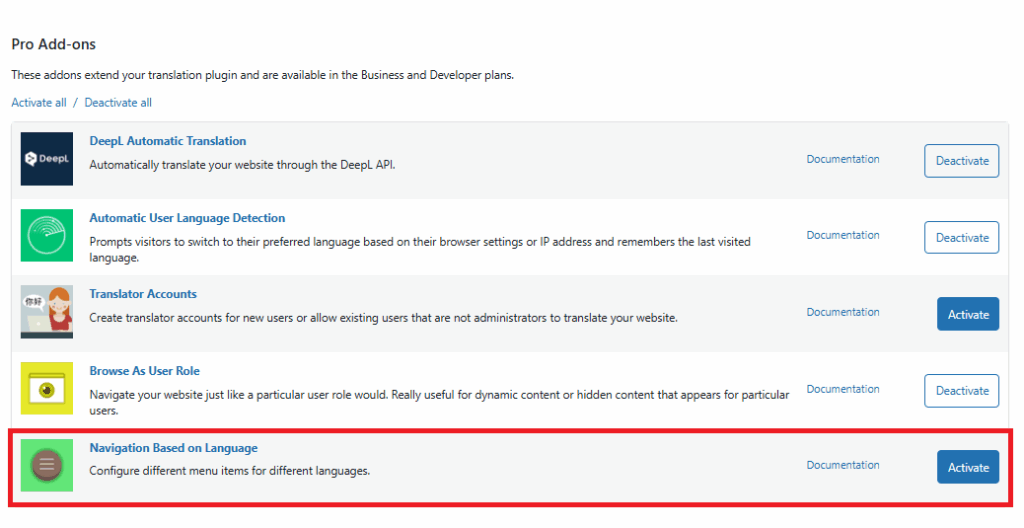
The Navigation Based on Language add-on is available in the pro versions of TranslatePress. After purchase, you can activate the add-on by navigating to Settings → TranslatePress → Addons tab. Locate the add-on in the Pro Add-ons section and click the Activate button to its right.
Next, go to Appearance → Menus → Menu Structure and by opening a certain menu item you will see the option to Limit this menu item to certain languages. Make sure to select only the languages where you want to show that menu item.
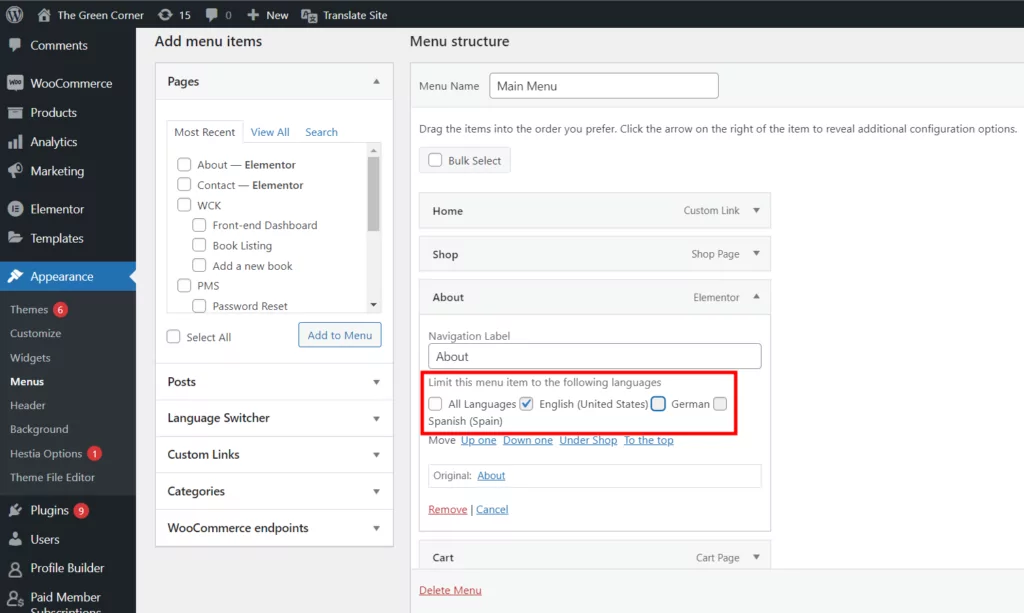
For our example, I want to eliminate the About page from the German and Spanish versions of the site. To do this, I’ll uncheck the All Languages checkbox and only check the English language instead. Now, you can see that this item is hidden when visiting the German version of the site.

Translate your entire Website
Turning your site multilingual doesn’t end with just translating the WordPress menu. You have to translate all the elements of your future multi-language website. The same visual translation process can be applied to any text on your site.
Besides standard text translation, you can use TranslatePress to translate different types of elements, like images containing text, WooCommerce products, custom fields & post types, forms, popups, etc. Or if you created your website using a popular page builder, like Elementor or Beaver Builder, you’ll be able to translate it easily with TranslatePress. It works out of the box, no extra compatibility needed.
Simply navigate each page using the TranslatePress translation editor, select and translate each piece of content, and head to the next one. You’ll have your site translated in no time.
If you’re looking to speed up the translation process, check out the Automatic Translation feature available in TranslatePress. Using automatic translation tools like Google Translate or DeepL, TranslatePress will automatically translate your site instantly.
Afterwards, you can manually refine the translations and make sure your translated content is high quality.
Wrapping Up
Translating a WordPress menu is really straightforward using TranslatePress. We’ve summed up all the steps covered above in this short video below:
In our example, I used only one translation language for learning purposes and to streamline your onboarding, but you can translate a WordPress menu (and your entire site) into as many languages as you need.
On top of that, you can use the navigation based on language add-on to customize which menu items are displayed based on the active language.
TranslatePress Multilingual
If you haven’t used TranslatePress yet, make sure to play with the demo or check out the free version.
Do you still have questions about translating WordPress menus? Let us know in the comments!
If you found this post helpful, please check out our YouTube channel, where we constantly upload short & easy-to-follow video tutorials. You can also follow us on Facebook and X to be the first to know each time we post.
