In this post
In this post
If you want to grow your membership website and open your audience to people in a whole new language, creating a multilingual membership site is a great decision.
By offering your membership site in multiple languages, you not only expand your potential audience, but you also make it easy for existing multilingual members to use your site and you can start ranking your membership site for search engine queries in new languages.
Translating a membership website can be difficult, though. When you display different content based on a user’s membership level, it can be tough to comprehensively translate your site so that every single member gets a localized experience.How to Use Google Translate in WordPress (Easy, SEO-Friendly Plugin)
To help make your life a lot easier, we’re going to show you how to create a multilingual membership site on WordPress. Two great things about the method that we’re going to show you are:
- You can translate all of your content using a simple visual editor, rather than messing around in complex backend interfaces.
- You can browse as different user roles while translating your content, which lets you see your site as different membership levels to create that perfect localized experience.
What You Need to Create a Multilingual Membership Site on WordPress
To create your multilingual membership site and follow this tutorial, you only need two things:
While the method that we’ll show you in this tutorial will work with any WordPress membership plugin, we recommend (and will use) Paid Member Subscriptions.
Paid Member Subscriptions comes in both a free and premium version and lets you:
- Create as many membership levels as needed, along with custom registration forms.
- Restrict access to your content using those membership levels.
- Charge for access to your membership site, on either a one-time or recurring basis.
Then, TranslatePress lets you translate all of your membership site content using a simple visual editor. TranslatePress:
- Lets you translate all of your site’s content, no matter where it’s coming from.
- Creates SEO-friendly translations and implements multilingual SEO best practices.
- Supports both manual translation and automatic translation via Google Translate or DeepL.
TranslatePress works with all membership plugins right out of the box, including Paid Member Subscriptions. It also lets you translate your membership content while previewing your site as different user roles, which makes it easy to translate restricted content.
Ready to create your multilingual membership website? Let’s dig in…
How to Create a Multilingual Membership Site
Here’s how to create your multilingual membership site in three steps:
- Set up your membership site (if you haven’t already)
- Install TranslatePress and choose your languages
- Translate your membership content using the visual editor
1. Set Up Your Membership Site With Paid Member Subscriptions
First off, you’ll need to set up your membership site itself if you haven’t already.
To get started, install and activate the Paid Member Subscriptions plugin. You can test it out with the free version at WordPress.org or upgrade to the premium version for recurring subscriptions, content dripping, and a lot more.
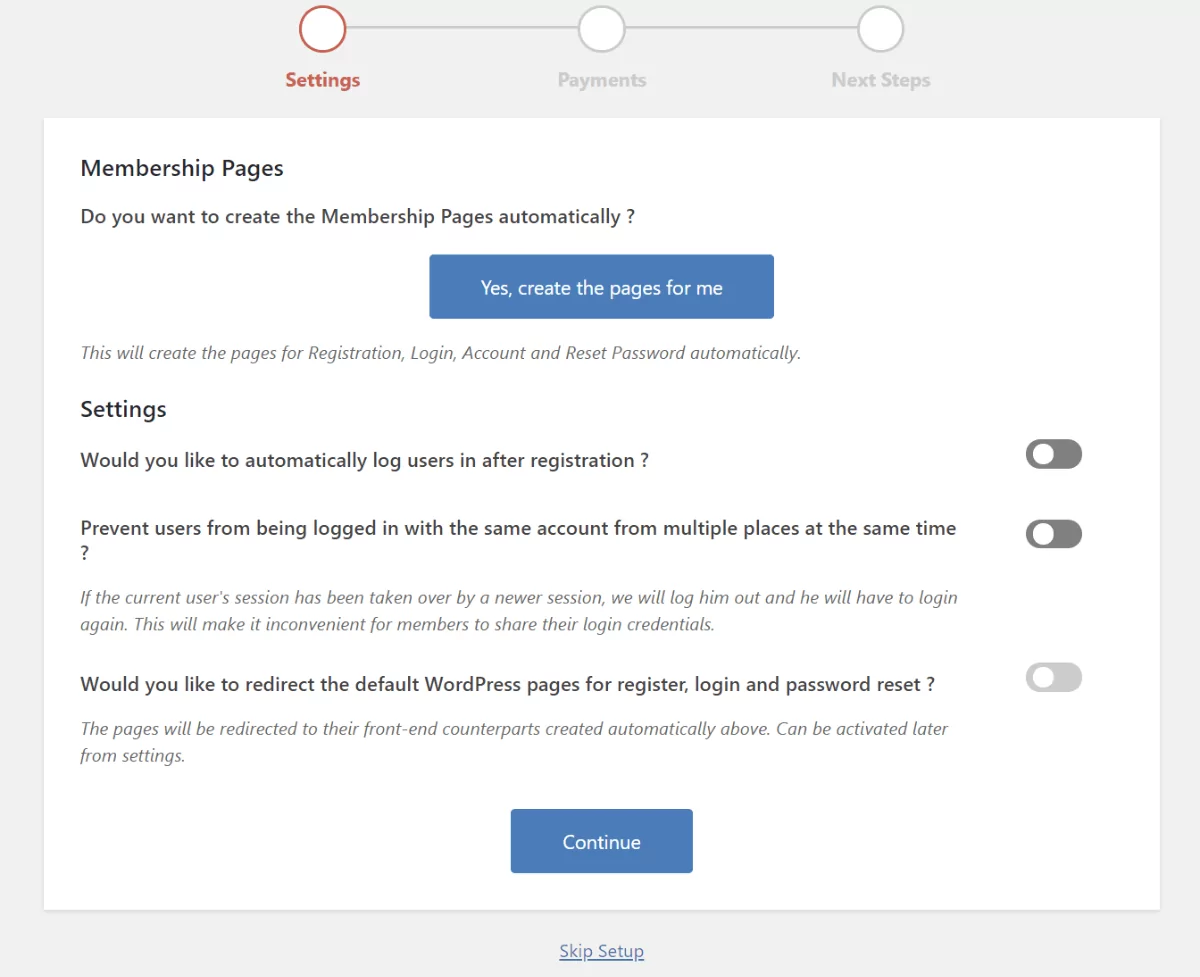
Once you install the plugin, it will launch a setup wizard to help you configure important basics, like creating core pages and choosing your payment processor:
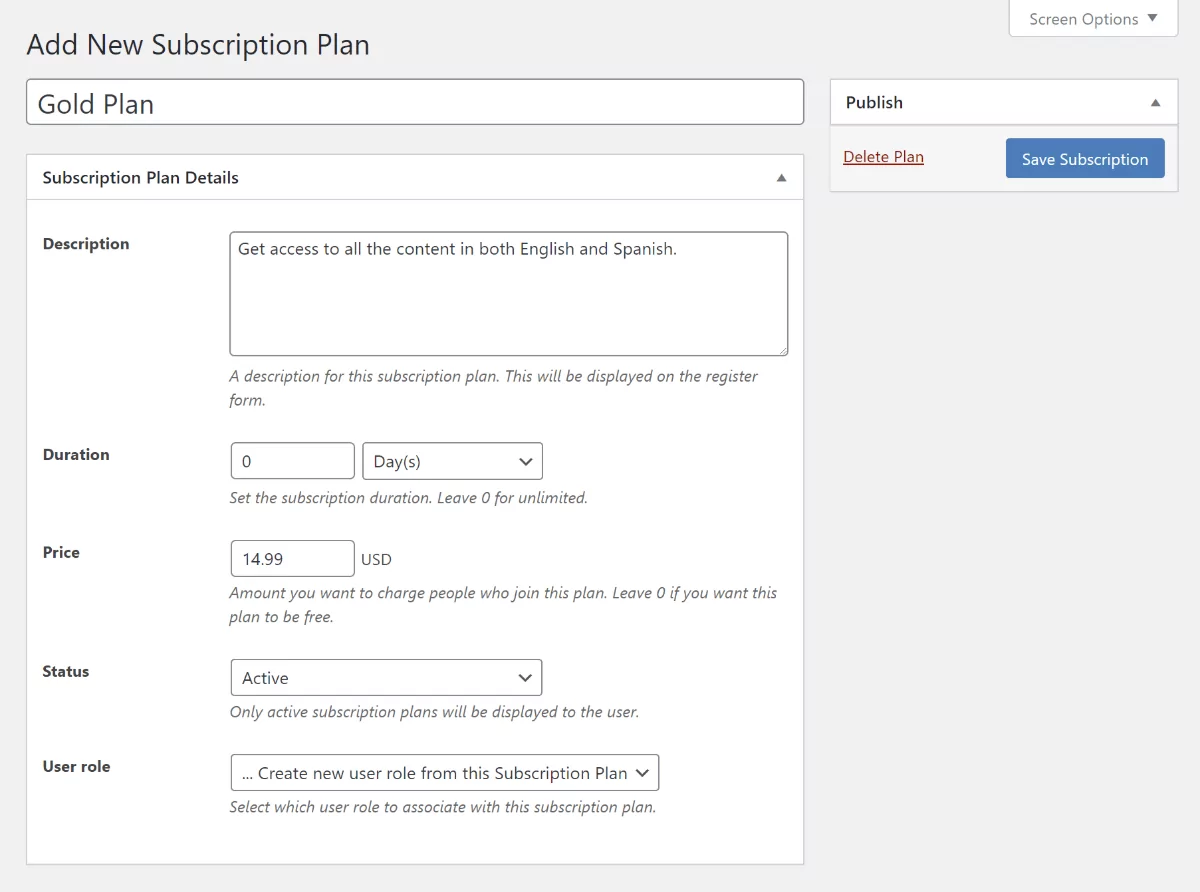
After completing the setup wizard, you can go to Paid Member Subscriptions → Subscription Plans → Add New to create the different membership access levels for your site:
You can repeat the process to create additional membership plans and order them so that users can easily upgrade/downgrade between different membership levels.
Once you’ve added your membership levels, you’re ready to start restricting access to content.
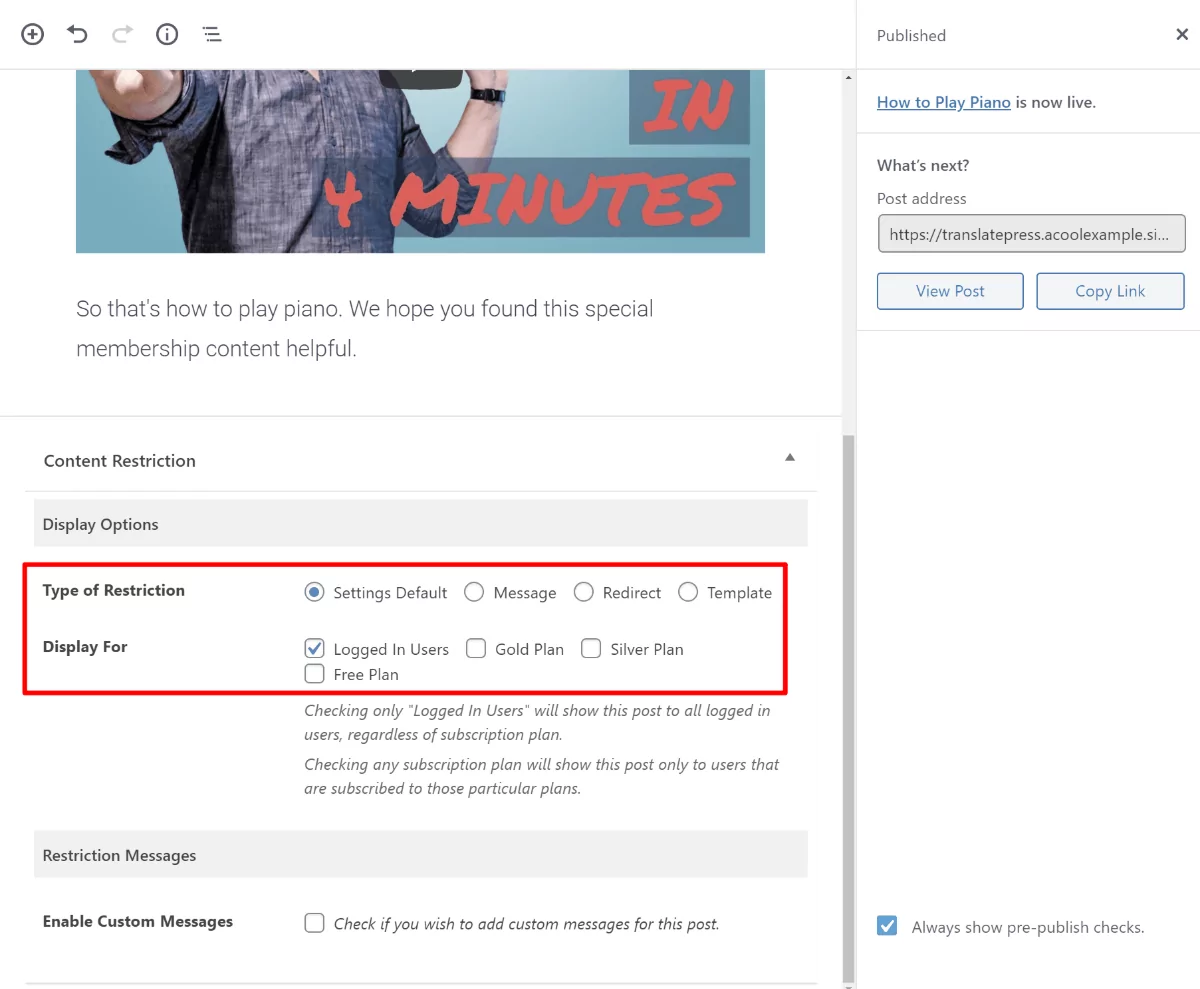
To do so, open the WordPress editor for the post, page, or custom post type that you want to restrict access to. Then, scroll down to the Content Restriction box.
There, you can use the checkboxes to select which membership plans can see this content. You can either choose specific membership levels or grant access to all logged-in users.
You can also customize the message that users see if they don’t have access:
Repeat the process for all the content that you want to restrict. With the Global Content Restriction add-on, you can also bulk restrict entire categories, tags, post types, etc.
And with that, you have a working WordPress membership site. Now, it’s time to translate it into new languages!
2. Configure TranslatePress and Choose Languages
To start translating your site, install and activate the free TranslatePress plugin from WordPress.org.
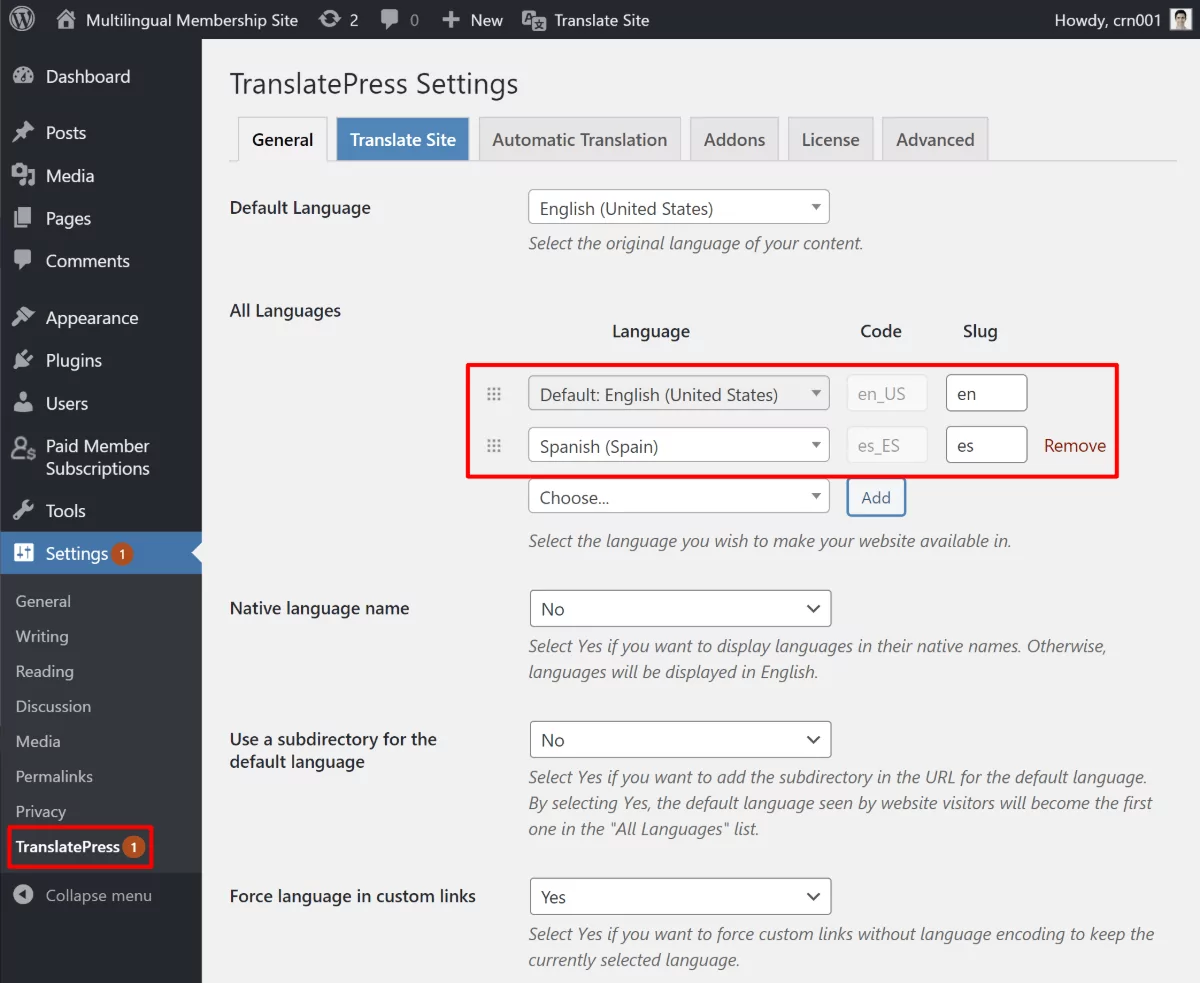
Then, go to Settings → TranslatePress to configure the plugin and choose your languages.
In the General tab, you can choose the languages to use and configure some other basics, like how the language switcher functions.
For example, to translate an English-language membership site into Spanish, you’d set it up like this:
If you want to save some time, TranslatePress also supports automatic machine translation via:
- Google Translate (available in the free version)
- DeepL (requires the paid version)
Even if you opt to use automatic translation, you’ll still be able to manually refine those translations using the visual translation editor.
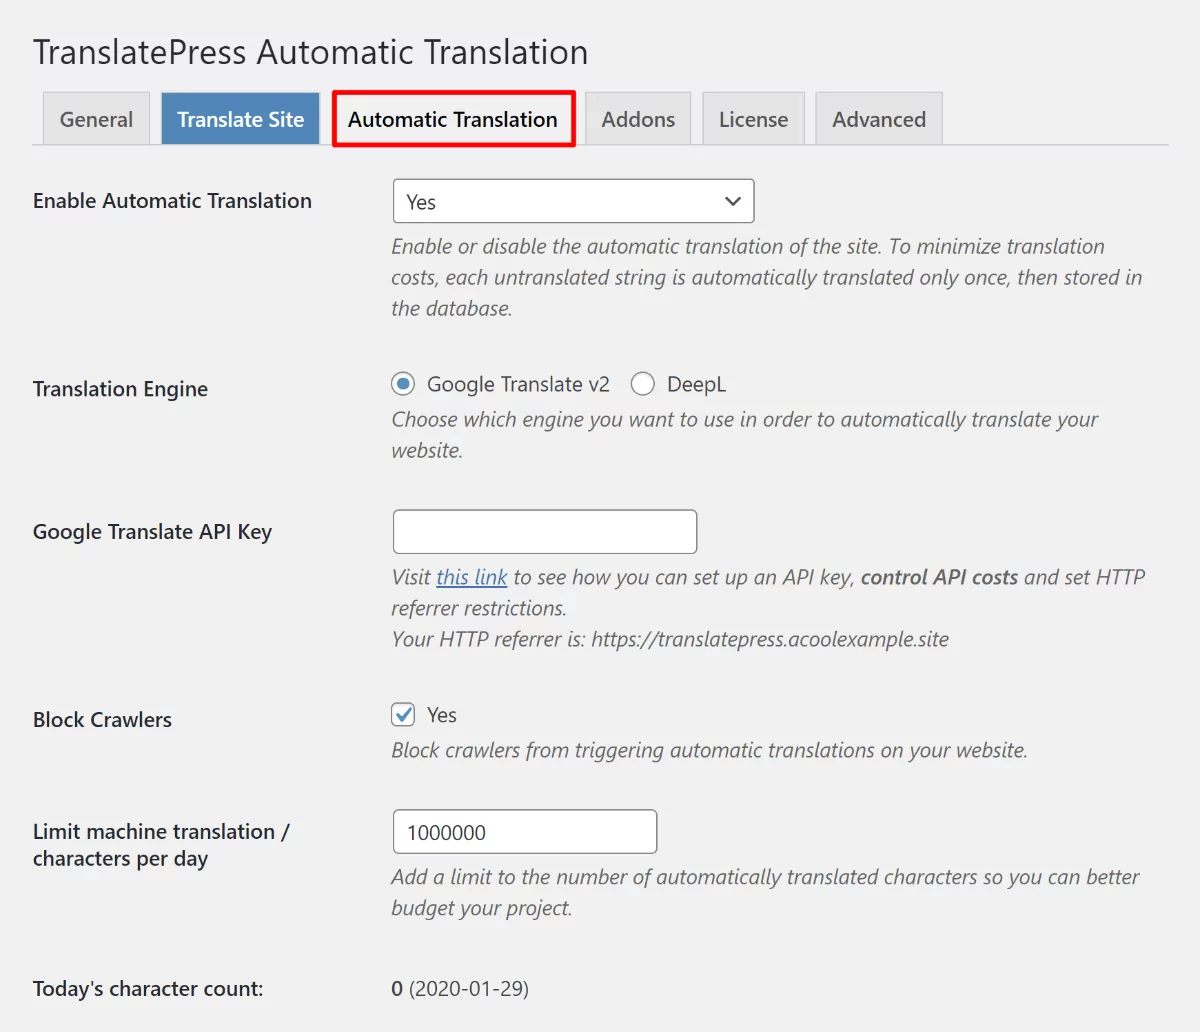
If you want to configure automatic translation:
- Go to the Automatic Translation tab in the settings area to enable automatic translation.
- Choose your automatic translation service.
- Authenticate your site with the service.
- Set limits to control billing (you’ll need to pay the translation service directly – but TranslatePress itself does not charge you extra for using automatic translation).
3. Launch Translation Editor to Translate Membership Site
Now, you’re ready to translate your membership site into the languages you chose in the previous step.
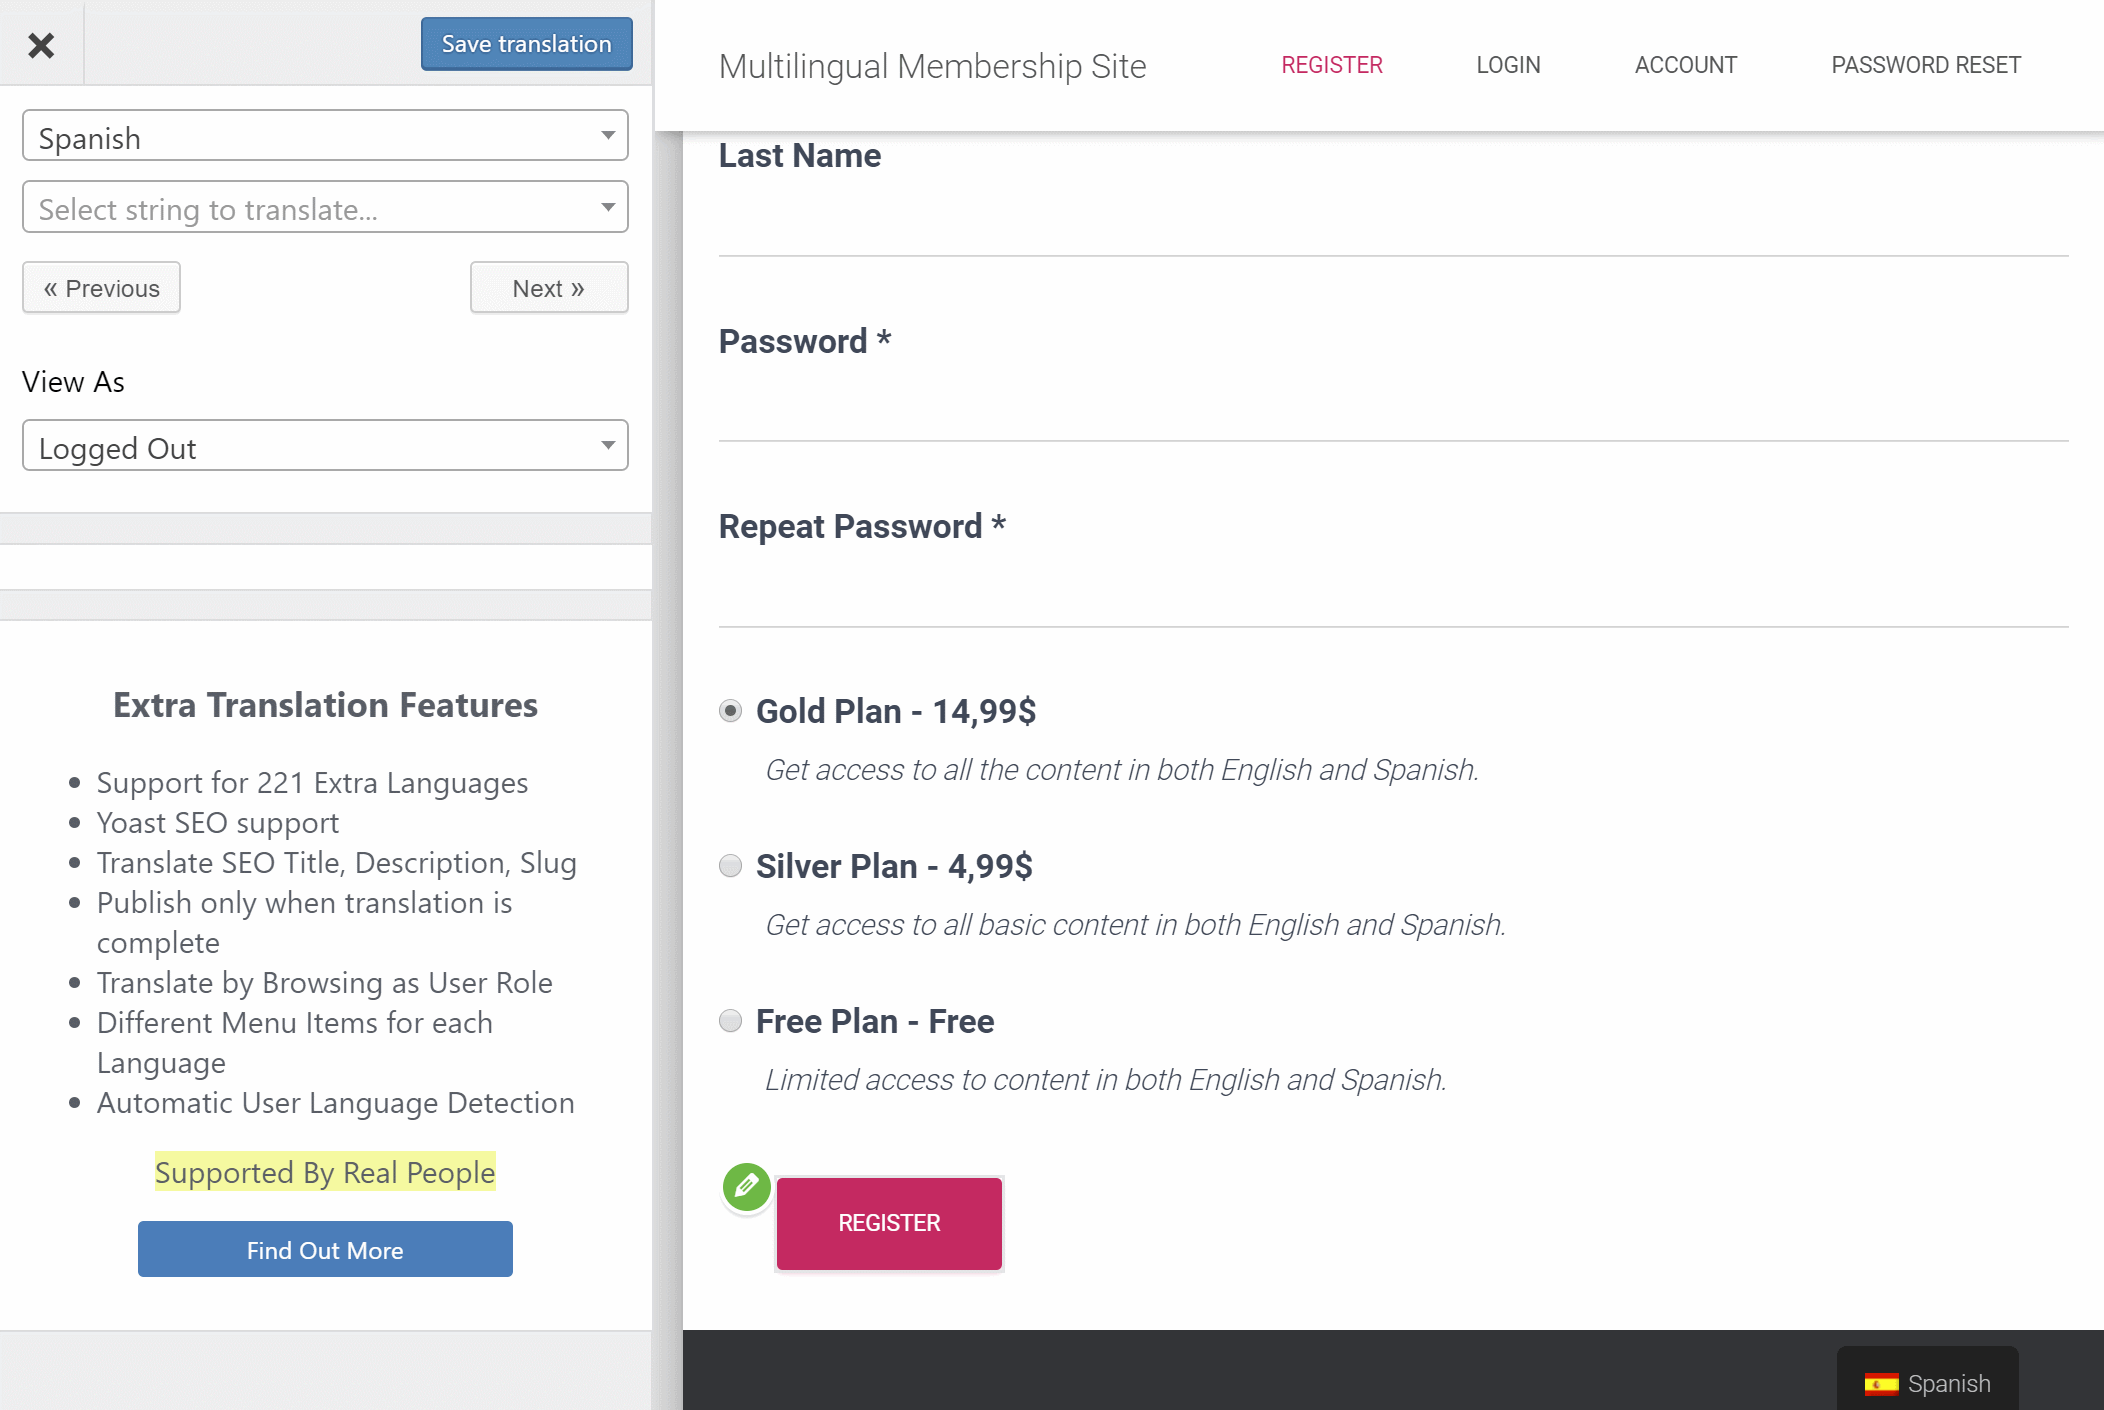
For this first example, we’ll translate the membership registration page from Paid Member Subscriptions. Then, we’ll get into how to translate restricted member content in the next section.
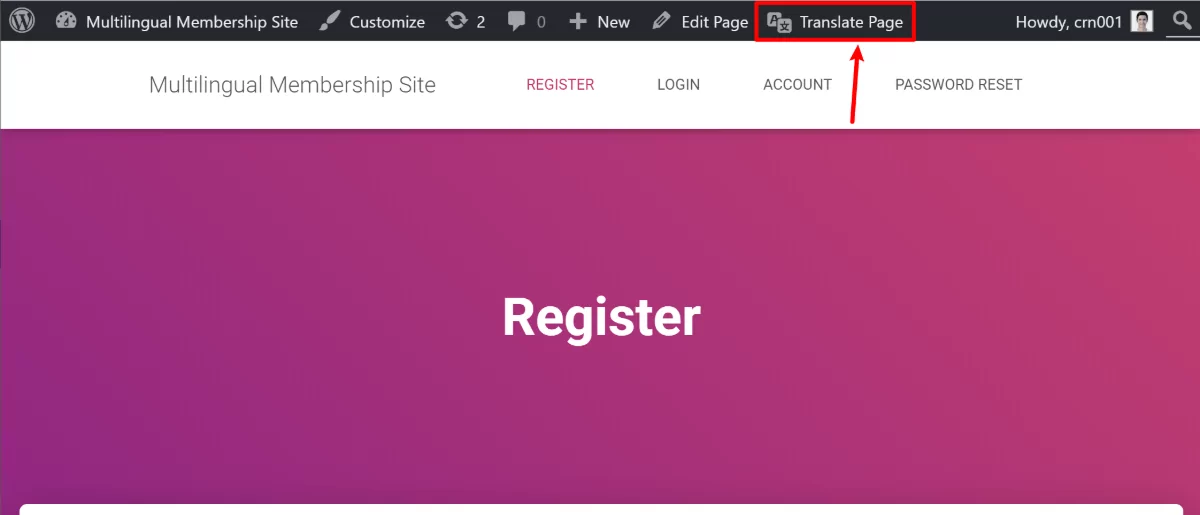
To access the visual translation editor, open the piece of content that you want to translate on the front-end of your site. Then, click the Translate Page button on the WordPress toolbar:
Then, to translate the content you can:
- Hover over the content that you want to translate.
- Click the pencil icon.
- Enter your translation in the sidebar.
Then, just repeat the process to translate your entire page. You can use the same approach to translate pretty much every element on your membership site, including:
- Regular text
- Form fields
- Menu items
- Buttons
- Widgets
- Images
- Sliders
- Popups
- Categories & Custom Taxonomies
- Etc.
At this point, you have the knowledge that you need to create a multilingual membership site. But let’s take a look at a few more examples of how you can use TranslatePress with your membership content…
How to Translate Restricted Member Content
With a membership website, not all of your visitors will experience your site in the same way. For example, a logged-in paying member might see one set of content, while an anonymous guest might see different content (like a prompt to register)
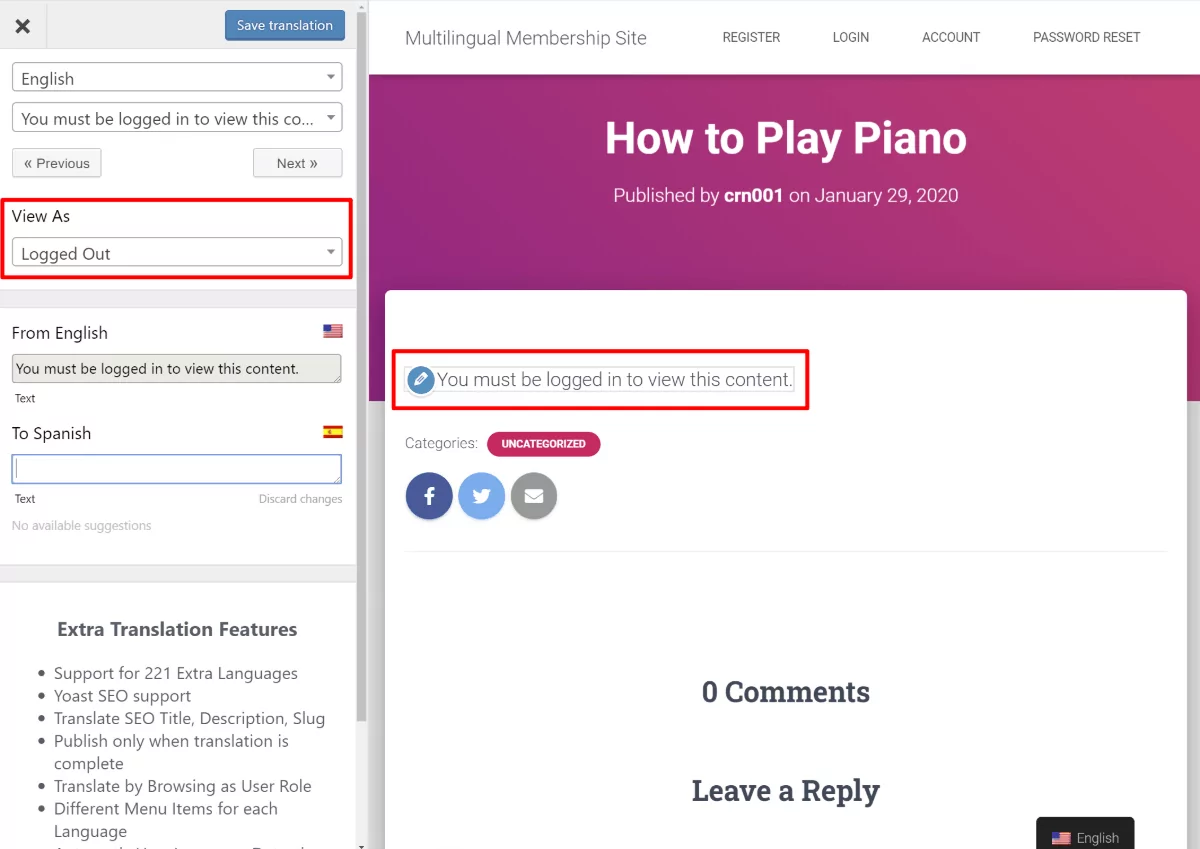
To handle these situations while using the same visual translation editor that you saw above, you can use the View As feature, which lets you see and translate your site’s content as different types of users would see it.
With the free version of TranslatePress, you can browse your site as:
- A logged-in user
- An anonymous guest
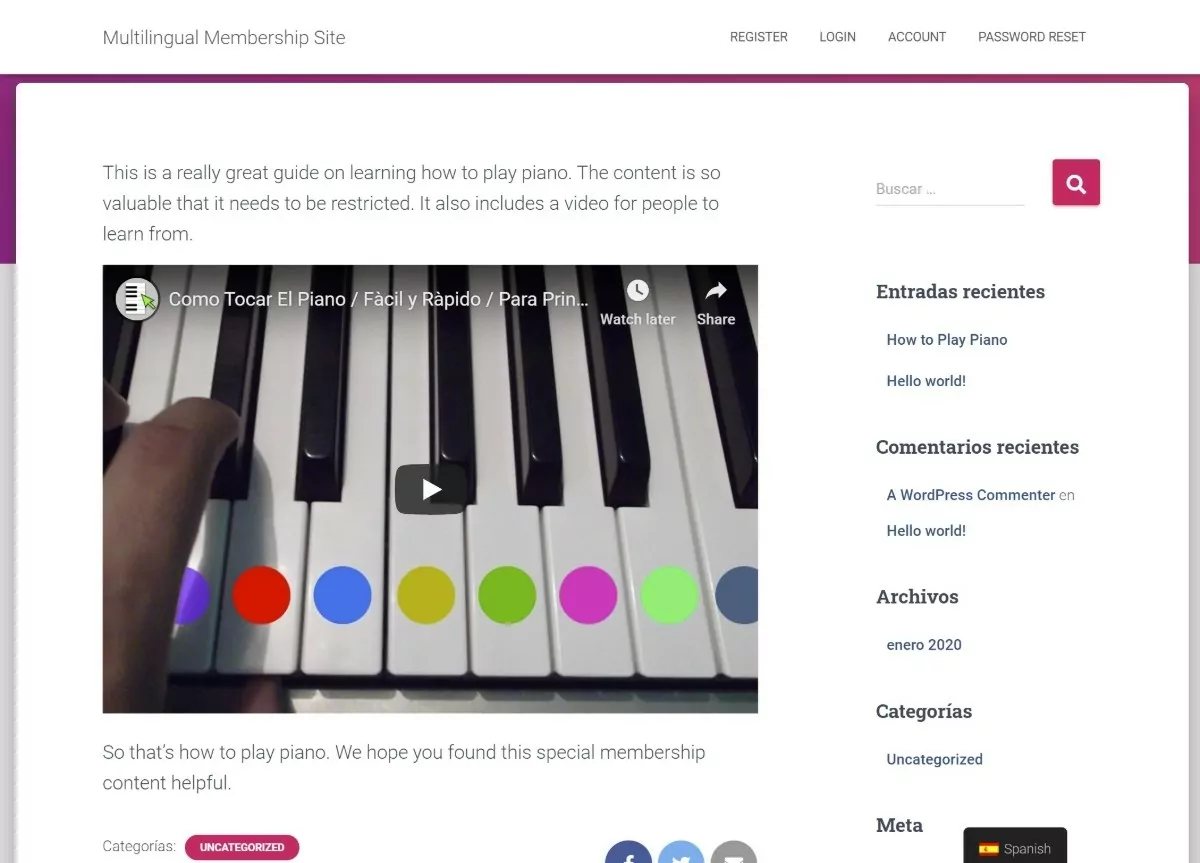
For example, when you browse a piece of content as an anonymous visitor, you can see and translate the content restriction message:
But when you switch to a logged-in user, you see and can translate the actual restricted content:
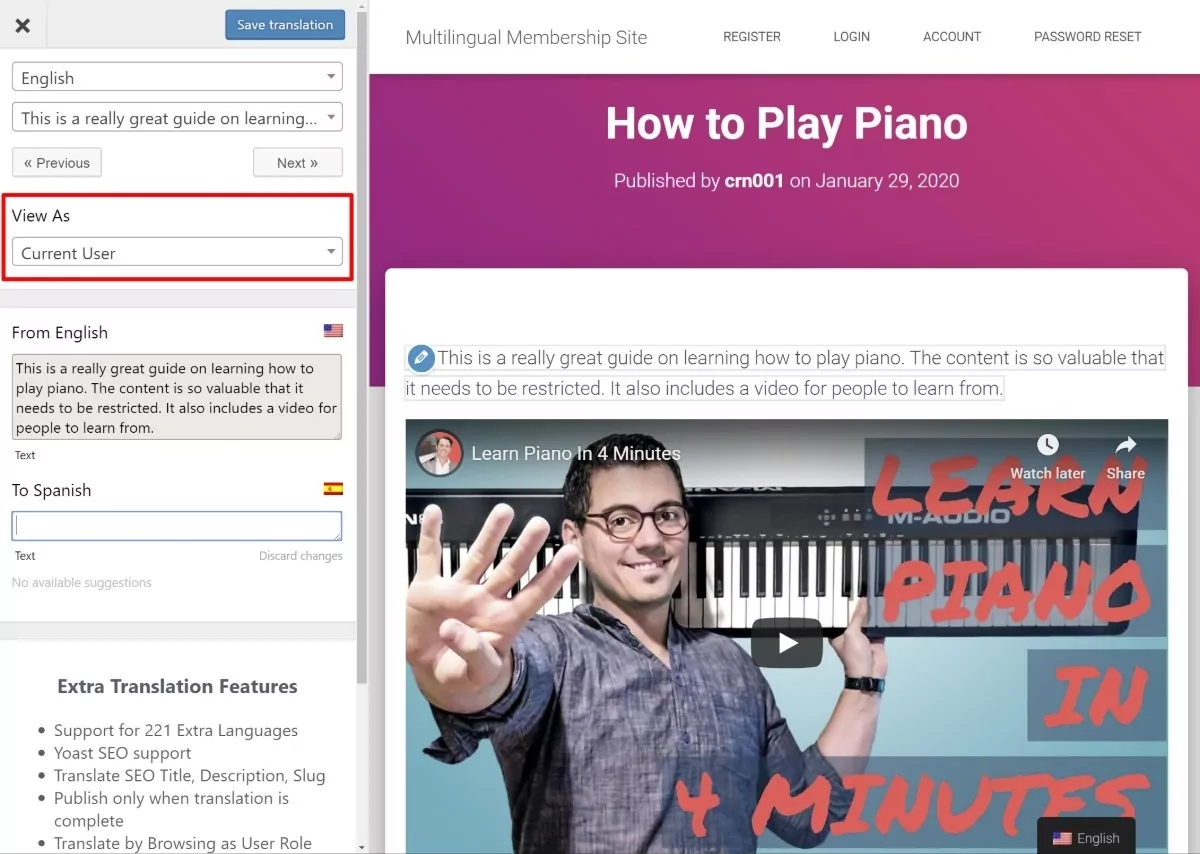
If you show the same membership content to all logged-in users, this might be all you need.
However, you might also have a situation where you show different content based on a logged-in user’s role.
If you upgrade to the TranslatePress Business plan or above, you’ll get access to the Browse As User Role add-on, which lets you use the same feature to browse your site as specific user roles.
By default, Paid Member Subscriptions creates a unique WordPress user role for each membership level, so this essentially lets you browse and translate your site as each unique membership level:

With this feature, you can make sure that every single member, no matter their access level, gets a great localized experience.
How to Translate Videos
A lot of membership sites include video content. If you want to fully localize your site, you might want to recreate these videos in each language that you offer.
Or, another option would be to use the same video and add subtitles.
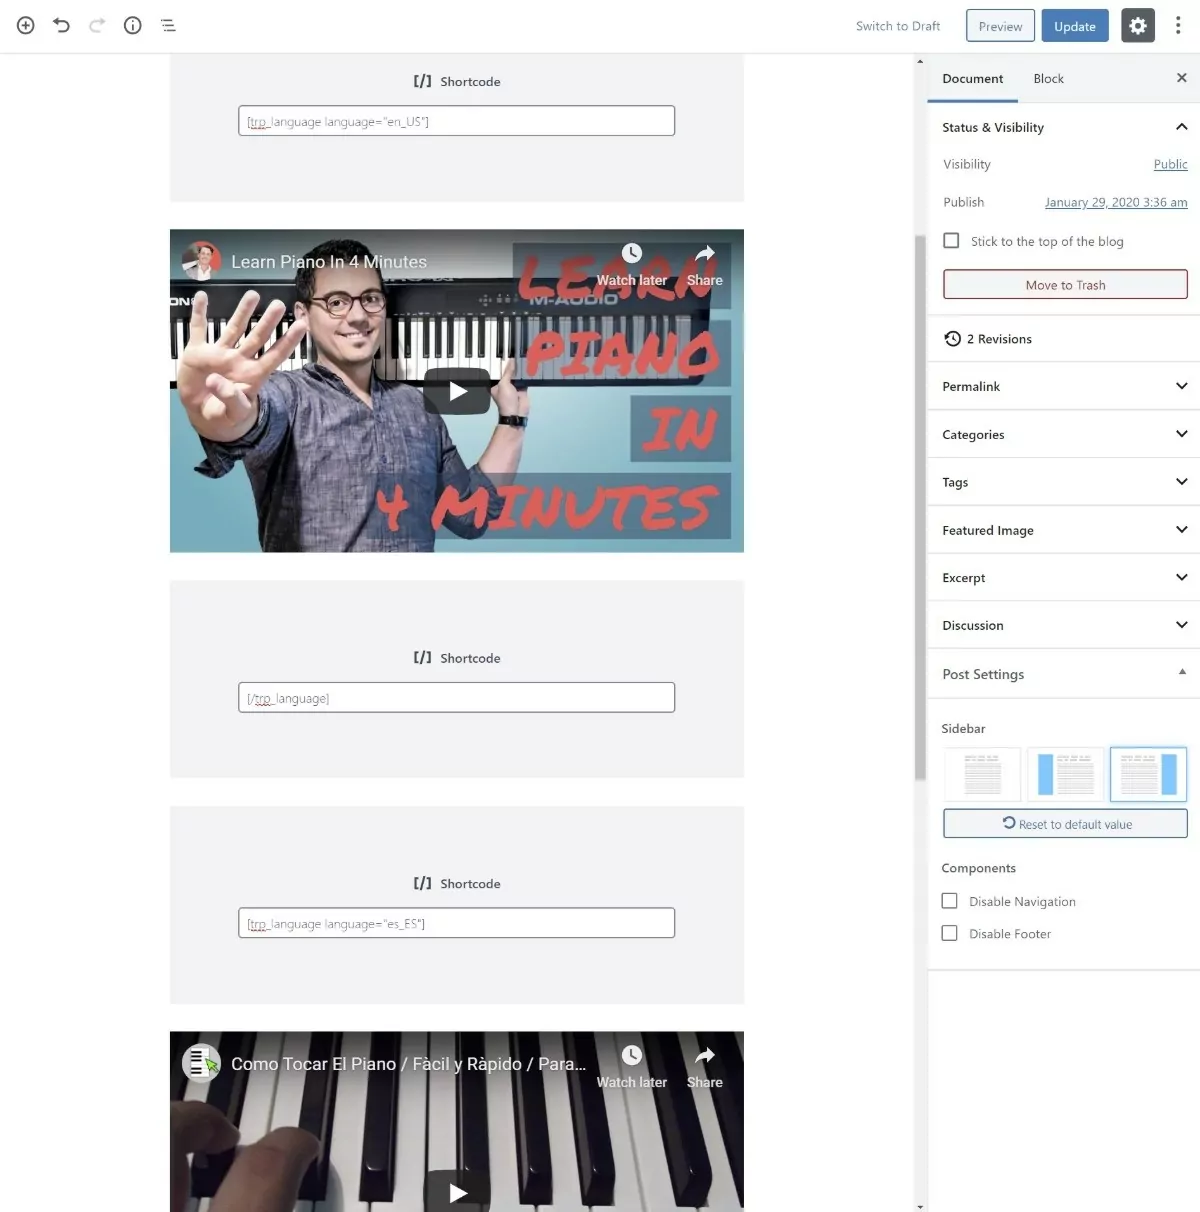
If you want to create completely separate videos in each language, you can display different videos based on a user’s language using the TranslatePress shortcode, rather than the visual translation editor.
To set this up, you need to open the regular WordPress editor for the piece of content that contains your video.
Then, add two separate video blocks and wrap them with the shortcode for the appropriate language.
The example below shows how to set it up so that:
- English-language users see video #1
- Spanish-language users see video #2
[trp_language language="en_US"]
VIDEO EMBED BLOCK #1
[/trp_language]
[trp_language language="es_ES"]
VIDEO EMBED BLOCK #2
[/trp_language]
Now, English visitors will see the first video:
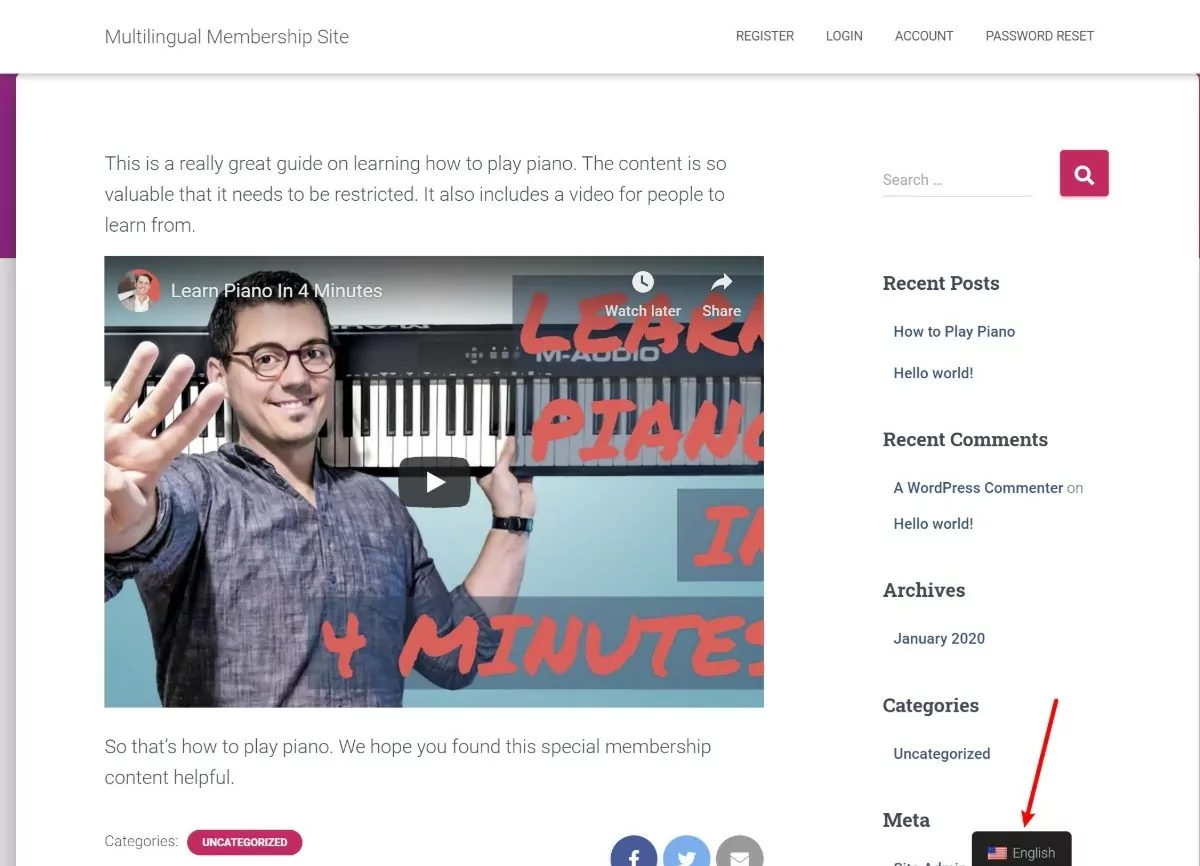
While Spanish visitors will see the second video:
We didn’t translate the text into Spanish so that you can better see how it’s the exact same page, just with a different video.
Create a Multilingual Membership Site Today
With Paid Member Subscriptions and TranslatePress, you can easily set up your own multilingual membership site on WordPress.
To create your membership content and subscription levels, you can use Paid Member Subscriptions to create unlimited free or paid membership levels and use them to restrict access to your content.
Then, once you’re cooking with your membership site, you can use TranslatePress to translate all of your membership content using a visual interface.
TranslatePress doesn’t just work with Paid Member Subscriptions, either – you can use it to translate content from literally any WordPress membership plugin.
You can use TranslatePress to create a multilingual membership site for free, but there are also a ton of benefits to upgrading to the premium version of TranslatePress:
- Browse as user role – while the free version lets you browse as logged-in/anonymous visitors, the premium version lets you browse as specific user roles, which lets you translate content for each individual membership level.
- Multiple languages – the free version lets you translate your site into one new language, while the premium version lets you use unlimited languages.
- Improved multilingual SEO – the premium version adds helpful multilingual SEO features to help your membership site rank higher in Google in all languages.
- DeepL support – the free version lets you use Google Translate for automatic translation, while the premium version adds support for DeepL, which many consider to offer better quality translations.
- Automatic user language detection – redirect visitors to their preferred language based on their browser language or IP address.
To learn more and upgrade, check out all of the premium features.
That is great! I have been waiting for a language plugin that could do video replacement. I’m sold, this looks fantastic. Congrats on some great work
I do have a question though, what happens to the video replacement if I add a third language that doesn’t have a video? lets say I add German, but I don’t have a German video. Do I still have to add a shortcode option for the German video (maybe with the English video) or does it default to the first one…or would it show no video at all? What would happen in that case?
Hi Nicolai,
Thanks for the kind words!
To answer your question, if you add German, but don’t have a German video, no video will be displayed.
Got it thanks! — I also got the plugin 🙂 (Business version)
It would be great if there was a default fallback setting for all additional languages. That way for example, you could have an English, Spanish and French video and then keep adding languages, say German, Portuguese and Polish and they would just show the fallback video (English) until replaced