In this post
In this post
Translating your WordPress site into a different language can be challenging. There are many methods out there, and it can be hard to know what works best.
In this post, we’ll show you a tutorial on how to use the Loco Translate plugin and then compare the features and functionality with an alternative: TranslatePress.
Translate Your Site Using Loco Translate
Loco Translate is a free, open-source translation plugin for WordPress. It helps you edit WordPress translation files in your browser, and provides integration with automatic translation services such as Google, DeepL, Microsoft, and Lecto AI.
The plugin uses built-in WordPress locale codes and a protected language directory for saving custom translations. There’s also developer support with Gettext/localization tools.
Download and Install Loco Translate
Before we get into the tutorial, Loco Translate is available for download on their WordPress.org plugin page. And of course, you can simply search for it from your WordPress Add Plugins screen. Install as you would any other plugin, and activate.
Loco Translate Configuration
Before configuring anything in the Loco Translate plugin itself, it’s important to run a quick check to make sure that your WordPress site can switch languages. In your WordPress dashboard, navigate to Settings → General. Scroll down until you see Site Language.

This is where you choose the default language for your site. From the dropdown list, choose a new language, such as Italian. At the bottom of the page, click Save.
In your dashboard, you should see the language of your site change to Italian. Any core strings included in WordPress will change to Italian for all visitors. However, any text you’ve added — like pages or posts — will still appear in the language in which you originally wrote them. Also, the language of some plugins may not change, either.
You’ll need to create custom translations for those strings, which is where a translation plugin like Loco comes in. Before we start doing that, go ahead and switch your language back to the default.
Creating Custom Translation Folders
Now you need to set up some protection for your custom translations. During an automatic translation or theme update, those can get overwritten and you’ll lose all your hard work.
To do this, you’ll need to get into your WordPress site’s files and folders on the server via FTP. If you’re not familiar with how to do this, you can check with your web host. They can show you how to access your files.
Once you have access, navigate to the wp-content/languages folder. Inside that folder, you need to create a folder called loco, then within that folder, a folder called themes. When finished, the full path will look like this:
wp-content/languages/loco/themes
Loco Translate will store custom translation files here rather than in your theme’s folders, which will prevent future updates from being deleted.
Check for the POT File
While you’re still in your site’s folders there’s one more thing to check. Navigate to your theme’s languages folder. The path will look like this (substitute your_theme for your theme’s name):
wp-content/themes/your_theme/languages
There should be a file in there with the extension .pot, like your_theme.pot. If there is, all is good. If not, you may need to switch themes to make sure it’s going to be compatible with Loco Translate.
Add a New Language
The next step is to add a new language to your site.
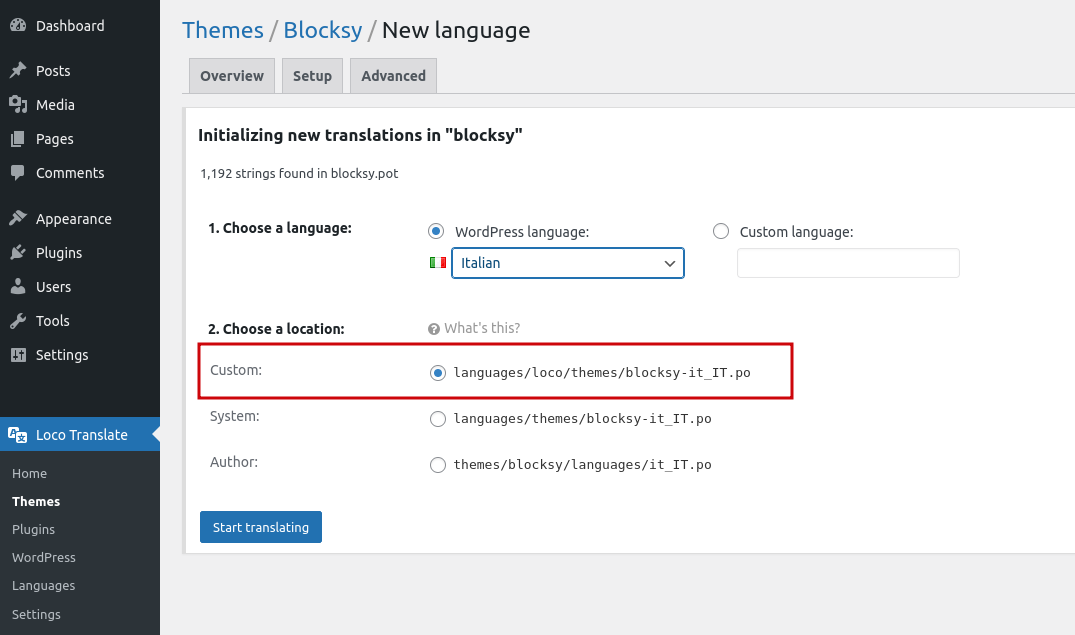
You need to make sure that you have Custom selected and that it shows the path to the folder we created earlier. Click Start Translating to go to the editor screen.
Translate a String Using Loco Translate
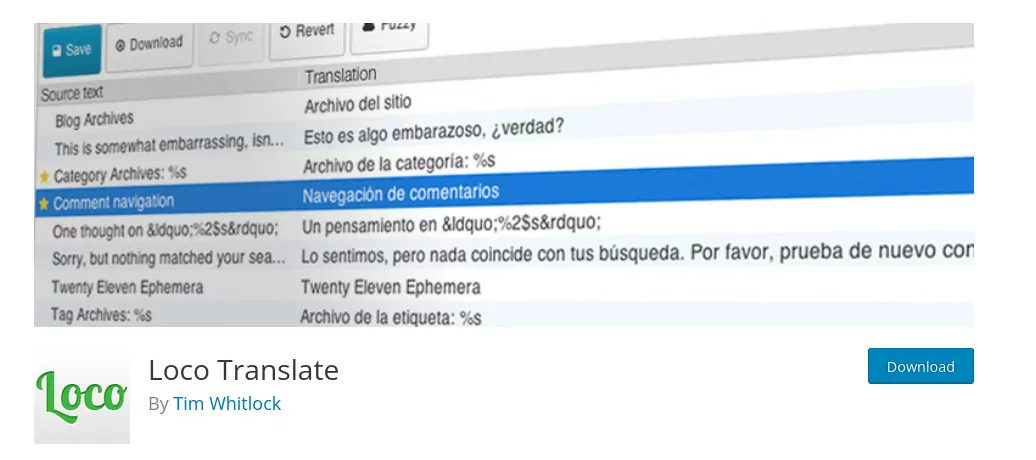
You’ll see a list of strings included in your theme’s template file. Select one from the list, or you can search using the Filter Translations field. In our example, we searched for the “Leave a Reply” string, which we are going to translate into Italian.

In the field below Source Text — in our case Italian translation — enter your translated text. You’ll need to do this manually for each string you’d like to translate. If you’re not fluent in the language you’re translating into, Google Translate comes in very handy here.
Click Save.
To test that it worked, go back to Settings → General and switch the language to your translated language — Italian, in our case. Since we translated “Leave a Reply”, we’ll look at the bottom of a blog post. Sure enough, the string is translated.
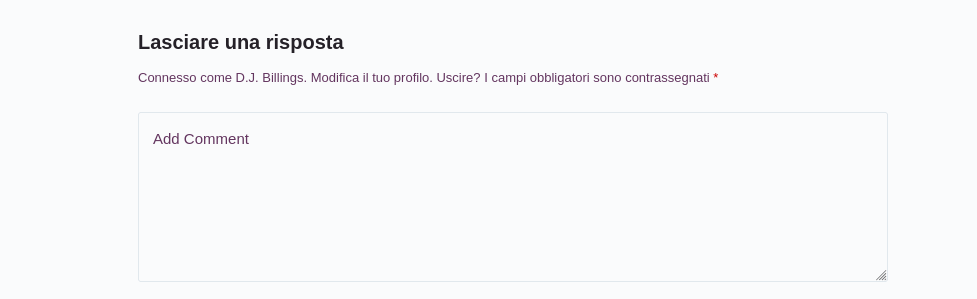
The other string in the field “Add Comment” still appears in English because it hasn’t been translated yet. At this point, you can go back into the Loco Translate editor and translate that string, as well as any other strings you like. Just repeat the steps above.
Automatic Translation
If you find translating strings manually a tedious task, you can automate the process. Loco Translate provides support for automatic translation services. You’ll need to sign up for those services and obtain an API key. Some provide their service for free and others may charge a fee.
Pricing
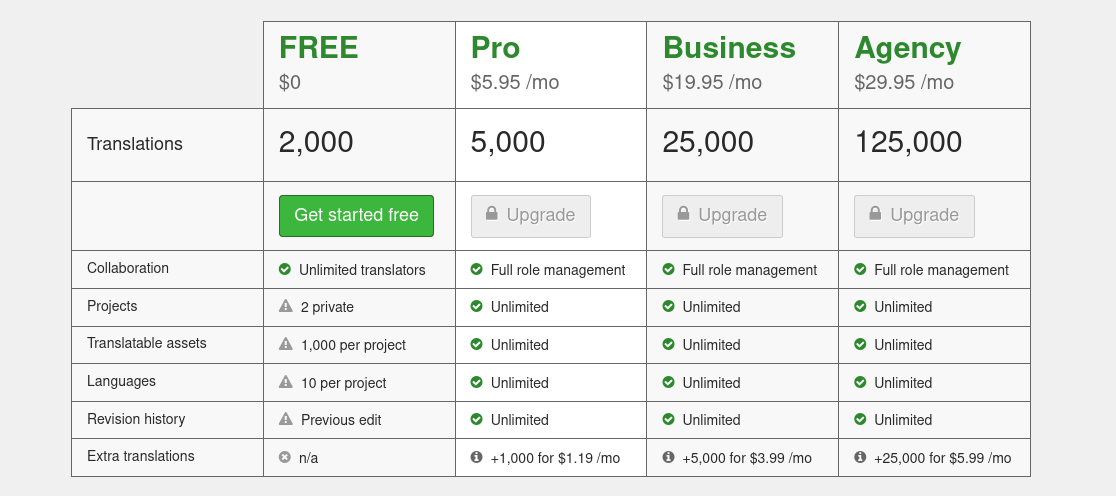
You can install Loco Translate and use it for free. That gets you up to 2,000 translations, or 1,000 translations per project — limited to 2 projects. If you need more translations and manage more projects, they offer tiered plans.
Multilingual Sites
While Loco Translate can successfully translate strings into any language you’ve added, only one translation can be activated at a time. That’s because the plugin relies on the core WordPress language switcher. To show translated strings to your visitors in a particular language, you need to select that language as the default in your site’s settings.
Best Alternative for WordPress
Now let’s compare Loco Translate vs TranslatePress, our own WordPress translation tool. We feel it’s the best alternative for translating your WordPress site, and we have some solid reasons to share!
TranslatePress Configuration
If Loco Translate seemed like a complicated process, there is a much easier solution that doesn’t require getting into your site’s files. Setting up TranslatePress is super easy.
Once you have the plugin installed and activated, the initial setup screen is intuitively laid out.
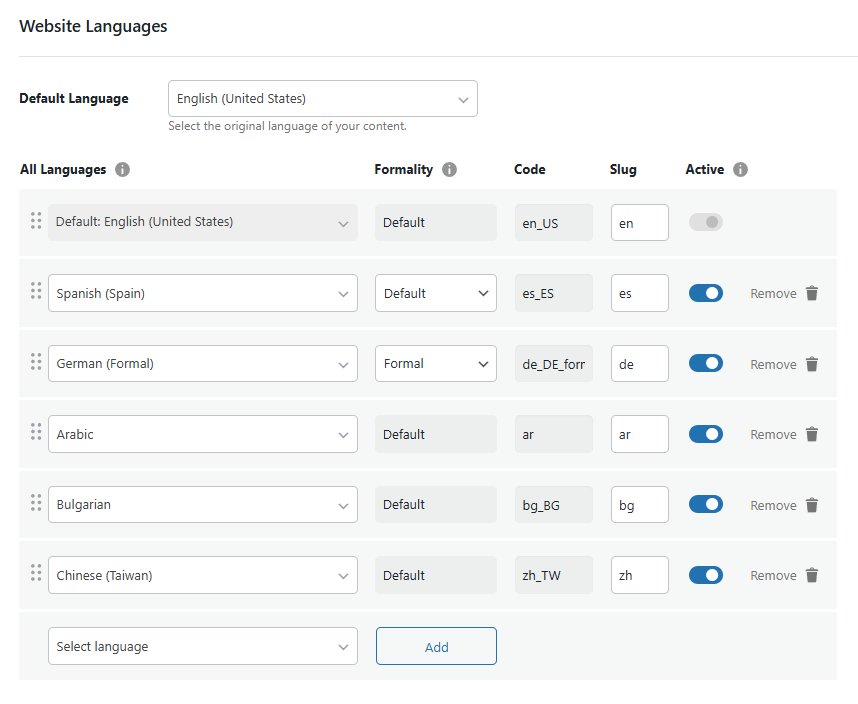
On this one screen, you can select your site’s default language and add as many alternative languages as you like. There’s no need to switch your WordPress core settings to a different default language.
There’s no reason you need to access your site’s files via FTP or worry about PO or MO file formats. All the functionality is built-in, and you can do everything from your WordPress dashboard.
String and Visual Translation Editors
TranslatePress has a great string translation tool, and you can filter (search) the list of your site’s strings to find exactly what you’re looking for.
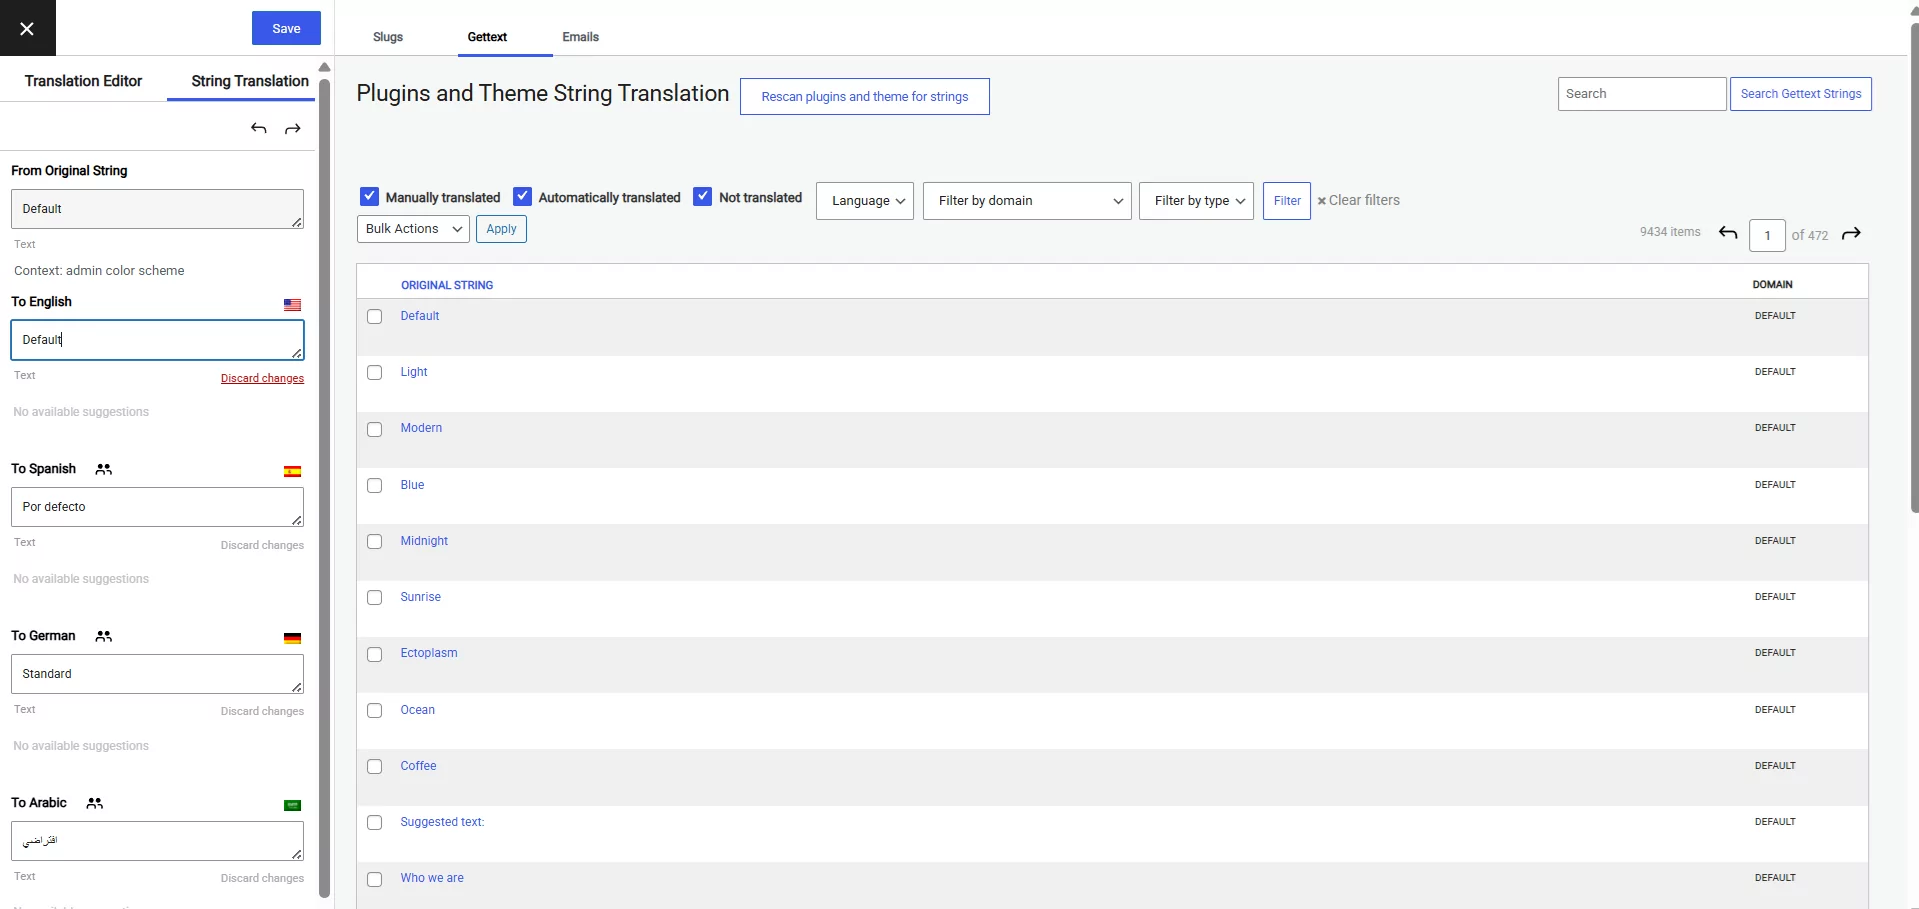
When you select a string, you’ll see it appear on the left along with a list of languages you’ve chosen to display on your site. Simply fill in each field with the translation and save.
Using this method, you can easily isolate string types by switching to Slugs, Gettext, Emails, and Regular.
While the String Translation method is useful, where TranslatePress really shines is in its Visual Editor. Just like it sounds, you can choose and edit translations visually by selecting them on the site’s page.
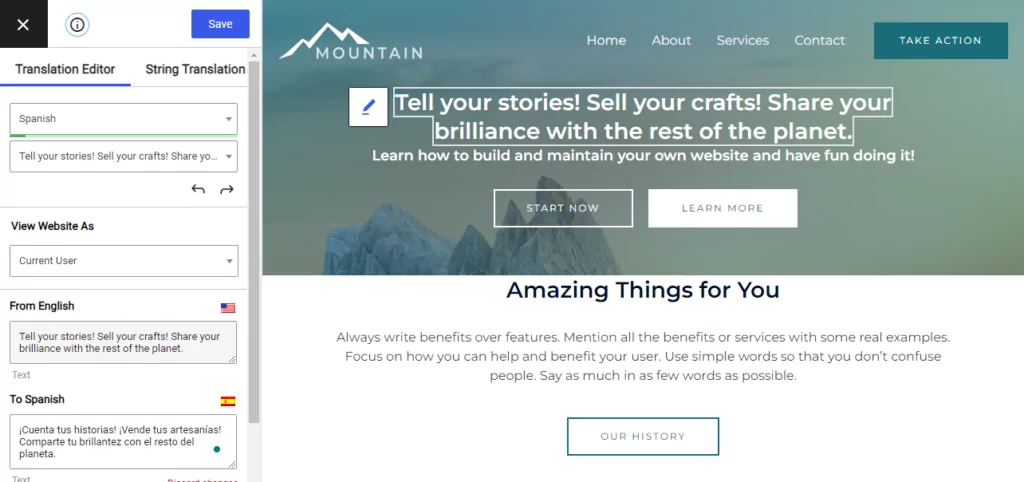
This makes it easy to find and select the exact strings you want to translate as you’re looking at the page.
Automatic Translation
TranslatePress also comes with the option to automatically translate your WordPress site, just like Loco Translate. All you need to do to set it up is fetch an API key from either DeepL or Google Translate, add it to your site, and see the magic happen while you refresh all your website pages.
A Truly Multilingual Site
Translating your WordPress site is really about making it easy for any visitor to navigate and read your content. Rather than choosing only one language translation to display at a time, you can put the power in your visitor’s hands and allow them to choose their own language.
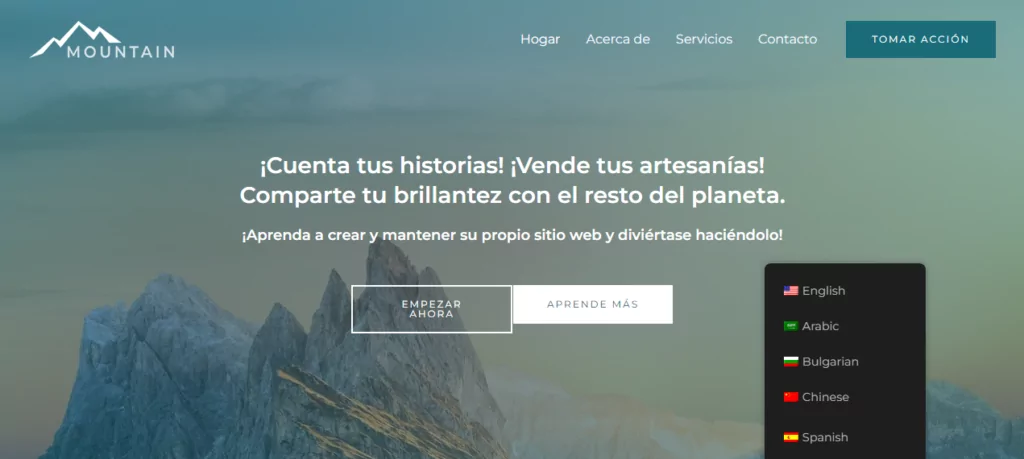
TranslatePress allows you to display a language button on the front end of your site, which shows a list of all available languages. As soon as a visitor clicks on their preferred language, your site is magically translated for them.
Summary
Loco Translate is a functional plugin that will help you translate your site into multiple languages. Particularly, it offers support for theme developers and those comfortable working in the back end of their WordPress site.
We believe TranslatePress is the best alternative for WordPress site translation, especially for users who need an easy out-of-the-box solution. It’s a foolproof and intuitive solution that does not require any previous technical skills. You get unlimited language support and a powerful visual editing tool. If you’re fine with adding just one extra language to your site you can try it for free and see just how well it works without any fuss.
TranslatePress Multilingual
If you have any questions about Loco Translate and how it compares to TranslatePress, feel free to leave a comment below.