
In questo post
Perché prendersi il disturbo di creare un sito web bilingue?
Nessuno ha mai detto che sia semplice creare contenuti per il tuo sito web; è un lavoro duro. Tempo e impegno vengono dedicati a ogni singolo contenuto che realizzi. Il ricerca meticolosa, risoluzione dei problemi, e rispondere alle domande rendono incredibilmente difficile sviluppare qualcosa di unico e degno di nota.
Lo fai comunque, però, perché apprezzi i contenuti, il contatti che può generare, il potenziali vendite, e naturalmente, visibilità per la tua azienda/il tuo marchio.
E se ti dicessimo che puoi fare di più? In una frazione del tempo, senza iniziare un post o una pagina del tutto nuovi?
Oggi vi mostreremo come massimizzare il traffico al tuo contenuto appena creato (o contenuto esistente), apri nuovi canali nei motori di ricerca, e attirare nuovi potenziali clienti/clienti. Creando un sito web bilingue, il costo per te?
Niente, tranne che per un breve periodo.
Perché un sito web WordPress bilingue e non multilingue?
La risposta breve è: il tempo. Innanzitutto, è opportuno traduci il tuo sito web in un'altra lingua.
Per definizione stessa, Essere bilingue significa parlare correntemente due lingue, Multilingue, beh, l'avete indovinato, più di due.
Creare una versione bilingue del vostro sito web basato su WordPress è un ottimo modo per sondare il terreno, crescere e imparare dall'esperienza.
In questo esempio, prenderemo in esame un sito web in inglese e ne creeremo una versione in rumeno. Per amore di precisione, Non è necessario parlare fluentemente il rumeno perché funzioni.
Quanto è facile creare un sito web bilingue?
Sul versione gratuita di TranslatePress, potrai creare un sito web bilingue in tutta semplicità. Ti accompagneremo lungo l'intero processo, fornendoti consigli e guidandoti in ogni fase.
Se desideri seguire questa guida, sentiti libero di scaricare la versione gratuita di TranslatePress e tieni aperta questa guida in una scheda del tuo browser preferito.
Installazione di TranslatePress
Nella schermata di amministrazione di WordPress, vai su Plugin quindi Aggiungi nuovo. Inserisci qui il termine TranslatePress nella barra di ricerca come di seguito:
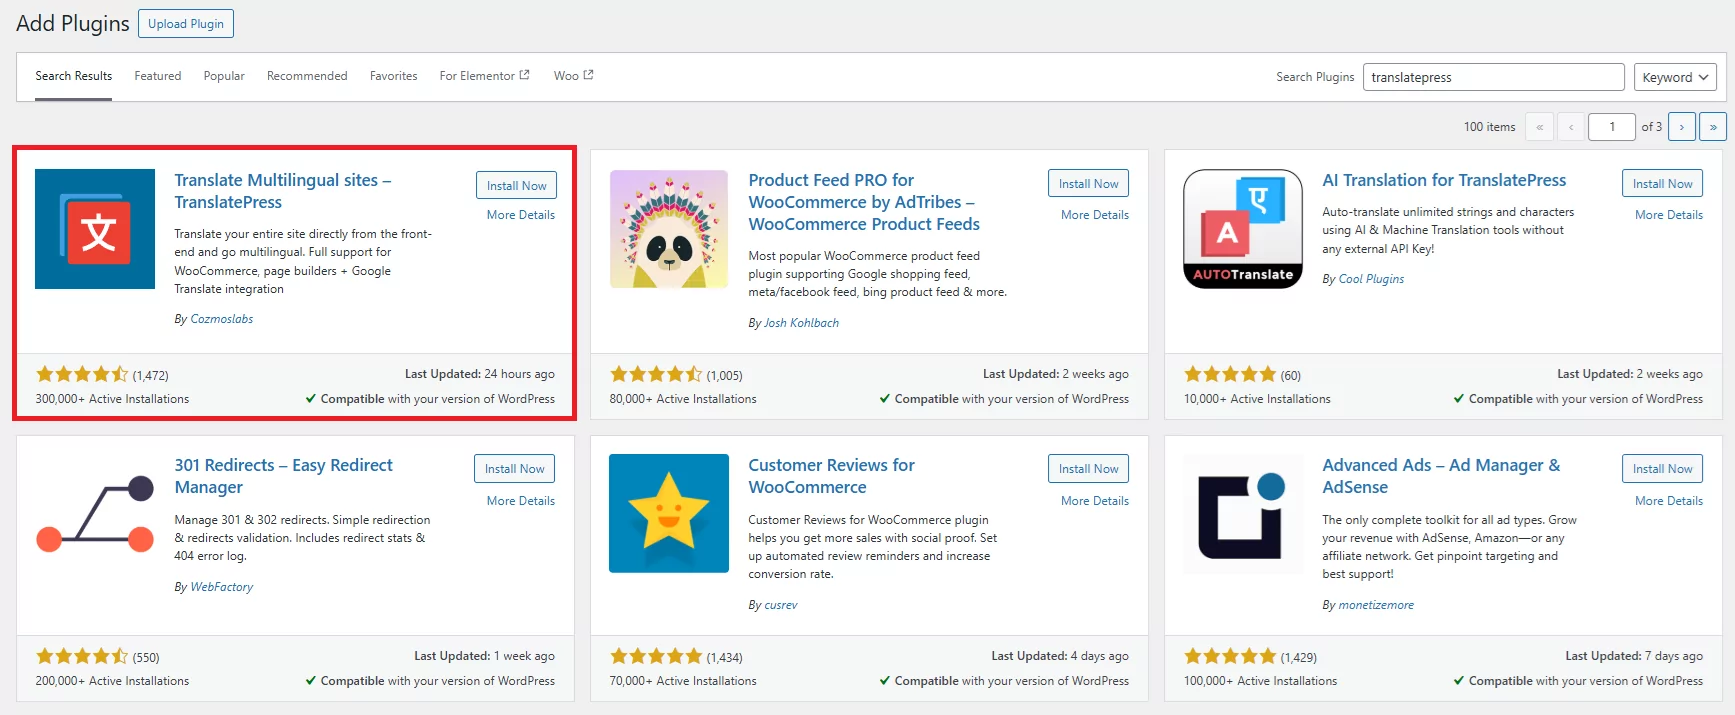
Colpisci Installa ora, allora Attiva. Complimenti, sei a pochi passi dalla creazione del tuo primo sito web bilingue con WordPress.
Guida introduttiva alle impostazioni di TranslatePress
Per iniziare, dobbiamo indicare a TranslatePress quale lingua desideriamo utilizzare per il nostro sito web bilingue. È possibile inserire manualmente una lingua oppure scorrere l'elenco come illustrato di seguito:
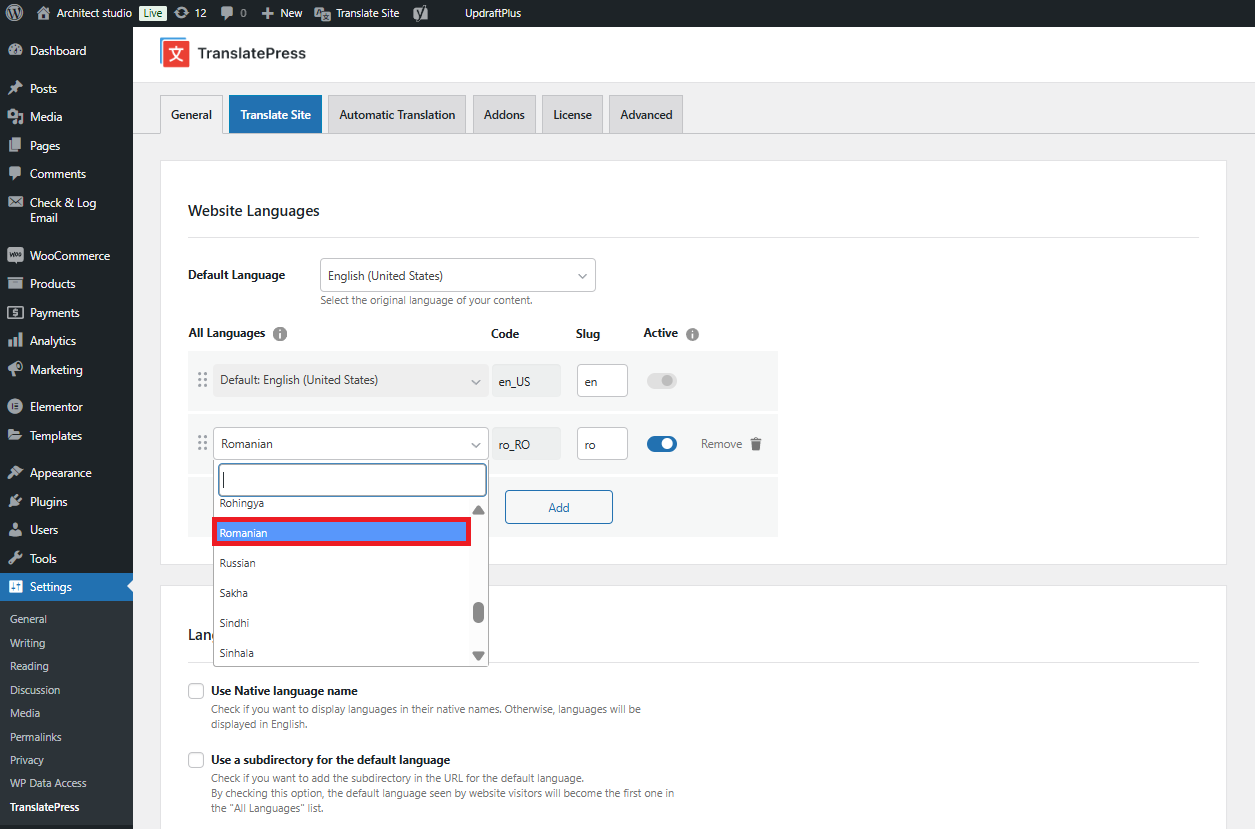
Ci sono ancora alcune impostazioni da configurare in TranslatePress; come puoi vedere nella schermata qui sotto, è stata aggiunta la lingua rumena:
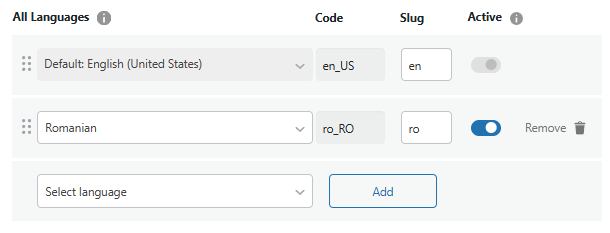
Poiché abbiamo selezionato il rumeno come lingua aggiuntiva, noterai che lo slug all'estrema destra dice ro.
Ovunque vi sia un'istanza di una pagina tradotta, come la vostra pagina "Chi siamo", entrerebbe in gioco la seguente struttura di URL:
mysite.com/ro/about/
A sua volta, aiuta gli utenti e fa una distinzione tra la versione inglese e quella romena e, naturalmente, cosa ancora più importante, per i motori di ricerca.
Impostazioni aggiuntive per il tuo sito web bilingue
Ci sono alcune impostazioni in più a tua disposizione; una volta configurate qui, non dovrai più preoccupartene.
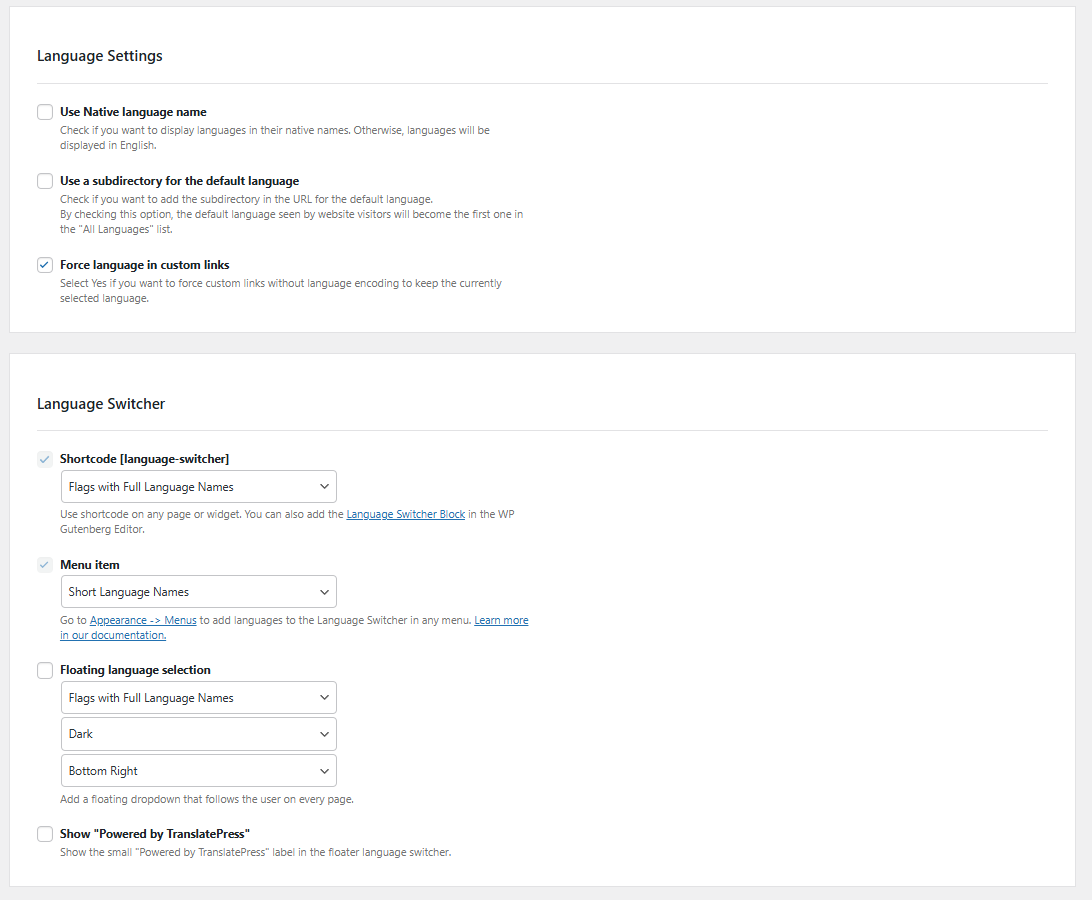
Nome della lingua nativa
Se desideri visualizzare le lingue con il loro nome originale, usa il menu a discesa e seleziona Sì per visualizzarli in inglese, lascialo impostato su No.
Usa una sottodirectory per la lingua predefinita
Due opzioni qui Sì o No. Supponi di voler visualizzare la tua lingua predefinita, in questo caso l'inglese, in una sottodirectory. Scegli Sì, così facendo otterrai la seguente struttura URL:
mysite.com/it/
Tutte le pagine successive seguiranno lo stesso formato:
mysite.com/it/chi-siamo/
Scelta Sì significa che la prima lingua dal Tutte le lingue l'impostazione verrà applicata; se necessario, è possibile riordinarle come indicato di seguito tramite trascrizione e rilascio:
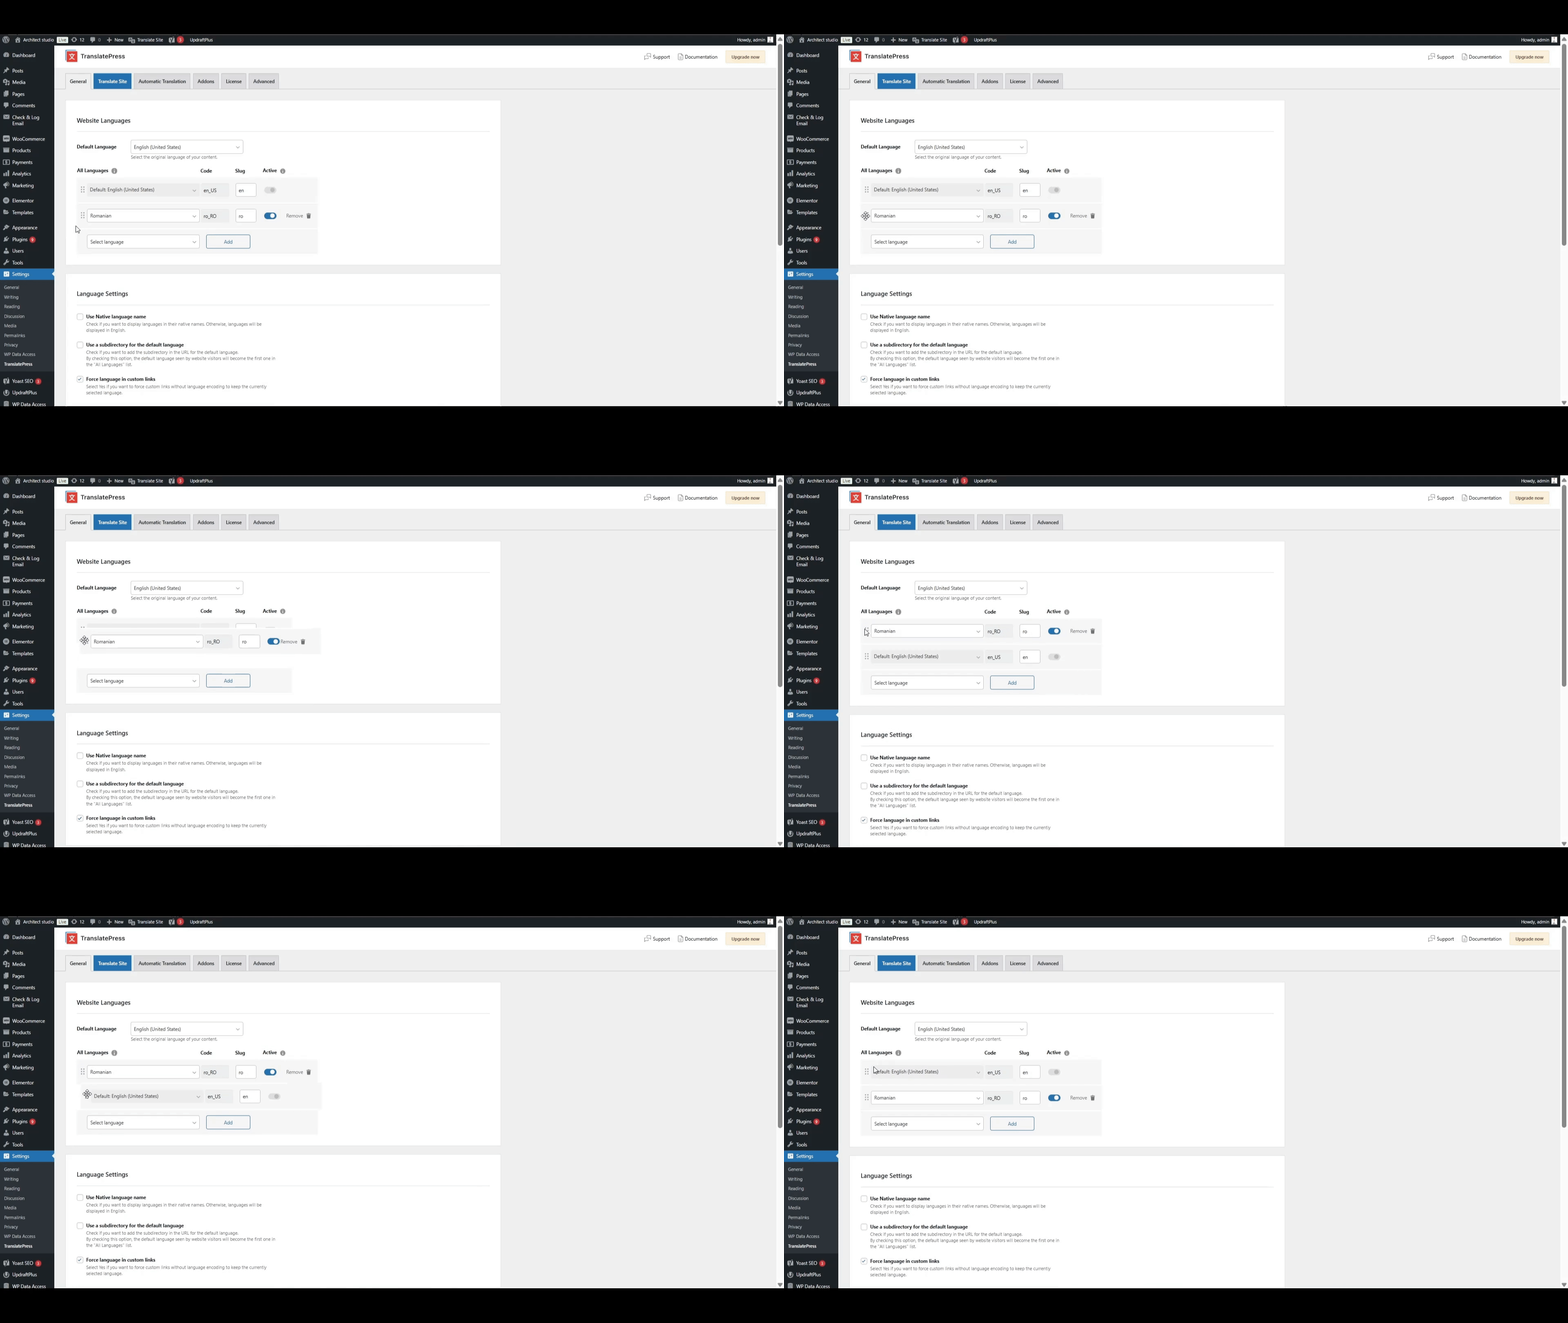
Non dovrai fare quanto sopra; vale la pena notarlo se decidi di aggiungere più lingue per convertire il tuo sito in un Multilingue uno invece di un Sito web bilingue.
Forza la lingua nei link personalizzati
Questa impostazione ti semplificherà la vita. In qualità di proprietario di un sito WordPress, avrai senza dubbio molti link interni e menu di navigazione verso altri contenuti per trattenere i visitatori sul tuo sito.
Vi faremo un esempio; in questo caso, abbiamo del contenuto in cui una frase specifica ha un link interno:
“Plugin di traduzione per WordPress” – collega a una pagina interna mysite.com/translation-plugin/
Se un visitatore si trova sulla versione in lingua rumena del tuo sito e fa clic su quel link sarà comunque:
mysite.com/translation-plugin/
Il che sono sicuro converrai non è di alcun beneficio per l'utente. Usando il Forza la lingua nei link personalizzati l'impostazione cambierà l'URL per collegare alla versione rumena della pagina, non a quella inglese.
Selezionando Sì, questo garantirà che:
mysite.com/translation-plugin/
diventa:
mysite.com/ro/translation-plugin/
TranslatePress può aiutarti farti risparmiare del tempo prezioso, specialmente se hai una strategia di link interni e È necessario mantenere tutto coerente.
Aggiungere un selettore di lingua al tuo sito web per i visitatori
Con qualsiasi guida, è impossibile sapere quale sia la tua configurazione. Che tu utilizzi una barra laterale per i post/le pagine e tutto il resto, lo sappiamo bene; ecco perché abbiamo sviluppato TranslatePress per coprire tutti gli aspetti di visualizzazione di un selettore di lingua.
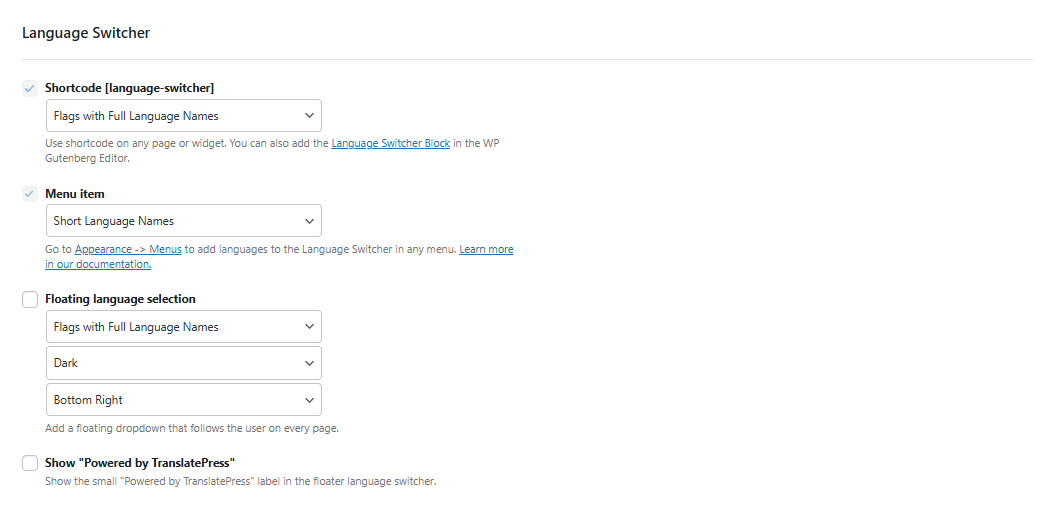
Utilizzo del selettore di lingua in una barra laterale
Se il layout dei tuoi contenuti prevede una barra laterale, potresti voler visualizzare il selettore di lingua al suo interno.
Utilizzando il seguente Shortcode:
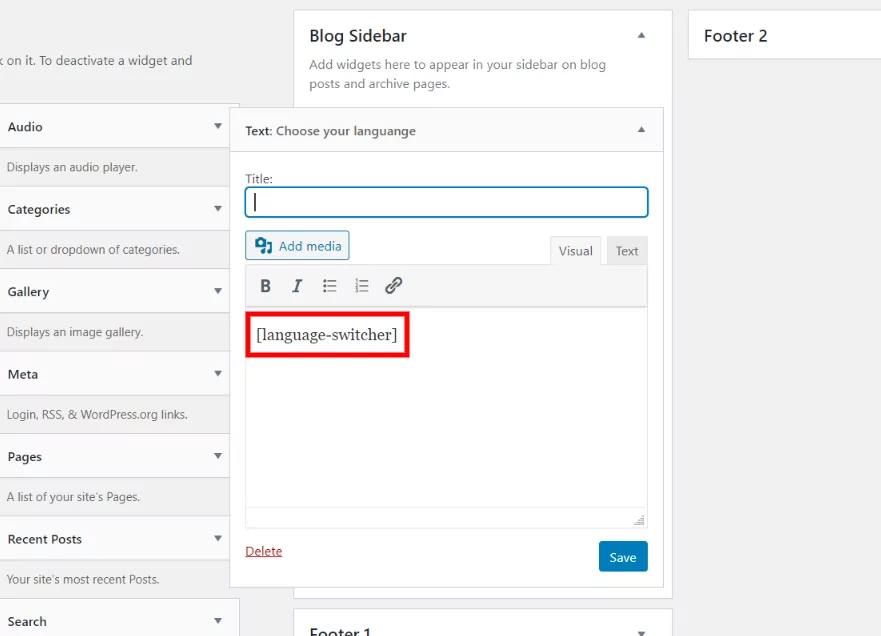
Una volta fatto, premi Salvare.
Aggiunta di selettore di lingua come voce del menu di navigazione
Se preferisci aggiungere selettore di lingua come voce di menu, puoi inserirlo nella navigazione principale o in qualsiasi altra sezione in cui si trovi la tua navigazione. Vai su Aspetto nel tuo pannello di amministrazione di WordPress, quindi fai clic su Menù.
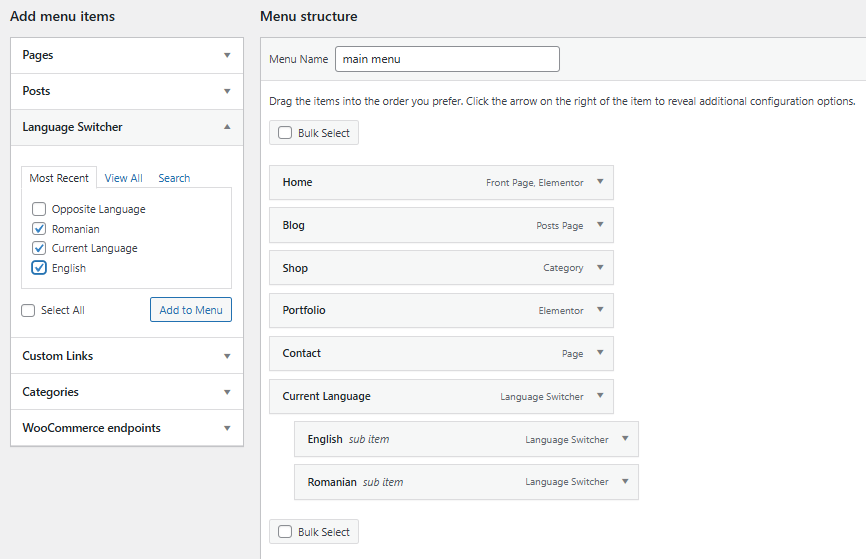
Come si può vedere dall'esempio sopra riportato, utilizzando la voce di menu "selettore di lingua", aggiungere la voce "Lingua corrente", quindi le voci di menu "Rumeno" e "Inglese". Selezionare tutte le voci o solo quelle che si desidera aggiungere.
È essenziale assicurarsi di aggiungere le voci di menu in inglese e rumeno come sotto-menu di Lingua Corrente e disporle tramite trascina e rilascia in modo che la lingua principale sia la prima voce.
Il completamento del passaggio precedente genererà una voce di menu nel frontend del tuo sito web:
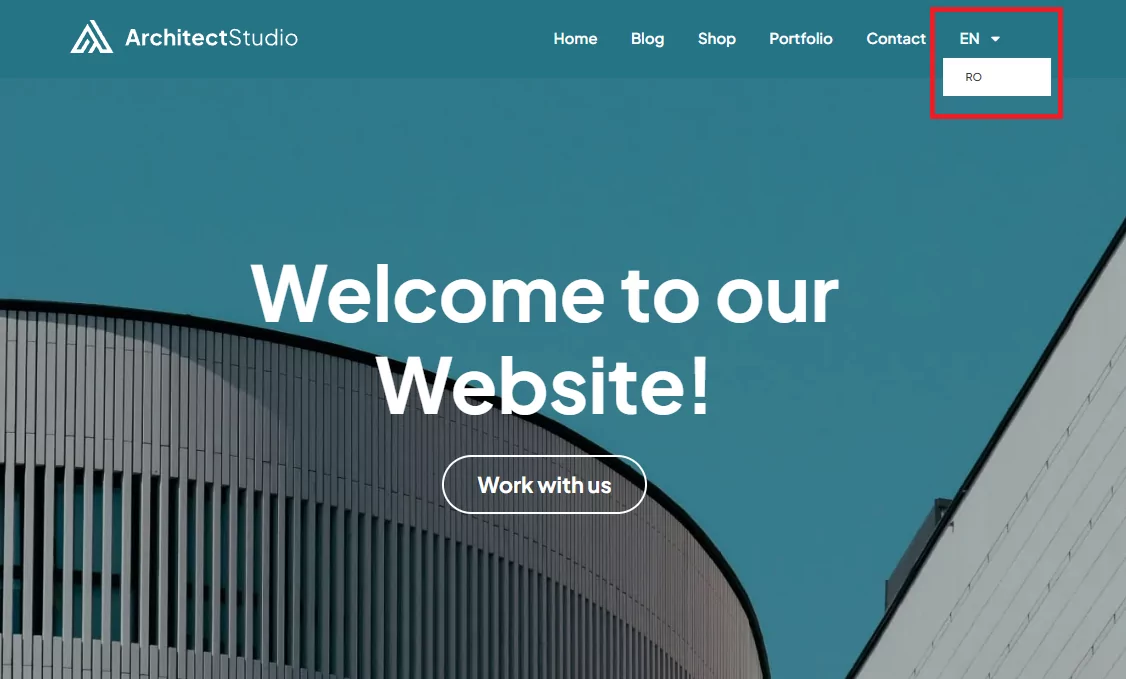
Comunque lingua Il contenuto costante sul vostro sito Web verrà mostrato al visitatore.
Come aggiungere un selettore di lingua mobile al tuo sito bilingue
Se nessuno dei due esempi precedenti soddisfa le vostre esigenze, c'è sempre Galleggiante selettore di lingua.
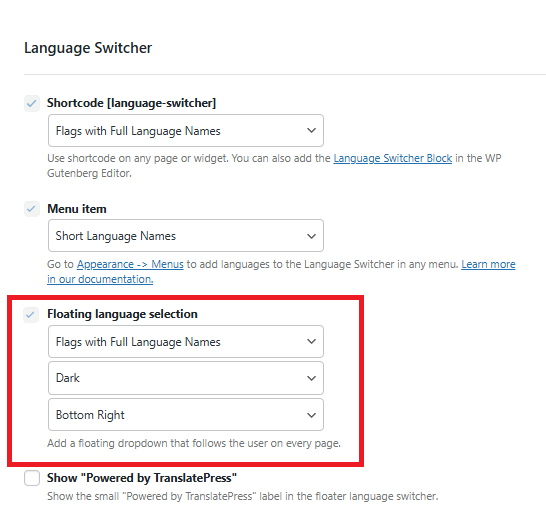
Questa opzione mostrerà un menu a discesa mobile in tutto il tuo sito web; qui puoi scegliere tra In basso a destra, In basso a sinistra, In alto a sinistra, e In alto a destra. Vedi sotto per un esempio di in alto a destra:
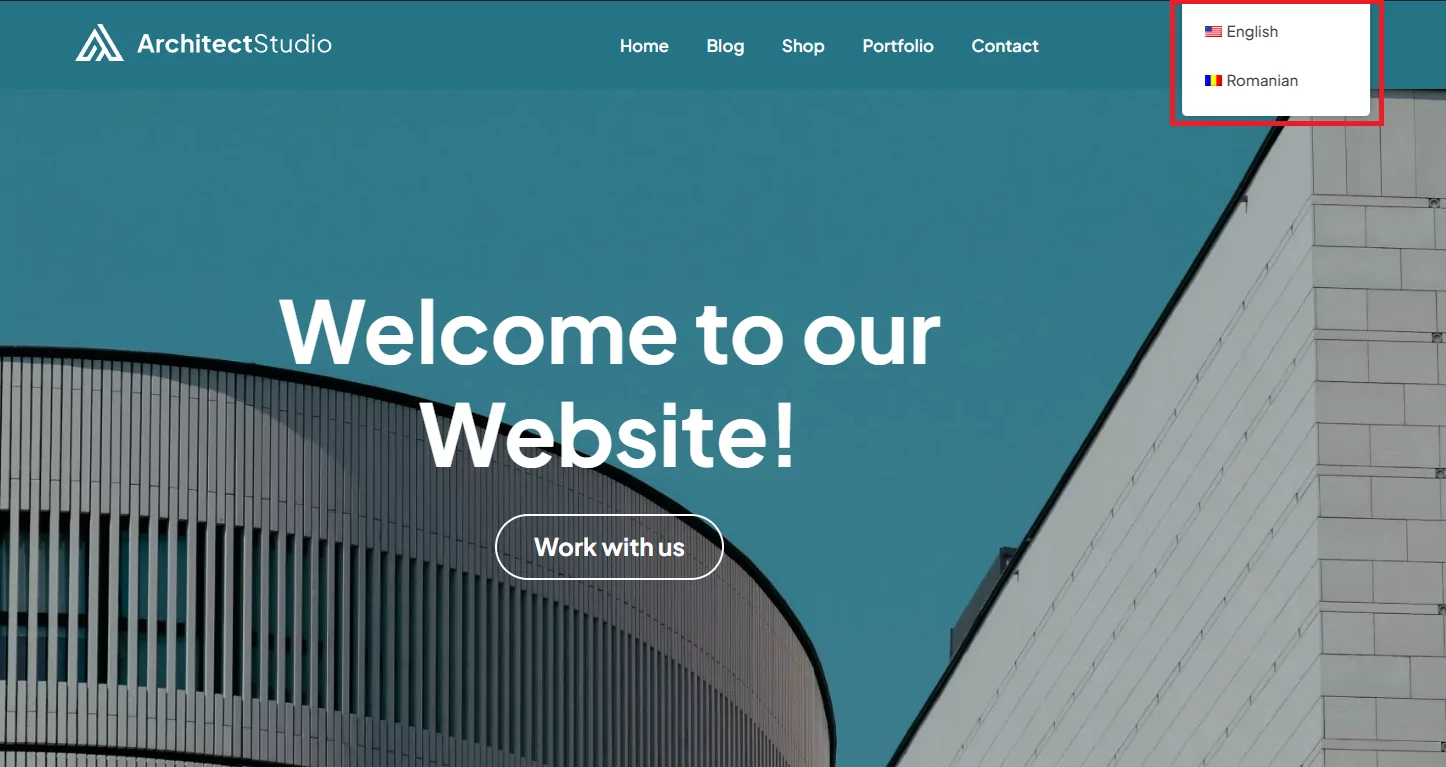
Utile per chi ha dei “call to action” sul proprio sito web o un pulsante “Torna all’inizio”, in quanto consente di scegliere dove visualizzare il proprio selettore di lingua mobile, in modo che non entri in conflitto con la tua estetica.
Impostazioni utili se hai poco spazio
Se lo spazio disponibile sul tuo sito web è limitato e devi modificare la modalità di visualizzazione di selettore di lingua, le impostazioni riportate di seguito potrebbero interessarti:
A prescindere dall'opzione che ritieni più adatta alle tue esigenze, che si tratti di un selettore di lingua mobile, di una voce di menu o di una barra laterale, puoi personalizzare la visualizzazione in base alle tue esigenze:
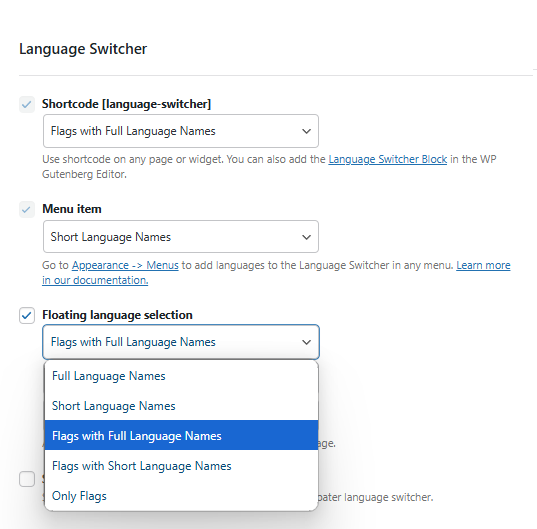
Tramite il menu a tendina, scegli un metodo di visualizzazione adatto a te:
- Nomi completi delle lingue: Italiano.
- Nomi di lingue brevi:- Visualizza la forma abbreviata, rispettivamente EN e RO.
- Bandiere con i nomi completi delle lingue: Piccola bandiera specifica del paese e nome del paese.
- Bandiere con nomi di lingue brevi:- Piccola bandiera e forma abbreviata.
- Solo bandiere: Mostra solo le bande associate alla lingua, nient'altro.
La traduzione dei tuoi contenuti: cosa puoi tradurre?
Abbiamo esaminato le impostazioni per la creazione del vostro sito web bilingue; ora si passa al gli aspetti pratici della traduzione del contenuto effettivo.
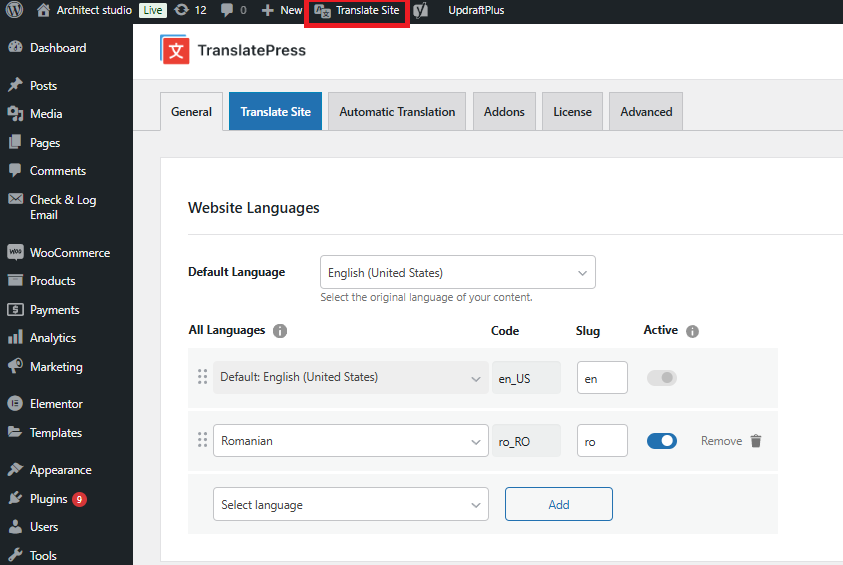
Per tradurre il tuo sito, puoi farlo in uno di questi due modi dall'amministrazione di WordPress e fare clic su Traduci Sito, o, se ti trovi nel front-end su un determinato articolo o pagina, fai clic su Traduci pagina:
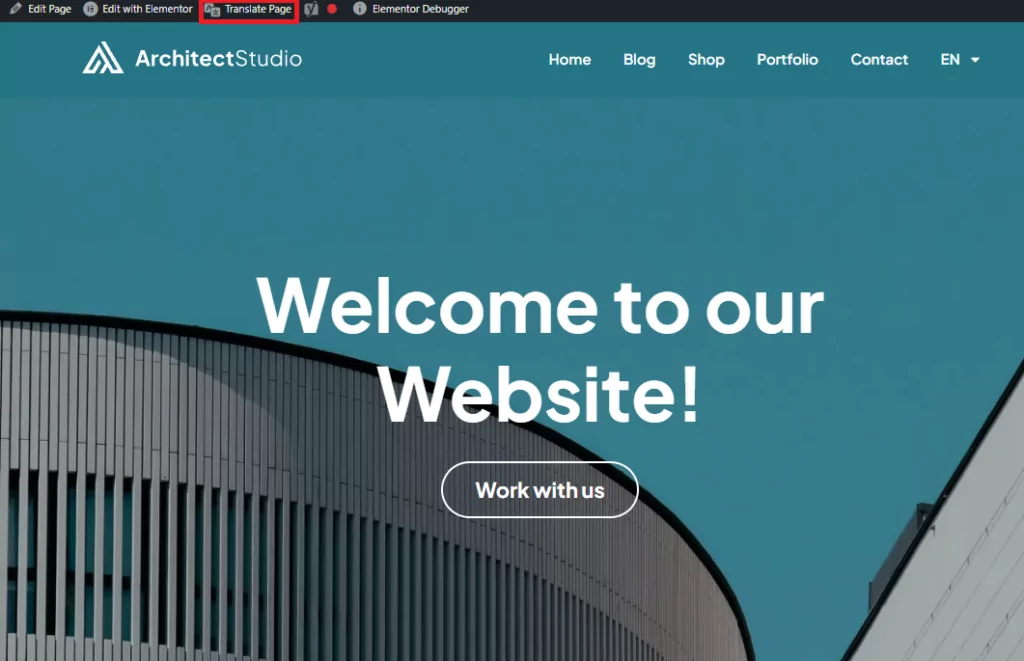
Una volta che hai fatto clic su Traduci pagina, vedrai le opzioni di modifica del frontend qui sotto:
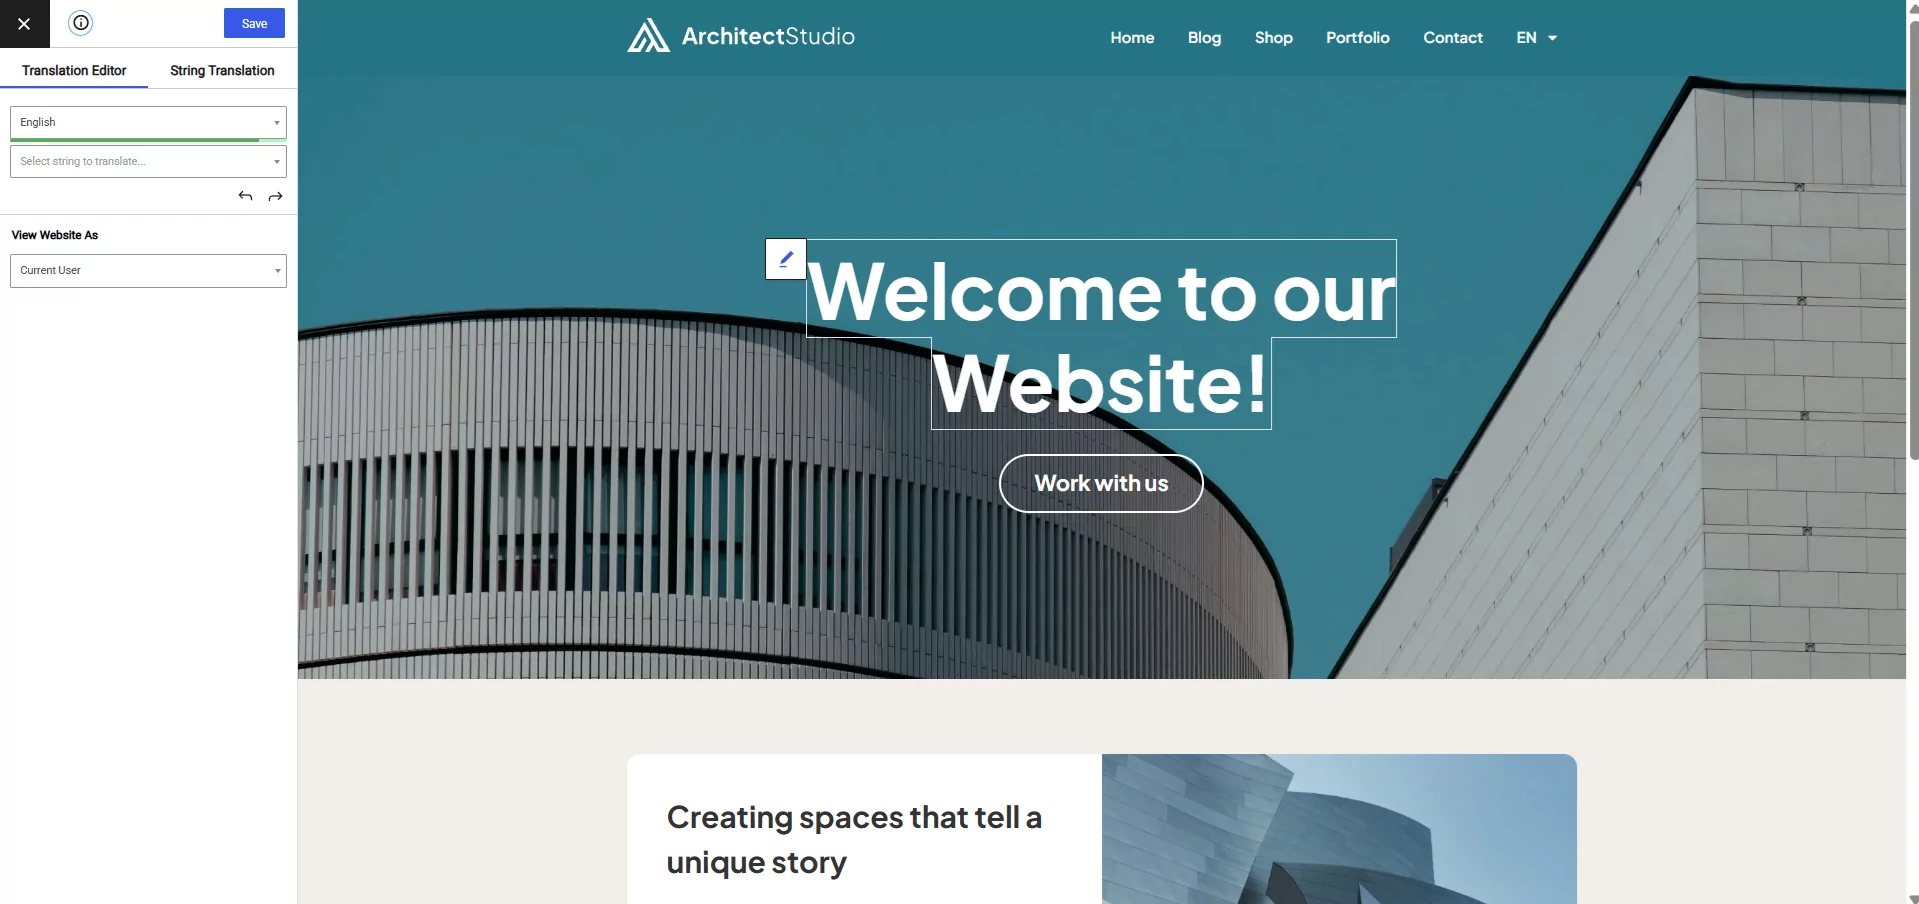
Ciò apre un'interfaccia di traduzione visiva, simile al Personalizzatore. Nessun passaggio da e verso i post o aggiornamento per vedere se le modifiche sono state applicate.
Tutta la modifica avviene sul front-end, il che significa che vedrai un esempio reale del tuo contenuto tradotto per la lingua scelta.
Per prima cosa, per iniziare a tradurre e vedere un esempio reale, dobbiamo cambiare la lingua corrente:
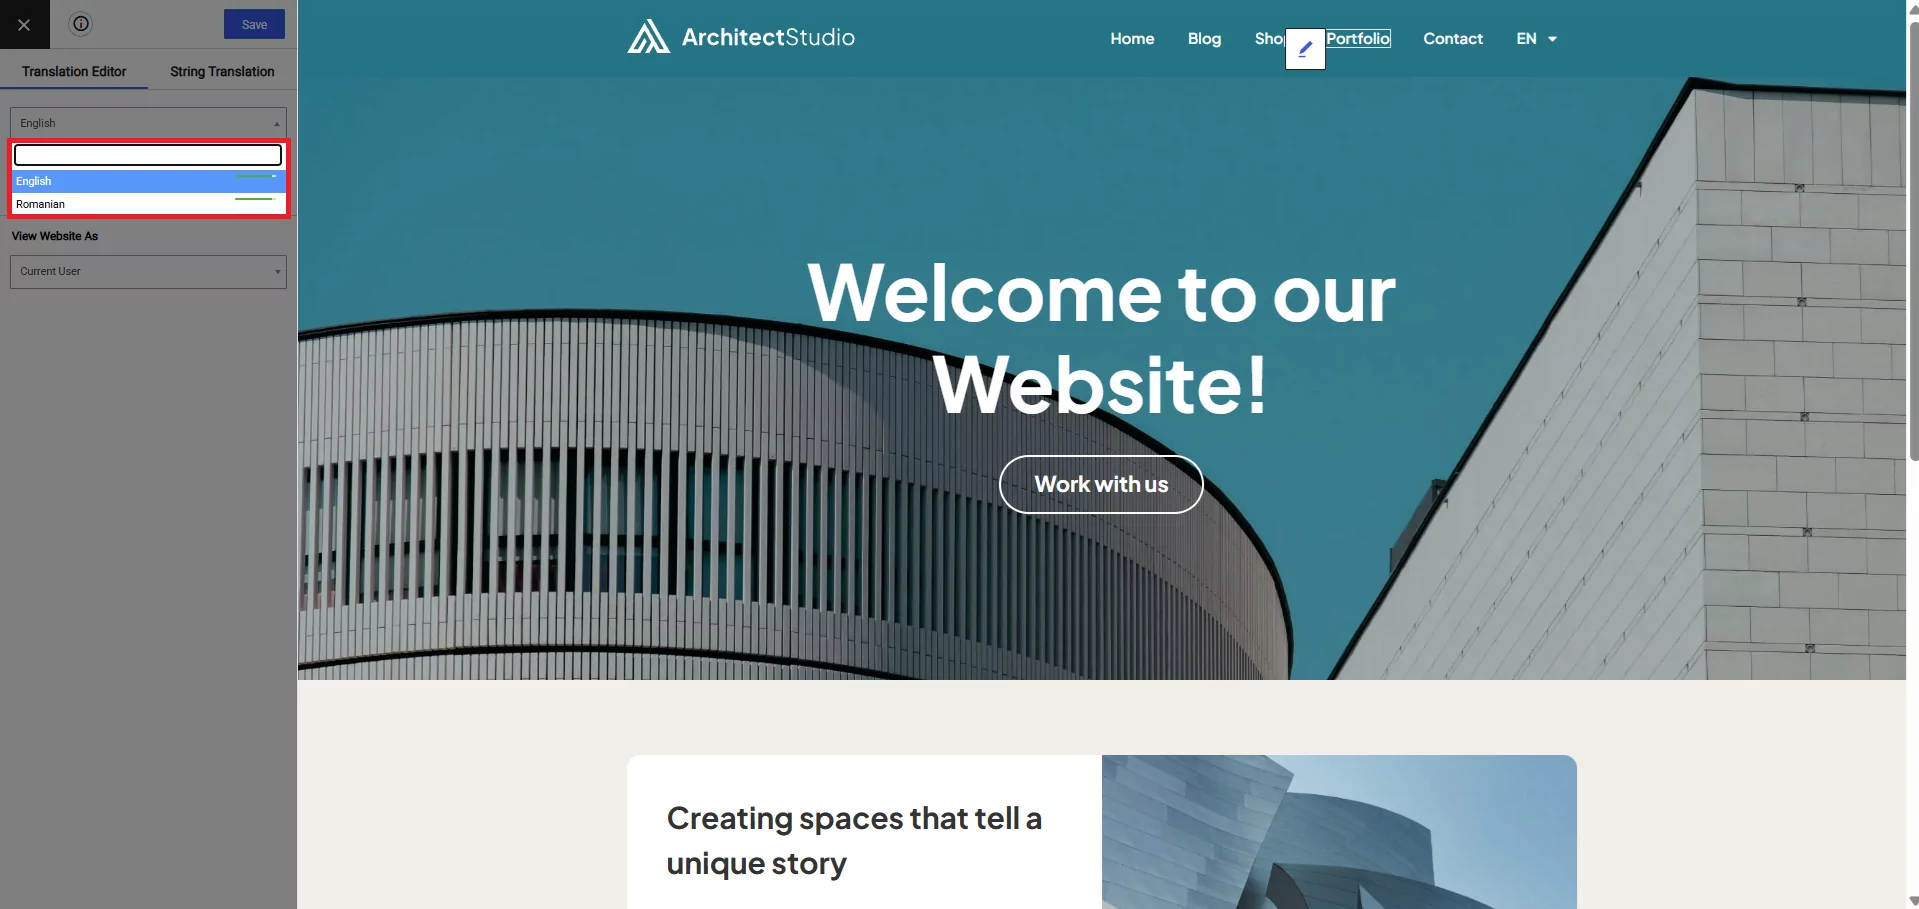
La selezione del rumeno consente di visualizzare il contenuto come se lo si leggesse dal punto di vista di un visitatore proveniente dalla Romania. In questo modo il lavoro di redazione risulta più semplice.
Lo ricorderai da prima in questo tutorial; non è necessario parlare fluentemente il rumeno (o la lingua che decidi di usare) per rendere il tuo sito web bilingue. Usando Google Traduttore in una nuova scheda/finestra, puoi facilmente convertire dall'inglese al rumeno, tagliare e incollare a tuo piacimento.
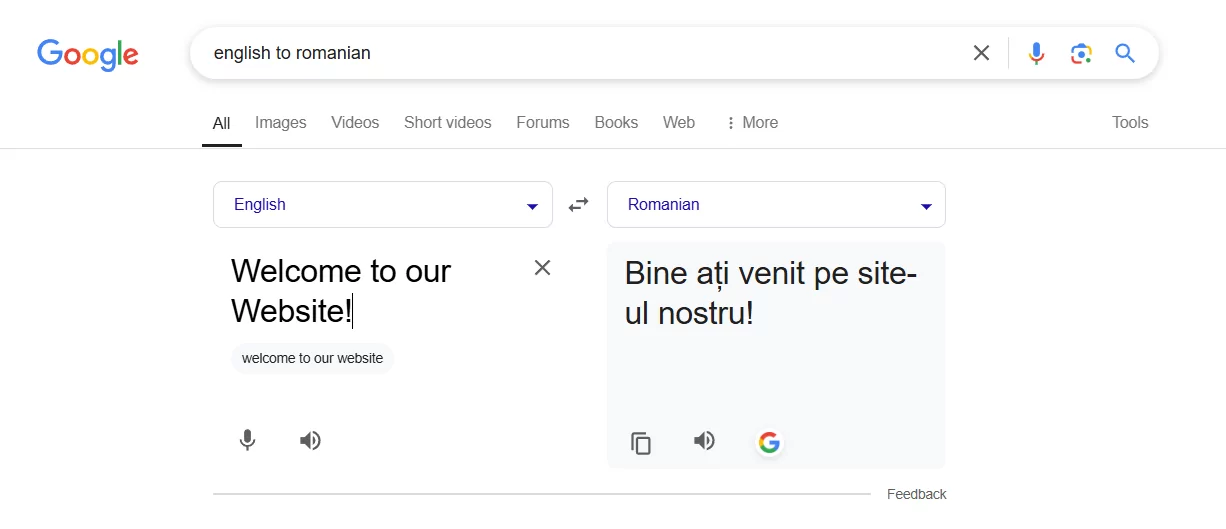
Ma come si fa a capire quali parti si possono tradurre? Con TranslatePress, il processo è semplice. Utilizzando il testo appena copiato da Google Translate, basta passare il mouse sul titolo del tuo post o della tua pagina, quindi incolla in questo modo:
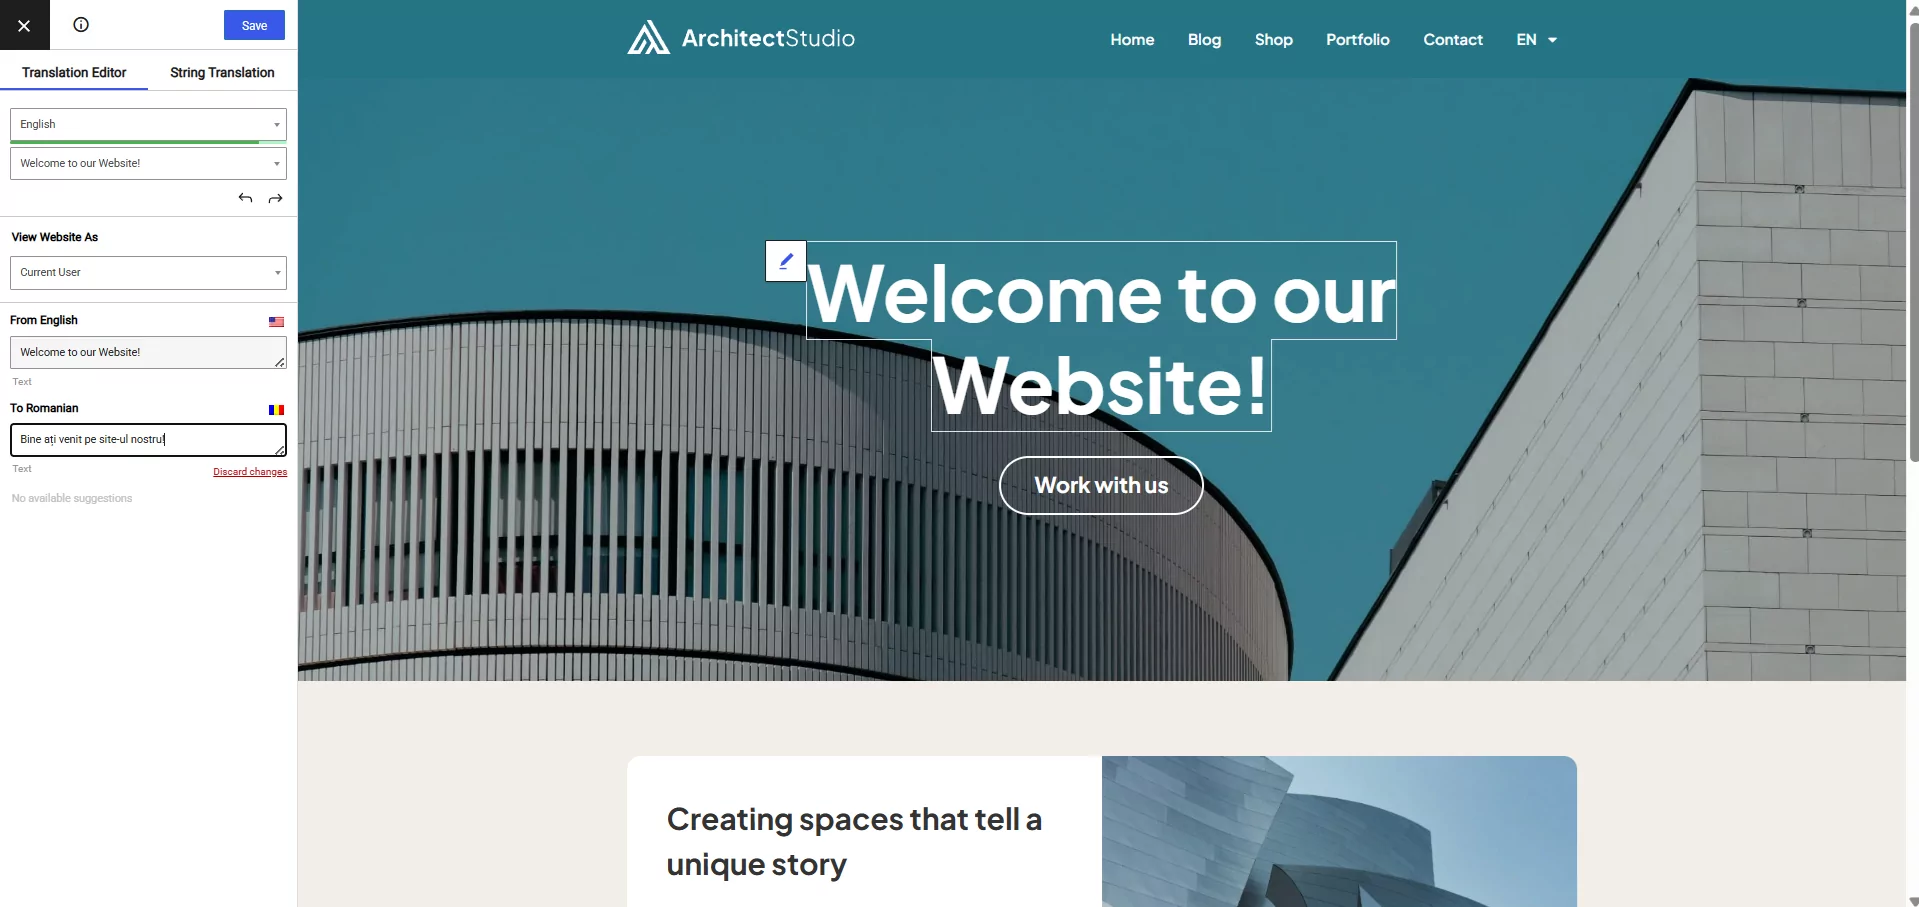
Noti l'icona della matita blu nell'immagine qui sopra? Quando modifichi il contenuto per il tuo sito web bilingue, tutto ciò che devi fare è passare con il mouse sopra qualsiasi testo che desideri modificare. Verrà visualizzata un'icona, blu o verde.
La differenza tra i due è semplice:
Il Blu l'icona della matita consente di tradurre il testo che hai creato, e Verde l'icona della matita è Gettext. Gettext è testo stringa, utilizzato in temi e plugin; vedi sotto per un esempio:
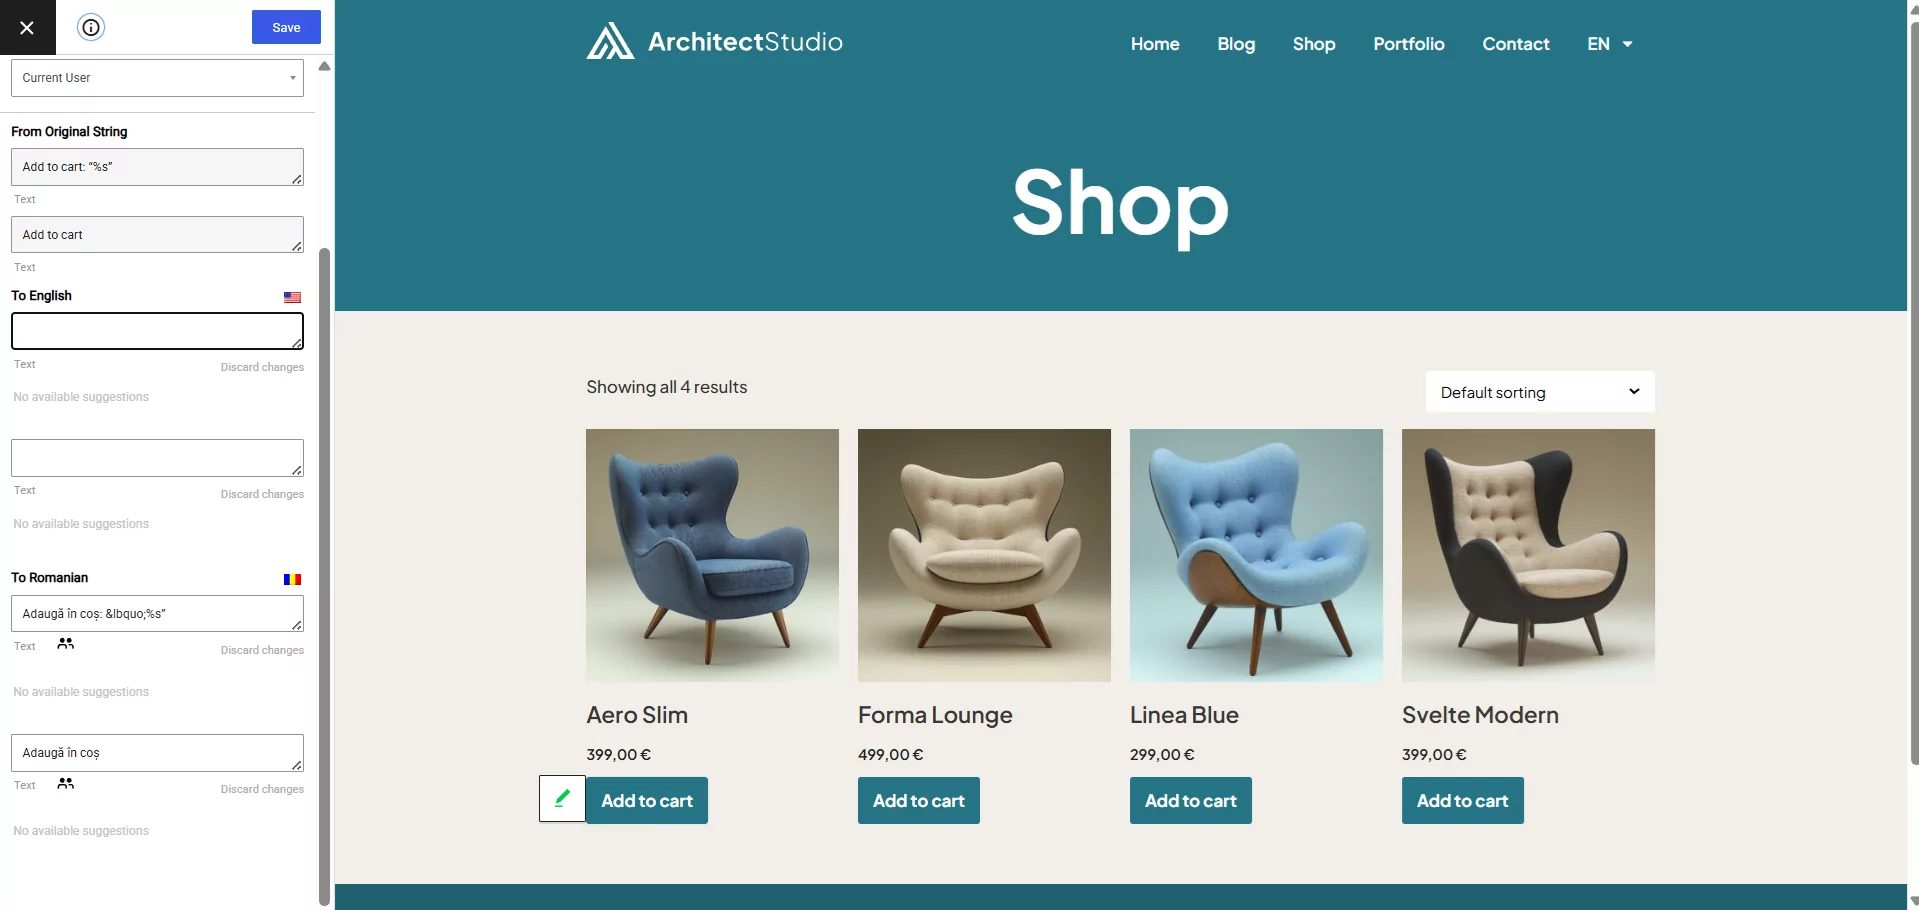
Per tradurre il tuo post/le tue pagine, evidenzia la sezione che desideri tradurre, clicca sull'icona, quindi taglia e incolla la tua traduzione e premi Salva.
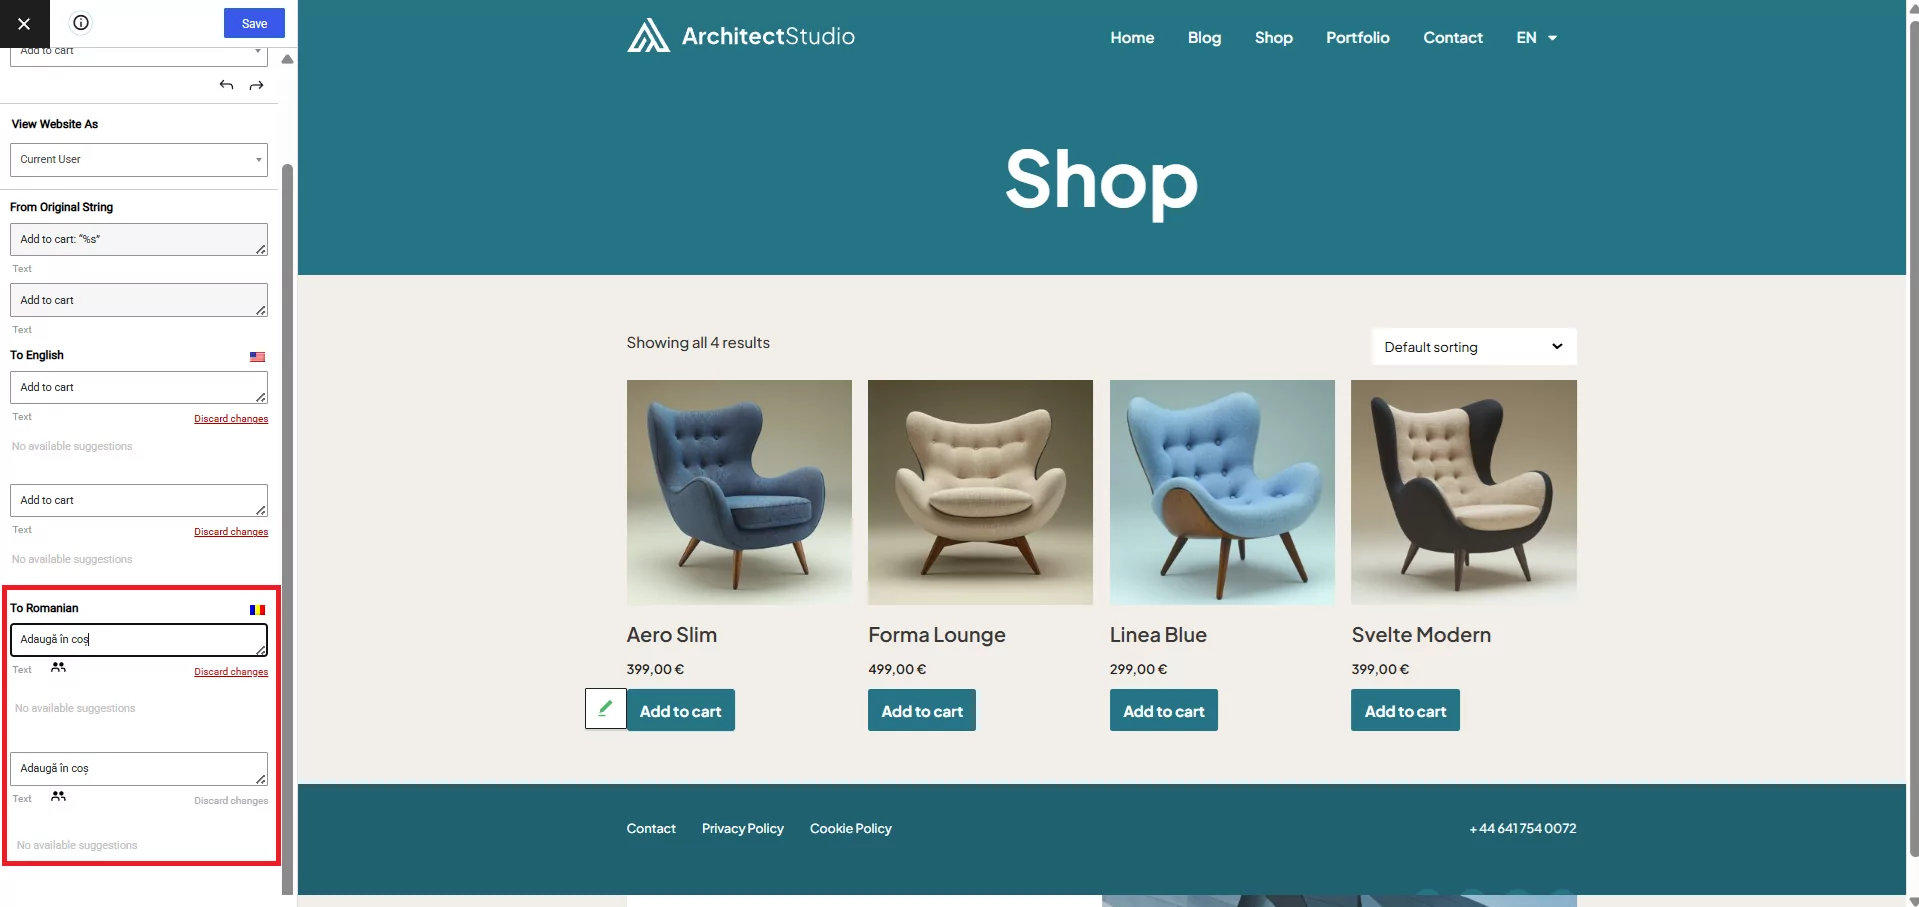
Una volta salvata, la pagina o l'articolo in questione si ricaricherà per mostrarti come appare, di nuovo risparmiando tempo nel processo di traduzione. Usando il metodo precedente, puoi convertire il tuo sito in uno bilingue in modo rapido e semplice.
Traduzione automatica dei tuoi contenuti
Nel versione gratuita di TranslatePress, supportiamo pienamente l'uso di Google Translate tramite una chiave API, il che significa che puoi tradurre automaticamente i tuoi contenuti:
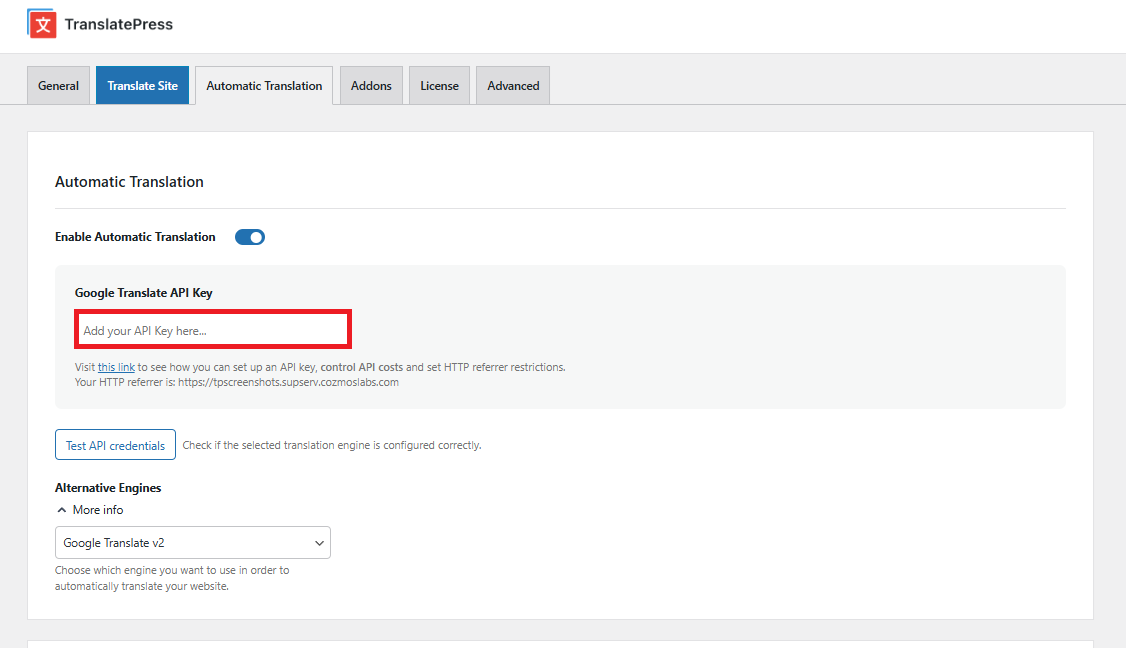
Abbiamo creato una guida per te su come tradurre automaticamente i tuoi contenuti con Google Traduttore, guidandoti attraverso l'intero processo.
DeepL è un altro famoso servizio di traduzione, rinomato per le sue traduzioni automatiche di alta qualità, disponibile nel versioni premium di TranslatePress.
Vantaggi della creazione di un sito web bilingue
Ci sono un sacco di motivi per creare un sito web bilingue; ecco alcuni dei vantaggi:
- Traducendo i vostri contenuti, state di fatto aprendo il vostro sito web a un pubblico completamente nuovo in un'altra lingua.
- Non tutti parleranno la tua lingua madre; tradurre i tuoi contenuti o il tuo sito e moduli di contatto potrebbe portarvi una marea di nuovi clienti/visitatori.
- Aiuta a migliorare l'esperienza utente per i visitatori che parlano la lingua in cui hai tradotto.
- Con TranslatePress, potrai aggiungere altre lingue man mano che il tuo sito cresce grazie alle visite internazionali. È il modo più semplice per aumentare il traffico multilingue.
In conclusione
Se desideri migliorare ulteriormente il tuo sito web bilingue, disponiamo di una gamma di componenti aggiuntivi premium per rendere le cose ancora più semplici per te.
- Addon Pacchetto SEO:– modifica gli slug degli URL per abbinare le lingue, i tag ALT delle immagini, modificare i meta OpenGraph per singola lingua, supporto per sitemap multilingue/bilingue (funziona con tutti i plugin SEO di WordPress).
- Componente aggiuntivo multilingua: Se hai bisogno di più di 2 lingue, questo componente aggiuntivo supporta oltre 221 lingue.
- Componente aggiuntivo di navigazione basata sulla lingua:- Mostra diverse voci di menu in base alla lingua.
- Componente Aggiuntivo di Traduzione Automatica DeepL:- Traduzione automatica del contenuto del tuo sito tramite l'API di DeepL.
- Rilevamento automatico della lingua dell'utente Reindirizza automaticamente gli utenti ai contenuti tradotti pertinenti nella loro lingua.
TranslatePress Multilingue
Ora che conosci tutti i passaggi per rendere il tuo sito web bilingue/multilingue, inizia oggi e raccogli i benefici di avere i tuoi contenuti disponibili in più lingue.
Hai ancora domande sui siti web bilingui? Faccelo sapere nei commenti!
Se hai trovato utile questo post, ti invitiamo a visitare il nostro Canale YouTube, dove carichiamo costantemente brevi tutorial video facili da seguire. Puoi anche seguirci su Facebook e Twitter per essere tra i primi a sapere ogni volta che pubblichiamo.