In this post
In this post
Trying to figure out how to use DeepL to translate a website?
DeepL is popular because of its accurate translations. In blind comparison tests by professional translators, DeepL regularly performed better than similar machine translation services from Google, Microsoft, and Amazon.
But while DeepL offers web and desktop apps that make it easy to translate text or documents, the service doesn’t offer a dedicated DeepL website translator that you can use to automatically translate all the content on a website.
Don’t worry, though! With the right tool, you can still use DeepL to translate your website’s content and create a multilingual website.
That’s the topic of this post. We’ll first talk about what you need in order to translate a website with DeepL.
Then, we’ll show you step-by-step how you can translate a WordPress-powered website using the free or paid DeepL API service.
Why Use DeepL to Translate a Website?
If you want to translate a website automatically, there are a lot of services that can help you out. So – why use DeepL vs services like Google Translate?
The main reason people like DeepL is because of its accuracy, especially when it comes to accurately capturing context and translating content in a way that reads naturally.
In a blind test of professional translators between DeepL vs Google vs Microsoft vs Amazon, professional translators were much more likely to prefer DeepL’s translations to the other services in situations where one service’s translations were noticeably better than the others.
That is, the image below doesn’t capture situations where all of the translations were equally good. It only displays situations where one service’s translation stood out as being better than the others.

So – if you want really accurate automatic translations for your site, DeepL is a great choice.
What You Need in Order to Use DeepL to Translate a Website
If you want to use DeepL to translate your own website, you’re going to need the help of a third-party solution. This is because there’s no dedicated DeepL website translator tool for dynamic translation (like our free website translator widget).
You could manually copy and paste text into the web translator or desktop app, but this isn’t a viable solution to fully translate a website.
However, DeepL does provide a translation API. If you’re not familiar with what an API is, it’s basically a way to programmatically “connect” your website to the DeepL service. You can feed your website’s content to the DeepL API and then the DeepL service will respond with the translated version of your content.
With the right tool, you can make this happen seamlessly and, more importantly, automatically. So, let’s look at how it works with WordPress, the most popular way to make a website.
To connect your WordPress site to DeepL, you could use the TranslatePress plugin.
With TranslatePress, you can use the DeepL API to automatically translate your entire site into one or more new languages. The basic process works like this:
- You install the TranslatePress plugin.
- You configure TranslatePress to connect to the DeepL API (this is non-technical and just requires pasting something from your DeepL account into the plugin’s settings).
- TranslatePress sends your site’s content to DeepL for translation using the API.
- DeepL sends back the translated versions of your content.
- TranslatePress stores those translations on your WordPress site’s server (so that everything is hosted locally and you don’t need to query DeepL every time someone visits your site).
Once TranslatePress stores the translations from DeepL, you’ll even have the option to manually edit them as needed using TranslatePress’s visual translation editor.
On the front-end of your site, your site’s visitors will be able to use a language switcher to choose their preferred language for your site’s content.
DeepL API Pricing
With the regular DeepL service, you can get unlimited translation for a very low price. However, DeepL uses different pricing for the DeepL API, which is what you need if you want to use DeepL to translate a website.
The DeepL API is free to translate up to 500,000 characters per month. This is equal to roughly 100,000 words, though the exact number of words depends on your content.
If your translation needs exceed that limit, the DeepL API Pro plan is a flat $5.49 per month plus $25 per one million characters that you translate.
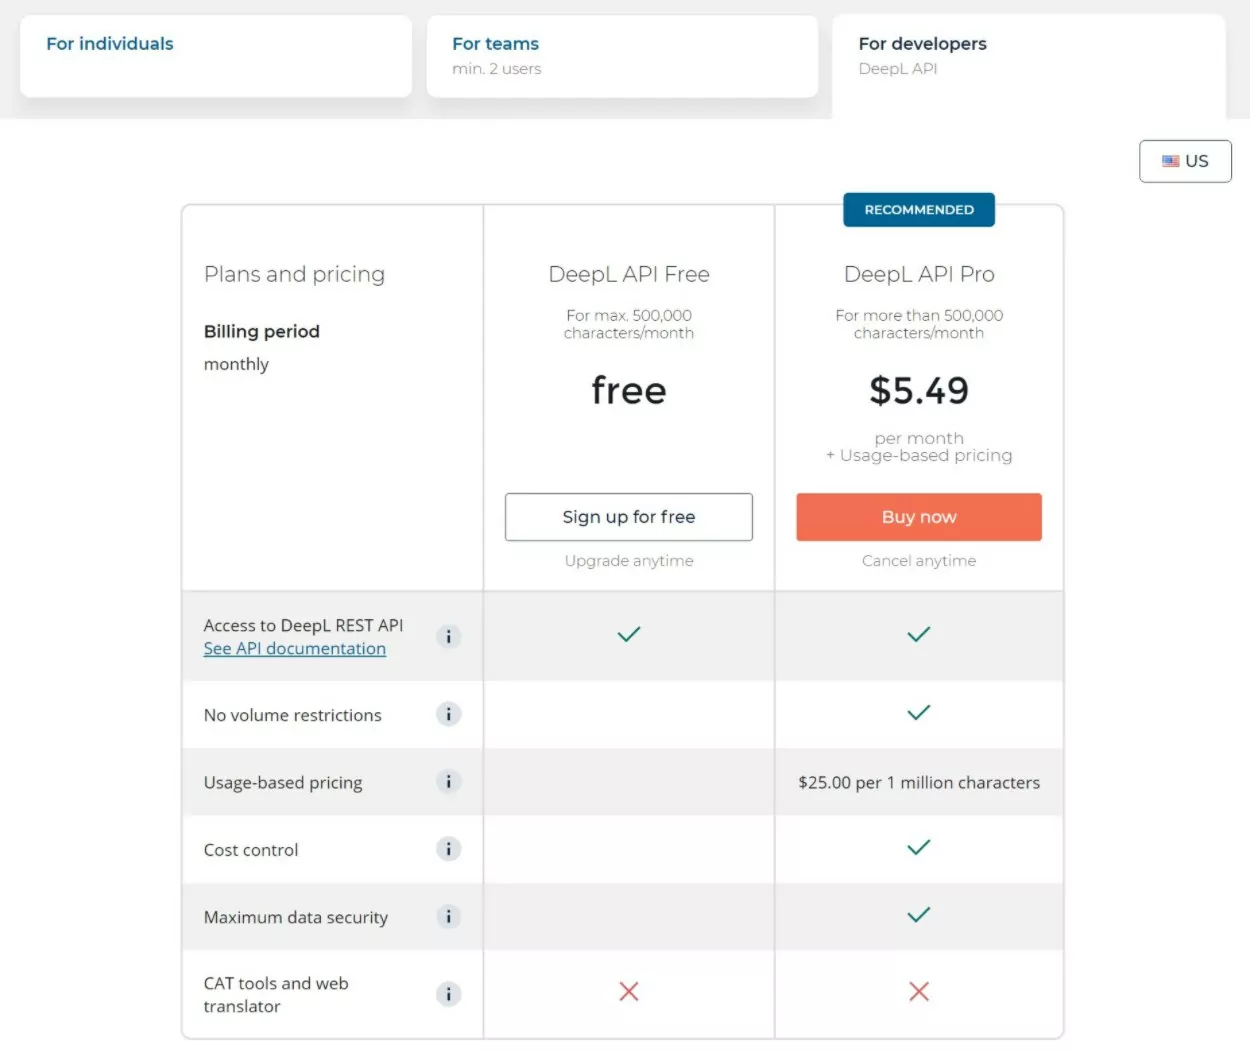
So if you translated two million characters per month on the Pro plan, you would pay $55.49 ($50 for the usage + $5.49 for the flat monthly fee).
The nice thing about using TranslatePress is that you’ll only need to pay the usage fees one time because TranslatePress stores your translations locally.
DeepL Translate Website Tutorial: How to Use the API
Now, let’s look at how to use the DeepL website translator API to translate your WordPress website using TranslatePress.
While TranslatePress does have a free version at WordPress.org, you’ll need to purchase at least the Business license to follow this tutorial because that’s what gets you access to the DeepL Automatic Translation Add-on.
The Business license also gives you access to lots of other useful tools, such as improved multilingual SEO, support for unlimited languages, automatic user language detection, and more.
TranslatePress Multilingual
For a short overview of the process you can watch this quick video tutorial:
But for a more in-depth approach, keep reading!
1. Install Plugin and Choose Languages
To begin, install and activate the TranslatePress plugin along with the Business add-on plugin, which is what gets you access to the DeepL integration along with other useful features such as improved multilingual SEO and support for unlimited languages.
You can download both of these plugins from your TranslatePress account dashboard after you’ve made your purchase.
Once you’ve activated the core plugin and the Business add-on, go to Settings → TranslatePress to choose the languages that you want to use on your site:
- Default Language – the language that your site’s content currently exists in.
- All Languages – one or more new languages into which you want DeepL to translate your website.
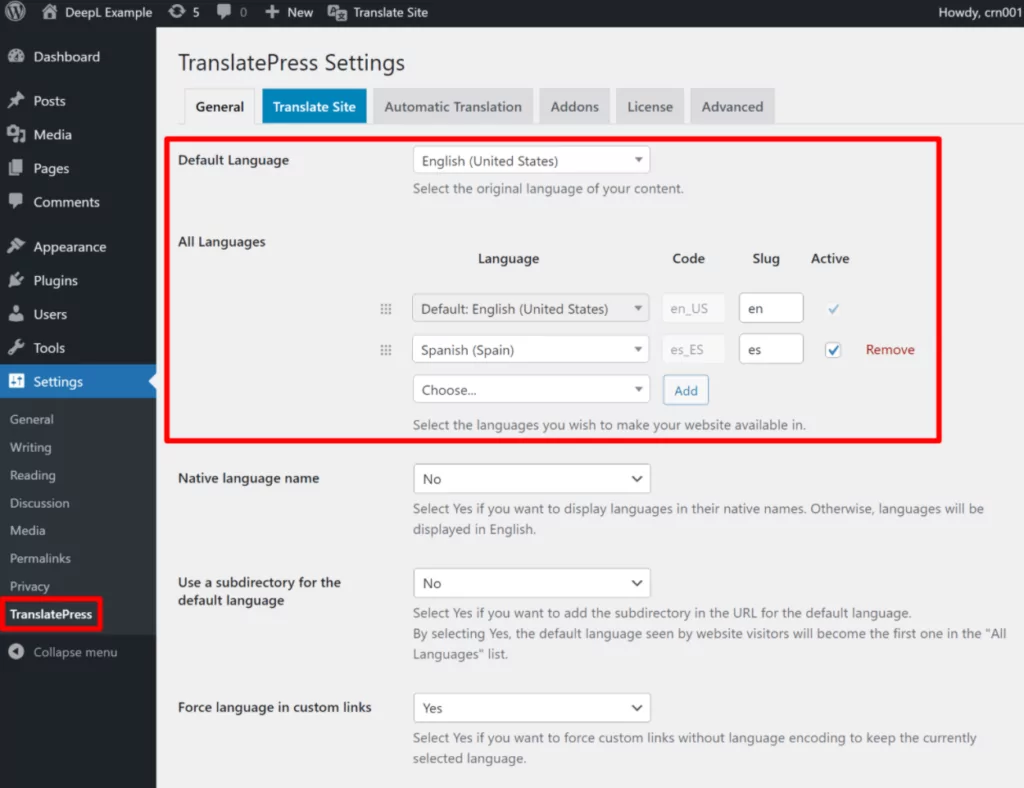
To ensure compatibility, make sure you’re using one of the languages that the DeepL API supports. Currently, the DeepL API supports 25+ different languages – you can find the full list here in the Listing supported languages section.
If your language isn’t supported but you still want to use automatic translation, you might want to consider Google Translate as an alternative. Compared to DeepL, Google Translate has much broader support, with over 100 languages available to translate. You can also still use TranslatePress with Google Translate – check out the full guide here.
2. Register for a DeepL Account and Access API Key
Next, you need to configure TranslatePress to connect to the DeepL API.
To begin, you need to create your DeepL account if you haven’t done so already. To do that, go here and either:
- Click Sign up for free if you want to use the free version (up to 500,000 characters per month).
- Click Buy now if you want to sign up for the Pro version of the DeepL API.
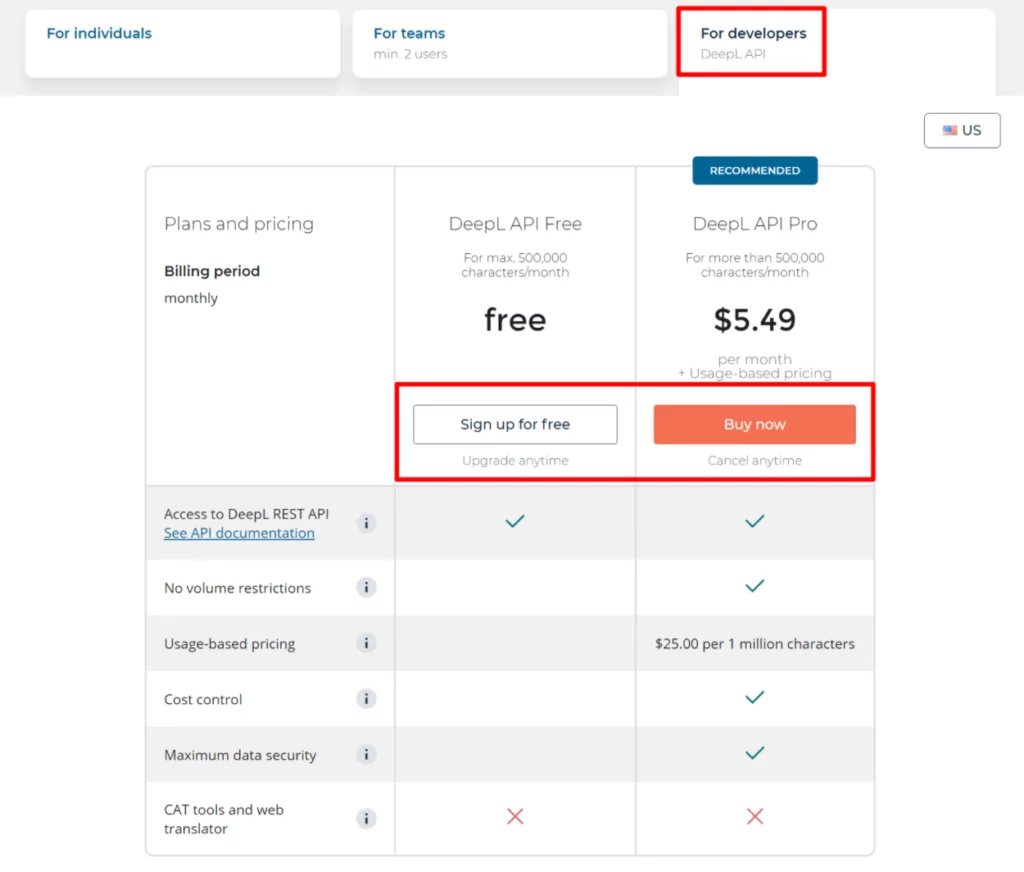
Even if you use the free plan, you’ll still need to enter a credit card for verification. DeepL will only bill you if you manually upgrade to the DeepL API Pro plan, though.
Once you’ve activated your account, you need to access your API key. To do this, use the menu in the top-right corner of the DeepL site to access your account area. Or, click this link to go straight to the account page.
Then, find the Authentication Key for DeepL API. Keep this value handy because you’re going to need it in the next step:

If you find the process of generating the DeepL API key too complicated, we do have a short video tutorial to help you out a little more:
3. Connect TranslatePress to DeepL
Now, you can configure TranslatePress to connect to the DeepL API.
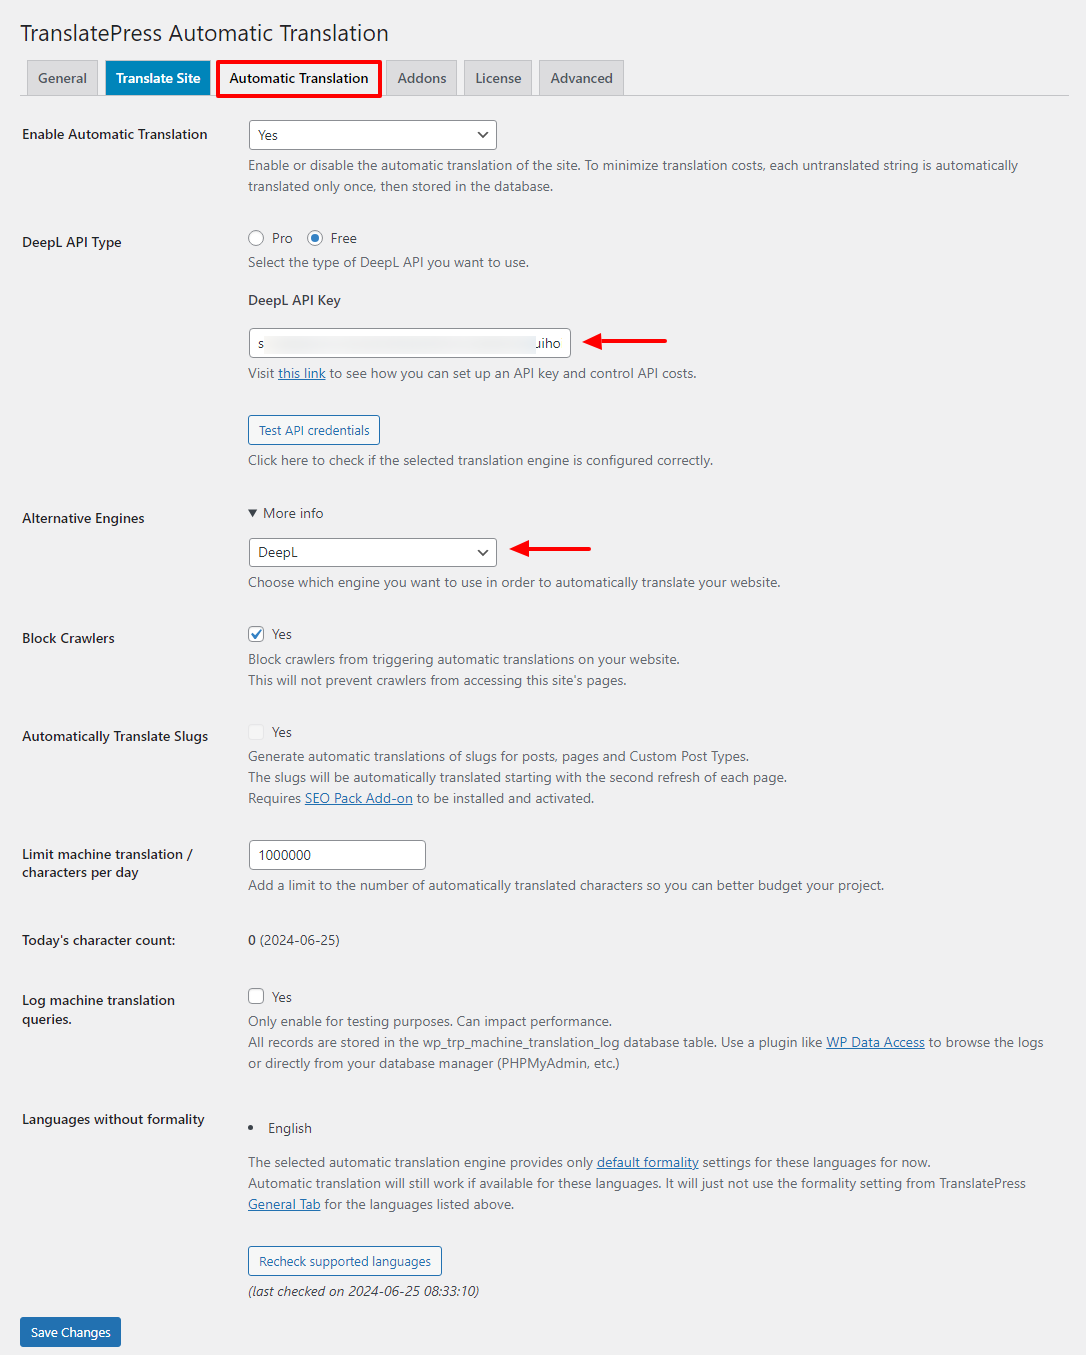
Go back to your WordPress dashboard and open the Automatic Translation tab in the TranslatePress settings.
Update: All premium versions of TranslatePress now come with TranslatePress AI, a fantastic feature that helps you to translate your website automatically using DeepL without fetching the API key. Just activate your TranslatePress license, choose your languages, and enable automatic translation.
But if you already have a DeepL account and you’d prefer to use that, just enable automatic translation and then choose DeepL as your translation engine. This will expand some additional options.
First, choose whether you’re using the free DeepL API or the Pro version. Then, paste your DeepL API key (from the previous section) into the DeepL API Key box.
Further down the page, you also have an option to Limit machine translation characters per day. This is a useful feature to control your budget and avoid surprises. For example, if you’re using DeepL API Pro and you set the limit to one million characters, you know that you’ll never be billed more than $25 in a day.
Remember – TranslatePress will store your translations locally, so you’ll never need to pay multiple times to translate the same content.
Once you’ve made those choices, click Save Changes.
4. Manually Refine Translations If Needed
One of the nice things about using TranslatePress with DeepL is that TranslatePress gives you the option to manually edit/refine your automatic DeepL translations if needed.
You don’t have to do this. But if you ever want to go in and tweak something in the automatic translations from DeepL, you can do that using TranslatePress’s visual translation editor.
To begin, open the page where you want to make your edits on the front-end of your site. Then, click the Translate Page option in the WordPress toolbar:
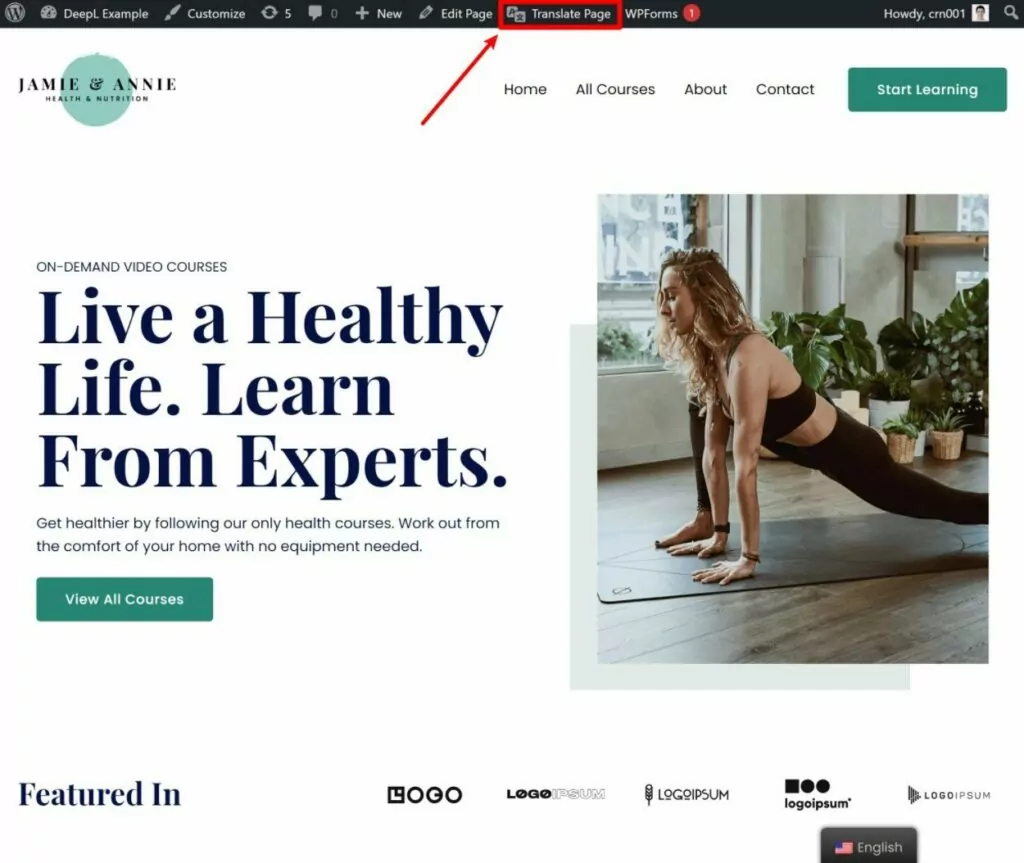
This will open the visual translation editor. You’ll see a live preview of your site on the right and a sidebar on the left where you can manage your DeepL website translations.
To edit a translation, just hover over that content on the live preview and click the pencil icon. This will open the translation in the sidebar, where you can make edits or even completely overwrite the automatically generated content:
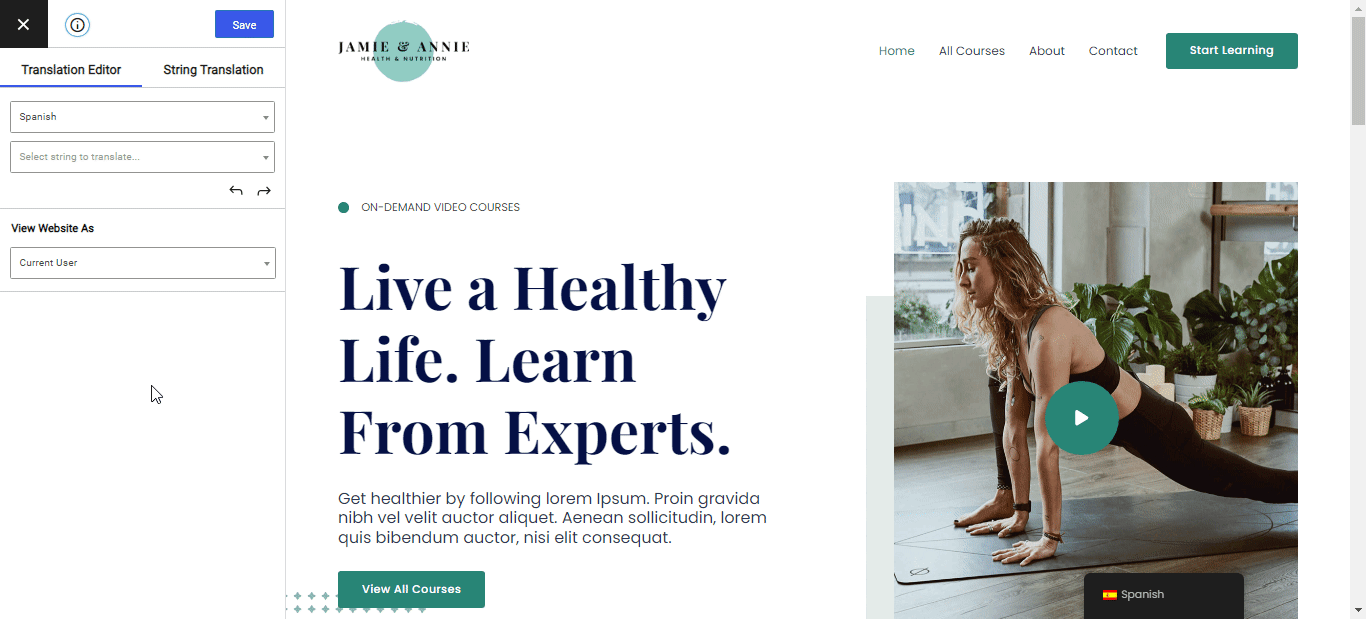
The translation editor also lets you go beyond just text translation and also “translate” your site’s images, which isn’t something that the DeepL API can do by itself. Essentially, this lets you display a different image file based on a user’s chosen language, which helps you further localize your site.
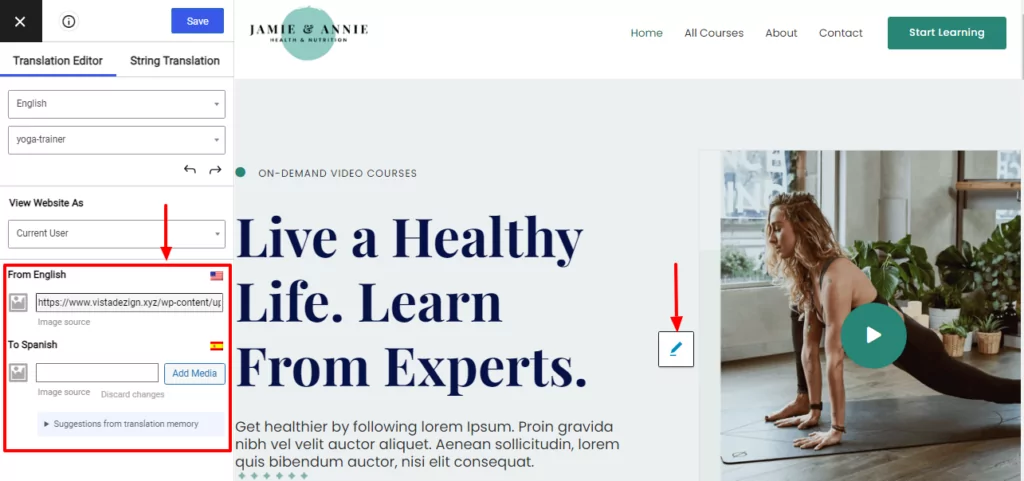
You can translate images just like editing text translations – hover over the image and click the pencil icon. That will open a file picker in the sidebar that lets you choose a different image from your Media Library:
You can use this same point-and-click approach to edit translations for all types of content. To see some more specific examples, we have lots of guides:
- Editor (Gutenberg) blocks
- Custom fields
- Custom post types
- WordPress forms
- WordPress menus
- Popup content
- Sliders
- WooCommerce products
- Elementor (page builder)
- Divi (page builder)
- Oxygen (website builder)
5. Add Your Language Switcher
To let your users choose a different language version of your site, TranslatePress makes it easy to add a front-end language switcher.
By default, TranslatePress adds a floating language switcher in the bottom-right corner of your site. If you want, though, you can also move it to a different location and otherwise customize its behavior, like choosing whether or not to show language flags.
To access these settings, go to Settings → TranslatePress and scroll down to the Language Switcher settings in the General tab:
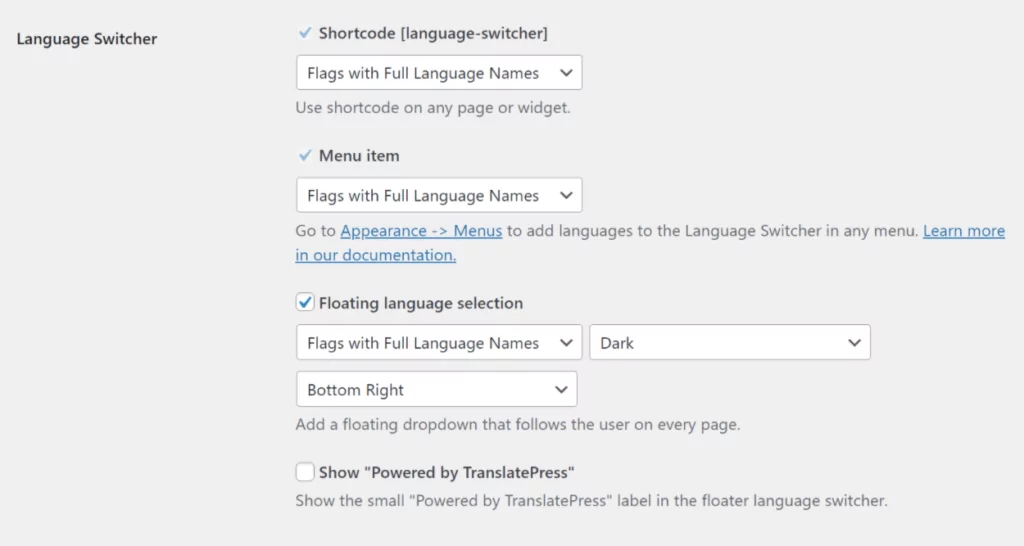
For a deeper look, check out our full guide to adding a WordPress language switcher.
Use DeepL to Translate Your Website Today
DeepL is the preferred choice of many webmasters because of its accurate translations, especially when it comes to context and local slang.
However, it doesn’t offer its own DeepL website translator tool like some other translation services. Thankfully, you can still use DeepL to translate your website – you just need the right tool to help.
If you’re using WordPress, that tool is TranslatePress.
TranslatePress helps you use the free or paid DeepL API to translate 100% of your site’s content. You get tools to control your budget and usage. Plus, because TranslatePress stores your translations locally, you’ll only need to pay the DeepL API fee one time and you’ll also be able to manually refine your translations using TranslatePress’s visual editor.
If you’re ready to translate your website using DeepL, purchase the TranslatePress Business license today and you can have a working multilingual website in under an hour!
TranslatePress Multilingual
Do you still have any questions about using DeepL to translate a website? Let us know in the comments!