In this post
Looking for a solution to partially translate WordPress and exclude WordPress pages, posts, or products from translation?
While a lot of people want to create a fully multilingual site, you also might have some situations where you only want to translate parts of your WordPress website.
With the free TranslatePress plugin, you can easily set up this behavior to only enable translation on the exact content where it’s needed. You can either enable sitewide translation and exclude certain content from translation. Or, you can only enable translation on specific pieces of content where needed and otherwise disable it.
Once you’ve enabled translation where you need it, you’ll be able to manage your translations using a simple visual editor like below, and you also have the option to use Google Translate or DeepL to automatically generate your translations and save some time:
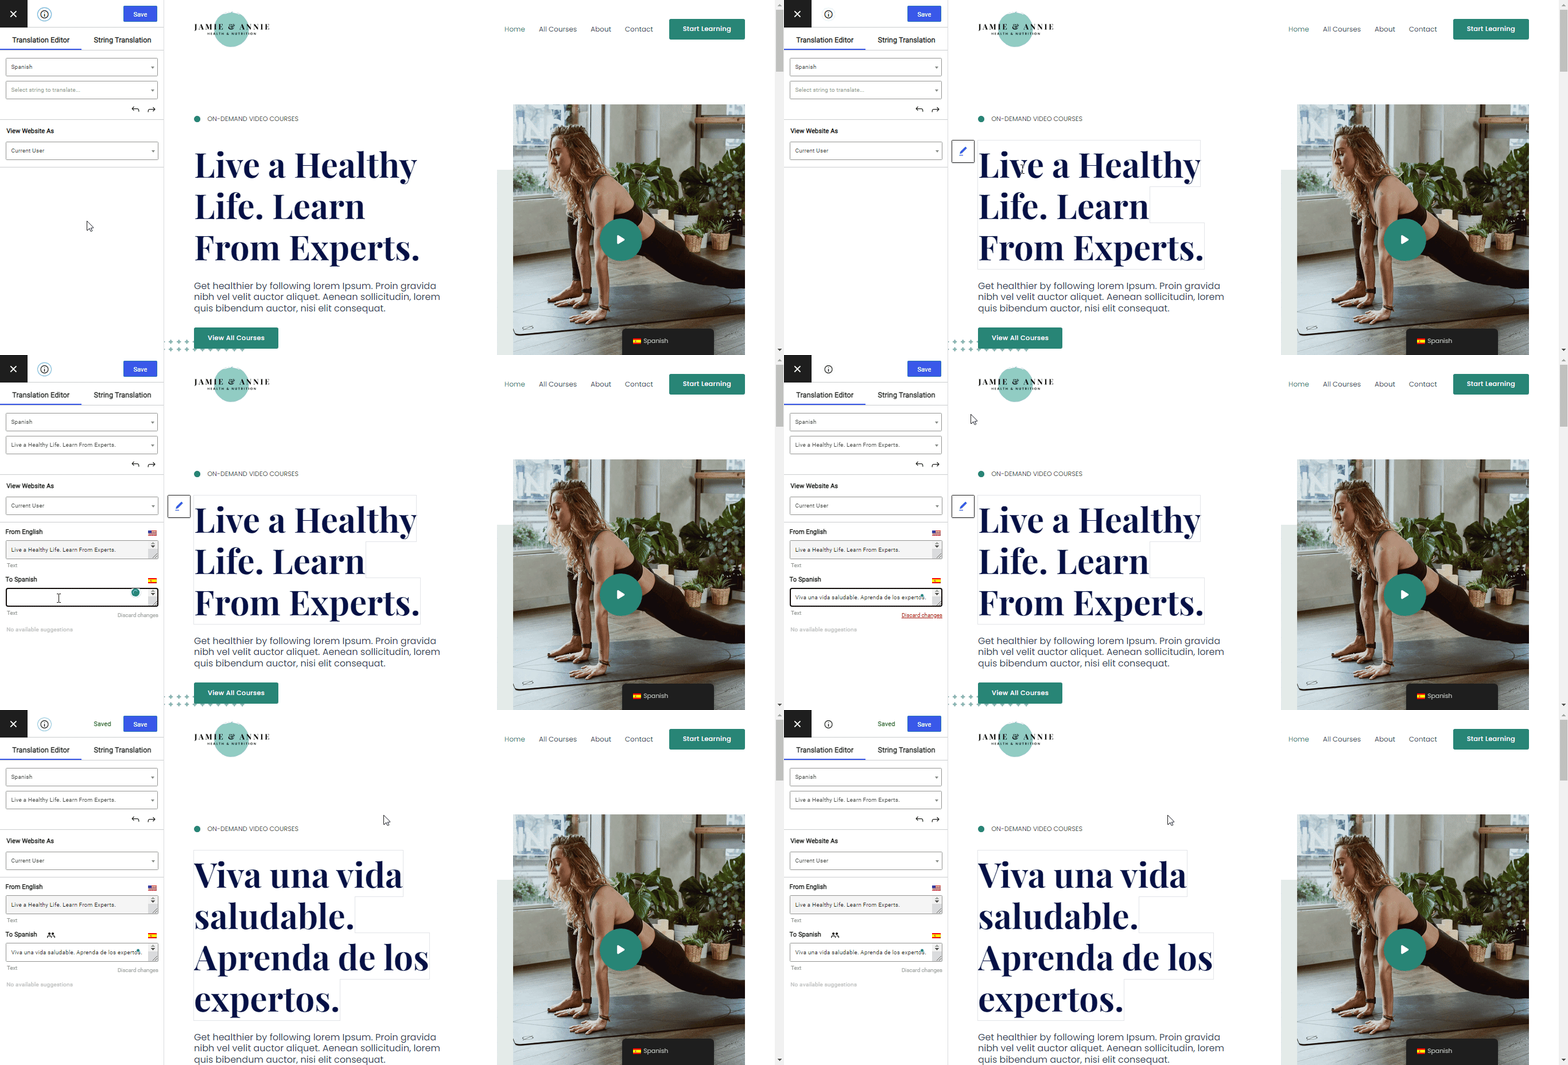
Keep reading and we’ll show you step-by-step how to translate specific parts of WordPress for free!
Example Use Cases for When to Exclude Content From Translation
There are a lot of reasons why you might want to translate certain parts of WordPress but also exclude content like posts, pages, or products from translation.
One of the most common use cases is a situation where you want to create a multilingual site for your core pages (e.g. homepage, about page, contact page, etc.) while leaving your blog in its original language (since translating every post you publish is a lot of work).
Another common use case is eCommerce stores, where you might want to only translate certain products into multiple languages. For example, you might just translate your best-selling products or you might just translate products that appeal to a multilingual audience.
Or, on a more granular level, you might have situations where you just want to exclude specific text strings or content blocks from being translated. For example, if your actual brand name is “Blue Widgets”, you’ll want to exclude “Blue Widgets” from translations to avoid confusing visitors by translating your brand name.
What You Need to Translate Part of Your WordPress Site and Exclude Specific Content
To translate some or all of your WordPress website, you can use the free TranslatePress plugin.
TranslatePress can help you create a fully multilingual website by translating 100% of your site’s content…but it also gives you granular control to only enable translations for specific pieces of content (or even just certain parts of your content).
Whether you’re translating all of your site or just part of your site, you’ll be able to manage your translations from a simple visual editor.
You’ll also get access to useful features like multilingual SEO optimizations and automatic translation support via Google Translate and DeepL for the content that you do want to translate.
TranslatePress Multilingual
Below, we’ll show you step-by-step how to set up TranslatePress to translate specific parts of your site.
Note – if you’re already using TranslatePress to create a multilingual WordPress site, you can skip ahead to step #2 to go straight to the part where we show you how to exclude content. In the first step, we’ll just quickly go over how to set up TranslatePress for users who are just getting started with WordPress translation.
1. Set Up TranslatePress
If you’re not already using TranslatePress to create a multilingual WordPress site, your first step is to install and configure the TranslatePress plugin.
Here’s how to do that:
- Install and activate the free TranslatePress plugin from WordPress.org.
- Go to Settings → TranslatePress to open the settings area.
- Set your site’s current language using the Default Language drop-down.
- Add one or more new languages into which you want to translate some of your site’s content. The free version of TranslatePress supports one new language while the premium version allows unlimited languages.
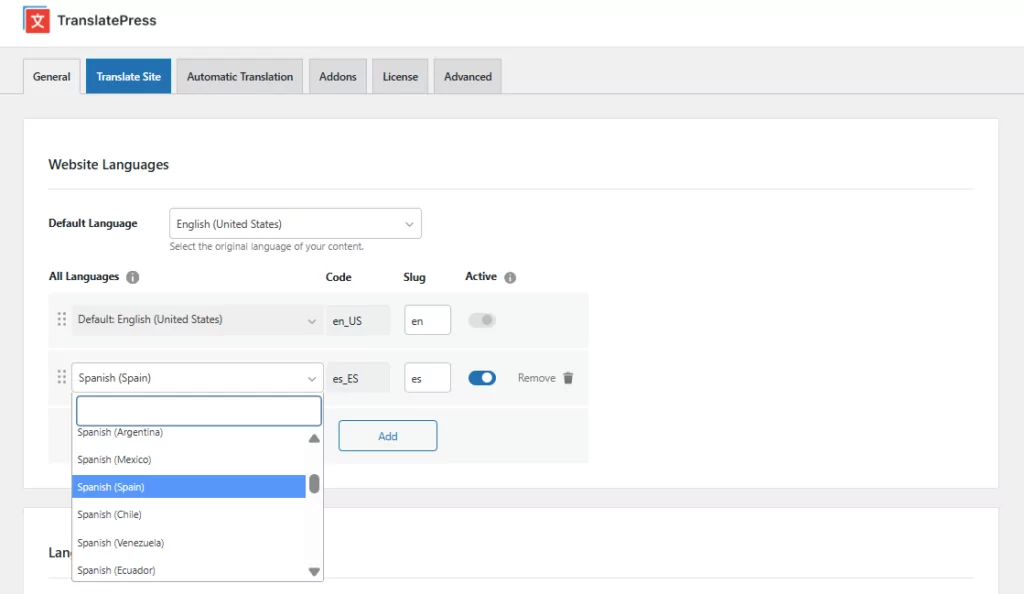
For a more detailed look, check out our full post on how to make a multilingual WordPress site.
Further down the settings page, you can also configure your site’s language switcher, which will only appear on content where you’ve enabled translation. By default, TranslatePress adds a floating language switcher in the bottom-right corner of your site, but you can move this language switcher to other areas as needed and otherwise configure its looks and behavior.
2. Exclude Content From Translation
Now, it’s time to tell TranslatePress which content to exclude from translation so that it can partially translate WordPress. When you exclude certain content from translation, two things happen:
- TranslatePress won’t show the language switcher on that content.
- You won’t be able to add translations for that content using the TranslatePress editor.
TranslatePress gives you several different ways to target specific content for translation:
- Include/exclude certain URL paths. This lets you exclude certain URLs/URL paths from translation or only enable translation on certain URLs/URL paths. This is what you’ll use to fully exclude entire pieces of content from translation.
- Exclude selectors from translation. This lets you disable translation for content with certain HTML selectors. This is useful if you only want to partially exclude certain content from translation while still translating the rest of the page.
- Exclude strings from automatic translation. If you’re using automatic translation, this lets you exclude certain strings (brand names, technical terms, etc.) from being translated with Google Translate or DeepL.
- Exclude Gettext strings. This is an advanced tactic that lets you exclude certain theme or plugin content from translation.
- Exclude selectors only from automatic translation This lets you disable automatic translation for content with certain HTML selectors.
- Exclude from dynamic translation This lets you disable strings translations that are found in html nodes matching defined selectors. These strings will still be translated on the server side if possible.
To access all of the exclusion rules in TranslatePress, go to the Advanced tab in the TranslatePress settings area and then click the tab named Exclude Strings:
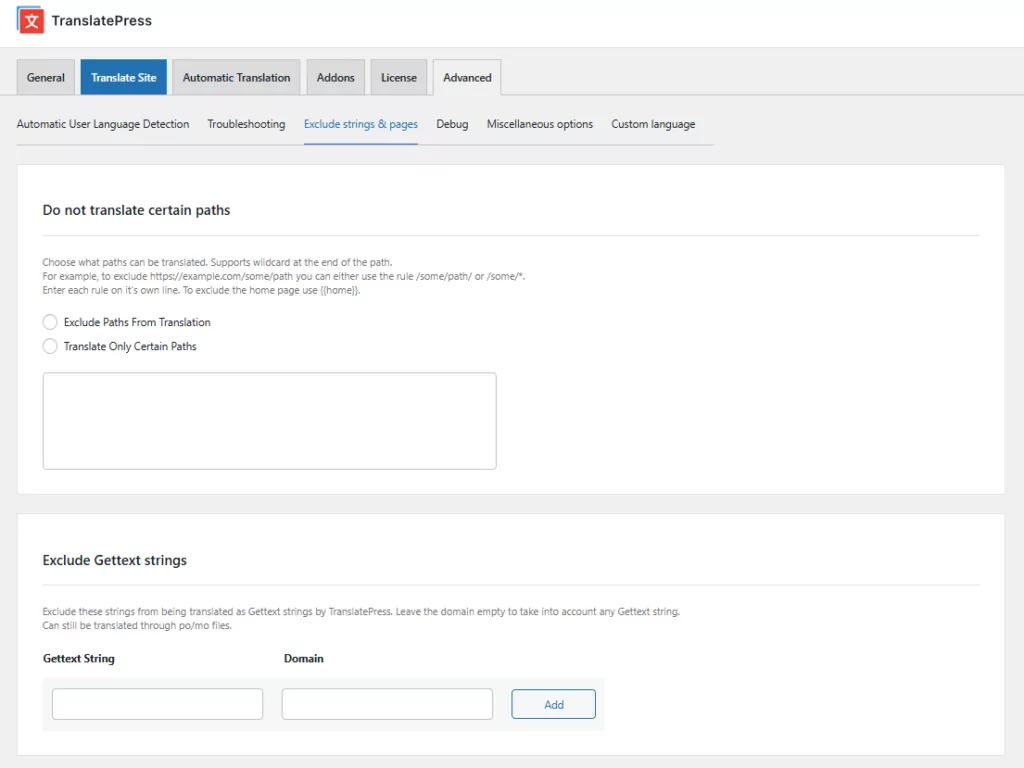
If you want to exclude posts, pages, or products from translation, you’ll want to use the URL paths feature, so we’ll cover that first.
How to Exclude Posts, Pages, or Products from Translation
To exclude entire posts, pages, or products from translation, you can use the URL paths feature in TranslatePress. This feature will also work for any custom post types that you might be using.
With the URL paths feature, you can use the Exclude Paths From Translation option to exclude certain content from translation by entering its URL path. When adding a URL path, you have three options to target content:
- Specific URL path – you can enter the full URL path to only exclude just that specific piece of content.
- Wildcard – you can use a wildcard (
*) to target multiple pieces of content that match. For example, entering/blog/*would target every piece of content that has/blog/as its root, including/blog/post-1/,/blog/post-2/, etc. - Home tag – you can enter
{{home}}to target your homepage.
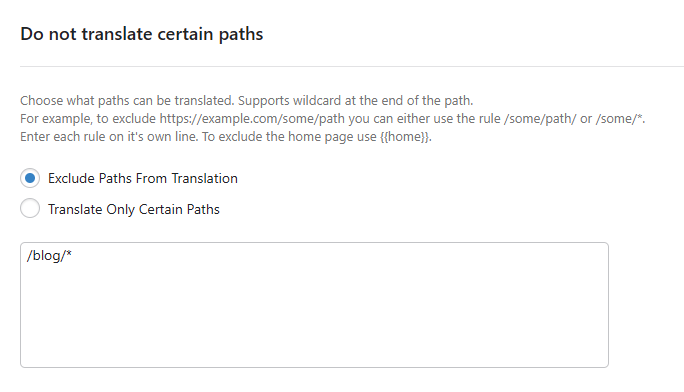
TranslatePress will disable translation and hide the language switcher for any content that matches the URL paths that you enter.
We’ll show you some real examples of how this works in a second.
How to Only Translate Specific Pages, Posts, or Products
In addition to excluding content by its URL path, TranslatePress lets you only enable translation for specific content by its URL path using the Translation Only Certain Paths option. This is a good option if you only want to include translation on a few pages on your site and want to disable translation everywhere else.
To put it another way:
- Exclude Paths From Translation – enables translation sitewide but lets you manually exclude certain content from translation.
- Translate Only Certain Paths – disables translation sitewide but lets you manually enable translation for certain content.
You can use all the same URL path options that you get for excluding content. The only difference is that you’ll select Translate Only Certain Paths when adding the URL paths:
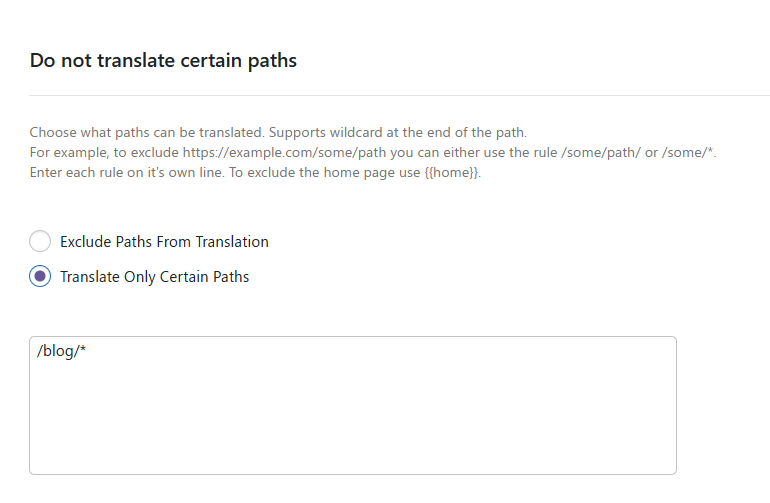
Let’s look at two examples of how the include and exclude rules work…
Example #1: Only Translate Certain Pages
For this first example, let’s say you have a website with four core pages and a blog. The core pages are:
- Homepage
- /about/
- /contact-us/
- /services/
The blog is located at /blog/ and each blog post follows this URL structure:
- /blog/post-1/
- /blog/post-2/
- Etc.
Let’s say you want to translate those four core pages but exclude your blog and all of the blog posts.
There are two ways that you could configure this.
First, you could use the Translate Only Certain Paths rule to tell TranslatePress to only translate the four core pages. It would look something like this (you can see that we used the {{home}} tag to target the homepage):
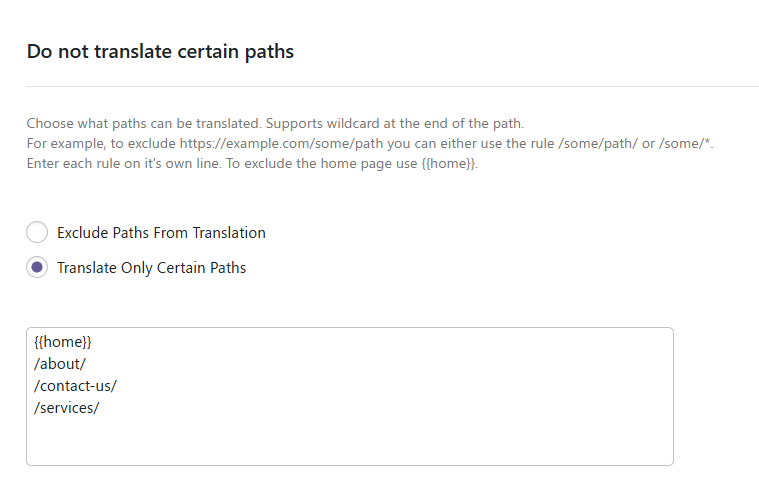
Or, you could use the Exclude Paths From Translation to exclude the blog page, as well as all blog posts by using a wildcard (asterisk). It would look something like this:
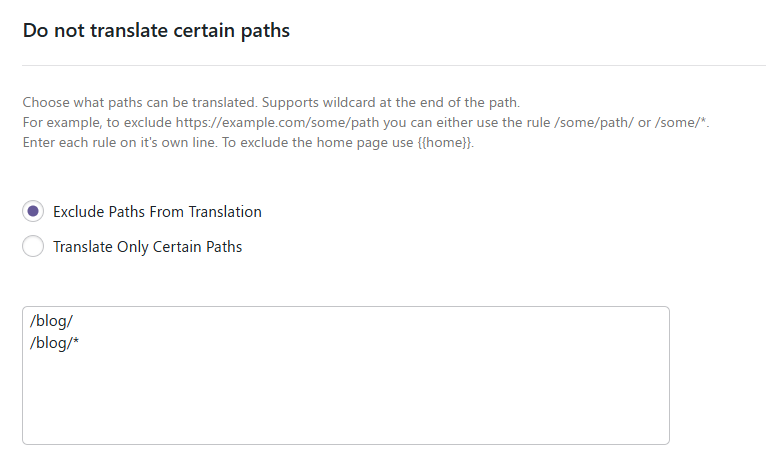
With this second approach, you would need to remember that any additional content you add outside the blog would still be eligible for translation. For example, if you add a fifth page at /team-members/, translation would still be active with the second approach.
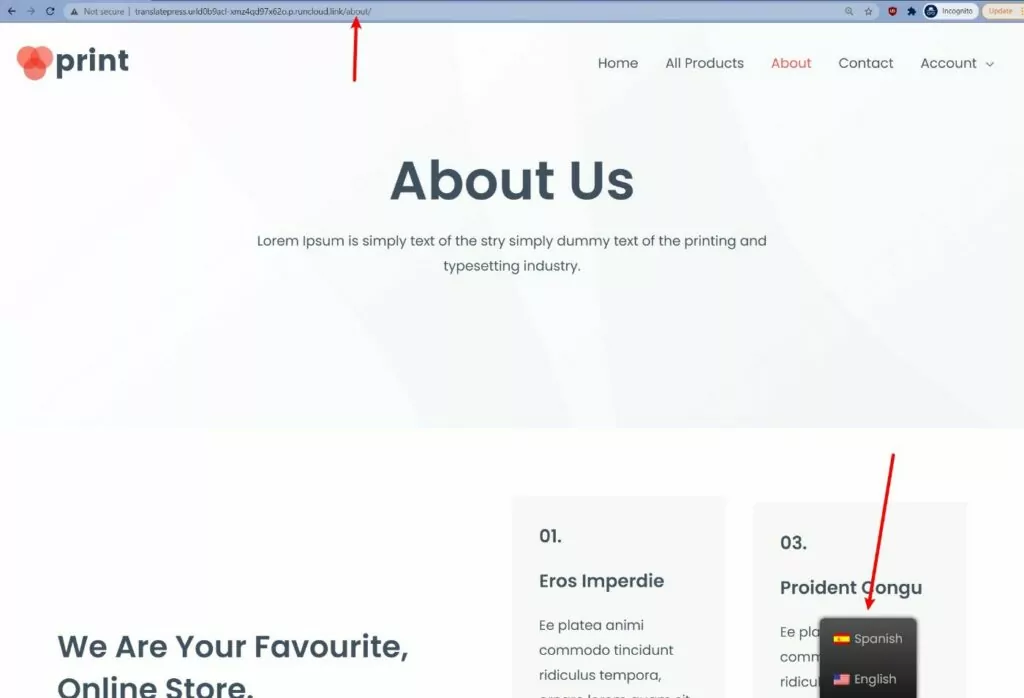
With these settings active, visitors would see the language switcher on your site’s homepage or one of the other targeted pages, like the about page:
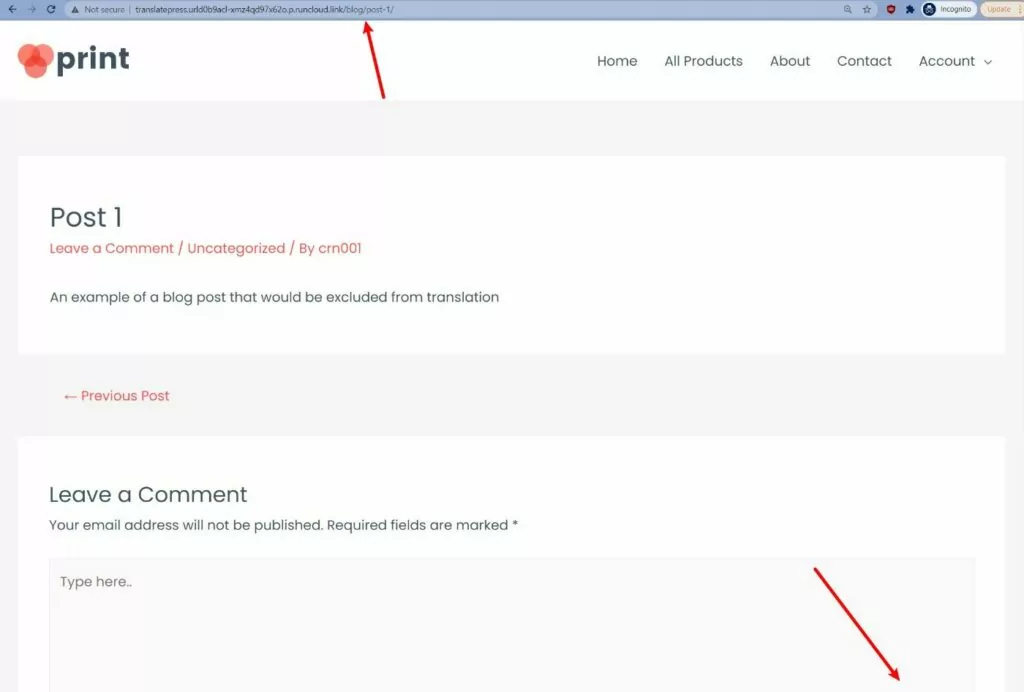
But if they browse to a blog post, the language switcher would disappear and your content would only be available in its default language:
Example #2: Only Translate Certain Products
In this second example, let’s say you have a WooCommerce store and you want to only offer certain products in multiple languages.
Let’s say you want to offer three products in multiple languages, but disable translation everywhere else on your store. The products that you want to translate are:
- /product/blue widget/
- /product/green-widget/
- /product/red-widget/
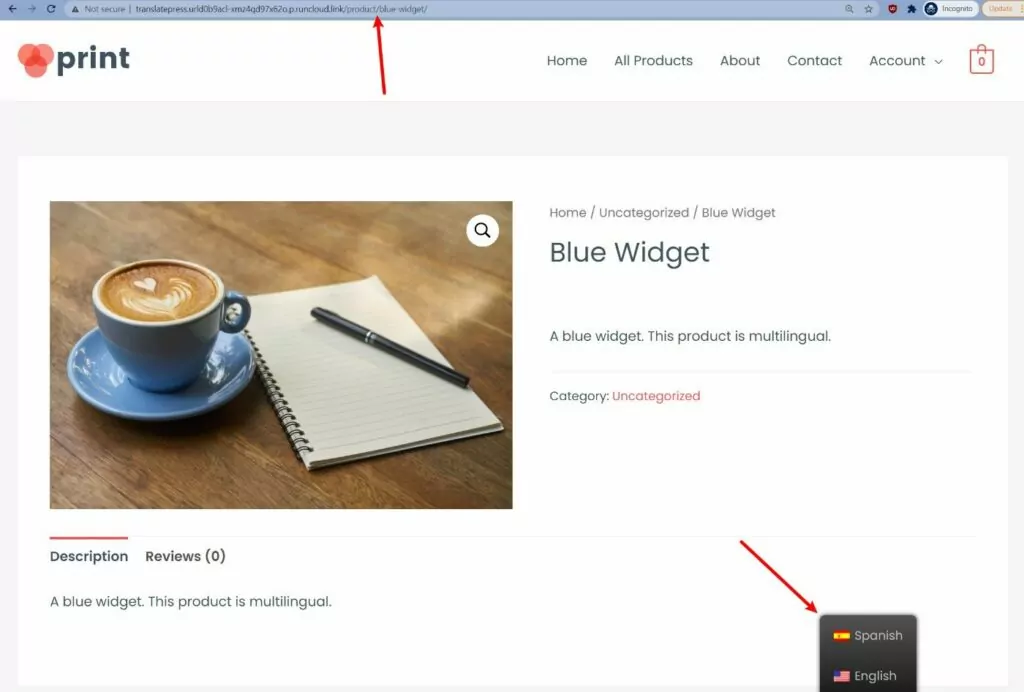
To only enable translation for those products and exclude all the other products as well as your store’s other content, you could use Translate Only Certain Paths like this:
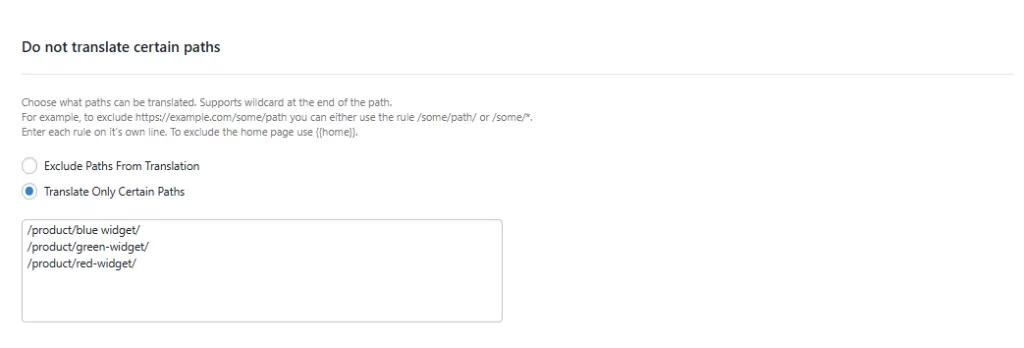
With this configuration, shoppers would see the language switcher if they navigate to one of the three products that you targeted:
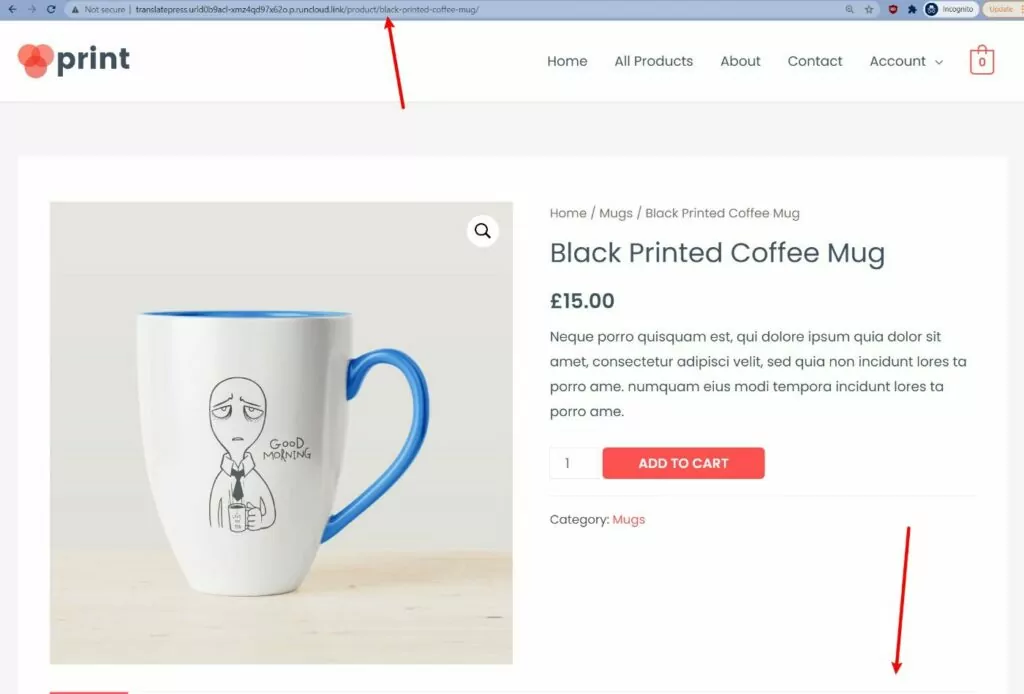
But if they go to a different product (or a non-product page on your store), the language switcher will disappear and they’ll only see content in your store’s default language:
How to Exclude Specific Elements of a Post/Page From Translation
In addition to letting you completely exclude posts, pages, products, and other custom post types, TranslatePress also lets you exclude just parts of your content, rather than the entire piece of content.
You can do this by targeting specific selectors in your site’s code. For example, if you wrap the content you want to exclude in <div id="donottranslate"></div>, you could exclude all of the content inside that div by adding #donottranslate to the Exclude selectors from translation box:

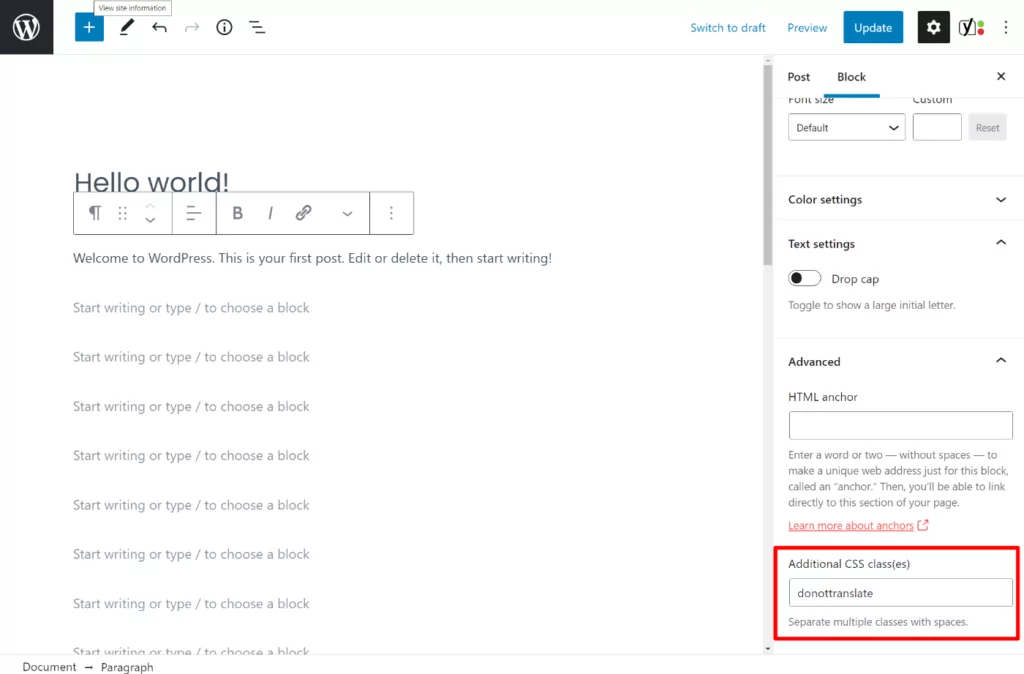
If you don’t feel comfortable working directly in your site’s code, the WordPress block editor also gives you an option to add CSS classes to a specific block, which then lets you exclude that block from translation.
For example, if you set a block’s CSS class equal to donottranslate, you could exclude all blocks with that class by setting up an exclusion rule for .donottranslate:
3. Translate the Content (That You Do Want to Translate)
Once you’ve set up your exclusion rules, your final step is to translate the remaining content using the visual TranslatePress editor.
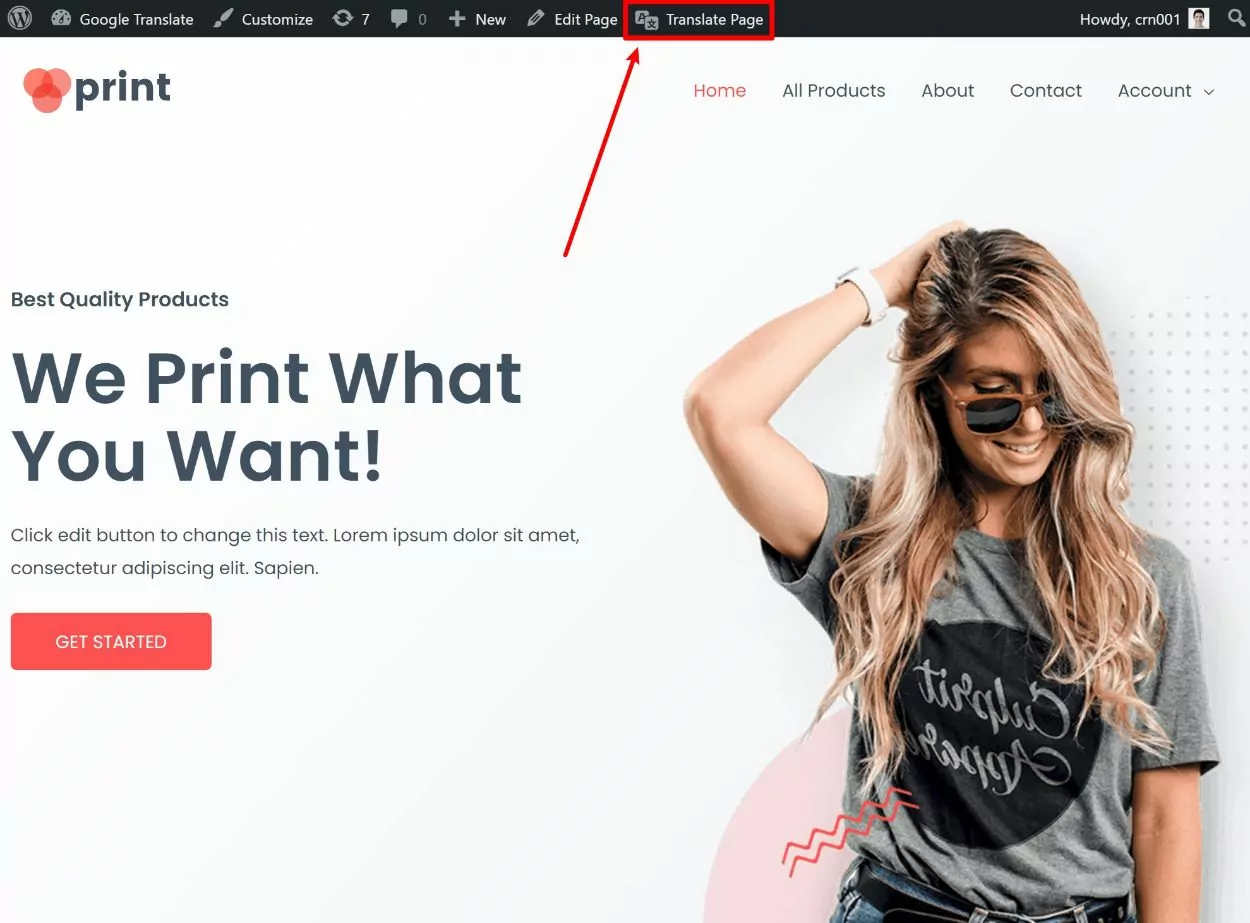
To open the editor, go to the page that you want to translate and click the Translate Page option on the WordPress toolbar. You’ll only see this option on pages where you’ve enabled translation – it will be hidden on any content that you’ve excluded from translation:
Then, you can translate any part of your content by hovering over it on the live preview and clicking the pencil icon. If you excluded specific elements from translation by using HTML selectors, you won’t see the pencil icon when hovering over those elements:
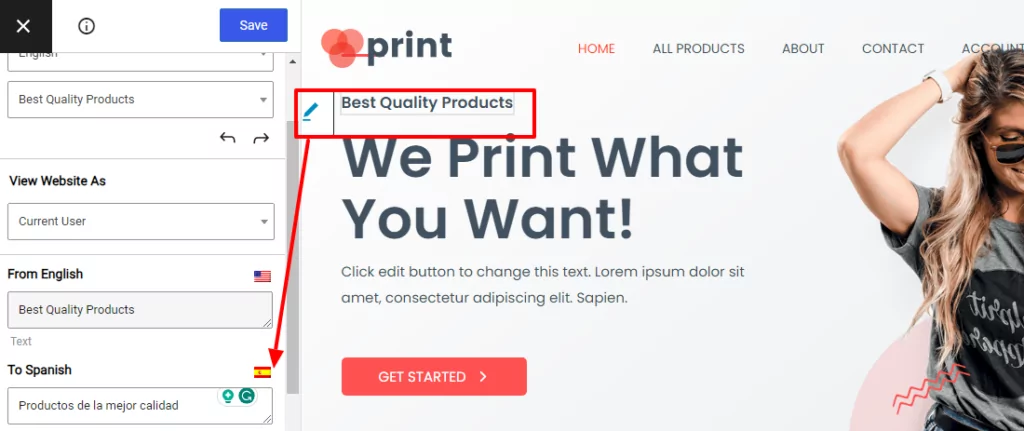
You can use the same point-and-click approach to translate 100% of your site’s content. But for some more detailed guides, you can check out these posts:
- Images
- Editor (Gutenberg) blocks
- Custom fields
- Custom post types
- WordPress forms
- WordPress menus
- Popup content
- Sliders
- WooCommerce products
- Elementor (page builder)
- Divi (page builder)
- Oxygen (website builder)
With the SEO pack add-on, you’ll also be able to translate SEO metadata and social graph information from plugins like Yoast SEO and Rank Math. To access this add-on, you’ll need to upgrade to the paid version of TranslatePress.
If you want to save time, TranslatePress also supports automatic machine translation via Google Translate and DeepL. You can learn more in our full guide to WordPress automatic translation.
TranslatePress Makes It Easy to Translate Only Part Of Your WordPress Site
Whether you want to create a fully multilingual WordPress site or you only want to translate part of your site and exclude WordPress pages, posts, or products from translation, TranslatePress can help you get the job done.
One option is to use TranslatePress to enable sitewide translation but exclude certain posts, pages, or products from translation. Or, you can also go in the opposite direction and disable sitewide translation, while manually enabling it for certain pieces of content.
You can partially translate your site into one new language with the free version. Or, you can upgrade to the premium version of TranslatePress for unlimited new languages.
The premium version also adds:
- Better multilingual SEO, such as the ability to translate SEO metadata and create a multilingual XML sitemap.
- Dedicated translator accounts.
- Automatic redirects based on a user’s preferred language.
- DeepL support for automatic machine translation.
TranslatePress Multilingual
Do you still have any questions about how to partially translate WordPress and exclude certain content from translation? Let us know in the comments!

