In this post
If you want to help Google and other search engines crawl your website, you need to create an XML sitemap. A sitemap is basically a list of all the content on your website – you can submit it directly to Google so that Google can discover all of your content and optimize how it crawls your website.
Where things can get a little tricky is when it comes to a multilingual sitemap. You have to not only create a list of content for each different language on your site, but you also want to give Google the tools to understand how your different languages connect together.
For example, you want to say “This is the version of [Page A] in English” and “This is the version of [Page A] in Spanish”. That way, Google knows that it’s the same page, just in different languages (rather than two completely separate pages).
While most WordPress SEO plugins make it easy to create a single-language sitemap, they can’t help you create a multilingual sitemap… At least not by themselves.
In this post, we’ll explain what a multilingual sitemap is and how it’s different from a single-language sitemap. Then, we’ll show you how you can use TranslatePress and its SEO Pack add-on to connect to your favorite WordPress SEO plugin and offer your sitemap in multiple languages.
How Does a Multilingual Sitemap Work?
Again, a sitemap (AKA an XML sitemap), is basically just a list of all the content on your site that follows a specific format.
Virtually all WordPress SEO plugins create a sitemap for you – it’s typically located at yoursite.com/sitemap.xml.
If you open the file in your browser, you’ll just see a list of all your content:

But if you download the .xml file and open it in a text editor, you’ll see the actual “code” of your sitemap. Each URL on your site gets its own <loc> tag, along with some additional information, like the date that the piece of content was last modified:

A multilingual sitemap follows this same basic format, but you’ll need to add some additional information to each <loc> entry. Specifically, Google tells you to add an <xhtml:link> child entry for every different language variation of each piece of content (including the original language).
So if your content is available in English (default) and Spanish, you would have two <xhtml:link> child entries for each <loc> entry.
Here’s an example of what it looks like (and what you’ll be able to create after following this tutorial):
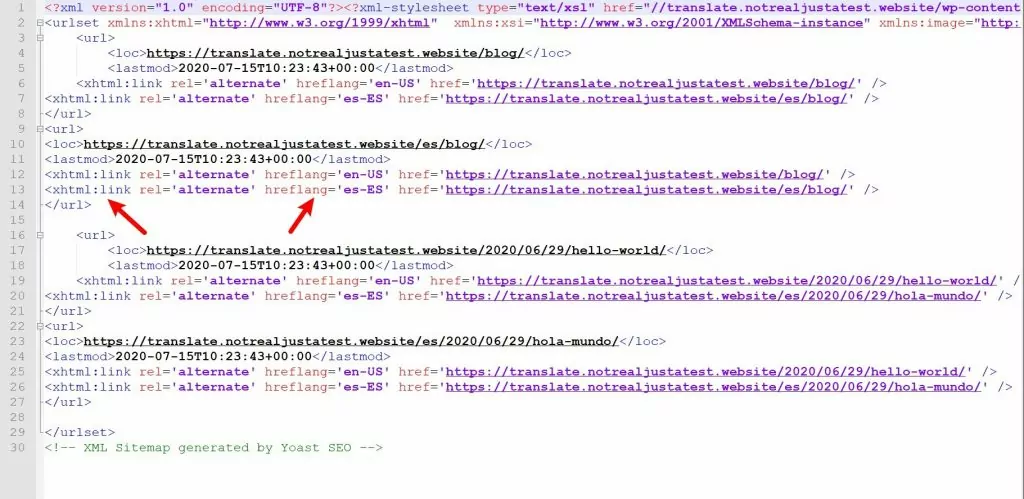
In that example, you can see one other addition – the hreflang tag. Hreflang is an important tool for all aspects of multilingual SEO, not just sitemaps.
Essentially, the hreflang tag tells Google which language and locale you’re using on a specific page. The locale is another important consideration beyond language. For example, you could use “es-mx” for Mexican Spanish and “es-es” for Spanish Spanish (both the language and the country).
Thankfully, you don’t need to manually add all of this information to your sitemap – in the next section, we’ll show you how to automatically create a properly formatted multilingual XML sitemap using the TranslatePress plugin.
How to Create an XML Sitemap for a Multilingual Site on WordPress
To create a multilingual XML sitemap for your WordPress site, you can use TranslatePress, along with the SEO Pack add-on, and your favorite SEO plugin, such as Yoast SEO or Rank Math.
With the free TranslatePress plugin, you can easily translate 100% of your WordPress site using a simple visual editor:
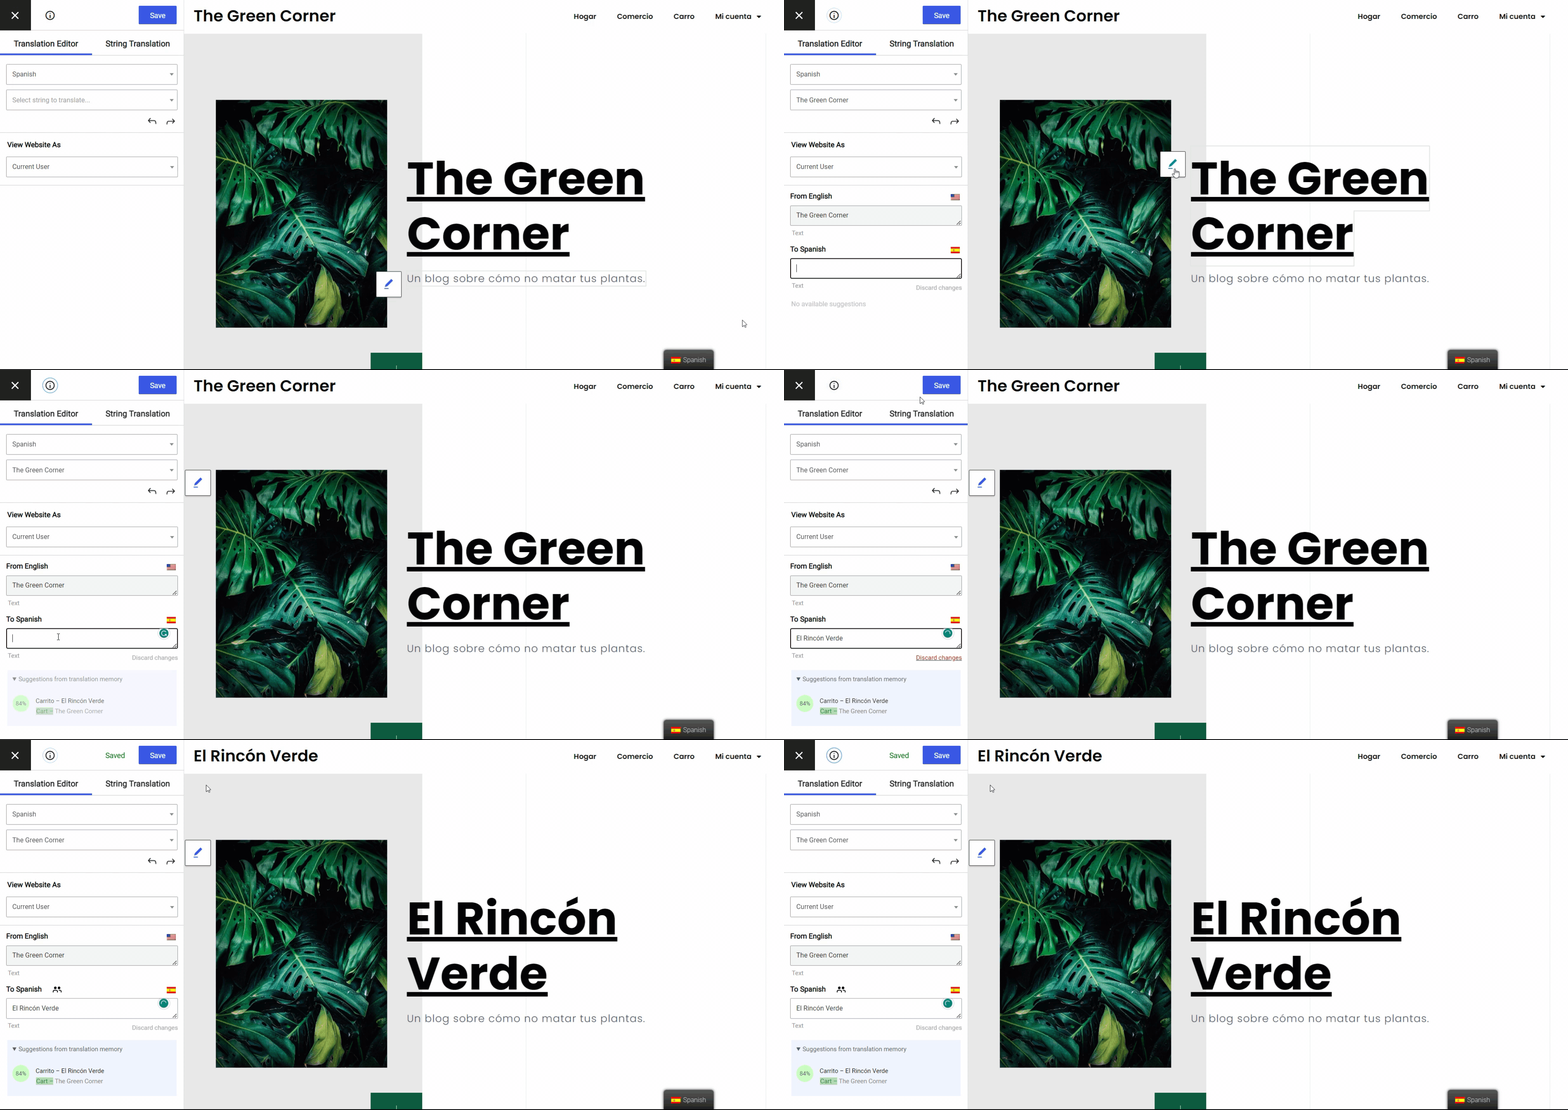
Once you’ve translated your site, you can use the premium SEO Pack add-on for TranslatePress to improve your multilingual SEO in a ton of different ways, including creating a multilingual sitemap.
The TranslatePress SEO Pack add-on is automatically compatible with the sitemap functionality from the following WordPress SEO plugins:
For this tutorial, we’ll assume that you’re using one of those SEO plugins.
You can purchase any premium license of TranslatePress to get access to the SEO Pack add-on.
TranslatePress Multilingual
Here’s how to set everything up…
1. Choose Your Site’s Languages
To get started, install and activate the free core TranslatePress plugin from WordPress.org. Then, go to Settings → TranslatePress to choose the language(s) into which you want to translate your content (and your sitemap):
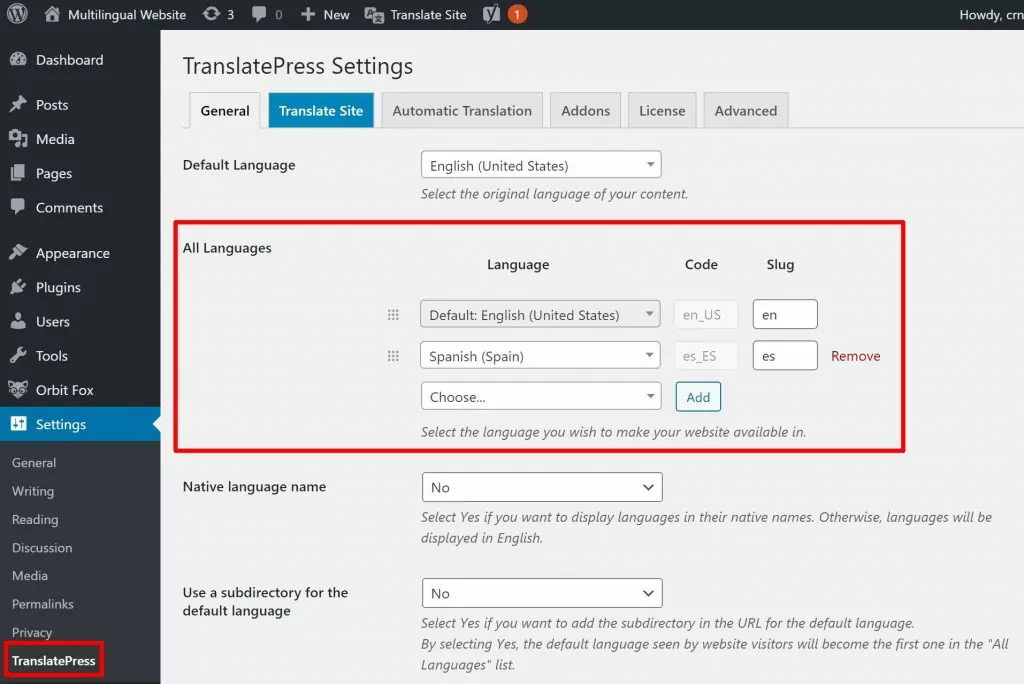
The free version lets you translate your site into one new language. However, the Personal license (which you need to translate your sitemap) also includes the Multiple Languages add-on. So – if you want to translate your site into more than one new language, go ahead and install the Multiple Languages add-on.
You also have the option to use automatic machine translation with Translate AI, a robust translation engine that integrates with DeepL, Google Translate, and other top translation engines effortlessly. This ensures you get the best accuracy for automatic translations. Alternatively, you can also use Google Translate or DeepL APIs.
Even if you use automatic translation, you’ll still be able to manually refine your translations using the visual editor.
If you want to use automatic translation (100% optional), you can go to the Automatic Translation tab and follow this guide on how to automatically translate WordPress with TranslatePress.
2. Translate Your Content
Before you can offer your sitemap in multiple languages, you need to offer your content in multiple languages!
To let you easily translate your content, TranslatePress gives you the user-friendly visual editor that we showed above.
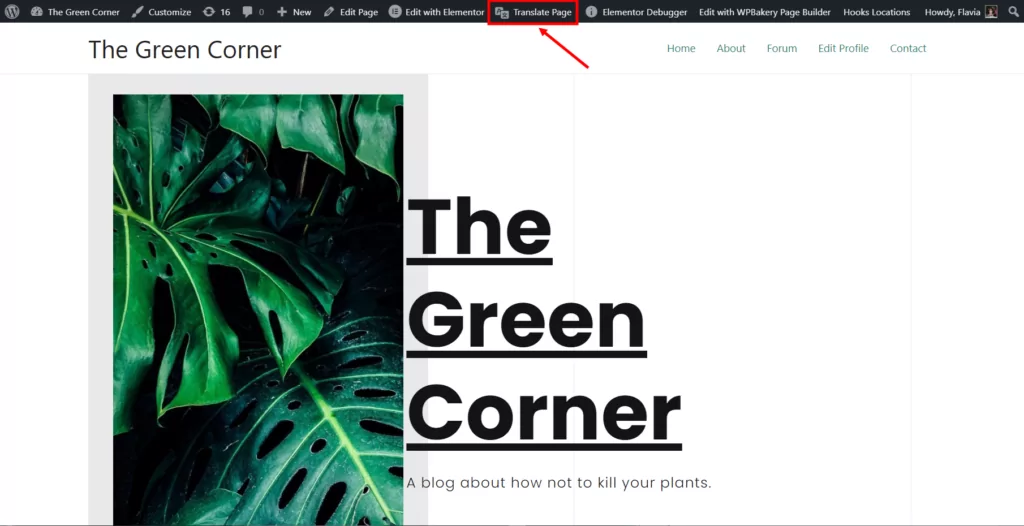
Whether or not you’re using automatic translation, you’ll be able to open the translation editor by visiting the page that you want to translate on the front-end of your site and clicking the Translate Page button on the admin toolbar:
In the editor, all you need to do is click on the content that you want to translate. Then, you can edit its translation in the sidebar:

You can use the visual editor to translate all of your content, no matter if it’s coming from the WordPress editor, your theme, a plugin, etc. The process is the same – just point and click. However, we have tons of specific guides if you want a more detailed look at translating any specific type of content:
- Editor (Gutenberg) blocks
- Custom fields
- Custom post types
- WordPress forms
- WordPress menus
- Images
- Popup content
- WooCommerce products
- Sliders
3. Install the SEO Pack Add-On
Once you’ve created your content, all you need to do is install the SEO Pack add-on to make your sitemap multilingual. Again, the SEO Pack add-on is available in all of the premium licenses and is automatically compatible with the following WordPress SEO plugins:
- Yoast SEO
- Rank Math
- SEOPress
- All in One SEO Pack
Once you install the SEO Pack add-on, there’s nothing to configure – it starts working right away.
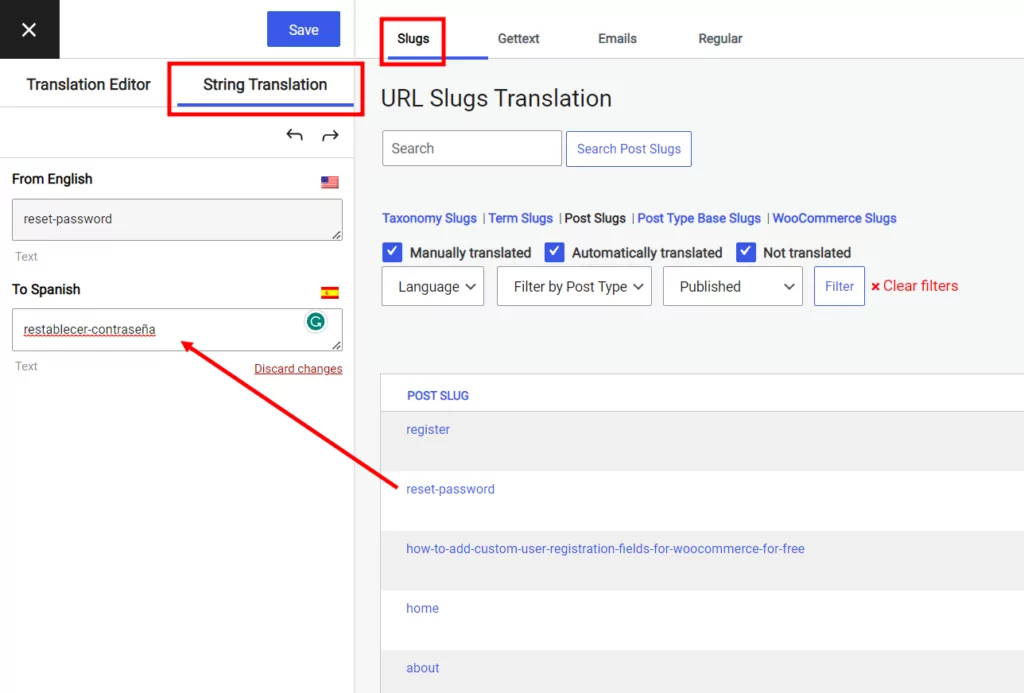
All that’s now left to do is translate your URL slugs that will be visible in your multilingual XML sitemap. To do this, select the String Translation option in the translation interface and then edit the URL slugs for your content to adjust the URL translations:
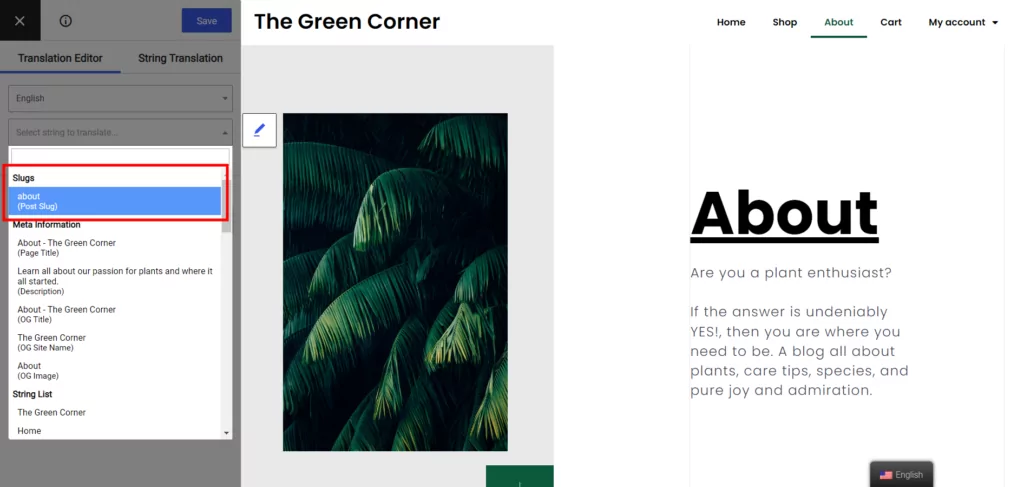
Alternatively, you can also select the slug you wish to translate from the Strings dropdown in the Visual Editor and then input its translation in the additional language field, just like you would do with any other piece of content.
Now that your URLs are translated as well, when you browse to your site’s sitemap, you’ll see all of your multilingual content:

However, this web view doesn’t show all the information available in the sitemap.
To verify that TranslatePress is properly adding hreflang tags, you can download the [content]-sitemap.xml file to your computer and open it in a text editor.
There, you can see how TranslatePress adds <xhtml:link> child entries for each language, as well as the hreflang tags.

How to Submit a Sitemap With Multiple Languages to Google
The process of submitting a multilingual sitemap is exactly the same as a single-language sitemap. That is, you can use Google Search Console to submit your sitemap. Google will automatically detect the multilingual content in your sitemap because TranslatePress implements the exact format that Google recommends.
If you haven’t already, you’ll need to verify your site with Google Search Console before you can submit your sitemap – Kinsta has a detailed guide on the different methods that you can use to do this.
Once you’ve verified your site with Search Console, you can submit your sitemap by following these instructions:
- Go to the Sitemaps tab in your site’s dashboard in Google Search Console;
- Enter the URL to your main sitemap in the Add a new sitemap box;
- Click Submit.
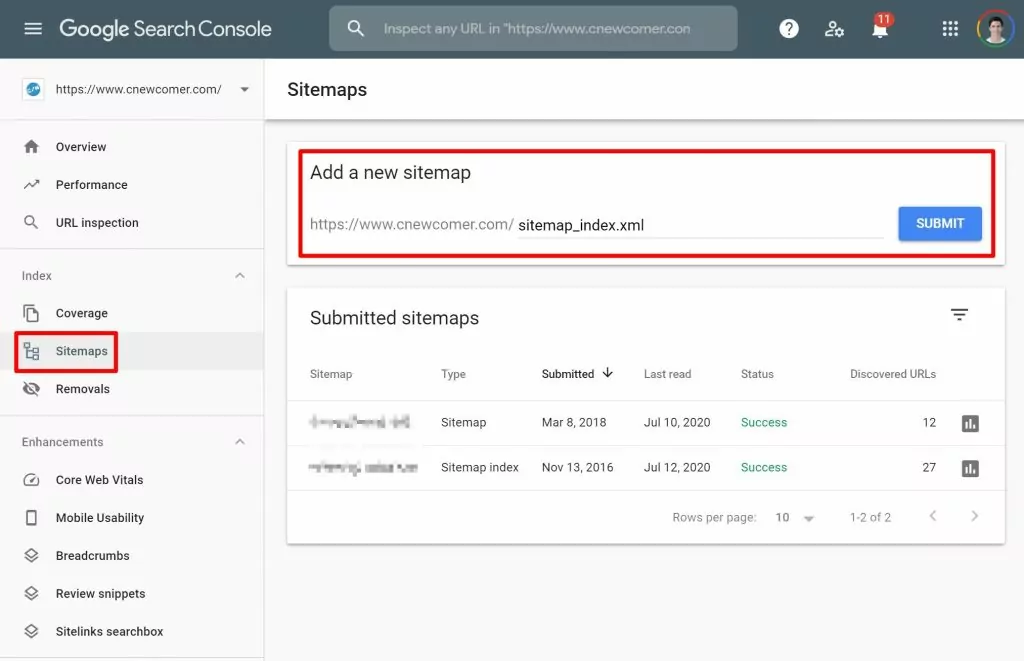
Note – if you’re using Yoast SEO, or another plugin that works by creating a “sitemap index” that contains other sitemaps, all you need to do is submit the sitemap index. Google will automatically discover the individual sitemaps inside the index.
Create Your Multilingual Sitemap Today
With TranslatePress and the SEO Pack add-on, you can easily create a multilingual WordPress sitemap that follows the exact formatting that Google recommends. Better yet, once you’ve translated your site, you can create your sitemap automatically, without lifting a finger.
To get started, you can translate your content using the visual editor. Then, all you do is install the SEO Pack add-on and you’re good to go – TranslatePress will automatically do all the work to include your multilingual content in your sitemap and also add the proper hreflang tags.
TranslatePress Multilingual
Do you still have questions about multilingual sitemaps? Let us know in the comments below!
If you found this post helpful, please check out our YouTube channel, where we constantly upload short & easy-to-follow video tutorials. You can also follow us on Facebook and Twitter to be the first to know each time we post.
