In this post
A slug is the user-friendly part of the URL that tells site visitors what a page is about. For example, this article’s URL is https://translatepress.com/blog/translating-url-slugs and the slug is simply “translating-url-slugs.” So you would assume the page is about translating URL slugs, and you would be right.
But what if the URL slug is in a language different from the rest of the page content?
When creating a multilingual WordPress website, translating URL slugs is an important part of the process. Not only are translated slugs really important for WordPress SEO but they help improve the user experience too.
In this post, we’ll take a look at why you should translate URL slugs, the process for translating slugs for pages, posts, custom post types, WooCommerce products and we’ll finish up with some best practice tips.
Why Translate URL Slugs?
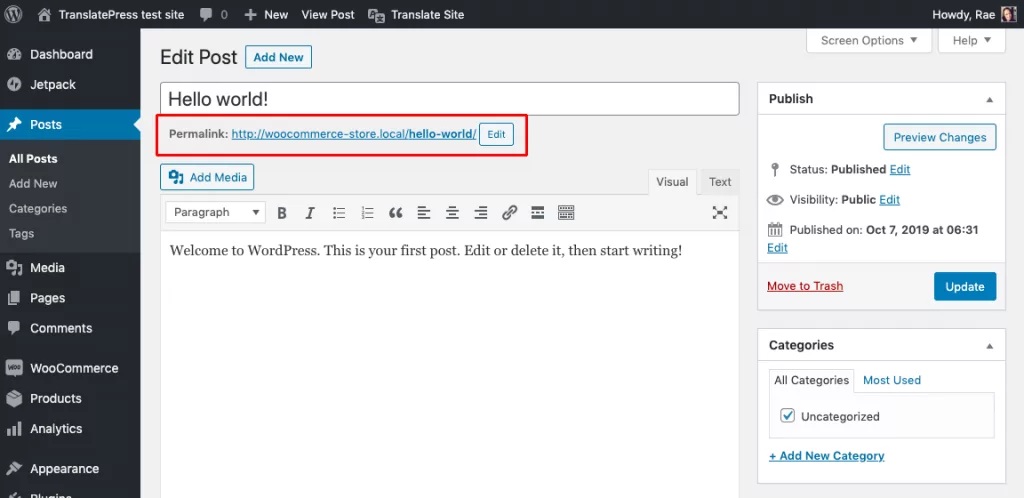
When you create a blog post, page, or product, WordPress will autogenerate the slug based on the title, like so:
And here’s what it looks like with the Gutenberg editor:
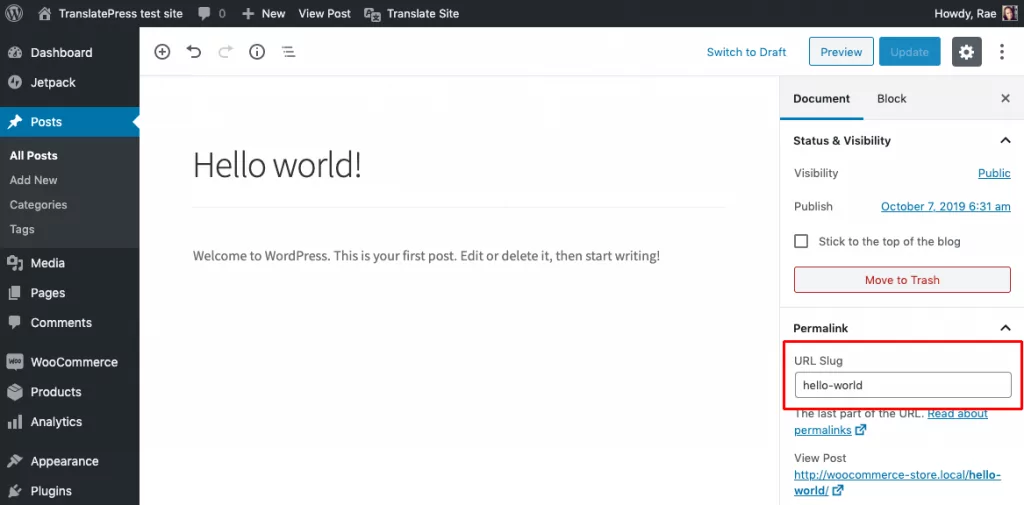
Keep in mind, you need to have “Post name”—aka pretty permalinks—enabled in WordPress for human-readable URL slugs.
You can edit slugs in WordPress, which is always recommended before publishing a post or page. Generally, writing good URL slugs that include keywords and exclude stop words can have a positive effect on your SEO. Keywords are one of the indicators search engines use to determine what a page is about.
For example, say you’ve got a post on your English language blog about killer whales titled “Everything You Need to Know About Killer Whales.” Rather than include the whole title in the slug (e.g. /everything-you-need-to-know-about-killer-whales/) it’s best to shorten the URL slug and include the main keywords only (e.g. /killer-whales/).
When translating the killer whale blog post into other languages, you’ll want to translate the URL slug, too. Not only does translating slugs mean visitors can read in their preferred language but it also provides a consistent user experience (i.e. you’re translating all your content, not just some of it).
For example, when translating the killer whale post URL slug into other languages, you would get:
- English: https://example.com/en/killer-whales
- German: https://example.com/de/killerwale
- Spanish: https://es.example.com/wiki/Orcinus_orca
Together with the page title and description, these three pieces of information help users decide whether they want to visit your page.

Making sure a translated URL appears in the search results for your content not only ensures your international visitors can read your URLs but indicates to them the rest of the content is translated too.
How to Translate URL Slugs with TranslatePress
Editing slugs in WordPress is easy—just open a post or page in the backend of your site and edit the slug, as we explored above.
But URL slug translation? You’ll need a translation plugin and the best WordPress plugin for the job is TranslatePress.
TranslatePress lets you translate your entire WordPress site directly from the front end using an intuitive visual translation interface. More importantly, it also lets you automatically and manually translate URL slugs.
With TranslatePress, you can:
- Translate URL slugs for posts, pages, custom post types, and WooCommerce products.
- Translate custom URLs that are added directly to the HTML (without using PHP functions to construct them) such as those added to post content.
- Translate external links that take visitors to third-party sites.
- Translate URLs for media such as images, videos, documents, and archive files.
Getting Started with TranslatePress
TranslatePress is easy to set up. Simply choose your desired TranslatePress plan and download it from your account after purchase.
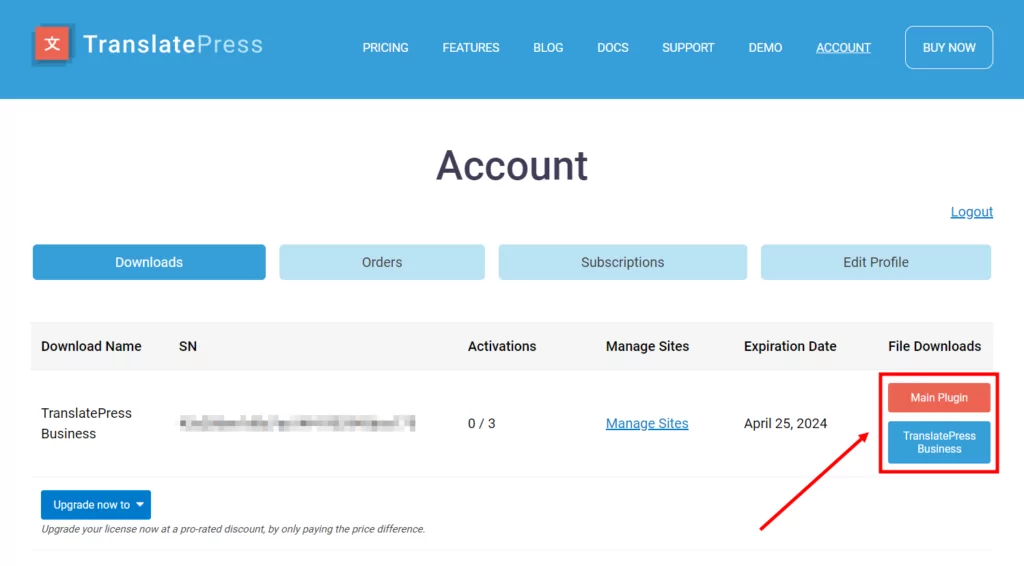
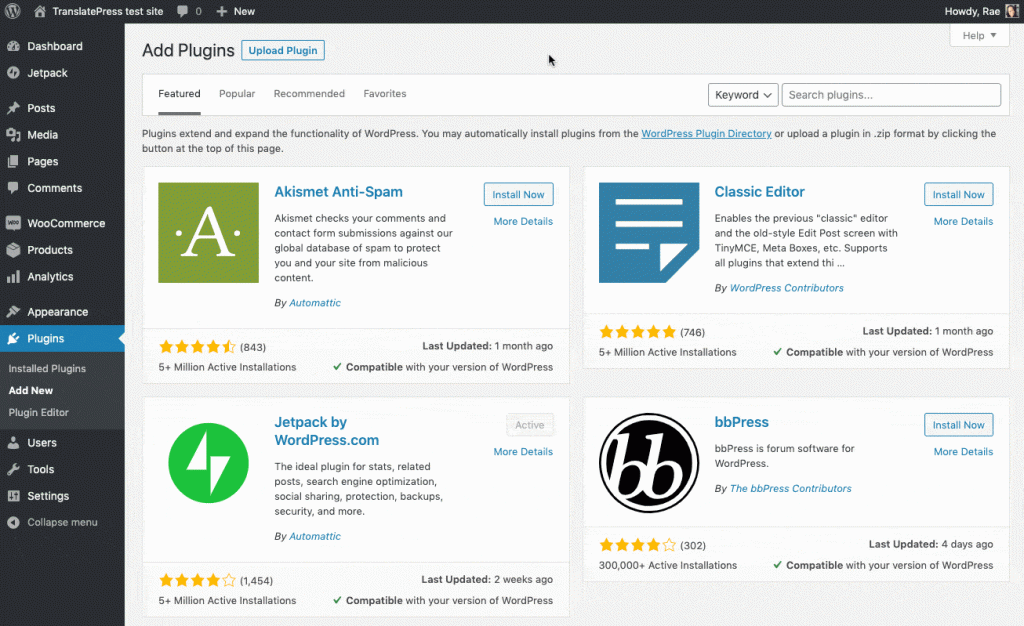
Then install it on your site just like you would any other plugin (from Plugins → Add New→ Upload Plugin).
To translate URL slugs, you’ll also need the SEO Pack addon (included with TranslatePress Premium). To enable it, go to Settings → TranslatePress → Addons tab and click the Activate button next to it.

Now, let’s step through the various ways you can translate URLs.
1. Translating URL Slugs for Posts, Pages, Custom Post Types, and WooCommerce Products
With TranslatePress, you can translate URL slugs manually and automatically.
Manually Translating URL Slugs
Manual slug translation is a good option if you only have a few posts, pages, or products you want to translate or if you want to update an individual slug that hasn’t automatically translated correctly.
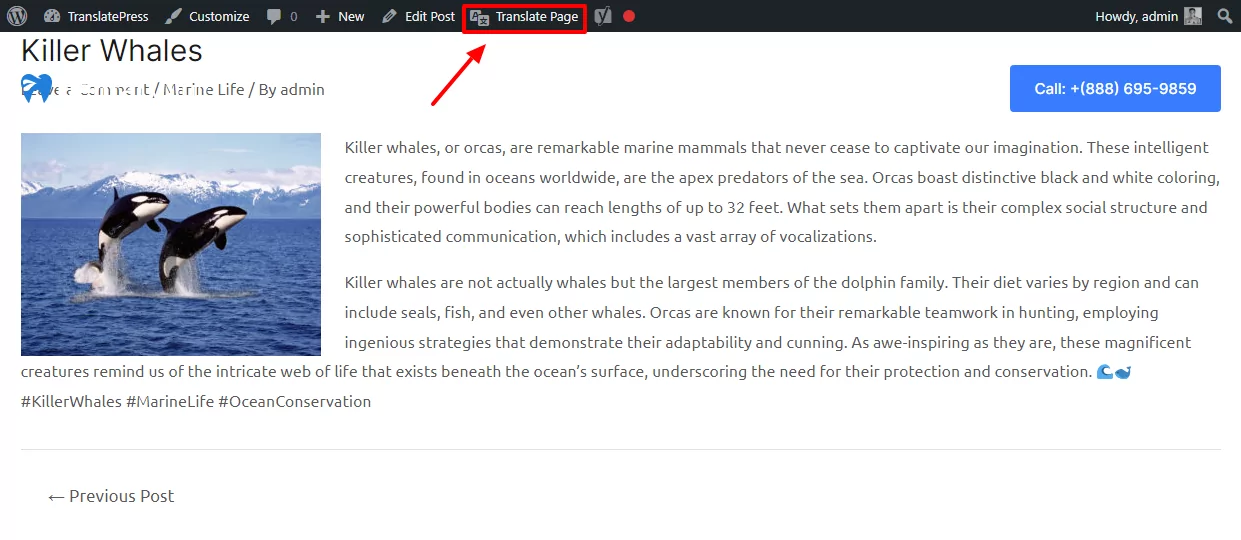
Navigate to the post, page, or product you want to translate and hit “Translate Page” in the WordPress admin bar to load the TranslatePress visual interface.
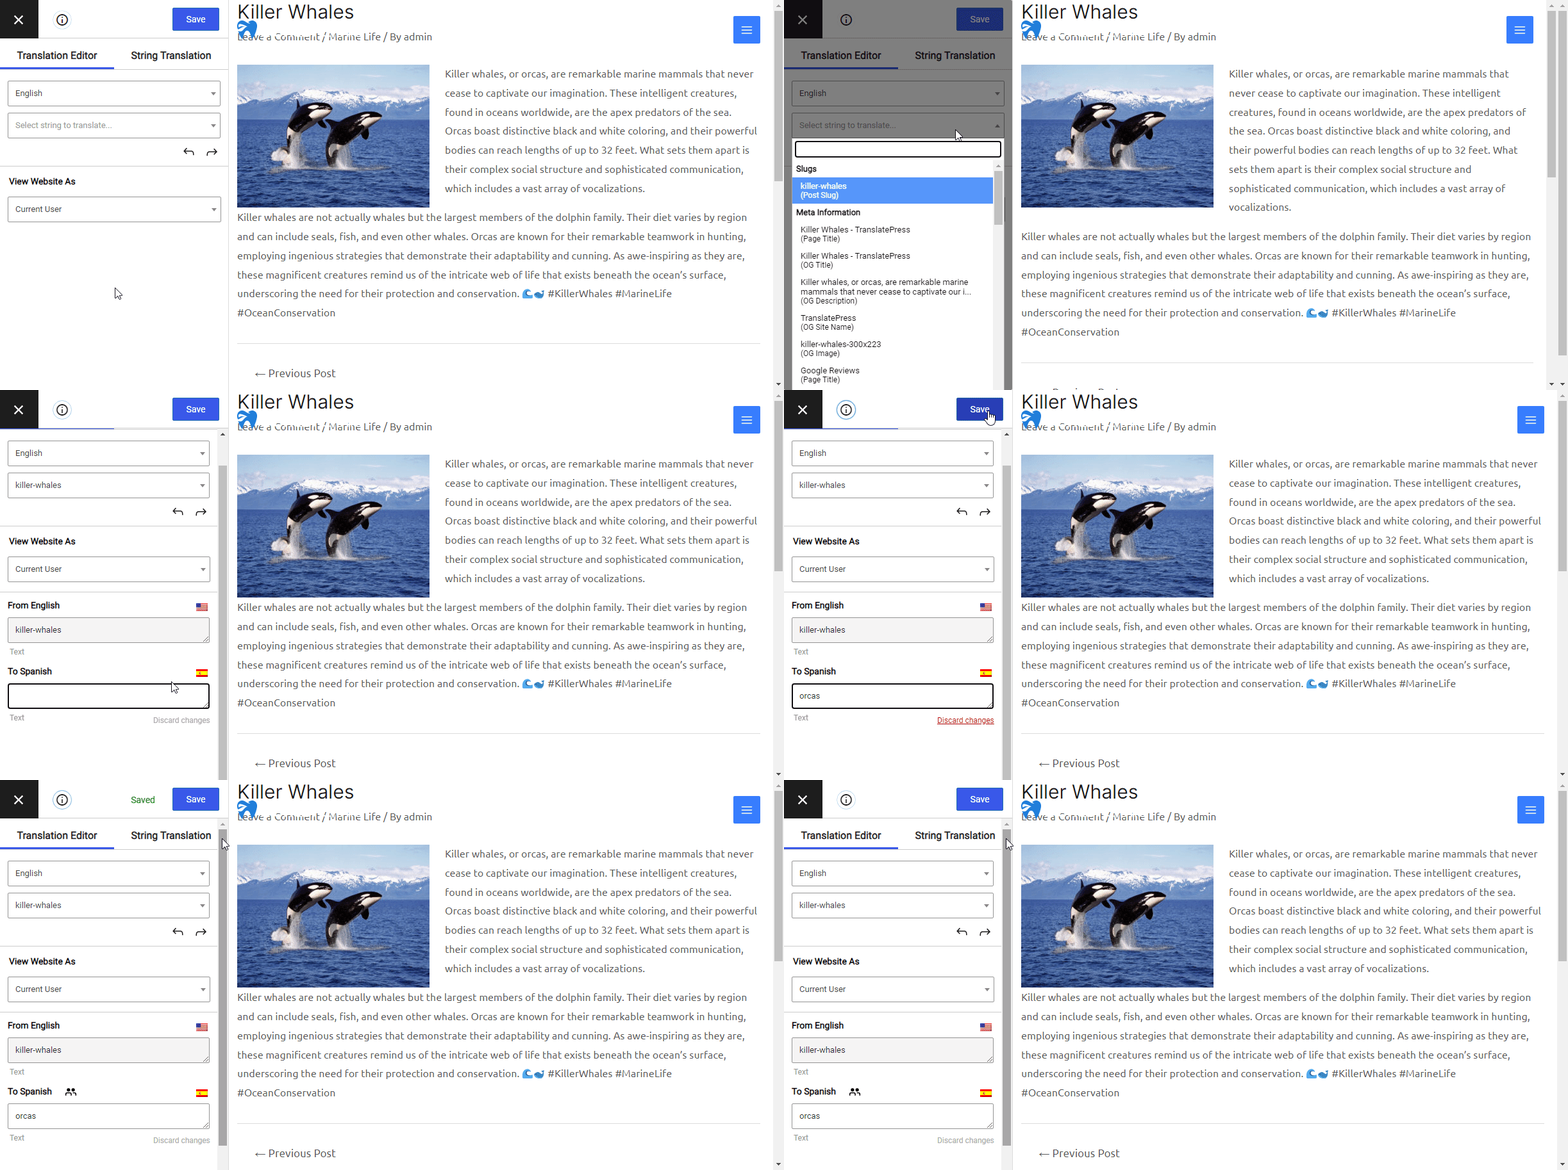
With the SEO Pack activated on your site, the TranslatePress visual interface will display slug and SEO meta information in the menu drop-down. Choose the slug you want to translate and enter the translated slug at the bottom of the sidebar.
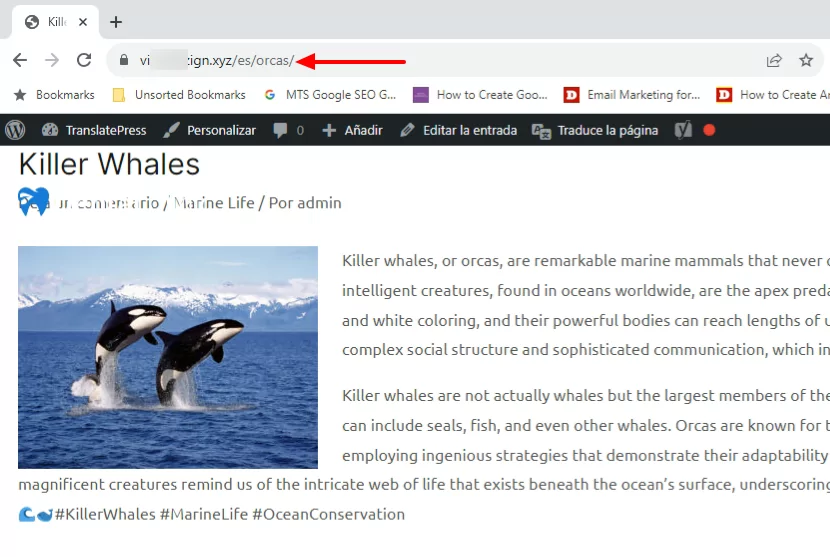
The next time you refresh the page in another language, the translated version of the URL slug will appear.
The process for manually translating URL posts and WooCommerce products is the same. Simply go to the page you want to translate on the front end, look for the “Translate Page” link in the WordPress admin bar, and follow the steps above.
For more on translating WooCommerce store content, check out our comprehensive guide to creating a multilingual WooCommerce store.
Automatically Translating URL Slugs
This option will generate automatic translations for all your post, page, product, and custom post type URL slugs. Navigate to Settings → TranslatePress and hit the Automatic Translation tab. Scroll down to Automatically translate slugs and check the box. Then hit Save Changes.
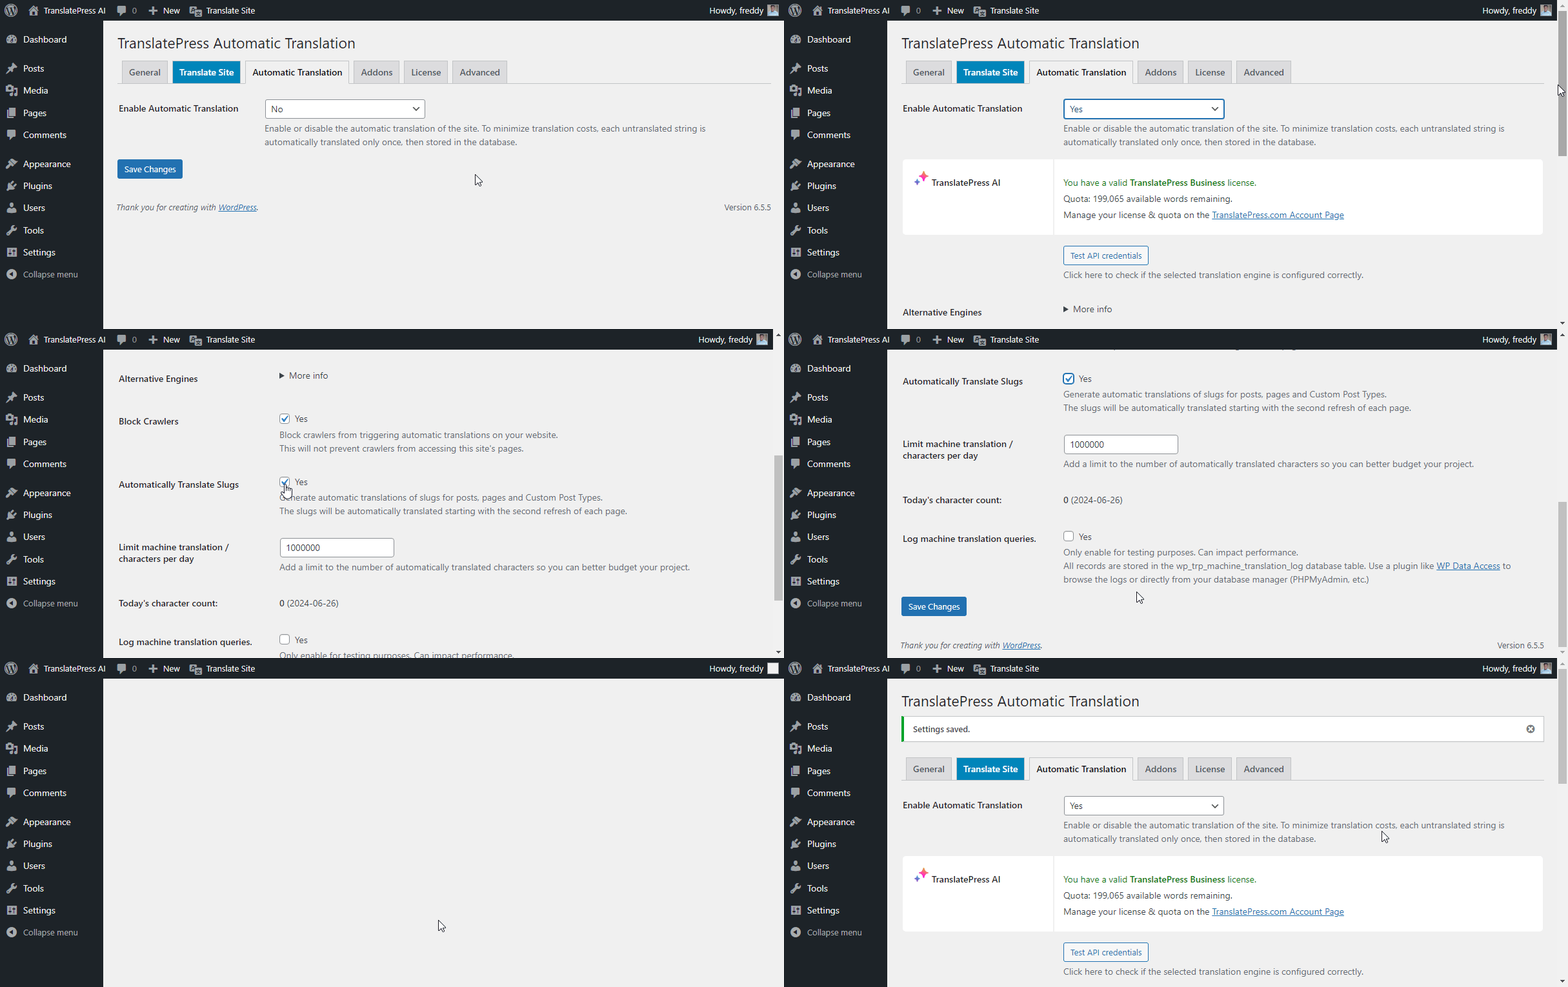
Note: For this to work, you’ll need to have automatic translation enabled for your site. Go to Settings → TranslatePress and then click the Automatic Translation tab. From here, you can choose to enable TranslatePress AI, Google Translate v2 or DeepL translation.
Both Google Translate and DeepL APIs will require you to create an account and get a key. For more on how to do this, check out this article on how to automatically translate a WordPress site.
For premium TranslatePress users, the robust TranslatePress AI integrates seamlessly with the above translation services, helping you avoid all the manual work that goes into generating APIs, eventually saving you time and money. It also gives you the best accuracy possible because of its superpower to pick the best translation engine for each individual situation.
2. Translating Custom URLs
With TranslatePress, you can automatically translate custom links throughout your site. This includes links that are added directly to the HTML (without using PHP functions to construct them) such as those added to blog post content.
The automatic translation of custom links is enabled by default in TranslatePress. To update this option, go to Settings → TranslatePress and hit the General tab. Scroll down to Force language in custom links and select Yes.
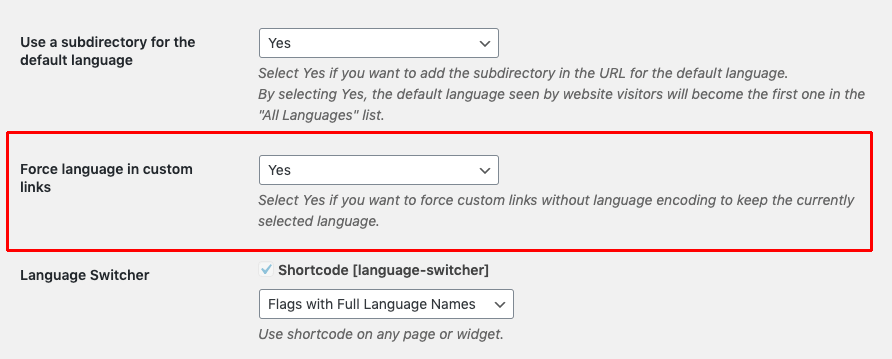
To manually translate a custom link, simply follow the steps outlined above for manually translating URL slugs.
3. Translating External Links
Have you ever browsed a site and clicked a link only to discover you’ve been taken to a page that’s in another language? It’s disorientating and breaks the user experience. With TranslatePress, you can avoid this scenario.
While this option isn’t really about URL slugs, it’s worth mentioning in the context of translating URLs.
Translating web links that go to third-party sites ensures when visitors click a link, they’ll be taken to translated content that’s in the same language they are browsing in. This approach also ensures a consistent multilingual experience across your site.
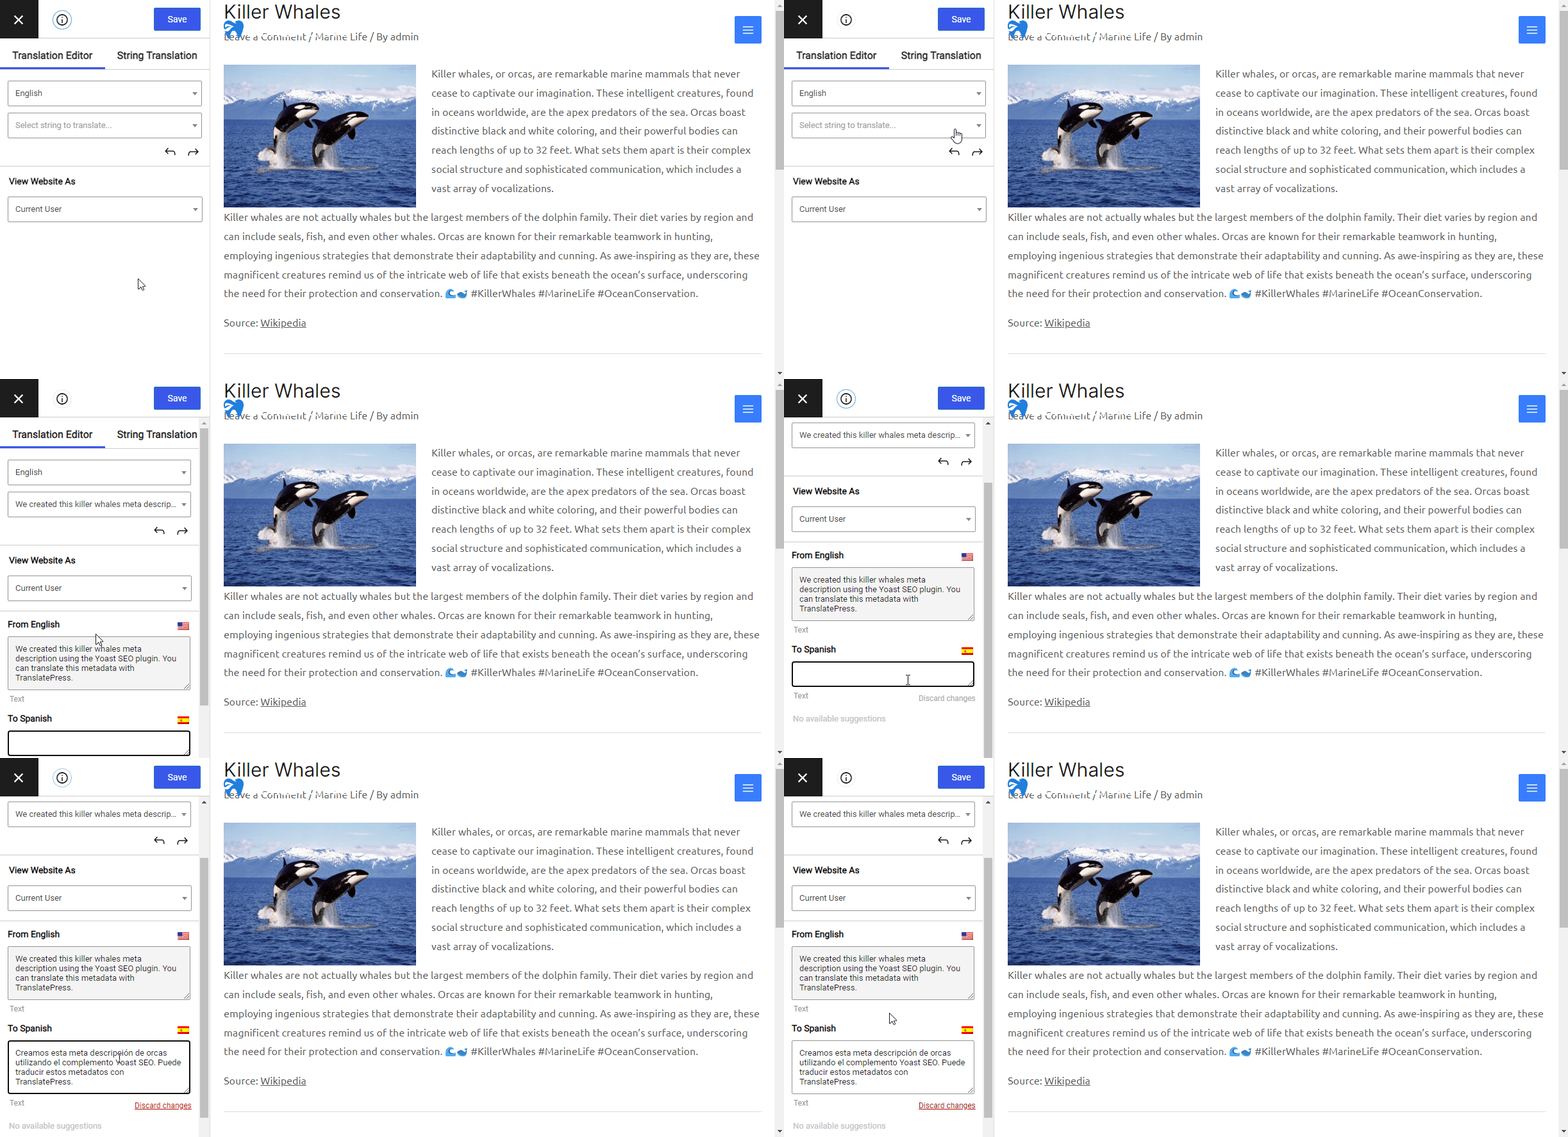
In the TranslatePress visual interface, hover over the link you want to translate and click the pencil icon that appears. In the sidebar, you can enter a different translated link.
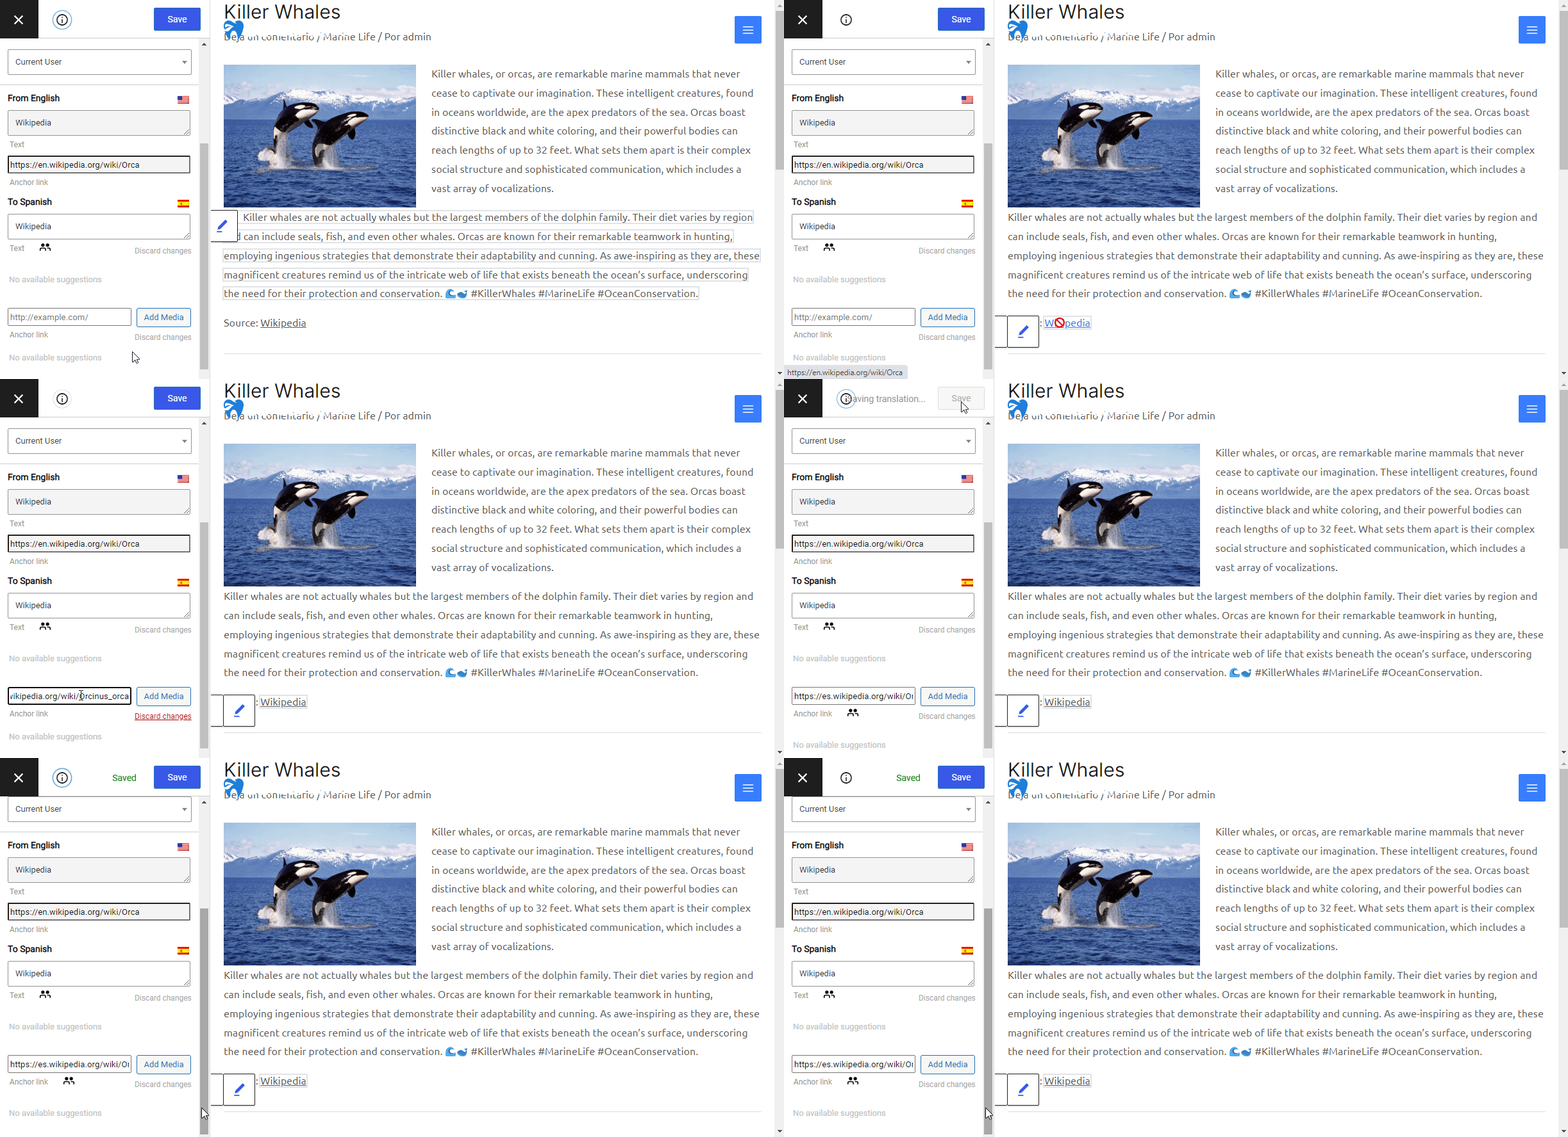
In the example above, the English version of the killer whales blog post includes a link to the English version of the killer whales Wikipedia page. For the Spanish version of the post, I’ve added a link to the Spanish version of the Wikipedia page. Basically, I’ve translated the href of the anchor to point to another URL.
4. Translating URLs for media
With TranslatePress, you can also translate links to images, videos, documents, archive files, and other types of media. This type of translation is useful when you want to display different images and videos on your site for users in various languages, or provide language-specific downloads.
Again, this option isn’t specific to URL slugs but is useful to know in the context of translating URLs.
For example, say you want to display different feature images for a blog post about killer whales, depending on the visitor’s language. You might want to use a picture of a killer whale taken in the United States for English-speaking visitors and an image from Spain for Spanish speakers.
To achieve this, open the translation editor, hover over the image you want to translate, and click the pencil icon. In the sidebar, add an alternative image using the Add Media button. This lets you use the WordPress media library to select an existing image or upload a new file.
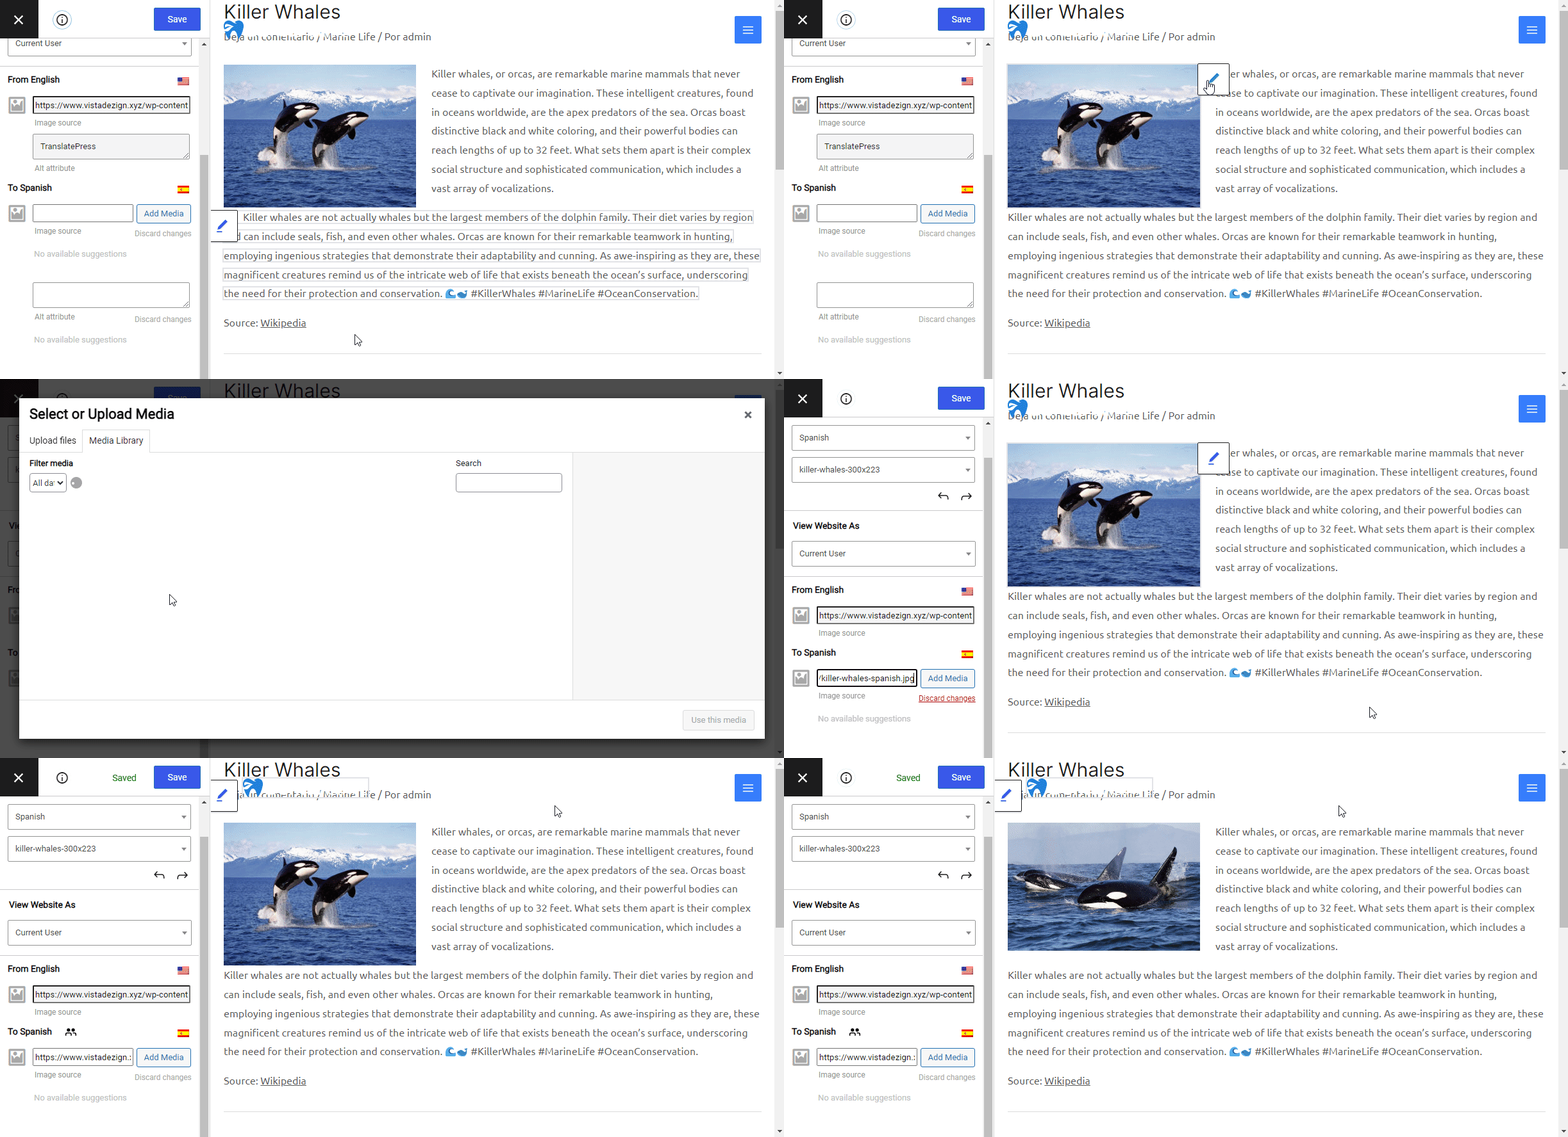
To translate a video, document, or other media, simply follow the same steps outlined above.
Each of the URL translation options above ensures you can translate your entire site, including links, providing a consistent user experience for your visitors in a variety of languages.
With TranslatePress, you can easily and automatically translate your site in no time! Then all you need to do is check over your pages to make sure everything looks good and manually update any text that doesn’t sound right or simply needs a more human translation.
We also have a short video tutorial explaining this process so, if you’re more of a video learner, you can watch this:
Best Practices for Translating URL Slugs in WordPress
Now that you know how to translate URL slugs, let’s take a look at some best practice tips.
1. Keep URLs Short
The shorter your URL slugs are, the easier they will be to read and the more memorable they’ll be for visitors. Also, short URL slugs are easier to translate.
While there’s no recommended ideal length for URL slugs, Google likes short slugs that contain the keywords describing the post. You’ll also find that shorter URL slugs are more likely to appear in full in search results.
You don’t need to remove stop words such as “a”, “and”, “the” etc. which has been a recommended SEO practice in the past. Yoast SEO even used to have a clean slugs feature. As Online Media Masters points out, removing stop words can completely change the meaning of a slug. For example, /growing-up-with-hearing-loss/ is not the same thing as /growing-hearing-loss/. Only remove stop words if it doesn’t change the meaning of a slug.
2. Always Include Important Keywords
A solid multilingual SEO content strategy should always start with keyword research. This means identifying target keywords for each region and language you’re translating your content into.
URL slugs should contain the most important keywords for your posts, pages, or products for each language on your site.
For more on how best to apply SEO to your translations, read our WordPress Multilingual SEO guide with tips to rank in all languages.
3. Don’t Forget to Translate Other Important SEO Elements of Your Site
Along with translating URL slugs, add translating meta titles and descriptions to your to-do list.
As I mentioned earlier, the page title, URL, and description for your pages will show up in search results so it’s important to ensure all three are translated.
For example, if you translate one detail, such as the page title, and forget to translate the other two elements, you’ll have an inconsistent user experience. This tells users your translations might be inconsistent and they may think twice about clicking through to your site.
In WordPress, you can use a plugin like Yoast SEO to edit the meta titles and descriptions for your default language. Then you can use TranslatePress to provide translations.
Get Started Translating URL Slugs with TranslatePress
Slugs are the user-friendly part of a URL that describes what a post is about. But if a slug is in a different language to the content, it can provide a jarring user experience. With TranslatePress, you can easily translate URL slugs, ensuring a consistent multilingual experience.
In this post, we explored various ways to translate slugs, URLs, and links. TranslatePress lets you quickly translate your entire WordPress site, including content, URLs, custom and external links, and media. Using the SEO Pack add-on for TranslatePress, you will significantly increase your chances of ranking in multiple languages.
Ready to get started with TranslatePress? Download TranslatePress today to follow this tutorial and upgrade to a premium plan for access to SEO features, automatic machine translation, and more.
TranslatePress Multilingual
Do you have questions about how to translate URL slugs with TranslatePress? Let us know in the comments below!
If you found this post helpful, please check out our YouTube channel, where we constantly upload short & easy-to-follow video tutorials. You can also follow us on Facebook and Twitter to be the first to know each time we post.


Thanks for your useful article. TranslatePress is such a great plugin to switch languages of pages’ slugs. I will try the free version first to see how it works and will upgrade later on. 🙂
It would be nice if we could also translate product category slugs.
We have been working for a while now on a big feature that also includes adding support for product category slug translation. It’s almost done, so it should be out soon 🙂
thank you. im waiting for this important update.
Waiting for this feature
Hi Adrián,
Translating category & taxonomy slugs is available for a while now as part of our SEO pack add-on: https://translatepress.com/docs/addons/seo-pack/
You can use the URL slug translation interface to translate all URL slugs.
any automatic plugin? no manual work
How do I translate a URL if it is not shown in the left bar to be translated?
How can I translate slug from a Metabox CPT like the re-write function of URL for CPTs.