In this post
Thanks to the web, online shoppers can choose to buy products from almost anywhere in the world. Want a pair of shoes you can’t find locally? Buy them from another country. Need a replacement part for your foreign-made car? Hop online and get it in a couple of days.
But while the web has made the world smaller in a lot of ways, language barriers continue to add friction to the online shopping experience, particularly for non-English speaking consumers.
According to a Common Sense Advisory survey, 75% of people want to buy products in their native language. Across the 10 countries surveyed, 56% either spend more time on sites in their own language than they do in English, or boycott English-language URLs altogether.
That’s why it’s important ecommerce businesses invest in creating a multilingual WooCommerce store, one that provides quality translations and localized currencies, sizes, shipping, and more.
But how do you create a multilingual WooCommerce store? Let’s take a look.
Why Have a Multilingual WooCommerce Store?
Expanding your business into other countries is the natural next step when you’ve achieved local success. Creating a multilingual WooCommerce store can help you tap into new overseas markets and reach customers who might otherwise overlook your products.
The benefits of having a multilingual ecommerce store include:
Reach new markets
When you think about it, there are millions of consumers around the world who might be interested in your product—they just haven’t stumbled across it yet because they can’t read your WordPress website. Making your WordPress multilingual site available in different languages is like putting an “Open” sign in your shop window, letting shoppers know you’re ready to serve customers in other locales.
Boost SEO and online visibility
One of the biggest advantages of having additional languages is the boost you’ll get in organic traffic. Translating your content and following basic multilingual SEO rules will ensure your multilingual site appears in the search results for your target languages.
Build trust and credibility
Having a fully translated WooCommerce website will help establish your business as a credible offering in other countries. Quality multilingual content and translated product pages will reduce any misunderstandings customers may have while browsing your site and provide a more comfortable user experience.
WooCommerce is localization-ready
WordPress is widely regarded as a solid and flexible platform for creating a multilingual website, and WooCommerce builds on this capability. It’s translation-ready, which means all you need to do to make your online store attractive to overseas shoppers is install a multilingual plugin.
But, you also need to take care of other aspects of localization specific to ecommerce, including payment methods, different currencies, sizes, shipping, and seasonability.
Payment methods are simple to configure in WooCommerce. Go to WooCommerce → Settings and click the “Payments” tab to enable and disable different payment methods. It’s a good idea to enable popular and trustworthy options like PayPal that are used internationally.
You can also choose one default currency, which you can configure by going to WooCommerce → Settings → General. If you want to sell in different currencies, you’ll need an extension so you can convert your default currency on the fly to display prices in your shopper’s native currency.
Some popular options include Booster for WooCommerce, WooCommerce Multi-Currency, and CURCY. Or you can check out our list of the 6 Best WooCommerce Currency Converter Plugins here.
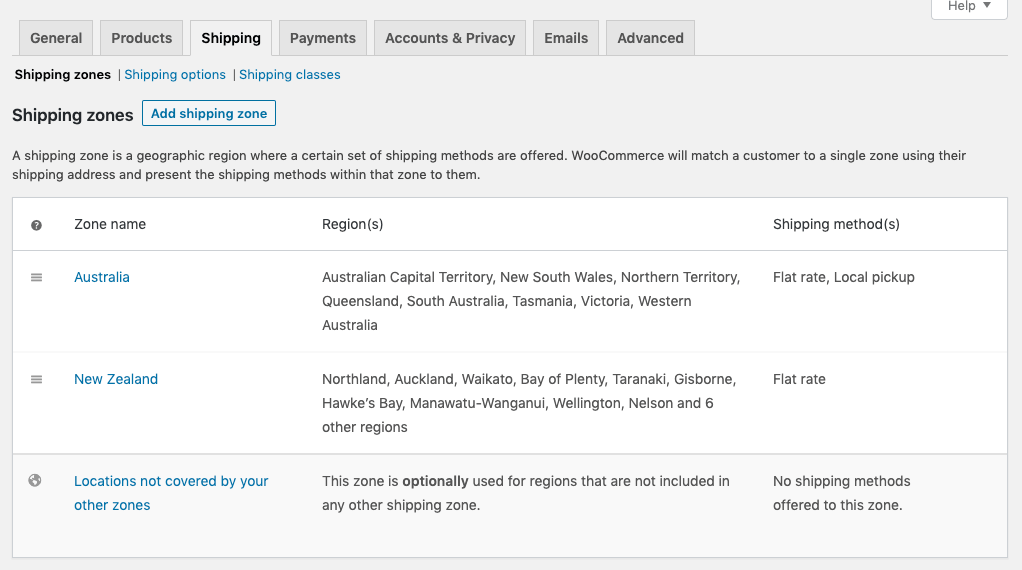
WooCommerce also allows for shipping zones. Basically, geographic regions where certain shipping methods and pricing are offered. At checkout, WooCommerce will match customers to a zone using their shipping address and display the shipping methods available within that zone to them.
Lastly, don’t forget about seasonal content and sales. For example, if you’re based in Europe and you have customers based in Australia, keep in mind that when it’s winter where you are, it’s summer down under.
You might also like to observe holidays and sales periods in your target countries. In the U.S., for example, shoppers look for bargains during the Black Friday / Cyber Monday long weekend, whereas in China consumers look out for sales on Singles’ Day, held each year on 11 November.
How to Create a Multilingual WooCommerce Store with TranslatePress
To create a WooCommerce multilingual store, you need two things: WooCommerce set up on your WordPress site, and a translation plugin.
In this tutorial, I’m going to show you how to use TranslatePress, an easy-to-use translation plugin that works out of the box with WooCommerce.
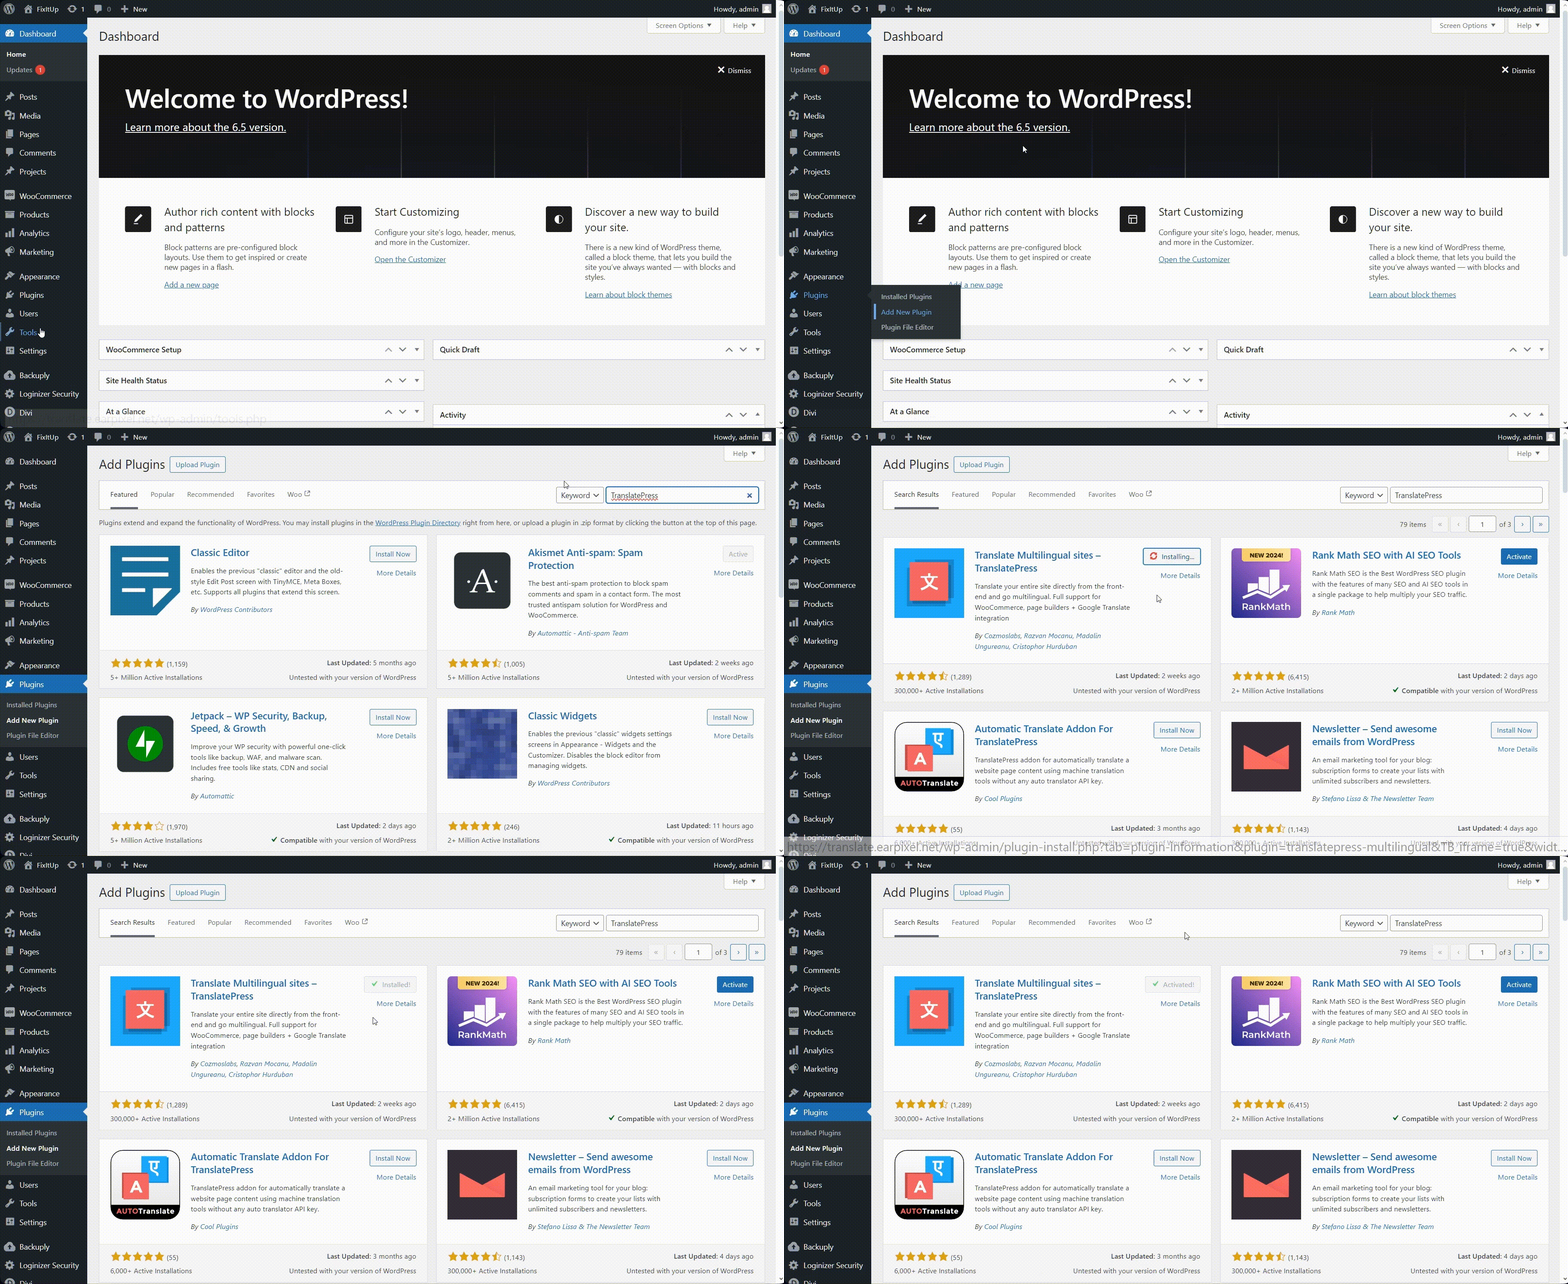
You can find it for free in the WordPress.org plugin repository. To install it from the WordPress backend, simply go to Plugins → Add New and search for it by name. When you find it in the list, click the “Install Now” button and then activate it.
TranslatePress lets you translate your entire WordPress multilingual site, directly from the front-end, using a super intuitive visual translation interface.
Importantly, it lets you translate every part of your WooCommerce online store, just not product pages, so you can provide a fully translated and consistent user experience across your site.
Note: For one part of this tutorial, you’ll also need the SEO Pack (included in TranslatePress Premium). I’ll let you know when it’s required.
How to Add Different Languages to Your Multilingual WooCommerce Store
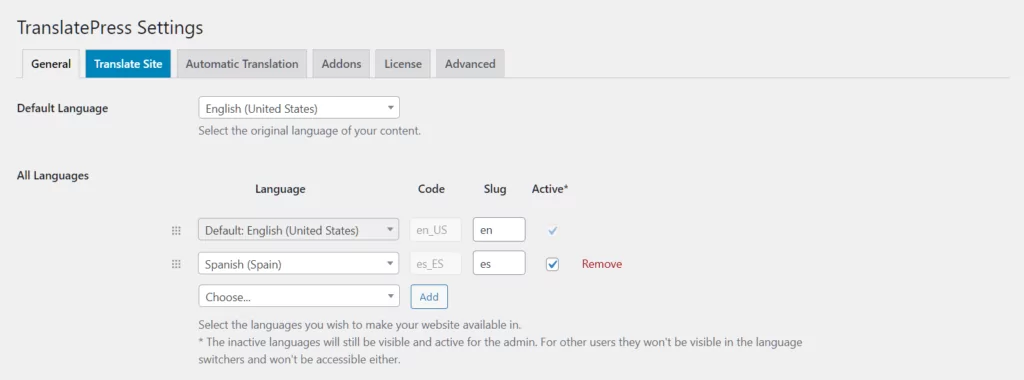
Before you can start translating your WooCommerce multilingual store, you first need to choose the languages in which you wish to make your site available in. Using TranslatePress this is really simple to do. Just go to Settings → TranslatePress to configure some basic options.
Under General settings, you can choose your default language and any additional languages you want to translate your content into.
Then, you can scroll down to configure basic settings, including language switchers for your WooCommerce website.
How to Translate a WooCommerce Shop Page
After setting up your different languages, you’re ready to start translating your WooCommerce site.
Let’s start with the Shop page.
Visit the front-end of your WooCommerce site and go to your “Shop” page. If you’re using Chrome, make sure you’ve got automatic browser translations disabled.
Then, click “Translate Page” in the WordPress admin bar. TranslatePress will load its visual interface for translating content.
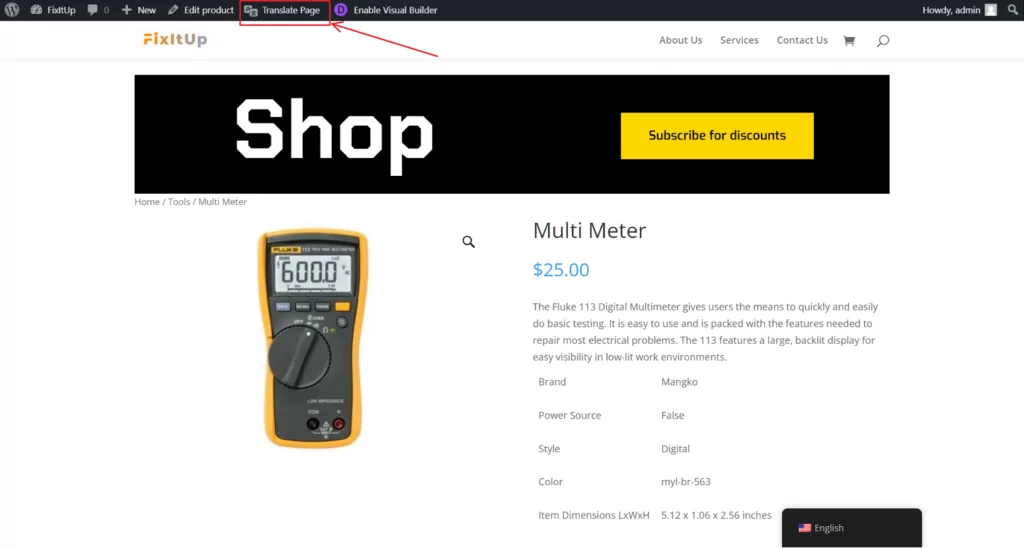
In the dropdown at the top of the sidebar, you’ll see your default language displayed. I recommend changing this to the language you are translating into. This way, you’ll be able to see what you’ve already translated on the page and view new changes you make instantly.
When you hover over pieces of text, you’ll notice either a blue or green pencil icon appears.
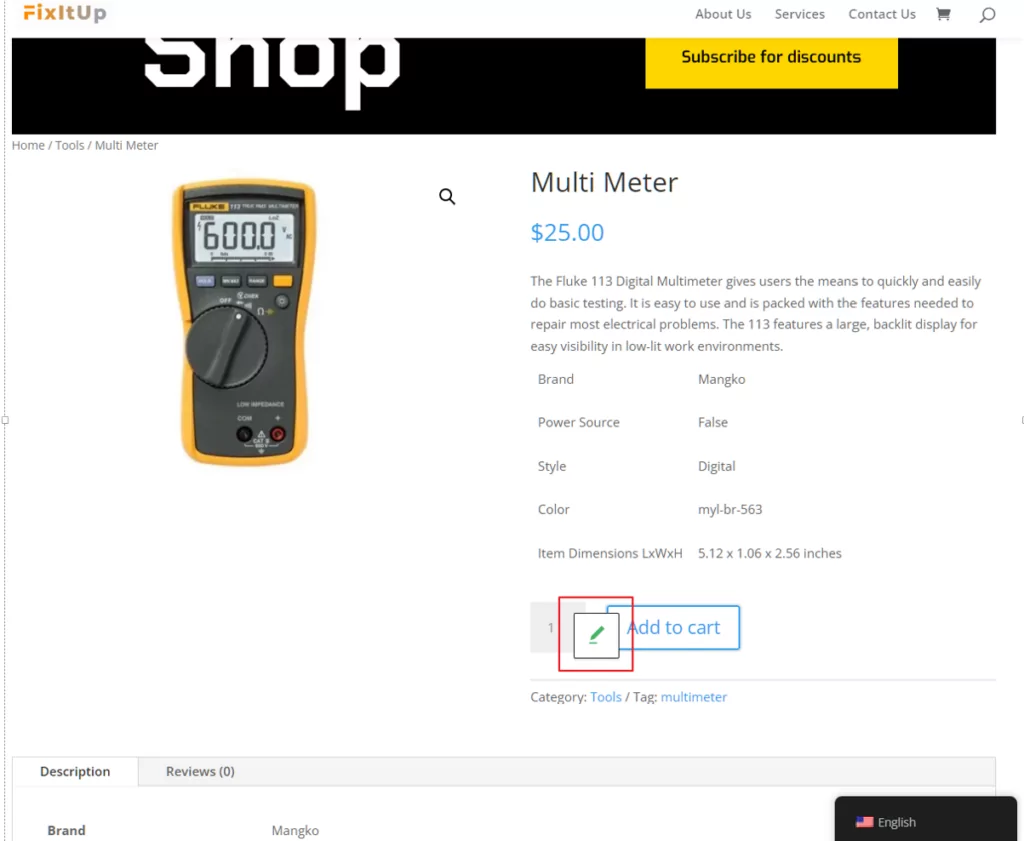
Let’s ignore the icon colors for now (I’ll explain later). When you click it, you’ll see the information in the sidebar update to display translation information about that piece of text.
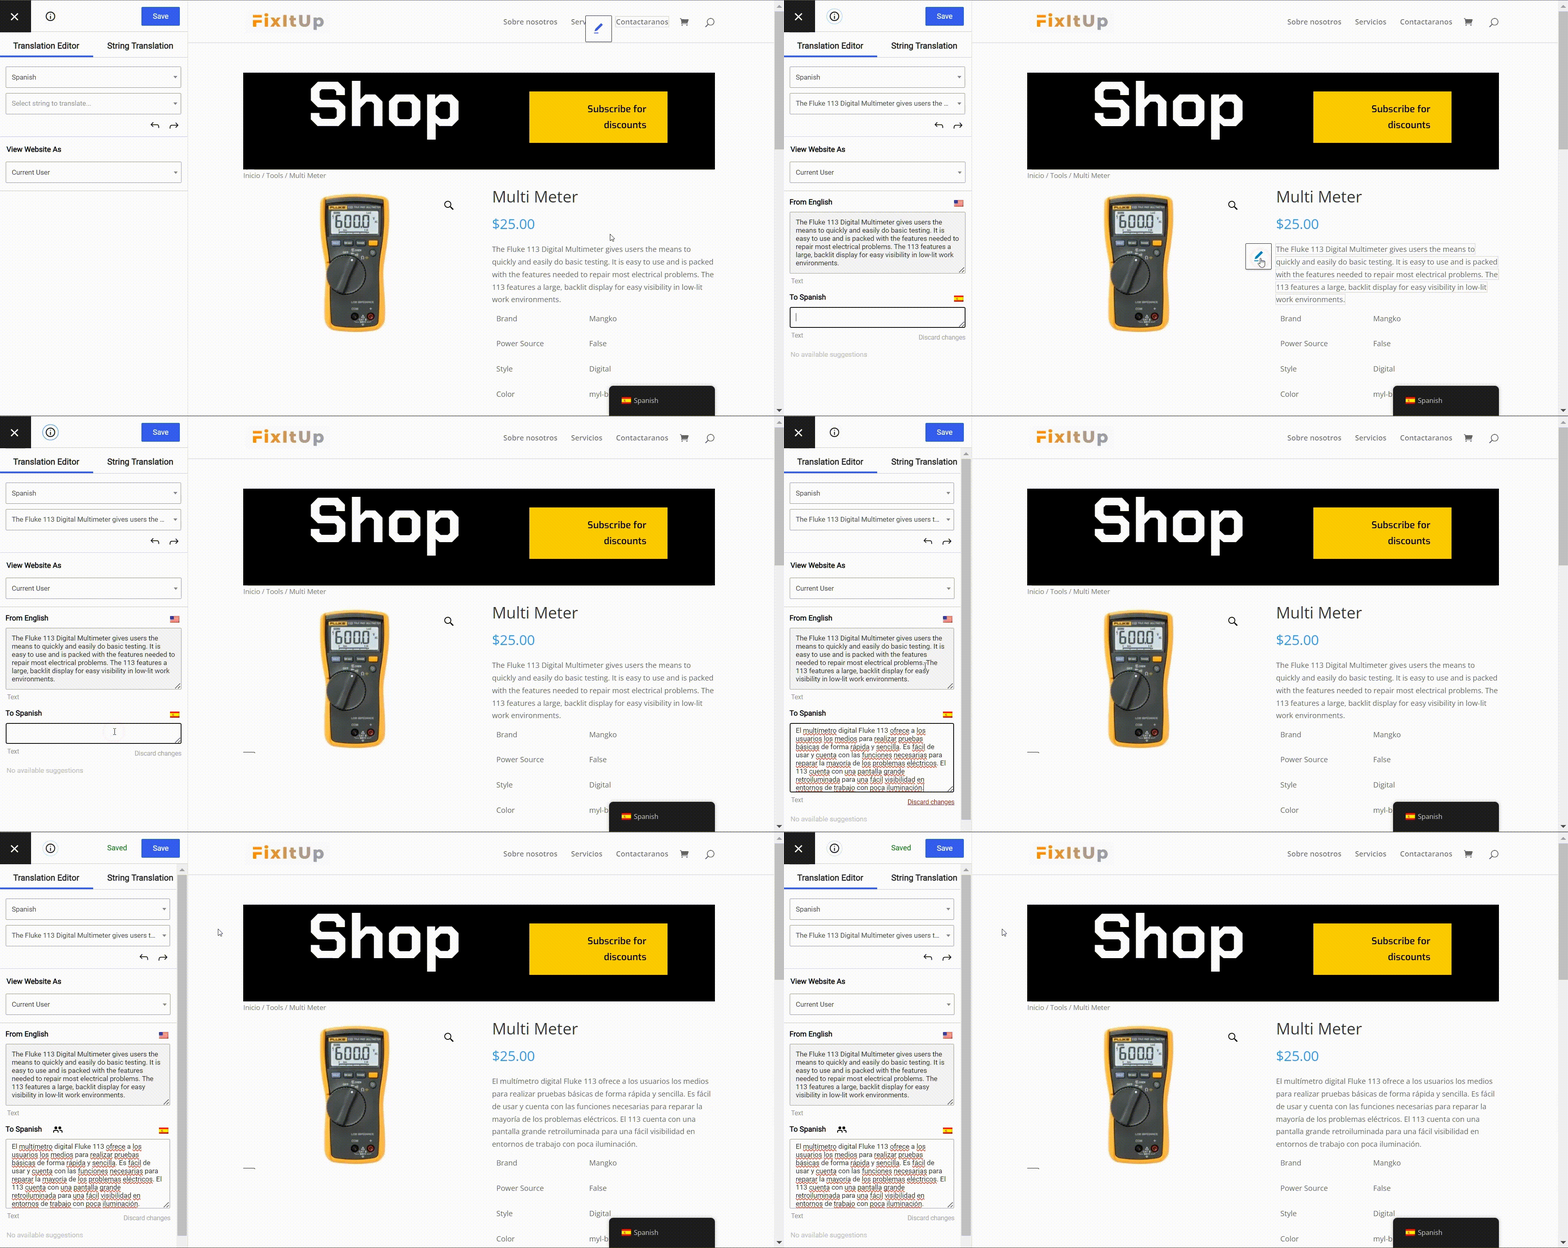
To add a translation, simply enter it into the text box at the bottom of the sidebar. When you click Save at the top of the sidebar, the page will automatically update to display your translated text.
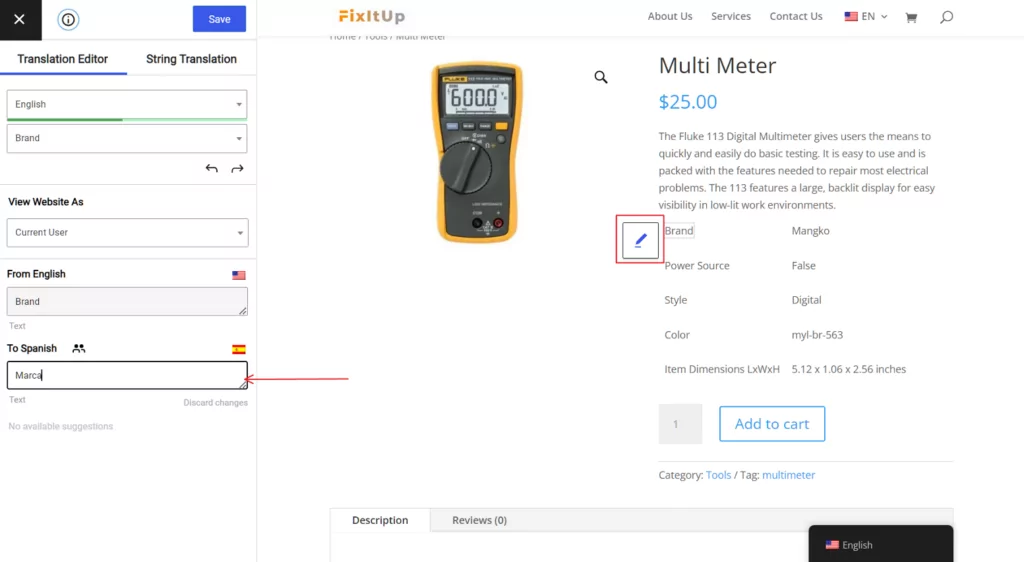
Any product-related text you translate, such as product attributes like names, will also be translated on your individual product pages. For example, in the image above I translated “Brand” in English to “Marca” in Spanish, and this translation will carry over to all of the product pages that have Brand/Marca present. That means you only need to translate these pieces of text once and you’ll see it on both the Shop and product pages.
That covers what you need to know about translating the Shop page for your multilingual WooCommerce store. You can go ahead and translate the rest of the text on the page until you’re finished.
Translating Dynamic and Variable Strings in WooCommerce
Remember the blue and green pencil icons I mentioned earlier?
Blue icon strings are user-generated text, such as product descriptions. Green icon strings, meanwhile, are gettext strings generated by WordPress themes or plugins, such as “Add to cart”, drop-down text for choosing different variants, and other text from WooCommerce.
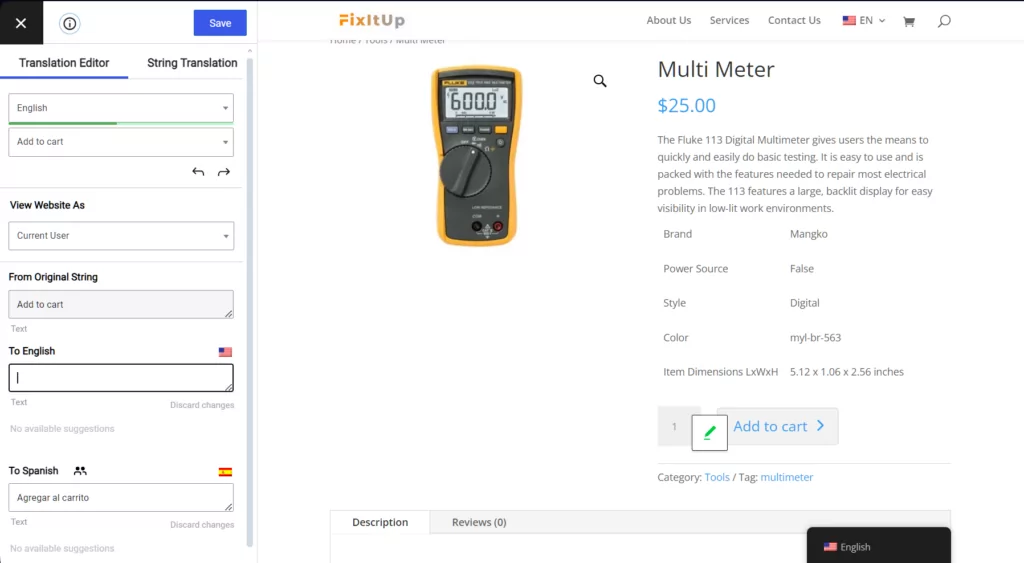
Usually, you would have to edit these types of text within theme or plugin files. But TranslatePress detects all gettext strings from WooCommerce and automatically loads their translations. So even before you start translating things like product titles or descriptions, you’ll notice parts of your online store are already translated.
When you translate a green icon text string, you’ll notice you get more fields to add translations to, including one for your default language. This is handy as it lets you directly change string translations coming from WooCommerce. For example, rather than “Category” you might change it to “Type.”
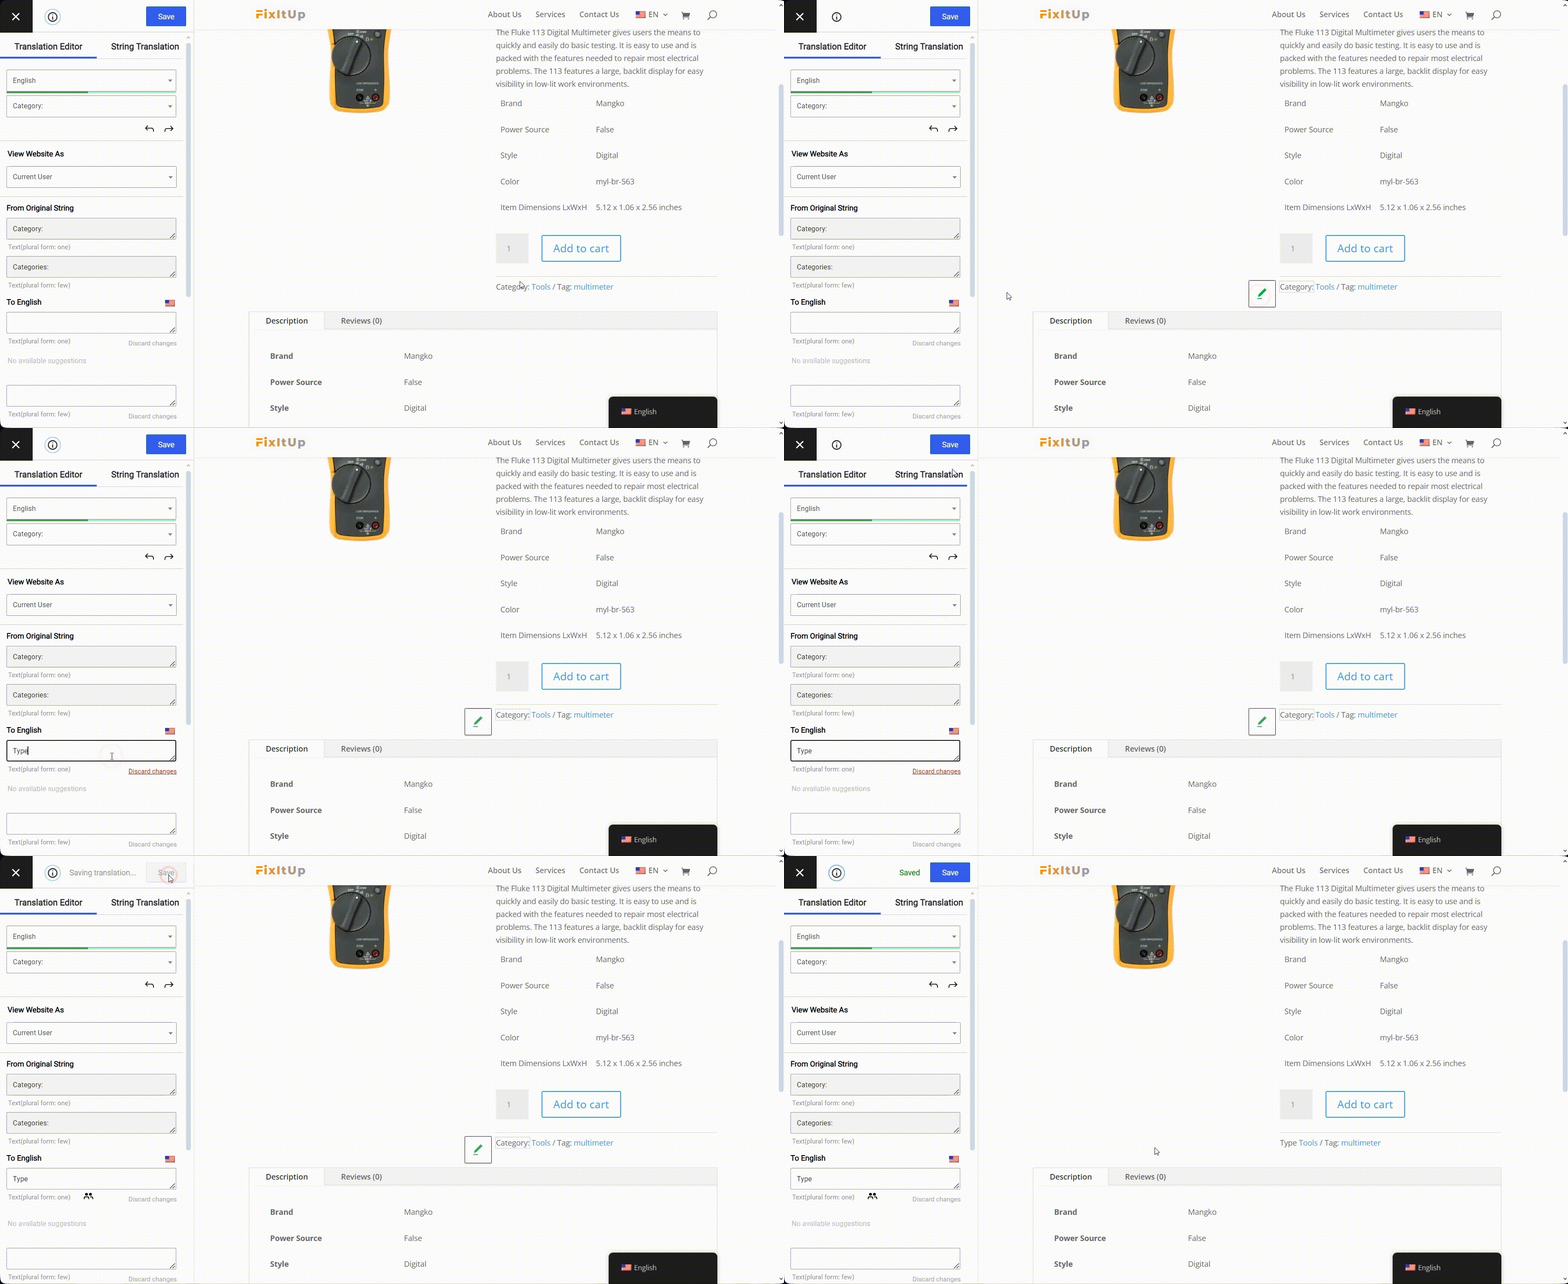
You’ll notice there’s some text you cannot get to using the pencil icon, including anything inside a drop-down. Drop-downs are usually used in WooCommerce for variable information, such as sizes and colors.
To edit variable text, use the menu in the sidebar. Here, you’ll find every piece of translatable text on the page, including gettext strings from WordPress plugins or themes.
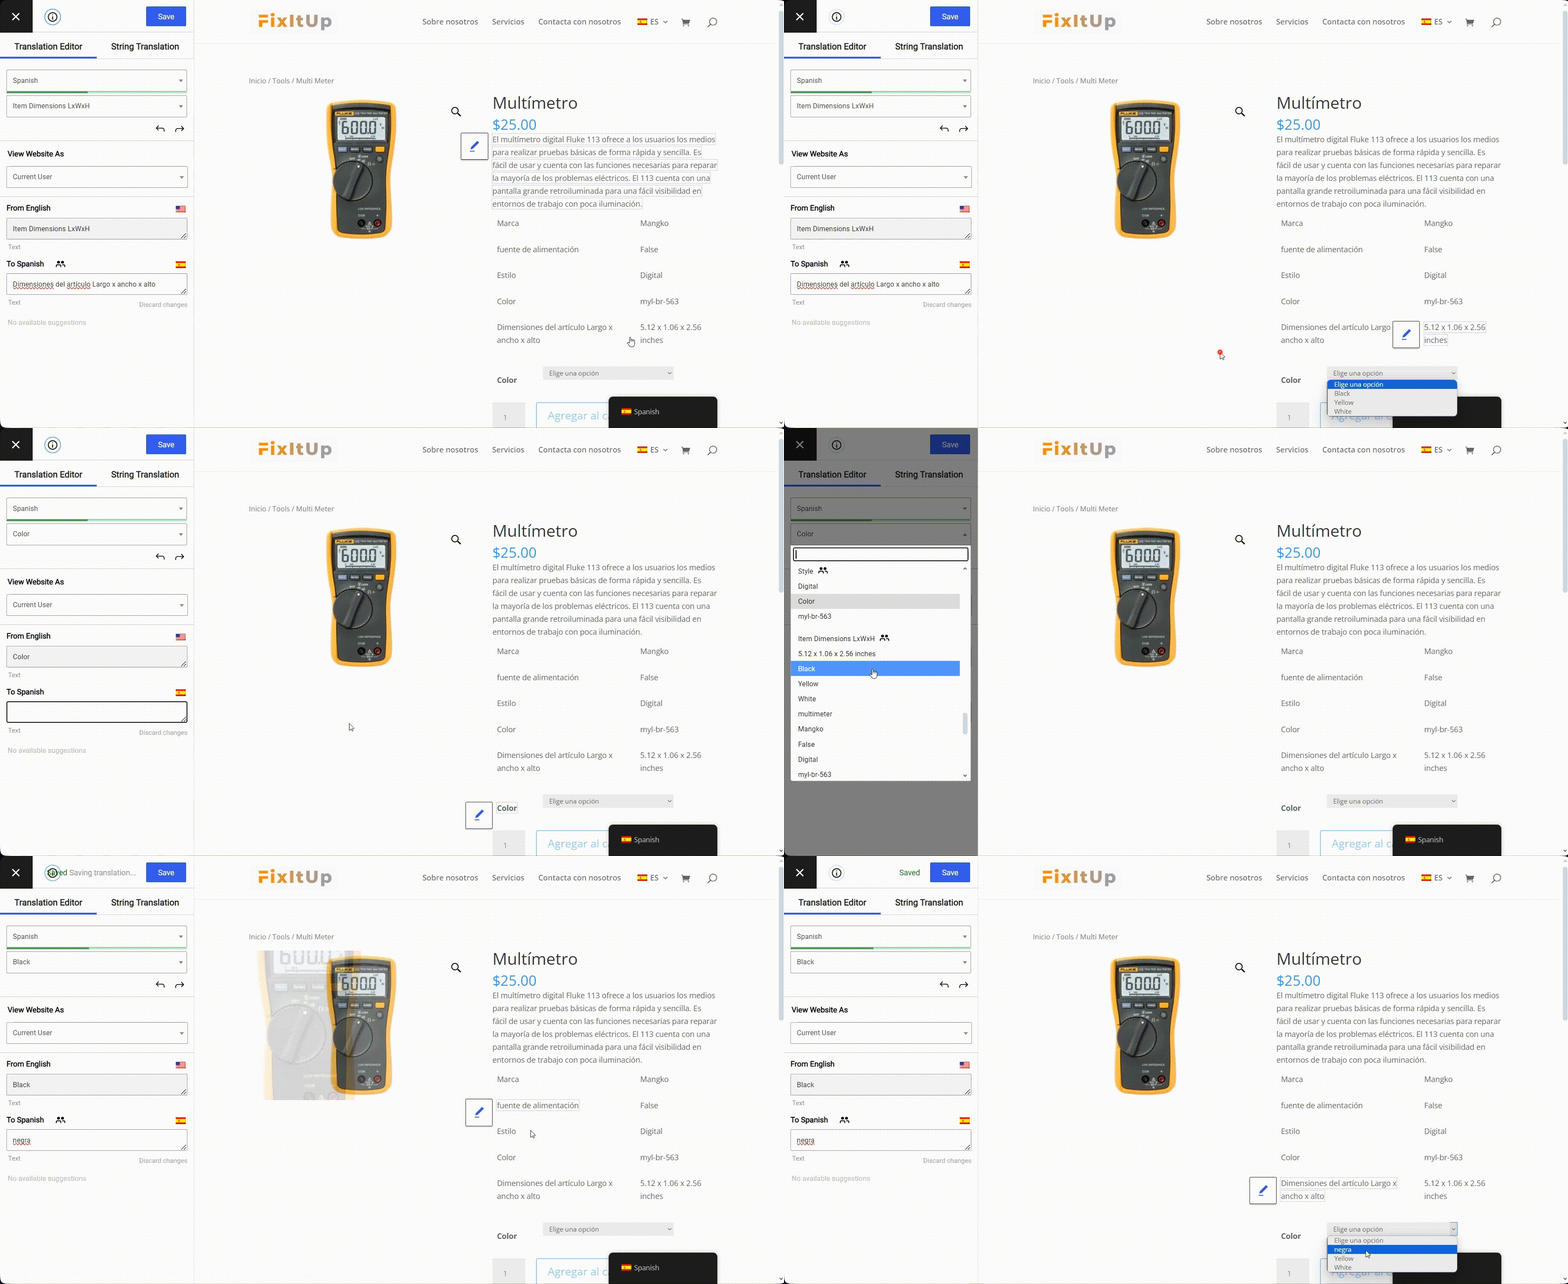
Be sure to go through the entire list in the drop-down so you don’t miss any translations.
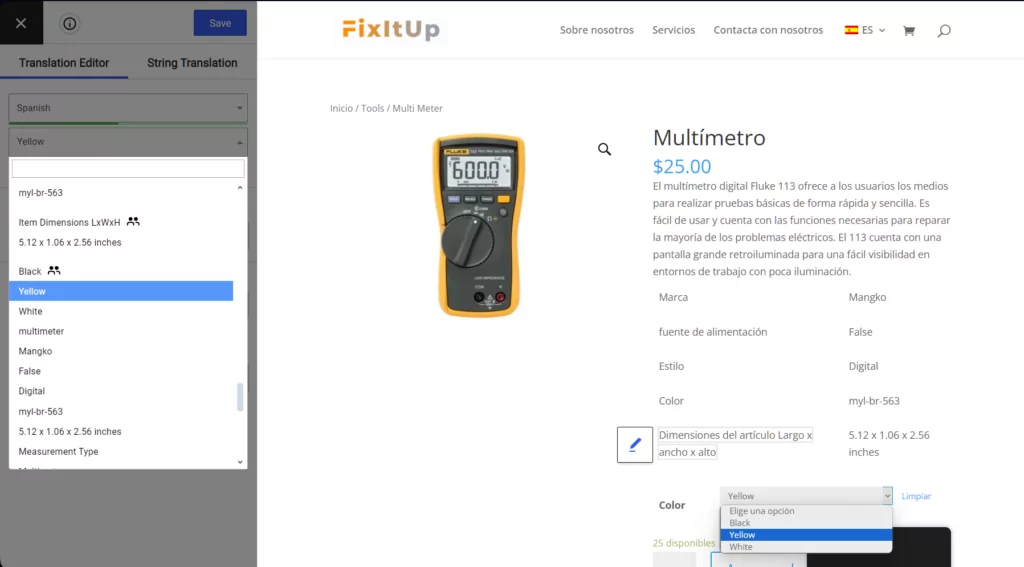
There’s some “hidden” text in WooCommerce that only appears after you complete an action. For instance, when you add something to your cart you’ll see a message like this:
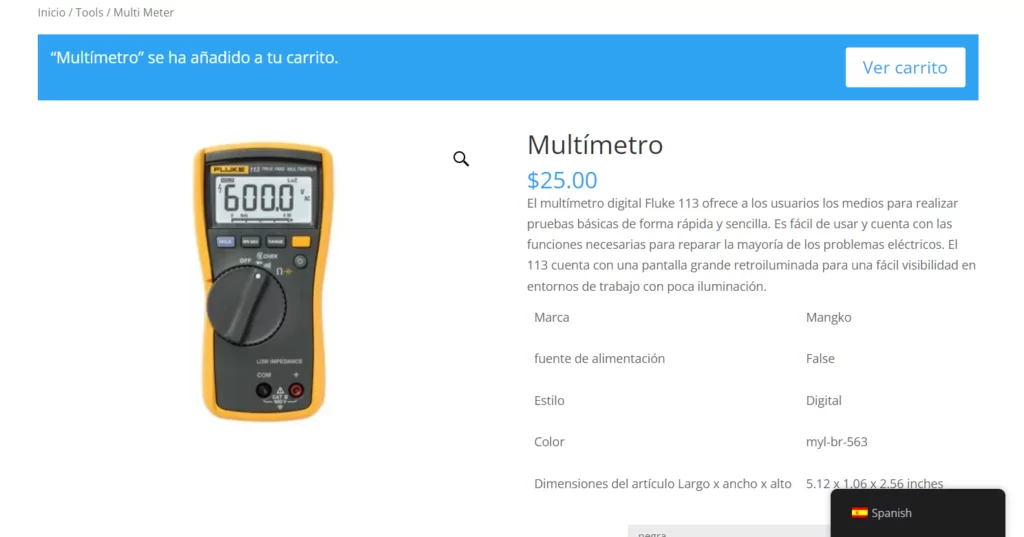
When these messages appear on screen, you can translate them like everything else. However, this means you’ll need to be thorough in completing and testing actions across your store to view and translate these hidden messages.
How to Translate WooCommerce Products
Translating WooCommerce products and product pages is much like translating your Shop page.
Simply navigate to the product you want to translate and hover over the title or description, click, and then enter your translation in the sidebar.

And that’s all you need to do. You can continue translating the description and other elements of the page.
For more on how to translate WooCommerce products, check out How to Easily Translate WooCommerce Products [The Complete Guide]. It covers in-depth everything you need to know about translating WooCommerce product with TranslatePress.
How to Translate Important SEO Elements
As I mentioned earlier, one of the biggest pros of having additional languages on your site is the increase you’ll get in traffic. But to get this traffic boost, you’ll need to optimize your translations for SEO to ensure your translations can be interpreted by search engines.
For this section, you’ll need to install and activate the SEO Pack for TranslatePress. This add-on allows you to translate important SEO elements, including
- URL slugs for posts, pages and custom post types
- Page titles
- Page descriptions
- Image alt tags
- Product categories and tags
Once installed, you’ll see new slug and meta information is listed in the menu drop-down.
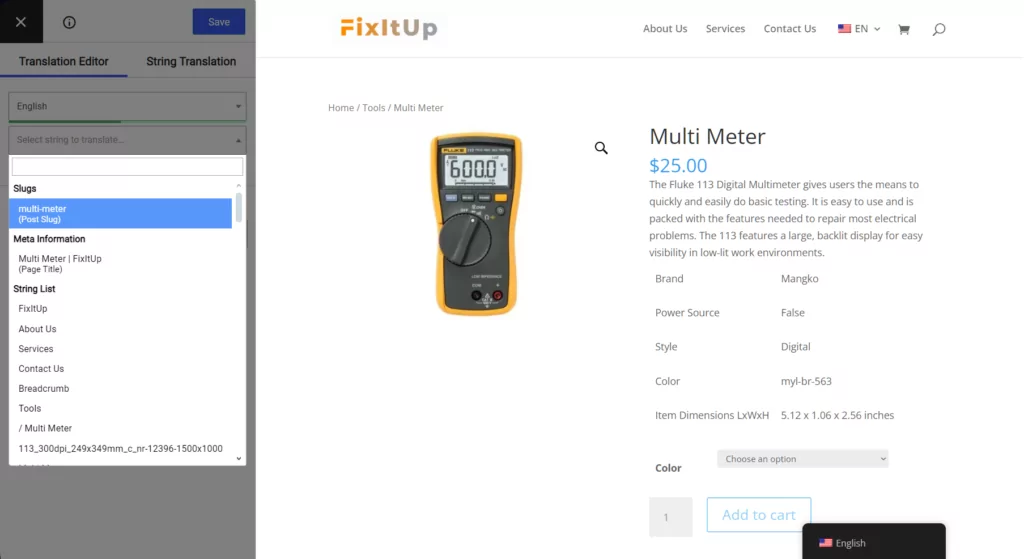
Translating this information is much like translating the rest of the page. Simply choose the option from the list and enter your translation in the sidebar below.
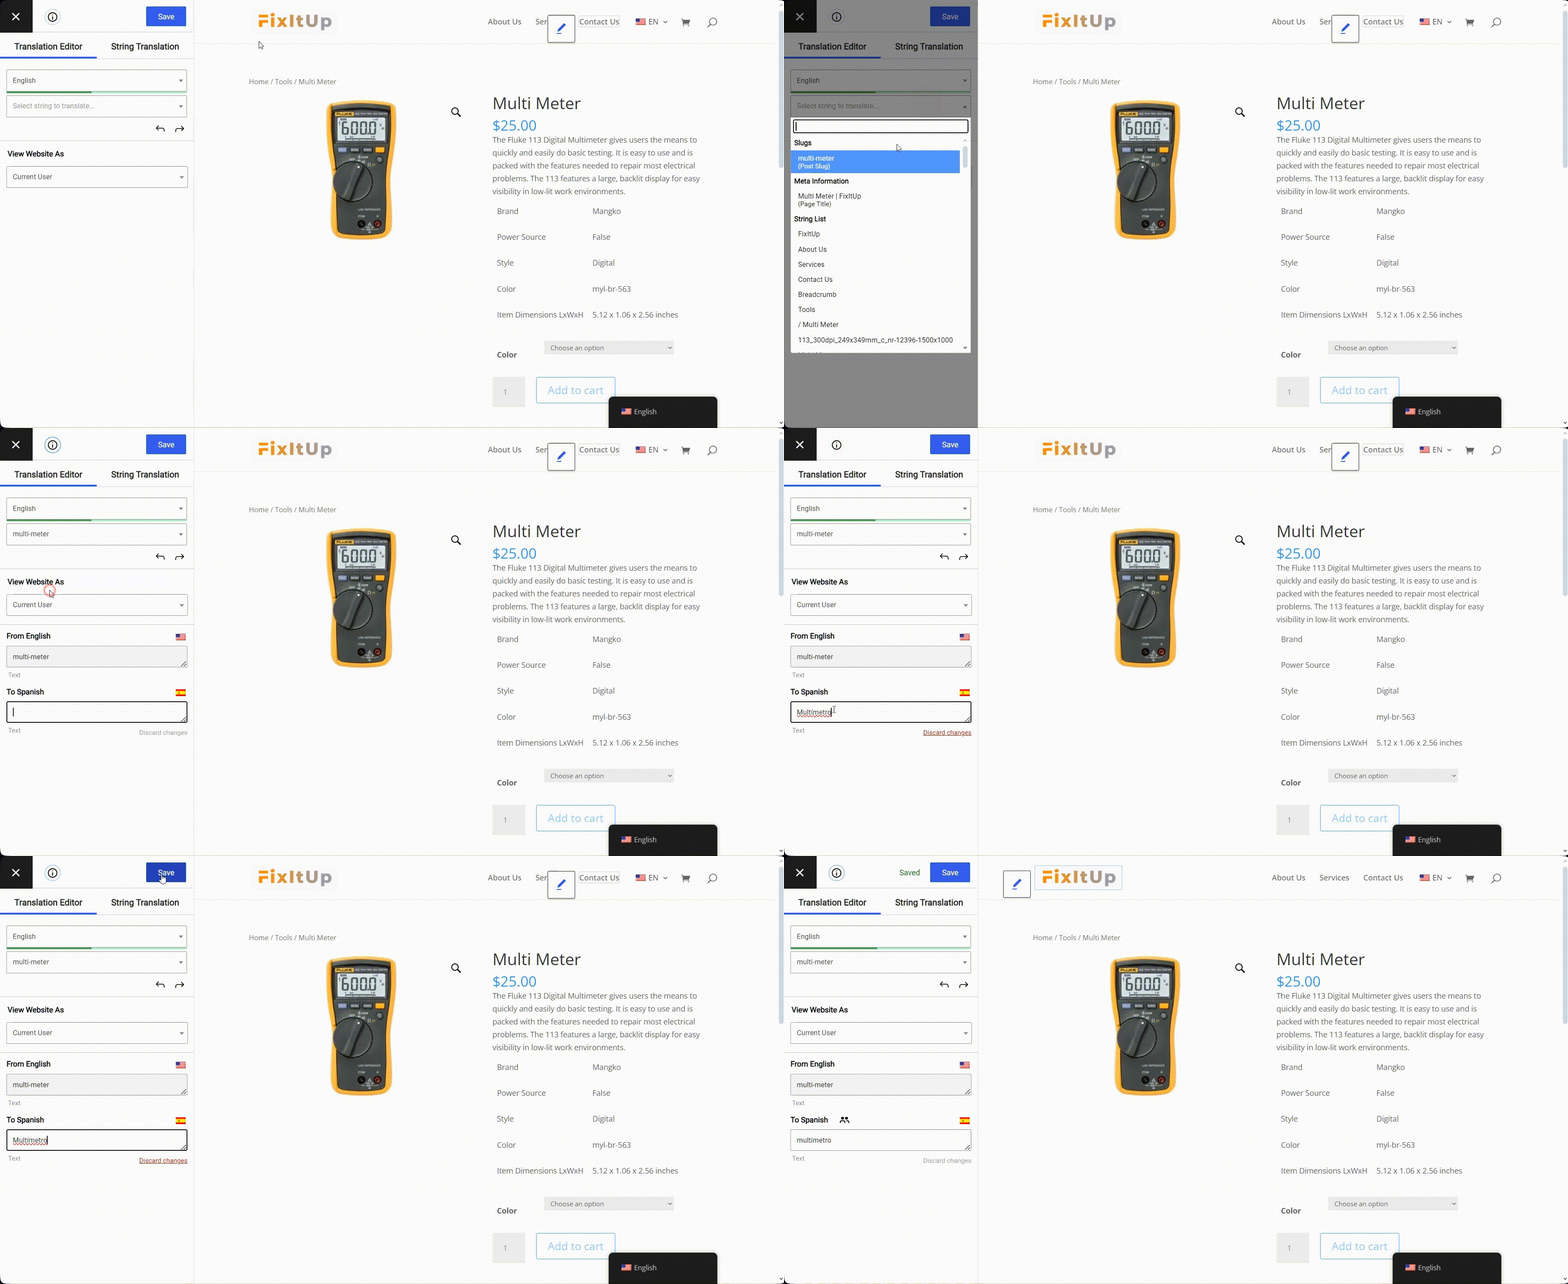
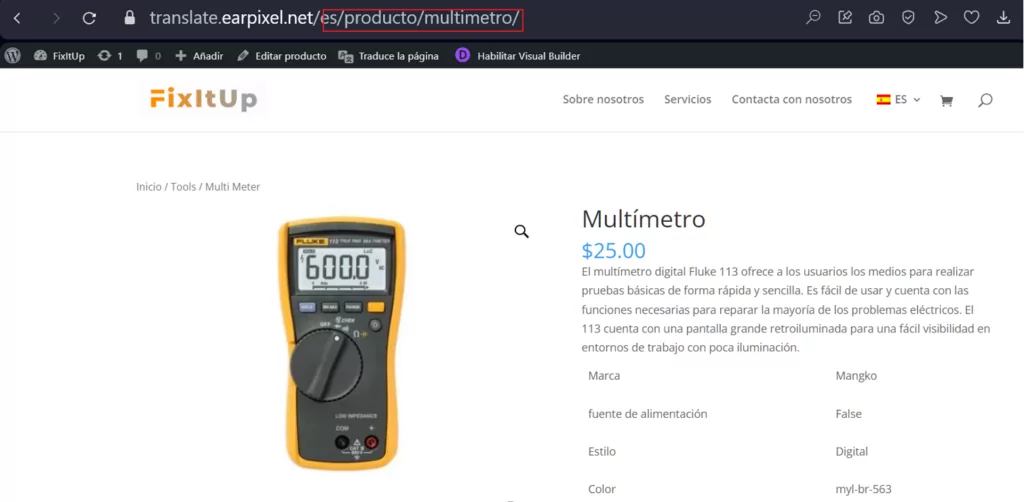
When you refresh the page, you’ll see your translated slug and page title.
Instead of doing it page by page, TranslatePress also offers a way to translate all URL slugs from one place, using the URL Slug Translation interface.
To access this, from the visual translation editor you’ll need to switch to the String Translation tab.
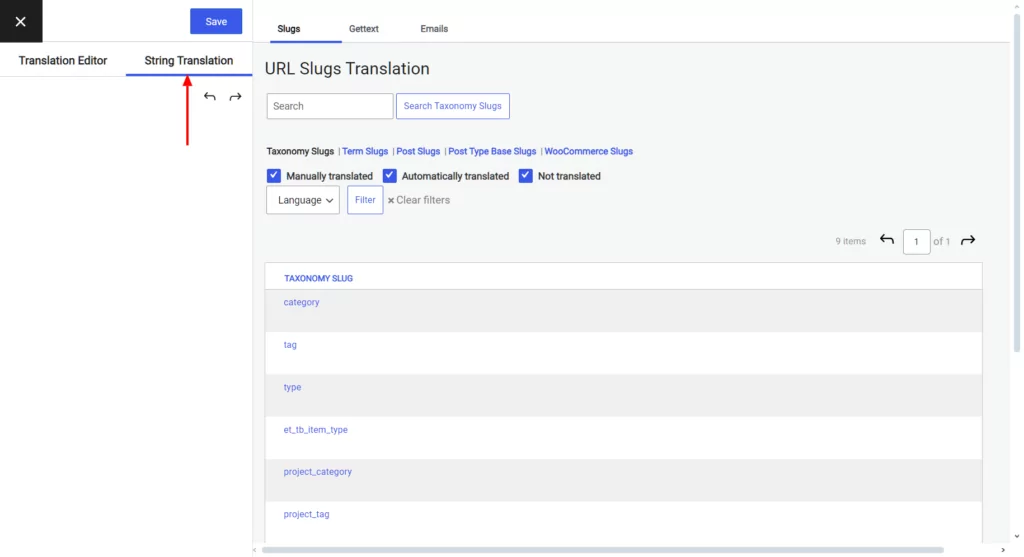
The URL Slug Translation interface lets you select and translate the type of slugs you want (by using the mini tabs), as well as filter your search by translation status, language, and keyword.
When translating WooCommerce slugs you can choose a language to have an easy overview of what’s been translated and what hasn’t. This is the best way to make sure all your WooCommerce store slugs are properly translated.
For a more comprehensive look at SEO for translations, read Multilingual SEO on WordPress: 7 Tips To Rank In All Languages.
How to Translate WooCommerce Emails
WooCommerce email translation is done from the same String Translation interface as the URL slugs. Only this time, you’ll have to switch to the Emails tab.
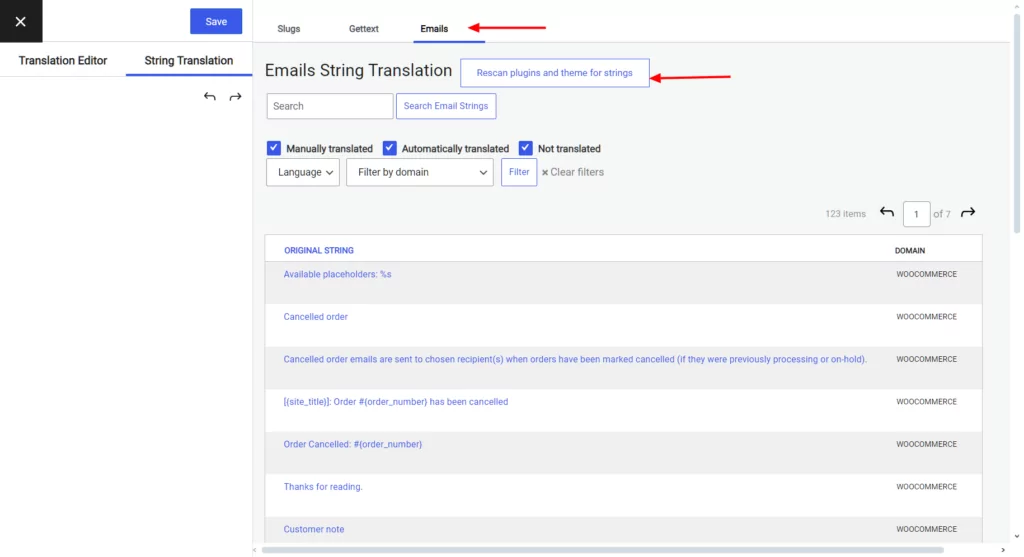
First, you’ll want to click on the Rescan plugins and theme for strings to make sure the interface is populated with all your emails. Once the scan is complete, you can start translating.
Using the search bar, search for each string in the email you want to translate one by one. Then, click the Edit button that appears under the string, on hover. Now you can add your translation in the left sidebar, just like you would with any other piece of content.
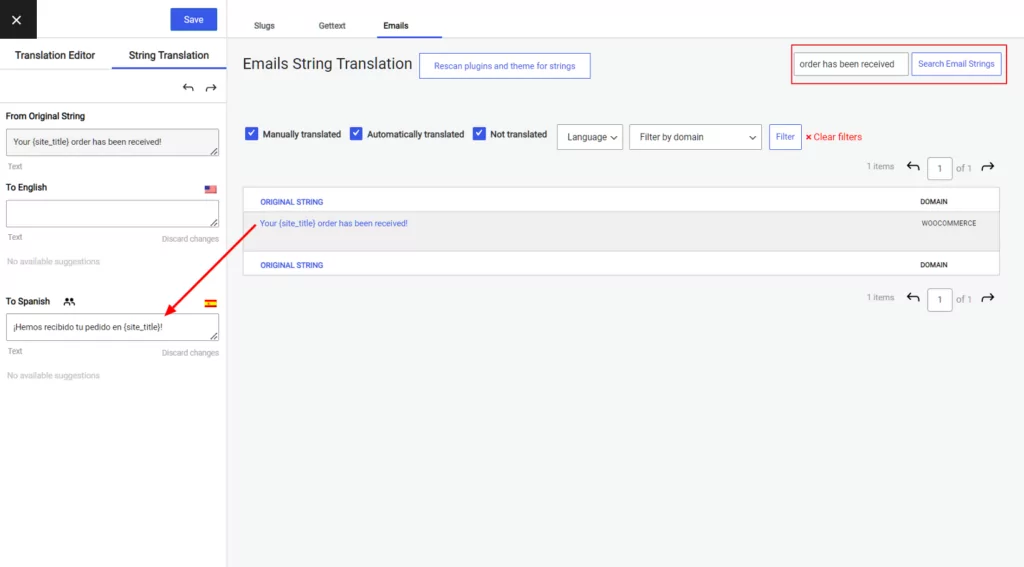
You can read our full tutorial on how to translate WooCommerce emails for more details.
How to Translate WooCommerce Cart
Translating WooCommerce carts is much like translating dynamic and variable content as you need to create a cart to view and translate it.
On the front-end of your site, add a few items to the cart and then view your cart. Then, use the top admin bar to translate the page.
In the visual interface, look out for green icon strings that you’ll only find on the cart page, such as “Cart totals.” You might want to update the original string in your default language and then enter your translation.
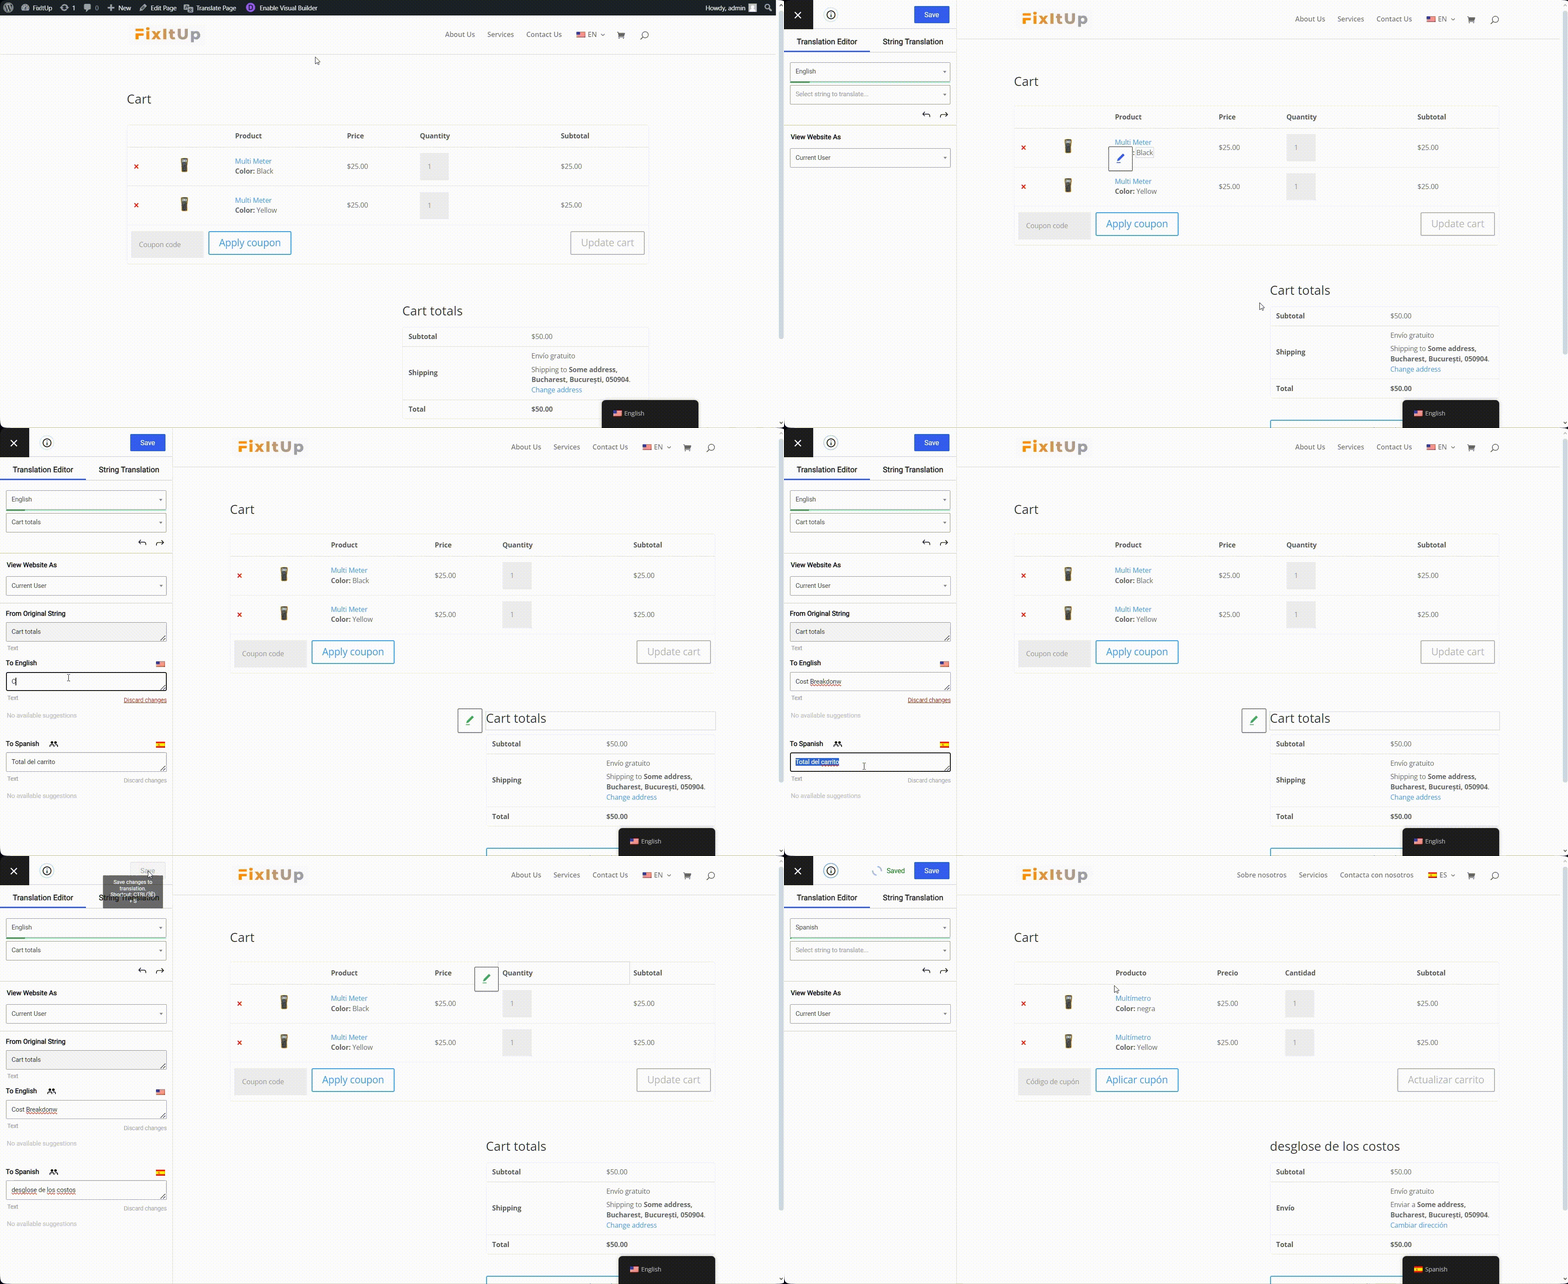
Similarly, you can go ahead and translate other cart-only green icon strings, such as “Proceed to checkout.”
How to Translate WooCommerce Checkout Page
Naturally, you’ll want to translate elements of your checkout page, too. There are lots of pieces of text generated by WooCommerce, such as the coupon code message, headings, placeholder text, and payment information.
To translate the coupon code text, for example, click to translate both sentences as usual. You’ll also want to edit the hidden coupon code message, which you can do by clicking the “Click here to enter your code” text.
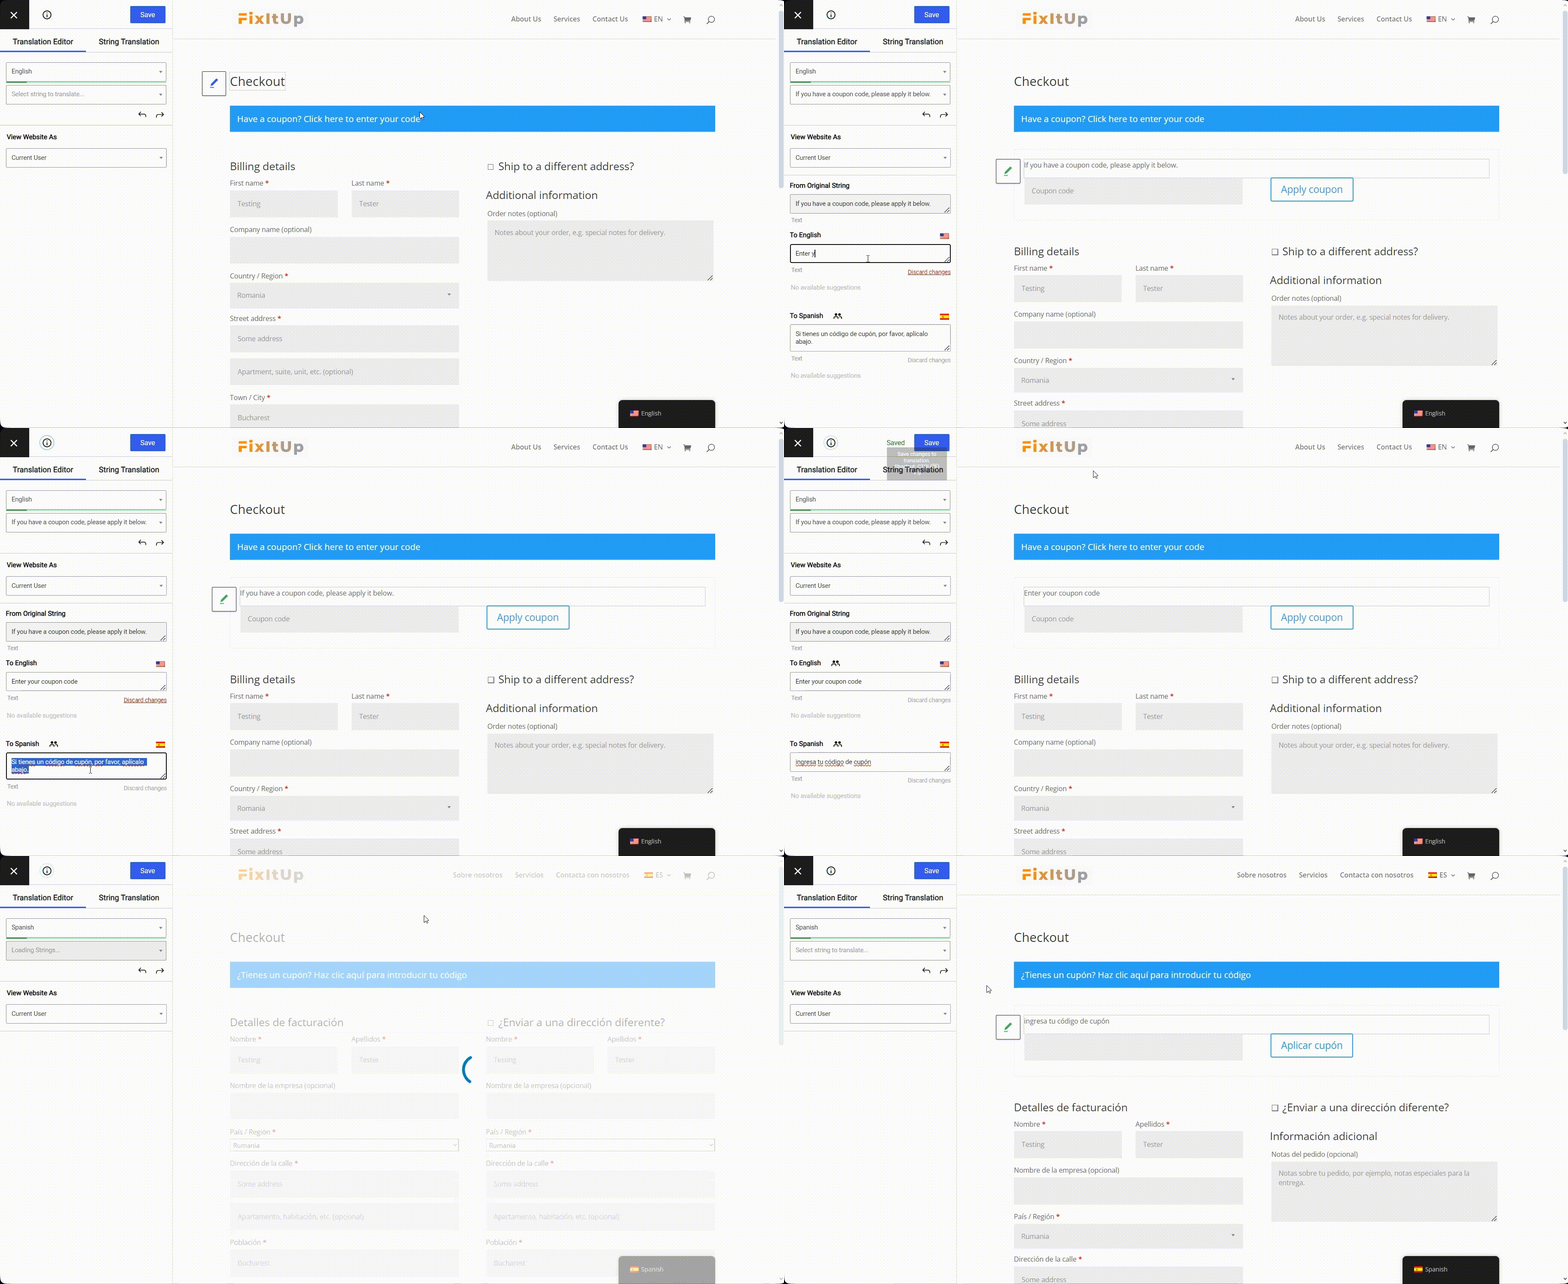
Then all you need to do is translate the rest of the page. Don’t forget to use the drop-down in the sidebar menu so you don’t miss any translations.
How to Translate WooCommerce Account Page
The account page is another important page you’ll want to translate for your customers, particularly as this is where they’ll view personal details, recent orders, and update addresses.
To translate this page, go to “My Account” to view your WooCommerce account. From here, you can click through each section of the dashboard.
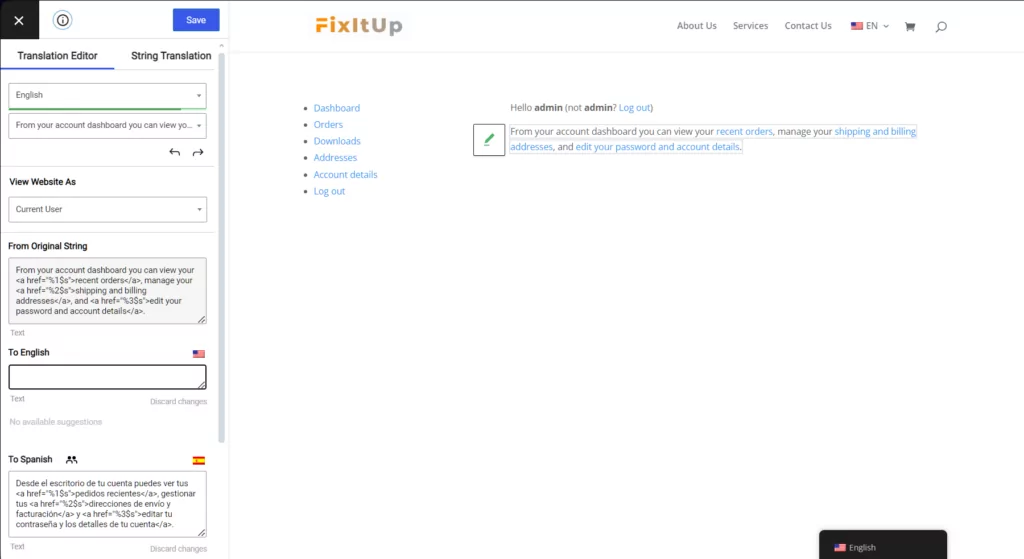
If you haven’t placed any orders (or downloads if you have digital products enabled) you’ll notice there’ll be blue WooCommerce notifications displayed in the “Orders” and “Downloads” section. Don’t forget to download these as they disappear once customers make their first purchase.
How to Translate Your WooCommerce Store Automatically
So far, you’ve learned how to translate every part of your WooCommerce site with TranslatePress. Everything from shop and product pages to SEO meta information and slugs, carts, checkouts, and account pages can be easily translated in just a few clicks.
With TranslatePress visual interface, you can manually translate everything in your store. But what if you want to speed up the translation process of your multilingual WooCommerce store?
Using the automatic translation feature from TranslatePress, you can. Just go to Settings → TranslatePress and click on the “Automatic Translation” tab to enable this feature.
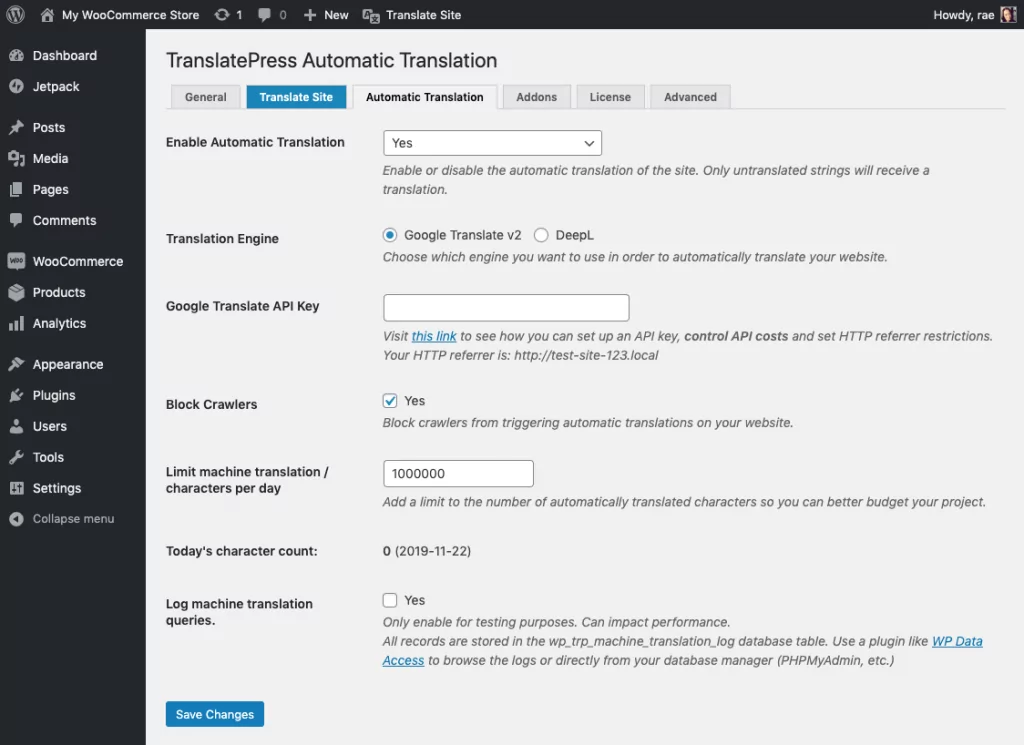
You’ll then need to setup a Google Translate API key to connect to the service. There’s also an option to use DeepL Automatic Translation in the premium plugin version of TranslatePress.
The brilliant thing about this feature is that it will take care of translating your whole multilingual WooCommerce store, including product pages, carts, checkouts, and account pages. You’ll have your WooCommerce store automatically translated instantly.
Then all you need to do is check over your pages to make sure everything looks good, and you can manually update any text that doesn’t sound right or you simply feel like changing.
Get Started Creating a Multilingual WooCommerce Store with TranslatePress
The fact is, there’s no greater opportunity for expanding your market reach than creating a multilingual WooCommerce store. Translating your store and providing localized content will not only help you attract new customers but maximize your reach and sales potential.
We’ve summed up all the steps that we went through in this short video below:
TranslatePress offers easy translation management. You can quickly translate your entire WooCommerce store, including product pages, cart and checkout pages, and variable text that changes as shoppers browse your store. Plus, using the SEO Pack add-on for TranslatePress, you will significantly increase your chances of ranking in multiple languages.
Ready to get started with TranslatePress? Download TranslatePress to follow this tutorial, and upgrade to a premium plan for access to SEO features, DeepL machine translation, and more.
TranslatePress Multilingual
Do you have questions about how to create a multilingual WooCommerce store? Let us know in the comments below!
If you found this post helpful, please check out our YouTube channel, where we constantly upload short & easy-to-follow video tutorials. You can also follow us on Facebook and Twitter to be the first to know each time we post.

It’s great if we can target customers from all over the world. That’s why we need a multilingual WooCommerce store. Thanks for sharing these amzing tool. I will try TranslatePress for my site.
Very good!
And how do we do with woocommerce emails?
I want that when an order is placed in a language, an email is received in that language.
Thank you.
Translating emails is actually a feature that we are currently working on and will soon be available. 🙂
Hi Flavia,
Do you know when this feature will be released?
This year?
We are hoping for this summer/autumn.
is this feature available yet?
Is there a solution for the woocommerce mails?
WooCommerce email translation is actually out now. 🙂 Here’s all you need to know about how it works and how to implement it: https://translatepress.com/translate-woocommerce-emails/
Very useful topic! But how we can translate currency? For example: in Bulgaria we use лв., but foreigners in Bulgaria use BGN. It is dynamic content! Thank you a lot!
Hi, Zdravka! Here’s an article that covers everything there is to know about multi currency in WooCommerce: https://translatepress.com/woocommerce-multi-currency/. Hope it answers your questions!