
In this post
Looking for ways to implement form translation on your WordPress website?
Translating forms is a great way to draw more traffic, increase your form’s conversion rates and boost your revenue collection.
In this article, we will show you how to translate a form on your WordPress website using a visual translation tool called TranslatePress. It’s very easy to use and helps you translate forms in a jiffy. After activating the tool, it will take you only a couple of minutes to get a translated form up and running.
Let’s get started.
Why Translate Site Forms?
No matter what type of form your WordPress site contains (contact form, job application, user registration, survey, etc), translating it will afford you the following benefits:
Target Wider Audience: By translating forms on your site, you can draw visitors from different geographical locations speaking in languages that are not your website’s default language.
Better User Experience: Visitors will find it easier to understand the purpose and function of your forms and they will do a better job of filling them up.
Better Conversion Rates: Accommodating visitors in their native language will help build trust and more people will make an effort to fill up the form.
Competitive Advantage: Offering translated forms sets you apart from competitors who may not support different languages, giving you an edge in international markets.
Global Branding: Bilingual or multilingual forms demonstrate a commitment to inclusivity and professionalism which can enhance your brand’s image and credibility.
Overall, translating forms on a WordPress website expands your audience, contributes to a positive user experience, and strengthens your brand’s global presence.
Now that you know how form translations can help your site, let’s learn how to actually translate the forms of your site.
Form Translation: How to Translate Forms in a WordPress Website
To translate the forms of your WordPress website, you need to take the following steps:
- Install a translation plugin;
- Translate form fields;
- Translate form placeholder & validation messages;
- Translate content on the page.
IMPORTANT: Before we dive into the steps, you need to have the form ready and published on your website.
In this tutorial, we are not covering how to create a form.
If you don’t have a form already published on your site then we recommend doing a simple Google search and following any of the guides that appear on the search engine.
Once you have a form published on your site, you can proceed with the following tutorial.
One more thing, if you are using Gravity Form, WPForms, or Contact Form 7, we have separate guides on them. Check those out.
If you are not using any of these form plugins, proceed with the tutorial below.
Step 1: Install a Translation Plugin
To translate your forms, you need a translation plugin. While there are several translation plugins to choose from, we are going to use the most popular and user-friendly translation plugin called TranslatePress.
TranslatePress has a free as well as a premium version.
The free version offers a ton of features like manual and automatic translations, a visual translation interface, ability to add a language switcher button in content, menu, or floating boxes, among other things.
The free version is sufficient for translating forms on a WordPress website. But if you are curious about the premium version, check out this article on TranslatePress free vs pro.
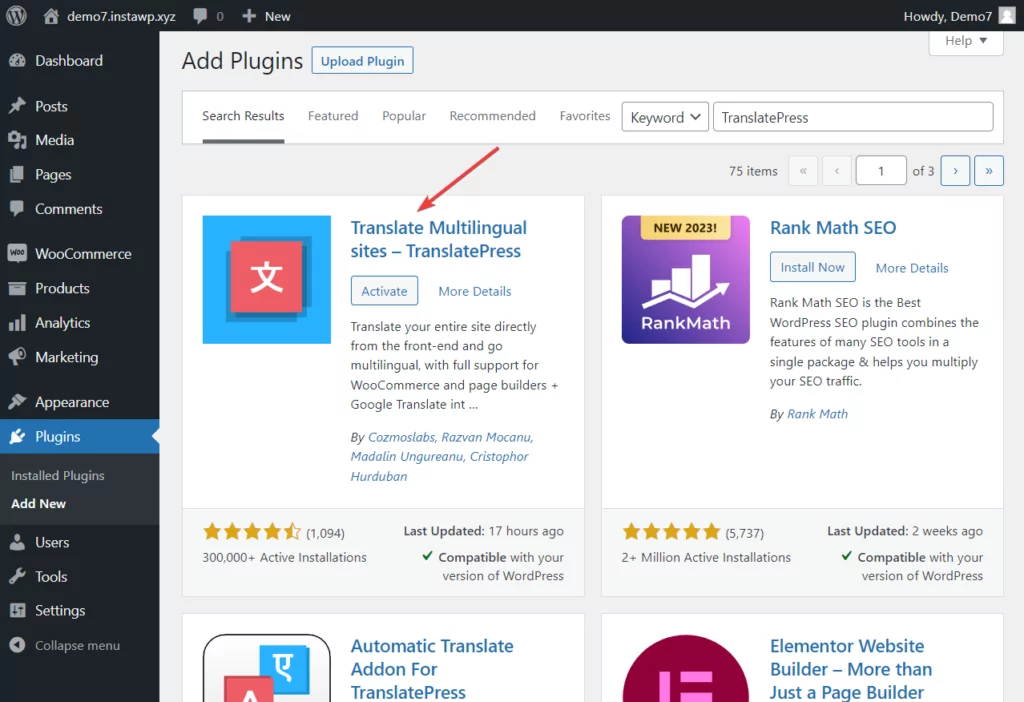
To translate your site’s form, open your WordPress dashboard and go to Plugins → Add New and insert “TranslatePress” into the search box. Then proceed to install and activate the plugin on your site.
Step 2: Add a Secondary Language
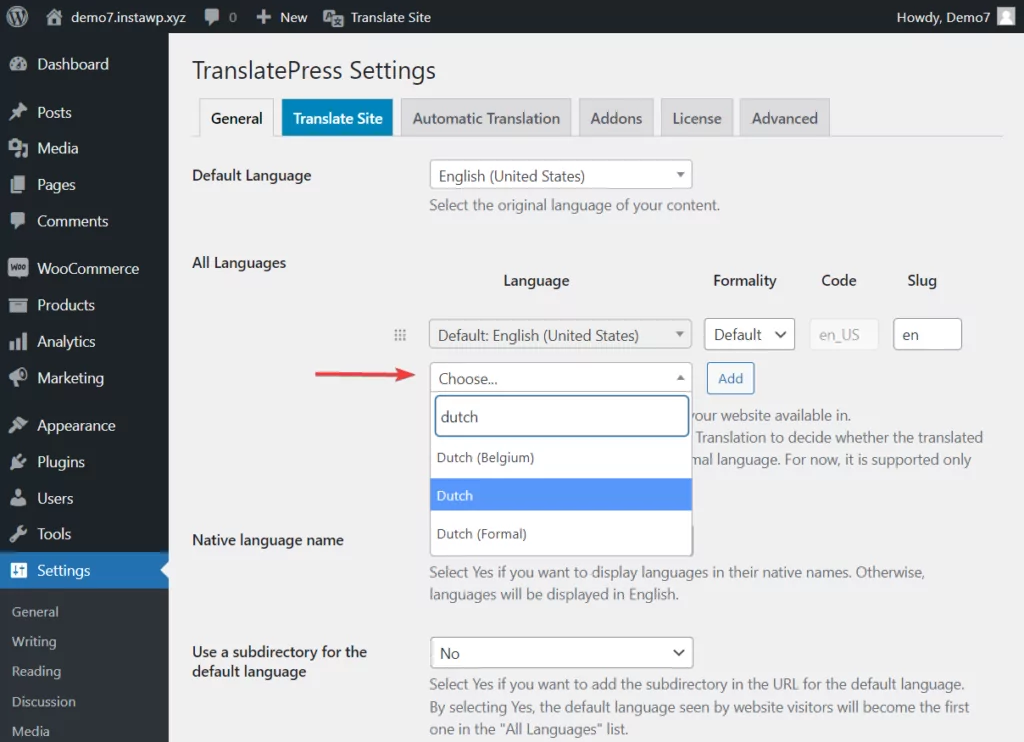
To select a second language, go to Settings → TranslatePress → General tab → All Languages.
The first language listed under All Languages is your site’s default language.
You can choose a second language (say, Dutch) from the dropdown menu. This is the language you will use for form translation.
It’s worth noting that with the free version of TranslatePress, you can add only a single language for translation. To be able to add more translation languages, you need to upgrade to the premium version of the plugin.
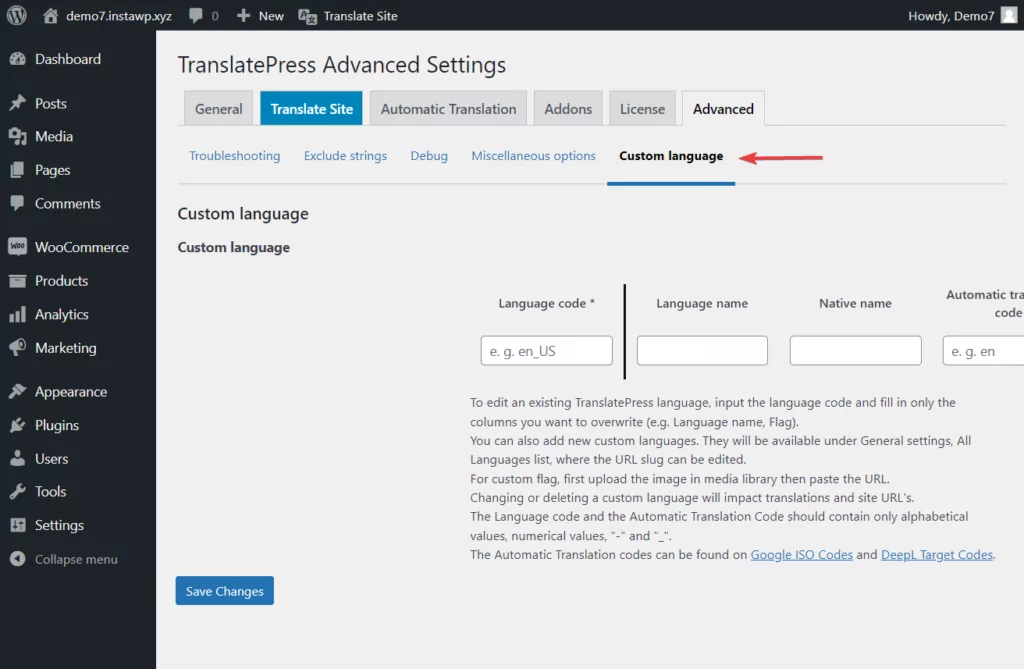
Note: If you can’t find a language of your choice, then add a custom language by going to Settings → TranslatePress → Advanced → Custom Language.
Step 3: Choose Automatic or Manual Translation
After the plugin is activated, you will need to decide whether you want to manually translate your site’s form or automate the translation process.
If you are pressed for time, then setting up auto-translation is the right way forward, but whichever method you choose, you can always manually edit your translations as well.
In the next sections, we will show you how to implement both methods. First, we will cover how to set up automatic translation and then how to manually translate a form.
Automatic Form Translation
First, setting up automatic translation involves selecting a translation engine. A translation engine is a tool that automatically translates the content of a website.
TranslatePress offers two translation engines: Google Translate v2 and DeepL.
DeepL is a premium feature so we are going to show you how to use the free Google Translate.
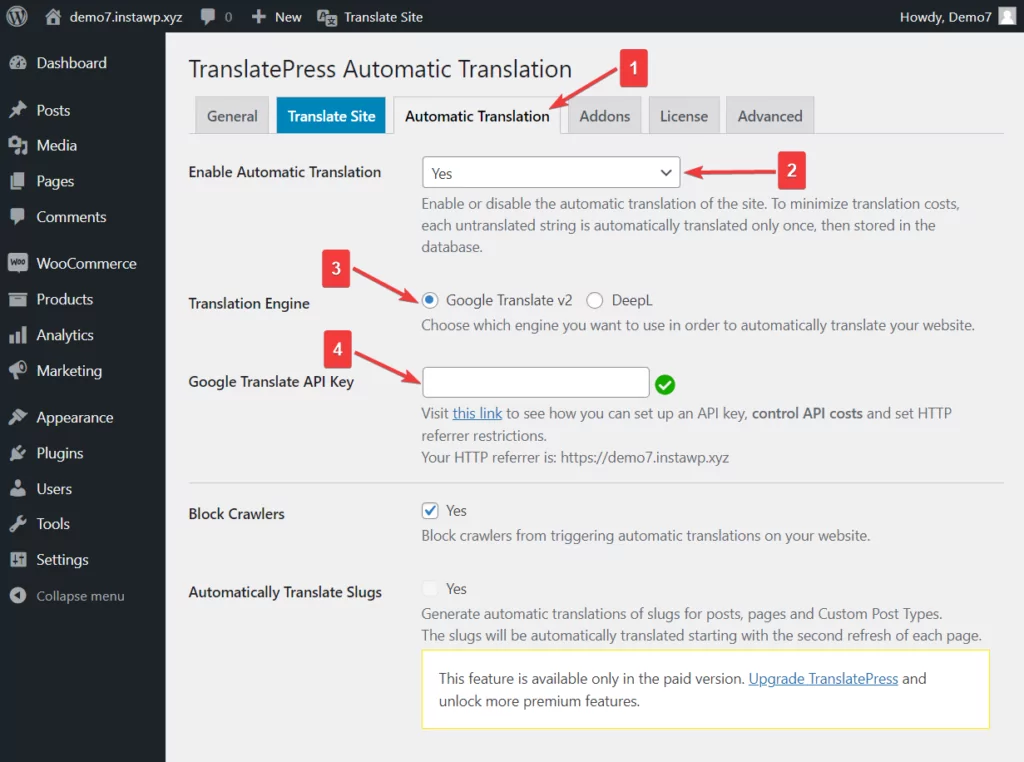
To select the translation engine, go to Settings → TranslatePress → Automatic Translation and select Yes to Enable Automatic Translation.
Then, choose Google Translate v2 as your Translation Engine.
To enable the engine, generate a Google API key and insert it in the Google Translate API Key option.
Now that the automatic translation system has been set up, we highly recommend that you read through the other setting options (like block crawler, limit character translation, etc) and modify them according to your needs.
When you are done, scroll down to the end of the page and hit the Save Changes button.
That’s it. TranslatePress will now automatically translate your form into your site’s second language once you open that page on the front end of your site.
IMPORTANT: Automatic translations are not always accurate. But don’t worry, if anything looks off in the automatically translated text, you can modify it using the visual translation editor. More on the editor in the next section.
Manual Form Translation
Manual translation of forms involves translating 3 elements in the form. Those are:
- Form fields
- Placeholders
- Success and validation messages.
In this section, we will show you how to manually translate these elements using TranslatePress’ visual translation editor.
Translate Form Fields
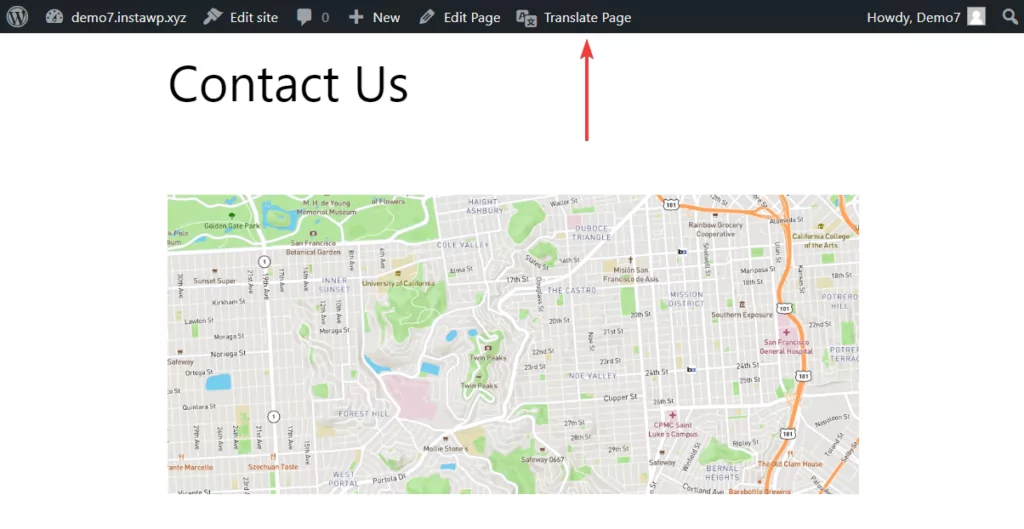
To start translating your form, open the page where the form is located. Then go to the WordPress admin bar and select the Translate Page option.
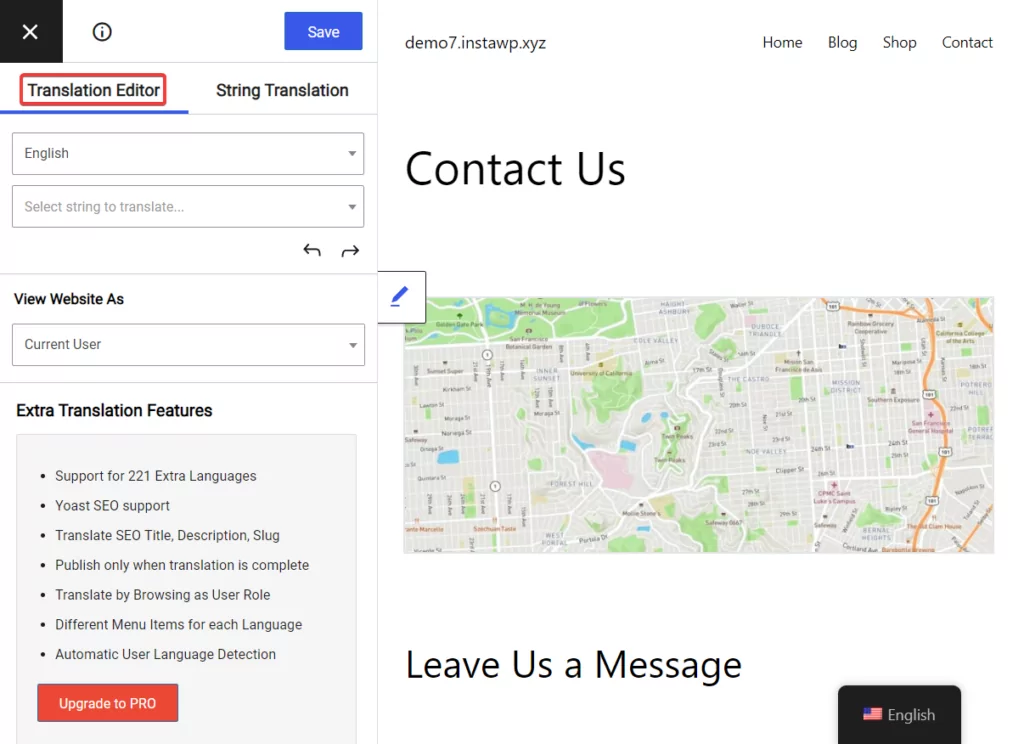
As soon as you do that, the Translation Editor tool will appear on the left of the screen. You will use this tool to translate your form.
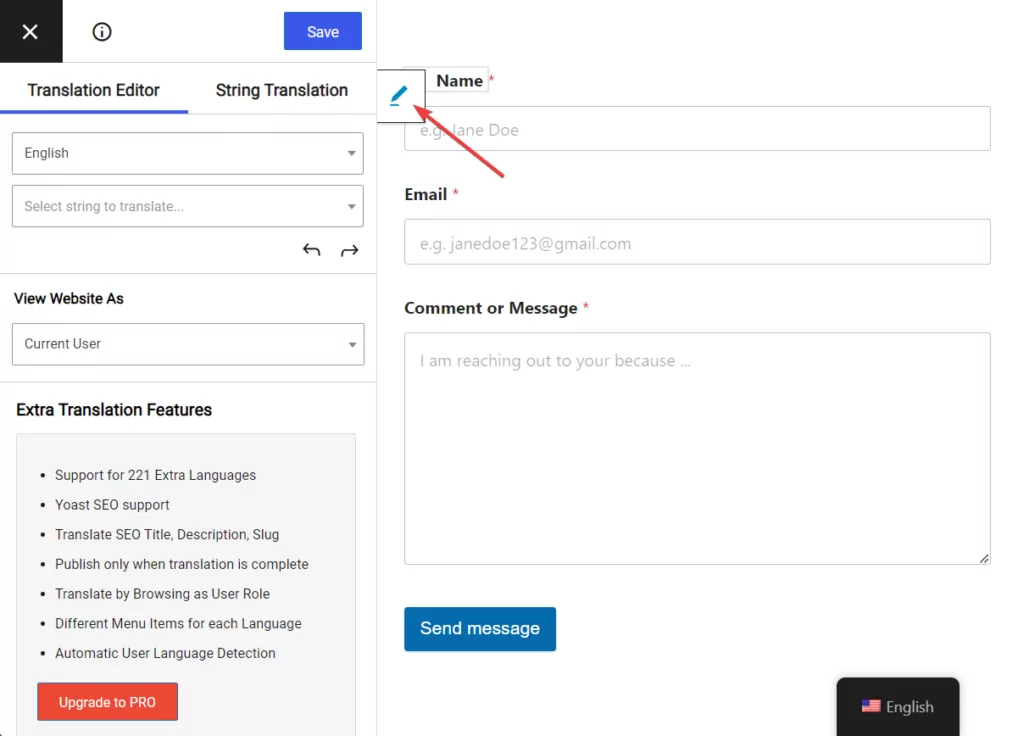
Select the first field in the form by clicking on the blue pen hovering nearby.
As soon as you select the field, the text in the field will appear in the Translation Editor.
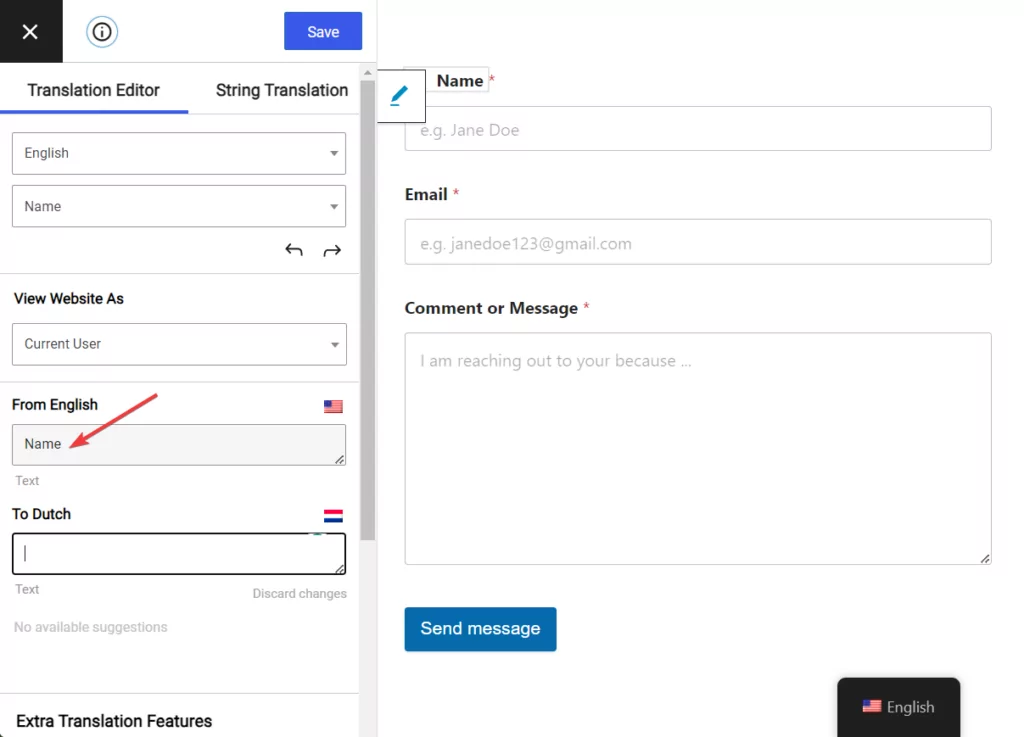
In the Translation Editor, insert the translated version of the text and hit the Save button to save the translated text.
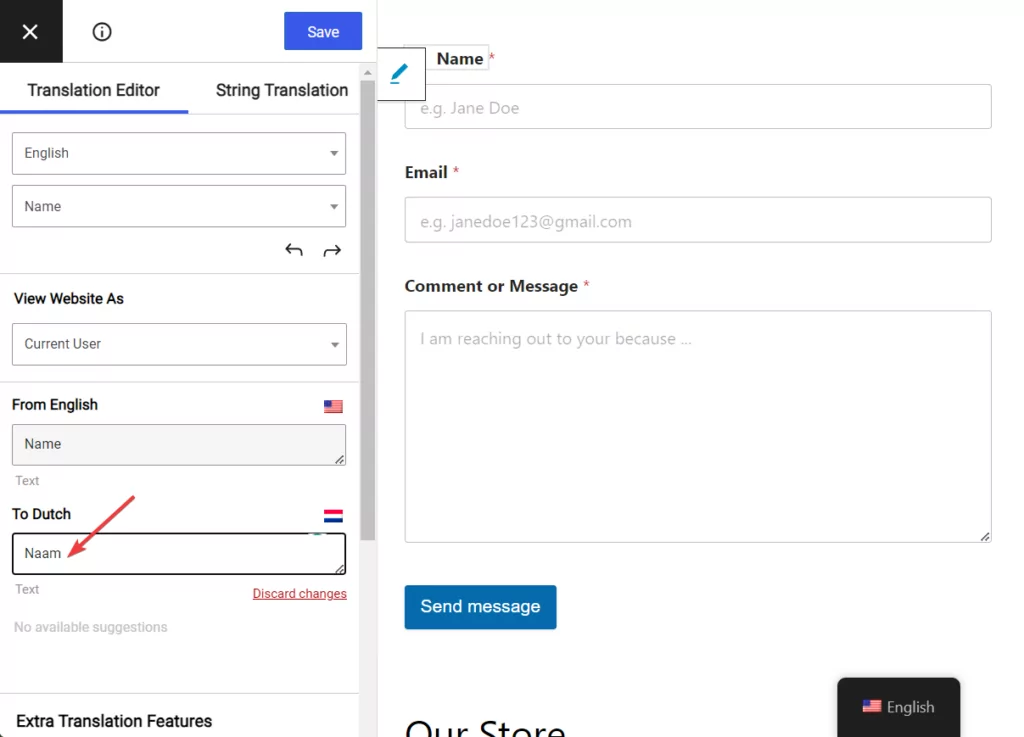
Then select the second field, insert the translated version of the text, and save the translation.
Proceed to translate all your form fields in this manner.
Translate Form Placeholders
Placeholders are texts that hint at the expected input for a field. For instance, the contact form used for demonstration in this tutorial has placeholders like Jane Doe, janedoe123@gmail.com, etc.
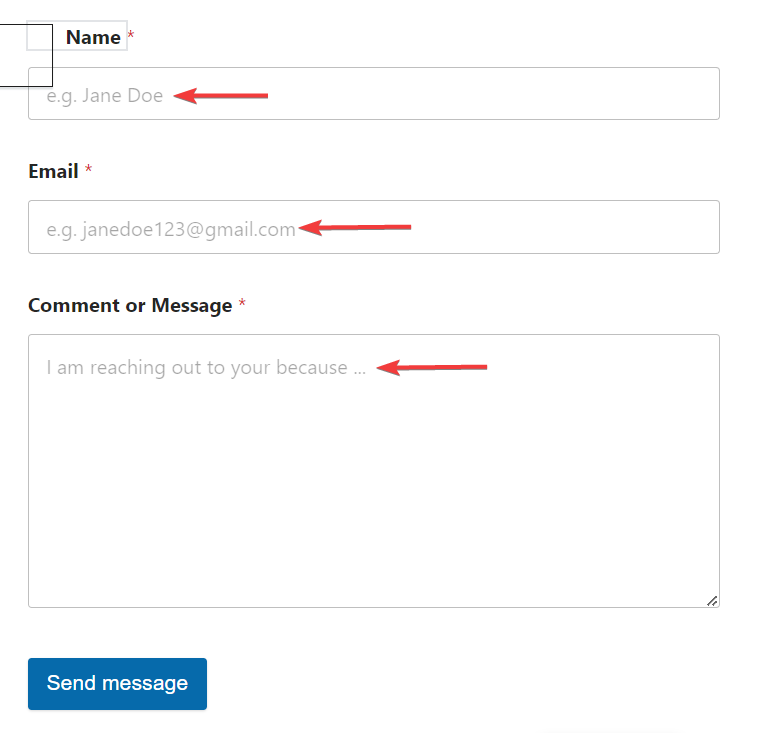
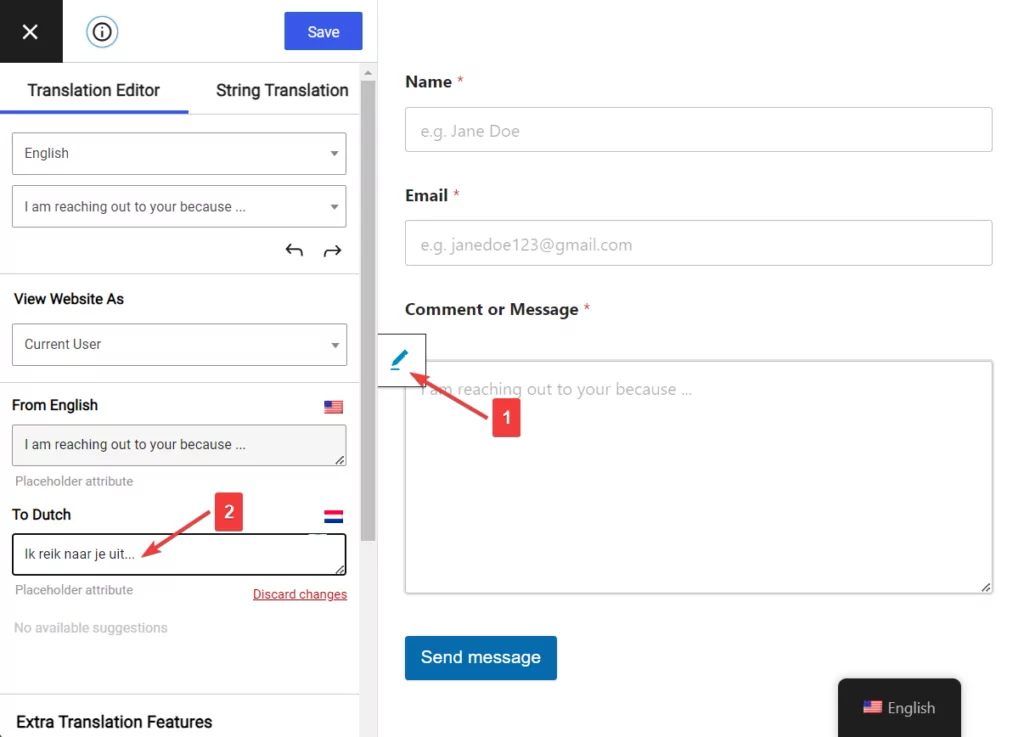
Placeholder translations are easy to implement using TranslatePress. All you need to do is select the placeholders by clicking on the adjacent blue pencil icon and insert their translations in the Translation Editor.
Translate Form Success & Validation Message
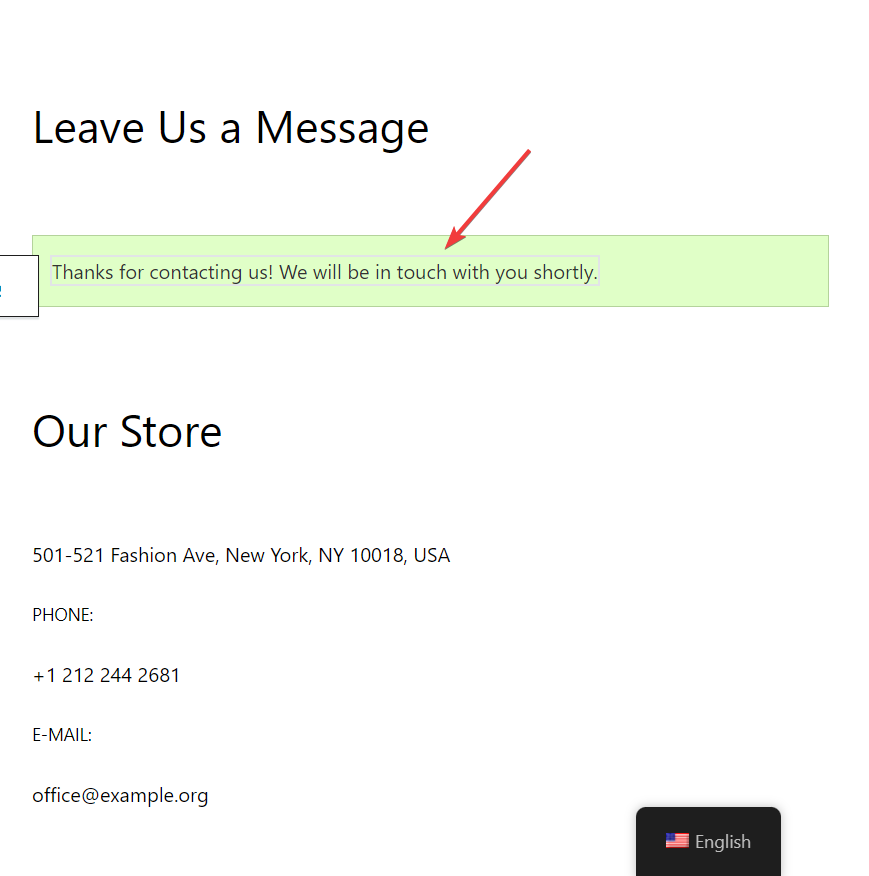
Success messages appear when visitors successfully submit a form.
And validation messages are error notifications that appear when submitted data does not meet the required criteria.
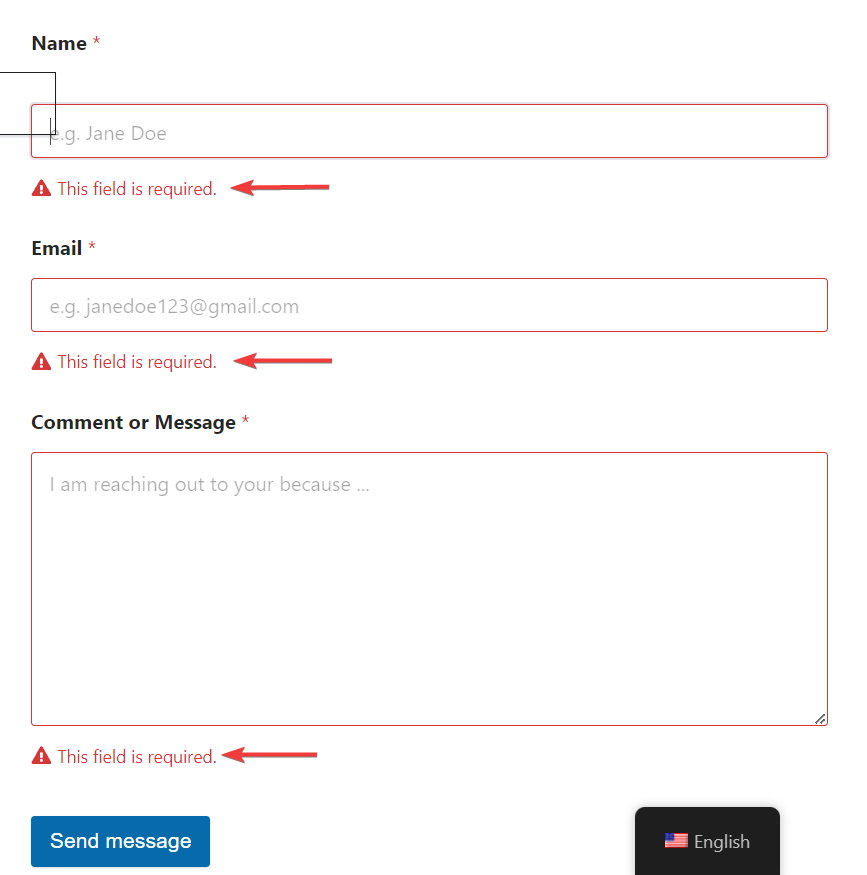
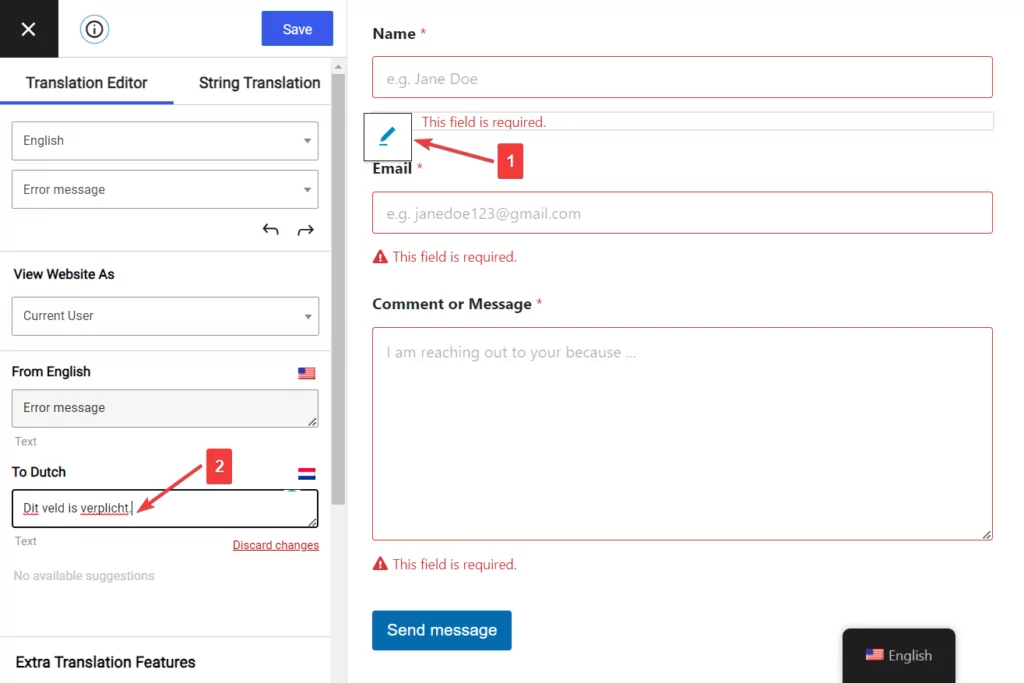
To translate the validation message, you can hit the Submit button of your form from the preview and the notifications will appear. Translation can be done in the same way you translated the fields and placeholders.
Just select the text and insert the translated version in the editor.
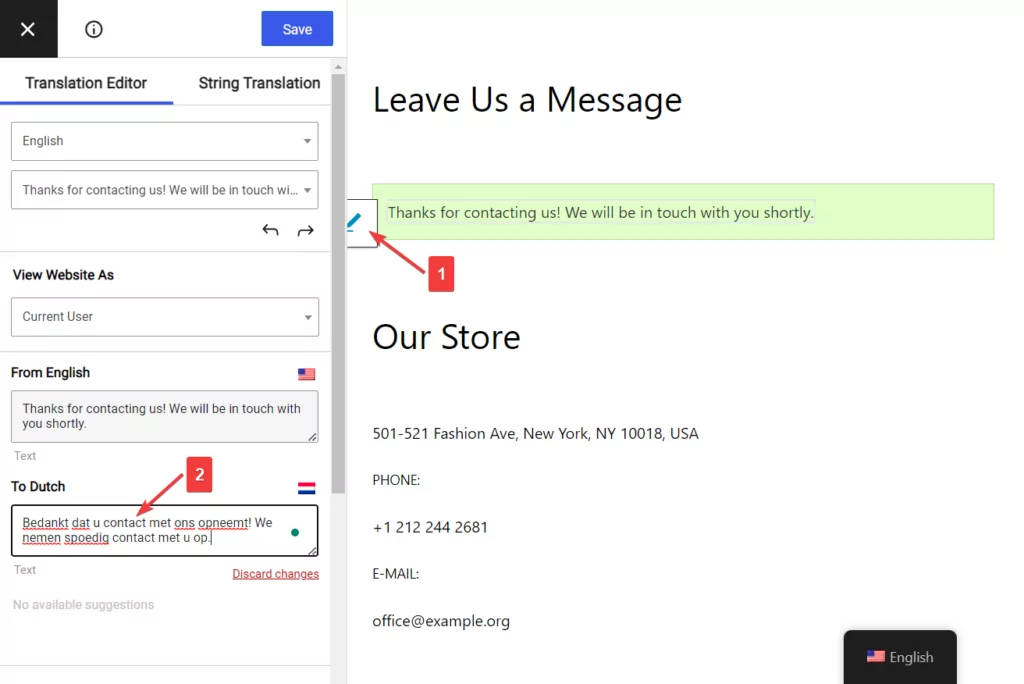
To translate the success message, you need to fill in the form and successfully submit it.
When the success message appears, select it and translate it in the editor.
And that’s it, folks. You have now translated your WordPress website form.
Another way to translate hidden content that only appears upon certain actions or isn’t just simply displayed on the front end is to use the String Translation interface.
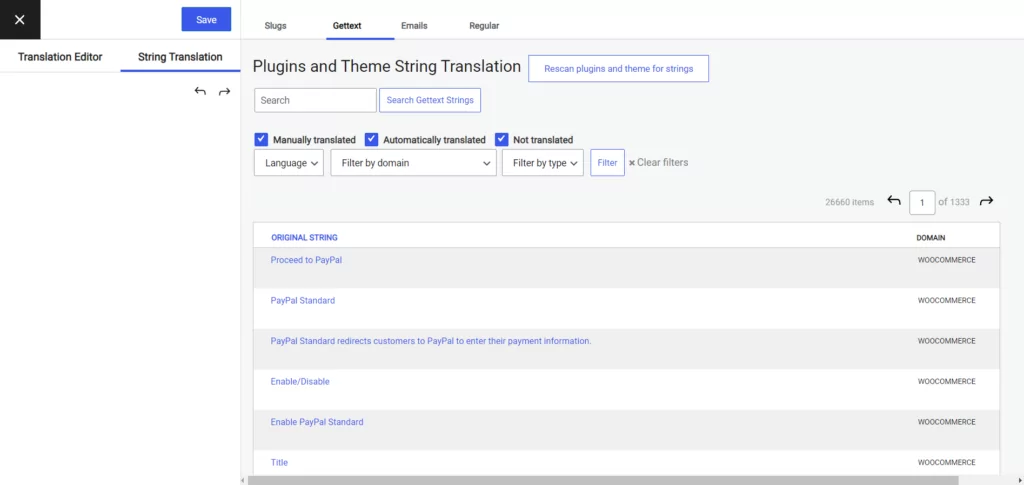
Simply use the search bar to search for the specific string you are looking for, click the Edit link under it, and input its translation in the sidebar.
Step 3: Translate Other Content on the Page (Optional)
It’s probably a good idea to translate the page where the form is located as well. This will help the visitor understand the context and add a sense of consistency to the page.
Your contact page may contain your address, phone, email, and store hours, among other things. After translating the contact form, you can also translate all these data, including the links and text in the footer.
It will certainly make the page look consistent, professional, and trustworthy.
You can use the exact same approach for all of the content on your website using both manual and automatic translation.
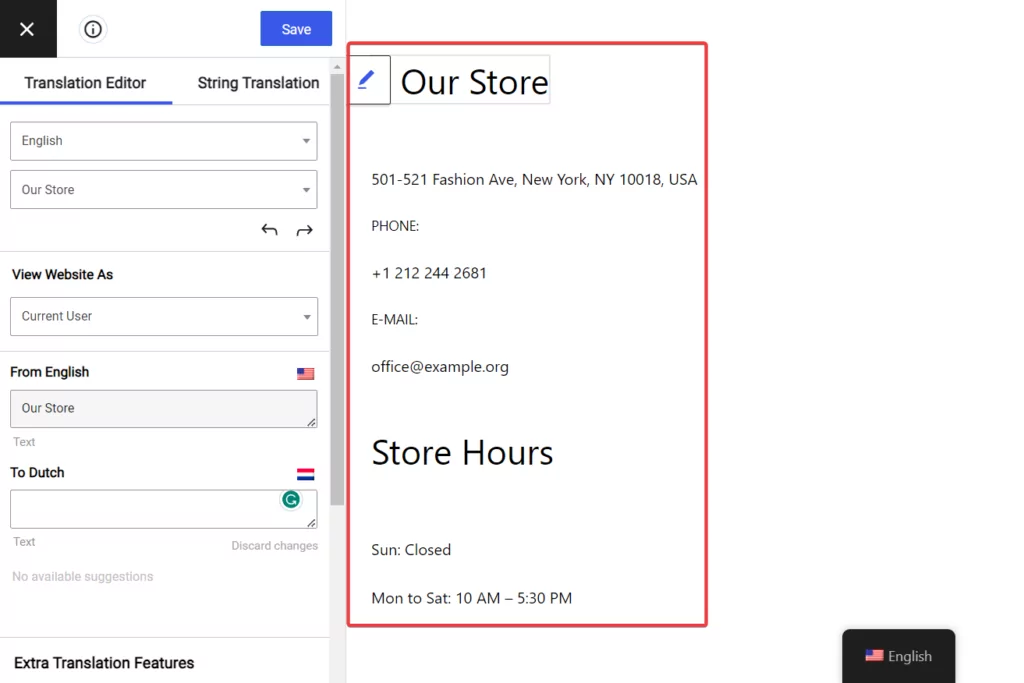
That said, it’s not mandatory to translate the entire page. But we highly recommend that you do it unless you have a good reason not to.
Conclusion
Translating your site forms can seem daunting at first but it’s not a difficult task if you have the right tools to aid you.
TranslatePress is the most popular translation plugin out there. It is powerful and very user-friendly.
The plugin has a free and a premium version. While the premium version offers impressive advanced features, the free version of the plugin is sufficient for translating a simple WordPress form.
The free TranslatePress plugin can be used to add a second language to your website and then you can set up automated or manual translations.
In this article, we demonstrated how to translate a simple form but the same process can be applied to translate job application forms, user registration forms, survey forms, etc.
TranslatePress Multilingual
Get TranslatePress today if you want to quickly and easily implement form translation on your site!
That’s it for this one! If you have any questions about how to translate forms, let us know in the comment section below.


