
En esta publicación
TranslatePress ofrece numerosas opciones para personalizar el selector de idioma de tu página web desde el primer momento. Esto facilita su integración con el diseño de tu página web y garantiza la coherencia de tu marca. Además, puedes personalizarlo aún más mediante código e incluso crear tu propio selector personalizado desde cero.
Así que, en este artículo, te mostraré cómo crear uno de 3 maneras distintas, comenzando con la opción sin código más fácil y llegando hasta la creación desde cero con PHP.
Pero primero, repasemos las ventajas de cambiar el diseño de tu selector de idioma. A continuación, te explicaré las opciones disponibles en la configuración de TranslatePress y cómo realizar cambios en tu selector mediante código de marcado.
¿Por qué crear un selector de idioma personalizado en TranslatePress?
Personalizar tu selector de idioma puede ayudar a mejorar el diseño, la usabilidad, la accesibilidad, la credibilidad y la efectividad de tu sitio web multilingüe:
- Asegura que esta parte necesaria de tu interfaz de usuario encaje bien con el resto de tu diseño de sitio, lo que lleva a una marca coherente, una experiencia de usuario agradable y una impresión profesional.
- Los visitantes pueden acceder más fácilmente al contenido en el idioma que deseen, lo que aumenta las posibilidades de que permanezcan más tiempo en tu sitio web. Esto también aumenta la confianza y hace que tu sitio web sea más atractivo.
- Puedes tomar decisiones de diseño apropiadas para visitores con discapacidades, como contraste de color suficiente y botones de tamaño adecuado.
Finalmente, la capacidad de ajustar el diseño de tu selector de idioma te da más libertad y control sobre cómo se ve tu sitio. Tienes la capacidad de experimentar con diferentes posiciones, formas, colores y aspectos del selector., fuentes, y hasta diseños móviles personalizados.
Bien, pasemos ahora a los tres métodos con los que puedes añadir un selector de idioma personalizado a tu sitio web si utilizas TranslatePress, ordenados de más fácil a más difícil.
Método sencillo: Opciones de personalización integradas en TranslatePress
Empecemos con el método más fácil (y el mejor, si me preguntas). Simple, rápido, sin código, pero aún con muchas opciones de personalización.
El plugin TranslatePress cuenta con numerosas opciones nativas para personalizar el selector de idioma integrado, lo que te permite realizar cambios radicales con solo unos clics. Las encontrarás todas en tu panel de control de WordPress, en la sección Configuración → TranslatePress → Selector de Idioma.
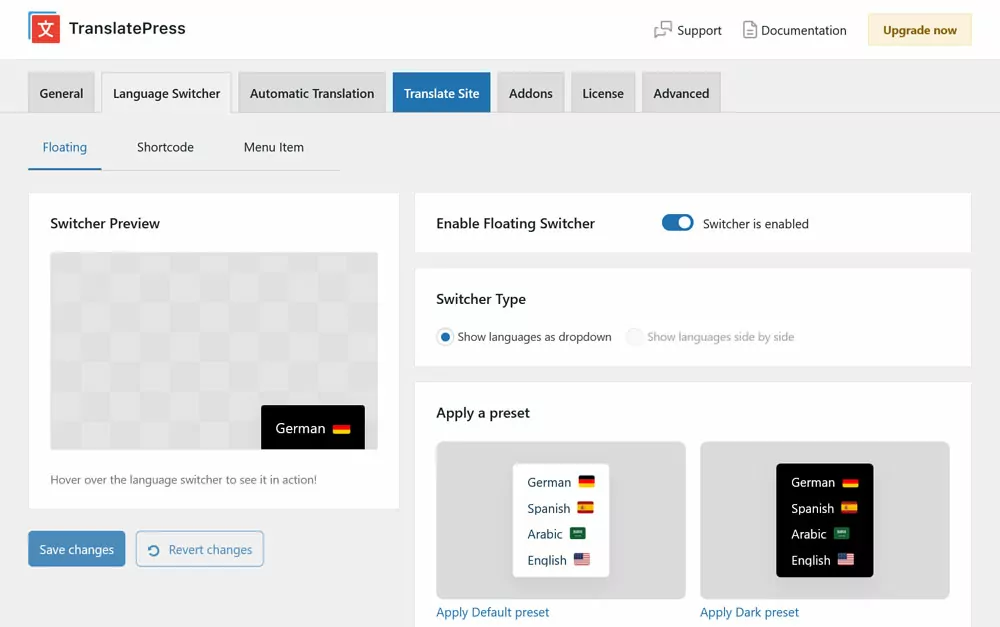
El selector de idioma predeterminado TranslatePress está disponible en tres versiones:
- como un botón flotante
- el
- o como un artículo del menú
Cada uno de estos ofrecen sus propias opciones de personalización. Vamos a revisar cada uno individualmente.
El cambiador de idioma flotante
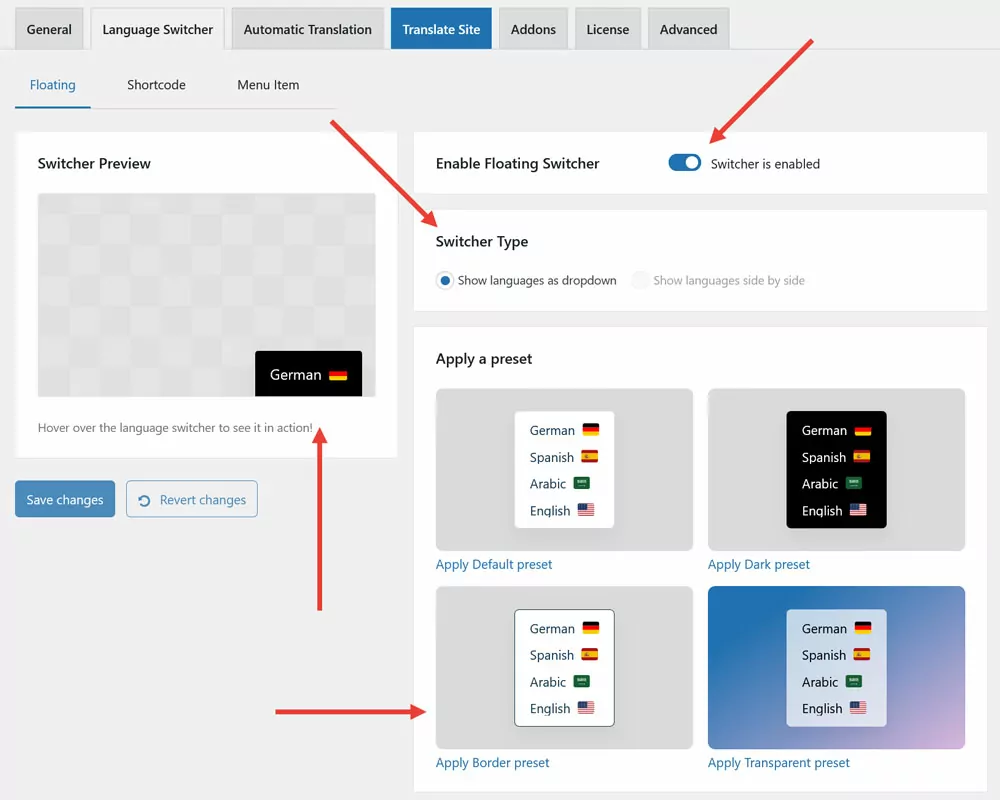
Puedes activar el interruptor flotante con el control deslizante de la derecha. Una vista previa en la esquina superior izquierda te permite ver cómo se verá en la página. Este interruptor permanecerá en la parte superior de tu sitio y seguirá a tus visitantes en cada página que visiten.
Debajo Tipo de conmutador, Primero puede decidir si desea que sus idiomas aparezcan como un menú desplegable o, si ofrece exactamente dos idiomas en su sitio, puede mostrarlos uno al lado del otro. Debajo de eso hay una serie de diseños preestablecidos. Habilítelos con un solo clic.
Adicionalmente, el Diseño a Medida la sección tiene docenas de opciones para ajustar casi todas las partes del conmutador, como:
- Color de fondo y color al pasar el cursor
- Color de texto (normal y al pasar el ratón por encima)
- Color, ancho y radio del borde (significa la curvatura de las esquinas)
- Animaciones de movimiento del menú desplegable
- Bandera y tamaño de texto (normal o grande)
- Icono de bandera forma (rectángulo o cuadrado)
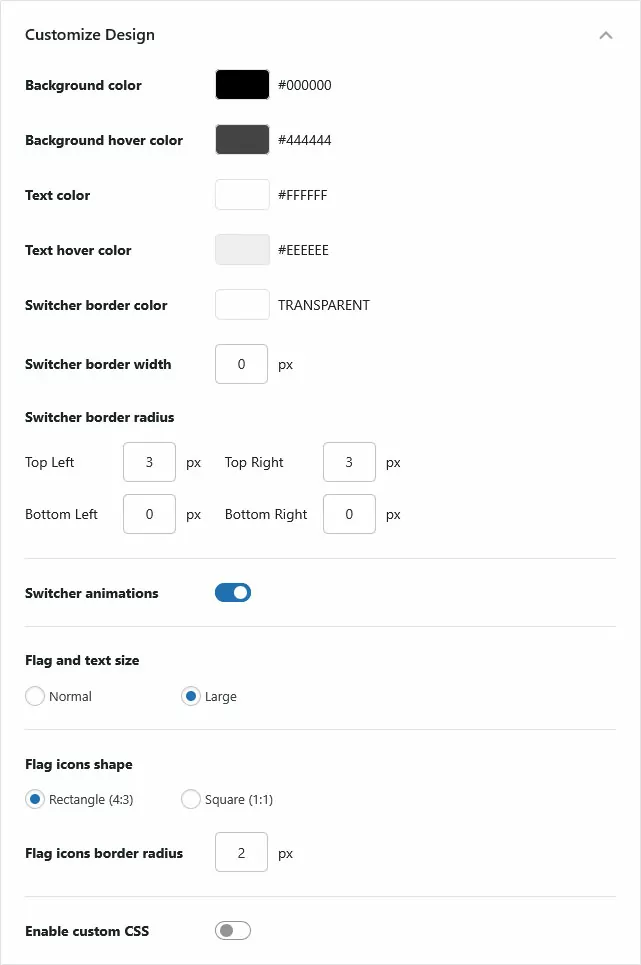
También tienes la opción de ingresar CSS personalizado, pero hablaremos de eso más adelante.
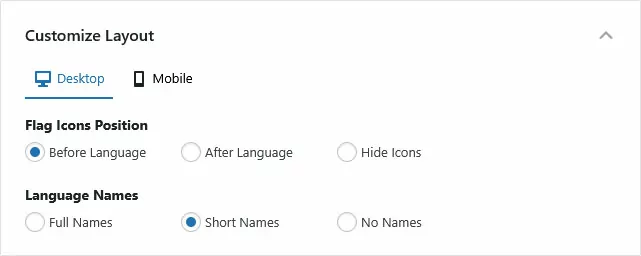
Debajo Personalizar Maquetación, puedes ajustar la posición y otras partes de la apariencia de tu selector de idioma.
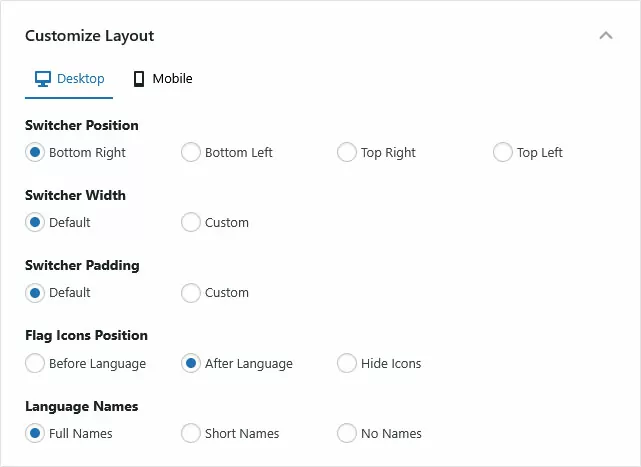
Específicamente, puedes:
- Colócalo en las esquinas inferior o superior izquierda y derecha de la pantalla
- Ajustar el ancho del botón
- Personaliza el relleno (es decir, el espacio interno alrededor del texto)
- Coloca las banderas de idiomas antes o después del nombre, u ocúltalas por completo
- Mostrar los nombres completos de los idiomas, su código ISO (EN, DE, etc.), o nada
Ten en cuenta que también puedes tener diferentes configuraciones para el escritorio y visitores móviles.
Finalmente, está Ajustes adicionales.
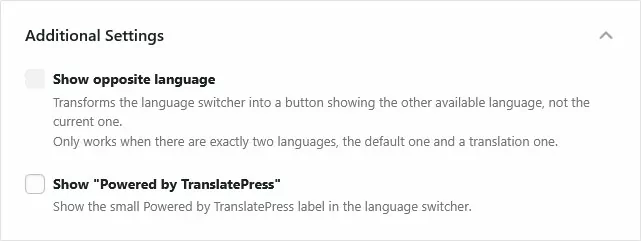
Solo tiene dos configuraciones:
- Cuando tienes exactamente dos idiomas en tu sitio, puedes decidir que el selector muestre siempre el idioma opuesto al que está activo en ese momento.
- Puedes mostrar una pequeña etiqueta que diga “Powered by TranslatePress” en el selector de idioma flotante (te agradeceríamos mucho que lo hicieras ☺️).
Guarda tus cambios para hacerlos permanentes. Usa el Revertir cambios botón para volver a la configuración predeterminada.
El Conmutador de Idioma con Shortcode/Bloque
La configuración del código corto ofrece opciones similares a las del conmutador de idioma flotante. Una diferencia principal es que puede colocar este conmutador en lugares específicos de su sitio, como el pie de página o una página específica.
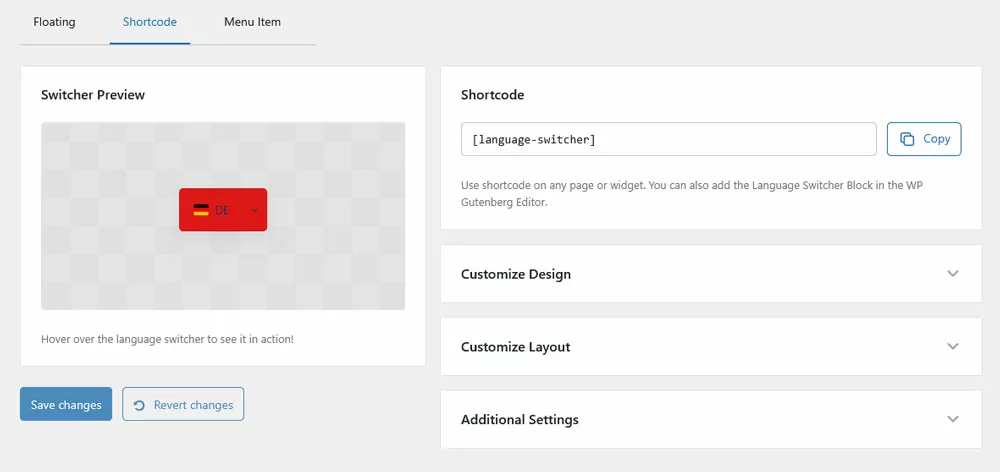
Puedes copiarlo y pegarlo en cualquier lugar de tu sitio para que el conmutador aparezca en esa ubicación específica.
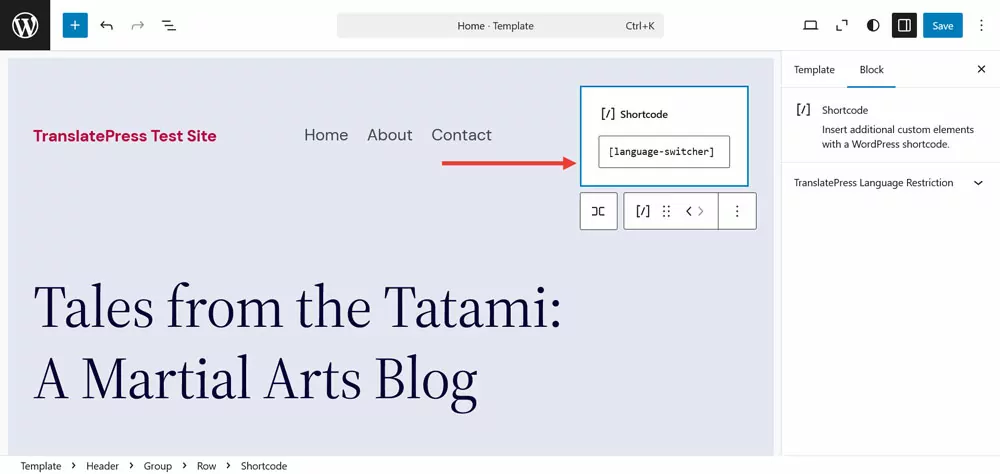
Sin embargo, el shortcode está destinado principalmente a lo clásico temas. Para los temas de bloques, TranslatePress ofrece un Selector de Idioma bloquear.
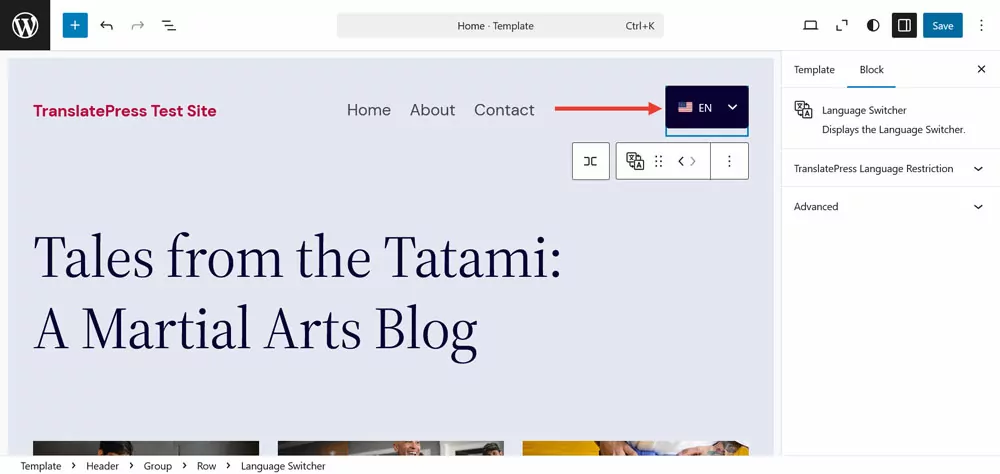
Puedes cambiar el diseño del botón de prácticamente la misma manera que el conmutador flotante.
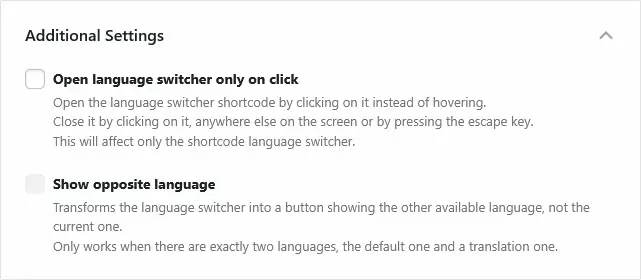
Debajo Ajustes adicionales, hay una opción adicional para que el cambiador de idioma se abra al hacer clic, no al pasar el ratón por encima.
El Selector de Elementos del Menú
Finalmente, tienes la opción de agregar el selector de idioma como un menú elemento a tu menú de WordPress.
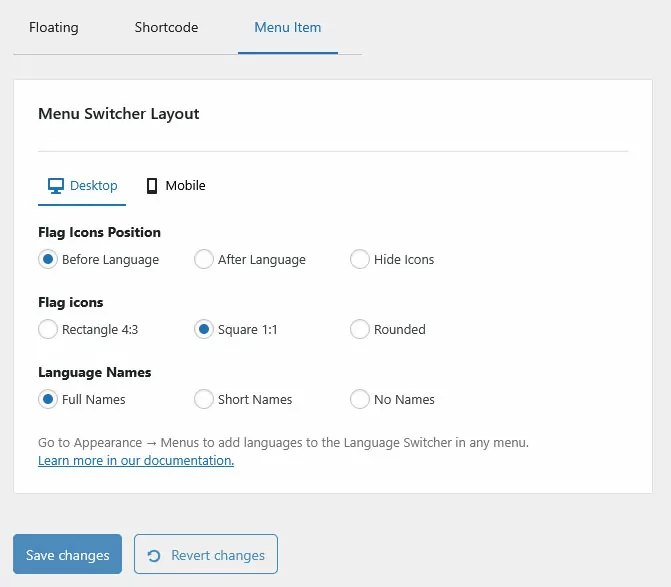
Este tipo de selector también es muy útil para temas clásicos. Para temas que utilizan bloques, podría ser más fácil usar lo mencionado anteriormente. Selector de Idioma bloquear en su lugar.
Este es un poco más restrictivo en cuanto a personalización, ya que el diseño del menú está vinculado al diseño de su tema. Por lo tanto, las únicas opciones de personalización aquí son las posiciones del icono de la bandera y los nombres de los idiomas. También encontrará una configuración para controlar la forma del icono de la bandera (rectángulo, cuadrado, redondeado).
La parte complicada aquí es que también deberá agregar manualmente sus idiomas en el menú desde la configuración de su menú. Esto significa navegar a Apariencia → Menús, y seleccionando el menú específico al que quieres añadir tu selector.
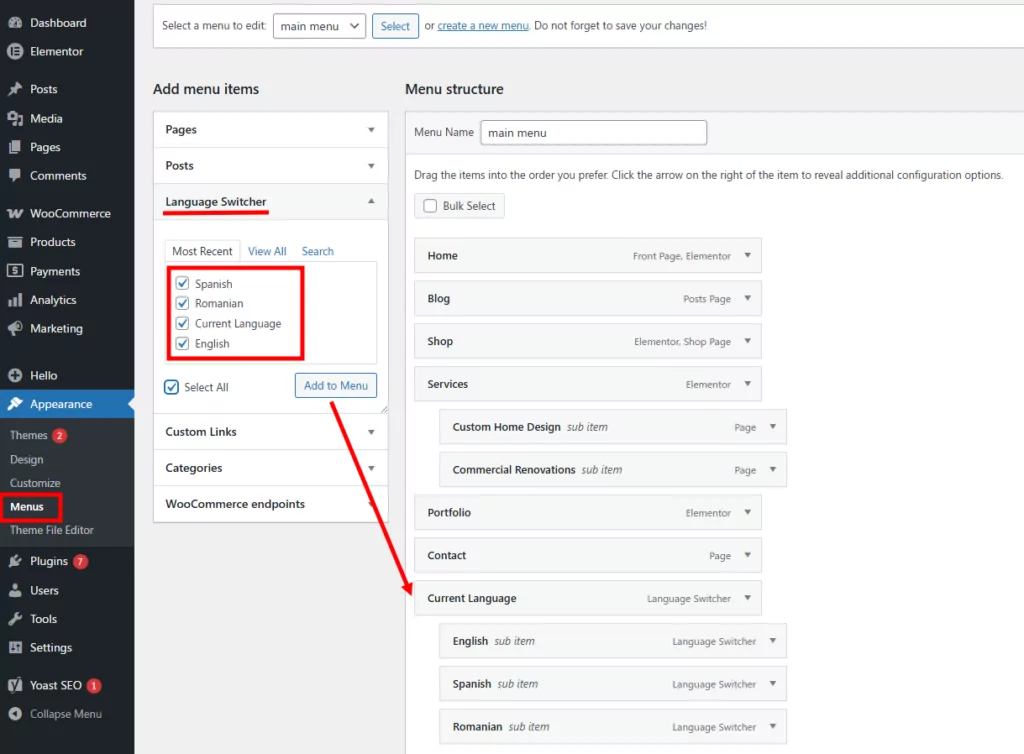
Luego, desde el Agregar elementos de menú sección a la izquierda, abre la Selector de Idioma pestaña, y agrega los idiomas que desees en tu menú, colocándolos como subelementos debajo de Idioma actual. Esto creará un selector similar a un menú desplegable, donde los usuarios podrán elegir su idioma preferido.
Cambiar las Banderas de Idioma Predeterminadas
La opción integrada final que quiero repasar para crear un selector de idioma personalizado es cómo cambiar las banderas de idioma predeterminadas.
Si quieres usar un icono de bandera diferente para cualquier idioma, lo primero que necesitas hacer es subir el archivo a tu sitio de WordPress a través de Medios → Añadir archivo multimedia.
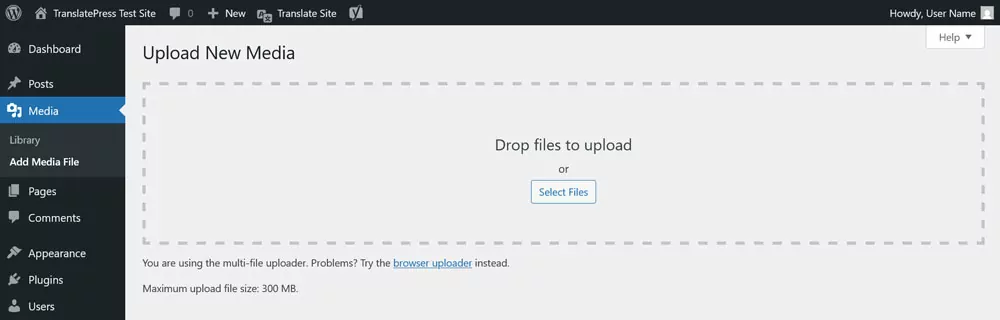
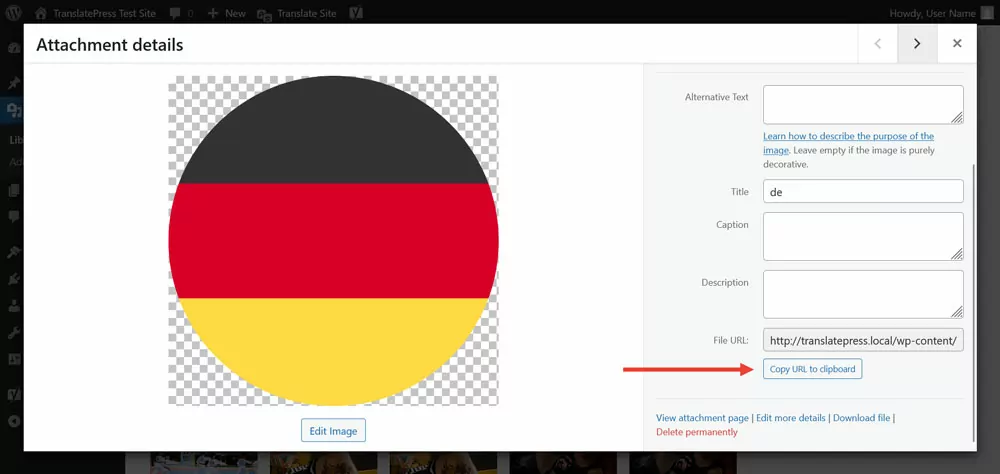
Cuando termines, abre la imagen en la biblioteca de medios y copia el enlace a su ubicación.
Luego ve Configuración → TranslatePress → Avanzado → Idioma personalizado. Aquí, introduce el Código ISO del idioma para el que desea cambiar el icono de bandera a continuación Código de idioma, Entonces, proporcione el enlace a su archivo de bandera recién subido en el URL de la bandera campo y clic Añadir, luego guarda.
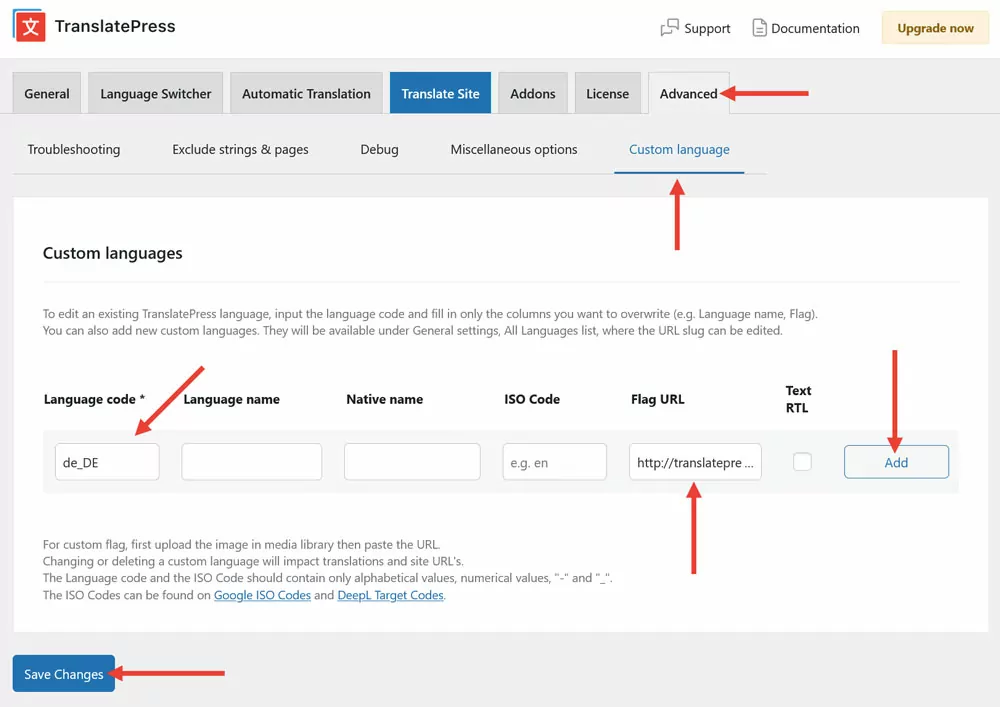
Puedes hacer esto para tantos idiomas como estés utilizando. Cuando guardes, el nuevo icono de bandera aparecerá en el front-end de tu sitio.
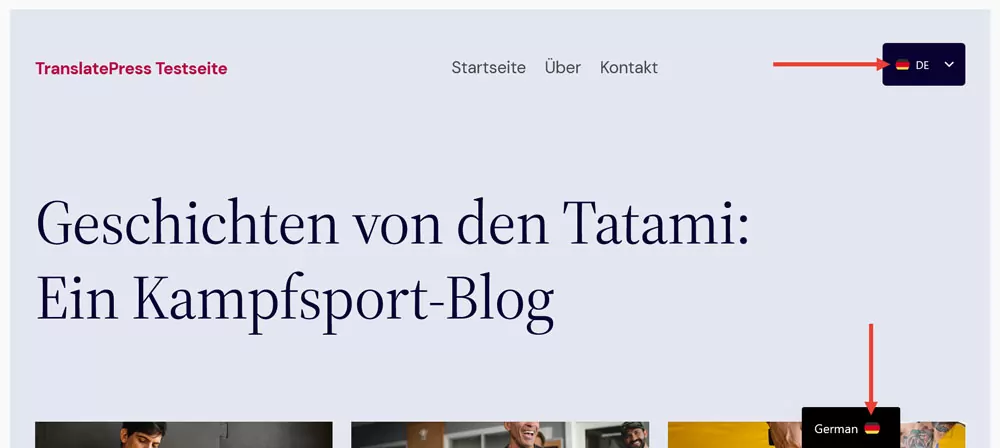
Método avanzado: Cómo personalizar el selector de idioma de TranslatePress mediante CSS
Si bien la configuración que ya te he explicado te ofrece muchas opciones de personalización sin necesidad de escribir código, puede haber casos en los que quieras ir un poco más allá.
Para personalizar aún más el selector de idioma de lo que permiten las configuraciones predeterminadas, siempre tienes la opción de usar CSS personalizado.
Como se mencionó anteriormente, el menú flotante del selector de idioma tiene una dedicada CSS personalizado opción. Puedes activarlo e ingresar tu propio marcado para cambiar aún más el diseño del selector.
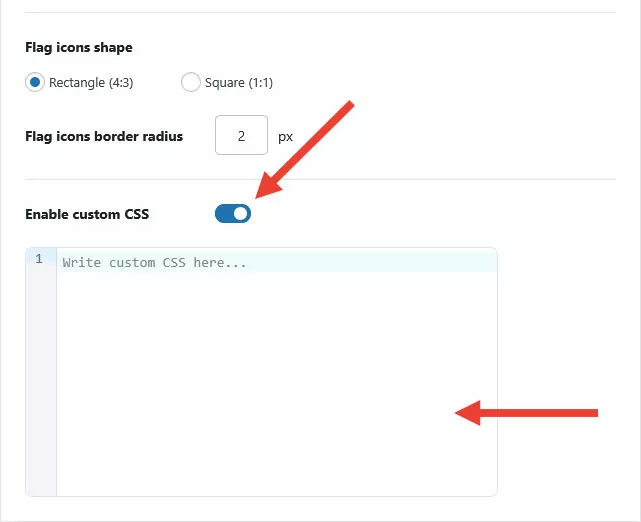
Veamos qué es posible. Justo después de un curso intensivo para principiantes en CSS.
Una breve introducción a CSS
En caso de que seas un principiante absoluto, CSS es el lenguaje de marcado que determina gran parte de la apariencia, el diseño y el comportamiento de los sitios web. Mientras que los elementos HTML proporcionan la estructura, CSS es lo que decide:
- cuán grandes son estos elementos
- qué colores tienen
- qué fuente usan
- cómo están posicionados
- cuánto espacio tienen a su alrededor
- y mucho más
Así es como se ve un fragmento de código CSS típico (llamado “conjunto de reglas”):
.button {
    color de fondo: #0073aa;
    color: #ffffff;
    tamaño de fuente: 16px;
}
Consiste en varias partes:
- Selector: En la parte superior, antes de las llaves de apertura, se encuentra el llamado selector. Se llama así porque determina o selecciona qué elemento del sitio web modificará el CSS. En este caso, se trata de un elemento con una clase llamada “button”, por lo que probablemente sea un botón real en la página.
- Propiedad Esta es la parte que determina a qué atributo del elemento seleccionado se dirige el conjunto de reglas. En este caso, es el color de fondo, el color de fuente y el tamaño de fuente del elemento. Pero hay muchas propiedades CSS, que incluyen ancho, altura de línea o alineación de texto.
- Valor: Las propiedades necesitan un valor; es lo que determina qué característica adquiere la propiedad en cuestión. Por ejemplo, en este caso, el tamaño de la fuente se establece en 16 píxeles y el color de la fuente en #ffffff, que es el código hexadecimal del blanco. Un par propiedad-valor se denomina «declaración». Como puedes ver, puedes tener varias declaraciones en un mismo conjunto de reglas.
La parte final que es importante es la sintaxis. Las declaraciones CSS necesitan un punto y coma al final, y los conjuntos de reglas requieren llaves abiertas y cerradas. Por supuesto, hay mucho más que aprender, pero esto será suficiente por ahora.
Encontrar los Selectores Correctos
Como puedes imaginar, para hacer cambios a través de CSS se requiere que apuntes a los selectores correctos. Puedes encontrarlos usando las herramientas de desarrollador del navegador. Simplemente haz clic derecho en cualquier elemento de una página web en tu navegador y luego elige Inspeccionar.
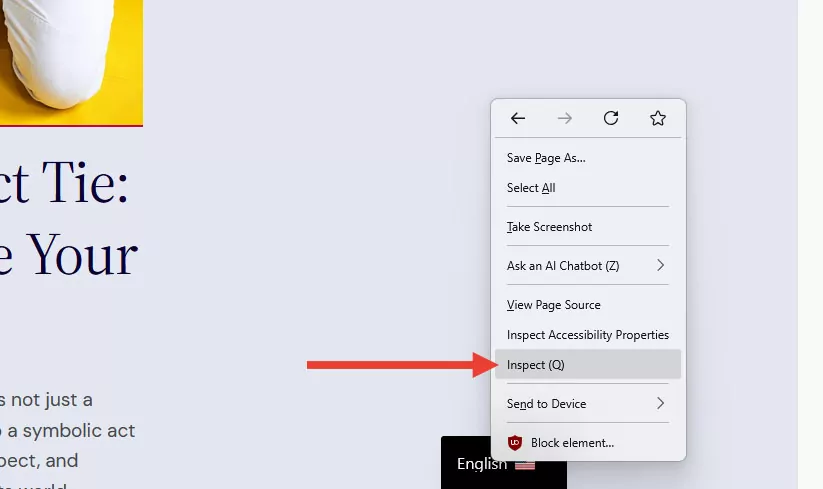
Las herramientas para desarrolladores del navegador te mostrarán la estructura HTML de la página y el código CSS del elemento elegido. Requiere un poco de práctica para entender a cuál de las cajas quieres hacerle cambios, pero pronto le cogerás el truco.
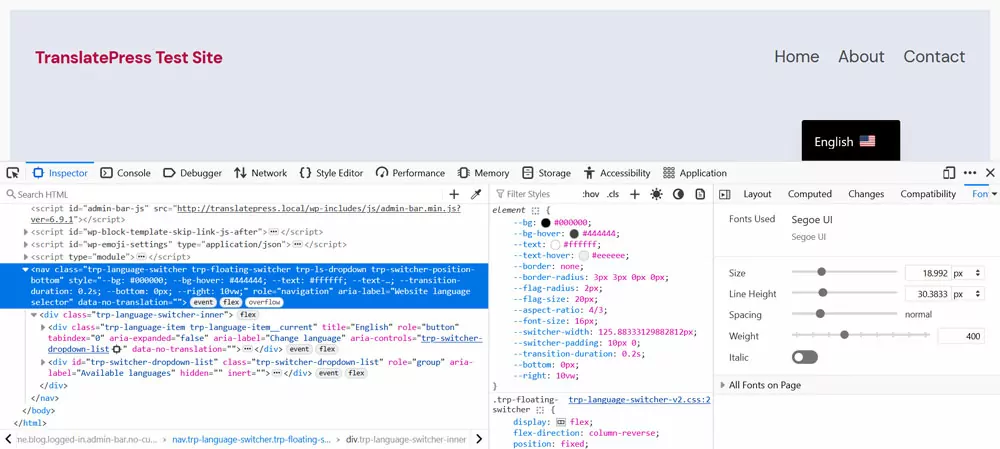
Los selectores importantes para personalizar el selector de idioma TranslatePress son:
.trp-language-switcherEsa es la clase del elemento selector de idioma en sí..trp-language-switcher-innerEl elemento contenedor de la lista de idiomas..lista desplegable de cambio de trpPermite personalizar la lista desplegable de idiomas..trp-language-item: Para los idiomas individuales en tu lista..trp-language-item__currentLa clase para el idioma actualmente activo en tu lista..trp-bandera-imagen: Apunta a las imágenes de la bandera del idioma.
Las diferentes variaciones del selector de idioma también pueden tener clases adicionales. Por ejemplo, el bloque del selector de idioma tiene un elemento contenedor con la clase .trp-block-container. Estos pueden ayudarte a distinguir el código que está dirigido solo a un tipo de selector de idioma. Además, varios elementos tienen más de una clase o id, lo que puede ayudarte crea un selector más específico para sobrescribir otra marca.
No te preocupes si aún no entiendes todo esto. Quedará más claro una vez que repase los ejemplos.
Cambiar la posición del interruptor de idioma
El selector de idioma flotante viene con cuatro posiciones predeterminadas. Si quieres colocarlo en cualquier otro lugar, tienes que hacerlo con código.
La forma más sencilla es sobrescribir el CSS existente. Cuando coloques el selector de idioma en la esquina inferior derecha a través de su configuración y lo examines en las herramientas de desarrollador del navegador, verás estas dos declaraciones adjuntas al mismo:
--bottom: 0px;
--right: 10vw;
Si estás confundido porque tienen un aspecto diferente al de las otras propiedades CSS que estoy usando, es porque lo son propiedades personalizadas o variables.)
Puedes sobrescribir estos con .trp-language-switcher como esto:
.trp-language-switcher {
    derecha: 0px;
    parte inferior: 50%;
}
Cuando coloca la marca anterior en el CSS personalizado campo en la configuración del conmutador de idiomas y guárdela, obtiene el siguiente resultado (también desactivé los nombres de los idiomas para que se vea mejor).
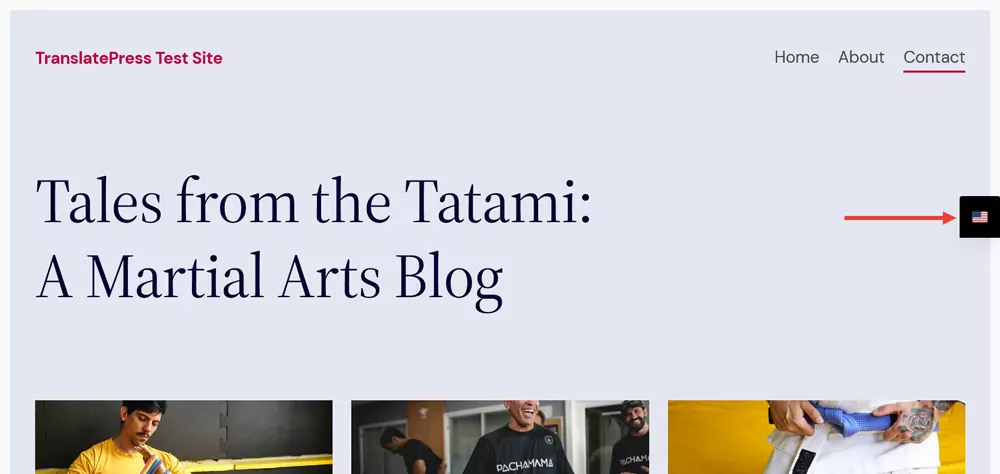
Tenga en cuenta que, si ha configurado la posición del selector de idioma de manera diferente en la configuración (por ejemplo, superior izquierda en lugar de inferior derecha), es posible que deba sobrescribir diferentes declaraciones CSS para moverlo.
Personalizar Forma y Estilo
También puedes usar CSS para cambiar el aspecto del selector de idiomas. Por ejemplo, en este caso, quiero convertir el selector y la lista de idiomas en círculos. Ya está posicionado donde quiero, solo necesito un poco de espacio a su derecha. Eso es posible con este CSS:
.trp-language-switcher {
    bottom: 50%;
    right: 1.5vw;
}
Para que los siguientes cambios sean visibles, primero tenemos que cambiar el color de fondo y el color del borde en la configuración a transparente.
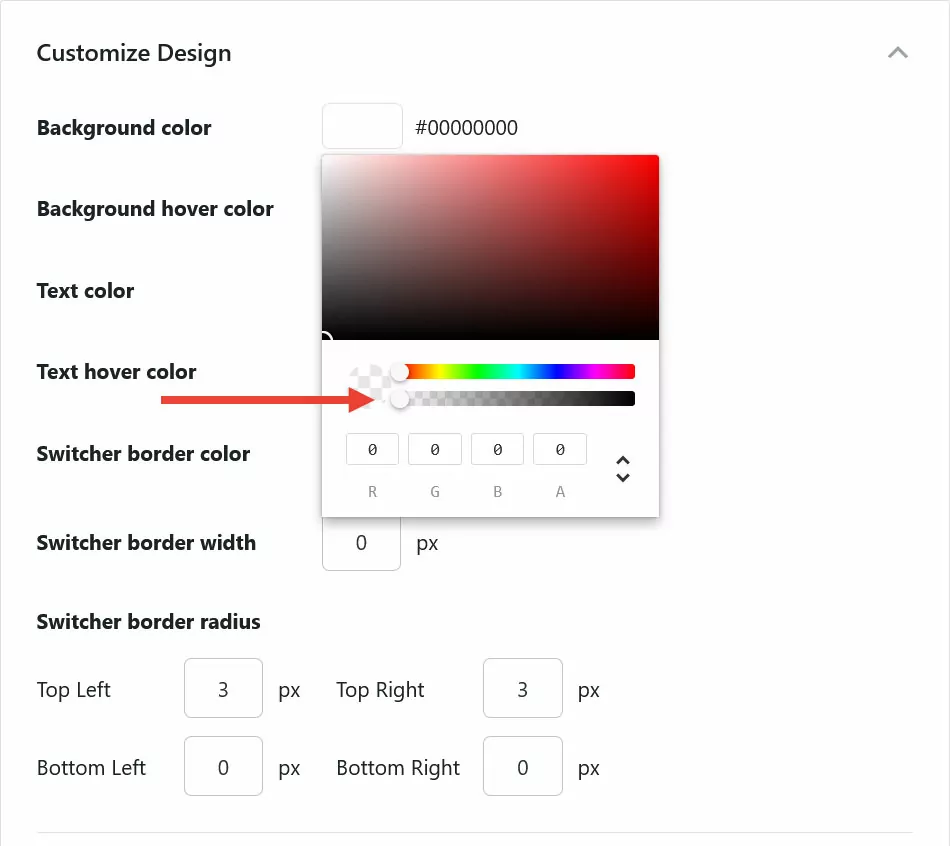
Luego, podemos convertir el selector de idioma en un círculo y devolverle algo de color:
.trp-language-switcher .trp-language-item {
    color de fondo: rgb(181, 11, 62);
    radio del borde: 50%;
    relleno: 16px;
}
Esto redondea las esquinas y también añade algo de espacio interno para hacer cada botón de idioma perfectamente redondo. Termina viéndose así:
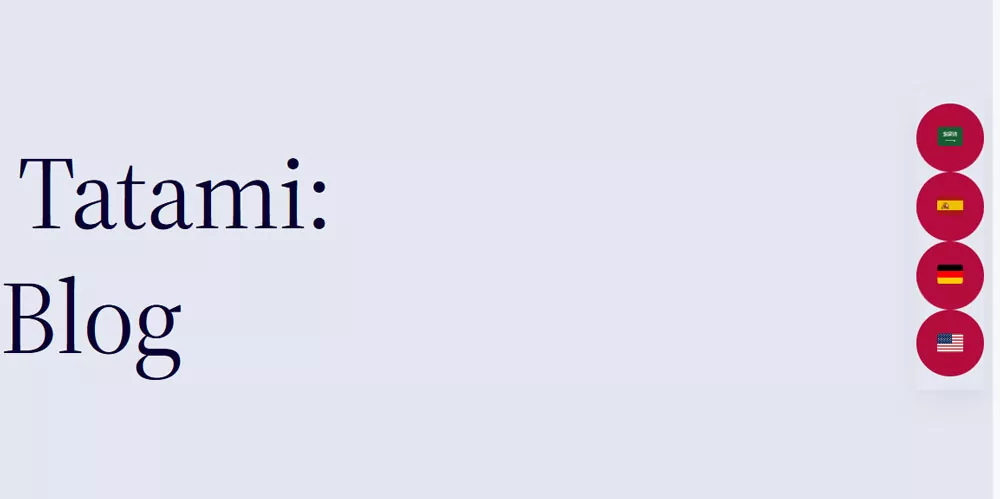
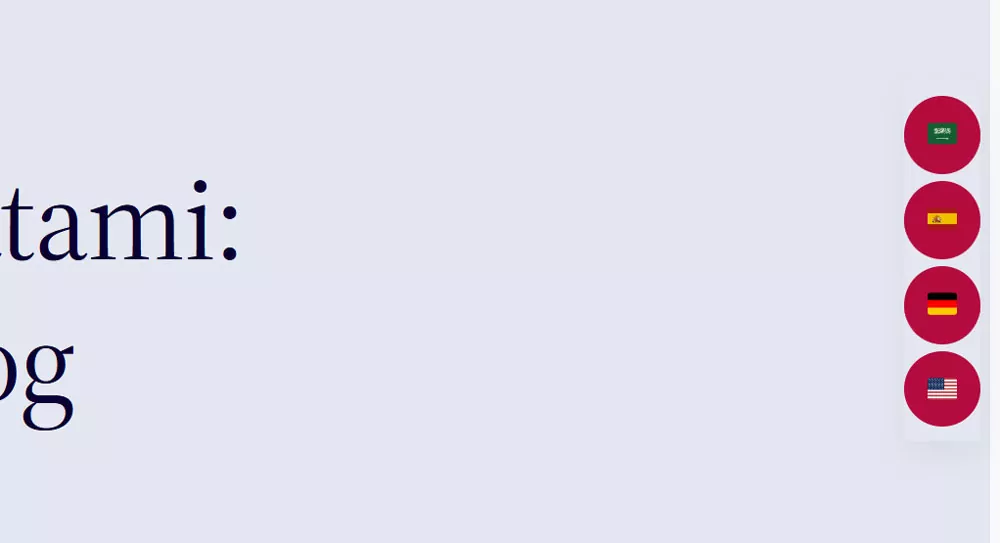
Ahora quiero espacios entre los campos de idioma:
.trp-language-switcher-inner,
.trp-language-switcher .trp-switcher-dropdown-list {
	espacio_entre_elementos: 5px;
}
El diseño está listo, ahora solo necesita un poco de estilo y algunos ajustes en la forma en que se abre:
.trp-language-switcher {
	box-shadow: none;
	pointer-events: none;
}

.trp-language-switcher .trp-language-item {
	border: none;
	pointer-events: auto;
}

.trp-language-switcher .trp-language-item:hover,
.trp-language-switcher .trp-language-item:focus-visible,
.trp-language-item:has(.trp-language-item__current:hover),
.trp-language-item:has(.trp-language-item__current:focus-visible) {
	background-color: rgb(160, 8, 55);
}
El código anterior:
- Agrega un nuevo color de fondo
- Ajusta el color de fondo al pasar el ratón
- Mueve el disparador del menú desplegable a los elementos de la lista
A continuación se muestra el resultado.
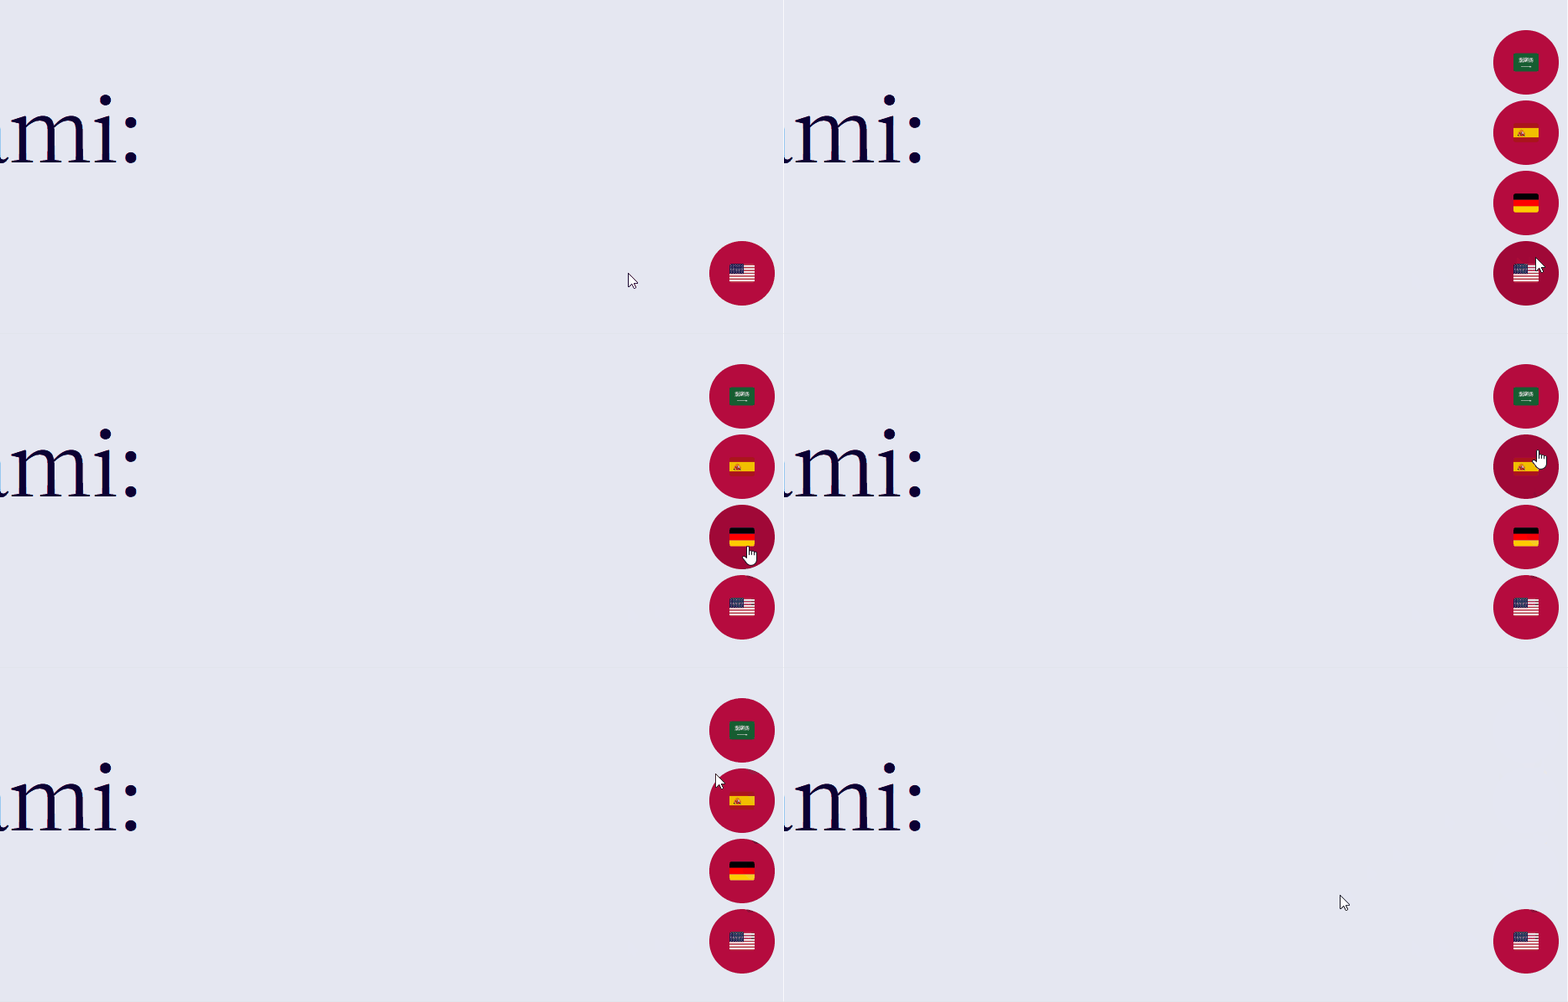
Aquí está todo el código junto:
.trp-language-switcher {
    bottom: 50%;
    box-shadow: none;
    pointer-events: none;
    right: 1.5vw;
}

.trp-language-switcher-inner,
.trp-language-switcher .trp-switcher-dropdown-list {
    gap: 5px;
}

.trp-language-switcher .trp-language-item {
	color de fondo: rgb(181, 11, 62);
    borde: ninguno;
    radio del borde: 50%;
    relleno: 16px;
    eventos del puntero: auto;
}

.trp-language-switcher .trp-language-item:hover,
.trp-language-switcher .trp-language-item:focus-visible,
.trp-language-item:has(.trp-language-item__current:hover),
.trp-language-item:has(.trp-language-item__current:focus-visible) {
    background-color: rgb(160, 8, 55);
}
Ajustar el diseño móvil
La última cosa que quiero cubrir en cuanto a CSS es cómo personalizar el diseño móvil de tu cambiador de idioma. Esto puede ser necesario para ajustar el diseño para tamaños de pantalla más pequeños.
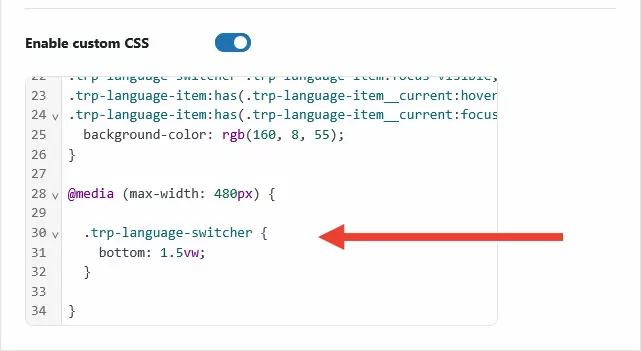
Puedes introducir cambios de diseño específicos para móviles a través de las llamadas “media queries”. Introducen condiciones en el marcado CSS. Básicamente dicen “usa este marcado solo cuando la pantalla esté por debajo o por encima de un cierto tamaño”. Aquí tienes un ejemplo:
@media (max-width: 480px) {

	.trp-language-switcher {
		bottom: 1.5vw;
	}

}
La primera línea dice simplemente “las siguientes reglas solo se aplican en pantallas de un máximo de 480 píxeles de ancho”. Debajo hay una variación del marcado de posicionamiento que usamos anteriormente. Esto mueve el selector de idioma personalizado de regreso al fondo de la pantalla.

Tenga en cuenta que solo tiene que incluir esas declaraciones que desea sobrescribir. Aquí, solo estamos cambiando el abajo propiedad de .trp-language-switcher. Todo lo demás se queda como lo configuramos antes.
Finalmente, es importante que coloques las media queries al final de tu código CSS. Los navegadores procesan el CSS de arriba a abajo. Por lo tanto, si deseas sobrescribir declaraciones o conjuntos de reglas anteriores, tu nuevo código debe aparecer después del original.
Método Profesional: Cómo Construir un Conmutador de Idiomas Usando PHP
Ahora bien, esta sección está dirigida a los expertos. Si, por alguna razón concreta, quieres ir aún más allá, también puedes crear desde cero un selector de idioma TranslatePress personalizado.
Esto, por ejemplo, te evita tener que sobrescribir el marcado CSS existente. En su lugar, puedes tener control total sobre la estructura, el diseño, la interactividad y el estilo de tu selector de idioma desde el principio.
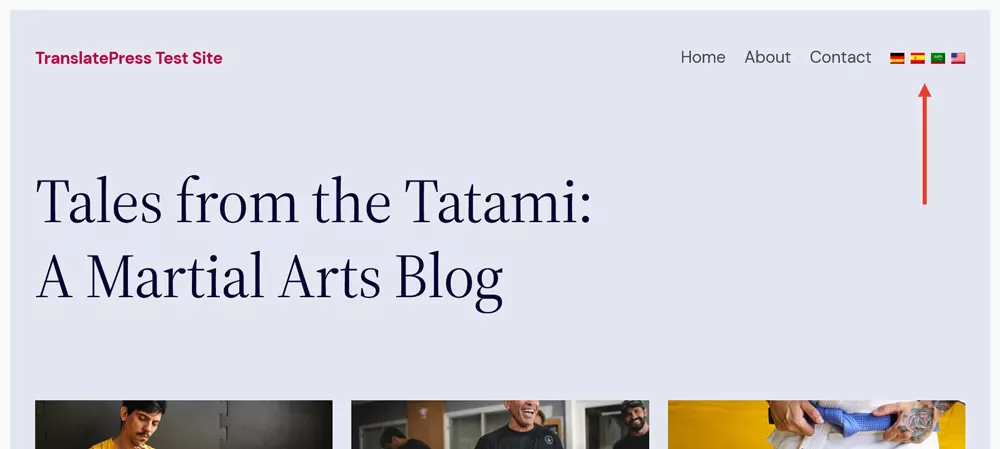
Para mostrarte cómo funciona, crearemos un selector minimalista y horizontal que solo use banderas y que pueda aparecer fácilmente en diferentes áreas de tu sitio web.
1. Conoce la función PHP
TranslatePress ofrece una función personalizada para crear tu propio selector de idioma. Devuelve parámetros para todos los datos importantes de los idiomas activos en tu sitio web:
- nombre_del_idioma El nombre completo del idioma (por ejemplo, “Inglés”).
- código_de_idioma El código de idioma (por ejemplo, “EN”).
- español El identificador del idioma utilizado en las URL.
- enlace_bandera: La URL de la imagen de la bandera del idioma.
- url_pagina_actual: La URL de la página en la que se encuentra el visitante, pero en ese idioma.
Puedes usar esto para crear tu propio conmutador de idioma con tu propio marcado. Una opción es colocarlo directamente en un archivo de tema dentro de un directorio de tema hijo (no en el tema principal, ya que tus cambios se sobrescribirán si actualizas el tema). Alternativamente, puedes crear un shortcode en functions.php, un complemento de fragmentos de código, o con tu propio complemento personalizado y usa el código corto para colocar el selector de idioma en tu sitio.
Nos quedaremos con la segunda opción aquí.
2. Crea el Shortcode
Lo primero que haremos es configurar la estructura del shortcode que crearemos. Coloca esto dentro de tu tema hijo functions.php o un archivo PHP en tu plugin personalizado:
<?php

function mi_selector_de_idioma_personalizado() {

	// el código del selector de idioma va aquí

}

add_shortcode( 'mi_selector_de_idioma', 'mi_selector_de_idioma_personalizado' );
Esto configura la función PHP que finalmente registrará y mostrará el shortcode en WordPress.
3. Construye el HTML del selector de idioma
A continuación, queremos crear la estructura básica para el selector de idioma. Como vamos a ser minimalistas, eso es relativamente simple.
<div class="my-language-switcher">
    <ul>
        <li class="language-item">
            <a href="#"><img src="flag.png" alt="Bandera del idioma"></a>
        </li>
    </ul>
</div>
Básicamente es un elemento contenedor con una lista desordenada dentro. Cada elemento de la lista contiene un elemento de enlace para el idioma, que tiene la imagen de la bandera dentro.
4. Añadir datos dinámicos de PHP
Ahora agregaremos la estructura HTML a nuestra función de shortcode y agregaremos los datos del idioma a través de PHP.
<?php
function my_custom_language_switcher() {
// Get all active languages
$languages = trp_custom_language_switcher();
// If no languages, return empty
if ( empty( $languages ) ) {
return '';
}
// Start capturing HTML
ob_start();
?>
<div class="my-language-switcher" data-no-translation>
<ul>
<?php foreach ( $languages as $language ) : ?>
<li class="language-item <?php echo !empty($language['current_language']) ? 'current' : ''; ?>">
<a href="<?php echo esc_url( $language['current_page_url'] ); ?>"><img src="<?php echo esc_url( $language['flag_link'] ); ?>" alt="<?php echo esc_attr( $language['language_name'] ); ?> flag"></a>
</li>
<?php endforeach; ?>
</ul>
</div>
<?php
// Devolver el HTML para el shortcode
return ob_get_clean();
}
// Registrar el shortcode
add_shortcode('my_language_switcher', 'my_custom_language_switcher');Esto crea el mismo código HTML que vimos antes, pero para cada idioma activo en tu sitio. También completa la URL del idioma, el enlace a la imagen de la bandera y el nombre del idioma como etiqueta ALT de la imagen. Además, agrega una clase adicional al idioma activo actualmente en caso de que desees agregar estilos adicionales.
5. Prueba la salida en tu sitio
Esto ya funciona. Puedes usar el código corto [mi_cambiador_de_idioma] para colocar el conmutador personalizado donde quieras en tu sitio, por ejemplo, a través del Código corto bloque en el editor de bloques de WordPress. Alternativamente, colócalo en un archivo como header.php o footer.php usando esta línea de código:
<?php echo do_shortcode('[my_language_switcher]'); ?>Ya deberías ver tu lista de idiomas, sin embargo, completamente sin estilo.
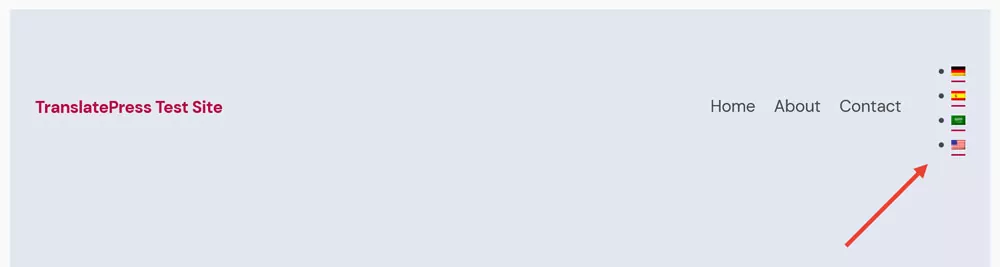
El paso final es cambiar eso.
6. Añadir estilo con CSS
El último paso para crear tu selector de idioma personalizado TranslatePress es darle un aspecto atractivo. Para conseguir el resultado que se ha mostrado anteriormente, añade esto a tu tema hijo, a la hoja de estilos del plugin o al CSS adicional campo en el editor de WordPress:
.my-language-switcher {
    display: inline-block;
}

.my-language-switcher ul {
    list-style: none;
    display: flex;
    gap: 8px;
    padding: 0;
    margin: 0;
}

.my-language-switcher li a {
    display: block;
    overflow: hidden;
}

.my-language-switcher li a img {
    width: 100%;
    height: 100%;
    display: block;
}
Crea tu propio selector de idioma personalizado hoy
Personalizar el selector de idioma de TranslatePress garantiza que se adapte al resto del diseño de tu página web y ofrezca la mejor experiencia a tus usuarios.
Anteriormente, he repasado varias formas de ajustar su aspecto, desde la configuración integrada del plugin, muy fácil de usar, hasta las personalizaciones mediante CSS y un selector creado completamente desde cero con PHP. Espero que ahora te sientas preparado para integrar plenamente TranslatePress en el diseño de tu propia página web.
Como puedes ver fácilmente, hay una opción que destaca en cuanto a comodidad y rapidez. TranslatePress incluye de serie numerosas opciones de personalización, por lo que no hace falta ser un experto en programación para disponer de un selector de idioma perfectamente funcional y personalizado.
TranslatePress Multilingüe
¡Pruébalo hoy y ten tu selector de idiomas funcionando en minutos!