In this post
In this post
TranslatePress offers many ways to give your website’s language switcher a custom design out of the box. This helps it integrate with your website design and keeps your brand consistent. Additionally, you can customize it further using code and even create your own custom switcher from scratch.
So, in this article, I am going to show you how to create one in 3 distinct ways, starting with the easiest no-code option, and going all the way to creating one from scratch with PHP.
But first, let’s go over the benefits of changing the design of your language switcher. Then, I’ll go into the available options in the TranslatePress settings, and how to make changes to your switcher using markup.
Why Build a Custom Language Switcher in TranslatePress?
Customizing your language switcher can help improve the design, usability, accessibility, credibility, and effectiveness of your multilingual website:
- It ensures that this necessary part of your user interface goes well with the rest of your site design, leading to consistent branding, a pleasant user experience, and a professional impression.
- Visitors can more easily access content in their desired language, increasing the chances that they stay on your website longer. This also increases trust and makes your website more engaging.
- You can make appropriate design choices for visitors with impairments, such as sufficient color contrast and large enough buttons.
Finally, the ability to adjust your language switcher’s design gives you more freedom and control over what your site looks like. You have the ability to experiment with different switcher positions, shapes, colors, looks, fonts, and even custom mobile designs.
Ok, let’s move on to the 3 methods you can add a custom language switcher to your site if you’re using TranslatePress, from easy to hard.
Easy Method: TranslatePress Built-in Customization Options
Let’s start with the easiest method (and the best one, if you ask me). Simple, fast, no code, but still lots of customization options.
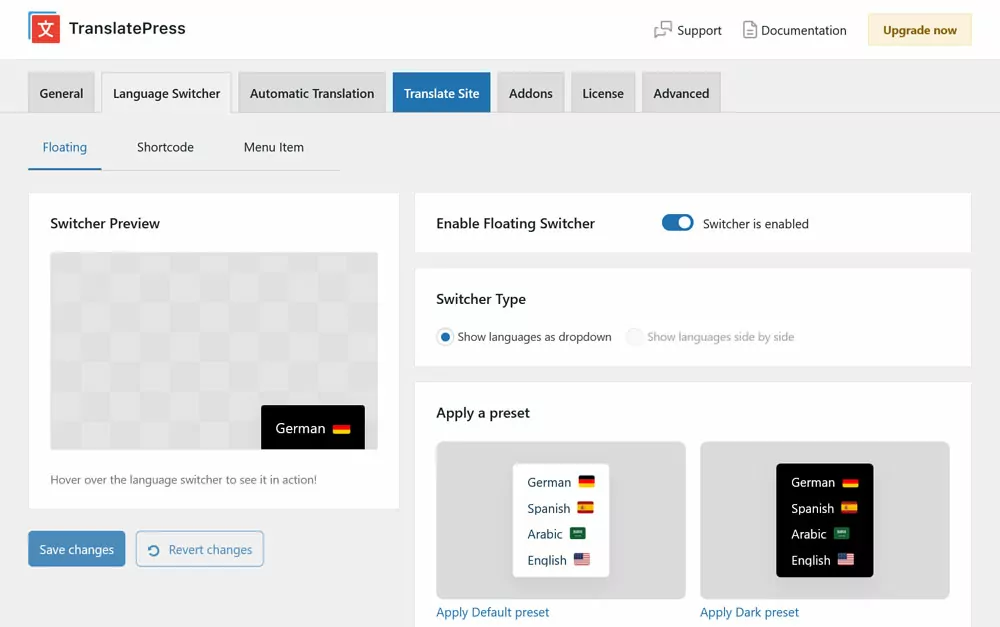
The TranslatePress plugin has many native options to tailor the built-in language switcher, allowing you to make sweeping changes with just a few clicks. You find all of them in your WordPress dashboard under Settings → TranslatePress → Language Switcher.
The default TranslatePress language switcher comes in three versions:
- as a floating button
- the
[language-switcher]shortcode (or block) - or as a menu item
Each of these offer their own customization options. Let’s go over each of them individually.
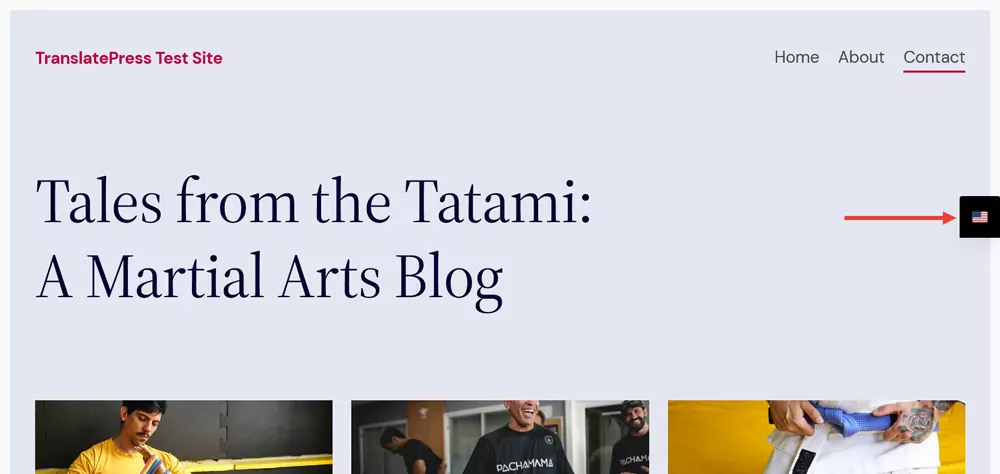
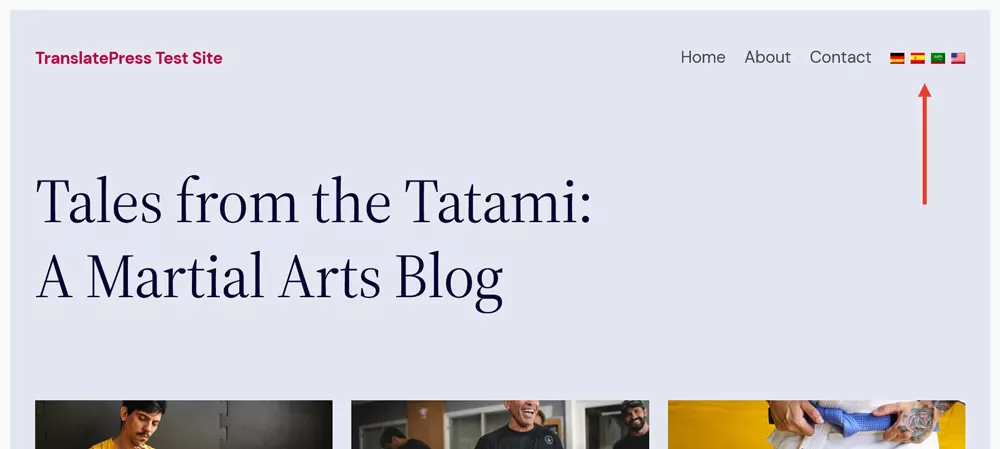
The Floating Language Switcher
You can turn the floating switcher on with the toggle on the right. A preview in the top left corner allows you to see what it will look like on the page. This switcher will stay on top of your site and follow your visitors on every page they go.
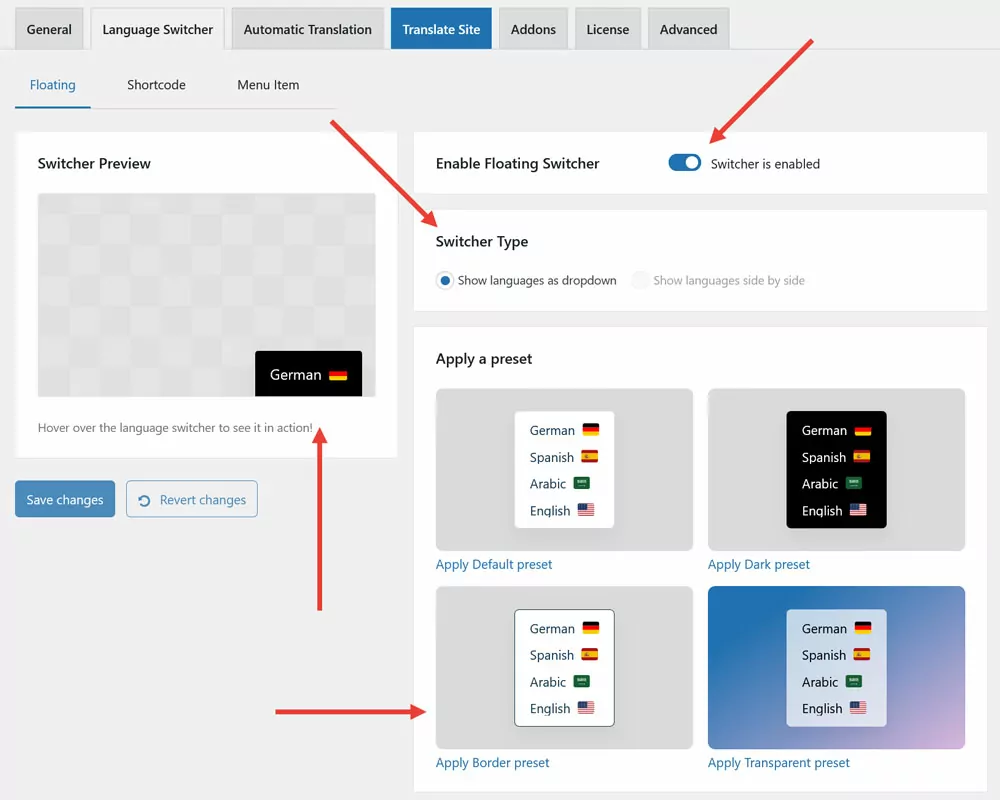
Under Switcher Type, you can first decide whether you want your languages to appear as a drop-down menu, or, if you offer exactly two languages on your site, you can display them side by side. Below that are a number of design presets. Enable them with a single click.
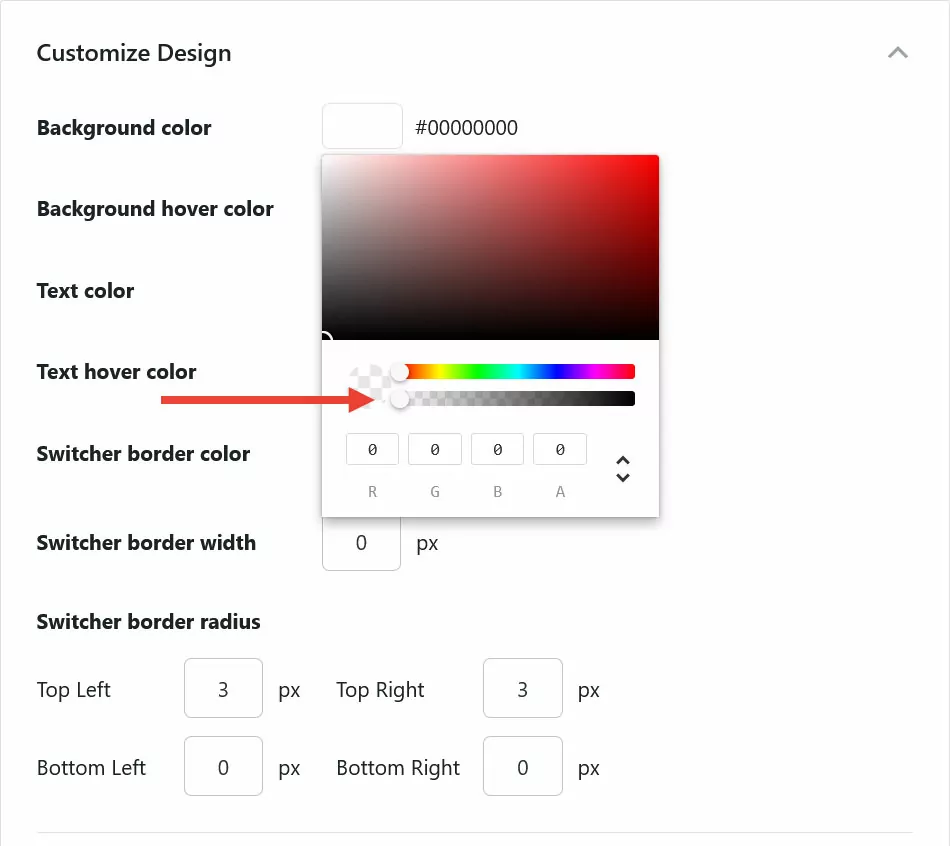
Additionally, the Customize Design section has dozens of options to adjust almost every part of the switcher, such as:
- Background color and hover color
- Text color (normal and on hover)
- Border color, width, and radius (meaning the curvature of the corners)
- Movement animations of the drop-down menu
- Flag and text size (normal or large)
- Flag icon shape (rectangle or square)
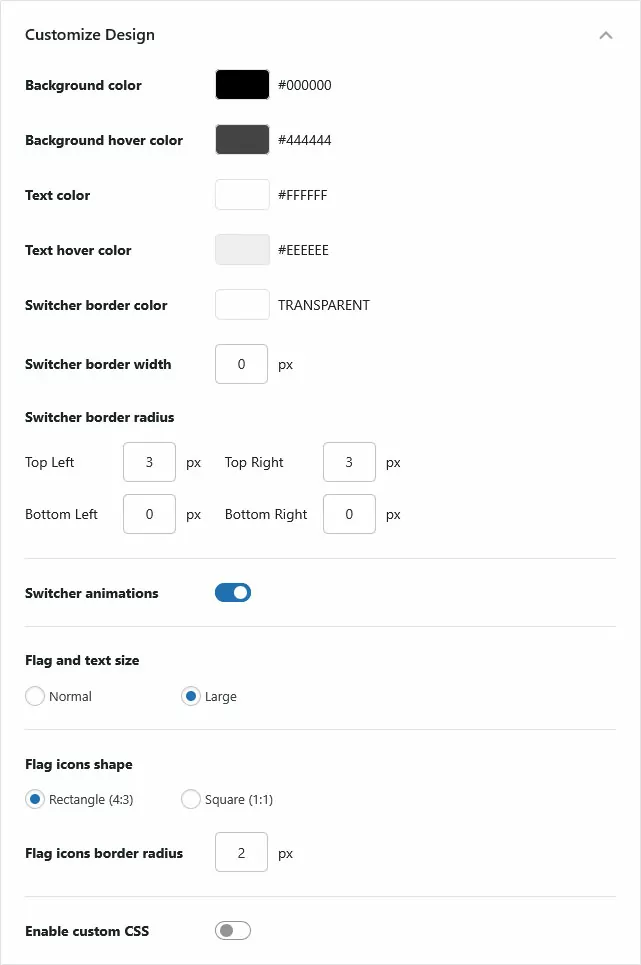
You also have the option to input custom CSS, but more on that later.
Under Customize Layout, you can adjust the position and other parts of your language switcher’s appearance.
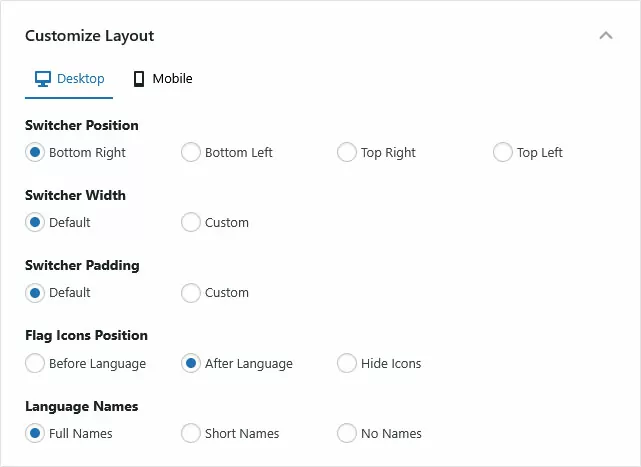
Specifically, you can:
- Place it in the bottom or top left and right corners of the screen
- Adjust the button width
- Customize the padding (meaning the internal space around the text)
- Place the language flags before or after the name, or hide them completely
- Display the full language names, their ISO code (EN, DE, etc.), or nothing
Notice that you can also have different settings for desktop and mobile visitors.
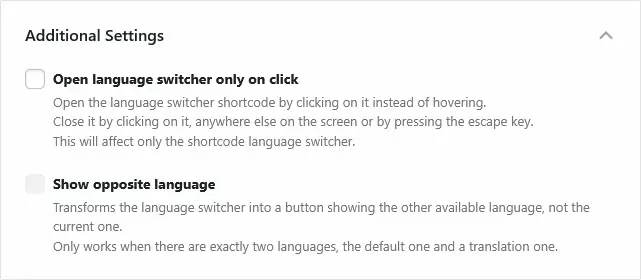
Finally, there’s Additional Settings.
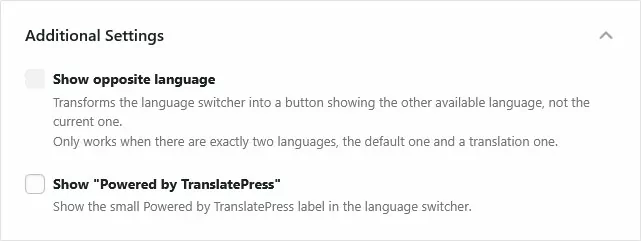
It has just two settings:
- When you have exactly two languages on your site, you can decide that the switcher always shows the opposite language from the one that is active at the moment.
- You can show a small “Powered by TranslatePress” label in the floater language switcher (we appreciate the shoutout if you do ☺️).
Save your changes to make them permanent. Use the Revert changes button to go back to the default settings.
The Shortcode/Block Language Switcher
The shortcode settings offers similar options as for the floating language switcher. One main difference is that you can place this switcher in specific places on your site—like the footer, or a specific page.
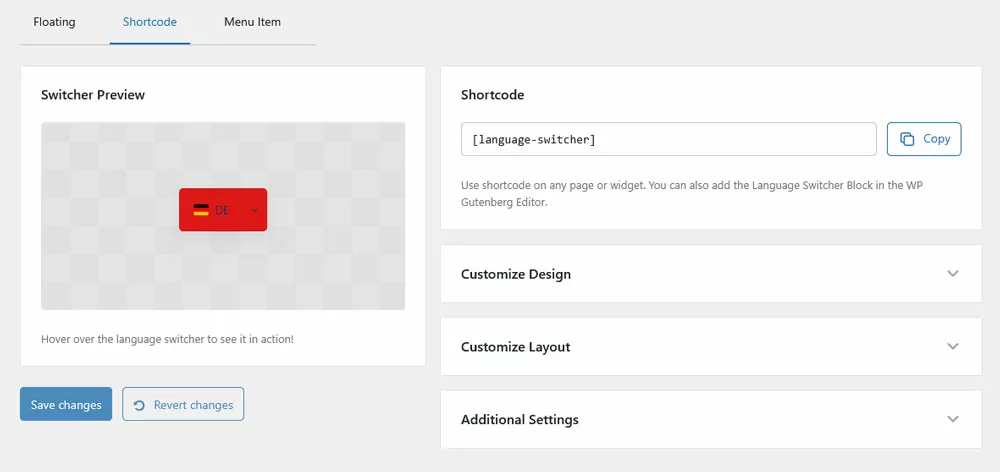
You can copy and paste it anywhere on your site to make the switcher show up in that specific location.

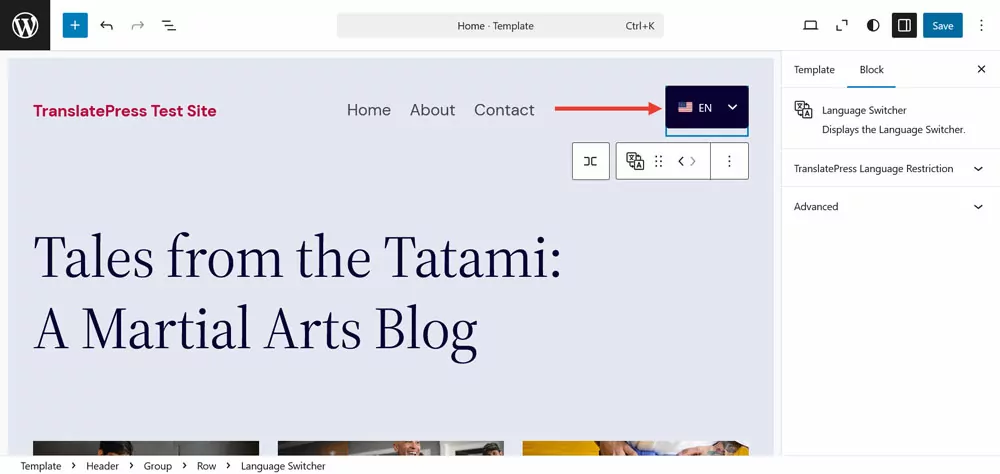
However, the shortcode is mostly intended for classic themes. For block themes, TranslatePress offers a dedicated Language Switcher block.
You can change the button design in pretty much the same way as the floating switcher.

Under Additional Settings, there is an extra option to have the language switcher open on click, not hover.
The Menu Item Switcher
Finally, you have the option to add the language switcher as a menu item to your WordPress menu.
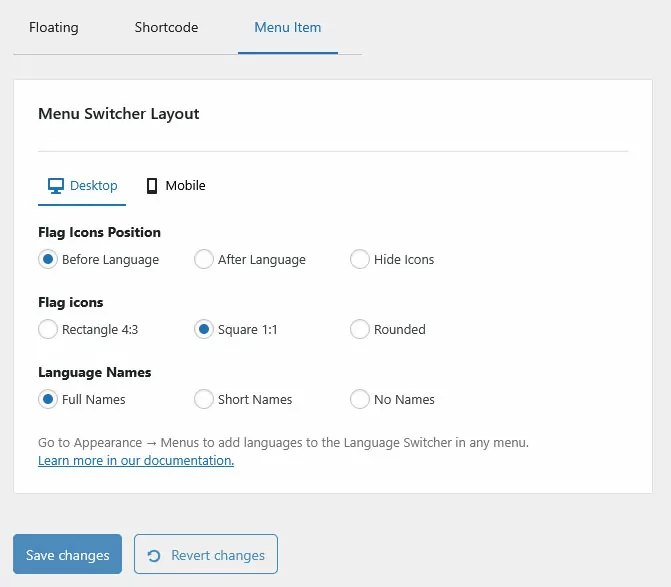
This type of switcher is very useful for classic themes as well. For themes using blocks, it might be easier to use the aforementioned Language Switcher block instead.
This one is a little bit more restrictive when it comes to customization, as the menu design is linked to your theme’s design. Therefore, the only customization options here are the flag icon positions and language names. You’ll also find a setting to control the flag icon shape (rectangle, square, rounded).
The tricky part here is that you’ll also need to manually add your languages in the menu from your Menu Settings. This means navigating to Appearance → Menus, and selecting the specific menu you want to add your switcher to.
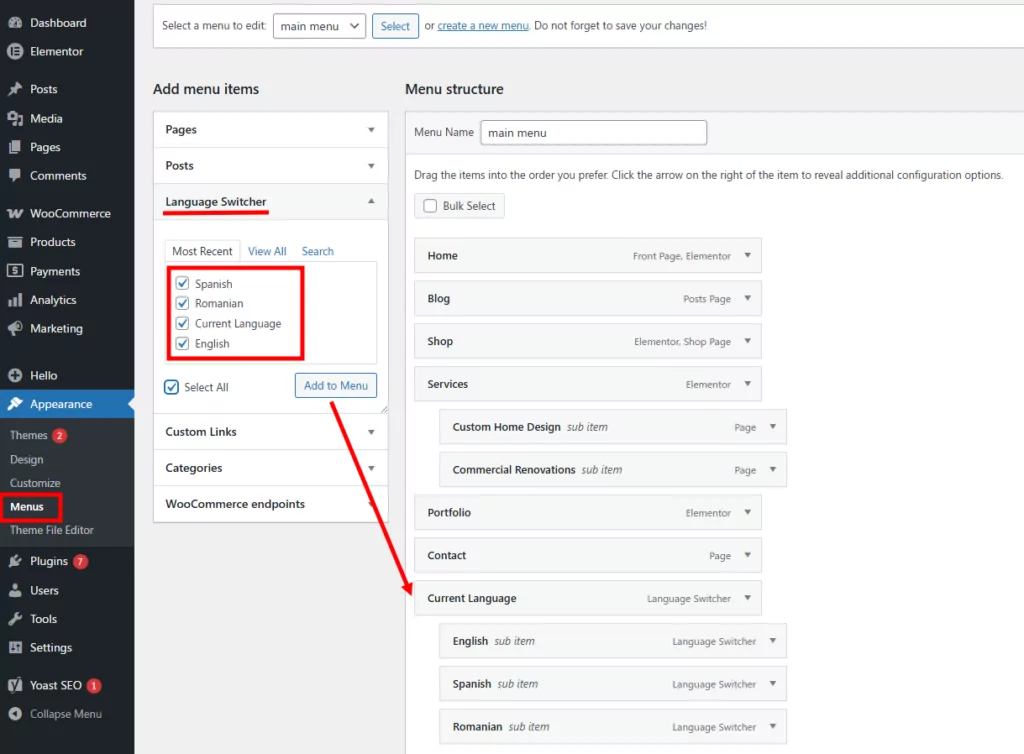
Then, from the Add menu items section to the left, open the Language Switcher tab, and add the languages you want in your menu, placing them as sub-items under Current Language. This will create a drop-down-like switcher, where users can select their preferred language.
Changing the Default Language Flags
The final built-in option I want to go over for creating a custom language switcher is how to change the default language flags.
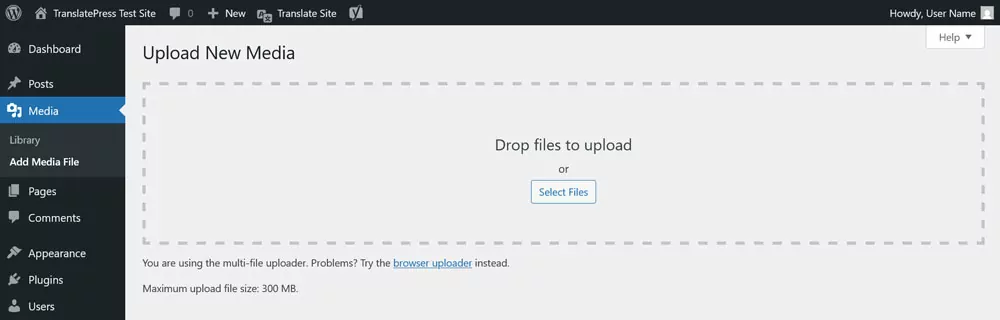
If you want to use a different flag icon for any language, the first thing you need to do is upload the file to your WordPress site via Media → Add Media File.
When you’re done, open up the image in the media library and copy the link to its location.
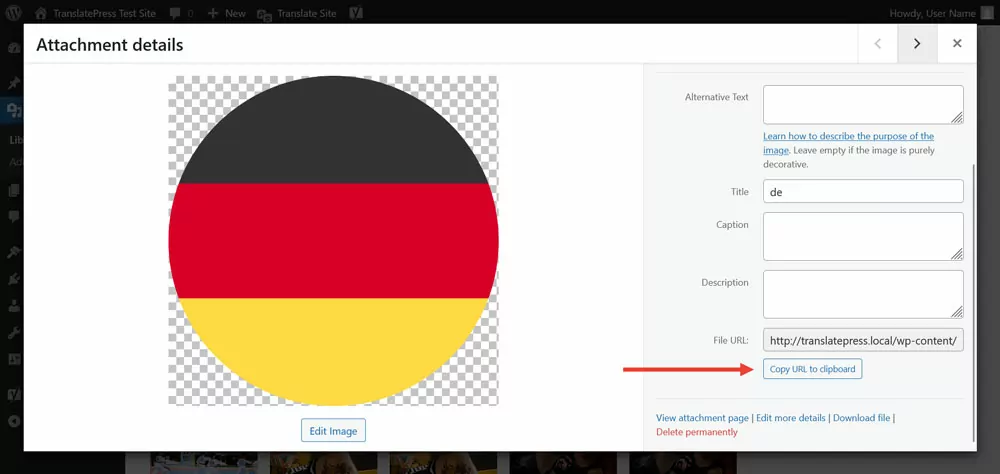
Then go to Settings → TranslatePress → Advanced → Custom language. Here, enter the ISO code of the language you want to change the flag icon for under Language code, then provide the link to your newly uploaded flag file in the Flag URL field and click Add, then save.
You can do this for as many languages as you are using. When you save, the new flag icon will appear on the front end of your site.
Advanced Method: How to Customize the TranslatePress Language Switcher via CSS
While the settings I’ve already walked you through give you plenty of customization options without using a single line of code, there may be cases where you want to take things a bit further.
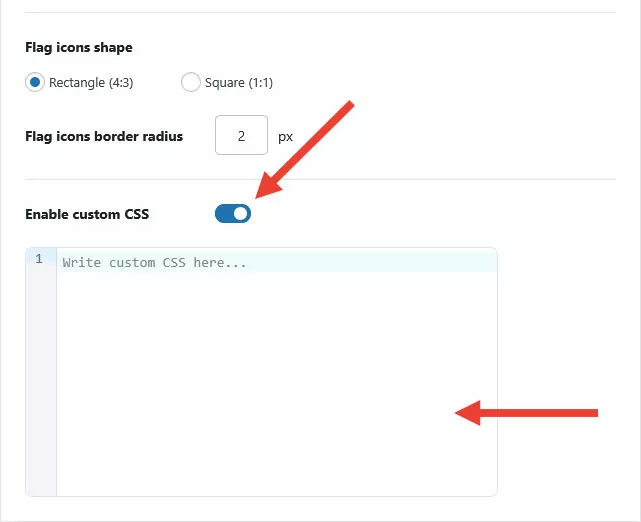
To customize the language switcher even further than the built-in settings can accommodate, you always have the option to use custom CSS.
As mentioned earlier, the floating language switcher menu has a dedicated Custom CSS option. You can switch it on and enter your own markup to further change the switcher’s design.
Let’s look at what’s possible. Right after a beginner crash course in CSS.
A Short Intro to CSS
In case you are an absolute beginner, CSS is the markup language that determines much of the look, layout, and behavior of websites. While HTML elements provide the structure, CSS is what decides:
- how large these elements are
- what colors they have
- which font they use
- how they are positioned
- how much space they have around them
- and much more
Here’s what a typical piece of CSS code (called “rule set”) looks like:
.button {
	background-color: #0073aa;
	color: #ffffff;
	font-size: 16px;
}
It consists of several parts:
- Selector: At the top, before the opening curly braces, is the so-called selector. It’s called that because it determines or selects which website element the CSS will modify. In this case, that’s an element with a class called “button,” so likely an actual button on the page.
- Property: This is the part that determines which attribute of the selected element the rule set targets. In this case, it’s the element’s background color, font color, and font size. But there are many CSS properties, including width, line-height, or text-align.
- Value: Properties need a value; it’s what decides what quality the targeted property takes on. For example, in this case font size is set to 16 pixels and the font color to #ffffff, which is the hex code for white. A property-value pair is called a declaration. As you can see, you can have several declarations in one rule set.
The final part that’s important is the syntax. CSS declarations need a semicolon at the end, and rule sets require open and closed curly braces. Of course, there’s much more to learn, but this will do for now.
Finding the Right Selectors
As you can imagine, to make changes via CSS requires that you target the right selectors. You can find them using browser developer tools. Simply right-click any element on a web page in your browser and then choose Inspect.
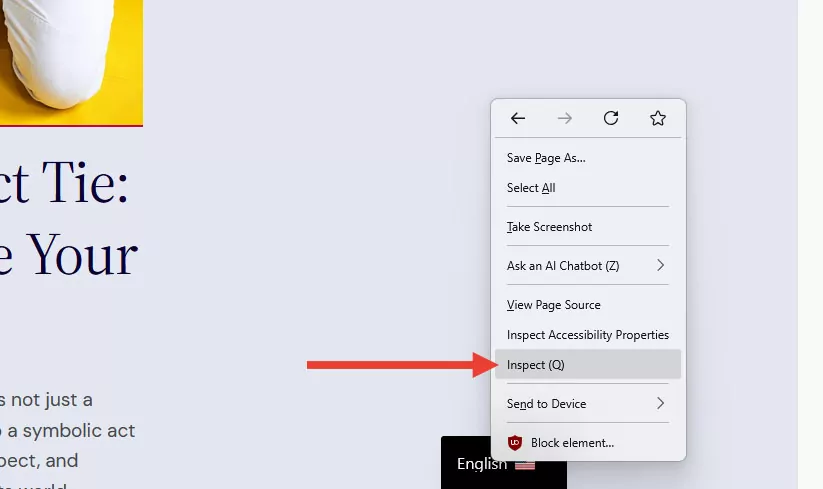
The browser developer tools will show you the HTML structure of the page and the CSS markup of the chosen element. It takes a bit of practice to understand which of the boxes you want to make changes to, but you’ll quickly get the hang of it.
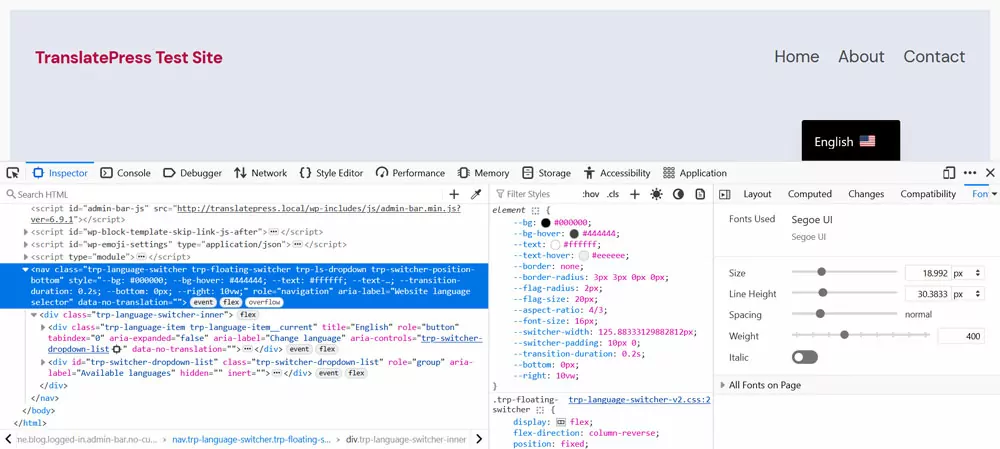
Important selectors to customize the TranslatePress language switcher are:
.trp-language-switcher: That’s the class of the language switcher element itself..trp-language-switcher-inner: The wrapper element for the list of languages..trp-switcher-dropdown-list: Allows you to customize the language drop-down list..trp-language-item: For the individual languages in your list..trp-language-item__current: The class for the currently active language in your list..trp-flag-image: Targets the language flag images.
The different language switcher variations may also have additional classes. For example, the language switcher block has a wrapper element with the class .trp-block-container. These can help you distinguish code that’s aimed only at one type of language switcher. Plus, several elements have more than one class or id, which can help you create a more specific selector in order to overwrite other markup.
Don’t worry if you don’t understand all of this yet. It’ll become clearer once I go over the examples.
Change the Language Switcher Position
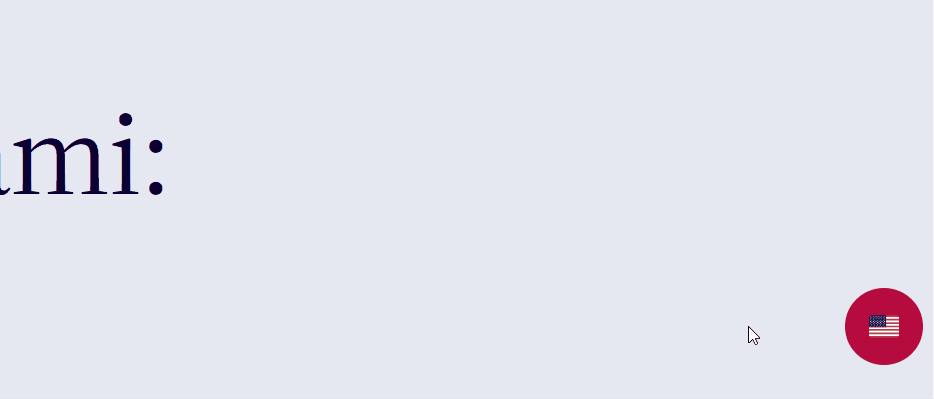
The floating language switcher comes with four default positions. If you want to place it anywhere else, you have to do it with code.
The easiest way is to overwrite the existing CSS. When you place the language switcher in the bottom right corner via its settings and examine it in the browser developer tools, you can see these two declarations attached to it:
--bottom: 0px;
--right: 10vw;
(If you are confused that they look different from the other CSS properties I am using, it’s because they are custom properties or variables.)
You can overwrite these with .trp-language-switcher like so:
.trp-language-switcher {
	right: 0px;
	bottom: 50%;
}
When you place the markup above into the Custom CSS field in the language switcher settings and save, you get the following result (I also switched off the language names to make it look better).
Note that, if you’ve set the language switcher position differently in the settings (e.g., top left instead of bottom right), you may have to overwrite different CSS declarations to move it.
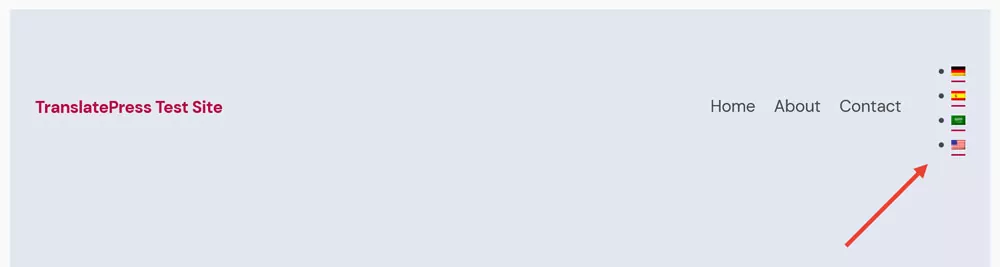
Customize Shape and Style
You can also use CSS to change the look of the language switcher. For example, in this case, I want to turn the switcher and the list of languages into circles. It’s already positioned where I want it to be; I just need a bit of space to the right of it. That’s possible with this CSS:
.trp-language-switcher {
	bottom: 50%;
	right: 1.5vw;
}
To make the next changes visible, we first have to switch the background color and border color in the settings to transparent.
Then, we can turn the language switcher into a circle and give it some color back:
.trp-language-switcher .trp-language-item {
	background-color: rgb(181, 11, 62);
	border-radius: 50%;
	padding: 16px;
}
This rounds the corners and also adds some internal space to make each language button perfectly round. It ends up looking like this:
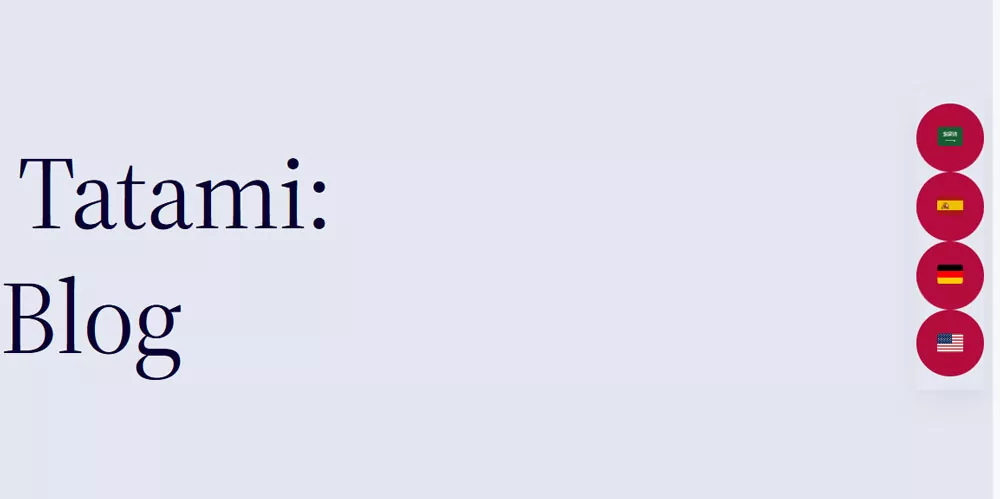
Now I want some gaps between the language fields:
.trp-language-switcher-inner,
.trp-language-switcher .trp-switcher-dropdown-list {
	gap: 5px;
}
The layout is done, now it just needs a bit of styling and some adjustments to the way it opens:
.trp-language-switcher {
	box-shadow: none;
	pointer-events: none;
}

.trp-language-switcher .trp-language-item {
	border: none;
	pointer-events: auto;
}

.trp-language-switcher .trp-language-item:hover,
.trp-language-switcher .trp-language-item:focus-visible,
.trp-language-item:has(.trp-language-item__current:hover),
.trp-language-item:has(.trp-language-item__current:focus-visible) {
	background-color: rgb(160, 8, 55);
}
The code above:
- Adds a new background color
- Adjusts the hover background color
- Moves the trigger for the drop-down menu to the list items
Below is the result.
Here’s the entire code as one:
.trp-language-switcher {
	bottom: 50%;
	box-shadow: none;
	pointer-events: none;
	right: 1.5vw;
}

.trp-language-switcher-inner,
.trp-language-switcher .trp-switcher-dropdown-list {
	gap: 5px;
}

.trp-language-switcher .trp-language-item {
	background-color: rgb(181, 11, 62);
	border: none;
	border-radius: 50%;
	padding: 16px;
	pointer-events: auto;
}

.trp-language-switcher .trp-language-item:hover,
.trp-language-switcher .trp-language-item:focus-visible,
.trp-language-item:has(.trp-language-item__current:hover),
.trp-language-item:has(.trp-language-item__current:focus-visible) {
	background-color: rgb(160, 8, 55);
}
Adjust the Mobile Design
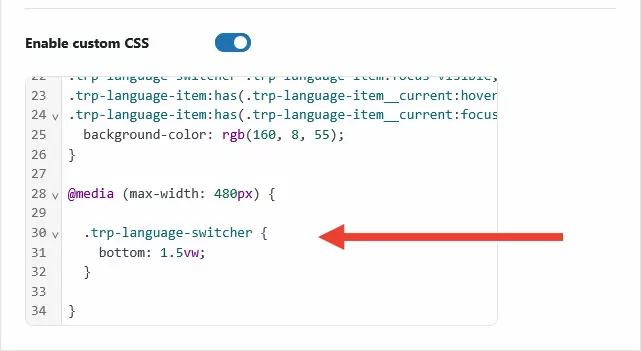
The final thing I want to cover in terms of CSS is how to customize the mobile design of your language switcher. This can be necessary to adjust the design for smaller screen sizes.
You can introduce mobile-specific design changes via so-called “media queries.” They introduce conditions to CSS markup. They basically say “only use this markup when the screen is below or above a certain size.” Here’s an example:
@media (max-width: 480px) {

	.trp-language-switcher {
		bottom: 1.5vw;
	}

}
The first line simply says “the following rule sets only apply on screens that are a maximum of 480 pixels wide.” Below that is a variation of the positioning markup we used earlier. This moves the custom language switcher back to the bottom of the screen.
Note that you only have to include those declarations you want to overwrite. Here, we’re only changing the bottom property of .trp-language-switcher. Everything else stays the way we set it up earlier.
Finally, it’s important that you place media queries at the end of your CSS markup. Browsers process CSS from top to bottom. So, if you want to overwrite earlier declarations or rule sets, your new code has to appear later than the original.
Pro Method: How to Build a Language Switcher Using PHP
Now, this section is for the pros. If, for some specific reason, you want to go even further, you can also build a custom TranslatePress language switcher from scratch.
This, for example, prevents you from having to overwrite existing CSS markup. Instead, you can have full control over the structure, layout, interactivity, and style of your language switcher from the get-go.
To show you how it works, we’ll create a flags-only, minimalist, horizontal switcher that can easily appear in different areas of your website.
1. Get to Know the PHP Function
TranslatePress offers a custom function for creating your own language switcher. It returns parameters for all important data points for the languages active on your site:
- language_name: The full language name (e.g., “English”).
- language_code: The language code (e.g., “EN”).
- short_language_name: The language slug used in URLs.
- flag_link: The URL to the language’s flag image.
- current_page_url: The URL of the page the visitor is on, but in that language.
You can use this to create your own language switcher with your own markup. One option is to place it directly in a theme file inside a child theme directory (not the main theme, as your changes will be overwritten if you update the theme). Alternatively, you can create a shortcode in functions.php, a code snippet plugin, or with your own custom plugin and use the shortcode to place the language switcher on your site.
We’ll go for the second option here.
2. Create the Shortcode
The first thing we will do is set up the scaffolding for the shortcode we’ll create. Place this inside your child theme’s functions.php or a PHP file in your custom plugin:
<?php

function my_custom_language_switcher() {

	// language switcher code goes here

}

add_shortcode( 'my_language_switcher', 'my_custom_language_switcher' );
This sets up the PHP function that will eventually register and output the shortcode in WordPress.
3. Build the Language Switcher HTML
Next up, we want to create the basic structure for the language switcher. Since we are going minimalistic, that’s relatively simple.
<div class="my-language-switcher">
    <ul>
        <li class="language-item">
            <a href="#"><img src="flag.png" alt="Language flag"></a>
        </li>
    </ul>
</div>
It’s basically a wrapper element with an unordered list in it. Each list item contains a link element for the language, which has the flag image inside.
4. Add Dynamic PHP Data
We’ll now add the HTML structure to our shortcode function and add the language data via PHP.
<?php
function my_custom_language_switcher() {
    // Get all active languages
    $languages = trp_custom_language_switcher();

    // If no languages, return empty
    if ( empty( $languages ) ) {
        return '';
    }

    // Start capturing HTML
    ob_start();
    ?>
    <div class="my-language-switcher" data-no-translation>
        <ul>
            <?php foreach ( $languages as $language ) : ?>
                <li class="language-item <?php echo !empty($language['current_language']) ? 'current' : ''; ?>">
                    <a href="<?php echo esc_url( $language['current_page_url'] ); ?>"><img src="<?php echo esc_url( $language['flag_link'] ); ?>" alt="<?php echo esc_attr( $language['language_name'] ); ?> flag"></a>
                </li>
            <?php endforeach; ?>
        </ul>
    </div>
    <?php
    // Return the HTML for the shortcode
    return ob_get_clean();
}

// Register the shortcode
add_shortcode('my_language_switcher', 'my_custom_language_switcher');
This creates the same HTML markup we saw earlier, but for each active language on your site. It also fills in the language URL, link to flag image, and the language name as an image ALT tag. In addition, it adds an extra class to the currently active language in case you want to add extra styling.
5. Test the Output on Your Site
This already works. You can use the shortcode [my_language_switcher] to place the custom switcher wherever you want on your site, for example, via the Shortcode block in the WordPress block editor. Alternatively, place it in a file like header.php or footer.php using this line of code:
<?php echo do_shortcode('[my_language_switcher]'); ?>You should already see your list of languages, however, completely unstyled.
The final step is to change that.
6. Add Styling via CSS
The last step of creating your custom TranslatePress language switcher is to make it look pretty. In order to achieve the result shown earlier, add this to your child theme, plugin style sheet, or the Additional CSS field in the WordPress editor:
.my-language-switcher {
	display: inline-block;
}

.my-language-switcher ul {
    list-style: none;
    display: flex;
    gap: 8px;
    padding: 0;
    margin: 0;
}

.my-language-switcher li a {
    display: block;
    overflow: hidden;
}

.my-language-switcher li a img {
    width: 100%;
    height: 100%;
    display: block;
}
Create Your Own Custom Language Switcher Today
Customizing the TranslatePress language switcher makes sure it fits the rest of your website design and provides the best experience for your users.
Above, I have gone over several ways you can make adjustments to its appearance, from the easy-to-use built-in plugin settings, to CSS customizations, and a completely built-from-scratch switcher via PHP. Hopefully, you now feel ready to fully integrate TranslatePress into your own website design.
As you can easily see, one option stands out when it comes to convenience and speed. TranslatePress comes with plenty of customization options out of the box, so you don’t have to be a code master to have a perfectly functional and personalized language switcher.
TranslatePress Multilingual
Try it today, and have your language switcher up in minutes!