In this post
Translating your website into multiple languages is helpful for your users, and it’s great for your traffic. When visitors see that they can read the content on your site in their language, they’ll stick around longer. As long as you’re offering translations, why not make it as easy as possible for users to switch to their preferred language? With TranslatePress there are multiple ways to display a language dropdown:
- Menu Dropdown
- Widget or Footer Dropdown
- Floating Selector
In this post, I’ll show you how to use all of them. But first, let’s talk about what makes for an effective language dropdown.
Designing an Effective Language Dropdown
Like any aspect of your website’s design, it’s all about the user. And when we’re talking about a language dropdown — or switcher — the main thing you need to be conscious of is how your site’s visitors will view and interact with it.
One significant design choice you can make is whether to display the languages in your site’s native language, or the specific language being shown. For example, on an English language site, rather than display the language as “Spanish,” you can display it as “Español.” This helps users easily identify their language and helps them feel instantly comfortable browsing your site.
Another visual guide that can be helpful is to display the flag of the country next to the language. Showing the Korean flag next to the language text in the switcher makes it instantly recognizable to a Korean visitor.
As you plan the layout of your site, it’s also important to think about the placement of the language dropdown. Every site is unique, so the best placement for your site may be different from another’s. Again, think about how your visitors will interact with your site. Consider where the most obvious place might be to display the dropdown. It could be in the bottom right, but if you have other important content there, you may want to consider moving it to the left of the page.
If you place the language dropdown in your footer, will visitors spot it easily? Consider also putting language switchers in multiple areas, like the sidebar, or even in your navigation menu.
The most important factor in displaying your language dropdown is how you imagine your particular users will best find and interact with it.
Now that we’ve covered the design aspects, let’s go over how to put it all into action!
Your Language Switcher Settings
Once you’ve installed the free TranslatePress plugin from your WordPress dashboard (Plugins → Add New), the first thing you need to do is visit your settings. You can find them in your WordPress dashboard menu under Settings → TranslatePress. Scroll down in the General tab to find the Language Switcher section.
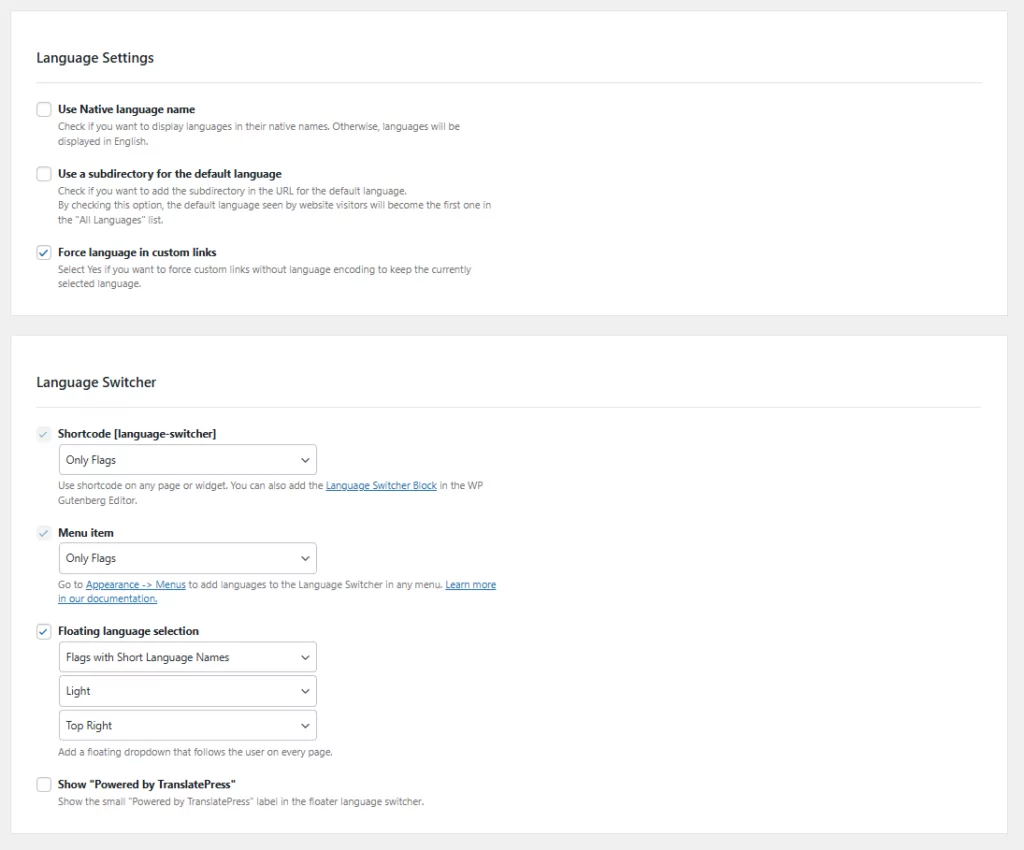
You’ll see three options, each with its own settings:
- Shortcode
- Menu Item
- Floating language selection
For each option, use the dropdown menus to choose how the language names will appear. For example, you can choose Full Language Names, Short Language Names, Flags with Language Names, and more.
Additionally, the Floating language selection gives you the choice of a Dark or Light theme, as well as positioning on the page.
Once you’ve made your selections and saved your changes, let’s move on to displaying the dropdown on the page.
Displaying Your Language Dropdown
Again, displaying your language dropdown is an individual choice. You may need to experiment with different settings and display options until you find the best fit for your site.
Shortcode
If you use the shortcode [language-switcher] option for your language dropdown, you can display the switcher virtually anywhere on your site that accepts the shortcode Gutenberg block. The best places for using the shortcode are typically in a widget — which you can place in a sidebar or footer.
If you’re using a block theme and full site editing, you can also add the shortcode in your footer very easily.
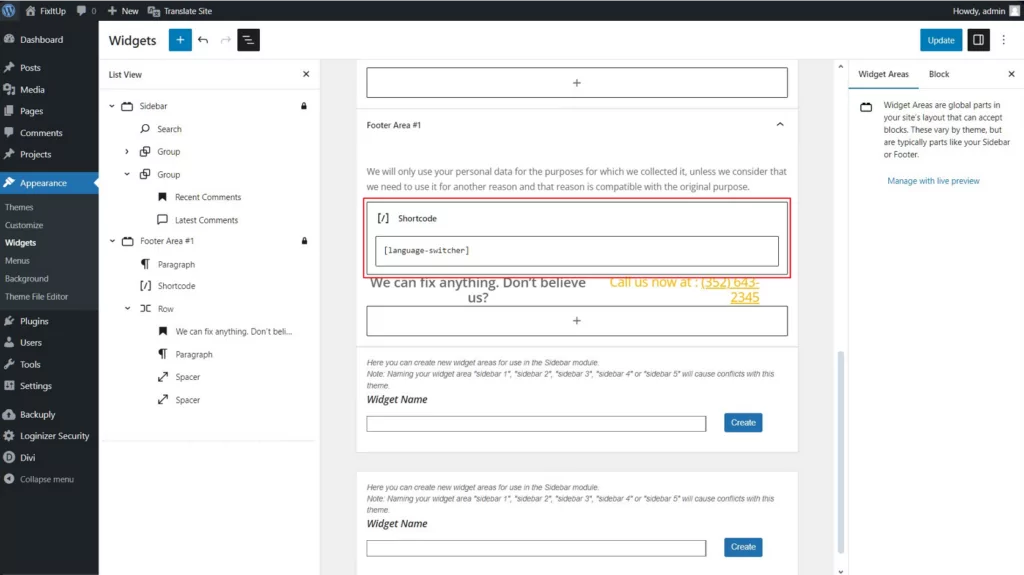
On the front end, your visitors can use the dropdown to select their preferred language.

Menu Item
If you like, you can display the language dropdown in your navigation menu. TranslatePress automatically adds the option to WordPress to make it easy. When you edit your Menus, you’ll see Language Switcher in the list of menu items you can add.
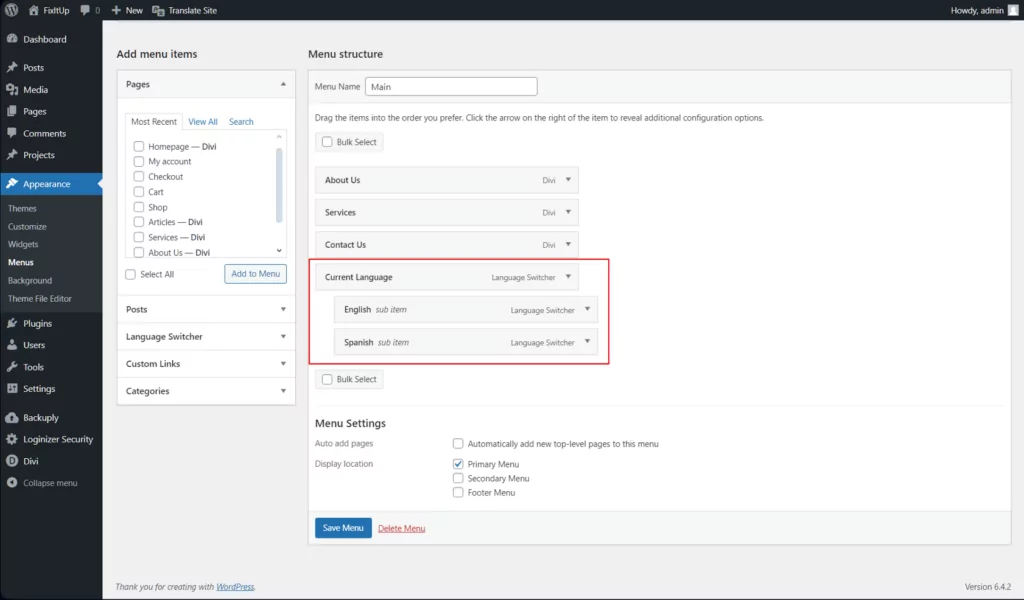
First, select Current Language and any languages you want to be displayed in the dropdown. Click Add to Menu. Then, arrange the languages as sub-items underneath Current Language.
Once you save your menu, you need to make sure the appropriate menu is selected in your site’s header — this will depend on your theme. On the front end, your language dropdown will appear in your navigation menu.

Floating Language Selection
If you want to have a language dropdown always available on every page, no matter where the user scrolls, you’ll want to use the Floating Language Selection.
If you’ve enabled this option in your TranslatePress settings as we covered earlier, then it will automatically appear wherever you’ve designated — there’s nothing else you need to do!
On the front end, the floating language switcher appears as a professionally polished button. Clicking expands the options for all languages you’ve made available.

If you’re using the premium version of TranslatePress, you can display as many languages as you like. However, if you only need one extra language you can use the free version.
If you want to see more, you can watch this quick video tutorial as well:
Make it Easy for Your Visitors with a Language Dropdown
There’s a lot you can do to make choosing a preferred language easy for your visitors. As you design your translated site, think about these choices:
- Native language name display or your site’s language;
- Using flags to help users quickly identify their language;
- Placement of the language dropdown.
The better you make the experience for your users, the more likely they are to stay on your site — and return!
TranslatePress Multilingual
If you have any more questions on how to setup your own language dropdown, don’t hesitate to let us know in the comments!
