In this post
Why Bother Making a Bilingual Website?
Nobody ever said it was straightforward creating content for your website; it’s hard work. Time and effort go into every single piece of content you make. The painstaking research, solving problems, and answering questions make it incredibly challenging to develop something unique and noteworthy.
You do it, though, because you value the content, the leads it can generate, the potential sales, and of course, exposure for your business/brand.
What if we told you there’s more you can do? At a fraction of the time, without starting a whole new post/page?
Today we’re going to show you how to maximize traffic to your freshly created content (or existing content), open up new channels in search engines, and attract new leads/customers. By creating a Bilingual website, the cost to you?
Nothing, save for a little time.
Why a Bilingual WordPress Website and Not Multilingual?
The short answer is time. In the first instance, it makes sense to convert your website into one other language.
By its very definition, Bilingual means speaking two languages fluently, Multilingual, well you guessed it, more than two.
Creating a Bilingual version of your WordPress-powered website is a great way to test the water, grow, and learn from experience.
For this example, we’re looking at an English website and setting up a German-language version. For the record, you don’t have to be fluent in German for this to work.
How Easy Is It to Create a Bilingual Website?
Using the free version of TranslatePress, you can create a bilingual website with ease. We will take you through the process, with recommendations, and guide you through every step.
If you’d like to follow this guide, please feel free to download the free version of TranslatePress and keep this guide open in a tab of your browser of choice.
Installing TranslatePress
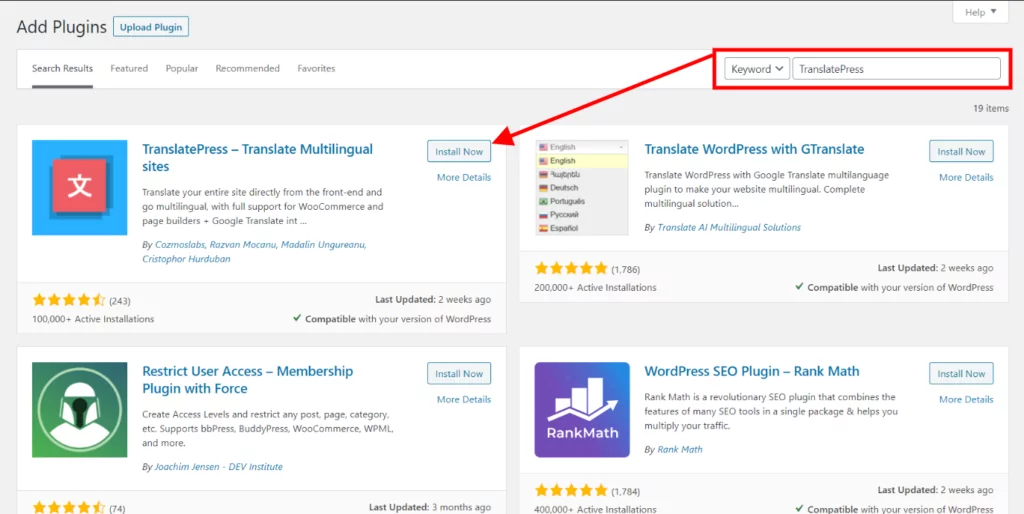
In your WordPress admin screen, navigate to Plugins then Add New. Here enter the term TranslatePress in the search bar as below:
Hit Install Now, then Activate. Congrats, you’re a few steps away from creating your first bilingual website with WordPress.
Getting Started With TranslatePress Settings
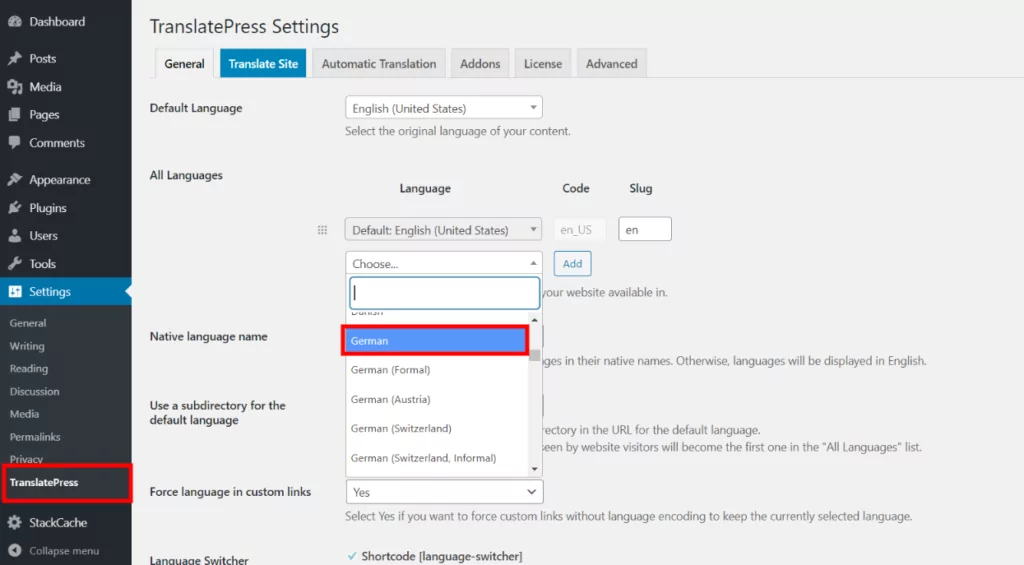
To get started, we need to tell TranslatePress what language we’d like to utilize for our bilingual website. You can either manually input a language or scroll through as below:
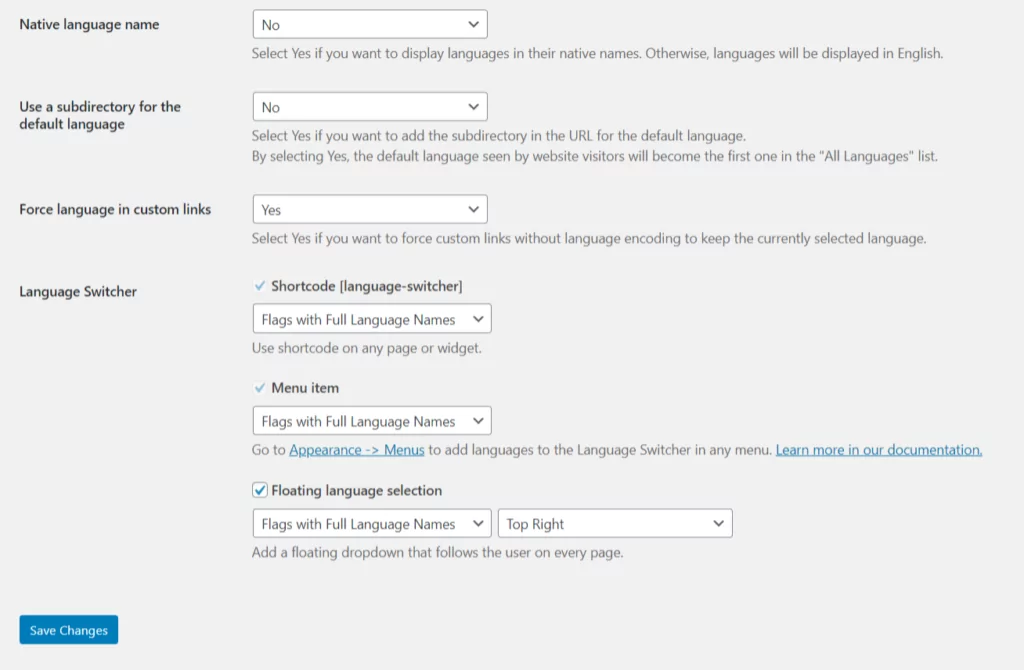
There are a few more settings to go through in TranslatePress; you’ll note the below screenshot with the German language added:
As we’ve selected German as the additional language, you’ll notice that the slug on the far right says de.
Wherever there is an instance of a translated page, such as your about page, the following URL structure would come into play:
mysite.com/de/about/
In turn, it helps users and differentiates between the English version and the German version and, of course, more importantly, search engines.
Additional Settings for Your Bilingual Website
There are a few more settings at your disposal; once set here, you need not worry about them.
Native Language Name
If you’d like to display languages in their native name, use the dropdown menu, and select Yes to display them in English, leave it set to No.
Use a Subdirectory for the Default Language
Two options here Yes or No. Suppose you’d like to display your default language, in this case, English, in a subdirectory. Choose Yes, doing this will mean the following URL structure:
mysite.com/en/
All subsequent pages will follow the same format:
mysite.com/en/about/
Choosing Yes means that the first language from the All Languages setting will be applied; if needs be, you can reorder these as below via drag and drop:
You won’t need to do the above; it’s worth noting if you decide to add more languages to convert your site to a Multilingual one instead of a Bilingual website.
Force Language in Custom Links
This setting is going to make your life easier. As a WordPress site owner, you’ll no doubt have plenty of internal links and menu navigation to other pieces of content to keep visitors on your site.
We’ll give you an example; in this case, we have some content where a specific phrase has an internal link::
“WordPress translation plugin” – links to an internal page mysite.com/translation-plugin/
If a visitor is on the German language version of your site and clicks on that link will still be:
mysite.com/translation-plugin/
Which I’m sure you can agree is of no benefit to the user. Using the Force Language in Custom Links setting will change the URL to link to the German instance of the page, not the English one.
Selecting Yes, this will ensure that:
mysite.com/translation-plugin/
becomes:
mysite.com/de/translation-plugin/
TranslatePress can help save you much-needed time, especially if you have an internal link strategy and need to keep everything consistent.
Adding a Language Switcher to Your Website for Visitors
With any guide, it’s impossible to know what your setup is. Whether you use a sidebar for posts/pages and everything in between, we know this; that’s why we’ve developed TranslatePress to cover all the angles of displaying a language switcher.
Using the Language Switcher in a Sidebar
If your content’s layout uses a sidebar, you might like to show the language switcher within it.
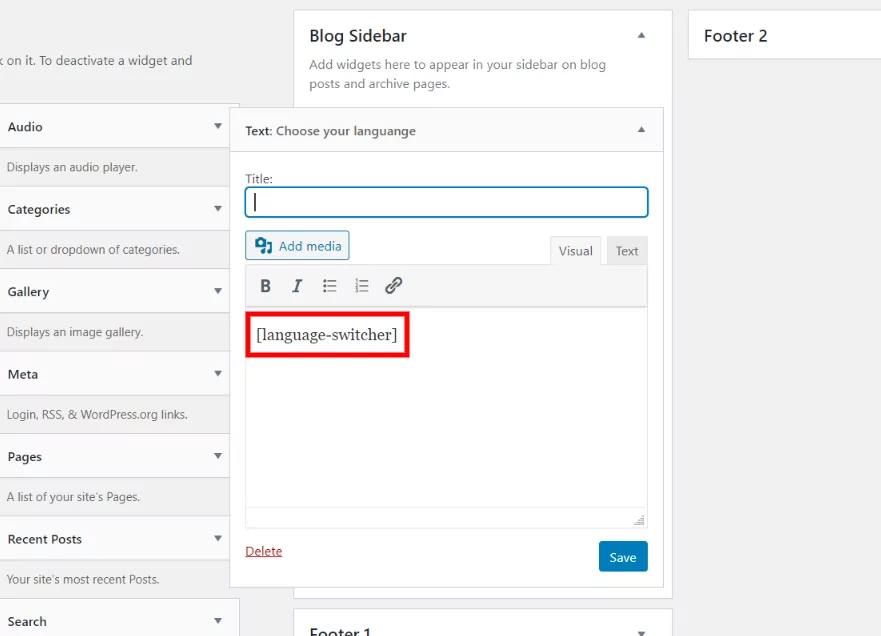
Using the following Shortcode: [language-switcher], you can add a widget to your sidebar. Navigate to Appearance, then Widgets, choose a Text Widget, then cut and paste the provided Shortcode:
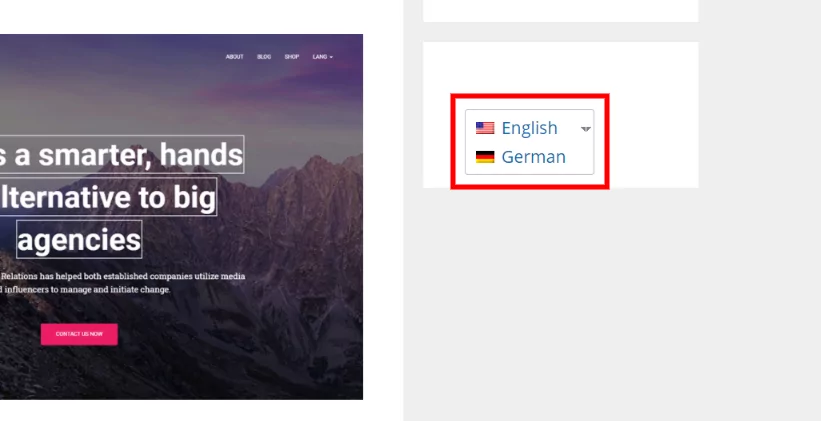
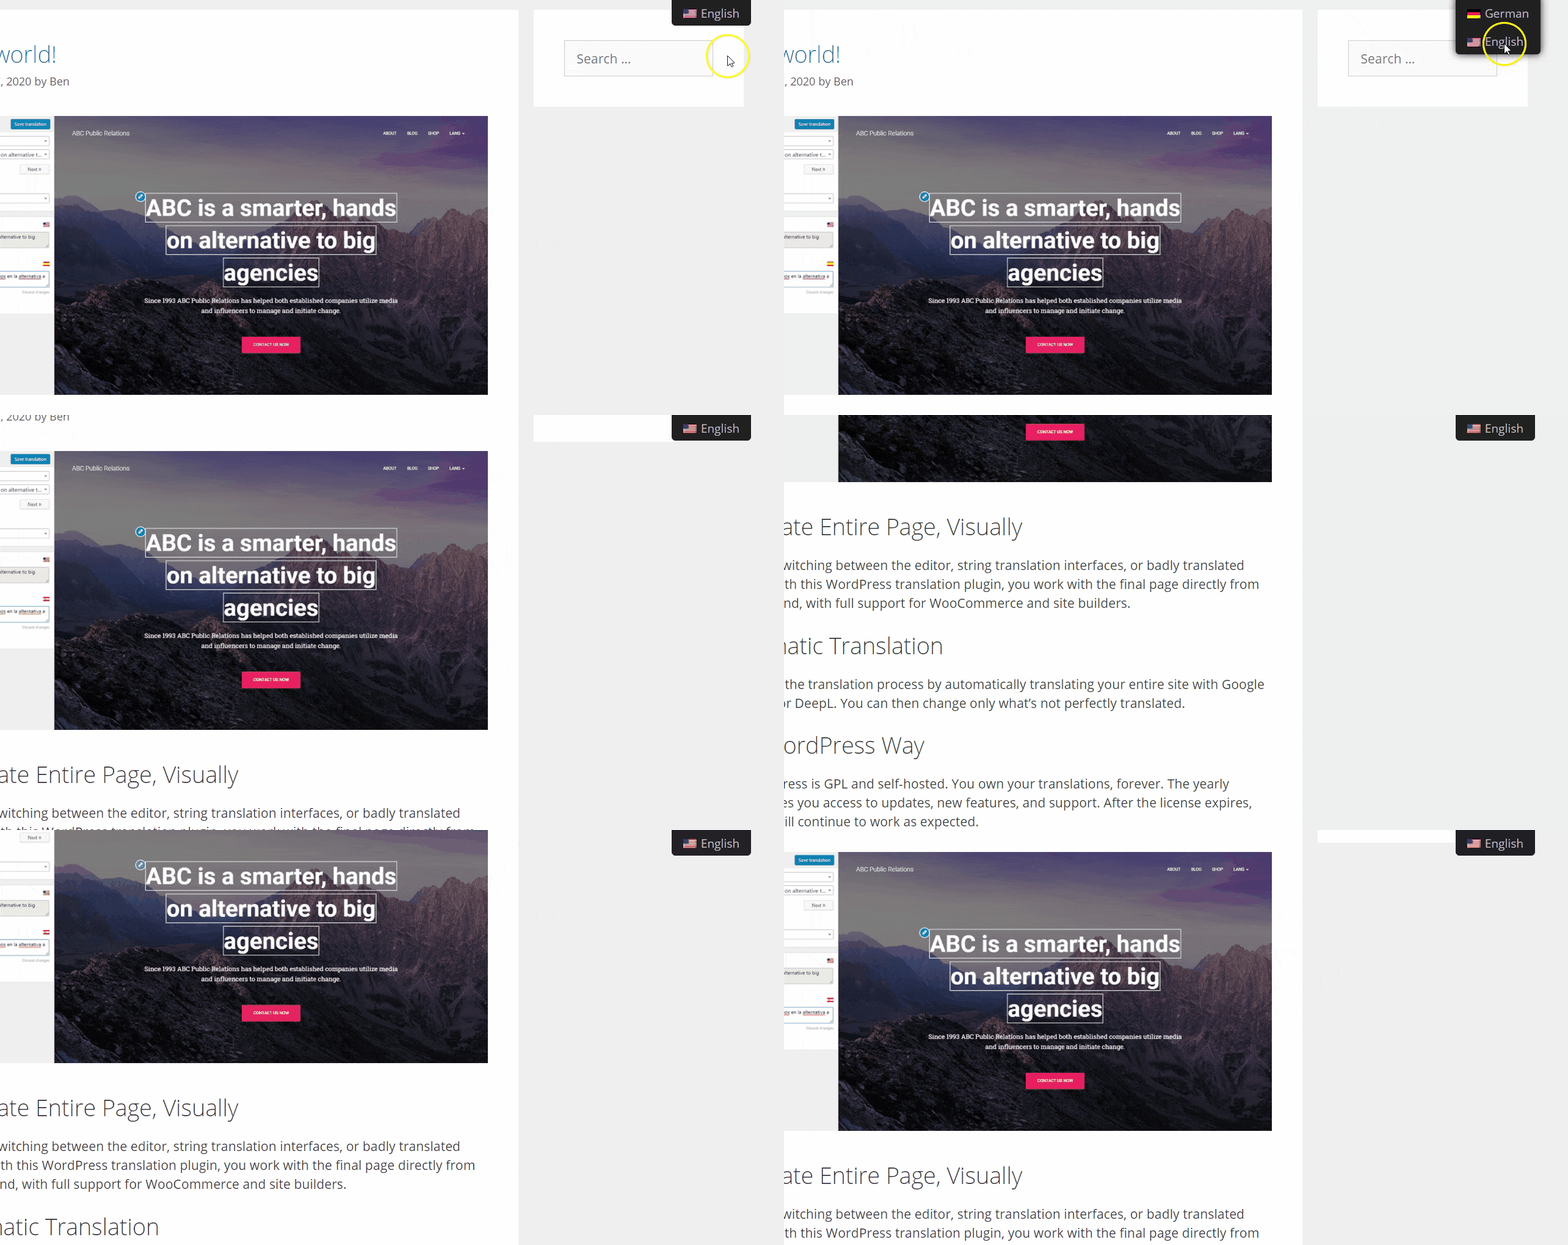
Once done, hit Save. See below for an example of the Language Switcher in a sidebar:
Adding the Language Switcher as a Navigation Menu Item
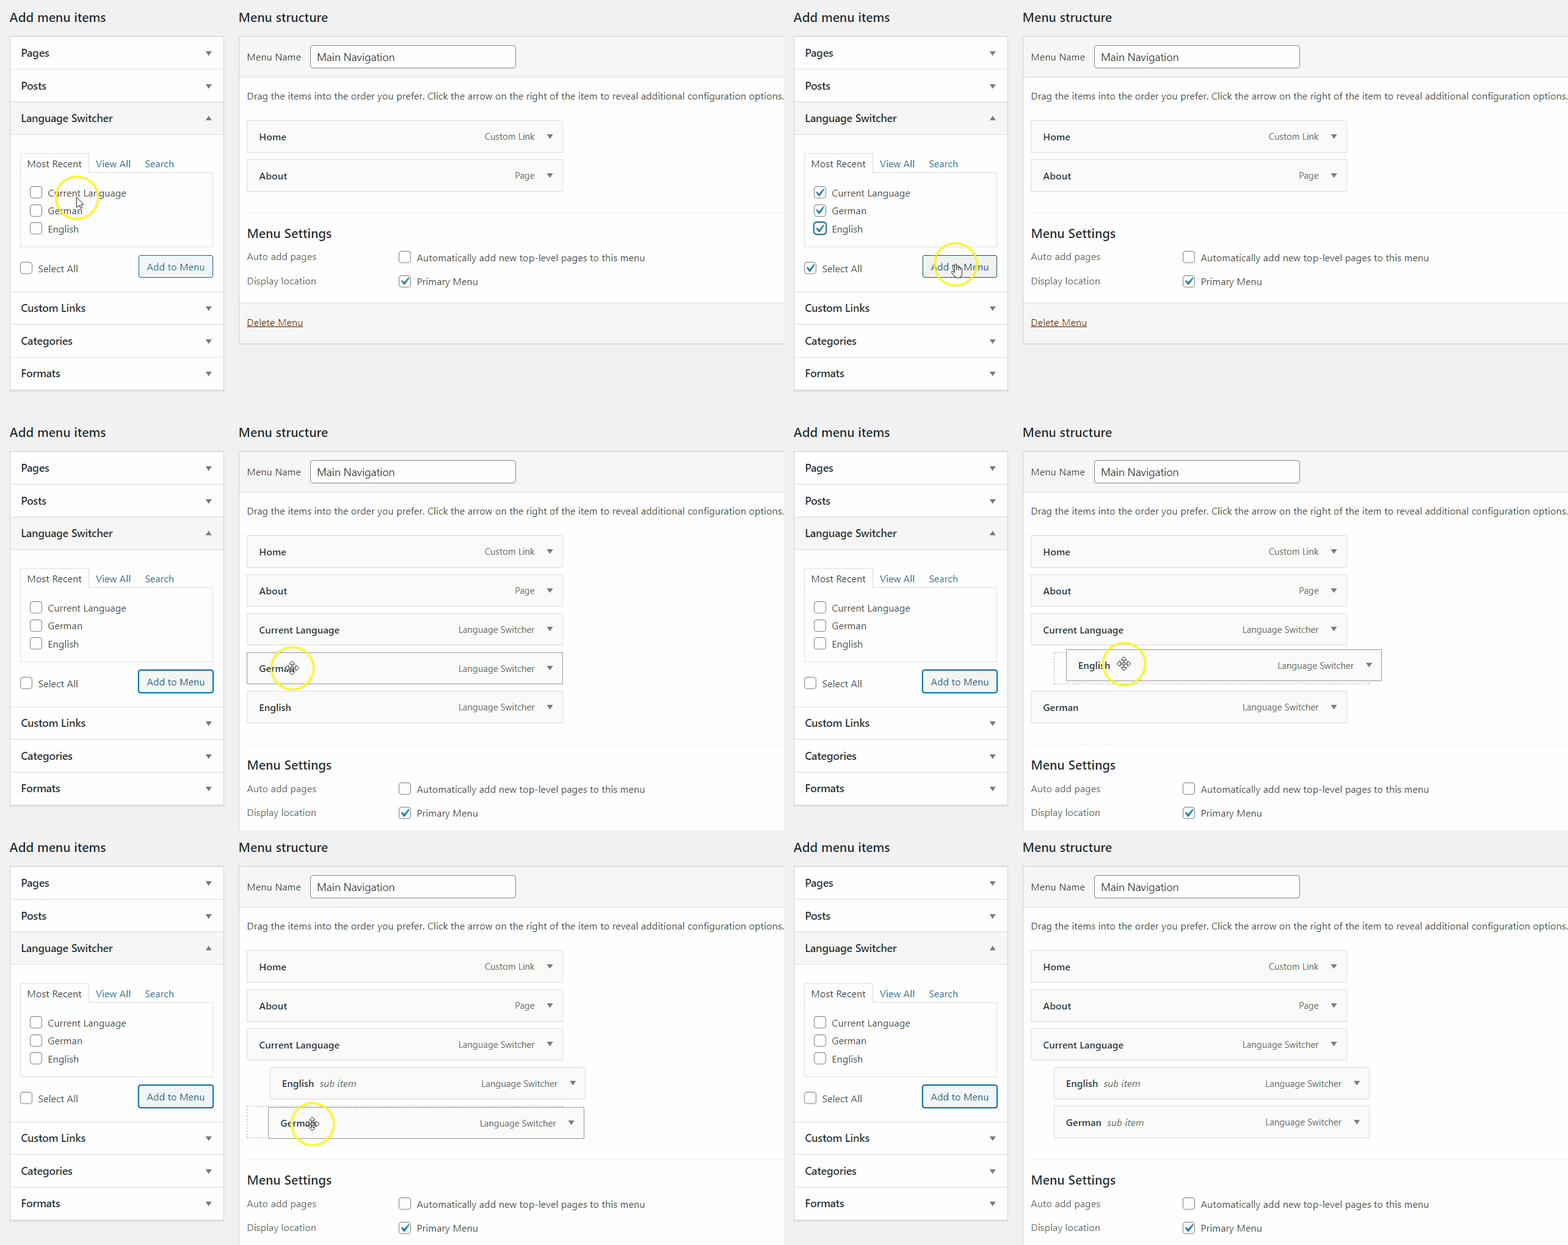
If you’d prefer to add the Language Switcher as a menu item, you can make it part of your main navigation, or wherever your navigation may reside. Head over to Appearance in your WordPress admin, then click Menus.
As you can see from the above example, using the Language Switcher menu item, add the Current Language, then the German and English menu items. Select all or just the ones you want to add.
It’s essential to make sure that you add the English and German menu items, as sub-menus of Current Language, and arrange them via drag and drop so your primary language is the first item.
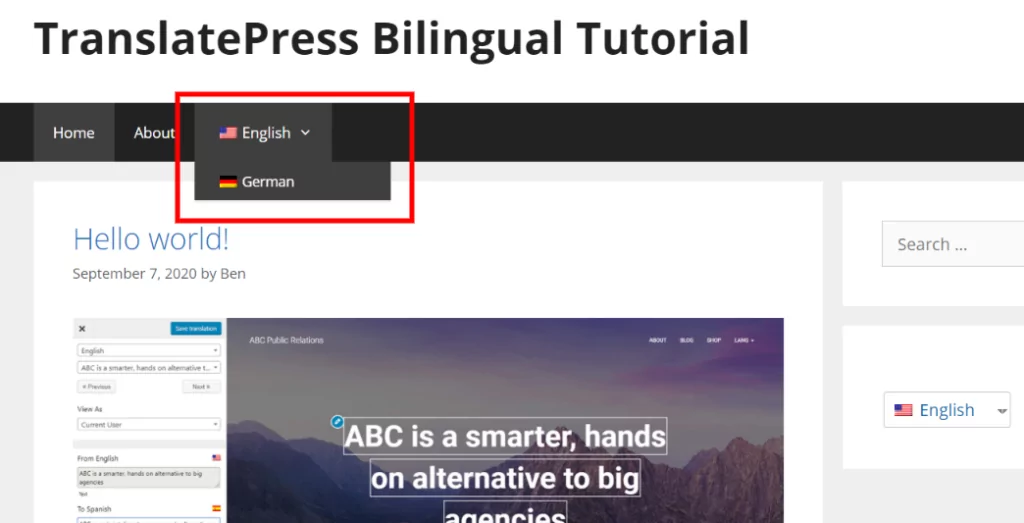
Completing the above step will render a menu item on the front end of your website:
Whatever language is constant on your website will be shown to the visitor. For example, if the user is reading your website in German, then the menu item and the Shortcode in the sidebar will display the current language.
Adding a Floating Language Switcher to Your Bilingual Site
If neither of the above examples is in keeping with your needs, then there’s always the Floating Language Switcher.
This option will display a floating dropdown menu throughout your website; here, you can choose from Bottom Right, Bottom Left, Top Left, and Top Right. See below for an example of Top Right:
Useful for those who have calls to action on their website, or a scroll-to-top button, by allowing you to choose where you’d like to display your floating Language Switcher, so it doesn’t conflict with your aesthetic.
Useful Settings If You Have Limited Space
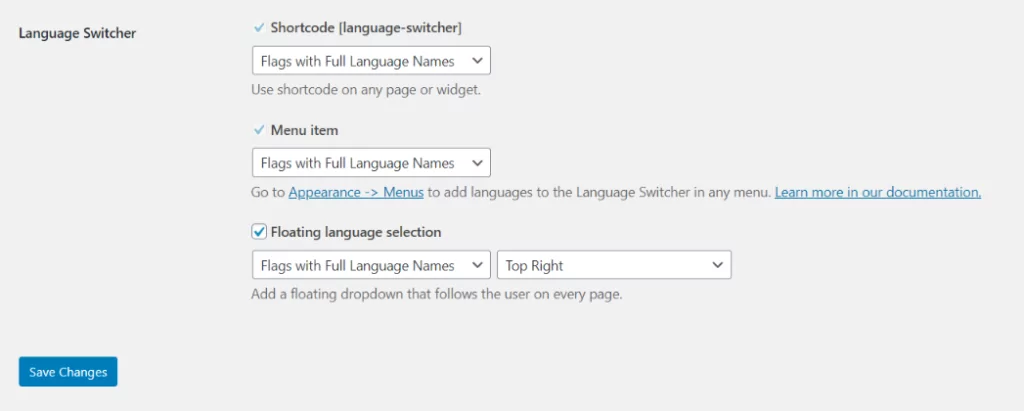
If you have limited space on your website and need to change the way the Language Switcher displays, then the below settings could be of interest to you:
No matter which option you decide is right for you; whether it’s a Floating Language Switcher, Menu Item or Sidebar, you can match the display to your needs:
Via the dropdown menu, choose a display method that works for you:
- Full Language Names:- Displays the language name, nothing else.
- Short Language Names:- Displays the abbreviated form, i.e., EN & DE, respectively.
- Flags with Full Language Names:- Small country-specific flag and country name.
- Flags with Short Language Names:- Small flag and abbreviated form.
- Only Flags:- Displays only the flags associated with the language, nothing else.
Translating Your Content – What Can You Translate?
We’ve covered the settings for creating your bilingual website; now, it’s on to the nitty-gritty of translating the actual content.
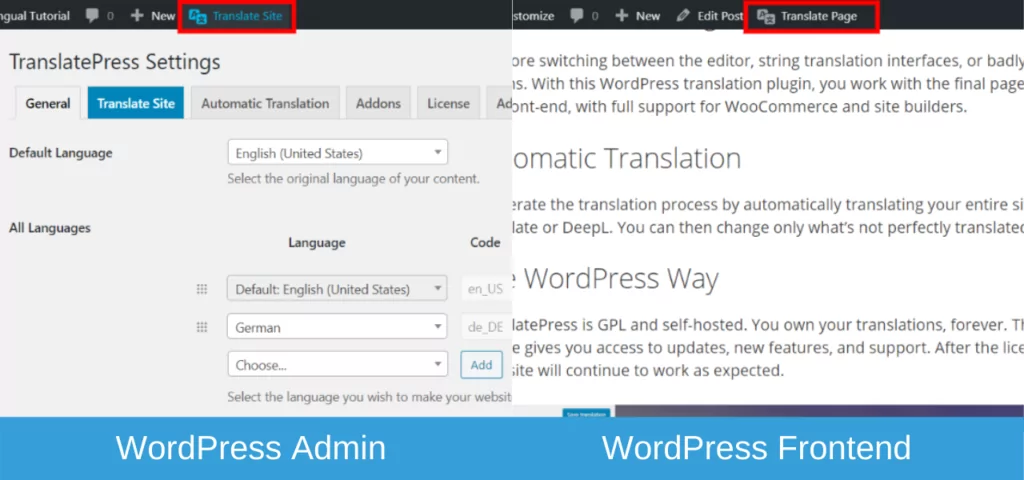
To translate your site, you can do this one of two ways from the WordPress admin and click on Translate Site, or if you’re on the front end on a specific post or page, click on Translate Page:
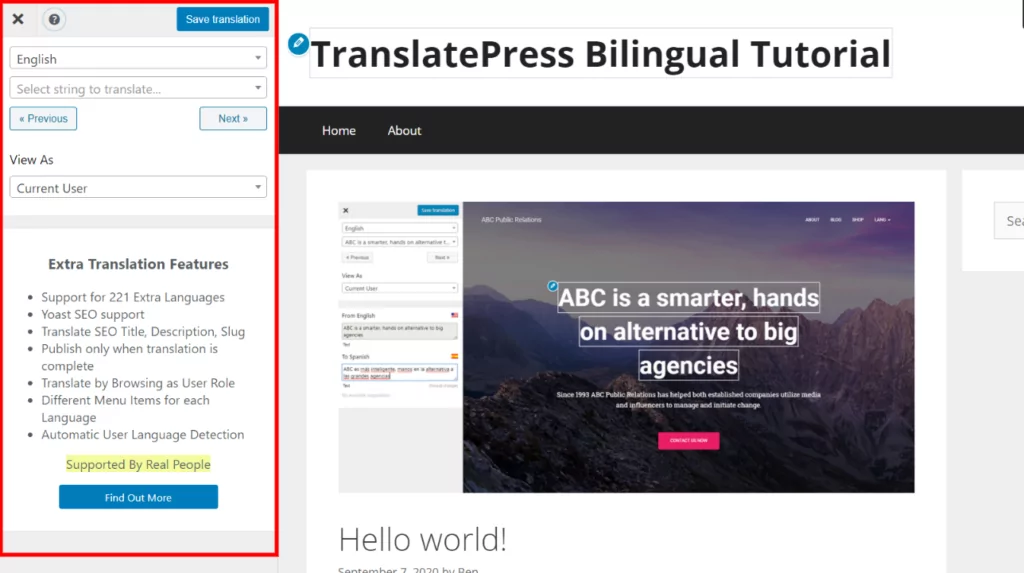
Once you’ve clicked on the Translate Page, you’ll see the front end editing options below:
This opens up a visual translation interface, similar to the Customizer. No flicking in and out of posts or refreshing to see if changes have taken effect.
All the editing is on the front end, which means you’ll see a real-world example of your content translated for your language choice.
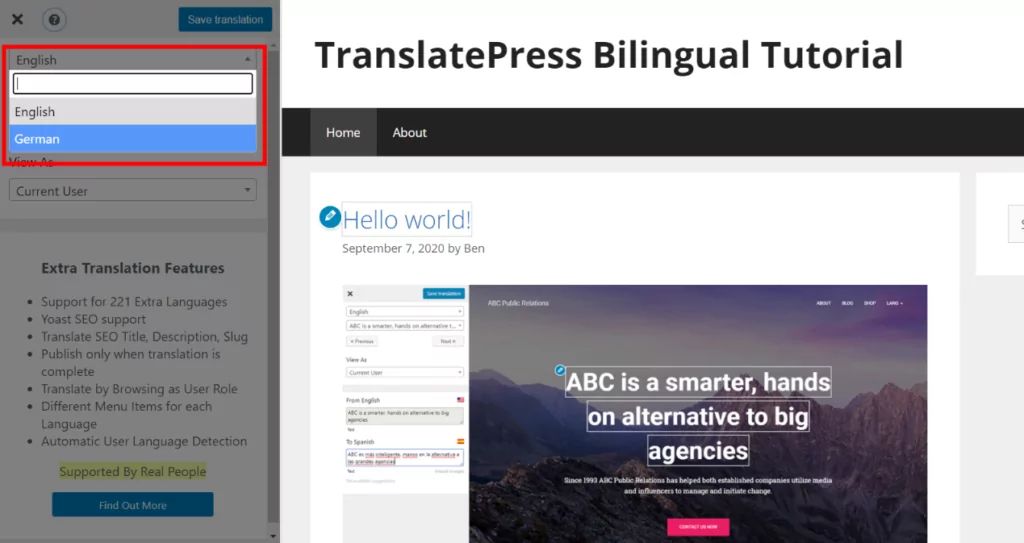
First, to start translating and seeing a real-world example, we need to change the current language:
Selecting German means you can view the content as if you’re reading the content as a visitor from Germany. Making it easy for you as the editor.
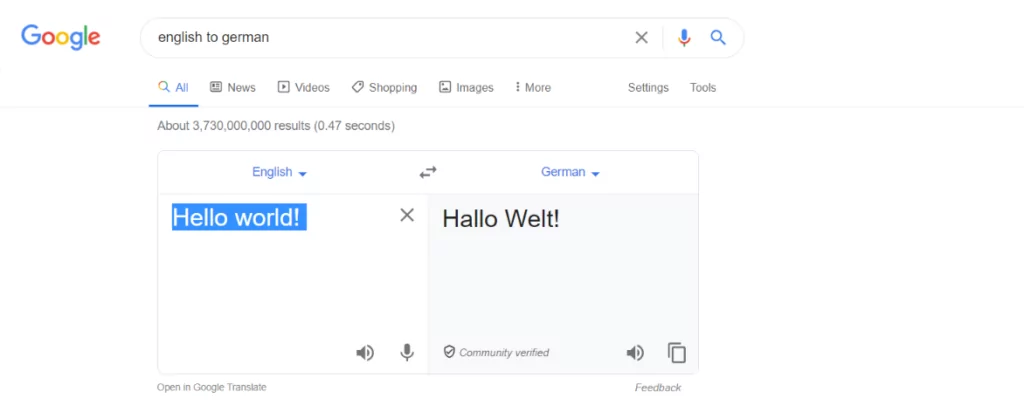
You’ll remember from earlier in this tutorial; it’s not necessary to speak fluent German (or the language you decide to use) to make your website Bilingual. Using Google translate in a new tab/window, you can easily convert English to German, cut, and paste to your heart’s content.
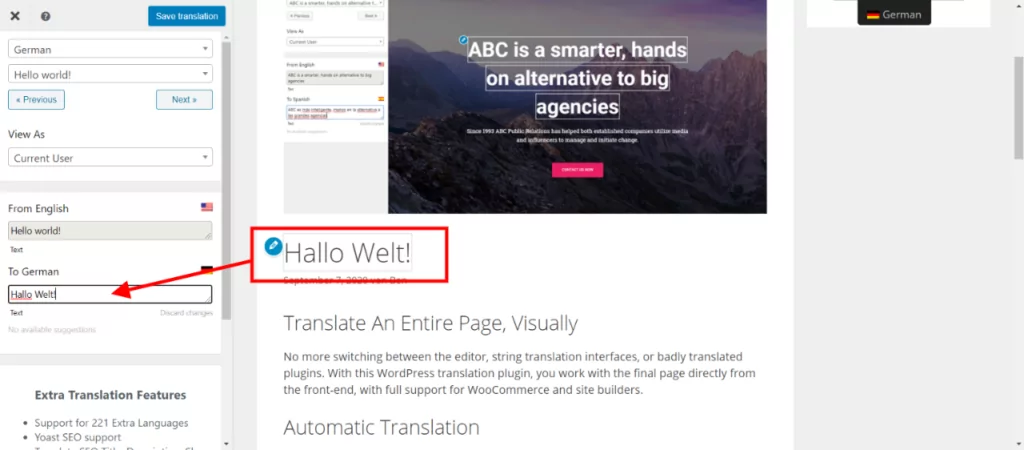
How do you know what parts you can translate, though? Using TranslatePress, the process is simple. Using our freshly cut text from Google Translate, all you need to do is hover over your post/page title, then paste-like so:
Notice the blue pencil icon in the image above? When editing content for your bilingual website, all you have to do is hover over any text you’d like to change. An icon will show, either blue or green.
The Difference Between the Two Is Simple:
The Blue pencil icon allows you to translate the text you’ve created, and the Green pencil icon is Gettext. Gettext is string text, used in themes and plugins; see below for an example:
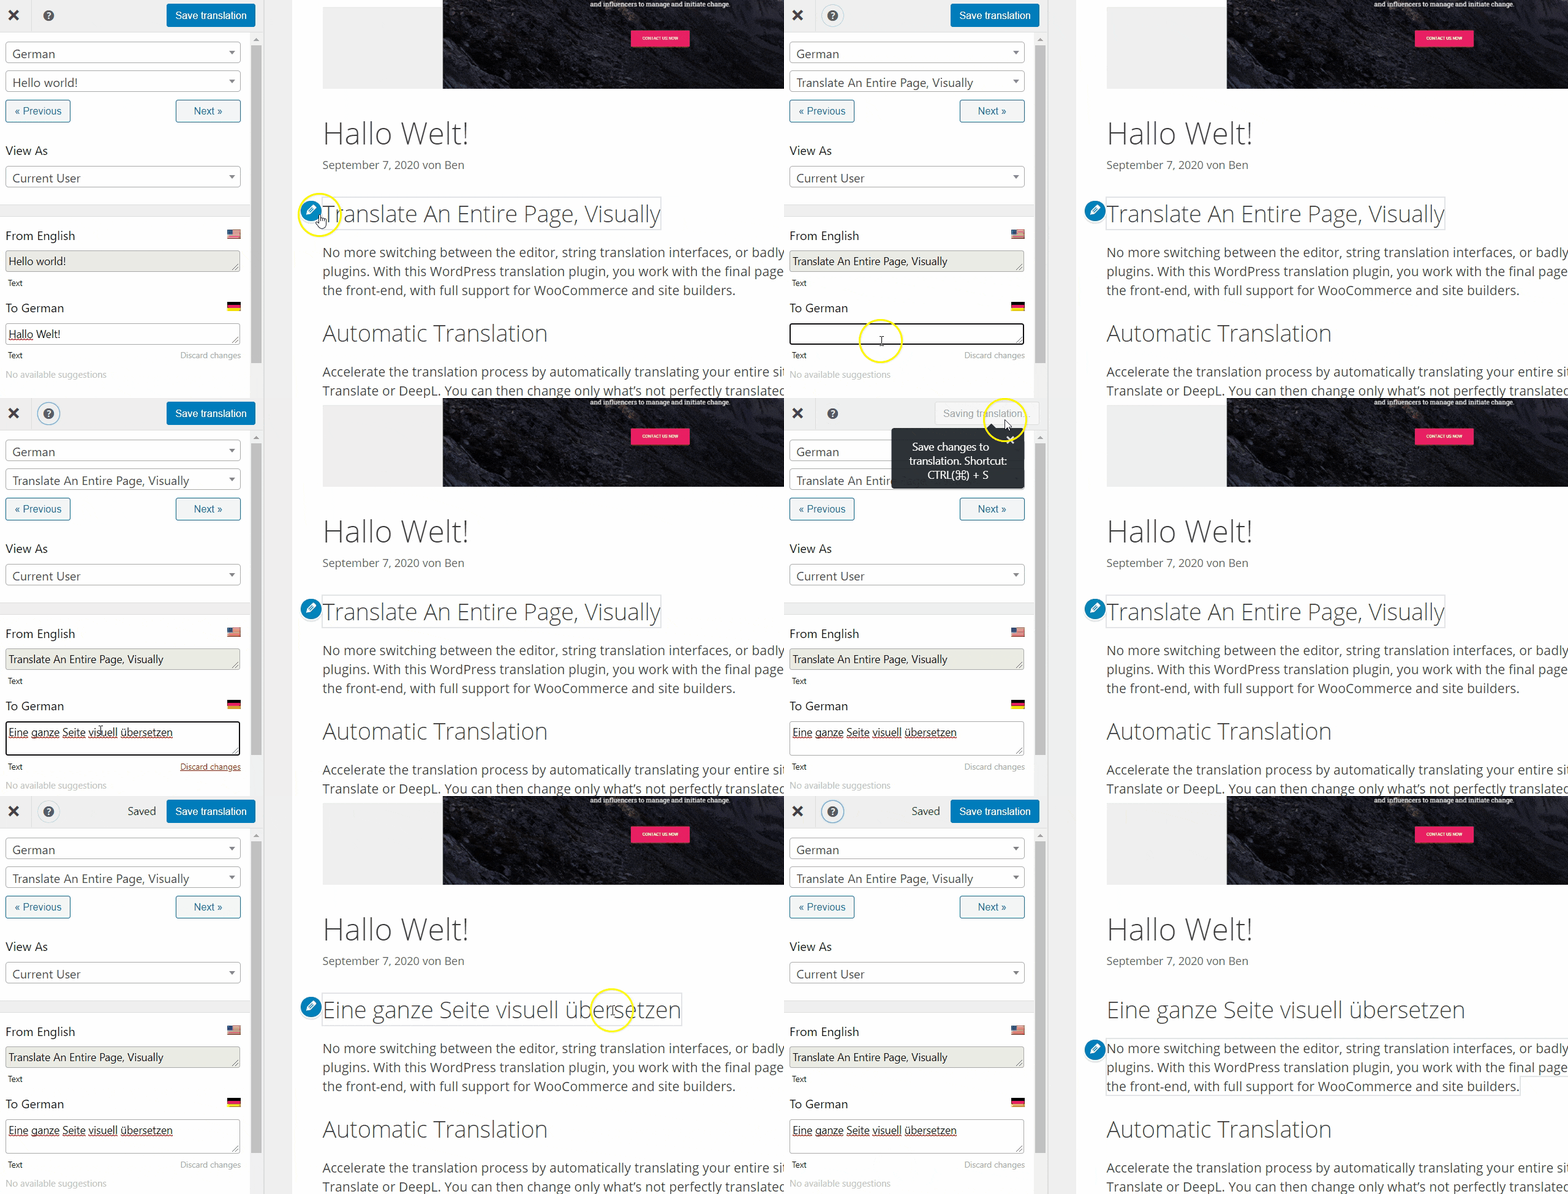
To translate your post/pages, highlight the section your wish to translate, click on the icon, then cut and paste in your translation, and hit Save.
Once saved, the page or post in question will reload to show you how it looks, again saving time in the translation process. Using the above method, you can convert your site to a Bilingual one quickly and easily.
Automatic Translation of Your Content
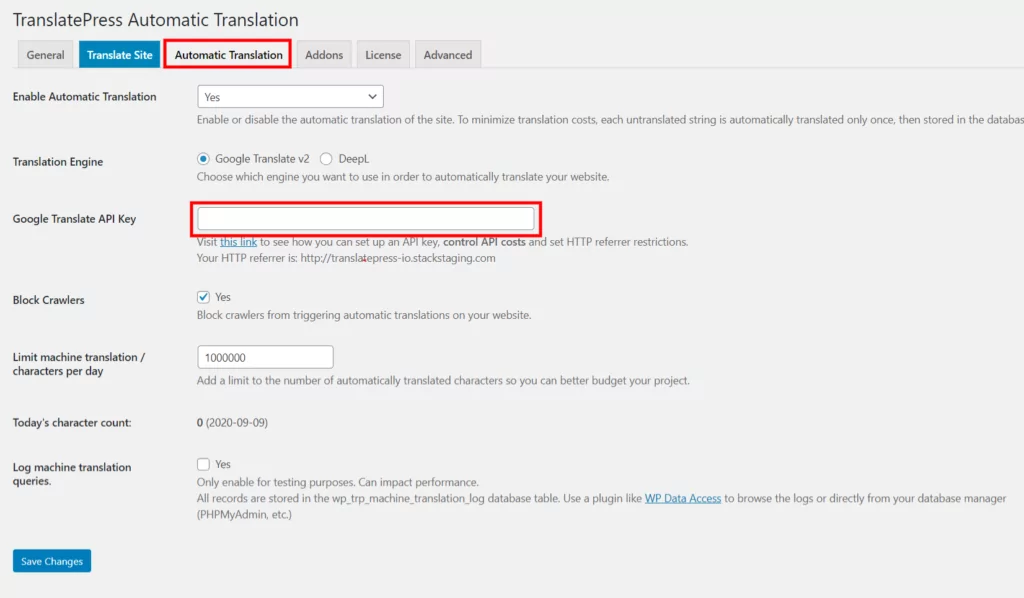
In the free version of TranslatePress, we fully support the use of Google Translate via an API key, meaning you can automatically translate your content:
We’ve created a guide for you on how to translate your content automatically with Google Translate, taking you through the entire process.
DeepL is another popular translation service, renowned for its high-quality automatic translations, which is available in the premium versions of TranslatePress.
Benefits of Creating a Bilingual Website
There’s a bunch of reasons to make a Bilingual website; here are some of the benefits:
- By translating your content, effectively you’re opening up your website to a whole new audience in another language.
- Not everyone will speak your native language; translating your content/site and contact forms could bring a whole slew of new business/visitors your way.
- It helps improve the user experience for visitors who speak the language you’ve translated to.
- Using TranslatePress, add additional languages as your site grows from international visits. It’s the easiest way to grow multilingual traffic.
Wrapping It Up
If you’d like to enhance your Bilingual website further, we have a range of premium add-ons to make your things even more comfortable for you.
- SEO Pack Addon:– edit URL slugs to match languages, image ALT tags, change OpenGraph meta on a per-language basis, multilingual/bilingual sitemap support (works with all WordPress SEO Plugins).
- Multiple Language Addon:- If you need more than 2 languages, this addon has support for over 221 languages.
- Navigation Based on Language Addon:- Show different menu items on a per-language basis.
- DeepL Automatic Translation Addon:- Automatic translation of your site’s content using DeepL API.
- Automatic User Language Detection:- Redirect users automatically to relevant translated content in their language.
TranslatePress Multilingual
Now that you know all the steps to make your website bilingual/multilingual, start today and reap the benefits of having your content available in more languages.
Do you still have any questions on bilingual websites? Let us know in the comments!
If you found this post helpful, please check out our YouTube channel, where we constantly upload short & easy-to-follow video tutorials. You can also follow us on Facebook and Twitter to be the first to know each time we post.
