In this post
In this post
If you’re dealing with 404 errors on your WordPress website, this post is going to help you troubleshoot the issue.
We’ll start things off with an introduction to 404 errors in general, including what they are, why they happen, and why they matter. Then, we’ll talk about why you might see TranslatePress 404 error messages.
Finally, we’ll get into more actionable advice and talk about how to diagnose 404 errors on your site and then notify Google when you’ve fixed the problem(s).
There’s a lot to cover, so let’s dig into it…
404 Errors: Why Do They Happen?
A 404 error occurs when a human visitor or search engine crawler tries to access a page that doesn’t exist on your website.
Technically, the 404 error is an HTTP status code that indicates that the page/resource the visitor’s browser/search engine crawler requested does not exist on the website.
You might see the 404 error message display in a few different ways. Here are some of the most common 404 error variations:
- 404 Error
- 404 Page Not Found
- 404 Not Found Error
- The requested URL was not found
- File or directory not found
What Causes 404 Errors?
We’ll talk about what can cause 404 errors in the TranslatePress plugin in a second, but let’s first talk about some of the general causes of 404 errors, as this might help you understand things as they relate to the TranslatePress plugin.
Here are some of the most common causes of 404 errors:
- Deleted pages. If you delete a page on your site, any traffic that’s sent to that page will see a 404 error because the page no longer exists.
- Mistyped URLs. If someone accidentally types the wrong URL, they’ll see a 404 error because the typo means that they’re trying to access a page that doesn’t exist.
- Broken links. If another website or social media user shares a link to a page that doesn’t exist, any people who click that link will see a 404 error. Broken links can happen for the reasons above, such as the link going to a page that is now deleted or the person making a typo when adding the link.
Why Do You Need to Fix 404 Errors
FIxing 404 errors on your site is important for two main reasons:
- User experience – if visitors are sent to pages on your site that don’t exist, it creates a bad experience for them because they aren’t able to see the content that they want to see. As a result, they might just leave your site. Or, even if they stick around, they’ll still need to spend time exploring your site to find the content that they’re interested in.
- Search engine optimization – 404 errors can also be bad for SEO because they waste Google’s crawl equity, can lead to poor link equity distribution (if they’re happening because of broken links), and can send bad user experience signals (such as a higher-than-normal bounce rate).
How to Detect 404 Errors On Your Own Website
There are a few different ways that you might detect 404 errors on your site.
Google Search Console
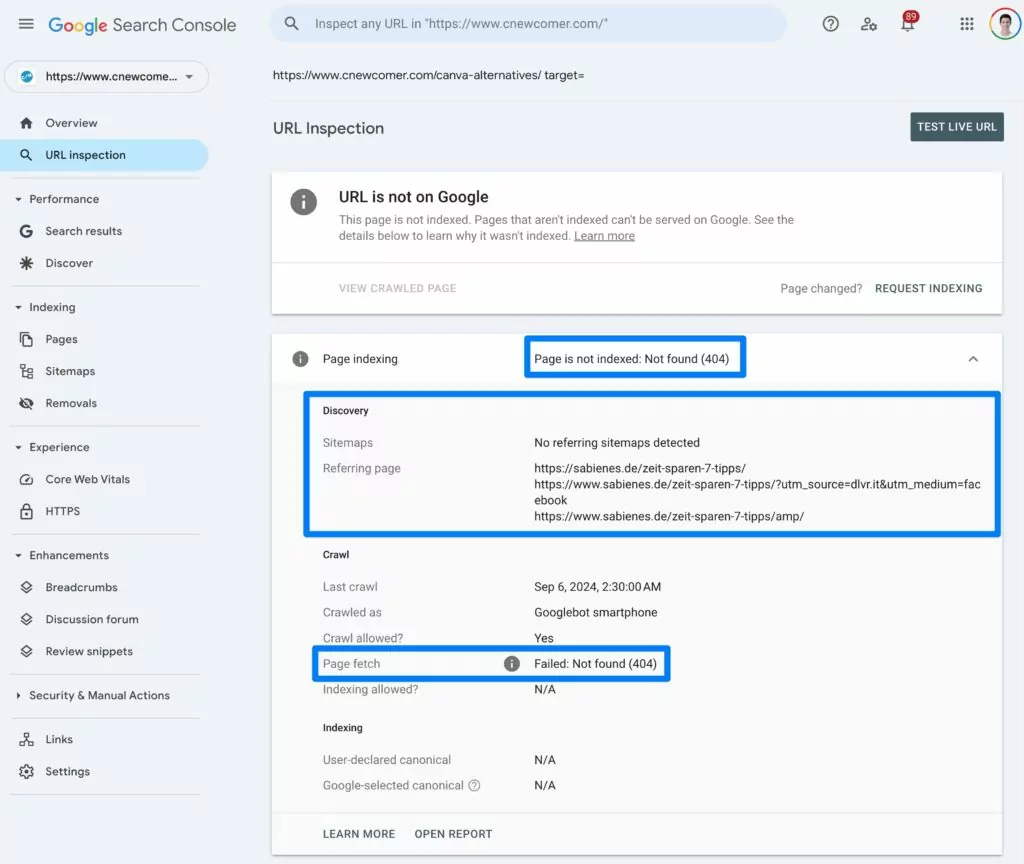
First off, if you’re using Google Search Console to help with your site’s SEO, you might see 404 errors show up in the Why pages aren’t indexed section.
Essentially, this is Google telling you about 404 errors that it’s discovered on your site (maybe because of one of the reasons above).
You can find these pages by going to Pages and then selecting Not found (404).
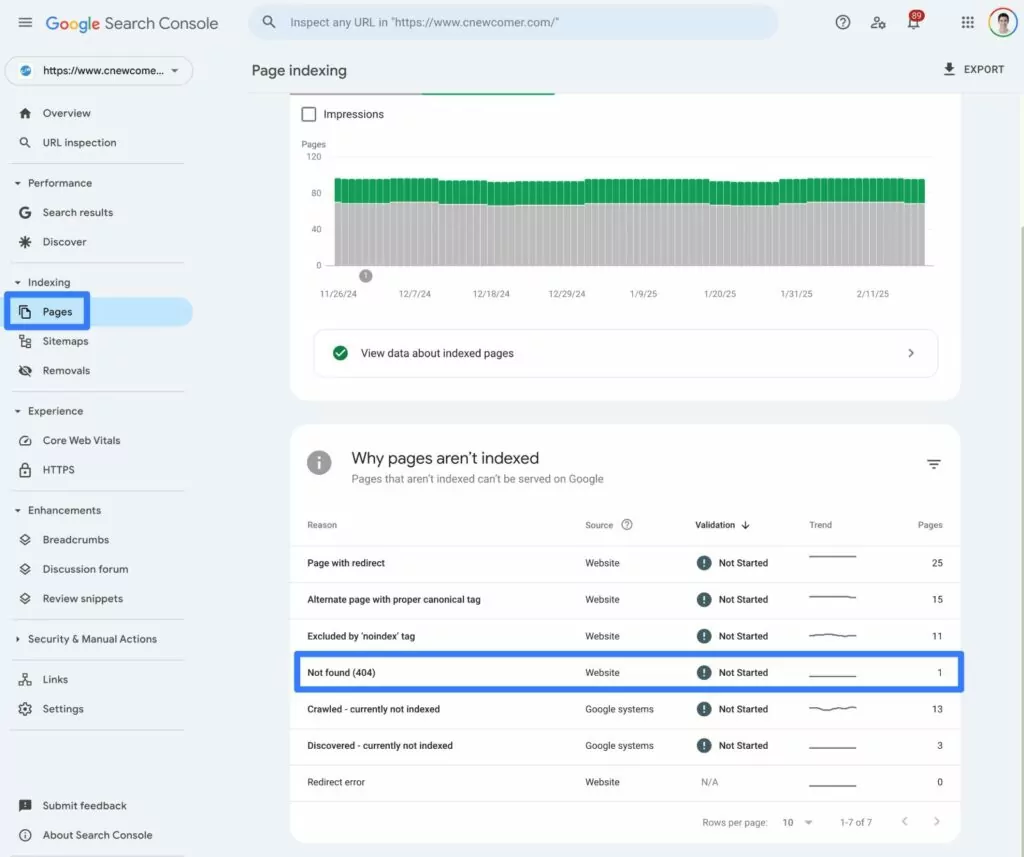
Then, you’ll see a list of all the 404 errors that Google has discovered, along with the last time that Google tried to crawl that URL.
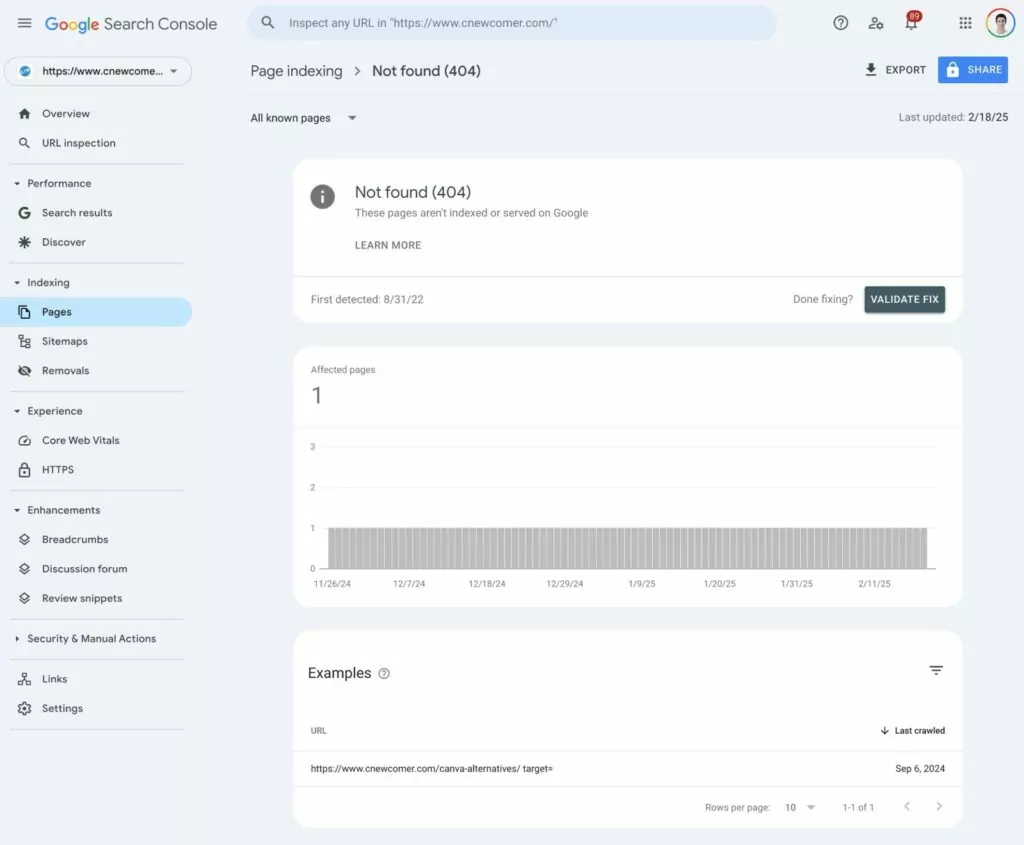
More importantly, once you’ve fixed the reason for your site’s 404 errors, you can also validate those fixes in this interface. We’ll talk about this in more detail later on, but the basic idea is that this tells Google you’ve fixed the problem and to re-check your site.
When you choose the option to validate fixes, Google will recheck the affected pages to see if they are accessible. If they are, it will give you a success notification and the previously affected pages will be removed from the report.
Web Analytics (Google Analytics)
You can also see 404 errors in your web analytics, though you might not be able to see the individual page URL that’s triggering the 404 error like you can with Google Search Console.
We’ll cover this in more detail later in this post.
How Can 404 Errors Happen in TranslatePress?
If you’re using the TranslatePress plugin to create a multilingual WordPress website, there are some reasons why you might see 404 errors related to your site’s multilingual content.
One common cause of TranslatePress 404 error messages would be deleting a language on your site. Because each translated piece of content gets its own URL, deleting a language will remove all of those translated pages from your site.
If there are any traffic sources that are still sending traffic to those translated pages, visitors and/or search engines will see a 404 error. Here are some specific examples:
- The translated page is still temporarily indexed in Google because of TranslatePress’s multilingual SEO functionality (we’ll share some tips for fixing this later in this post).
- Another website linked to one of the translated pages.
- Someone shared one of the translated pages on social media.
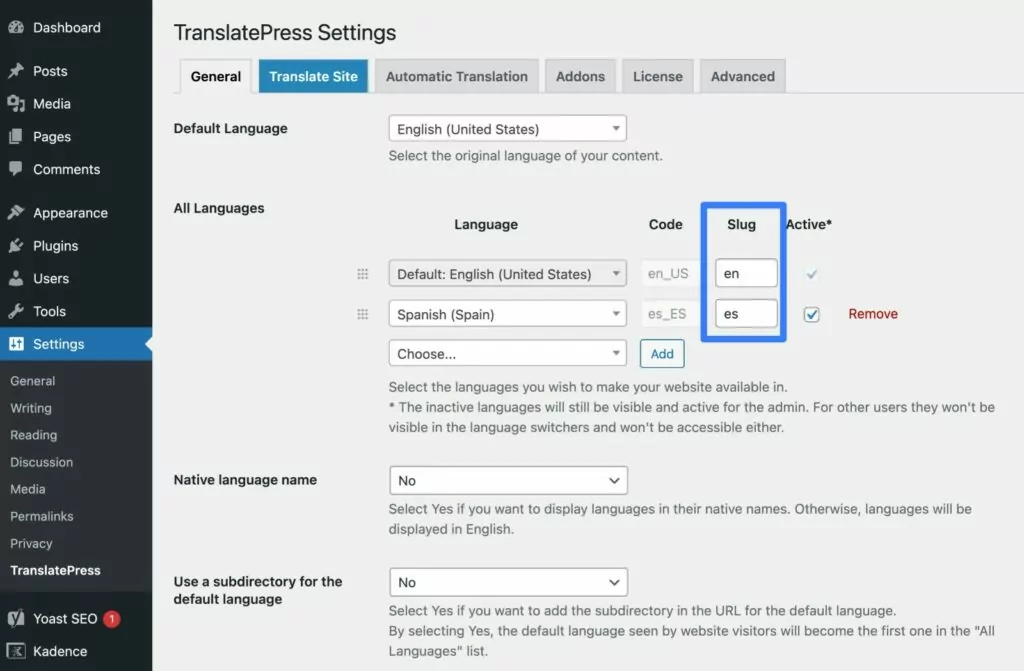
Another common reason why you might get 404 errors is if you change the URL slug of a language or of an individual piece of content.
For example, if you change the language’s slug in the All Languages section of the TranslatePress settings, that will update the URL slug for every translated piece of content. Consequently, this could cause issues whenever someone tries to access a URL using the previous slug, as those URLs will now return 404 errors.
For this reason, you should be very careful about changing a language’s URL slug after you’ve already translated your content and indexed those translations in Google.
How to Find Where 404 Errors Are Coming From
As we mentioned earlier, 404 errors can occur if there’s traffic being sent to a broken page on your site. This broken link could be on your own site, on someone else’s site, on social media, etc.
The question then becomes – how do you find the source of traffic to the 404 page?
Use the Google Search Console Report
To start, you can use the Google Search Console Not indexed report to look for any similarities between the 404 pages on your site.
For example, if you’re using TranslatePress and you notice that all of the 404 pages are coming from a single language on your site, you might want to check if you’ve recently deleted that language or performed some other action that might cause language-wide problems (such as changing the entire language’s URL slug).
Again, you can find this report by going to the Pages menu under Indexing in Search Console. Then, choose the Not found (404) option under Why pages aren’t indexed.
You can also dig into individual URLs in more detail using the URL inspection tool, including where issues with that URL are happening.
To access this tool, you can use one of these options:
- Paste the URL into the Inspect any URL search box at the top of the page.
- Click on a specific URL in the Not found (404) report. Then, select Inspect URL in the slide-out that appears.
You’ll then see a detailed report on that page, including the referring sitemap or page that’s causing the 404 error.
Once you fix the problem (e.g. by fixing a broken link), you can also have Google recheck the page, which we’ll cover later in this guide.
Use Your Web Analytics Tool
You can also get a look at where 404 errors are coming from by using your web analytics software – e.g. Google Analytics.
For this guide, we’ll assume that you’re using Google Analytics. However, the same basic principles will apply to other web analytics software, as well.
Let’s go through it…
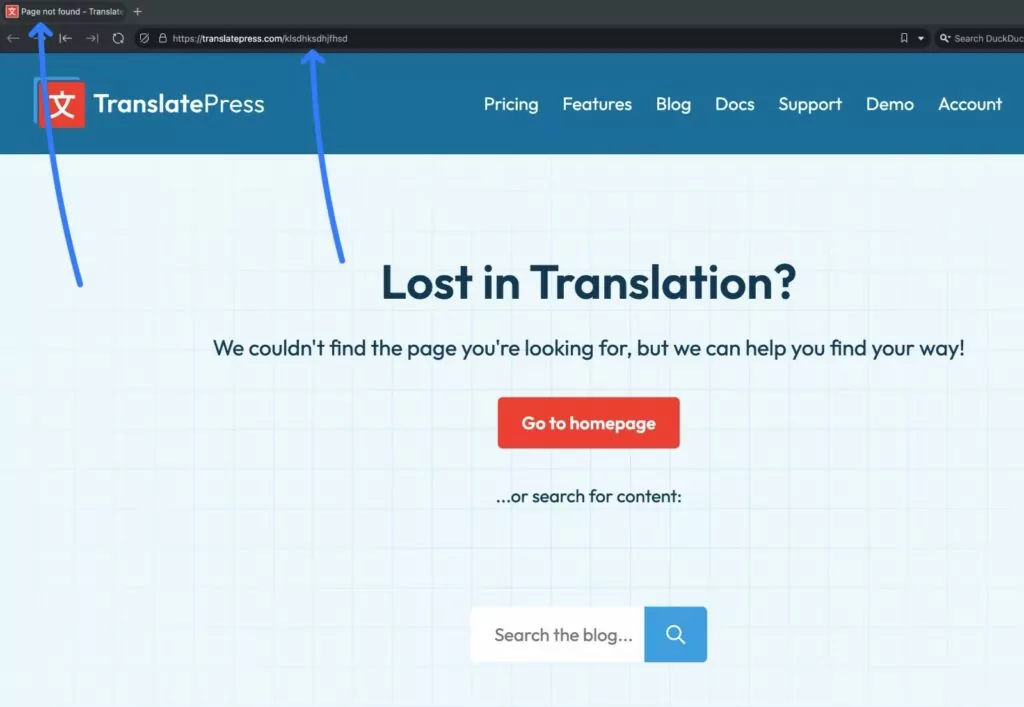
1. Find the Title of Your Site’s 404 Page
To start, you need to find the title of the 404 page design on your site, which is unique to each WordPress theme.
To do this, open a page on your site that you know doesn’t exist – e.g. yoursite.com/sdklhsdfhsdfjksdfhjk (a bunch of gibberish).
Then, look at the title of the page that appears in your browser tab. For most WordPress sites, it will be something like “Page not found”, but your site might be different.
2. Find All 404 Traffic in Google Analytics
Once you know the title of your site’s 404 page, you can use Google Analytics to find all the visitors that have hit your site’s 404 page:
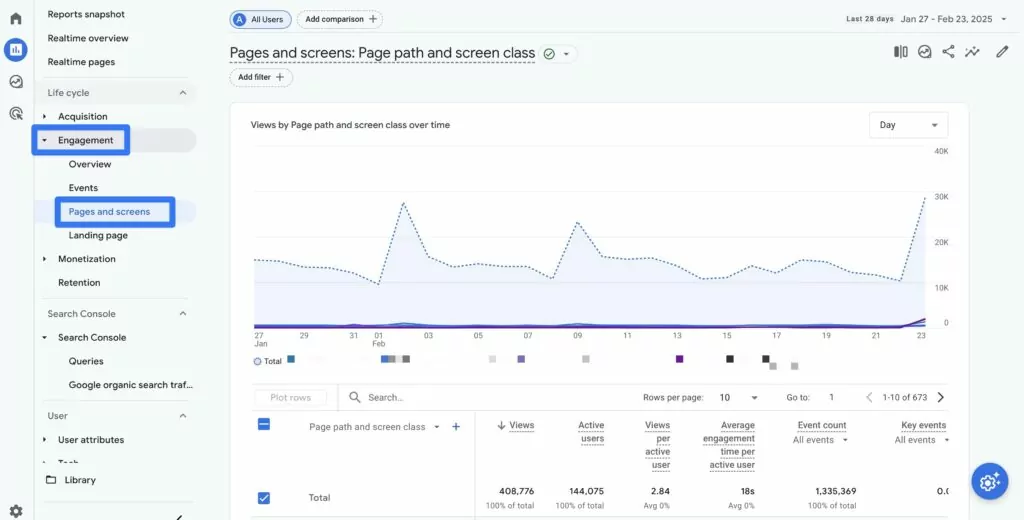
- Open your site’s dashboard in Google Analytics.
- Open the Engagement section in the sidebar.
- Click on the Pages and screens report.
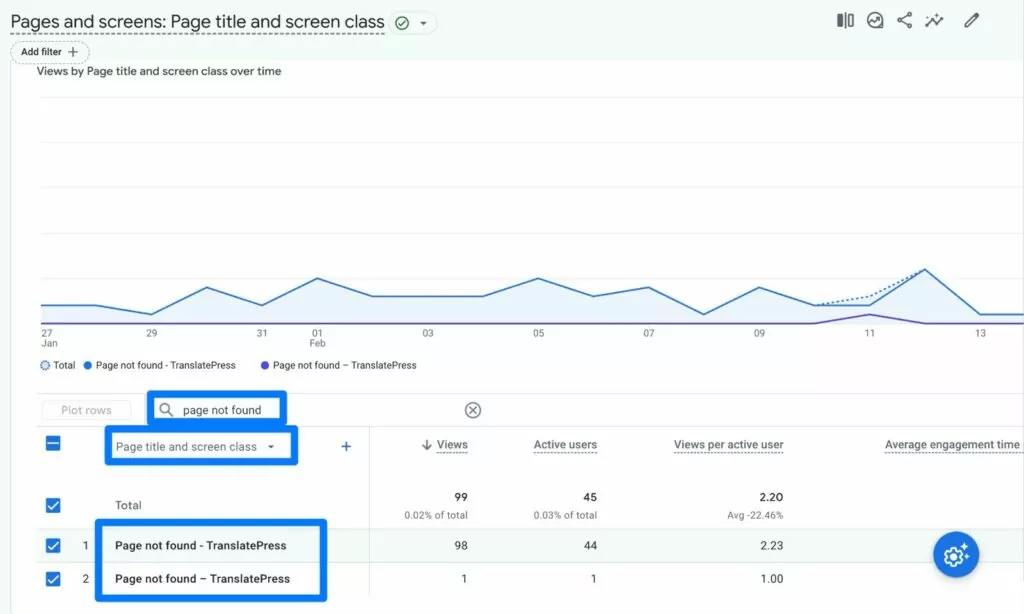
In the left-most column of the report, click the down icon next to Page path and screen class and then select Page title and screen class in the popup that appears.
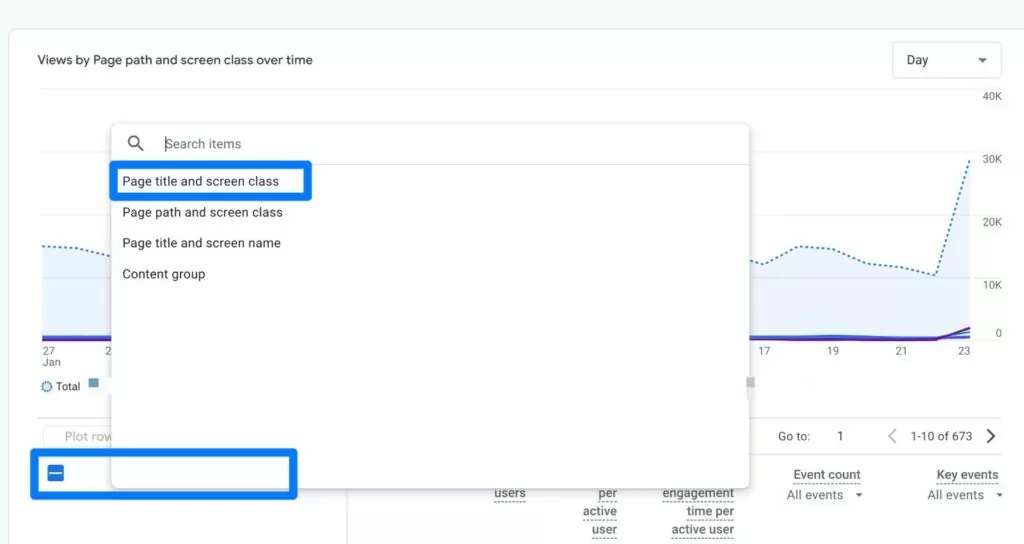
Once you’ve changed it to show the Page title and screen class, you can use the search box to search for the title of your 404 page – e.g. “Page not found”.
This should then show you the total number of visits to your 404 page within the given time period. If you don’t see any 404 visits, you can try using the date pickers to expand the time period of your search.
3. Add Another Dimension to Find the Traffic Source
Now, to find the sources of all those visits, you can click the plus icon next to Page title and screen class to add another dimension to your report.
In the popup that appears, choose Traffic source → Cross-channel → First user source / medium.
You should then see a new column beside Page title and screen class that shows the source and medium for all of the visits hitting your site’s 404 page.
For example, in the screenshot below, you can see that some 404 visits are coming from Google, some from Reddit referrals, etc.
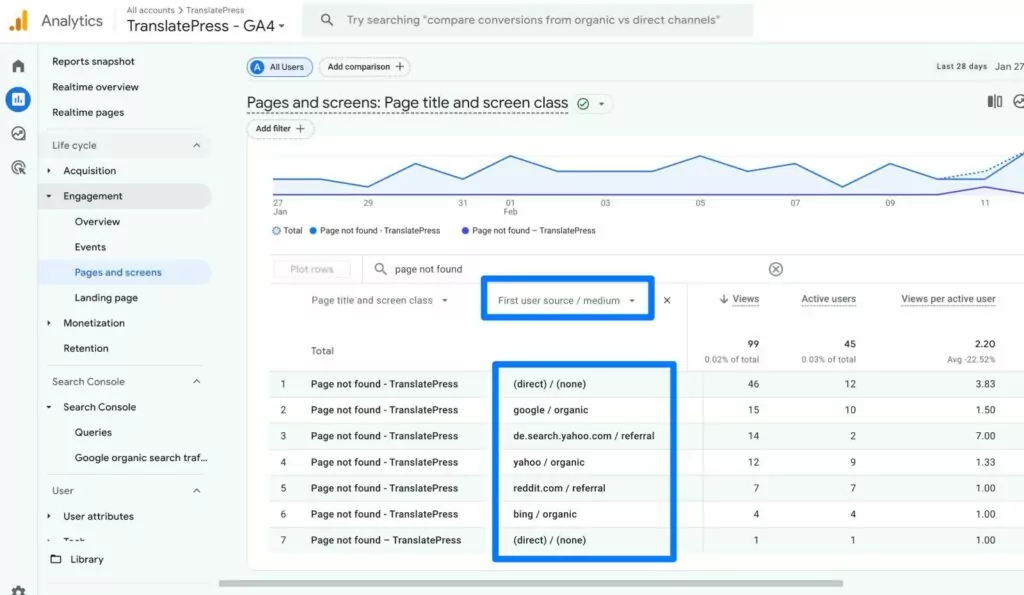
In addition to Google Search Console, this will give you another look at where your 404 traffic is coming from.
Not Indexed Pages: Why Do You Have Not Indexed Pages?
Earlier, we touched on using Google Search Console to find 404 errors. However, if you dig into the Not Indexed report in more detail (Pages → Why pages aren’t indexed), you might see other reasons beyond just Not found (404).
There are a lot of reasons why Google might not index pages on your site, including some of the following:
- You’ve added a noindex tag to the page, which specifically tells Google not to index it.
- There’s some type of redirect error.
- Google has just chosen not to index the page(s) for its own reasons (Google doesn’t have to index content just because it’s available).
By default, all of the translated pages that you create with TranslatePress are set to be indexed in Google. Again, this is one of the reasons why TranslatePress works so well as part of an international SEO strategy.
However, a noindex issue can occur in situations where you change the canonical version of a page in your SEO plugin and the canonical version in the SEO plugin doesn’t match the hreflang tag that TranslatePress adds to your translated content.
This could be the situation if you see a reason such as Alternative page with proper canonical tag.
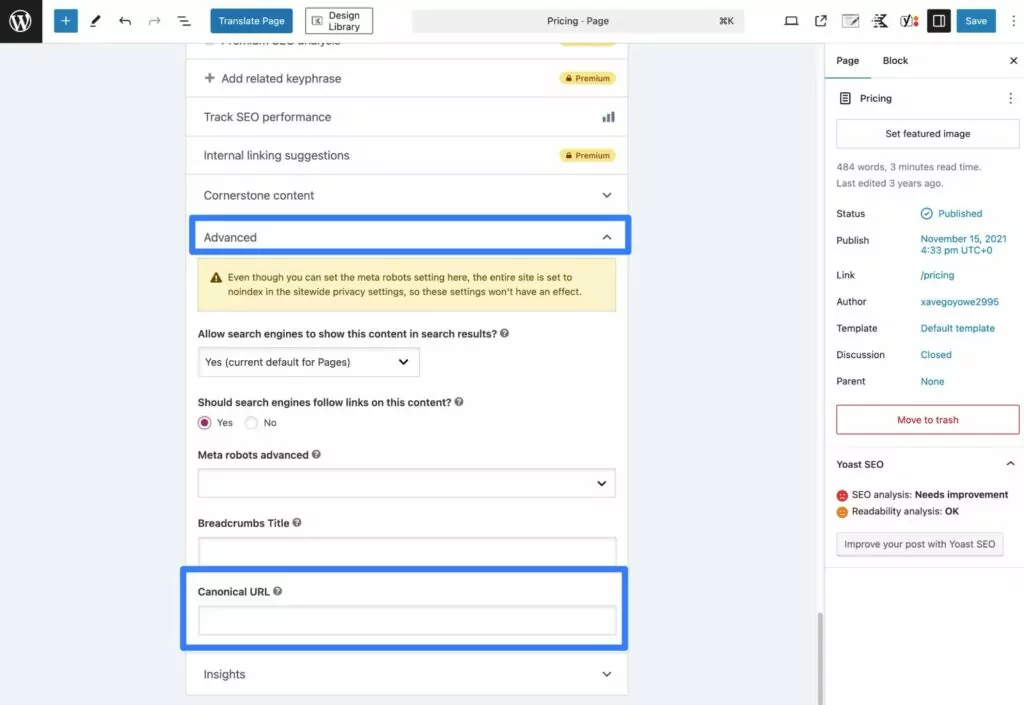
If you see pages with this problem, you can try removing any custom canonical URL that you’ve set with your SEO plugin. For example, if you’re using Yoast SEO, you can find the canonical URL option by expanding the Advanced accordion in the Yoast SEO metabox.
After fixing any canonical URL issues, you can click the Validate Fixes option to have Google re-crawl your site and check if you’ve fixed the problem.
Speaking of…
How to Re-Index Your Website or Page After Fixing 404 Errors or Other Indexing Problems
Even if you fix problems with 404 errors or not indexed pages on your site, that doesn’t automatically mean Google will notice those fixes right away.
To speed up the process, you can perform some manual actions to get Google to re-index an affected page or your site as a whole.
You’ll want to do this after fixing broken links, updating content, fixing URL slug issues, etc. While you can technically just wait for Google to notice the fixes on its own, using one of the methods below will speed up the process a lot.
How to Re-Index a Single Page
If the problem was just with a single page or a small number of pages, you can use Google Search Console to manually re-index individual URLs:
- Open Search Console for your site.
- Paste one of the affected URLs into the Inspect any URL in “site.com” box at the top.
- Click the search icon or hit enter to inspect that page.
- On the URL Inspection page for that URL, click the Request Indexing option next to Page Changed?.
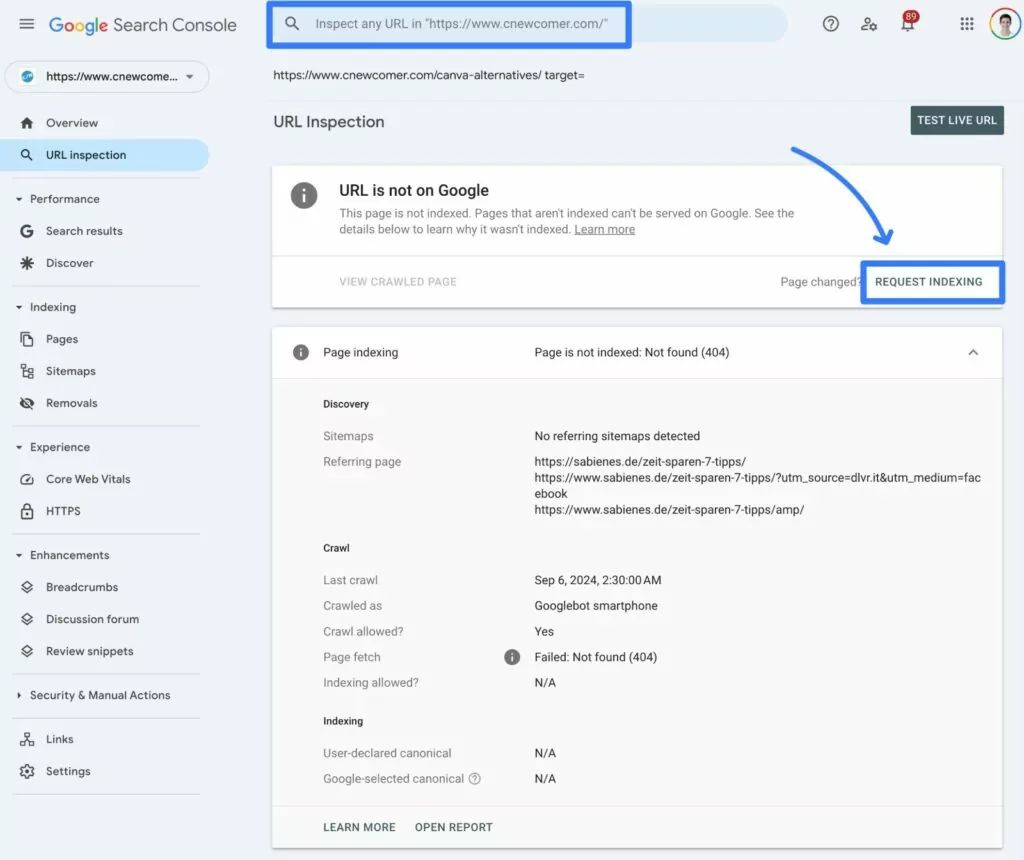
Google will then re-crawl that page, which should let it detect the fixes that you’ve implemented. You won’t see changes happen immediately, but they should happen pretty soon.
How to Validate Fixes for Non-Indexed Pages
Another way to tell Google that you’ve fixed the problem with page(s) on your site is to use the Validate Fix tool in Google Search Console, which we covered earlier when talking about the Not indexed pages report.

This tells Google that you’ve fixed all instances of that issue. When you click the button, Google will re-crawl all those pages and check to see whether you’ve fixed the issue.
Google says that validation “takes up to about two weeks, but in some cases can take much longer”.
You’ll receive a notification when it succeeds or fails. If it does fail, you can see which URL caused the validation to fail and then restart the validation after you’ve fixed the problem with that URL.
How to Re-Index Your Entire Site By Adding a Sitemap
If you want to encourage Google to re-crawl your entire site, you can do so by submitting an XML sitemap in Google Search Console if you haven’t done so already.
Select the Sitemaps option under Indexing and then use the option to Add a new sitemap.
If you’re using TranslatePress, TranslatePress works with most SEO plugins to automatically create a multilingual XML sitemap that you can submit to Google.
Troubleshoot Your Indexing Errors Today
Out of the box, the TranslatePress plugin is optimized for multilingual SEO and makes it so that Google and other search engines can index all of the translated content that you create.
However, in some situations you might see 404 errors or not indexed pages as a result of deleting a language, changing a translation URL slug, or changing the canonical URL in an SEO plugin.
To fix these issues, you’ll first need to fix the root problem on your site and then you can re-index your URL or site in Google Search Console to alert Google to the fixes that you’ve implemented.