Creating a multilingual WordPress site is a pretty laborious task. You first need to figure out what languages you want your site to be available in, then find the best translation plugin for your project. Only after this you’ll get to the part where you actually translate your site content. This process is probably the most time consuming of all the above.
Automatically translating your WordPress site is a excellent way to speed up the translation process and use automatic translations as a starting point for your multilingual content. You can have everything translated in minutes, not days or weeks.
In this tutorial we’ll go through how to automatically translate WordPress sites fast and with minimal costs by using TranslatePress.
TranslatePress offers both automatic and manual translations. What sets TranslatePress apart from other multilingual solutions is that you can to translate all your site content directly from the front-end, by using a visual translation interface.
Let’s get started…
How to Automatically Translate Any Website With Google Translate
Later in this post, we’ll show you the most optimal way to use automatic translation to translate your own website. But if you’re looking to translate someone else’s website, all you need is Google Translate.
This is useful if there’s a website in another language that you want to experience, or if you just generally need to translate a website that you don’t control.
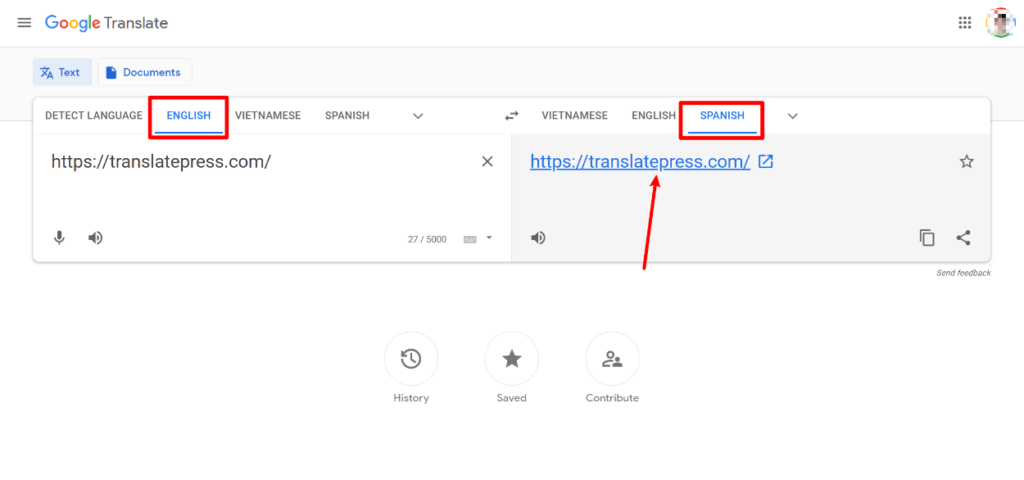
To get started, go to the regular Google Translate page and choose the language that the website is in (on the left) as well as the language into which you want to translate the website’s content (on the right).
Then, instead of entering the text that you want to translate like you normally would, just paste the URL to the website that you want to translate in the box on the left. Then, click the link in the box on the right to open the translated version of the website.
For example, to translate the TranslatePress website from English to Spanish, you would configure it like so:
When you click the link, it will open the translated version of the website, along with a new toolbar from Google Translate. You can click around to different parts of the site just like you normally would and you can also use the toolbar to change languages and switch back to the original version as needed:
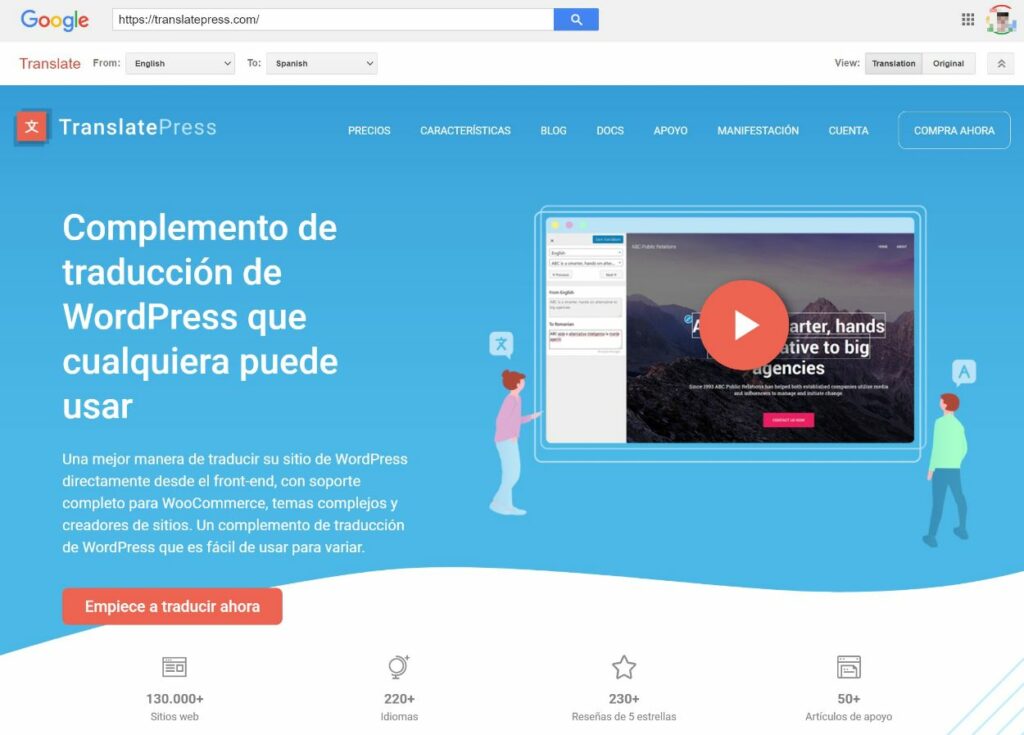
And there you have it – an easy way to automatically translate a website.
Why Dynamic Translation From Google Translate Isn’t Good for Your Own Website
The Google Translate method above is really handy if you need to translate a website that you don’t control. But if you’re looking to translate your own website to create a multilingual website, you shouldn’t use this dynamic approach.
It’s important to note that only the “dynamic” part is the problem.
It’s totally fine to use Google Translate to automatically translate your content, you just need to do so in a way that creates static versions of the translated content after you generate your translations using Google Translate, which is what we’ll show you in the tutorial below.
There are two problems with just using Google Translate to dynamically translate your content on-demand:
- Multilingual SEO – with dynamic translation, the translated versions of your content don’t have their own permanent URLs on your site, which means that Google won’t be able to include them in its search index and you won’t be able to rank for multilingual search terms. This is a big negative if your goal is to benefit from multilingual SEO.
- Accuracy (no manual control) – because the translation happens dynamically, you don’t have the option to manually edit the translations once they’ve been generated. Sometimes the automatic translation isn’t perfect, so this might mean you have to put up with inaccurate translations.
If you want to automatically translate your website, a better approach is to use Google Translate (or another service) to generate your site’s initial translations. However, instead of doing so dynamically, you take those translations and store them in your site’s database.
Because you’re locally storing the translations, you can create static, indexable versions of your translated content (for SEO) and you can also edit the automatic translations as needed.
In the tutorial below, we’ll show you how to implement this approach on WordPress using the free TranslatePress plugin.
Why You Should Still Automatically Translate WordPress Site
As long as you don’t use the dynamic approach, translating your WordPress site automatically is an excellent choice that will allow you to go multilingual, while saving both time and money.
Even if you’re fluent in the languages you want to make your site available in, setting up automatic translation is a great starting point. Once your content is automatically translated, you could review everything and make the necessary changes.
Keep in mind that this step is critical if you’re serious about multilingual SEO. But we’ll dive into the details of ranking in more languages later.
For now I think we can both agree that automatic translations are a great time saver.
If you’re not fluent in the languages your website will be available in, starting with automatic translations is still a great option. Once your site is automatically translated, you can hire a professional translator to polish everything and give your content a human touch.
Most of it won’t need any changes, but some parts of the text may need human intervention for making sure the meaning of each sentence is clear, and not just translated literally. TranslatePress let’s you set up Translator Accounts, so you can easily create or allow a professional translator go over your site and make changes without giving him admin rights.
And last but not least, translation costs. The costs of working with a professional translator are much higher than those of using an automatic translation service. Besides this, the back and forth with finding the right translators, get everything translated and approved will delay things significantly.
TranslatePress is optimized to minimize your costs with translating text automatically.
Below, I’ll explain more about how TranslatePress will make sure you only pay once for a certain text to be automatically translated, and NOT be charged every time a user tries to browse a translated page.
How to Automatically Translate WordPress Site Using TranslatePress
Translating your WordPress site automatically is really straight forward using TranslatePress and its automatic translation feature.
It lets you enable and use Google Translate API or the powerful DeepL API. We’ll go through both of these two automatic translation services below.
To get started let’s say you’re an online business selling WordPress themes and you’re looking to reach more customers by offering your content in their native language. For this tutorial I created a page using an Elementor template and added some content.
Here’s how it looks:

Feel free to use your existing website content, as it will work exactly the same.
Install and Set Up TranslatePress
You can download the free version of TranslatePress from wp.org. In your WordPress dashboard, simply go to Plugins → Add New and search for “TranslatePress”. Install and activate the plugin.
Next, head over to Settings → TranslatePress to configure your multilingual options.
First up, you’ll want to choose the languages to use on your site. Select the current language of your site in the Default Language drop-down. For us this will be English (United States). Then, choose the new language into which you want to automatically translate you content. We’ll add Spanish (Spain) for this tutorial.
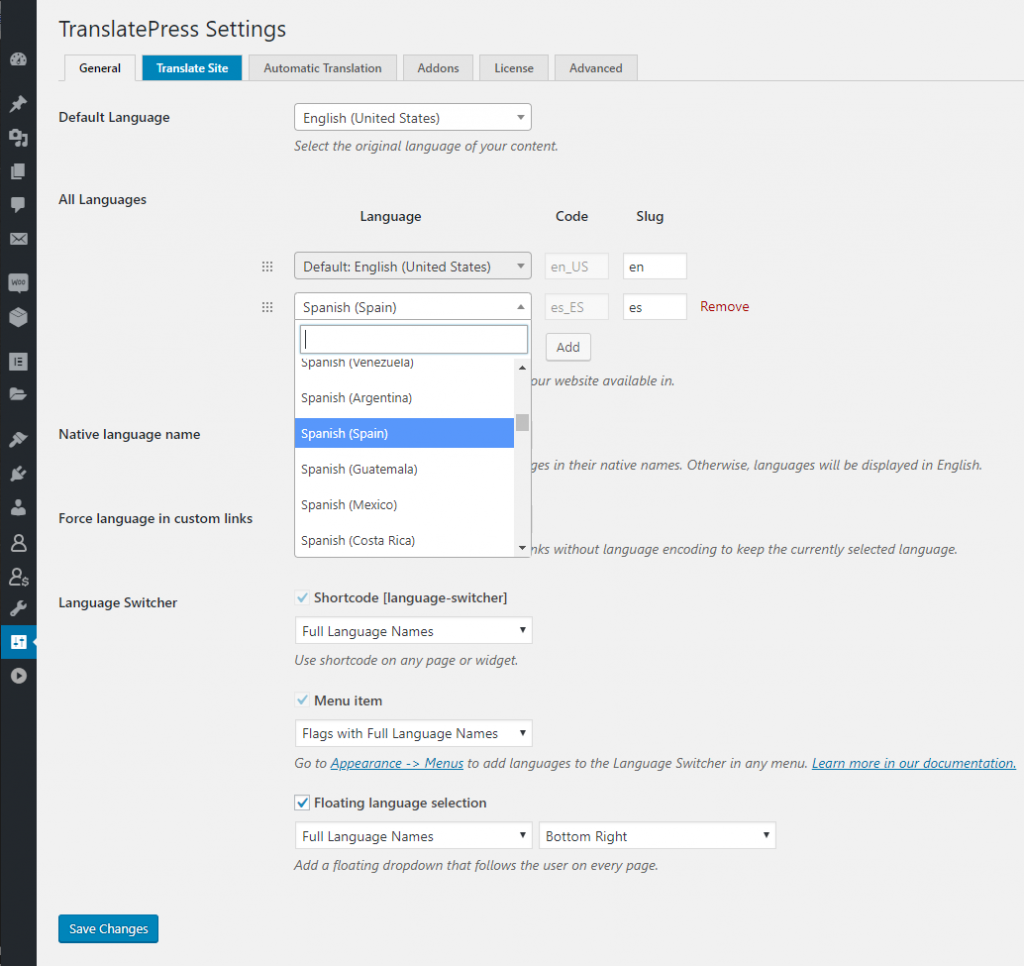
The Settings page also allows you to customize the look of the language switcher, but we can leave everything to default for now and click “Save Changes”. By default, you’ll notice a floating language dropdown that will follow you on every page, making it easy to change the language.
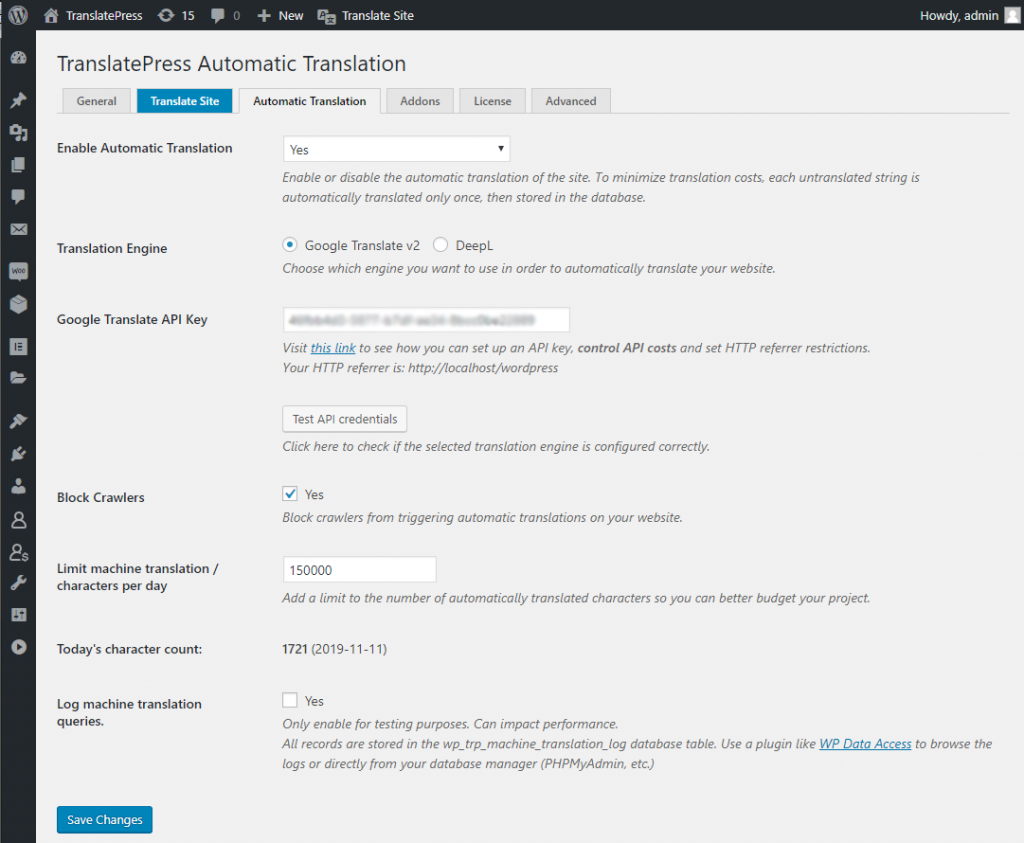
Next, click on the “Automatic Translation” tab and make sure to “Enable Automatic Translation” by setting it to “Yes”.
You will then be asked to choose your translation engine for automatically translating your site content.
Using Google Translate to Automatically Translate WordPress Site
The first option for automatically translating your site is to use Google Translate API. Simply follow these steps for generating a Google API Key (or watch this video) and then copy it under “Google Translate API Key”.
Hit “Save Changes” and you’re done! When you first navigate to the Spanish version of your page, it will be automatically translated to Spanish. In the visual translation editor, you can easily modify anything that sounds off.
That was fast, right?
Using DeepL to Automatically Translate WordPress Site
DeepL is a great service for high quality automatic translations, because it uses neural networks and artificial intelligence to translate texts. This results in accurate translations, where very little human intervention is needed.
You can allow TranslatePress to translate your site automatically using the DeepL Automatic Translation add-on, available in the premium version.
Once you download and install the DeepL add-on, under TranslatePress → Settings → Automatic Translation tab, you’ll be able to insert the DeepL API Key. DeepL offers free API access that allows you to translate up to 500,000 characters per month for free. If you need more than this, you’ll have to purchase an API key, which costs 4.99€ + translation fees.
After entering the DeepL API key, hit Save Changes and you’re done. The first time you or a user visits a page in Spanish, DeepL will automatically translate it.
How TranslatePress Minimizes Automatic Translation Costs
Now that we saw how easy it is to automatically translate a WordPress site using TranslatePress and its integration with automatic translation services, lets have a look at how it helps you minimize costs.
The automatic translation is triggered ONLY the first time a user visits a page that hasn’t been translated yet.
By browsing your site for the first time in a certain language you’re actually automatically translating it page by page. Once a text has been automatically translated, TranslatePress stores it in your database, thereby minimizing the requests to the automatic translation service.
This also results in a fast loading of the translated pages.
You can also keep costs under control by setting a daily limit for the automatically translated characters.
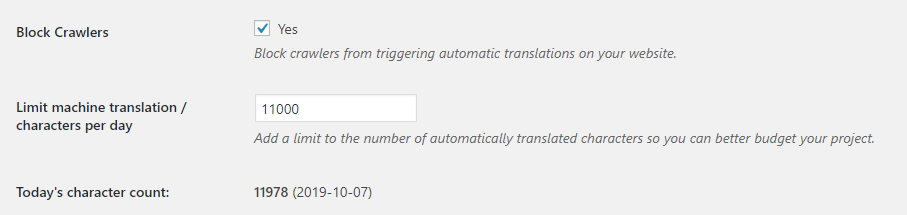
By default, we are also blocking crawlers from triggering automatic translations on your site, as this can also result in unwanted costs from texts that maybe you didn’t want translated.
All these options are part of the Automatic Translation tab in TranslatePress.
Manually Editing Automatic Translations
Once your page has been automatically translated, you can easily refine translations by browsing it using TranslatePress visual translation editor. In fact, it’s highly recommended you do this.
Simply navigate to the page you want to edit, then click “Translate Page” from the admin toolbar at the top.
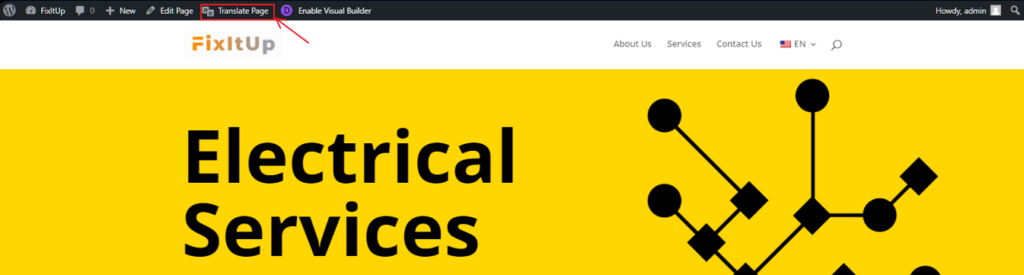
This will open up a visual translation editor, where you simply hover and click the pencil icon to select a certain text. Then you can modify its translation in the left sidebar, save and move to the next one.
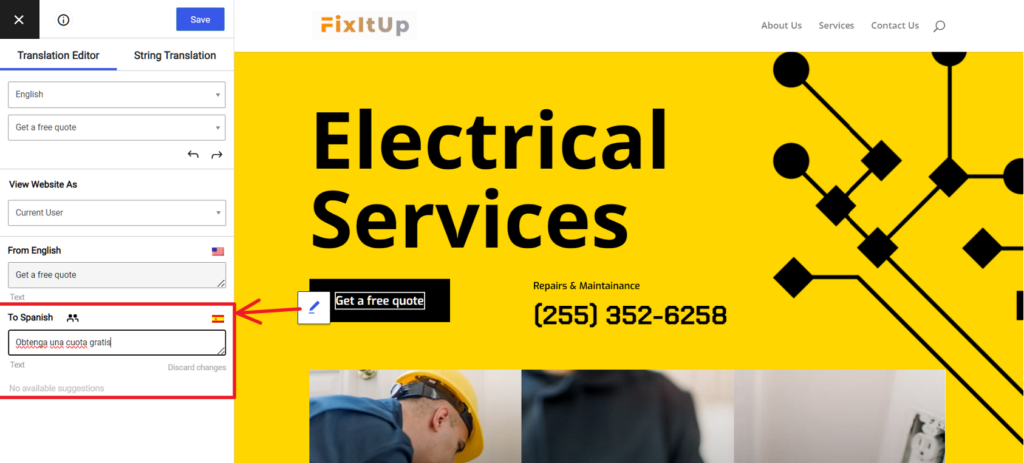
You can do this yourself or give access to a professional translator using the Translator Accounts add-on.
Besides text, TranslatePress lets you translate many other elements, like images, pop-ups, sliders, widgets or menu items.
No matter how your content was created, be it using a page builder, output from a plugin shortcode, custom fields or custom posts types, as long as it’s displayed in the front-end of your site you’ll be able to translate it automatically or manually using TranslatePress.
Multilingual SEO and Automatic Translations
Last but not least, if you want your content to rank in translated languages you need to follow the multilingual SEO principles.
If you’re using TranslatePress, the plugin will automatically add the hreflang attribute for each language that your site uses. This way Google knows the language for each piece of content from your website.
TranslatePress SEO Pack add-on will make sure you are able to automatically translate the most important SEO elements on a page. Things like URL slug, page title, description, image alt tags or social graph tags.
It works out of the box with all popular SEO plugins (like Yoast SEO, Rank Math, All in One SEO, SEOPress) and extends their sitemap functionality to create a multilingual sitemap that follows Google’s recommendations.
Make sure to review everything that has been automatically translated. First, make sure that each page has been fully translated, as Google strongly advises that each page has content available in ONE language only. Otherwise, the chances of ranking for that page will drop significantly.
Second, make sure to modify all sentences or bits of text that have been translated literally by the automatic translation engine and lack meaning. Everything needs to read like it was written by a human, to increase your chances of ranking well.
If you have content that’s available only for certain user roles or logged-in users, the translation editor lets you browse the site as a certain user role in order to translate user specific content.
That’s How You Automatically Translate Your WordPress Site
Automatically translating WordPress sites using TranslatePress is really straight forward and requires no special knowledge. Once your multi language website is automatically translated, you can browse each page and manually change any bits of text that lack meaning or sound off.

Besides ease of use, the beauty of using TranslatePress visual translation interface is that you are always familiar with the context in which a sentence or piece of text is appearing. This makes it easy to come up with the right translation for it.
Since TranslatePress works out of the box with any translation-ready theme or plugin, including WooCommerce or page builders, the same principles shown here can be used to translate any type of WordPress site, independently of the tools used to create it.
TranslatePress Multilingual
TranslatePress is the easiest way to translate your WordPress site. It's fast, won't slow down your website, works with ANY theme or plugin and it's SEO friendly.
Get the pluginTo learn more about how TranslatePress can help you automatically translate WordPress sites, make sure to check out all the features.
Also, make sure to browse this short video covering the few steps required for setting up TranslatePress with Google Translate to automatically translate all your website content:
If you’re looking to translate your website automatically and have any questions, please make sure to ask them in the comments section below.
Such a great article. I want to target many countries. However, hiring a translator to translate the website manually takes a lot of time and more ney. I can make it done easily now.
Best plugin for automatically translate